123FormBuilder Knowledge Base
Search our documentation platform for answers, service specifications and 3rd-party integrations.
Knowledge Base
By using a custom JS script added to the form, you can fill form fields with UTM tracking parameters or other source values. Once submitted, you can use these values in other workflows involving external integrations or the form API.
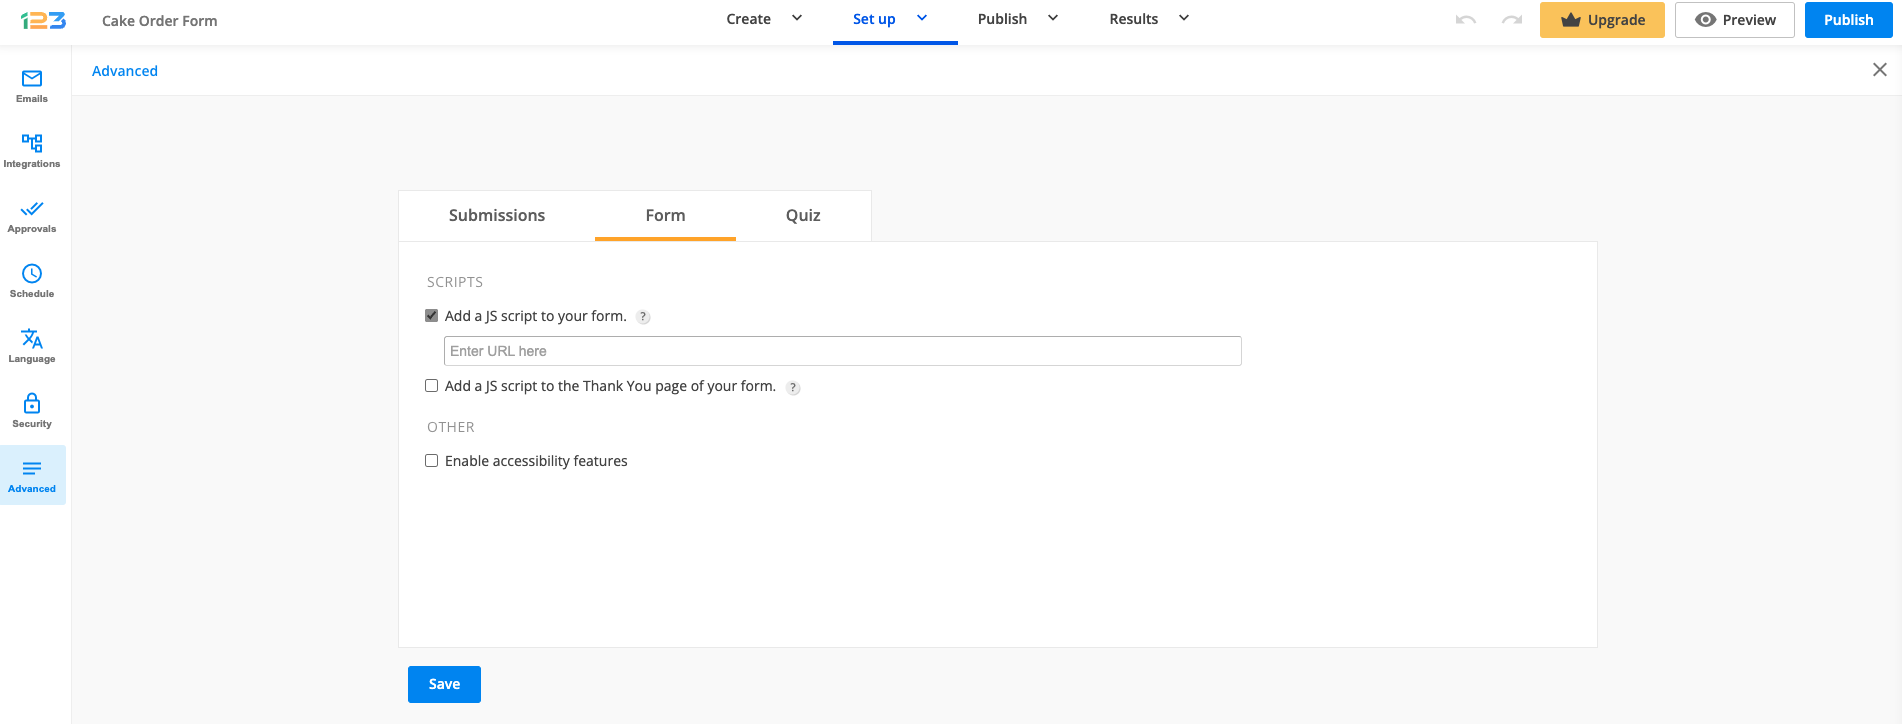
To add a custom script to your online forms, access your form builder account, go to the Advanced → Form tab. Then, select the option Add a JS script to your form and paste the script URL.
Here is a more detailed article on how you can host, share and apply a script to your form: How to add custom JavaScript to form.
We have provided a few script examples below on how you can capture the UTM tracking parameters or other values.
Example Script 1
This script retrieves the UTM parameters values from your URL (they will appear when a click is made on the form):
function getReferrer() {
setTimeout(function() {
var queryString = window.location.search;
var urlParams = new URLSearchParams(queryString);
var utmSource = urlParams.get('utm_campaign');
var utmMedium = urlParams.get('utm_source');
var utmCampaign = urlParams.get('utm_medium');
loader.engine.document.getElementById(111111111).setValue({ value: utmSource });
loader.engine.document.getElementById(222222222).setValue({ value: utmMedium });
loader.engine.document.getElementById(333333333).setValue({ value: utmCampaign });
}, 1000);}
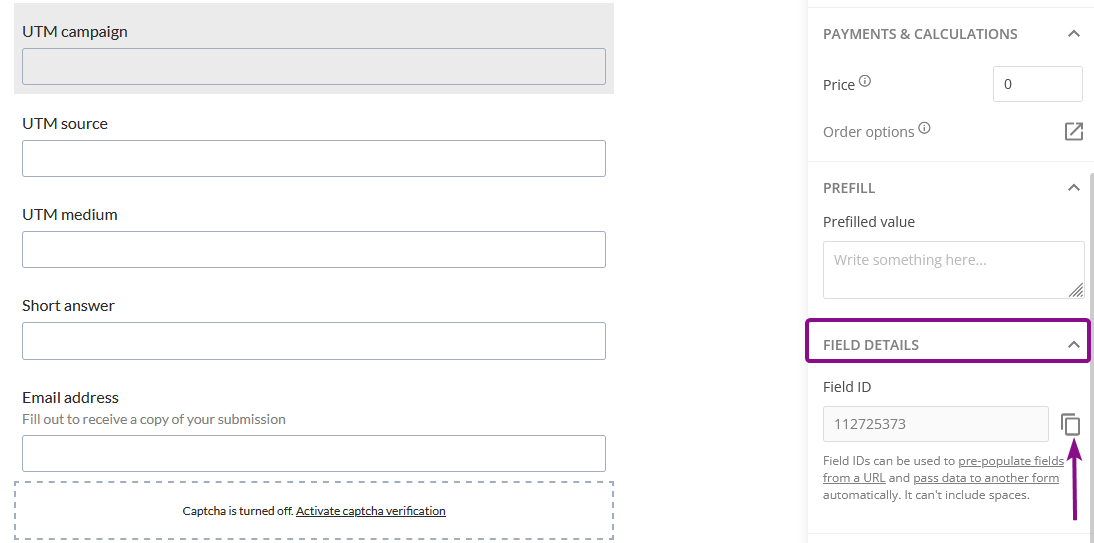
window.onclick = getReferrer;Replace 111111111, 22222222 and 33333333 with your Field IDs. You can find your Field ID by clicking on your field in the editor, and scrolling down to the section called Field Details:
Example Script 2
This script retrieves the src link of the form iframe containing search parameters from a UTM cookie. The values of these parameters are then extracted and prefilled in hidden form fields.
var queryString = window.location.search;

var urlParams = new URLSearchParams(queryString);
var is_campaign = urlParams.get('utm_campaign');
var is_source = urlParams.get('utm_source');
var is_medium = urlParams.get('utm_medium');

document.getElementById('id123-control11111111').value = is_source;
document.getElementById('id123-control2222222').value = is_medium;
document.getElementById('id123-control3333333').value = is_campaign;
(‘id123-control11111111’) represents the field control ID. Replace it with the actual ID of your form fields.
Example Script 3
Another approach to capturing any value in a field involves the following syntax structure:
loader.getEngine().getDocument().getControlsList().find(function (control) {
        return control.id === 0000000; // this targets a field based on its control id
    }
).setValue({value: 'new value'}); // this sets a value in a control
This script captures the parent window URL where the form is embedded and populates it in a hidden field on the form.
jQuery(document).ready(function() {
  setTimeout(function() {
    var parentFrame = window.location;
    var desiredControl = loader.getEngine().getDocument().getControlsList().find(function(control) {
      return control.id === 0000000; // the desired control id
    });
    desiredControl.setValue({value: parentFrame.href});
    console.log('custom static resource loaded');
  }, 2000);
});
‘new value’ can be static or dynamic (returned by a function or retrieved after a third-party API call) as long as that value (‘new value‘) is a string.
Control.id represents again the ID of your form field. Replace “0000000” from our example with the ID of your field.
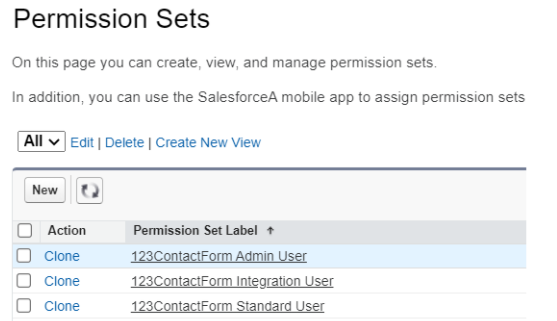
When the 123FormBuilder app is installed in a Salesforce instance, three permission sets are automatically generated:
These permission sets refer only to the Custom Objects that our app creates. Therefore, they don’t impact any other objects from Salesforce.
The only difference between the three permission sets is in terms of Object Permissions and Tab Settings in the Object Settings category.
Object permissions
1. 123FormBuilder Submissions Object:
- Admin has Read, Edit, Delete, Modify All, View All permissions.
- Integration has just like the Admin + Create (so Read, Create, Edit, Delete, Modify All, View All permissions).
- Standard has Read, View All + Tab Settings: Visible.
2. Field Responses Object:
- Admin: Read, View All.
- Integration: Read, Create, Edit.
- Standard: Read, View All.
3. Form Fields Object:
- Admin: Read, Create, Edit, Delete, View All, Modify All.
- Integration: Read, View All.
- Standard: Read, View All.
4. Forms Object:
- Admin: Read, Create, Edit, Delete, View All, Modify All.
- Integration: Read, View All.
- Standard: Read, View All + Tab Settings: Visible.
5. Form Send Logs Object:
- Admin: Read, Create, Edit, Delete, View All, Modify All.
- Integration: Read, Create, Edit, Delete.
- Standard: Read, Create, Edit, Delete, View All, Modify All.
Tab Settings
In terms of Tab Settings, only the Standard User Permission Set has the option Visible for the following 123FormBuilder Objects: Settings, Submissions, Forms, Home.
We always recommend respecting the principle of least privilege when setting permissions. However, we’ve seen that our existing clients usually assign all three permission sets for users with a 123FormBuilder license, since this refers only to the custom objects that our app creates in Salesforce.
Restrictions on Form Editor/Settings or what forms the sub-users have access to are inside the 123FormBuilder app. You can find them in the Users section.
Related articles
You can add queries to your online forms to search in your organization’s Salesforce data for specific information. Queries are more advanced lookups to pull data from Salesforce and are useful if you need to establish multiple filters. When creating queries, you can use the operators OR and AND.
Queries are triggered only after the form is submitted, so they can’t be used to prefill form fields, but they can be used in the Object Mapping section for mapping or as a condition for updating an existing record.
1. Use the query result as a Data Source in the Object Mapping section.
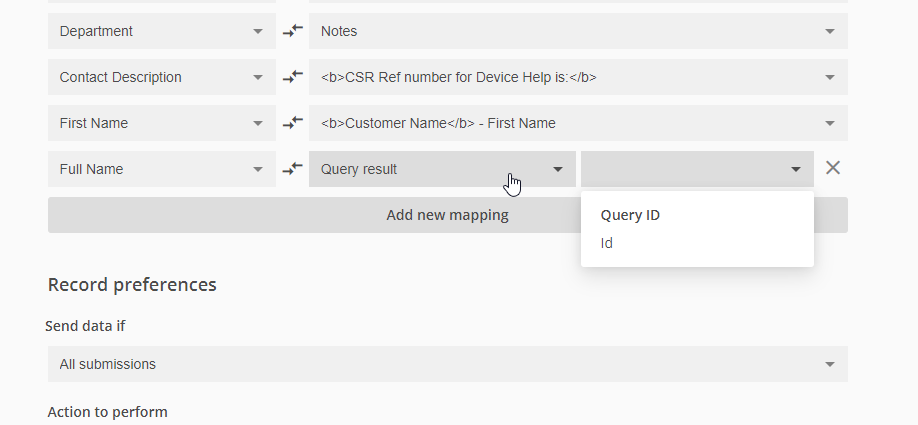
2. Use the query result as a condition for updating an existing record:
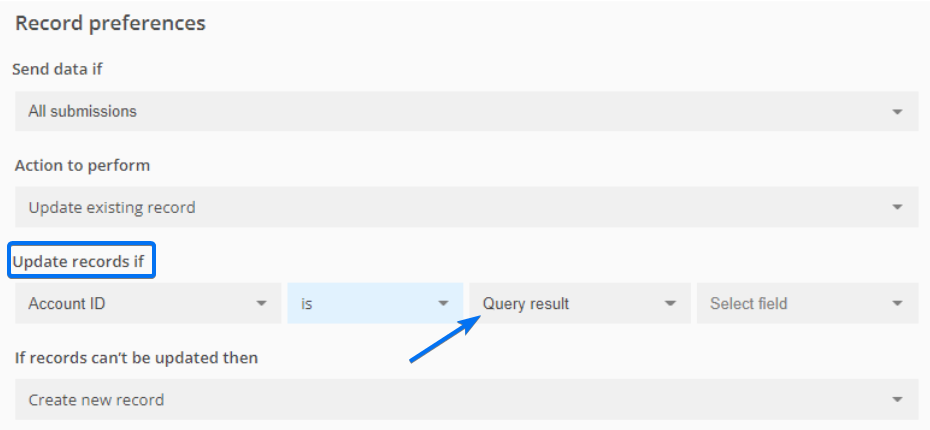
How to create Queries:
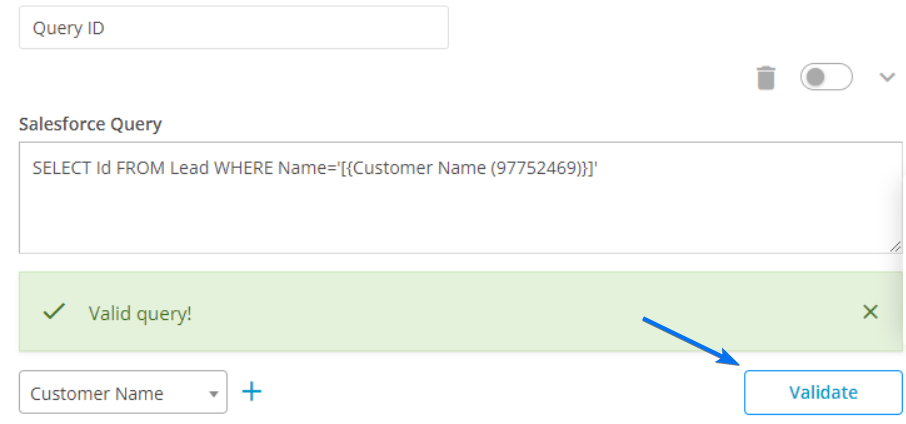
Under the Salesforce Integration → Query tab, specify a Query name to easily identify it. Start typing SOQL queries in the box below.
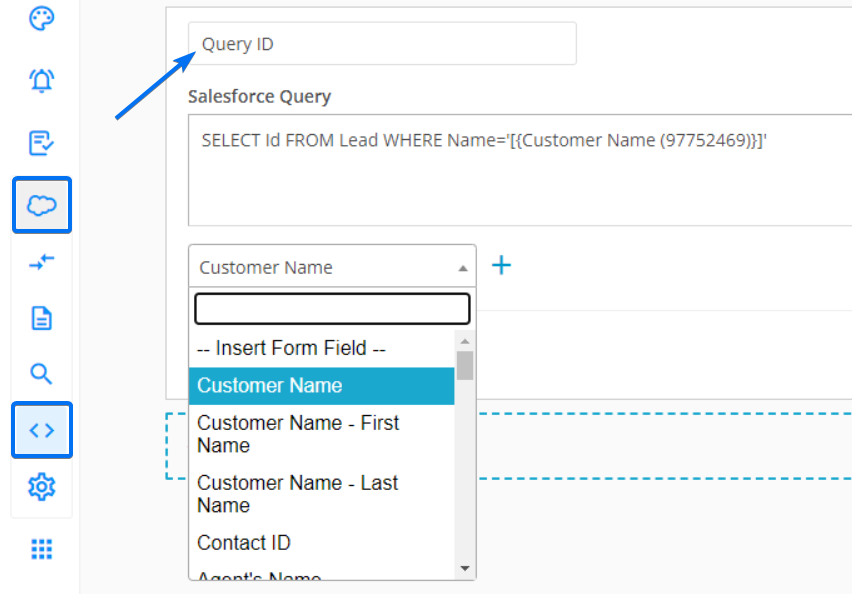
Here are some query examples:
SELECT Name FROM Lead WHERE Company = '[{company(5427369)}]'
SELECT Id, Name, BillingCity FROM Account WHERE Email = '[{email(5783943)}]'
SELECT Id FROM Contact WHERE Name = ‘[{name{6457284)}]' AND MailingState='[{state(643784)}]' OR Email = '[{email{698345}]’
You can use the Validate button to check if your query is correct.
Related articles
Why does it show up?
This error shows up in the Form Editor if you recently accessed the form builder app in a different ORG, in the same browser.

You get this error message if you have 123FormBuilder installed in both Production and Sandbox and you attempt to work in both ORGs in the same browser session.
Unlike Salesforce – which allows multiple sessions in the same browser, 123FormBuilder can only have one session per browser.
How to fix it?
To solve this issue, clear the browser’s cache and cookies.
How to prevent this from happening?
As a precaution, don’t access the 123FormBuilder app in two different ORGs on the same browser. If you need to do so, you could use two different browsers or an incognito window.
Why does it show up?
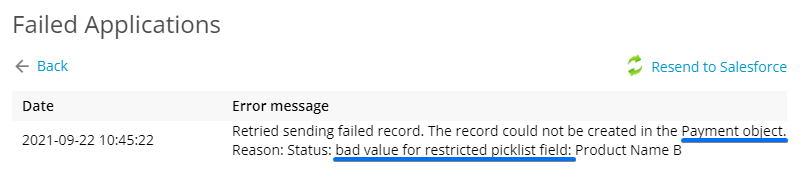
The restricted picklist error means that the form is trying to create a record with a picklist value that doesn’t exist in Salesforce.
If the submitted value is not identical to the API value name in Salesforce, data won’t be sent to Salesforce. In the forms Submissions section (Failed Applications tab), you’ll receive the following error:
How to fix it?
Since 123FormBuilder works with the Salesforce API, it relies on the API Name. No worries, you don’t have to put the API value on the form as a choice. However, you need to provide the API value in the Object Mapping section.
To fix the restricted picklist error, first, you need to check the API values for that picklist in Salesforce.
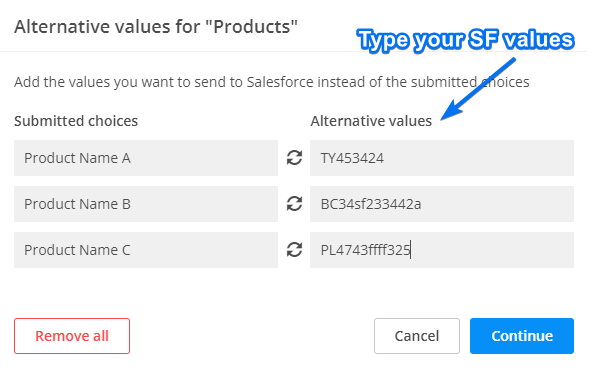
Then, go to the form Salesforce Integration → Object Mapping, identify the picklist field, hover and click on the Alternative Values icon and provide the exact API values:

In the below example, the Salesforce API values are just codes that mean nothing to the form visitors. I want to display the product name on the form, but the value sent to Salesforce needs to be that code. Therefore, I use Alternative values and make sure to add the values exactly the same as they are in Salesforce, with proper capitalization and no leading or trailing spaces:
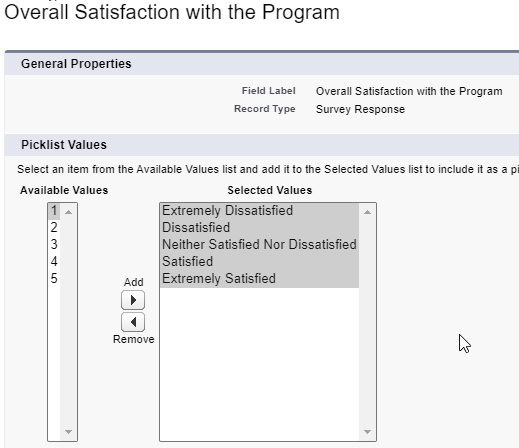
If the API name of the value is correct and you’re still receiving the error message, verify that the value is selected for your Record Type.
Go to Setup -> Object Manager -> Find the Object -> Navigate to Record Types -> Select the record type and ensure that the picklist value is displayed in the Selected Values column:
Related articles
The web forms created with 123FormBuilder can easily be published on your WordPress website using the embed codes provided for you in the Publish section.
It is worth noticing that there are two options of publishing a 123FormBuilder form on WordPress.org, depending on the version of WordPress.org.
WordPress.org older than version 5
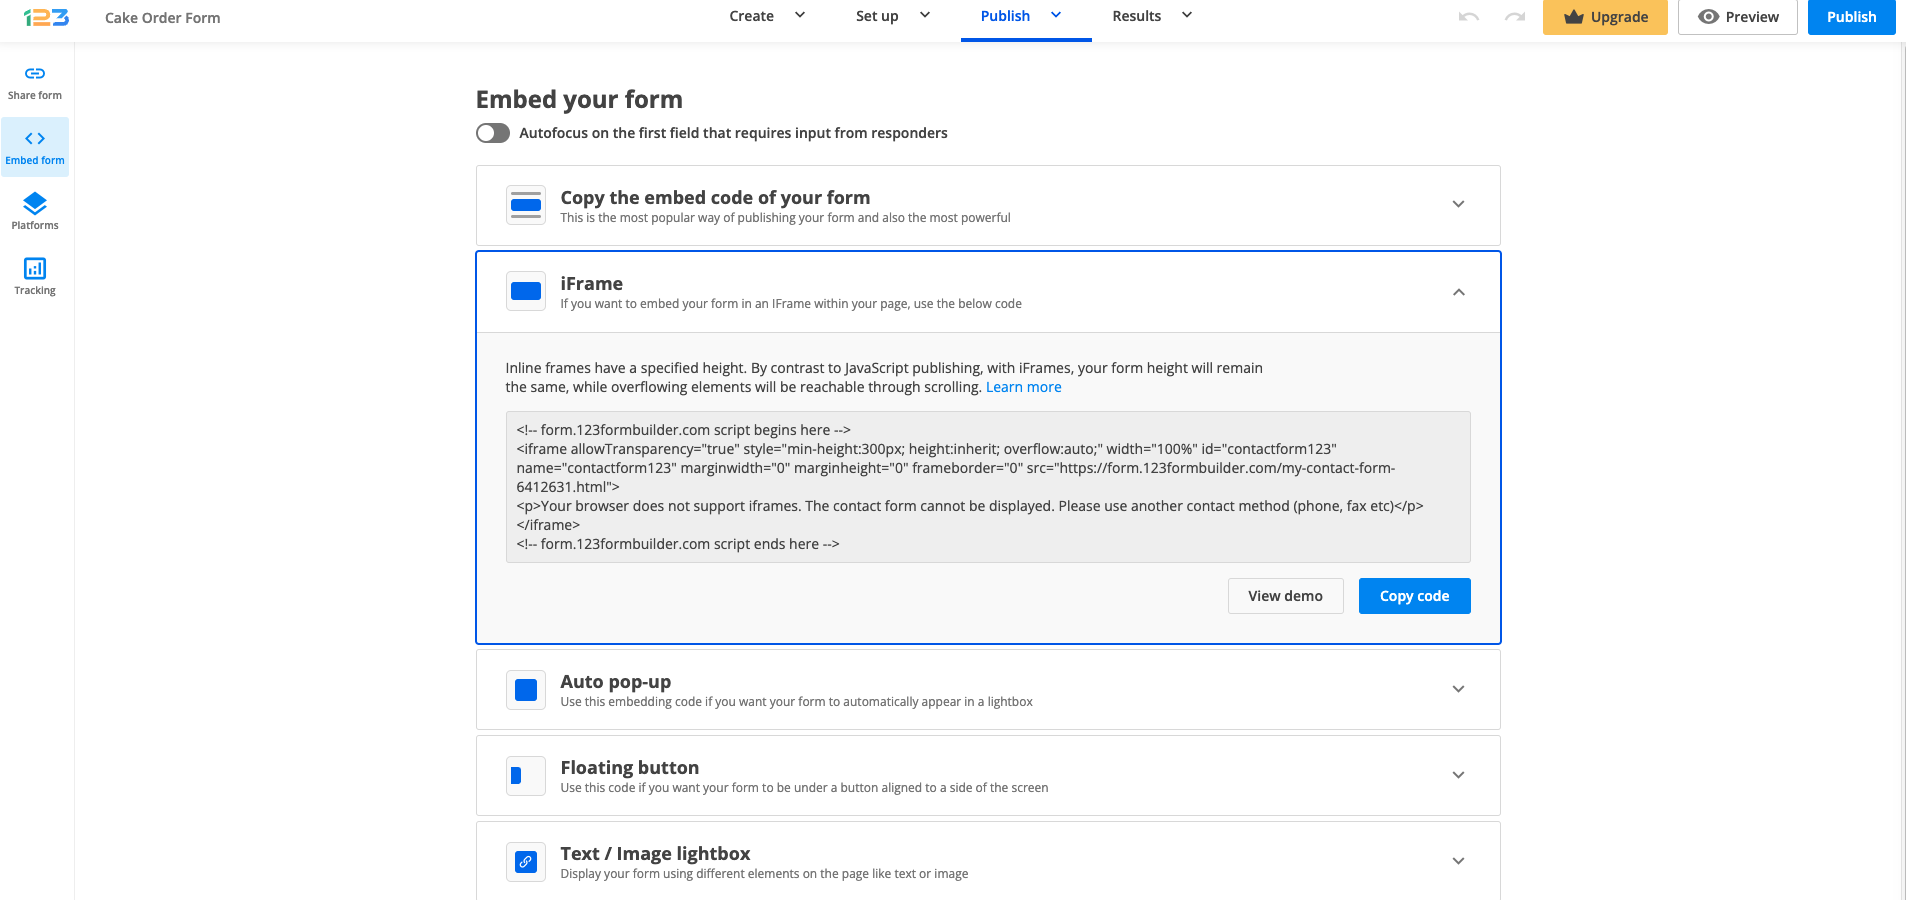
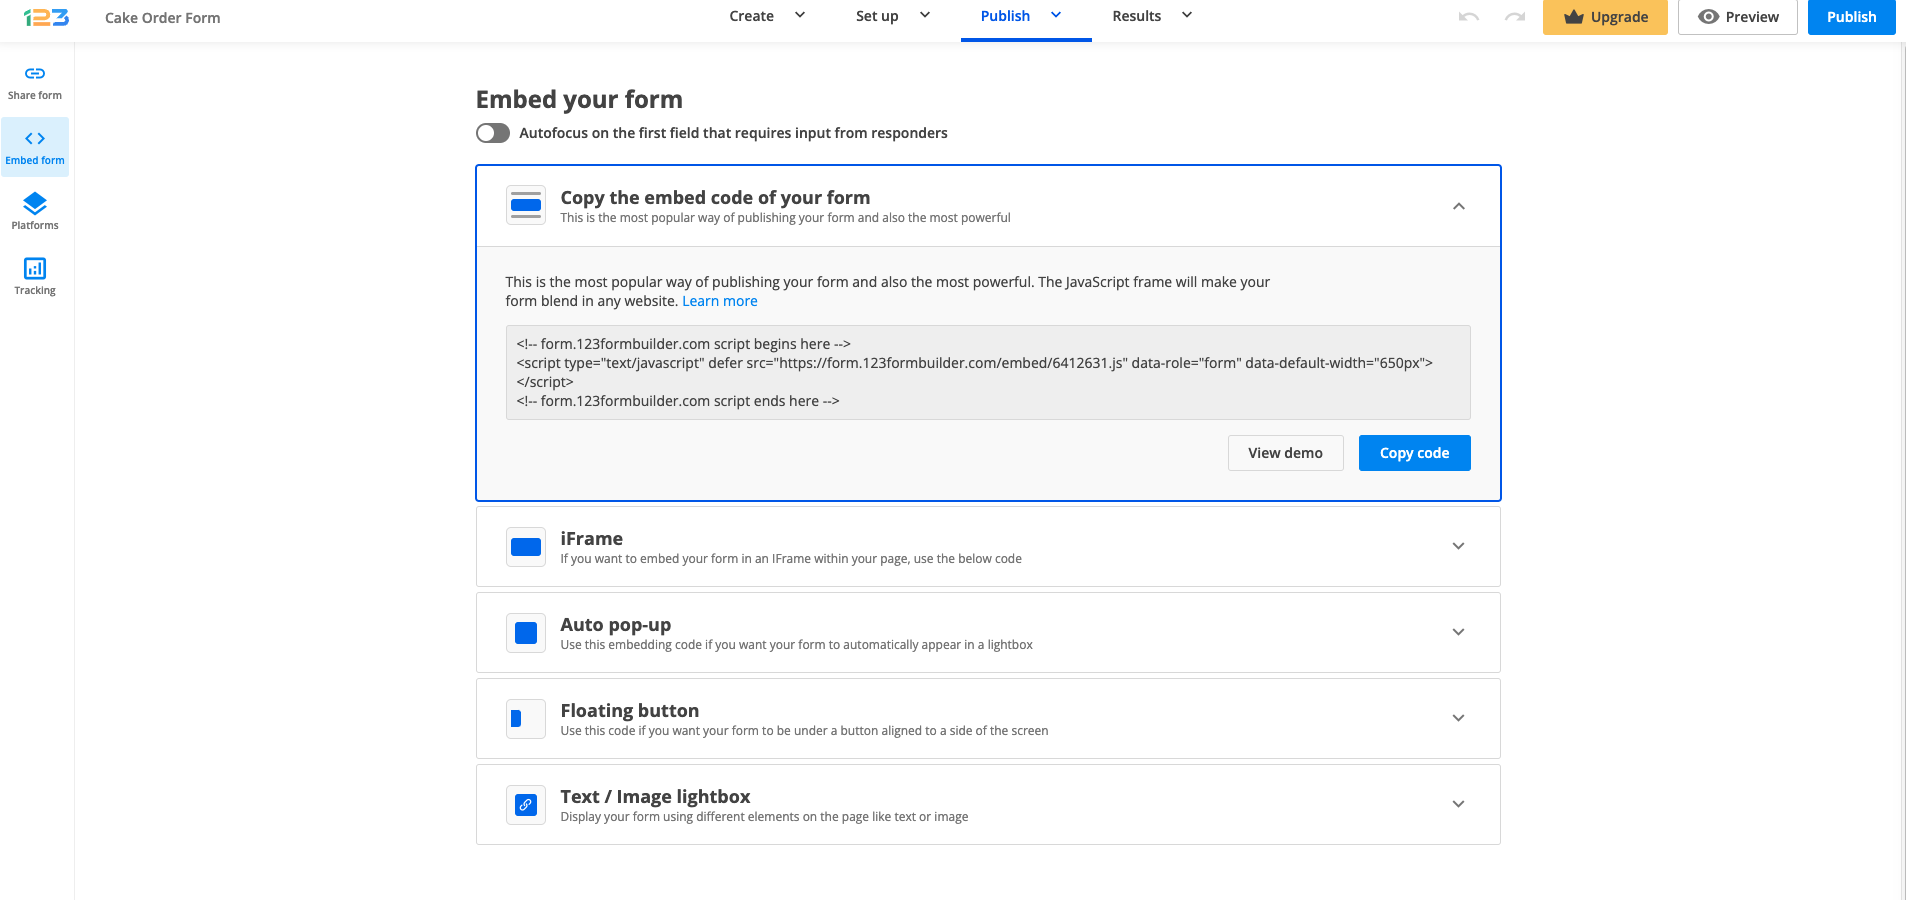
1. In your form builder account, select the desired form and go to the Publish section. From Embed form, copy the IFrame code.
2. On WordPress, select the page or post where you want to publish your form.
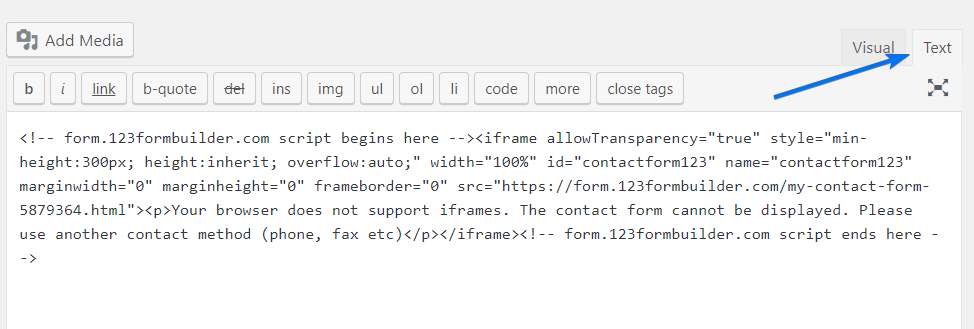
3. Switch the page/post editor from Visual to Text and paste the code.
4. Don’t worry if the form will not display properly when you turn the editor back to Visual mode. The form will be visible on your WordPress website when you Preview Changes and Update/Publish your page/post.
It’s worth mentioning that the IFrame embed method has a default height of 300px, allowing users to navigate through the form by scrolling it. You can remove the scrollbar specific to this publishing method by increasing the height from the IFrame code. See the highlighted example below:
<!-- form.123formbuilder.com script begins here --><iframe allowTransparency="true" style="min-height:1500px; height:inherit; overflow:auto;" width="100%" id="contactform123" name="contactform123" marginwidth="0" marginheight="0" frameborder="0" src="https://form.123formbuilder.com/my-contact-form-5879364.html"><p>Your browser does not support iframes. The contact form cannot be displayed. Please use another contact method (phone, fax etc)</p></iframe><!-- form.123formbuilder.com script ends here -->You can also publish your form by using the Javascript code from the same Publish section and following the same steps explained above.
If your 123FormBuilder form has a 3rd party redirect, additional settings need to be applied.
Having a 3rd party redirect on your form would mean, for example, to have a payment processor added on the form.
Let’s take PayPal as an example. By default, after your respondents would click on the Submit button, they would be redirected to PayPal in order to complete the transaction. After the payment transaction is successfully completed, respondents would return to the checkout ending message displayed on the form, and not on your WordPress.org website.
In order to make sure that your respondents would return to your WordPress.org website after completing the online transaction, some tweaks need to be done to the Thank you page section.
Select Show text, then redirect to a web page option and leave the “in the parent frame” option selected – this would mean that the respondent is redirected to the parent (initial) URL.
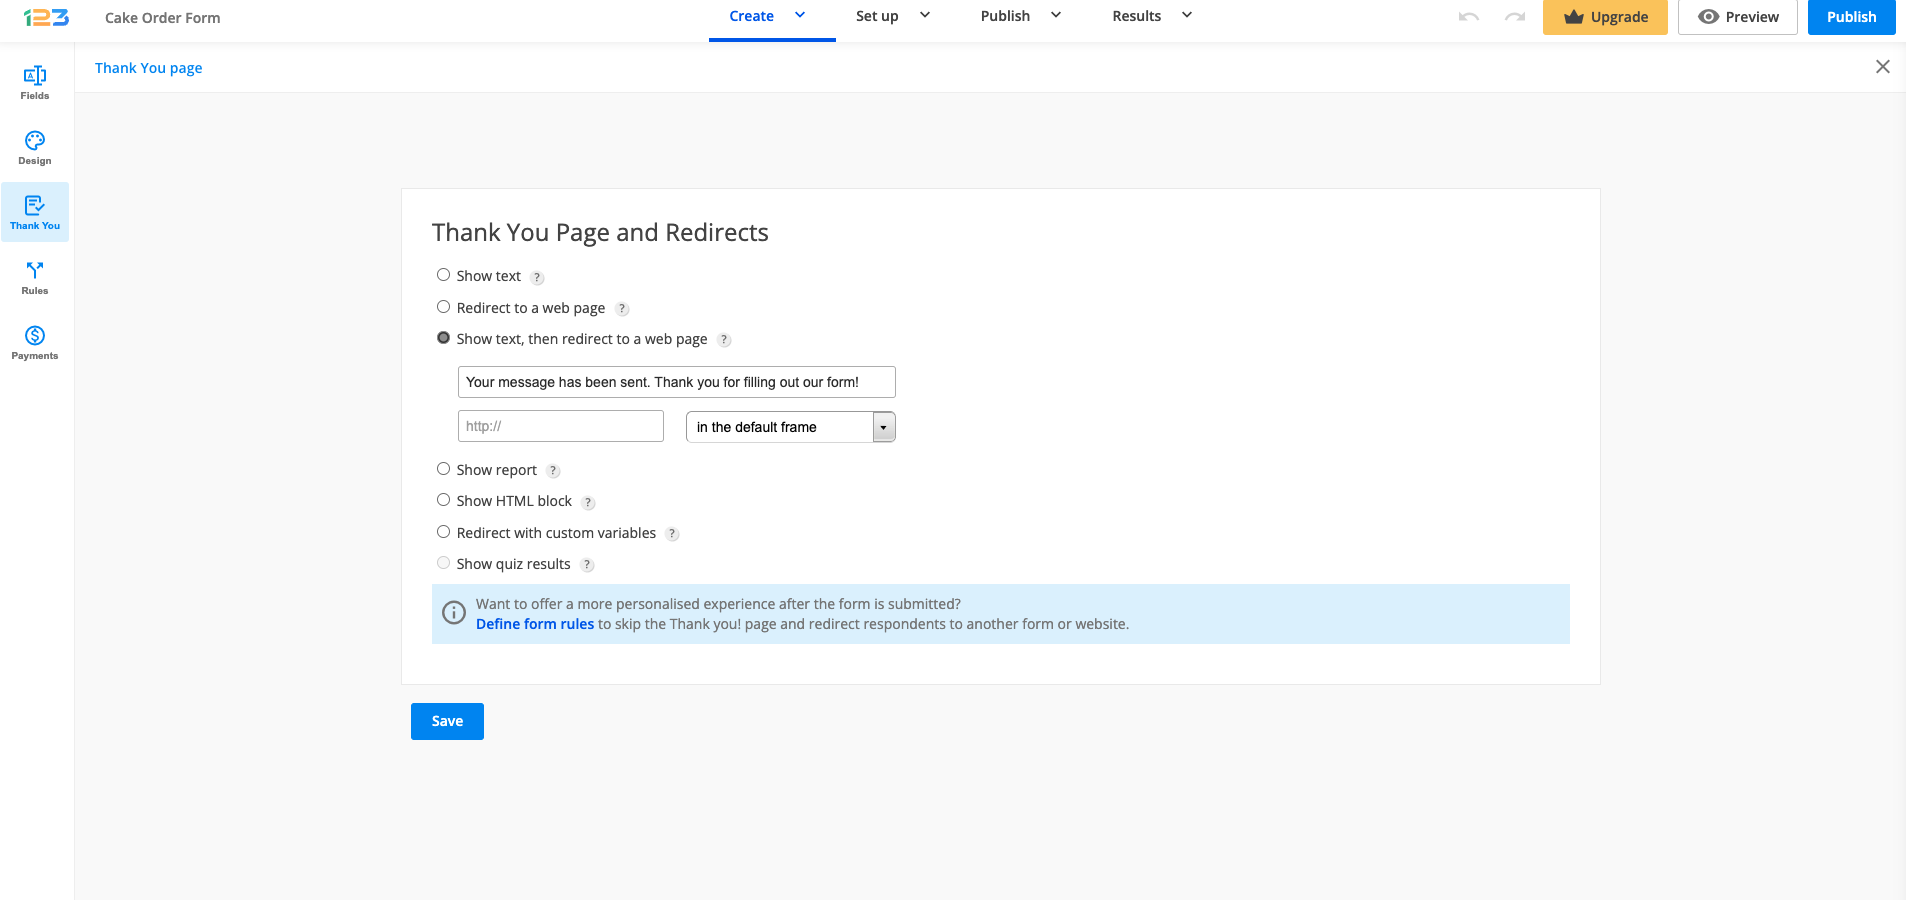
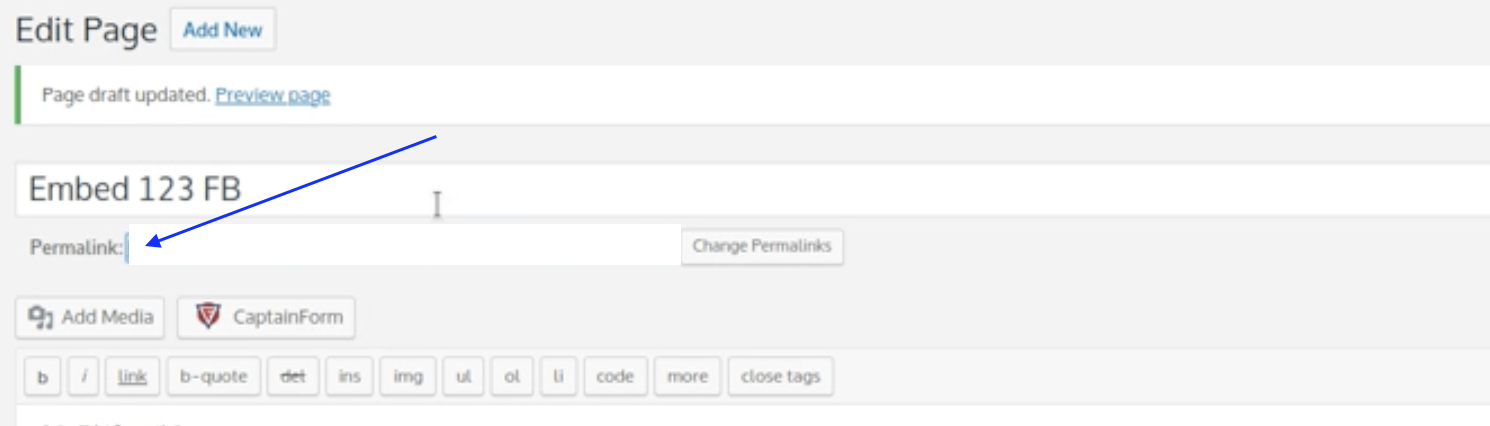
In the above text box, you have to introduce the URL visible for Permalink, below the title of your WordPress page.
After saving your WordPress.org page and publishing it, your respondents will be able to see your 123FormBuilder form embedded on your page, make payments and be redirected to your WordPress page after completing the payment.
WordPress.org latest versions
The latest version of WordPress.org is 6.1. Starting from version 5, WordPress has introduced the block editor, making it easier for you to create your WordPress page.
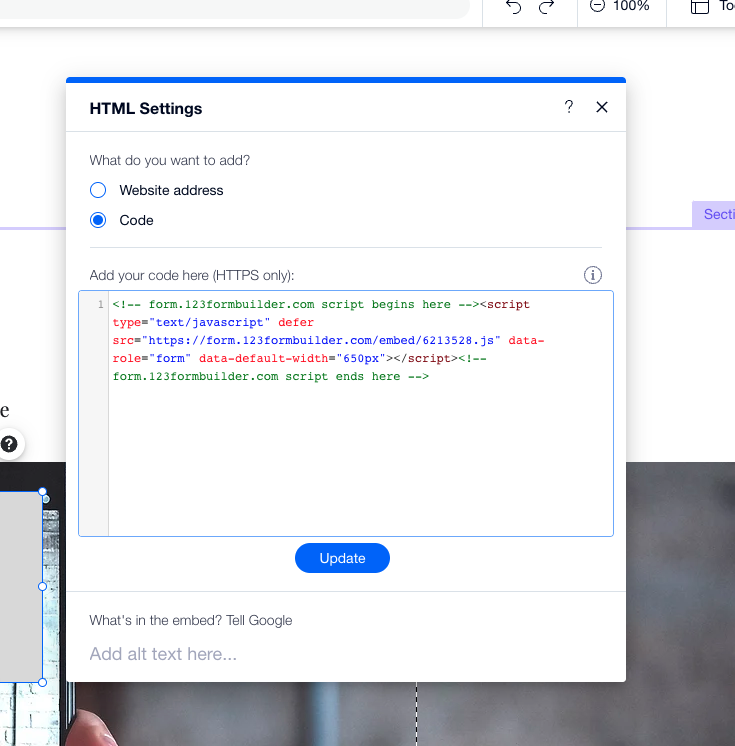
When creating your page for WordPress, all you have to do is to insert a custom HTML block. Inside the custom HTML block, paste the Javascript embedding code of your form.

If your 123FormBuilder form has a 3rd party redirect, additional settings need to be applied.
In order to make sure that your respondents would return to your WordPress.org website after completing the online transaction, some tweaks need to be done to the Thank you page section.
Select Show text, then redirect to a web page option and leave the “in the parent frame” option selected – this would mean that the respondent is redirected to the parent (initial) URL. In the text box, input the URL of your WordPress.org page.
After saving the WordPress page and publishing it, your respondents will be able to complete the form posted on your page, make the payment and be redirected to your WordPress page if the above steps have been followed.
That’s it! Now you can sit back, relax, and wait for submissions to roll in from the forms published on your WordPress website.
123FormBuilder provides a special App for Wix users that helps manage, create and publish web forms directly from your Wix website. However, publishing forms on Wix is not limited only to our application. Let’s go over some alternative methods by which you can publish your forms on Wix.
Embed the form
With the help of the Wix HTML Widget and our JavaScript code, you can also choose to embed forms on your website.
1. First, log in to your form builder account.
2. Head over to the My Forms section to select the form you want to publish and click on Edit Form.
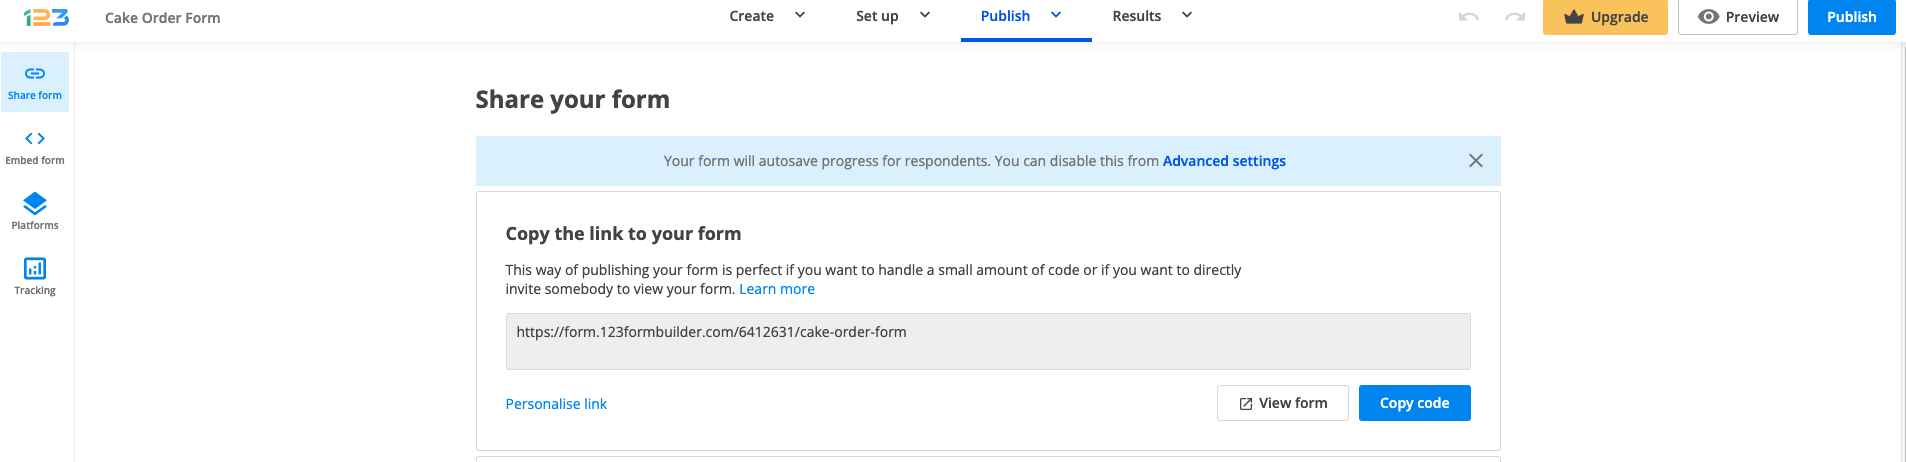
3. Now you are in the form editor. The next step is to select the Publish button from the top right corner of the page and choose Embed form → Javascript → Copy code.
4. Once you have copied the JavaScript code, head back to your Wix website editor. From the left-side panel, select Add → Embed → Custom Embeds → Embed a Widget.
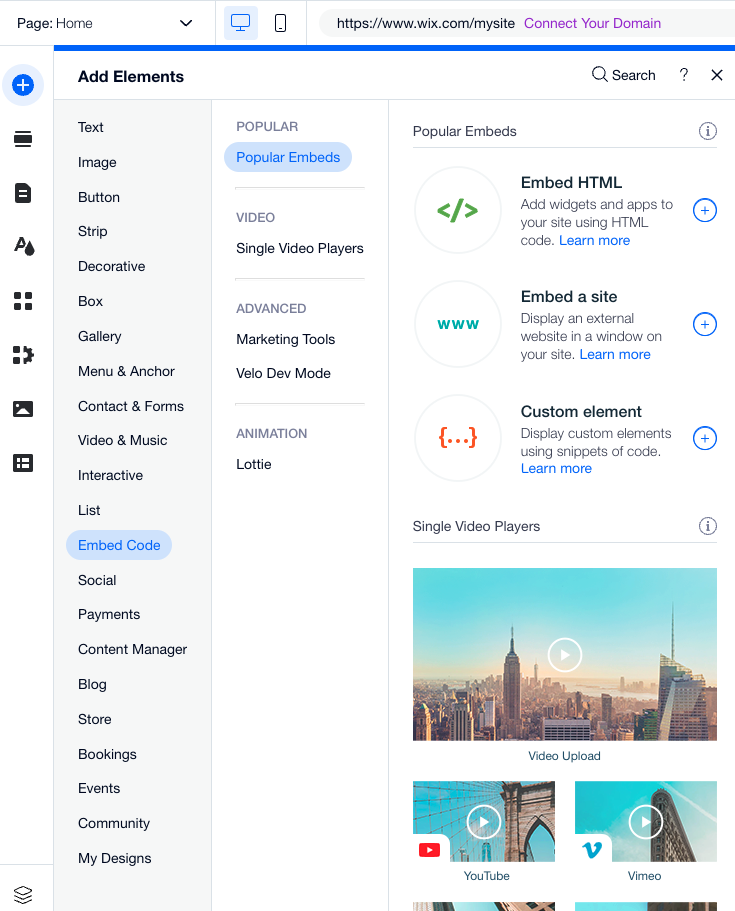
5. Click on the Embed HTML button and paste the JavaScript Code, select Update and you are all set!
Important Note
The HTML Widget has a fixed size, therefore you will need to resize the margins until the entire form is displayed within the box.Link the form to a button
Another alternative method to publish your form would be to link it to a Wix button.
To get started, repeat the first three steps showcased above. However, once you are in the Publish section, select the Share form option instead, and copy the code.
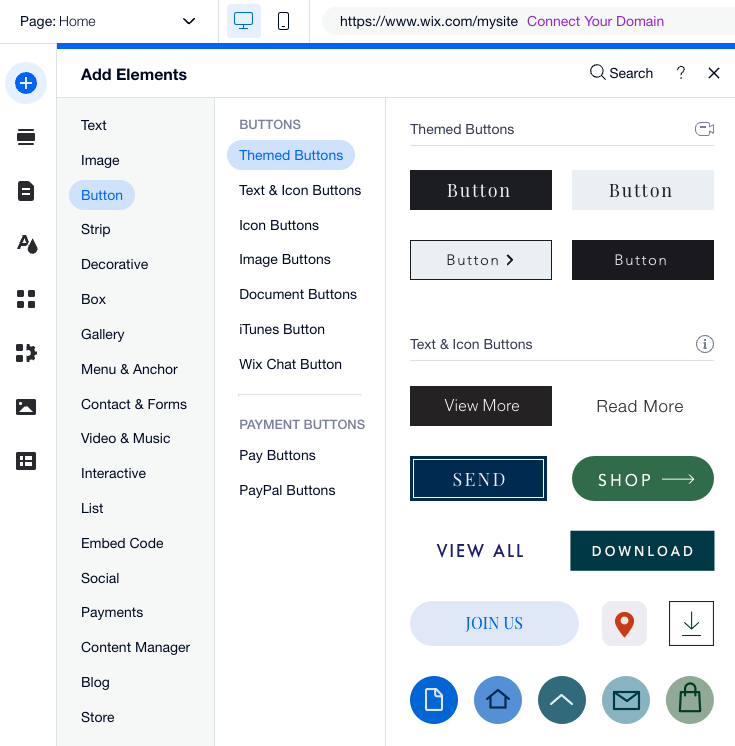
Now it’s time to go back to your Wix website editor and select Add → Button. Here you have a wide variety of buttons that you can choose from and customize later if needed. You can change the text, placement, color, and even add animation.
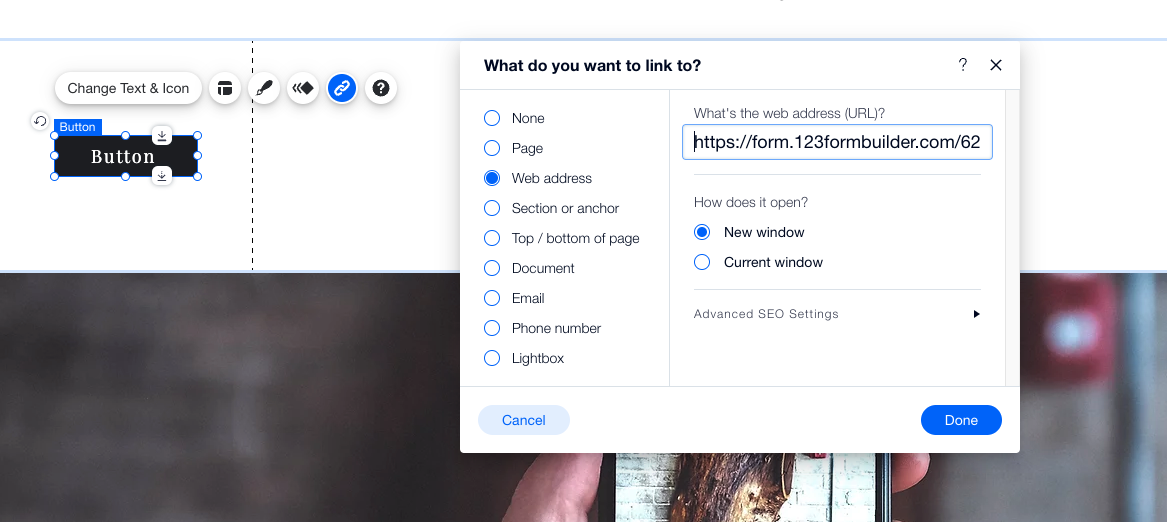
Select the button that you like most and click the Link icon.
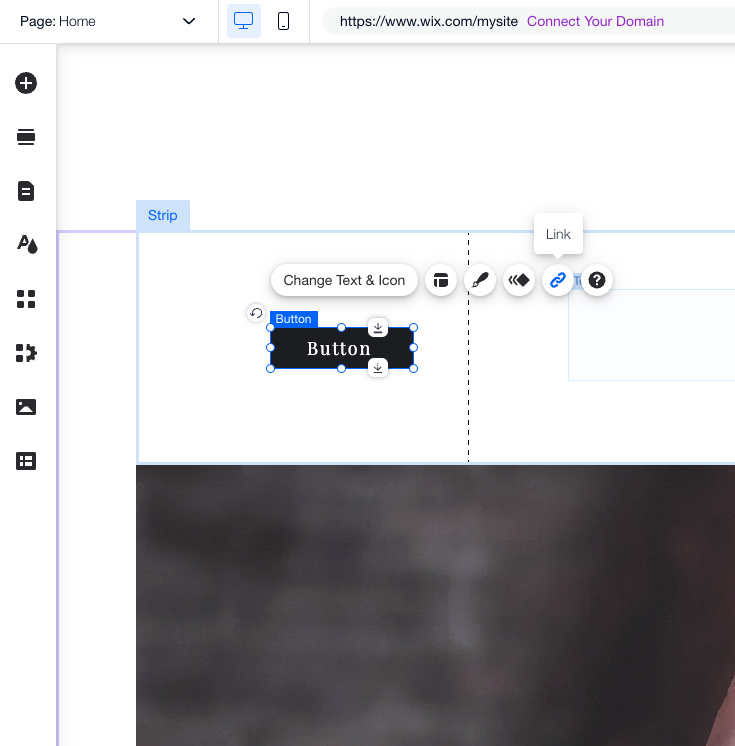
In the lightbox that opens, select Web Address, paste the forms link, and choose how would you like for it to open (in a New Window, or the Current window).
Did you know? Our 123FormBuilder Wix App also has an option to publish the form as a button. Just head over to the Settings tab and enable the option “Display form as a button”. Then, from the Design tab, you can customize the button’s appearance or replace it with an image instead.

First things first, what is fair usage exactly? Fair usage is the limit imposed over certain features to ensure the best performance of your forms.
While it might sound strange to establish a limit over the “unlimited” features that we provide in our form builder, we want to make sure that each and every one of our users can benefit from top-quality forms and enjoy all the advantages that our platform has to offer.
That being said, let’s go over our fair usage policy for some of our features:
- Form fields: 800 fields per form.
- Rules: 400 field rules and form rules combined per form.
- Email notifications: for the first 1000 submissions made per form, per day.
- Upload fields: 50 upload fields per form, with a maximum size of 150 MB per field. However, the total size of the files submitted cannot exceed 1GB.
- Free plans have 100 API calls per day.
- Unlimited API calls per day on paid subscriptions.
- Bounce rate. If the bounce rate of the email notifications triggered by your form is too high, your account will get limited. This is because a high email bounce rate is sanctioned by Amazon SES and can result in the impairment of the service for all of the platform users.
There are other feature limitations on each plan. For example, on the Basic plan, you can add 10 fields per form. To find out more about the features included in your plan, visit our Features Matrix.
Collecting and managing data is a huge responsibility. 123FormBuilder is here to help you collect the data you need as easily as possible with our form builder, while also keeping the integrity of our business.
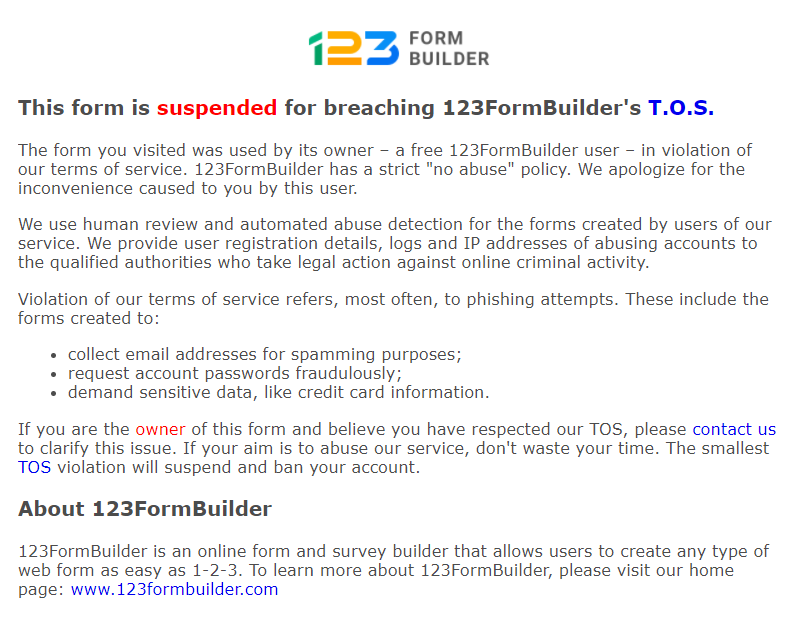
This being said, we have a strong no abuse policy when it comes to collecting sensitive information from your users. We use both human review and an automated system to track down forms that are collecting data for phishing purposes. Such forms don’t need to be published in order to be suspended. Our system scans them as soon as they are created.
Forms that are breaching our Terms of Service display the following message:
So what information I can’t collect?
You can’t collect the below information under any circumstances:
- Credit Card details.
- Passwords.
- Account credentials.
If you need to collect payments from your customers, we offer several user-friendly payment processors that you can integrate into your forms. For assistance in setting up the payment processor of your choice, please contact us.
When you create a registration form, you will need to clearly specify that users need to “Create a new password” or “Create a Username”. You also cannot place a Password field below an Email field.
Are there any other limitations?
Using logos of well-established companies and impersonating them for advertisement purposes is also strictly forbidden. We don’t tolerate forms that advertise fake offers, fake job opportunities, or any other type of tricks.
There might come a time when you need to collect certain sensitive information from your users, such as IDs, Social Security Numbers, and Passports, just to name a few. Any data that could potentially be used to identify a particular person is classified as Personally identifiable information, or PII.
You can collect this information only if you add an extra layer of security over the data at rest by enabling the Data Encryption feature on your account. This feature is available starting from our Professional plan.
For collecting medical information our custom corporate solutions can offer you HIPAA compliant forms. Get in touch with our Enterprise team for more information.
Another situation that can suspend your account is if you have purchased your subscription using a stolen credit card. In this case, your payment is marked as suspect, rejected by our partners from 2CheckOut and the account is automatically suspended.
Important Note
Forms reported by companies whose image has been affected for using their brand or by entities that handle internet security will be permanently suspended whether they are using the Basic free plan or a paid subscription. In this situation, the account can’t be reinstated.Please contact us if you believe that your account has been wrongfully suspended.
This integration has been deprecated.
With Agile CRM you can manage your contacts and leads data. This CRM provides your company with great business management solutions.
In this article, we’ll show you how to use 123FormBuilder to import form entries into contacts on your Agile CRM platform.
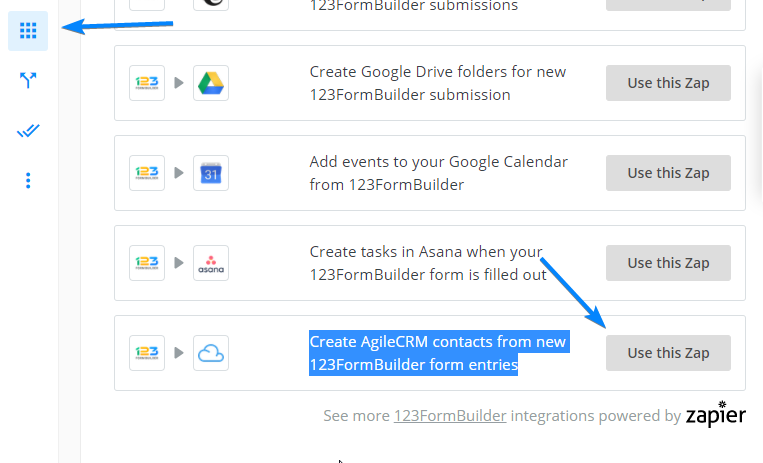
First, open the Integrations section of your form, and below Applications by Zapier choose to create the Zap with Agile CRM.
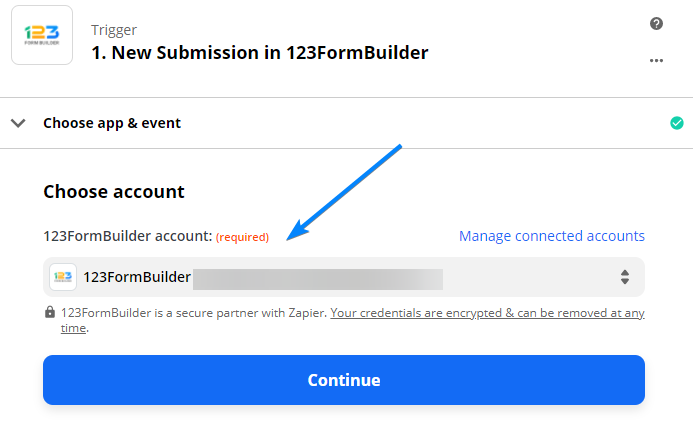
Next, in the pop-up window connect your 123FormBuilder account.
Select your form from the dropdown menu.
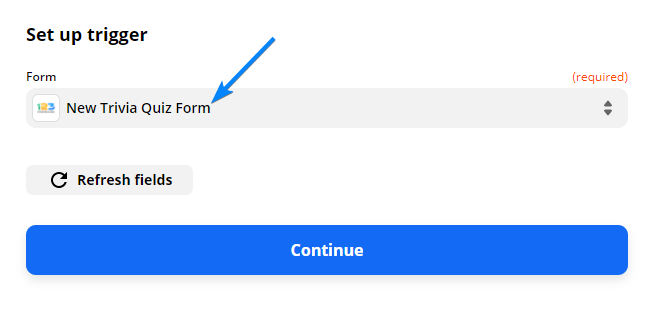
Make sure that you have at least one submission made on the form to test the trigger.

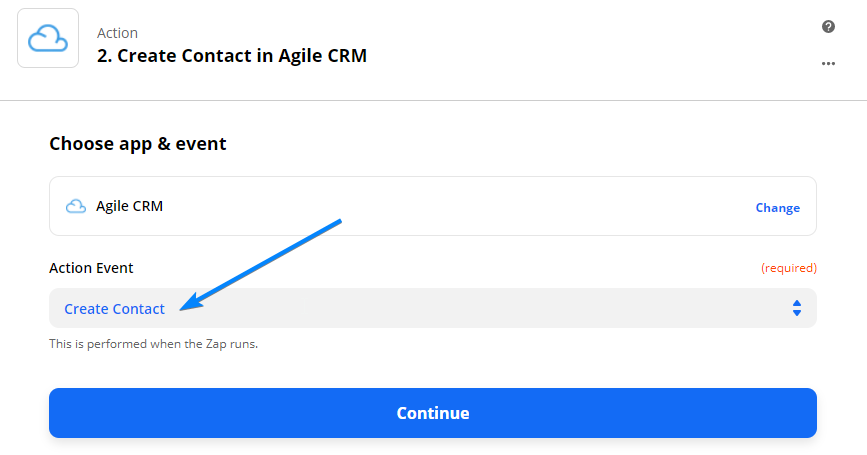
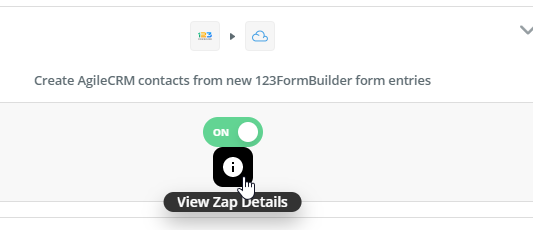
On the second part of the zap choose to create an Agile contact.
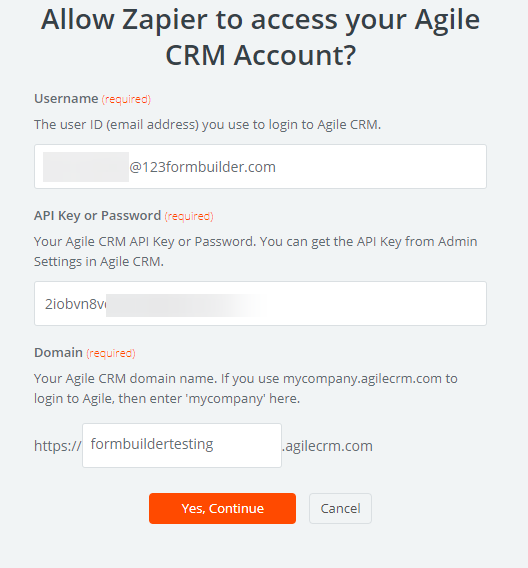
Grant Zapier the permission to access your Agile account details.
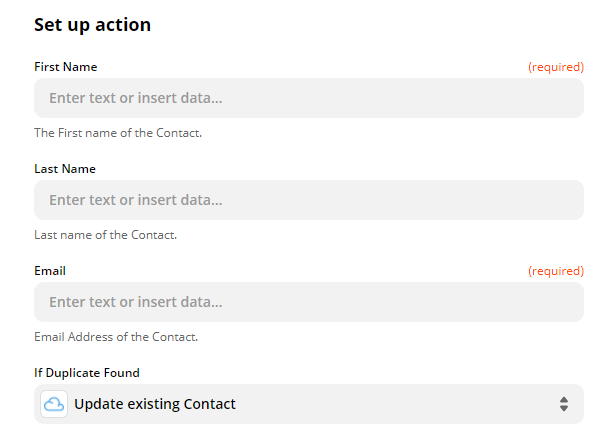
Set up the action and map the fields from Agile with your 123FormBuilder fields.
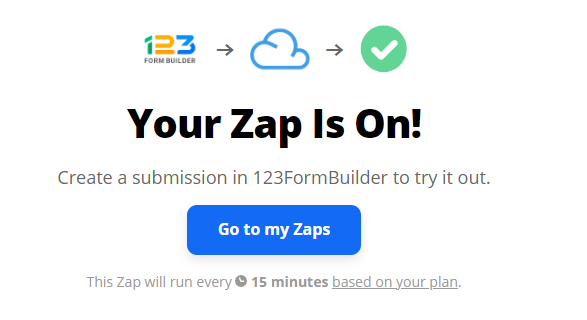
Click to make a test and enable the zap.
Important! Your Zapier connection status and details can be checked only on Zapier’s end.
The Wix Premium Starter plan is designed for Wix users. This subscription is managed by Wix. It offers many benefits and allows access to many powerful features for your business.
Check out our Features Matrix for more information about our pricing plans.
Account Features
- You can create 8 forms within your account.
- On each form, you can add 30 fields.
- 1,000 submissions per month on your account. The submissions limit is reset on the first day of each month.
- Create a connection path between your 123FormBuilder account and other services to execute certain operations. With the Wix Starter plan, you have available 200 API calls per day.
- 100 MB upload storage.
- Connect your forms to 1 Premium Wix site. With our native plans, you can connect your forms on multiple Wix instances.
- Create unlimited custom reports. Apply custom filters to your reports.
- Live Chat Support.
- No backlink to 123FormBuilder.
Form Configuration
- Add 1 email recipient.
- 1 default email notification template.
- Unlimited Likert Scale statements.
- Multiple publishing methods are available.
- Track the form’s activity by adding your Google Analytics Profile ID and domain.
- Establish a multilingual form.
- Create an anti-spam form by adding our security options. You can protect your Inbox from spam by using Captcha verification images, limiting form submissions from the same IP to one per day, rejecting submissions coming from specific countries, and even limiting the total number of submissions.
- Overview of the default report, which contains all form fields, shown in pie charts in the order that they appear in your form.
- Add custom scripts on the form and on the Thank You Page.
- Attach a PDF file in the email notification. Plain PDF or PDF Layout.
- Branching & Conditional Logic. You can establish unlimited rules per form. Form rules and field rules combined.
- Attach a file in the email notification.
- Advanced features such as: save for later, edit submission, and preview submission.
- Custom Thank You Page.
- Quiz options.
- Download Form Layout PDF for a submission.
- Download Plain PDF for a submission.
- Export submissions to CSV & Excel.
Third Party Applications
Read more about our plans:
123FormBuilder is a user-friendly web form & survey builder for any type of business. There are four standard plans to choose from: Basic, Gold, Platinum, and Diamond. Here is our Features Matrix with all the details.
Let’s look into the features available on the Basic free plan.
Account Features
- You can create 5 forms within your account.
- On your forms, you can add 10 fields.
- 100 submissions per month on your account. The submission limit is reset on the first day of each month.
- Create a connection path between your 123FormBuilder account and other services to execute certain operations. With the Basic free plan, you have available 100 API calls per day.
- Create 1 custom report. Apply custom filters to your report.
- Connect to multiple Wix sites.
- Live Chat Support.
Form Configuration
- Add 1 email recipient.
- 1 default email notification template.
- Multiple publishing methods are available.
- Track the form’s activity by adding your Google Analytics Profile ID and domain.
- Create an anti-spam form by adding our security options. You can protect your Inbox from spam by using Captcha verification images, limiting form submissions from the same IP to one per day, and rejecting submissions coming from specific countries.
- Overview of the default report, which contains all form choice fields, shown in pie charts, in the order that they appear in your form.
- Add custom scripts on the form and the Thank You Page.
- Branching & Conditional Logic. You can establish unlimited rules per form. Form rules, field rules, and notification rules.
- Advanced features such as edit submission, and preview submission.
- Custom Thank You Page.
Third Party Applications
Read more about our plans:
Most Popular
Frequently Asked Questions
Here is a list of the most frequently asked questions. For more FAQs, please browse through the FAQs page.