PayPal Account Optional allows customers to complete website payments with PayPal even if they don’t have a PayPal account. To use this feature, you need to have a verified PayPal Premium/Business account and to confirm the email address used for accepting payments.Here’s how to enable the PayPal Account Optional feature:
Log in to your Business PayPal account and go to My Account → Preferences → Website Payments
Go to Website preferences and click on Update.
In the PayPal Account Optional section, select On.
Remember to always select the same language in the PayPal payment gateway box from Payments as the one you are using in your PayPal account. If it is all set correctly, your form users will no longer be required to log in or create a new account on PayPal to finish payments.
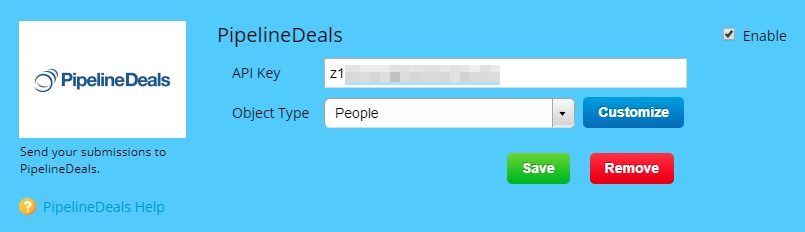
Integrate your forms with Pipeline Deals to have People and Deals added to your Pipeline Deals lists at every form submission. Go to Integrations, search for Pipeline Deals using the search bar, and press Connect.
Provide your API Key in the customization lightbox and choose the type of Object that you want to create: People, Deals, or People + Deals. Needless to say that the first option sends information to the People section in your Pipeline Deals account, the second to Deals, and the third one to both.
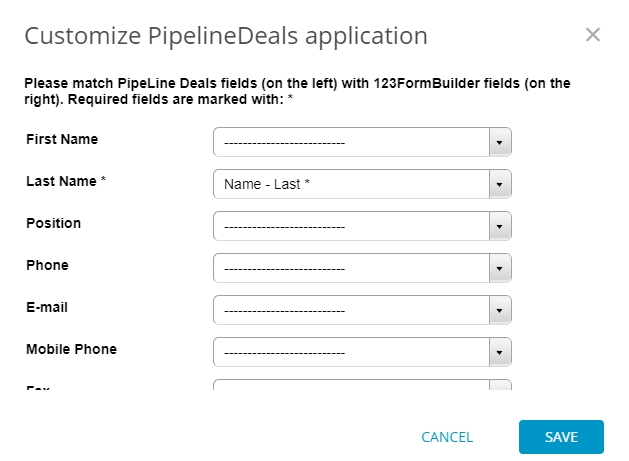
Click Customize to open the customization lightbox and create associations between the fields in your 123FormBuilder web form and the fields in your Pipeline Deals lists. New contact and lead information will be added to your Pipeline Deals account according to these associations.
To use custom fields, make sure you connect your Pipeline Deals account to the form before going to the customization lightbox.
Press Customize and you’ll see your custom fields on the left side, under the default fields. Associate them with your form fields and don’t forget to save upon exit.
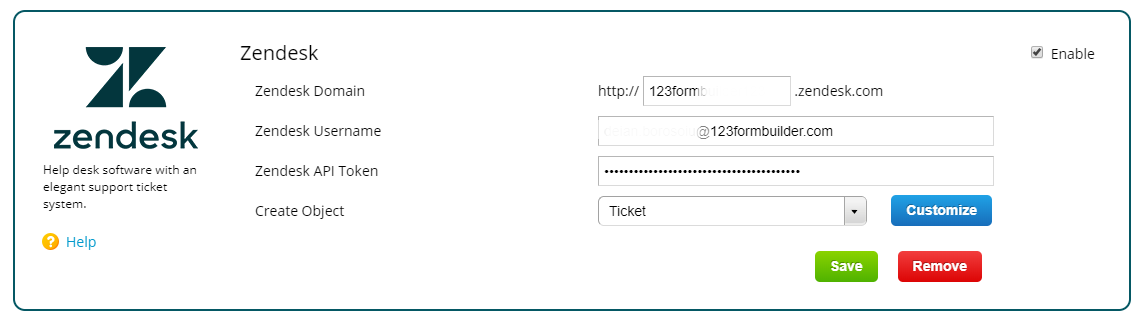
The integration of 123FormBuilder web forms with the Zendesk help desk picks up and sends support tickets to the Zendesk interface, where they are managed like any other Zendesk support ticket. If you use this integration, clients won’t necessarily have to go to your help desk to request support; they will just need to fill out your 123FormBuilder web form, which can be published anywhere on the web. Besides tickets, you may use our integration to create or update organizations, users, and articles.
To enable the Zendesk integration, go to your Integrations section, search for Zendesk using the search bar, and press Connect. The application box will show up on your page. Fill in your Zendesk URL and provide your Zendesk username and token to allow the applications to communicate. Remember to also enable the token access feature in Zendesk for the integration to work properly.
Select the object type you want to create: Ticket, User, Article, or Organization. Click on Customize to create field associations. Match the Zendesk fields on the left side of the lightbox with the 123FormBuilder fields on the right. If you do not match fields that are required in Zendesk, the integration will not work. Save the settings and, from now on, all the messages sent through your form will arrive at your Zendesk help desk.
In the customization lightbox, you can map form fields with default and custom fields from Zendesk. If you want to use Zendesk custom fields, make sure they don’t have the same name as your standard fields in Zendesk, otherwise, their input data will not be sent to Zendesk at all.
Create Ticket
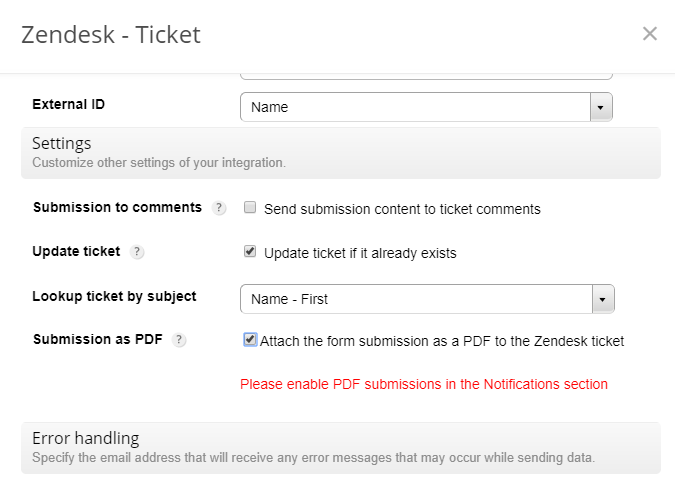
In the application box, use the dropdown to select Ticket if you want to send form submissions to your Zendesk platform as support tickets. Under Settings, you can opt to send the content of the submission to ticket comments, update ticket, and attach the form submission as a PDF file to the ticket.
In order to update tickets, you’ll need to specify the subject field in the dropdown that appears once the option is checked. If you want to attach the form submission as a PDF file to the ticket, make sure you enable the Attach submission as PDF to the notification email option in Form Settings –Notifications – PDF Options.
If you want to create tickets through submissions, note that Subject, Description, Name, and Email are required fields; Ticket Type, Priority, and Attach File are optional.
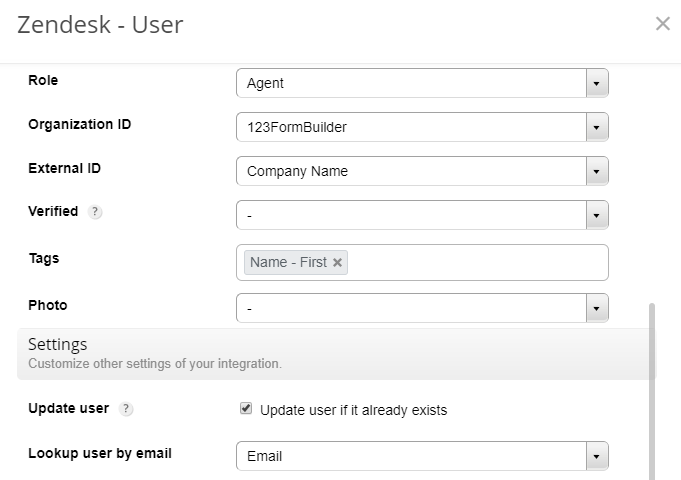
Create User
In the application box, use the dropdown to select User if you want to create a new user in your Zendesk account after each form submission. In the customization lightbox, map the fields for name and email, which are required, and other fields if needed.
Under Settings, you can opt to update users based on the submitted email address on the form. A dropdown will appear below when the option is enabled. Use that dropdown to select the field where the form visitors submit their email address.
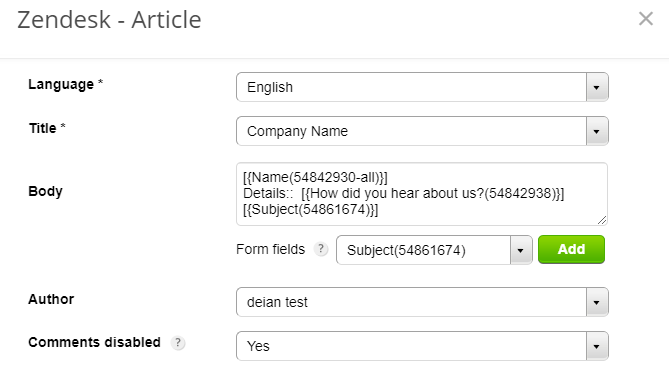
Create Article
In the application box, use the dropdown to select Article if you want to create a new article in your Zendesk account after each form submission. Make sure you map the required fields Section, Language, and Title, followed by the optional fields if needed.
Note: If you create new articles through form submissions in a certain language, you will not find them in Zendesk, unless you select the respective language in the language bar of your Zendesk interface. Articles will be visible in the language they were set.
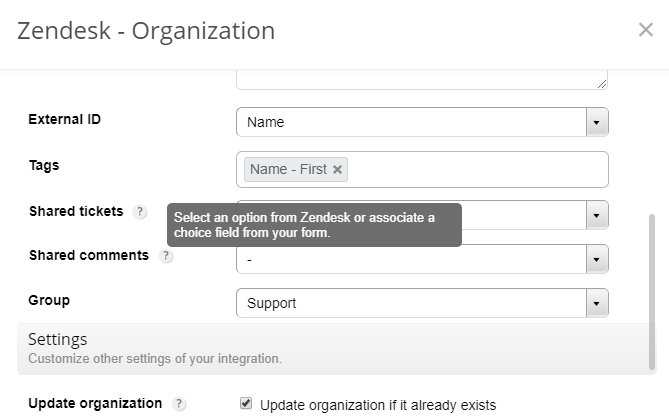
Create Organization
In the application box, use the dropdown to select Organization if you want to create a new organization in Zendesk after each form submission. Set the name field as required and make sure you map it in the customization lightbox, together with other optional fields, if needed.
Under Settings, you can opt to update organizations based on their names in your Zendesk account. Tick the checkbox to enable the feature and use the Lookup organization by name dropdown to select the field that will be used to find and update the respective organization.
Using the Top Producer integration, real estate’s most intuitive CRM, you can send all the contact information provided by users when filling out your forms to your Top Producer account. Go to Integrations, choose Top Producer, and press Connect. 123FormBuilder generates a username and a password that you will need when setting up the integration on the Top Producer side.
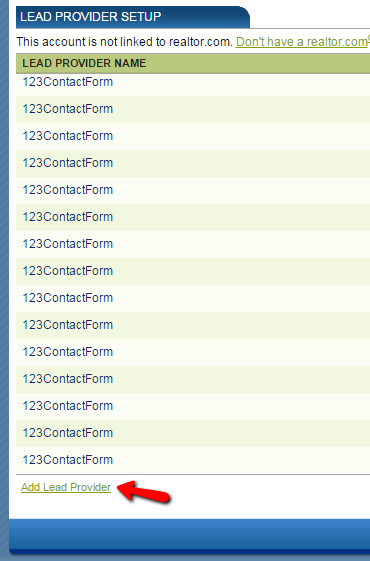
In your Top Producer account, go to the Settings section and click on the Contacts tab.
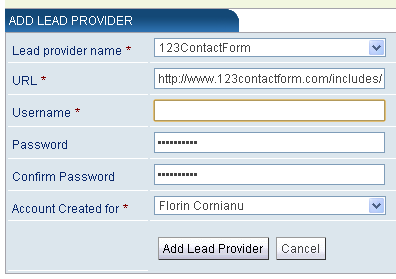
Next, go to Lead Provider Setup and click on the Add Lead Provider link on the bottom part.
Select 123FormBuilder in the Lead provider name dropdown and the URL box will be completed automatically. Paste the username generated by 123FormBuilder, type in and confirm the password, select the person who is supposed to receive the leads, and press Add Lead Provider.
Important: If you’re using a White Label, you’ll need to change the existing URL from Add Lead Provider with the URL of your website as in the example below.
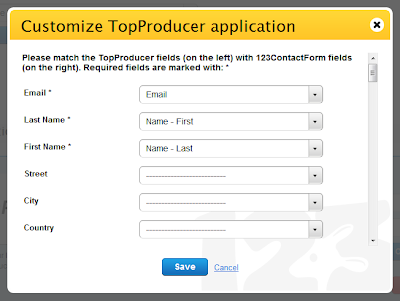
That sums up the settings needed on the Top Producer side. Return to the 123FormBuilder Settings section. Click on Customize and match the Top Producer fields (on the left) with the 123FormBuilder fields (on the right). The Email, First Name, and Last Name fields are required; all the rest are optional.
Contact information will be sent from your web form to your Top Producer account according to the associations you set up here between fields.
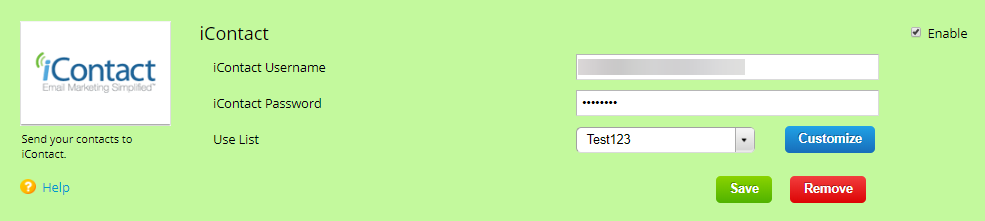
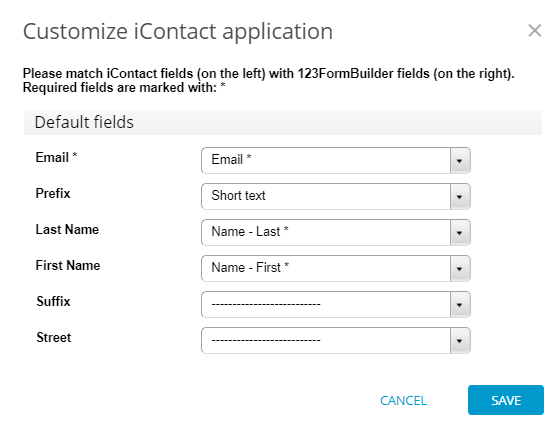
iContact integration allows you to send form visitors’ information to your iContact lists automatically. At every submission, you’ll have a new contact added to one of your lists.
Go to Integrations, search for iContact using the search bar, and press Connect. Provide your iContact username and password and press Save. Then choose the iContact list to which you want to add contacts.
Next, you need to create form fields associations, to establish what piece of information goes where. Press Customize to open the customization lightbox.
On the left side, you’ve got the available iContact fields. The dropdown lists on the right side contain the fields within your form. Specify what information will be sent to your list for each field. For instance, for the first iContact field (Email) select your Email form field. For the second one Last Name select Name – Last and so on.
See how to add an opt-in checkbox to your form. Before having their contact data sent to your iContact account, form users will be asked for confirmation.
If you want to send form data to iContact custom fields, scroll down in the Customize lightbox to the Custom fields subsection. Associate fields and you are done.
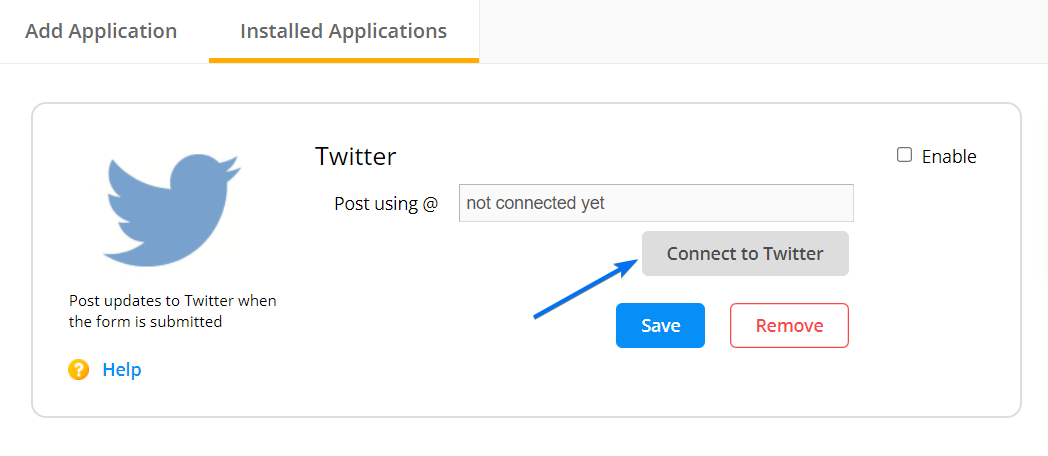
Twitter integration generates a tweet from your Twitter account for every new entry your web form receives. To enable the Twitter application, go to Integrations, search for Twitter using the search bar, and press Connect. Then you will have to input your account and on Connect to Twitter.
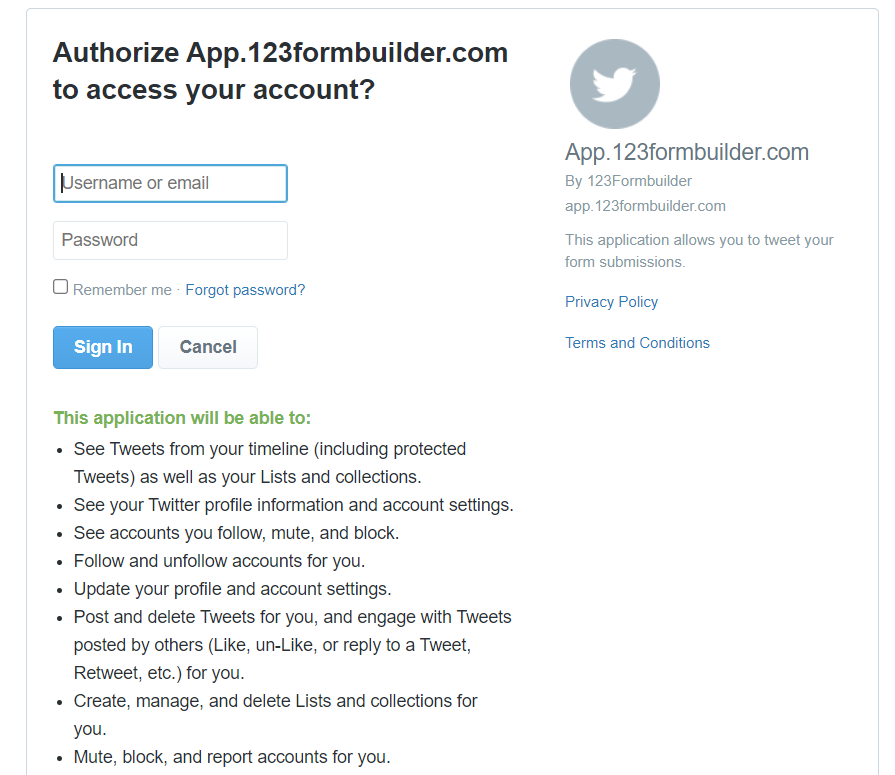
Moving forward, you’ll be redirected to a page where you need to provide your Twitter username and password. On this page, you can also read about what the 123FormBuilder application will or will not be able to do with respect to your Twitter account.
Hit Sign In to return back to the application. You can now customize the text that tweets will contain. By default, the message is [%Name%] has just registered on {{FormName}}. In the actual tweets, {{FormName}} will be replaced with the name of your form. [%Name%] refers to the Name form field and will be replaced with the input provided by form visitors in that field. All of your form fields can be used in the same way.
For example:
to reach the form field labeled Email, you will need this code: [%Email%]
to get users’ input for a field named Favorite browser, type [%Favorite browser%]
Include these codes in the text customization box and your Twitter messages will pick up the input provided by your form visitors in those fields.
It’s important to mention that the Twitter integration will not post duplicated tweets. Therefore, make sure to include a unique variable in your message, such as [%Name%].
This is an older version of the 123FormBuilder integration with Salesforce. For the current version, please visit our AppExchange listing and read our app introduction.
With our Salesforce forms builder, you can import form data from your submitters to your Salesforce account. You will find the integration in the Integrations section of your form within your form builder account on 123FormBuilder.
Type in your Salesforce email address, password, and authentication token. The Salesforce authentication token needs to be retrieved from your Salesforce account. Read here the instructions on how to do it.
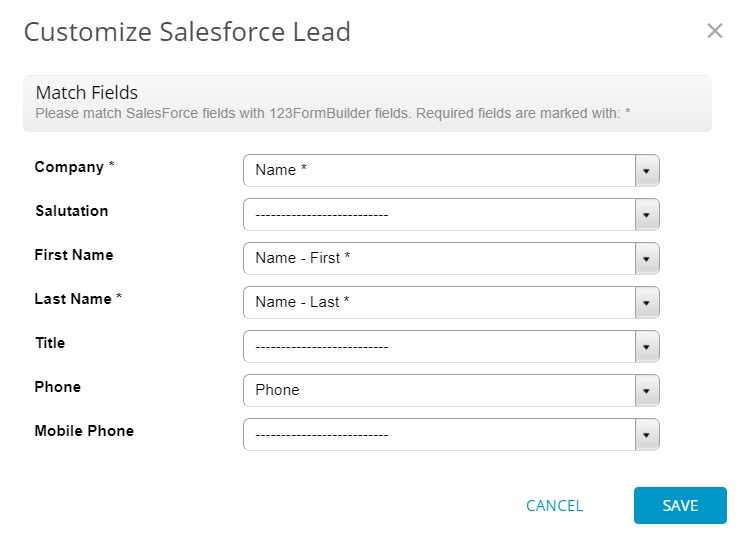
Then, select in the Create Object dropdown any of the available object types, according to the type of object you want to create: Lead, Contact, Note, Case, Account, Document, Opportunity, Event, Task, Campaign, Custom Object, or Attachment.
Click on the Customize button to specify how to manage user input. For example, in the Company dropdown, choose the form field where users specify what company they represent. This way, the company name will be placed in the corresponding Salesforce field.
Press Save, then Save again in the main Salesforce integration box to enable the application.
If you use more than one-page layout on Salesforce, make sure you use the dropdown in the customization lightbox to select the layout that contains the fields you need. To see what fields each layout contains, select the layout in the dropdown and scroll down to see the fields.
Important Note! Salesforce provides API access, which is needed in order for the two apps to communicate, starting with the Salesforce Enterprise service plan.
Enabling the Google Groups application will automatically add your submitters’ emails to your Google Group.
All you have to do is go to Integrations section, search for Google Groups using the search bar and click on Connect.
Type the name of your group and click Visit to make sure it’s the right one. Then select, in the dropdown list, the form field which contains your submitters’ email addresses and press Save.
The form users will receive via email the invite link to join your group.
If you encounter any issues with your group, make sure to check this article from Google. It contains the most common issues and their solutions.
The new Google Sheets integration
The Google Sheets integration allows you to send form submissions to Google spreadsheets. Before integrating with Google Sheets there are a few things that you should be aware of:
Do not delete any spreadsheet columns generated by your form fields. You can delete fields from your form but not their corresponding spreadsheet column in Google Sheets.
Do not reorder the columns in your spreadsheet. You can add fields to your form, but keep in mind that the newly generated columns will always be listed after the existing columns in the spreadsheet.
Selecting a group of cells and sorting/filtering data will break the integration.
If you want to pause data transmission to your spreadsheet, use the Enable/Disable toggle–do not remove your integration. Removing your integration and adding it again (even when using the same account) always generates a new spreadsheet.
Setting up your integration
In order to use the Google Sheets integration, you need to be on a Starter plan if you are on Wix, a Silver plan if you are on Weebly, or a Gold plan on all the other platforms.
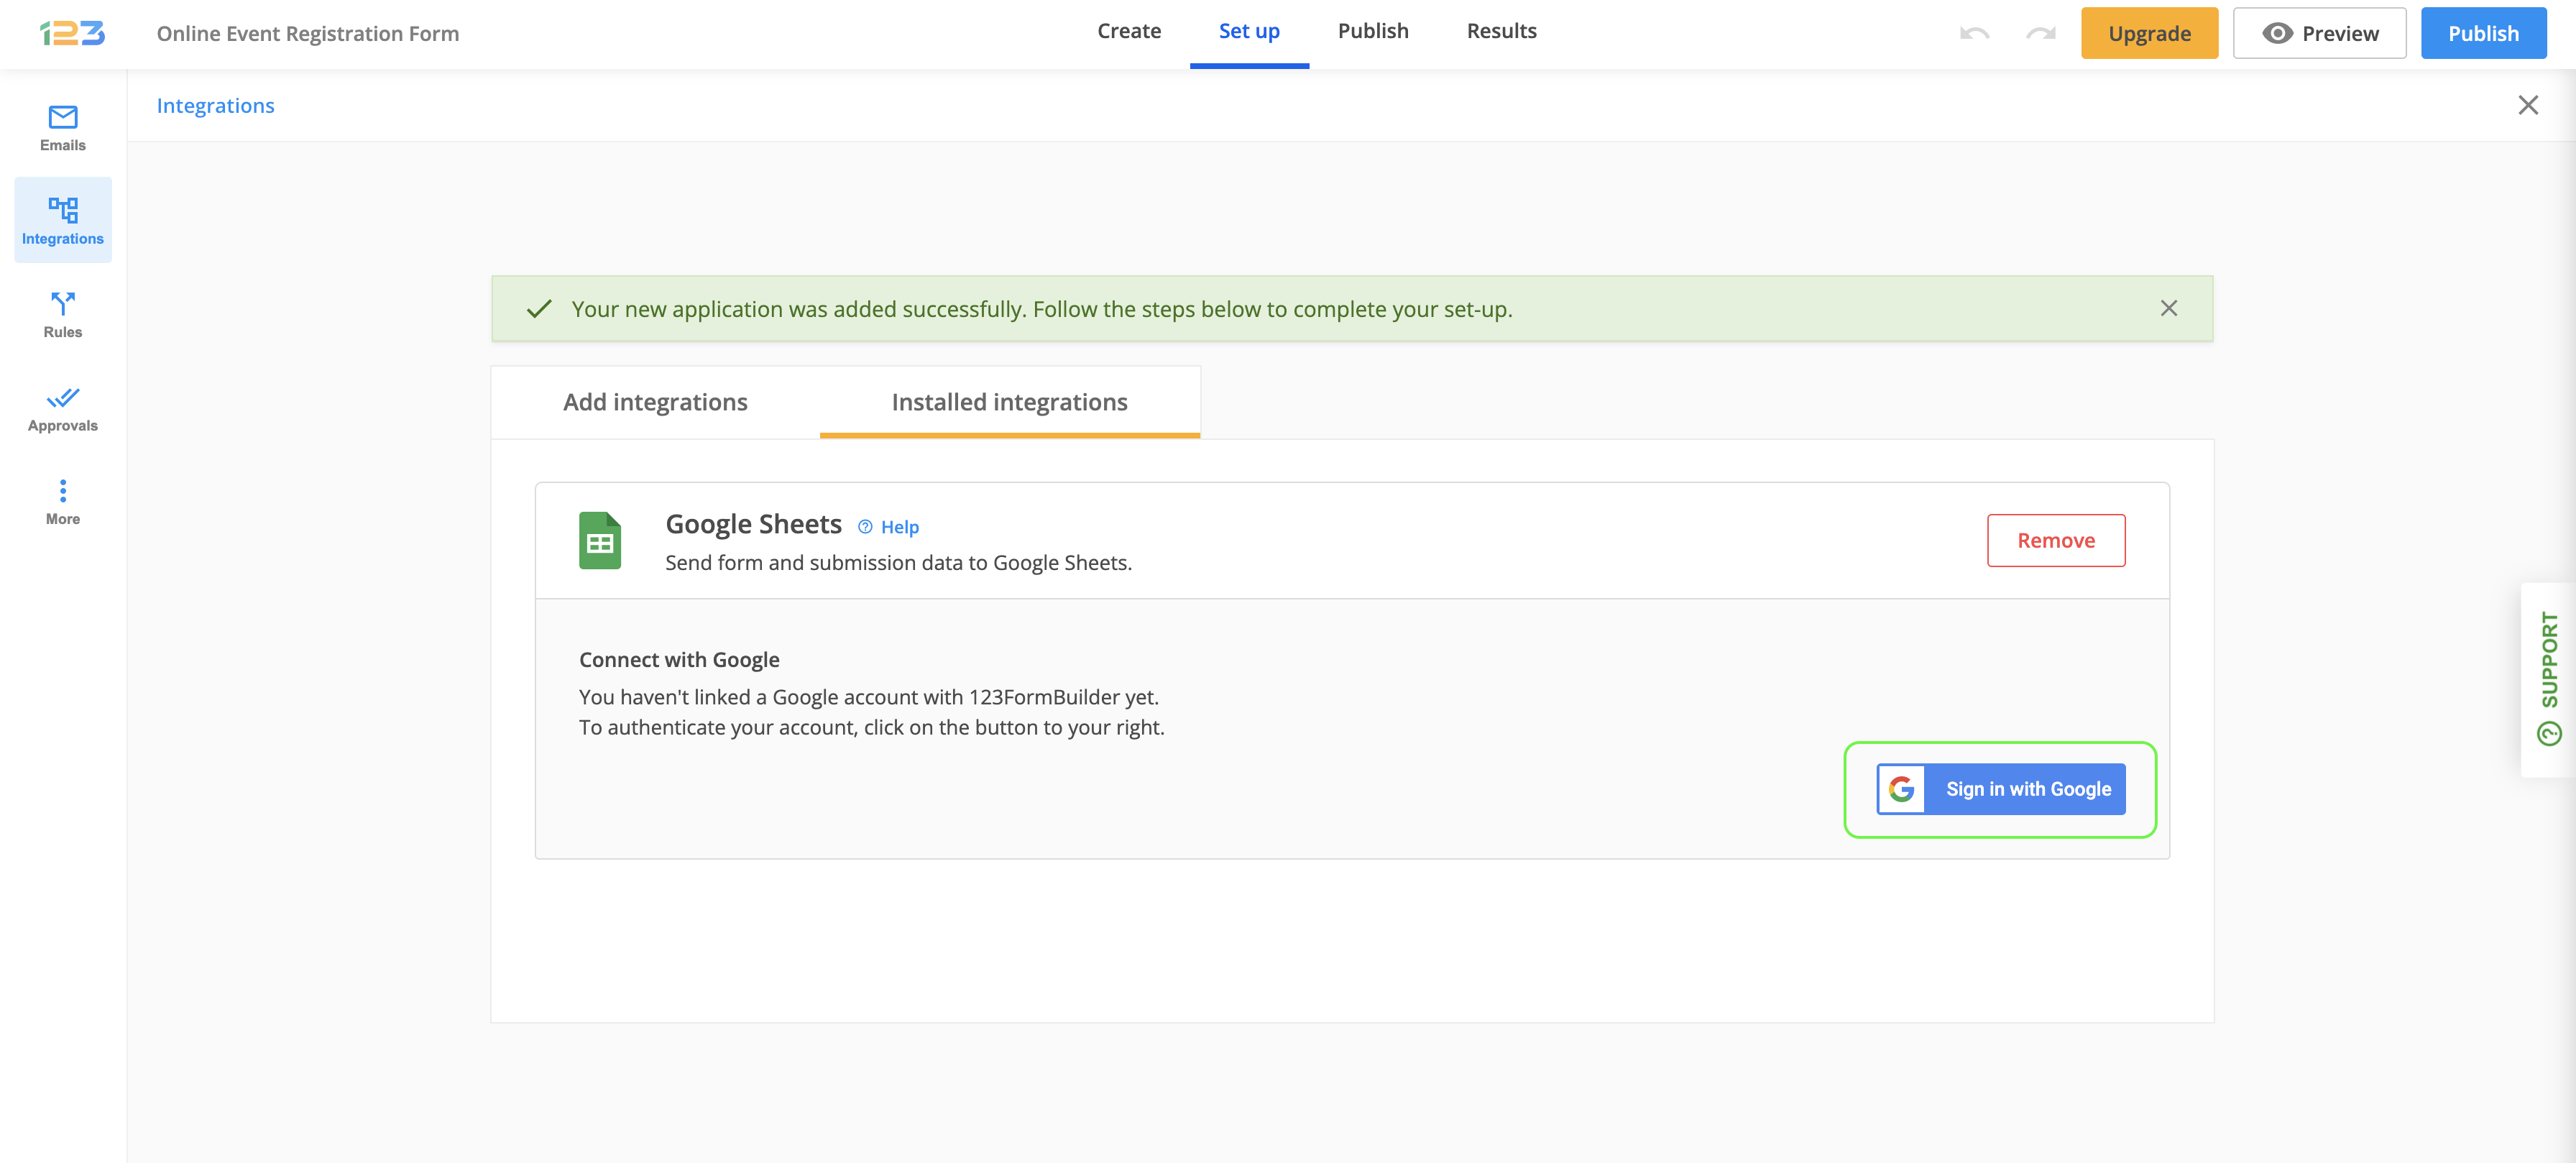
To add the Google Sheets integration to your form, open it in editing mode, then navigate to the Set up tab in the header bar. When in Set up, locate the Integrations tab on your left side menu and open the section. The Google Sheets integration is at the top of the listing on this page.
Add the application by clicking on the Connect button.
Authenticating a new account. Connecting a previously authenticated account
If you have never authenticated a Google account with 123FormBuilder before, you will be redirected to a screen where you can grant the necessary permissions to initiate the integration.
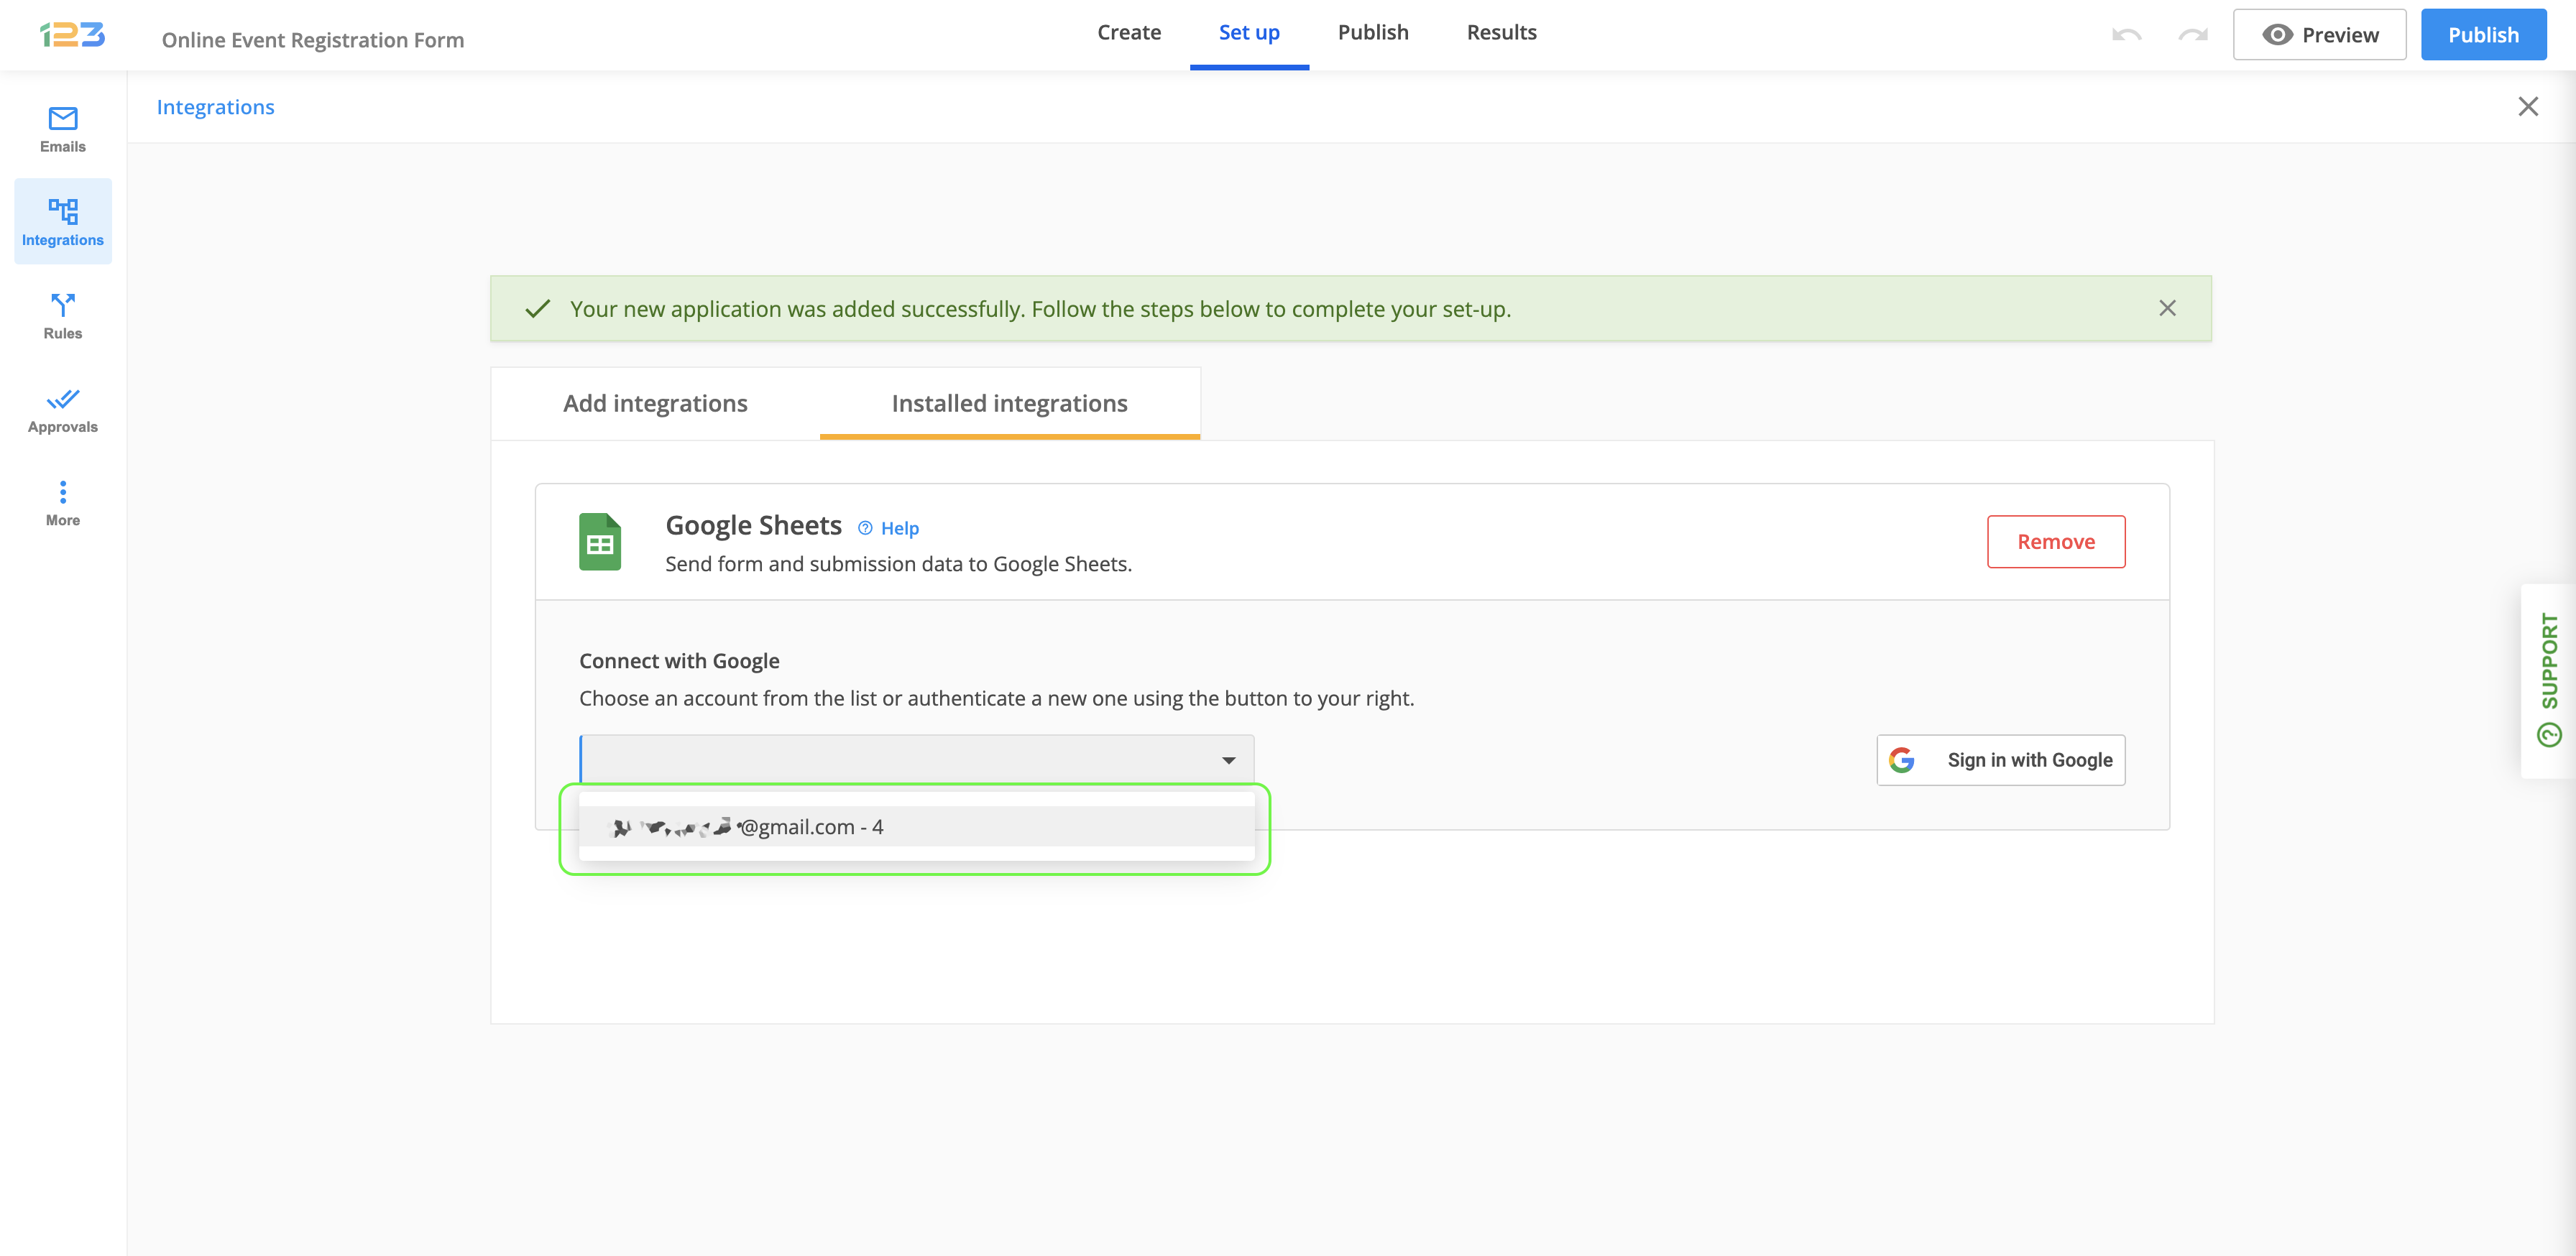
If you have Google accounts that have been previously authenticated with 123FormBuilder, you will be able to locate them in a dropdown menu on your left-hand side. The counter displayed next to the name of the Google account specifies the number of active connections on that specific account.
Clicking on any of the accounts in the dropdown will automatically initiate the connection, without the need of authentication.
However, if you want to connect a different account than those listed in the dropdown, you may do so by clicking on the Sign in with Google button on your right-hand side and begin the authentication flow for that specific account.
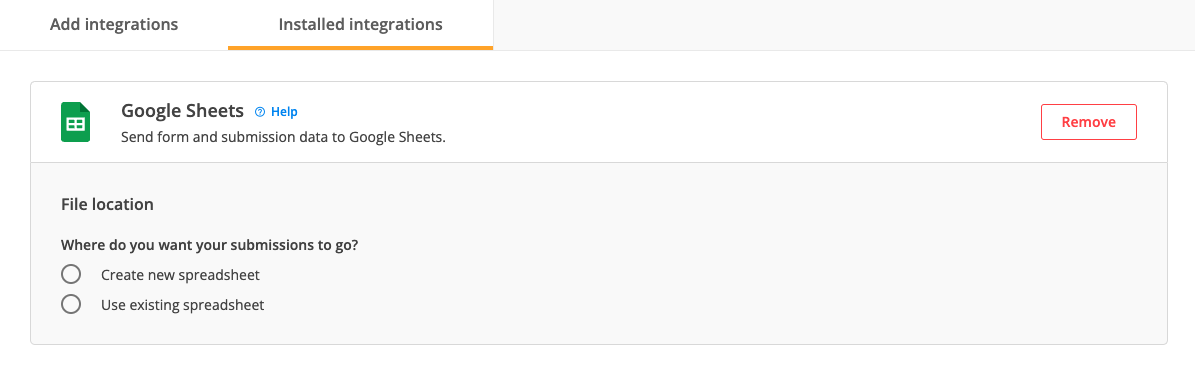
Activating your integration
After the connection between your Google account and 123FormBuilder has been created, the next step is to choose the file location: whether you want to create a new spreadsheet or use an existing spreadsheet.
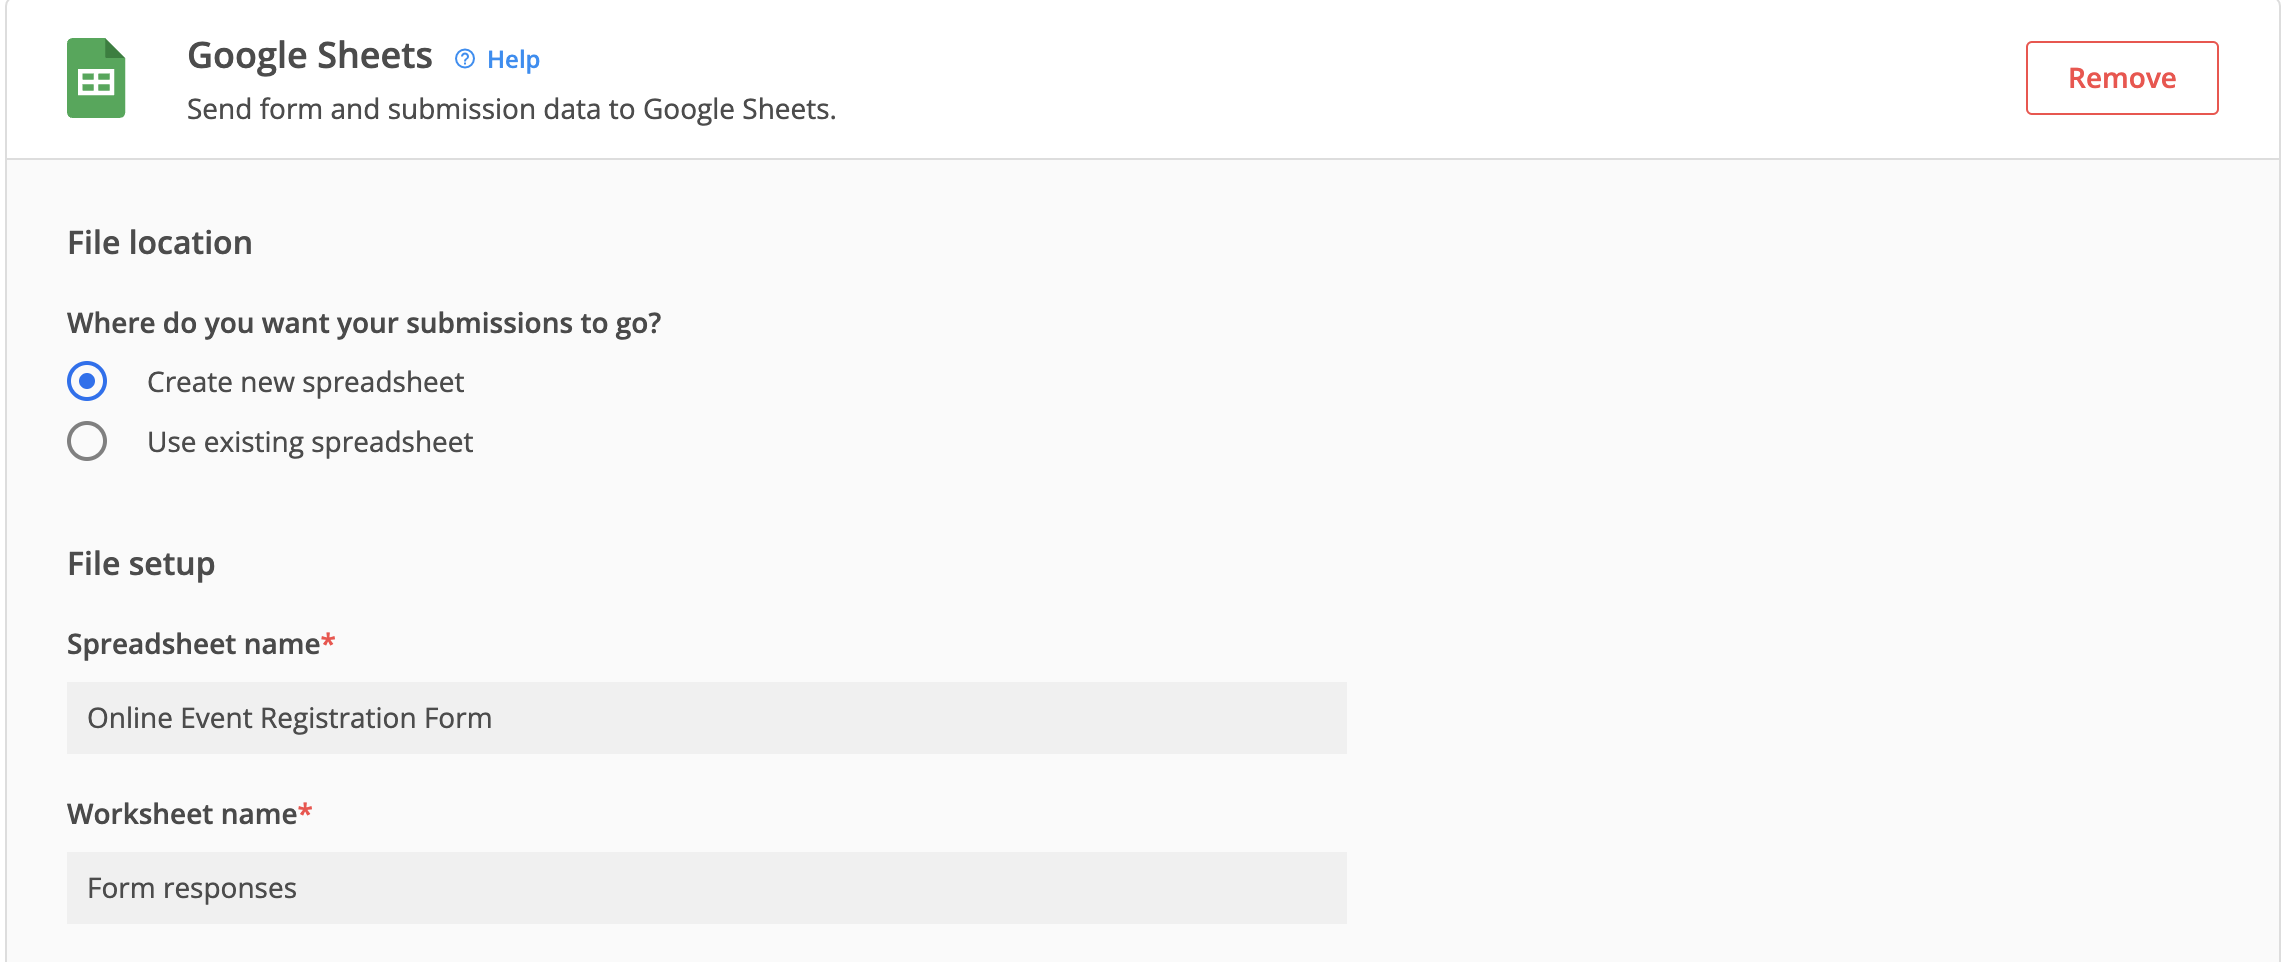
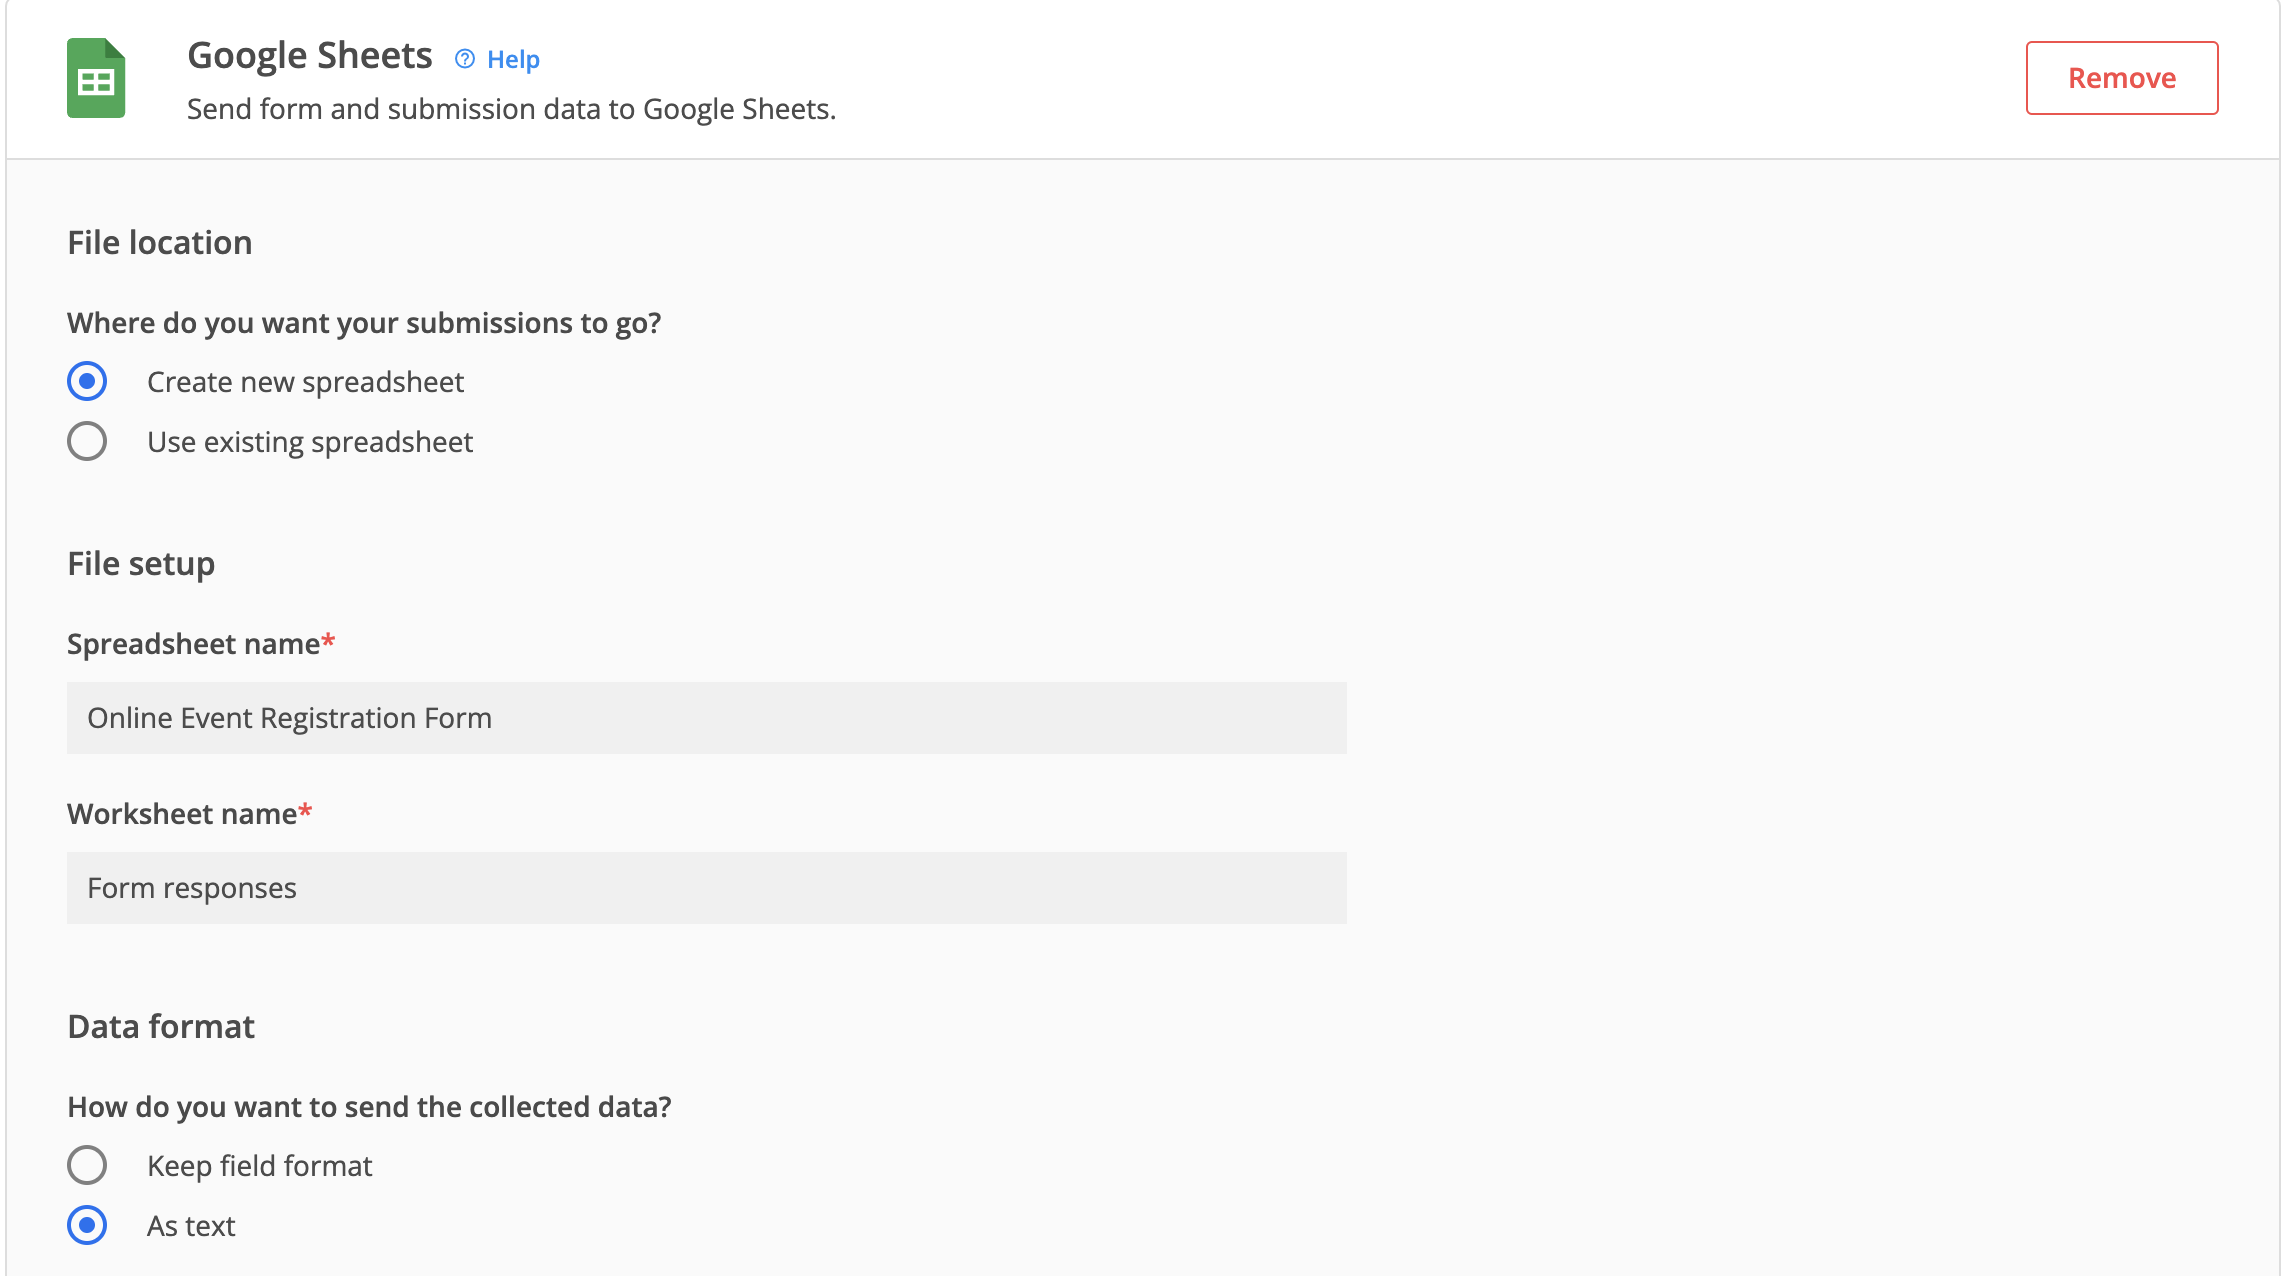
Create new spreadsheet
When choosing to create a new spreadsheet, the next step would be the File setup.
By default, the spreadsheet name is the same as the form’s name, but you can easily change that by clicking within the text input. The worksheet name is by default set as Form responses, but that is editable.
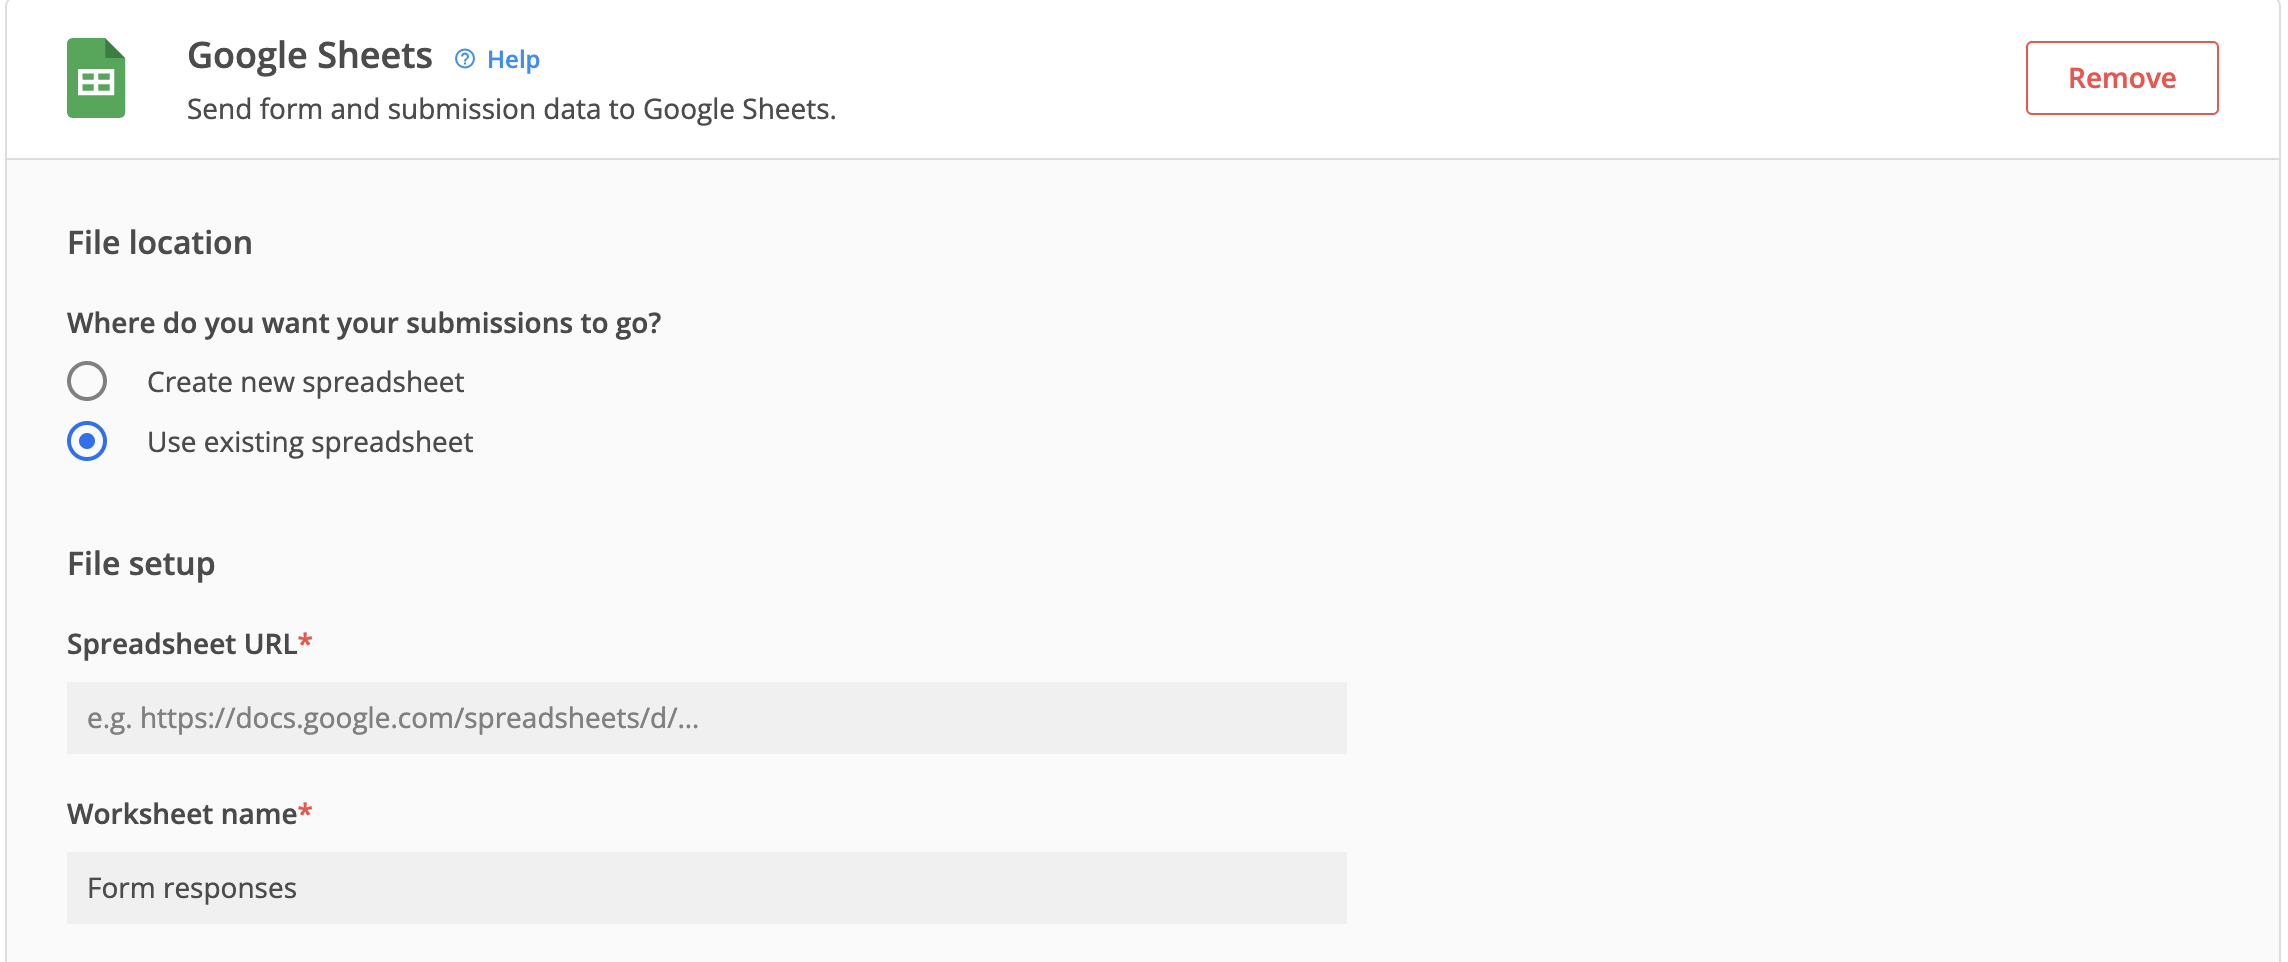
Use existing spreadsheet
When choosing to use an existing spreadsheet, you will have to provide 2 details. The first one would be the spreadsheet URL. You simply have to take the URL of your spreadsheet and paste it in this input text box.
The second detail needs to be the Worksheet name. By default, it would be named Form responses.
Note: let’s say you already have a worksheet named Form responses within the same spreadsheet. When clicking Save, you will receive an error that a sheet with the same name already exists.
Data format
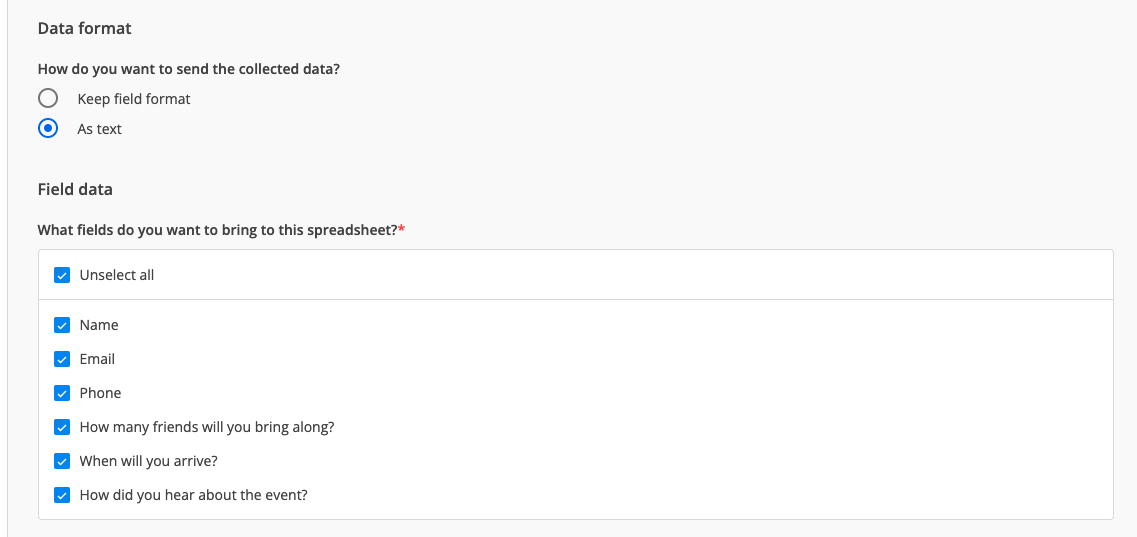
The next step would be to choose how you want to send the collected data. By default, the data is sent as text, but you can choose to keep the field format.
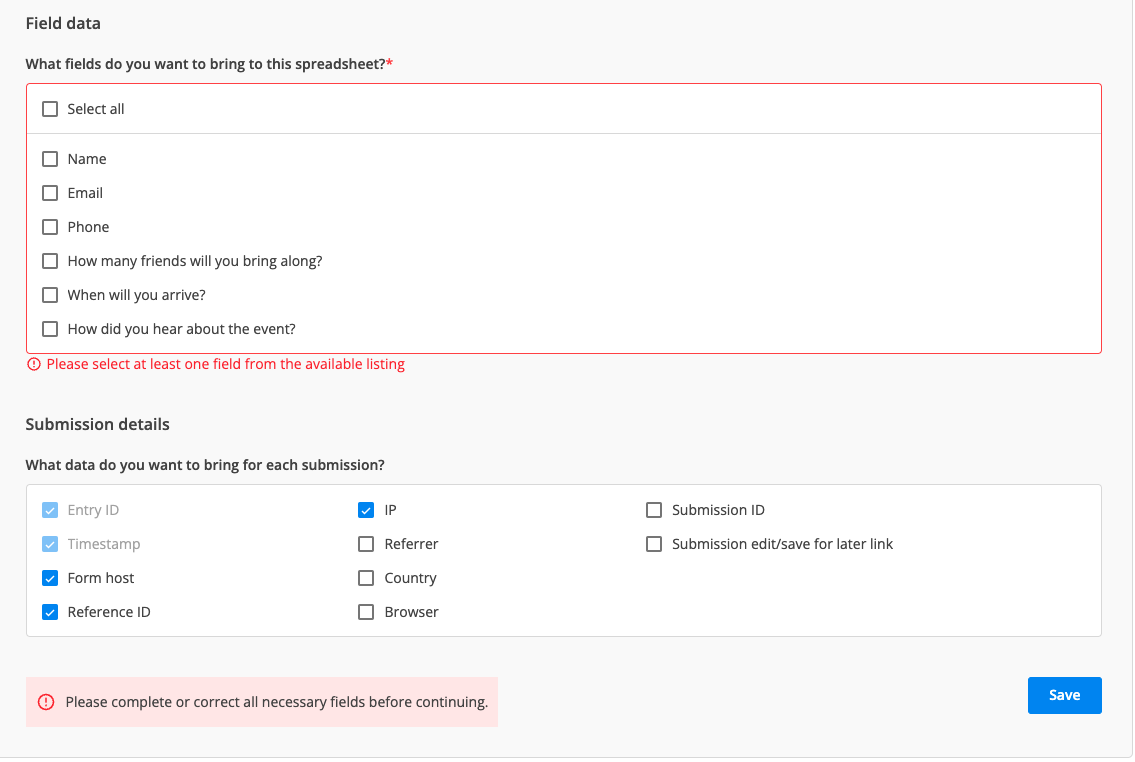
Field data
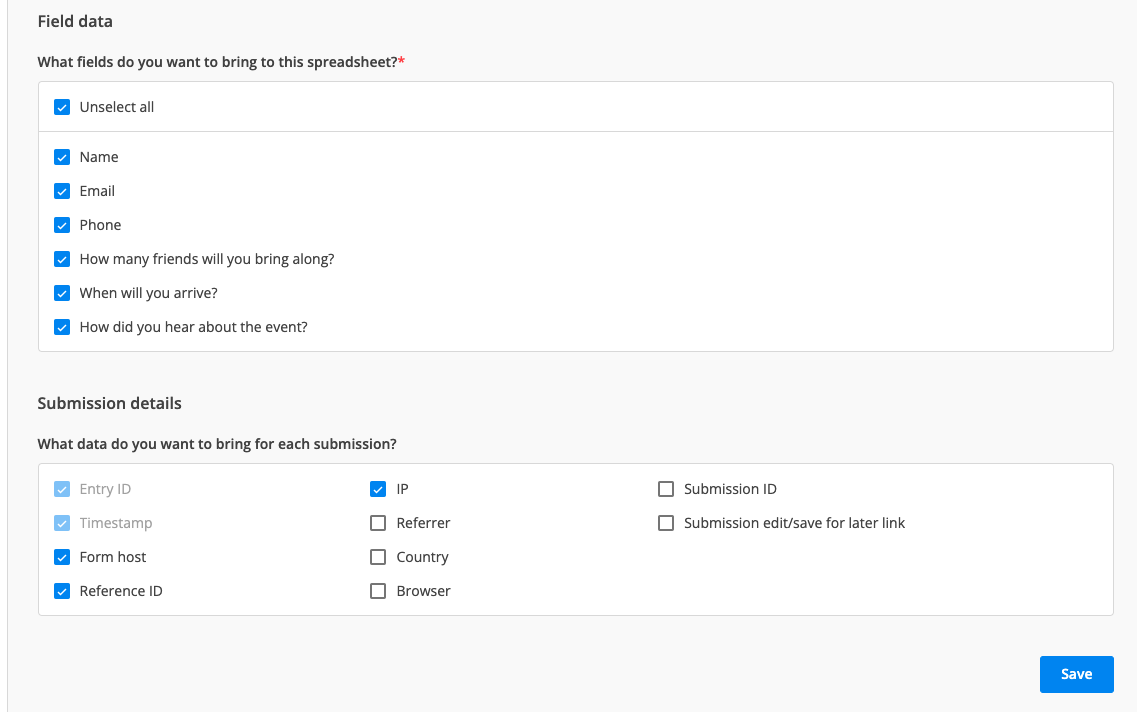
By default, all fields from your form will be selected. You can customise this according to your needs and click on Save.
The next step is to select which fields you want to send out to your spreadsheet.
Submissions data
Going further, you can customise what type of submissions data you want to send to your Google Sheets.
You have a variety of data to choose from, but what is important to notice is that Entry ID and Timestamp are checked by default and they can not be edited. These variables will always be sent to your Google Sheet.
Notes
You can not save the Google Sheets integration without having at least one field selected from the form. Whenever you see the error Please complete or correct all necessary fields before continuing, keep in mind that there is an error within your setup – you either did not select at least one field, there hasn’t been a spreadsheet/worksheet name provided or an URL.
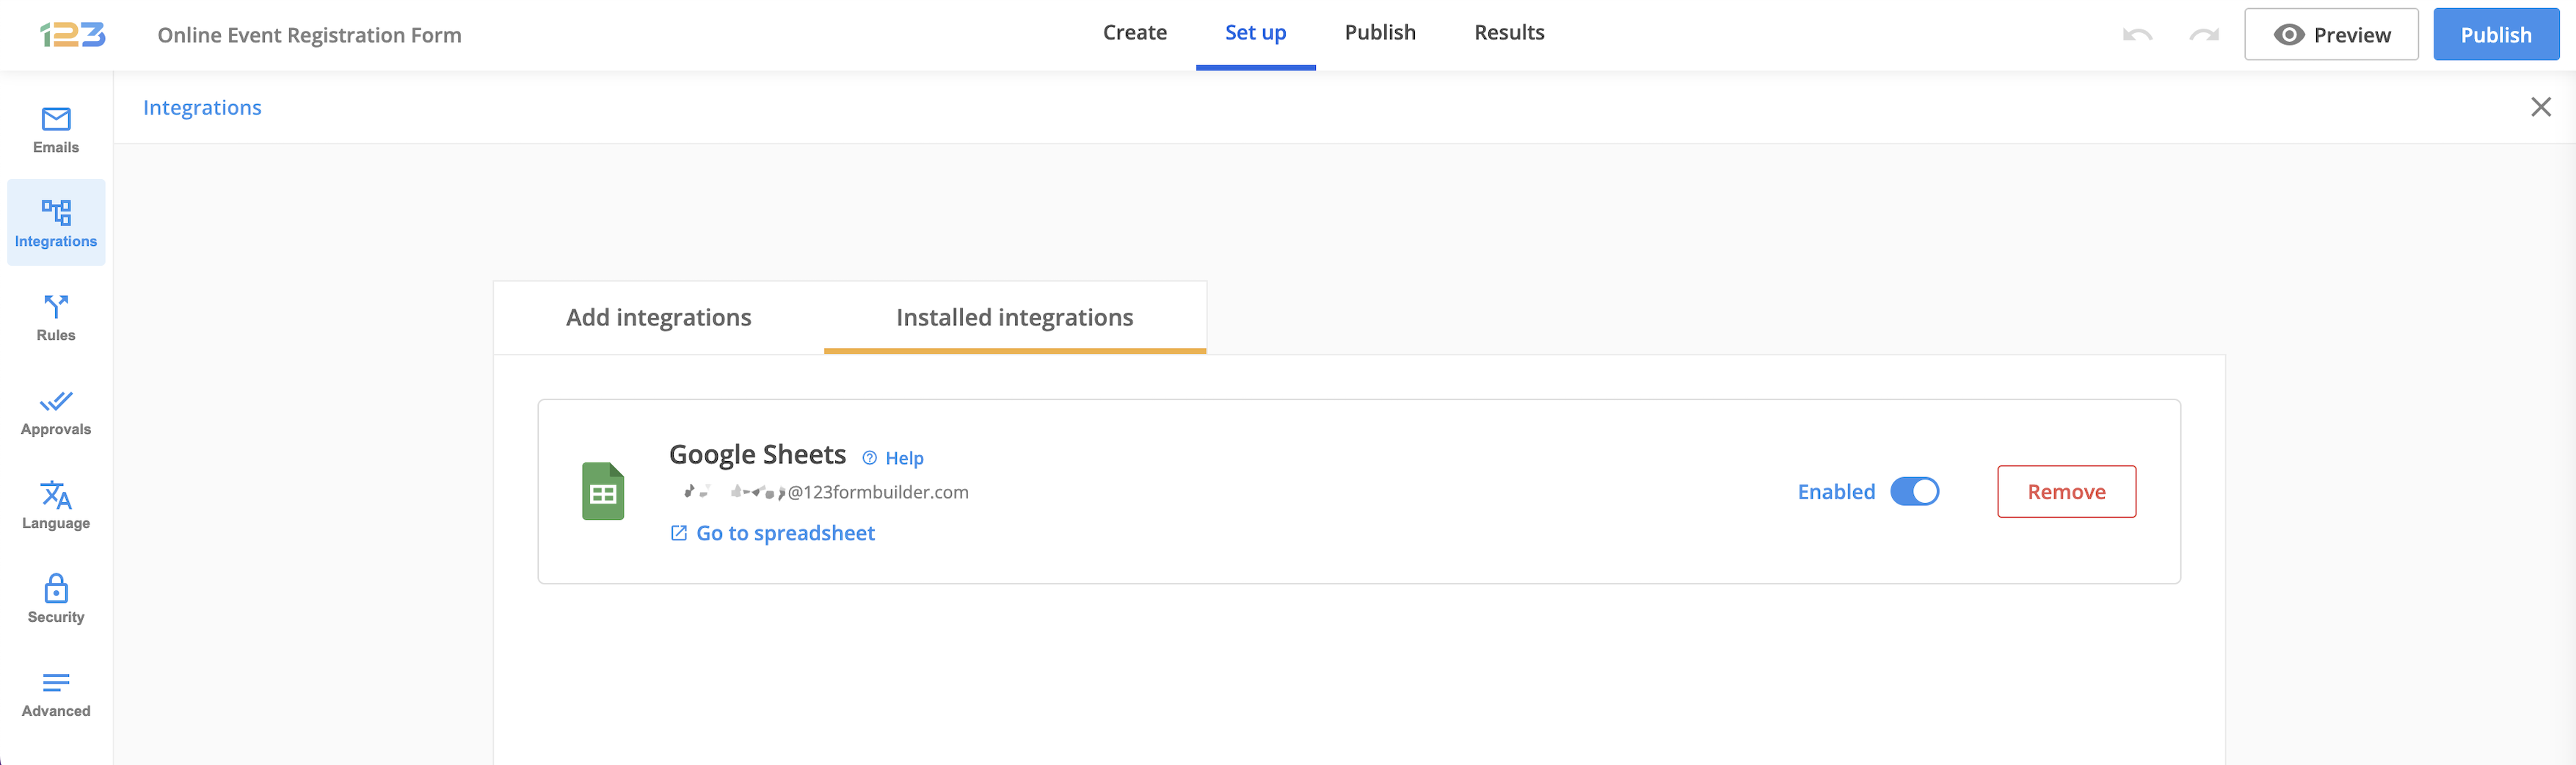
Installed integration management options
After you activate the integration with Google Sheets, and whenever you return to the Installed integrations tab, you will see the screen listed below, where you can find several options for managing your enabled integration.
1. Viewing your spreadsheet
The spreadsheet will be blank until the first submission after activating the integration is made. After this first submission is sent to the spreadsheet, then the form fields and additional submission data (e.g. timestamp, entry ID, form ID, reference ID, form host, IP) will generate the column header row, while each new submission will be collected on individual rows, according to the categories set in the column header row.
2. Pausing your integration
If you want to temporarily stop sending submission data to the spreadsheet, you can switch the toggle available on your installed integration management screen to the Disabled position and data transmission will be paused.
When you are ready to resume collecting data, just switch the toggle to Enabled and all the submissions collected from that moment onwards will be sent to the same spreadsheet you used before.
Please note that all the submissions made during the time the integration is paused can only be retrieved manually, in case you change your mind and want them sent to the spreadsheet.
However, make sure that you add the information to new empty rows and avoid adding any new columns, as this will break the integration.
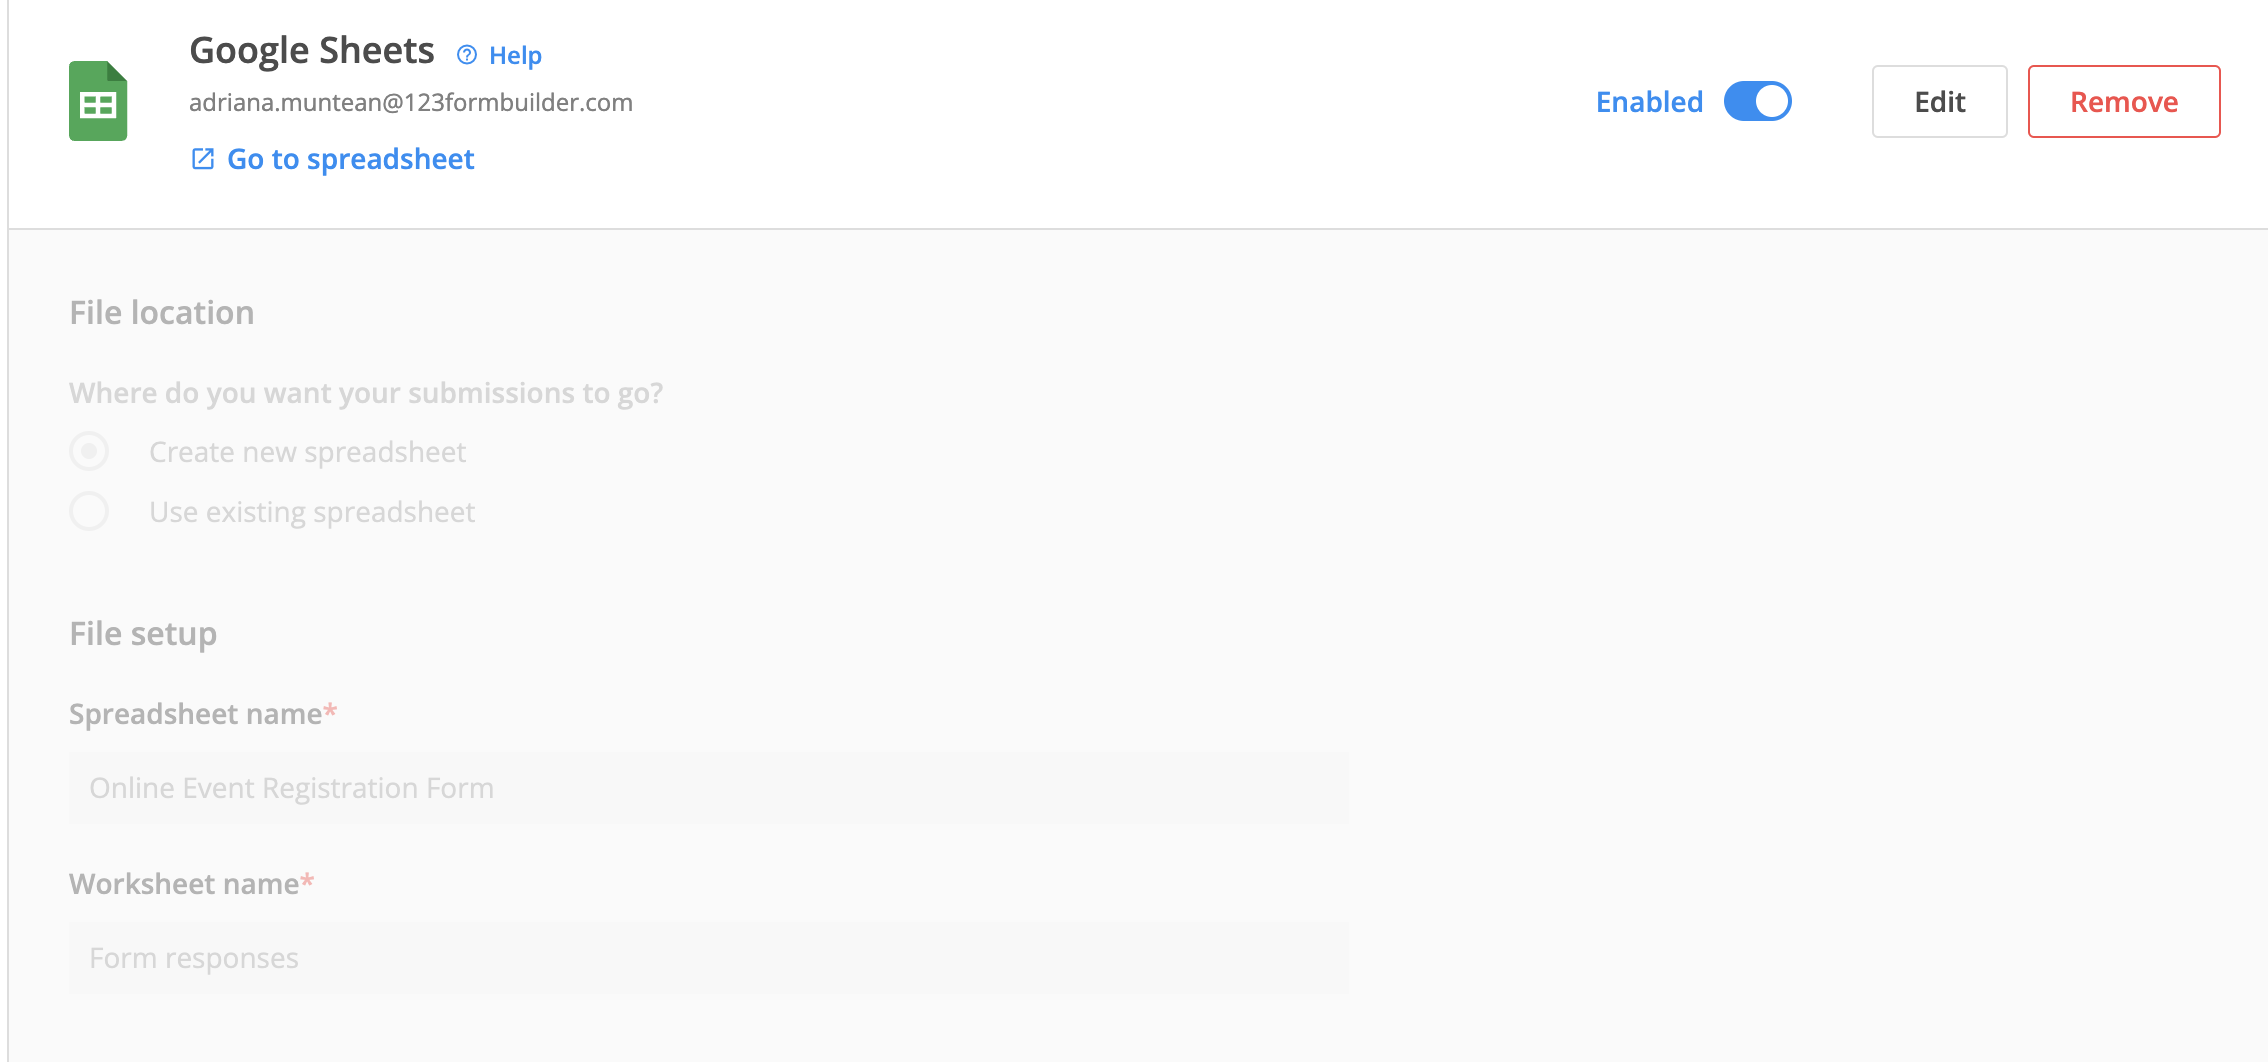
3. Editing your integration
You can easily edit the Google Sheets integration by clicking on Edit button.
Once you click Edit button, you’ll notice that the File location & File setup are greyed out – these can not be modified.
4. Removing your integration
You can end the integration between your form and the Google spreadsheet at any point during the set up flow by clicking on the Remove button available in the integration header, or when active, by clicking on the same button in the installed integration management screen.
Removing the integration and adding it again always creates a new spreadsheet, no matter if you connect a previously disconnected account. The connection with any old spreadsheet can not be restored.
I have a set-up created on the previous flow, where the integration is installed while my Google account is disconnected. What happens on the new flow, where I can’t see the integration anymore in the Installed tab and the Disconnect/Connect account option is no longer available for me to reconnect my account?
On the Add integrations screen, locate the Google Sheets integration and click on the Connect button. In the next screen–as shown below—, simply select the account you want to reconnect from the list and click on it.
Your integration will be automatically activated and you will be taken directly to the Installed integration screen, where you can manage your active integration.
From now on, please use the available options to manage your integration:
enable/disable the integration, which pauses data transmission but keeps the connection to the same spreadsheet;
remove the integration, which terminates data transmission and the connection to the spreadsheet. After using the remove option, a new spreadsheet will be generated each time you connect, no matter the account.
Is there any way to import previous submissions to the Google spreadsheet?
The Google Sheets integration will start sending the information submitted via the form to the spreadsheet only after it has been activated.
At the present moment, we cannot import any submissions made prior to that. What we can recommend in this case is to export your submissions to CSV, copy the older submissions, and paste them into your spreadsheet.
However, please make sure that you add the information to new empty rows and avoid adding any new columns, as this might break the integration.
Can I upload files to Google Drive using the Google Sheets integration?
You can’t upload files to your Google Drive using the Google Sheets integration.
If you need to upload files via a form, you need to use the file upload field. The files uploaded using this type of field will show up in the Google spreadsheet as hyperlinks. From there you can download them.
If respondents update their submissions, will the information be updated in the Google spreadsheet, as well?
The Google Sheets integration only sends information over to the spreadsheet on the initial submission. Editing an existing submission will not trigger a new one, therefore the updated information will not be sent over through the integration.
The form would need to be resubmitted with the update info in order to generate a new row in the spreadsheet.
Can I change the Google spreadsheet name?
The Google spreadsheet can be renamed.
Can I move the Google spreadsheet to another folder?
The Google spreadsheet can be moved to another folder.
My Likert scale field does not have all the statements sent to Google Sheets. What is going wrong?
Currently, we are experiencing some difficulties with the likert scale field sent to Google Sheets. If you have statements from your likert scale missing in your Google Sheets, we recommend going to your Google Sheets integration and edit it by unchecking, then checking the likert scale field and saving the integration once more.
We do understand that this is not the optimal way of doing things, but we are working on improving the flow so we could help you automate your workflows.
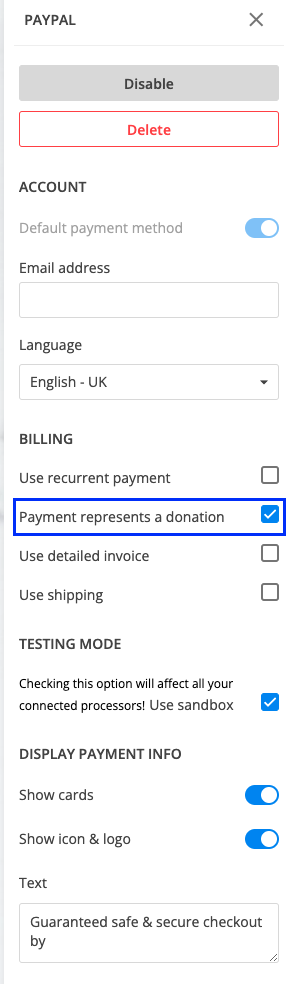
When you use the PayPal integration on 123FormBuilder for your online donation form, make sure to tick the option Payment represents a donation, as well. This way, the payment will be recognized by PayPal as being a donation.
Create your form and add a Number field, which will represent the donation box, and set it as required, if needed.
Assign to your Number field the value 1. For more details about how to assign prices to your form field, check out this article.
Do not assign negative values to your fields. Negative values aren’t recognized by PayPal.
That was it! Now people will be able to donate from 1 dollar, euro, or whatever currency you have set up.
The recurrent payments option will not work with donation forms. The two options can not be enabled on the same form.
123FormBuilder provides a very simple way to receive payments with your own PayPal form. You will be able to accept donations, orders, and subscription fees in no time. Just follow the steps below to set up the PayPal integration for your form.
Setting up the PayPal integration
1. Click New Form from your account dashboard and start creating your payment form.
You can use choice fields (single/multiple choice and dropdown lists) to display the products on sale or, even better, Product field. Add a Price field or a Number field if you wish to let customers specify the amount they want to pay. With 123FormBuilder, you can also create subscription forms for newsletters and other services.
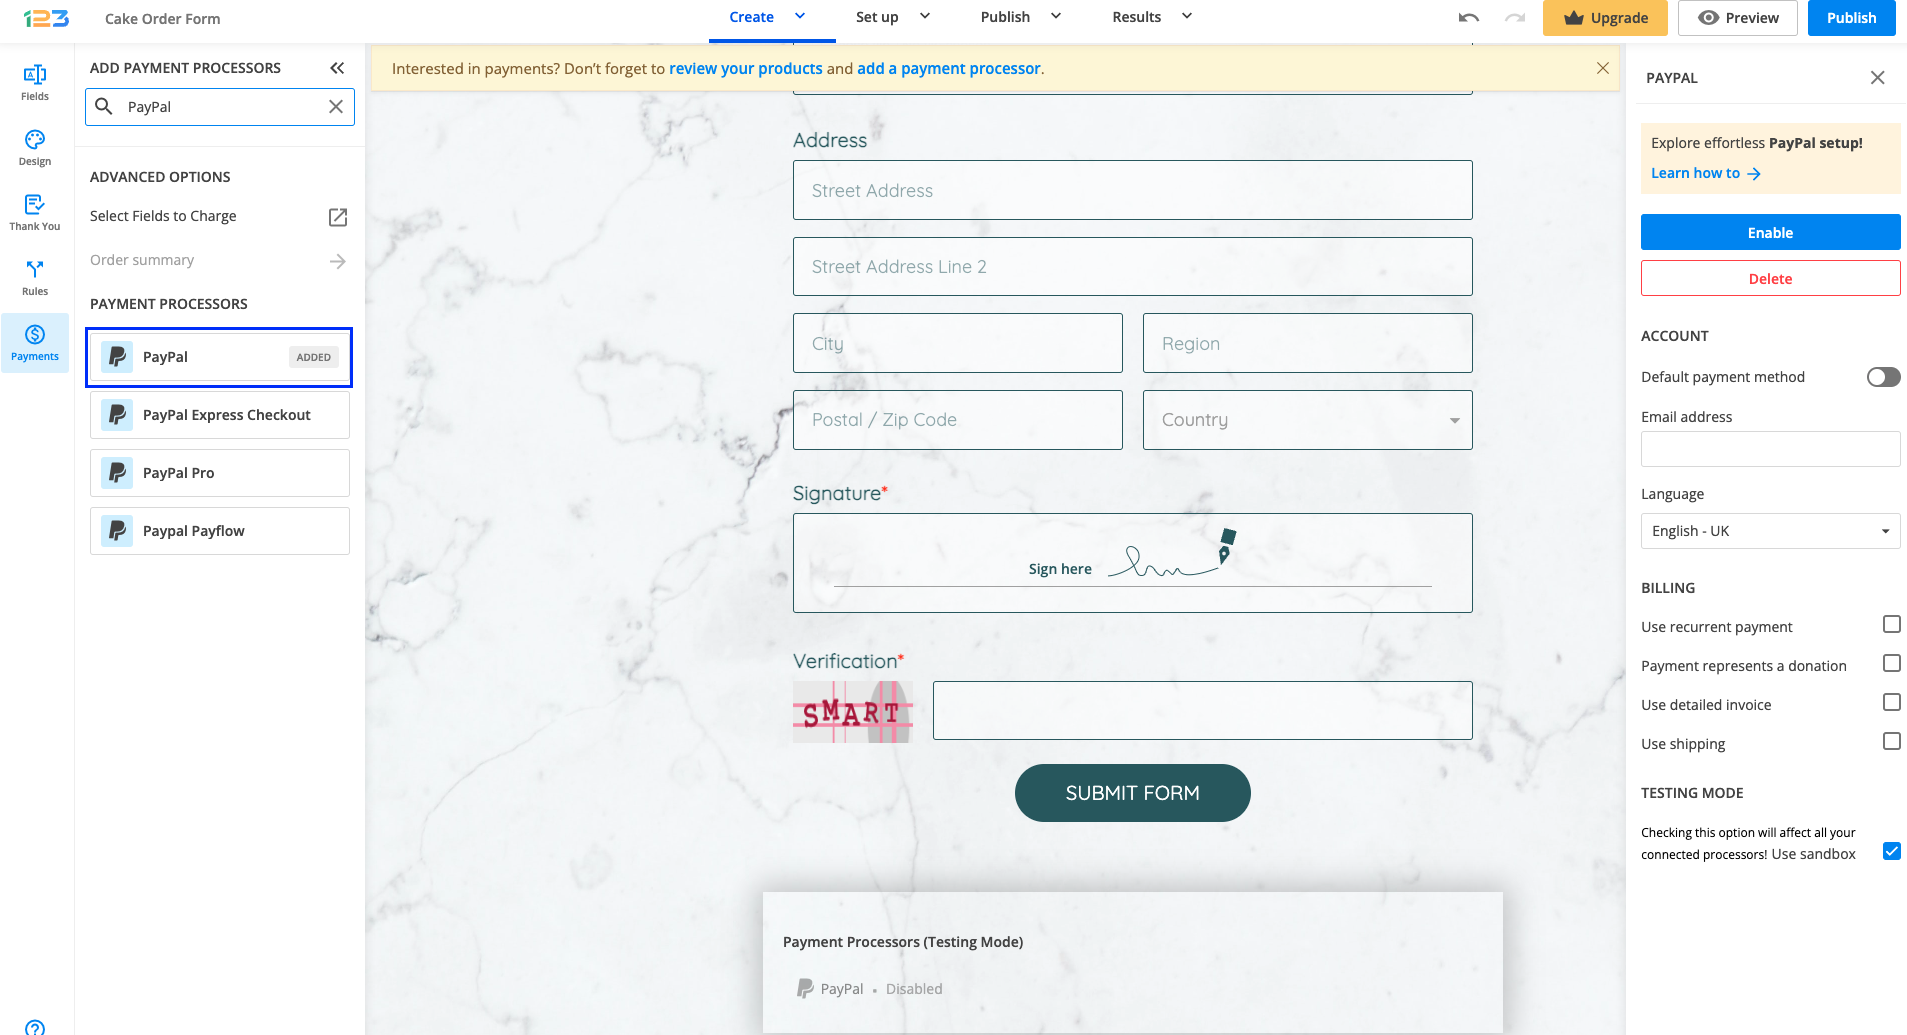
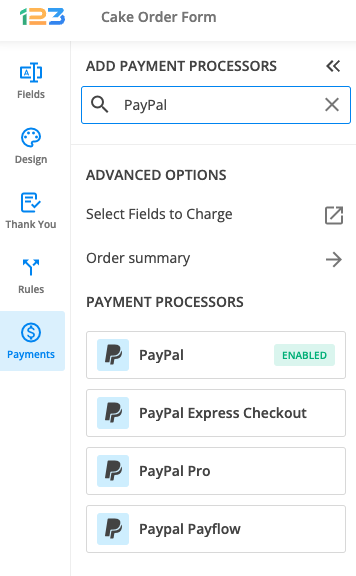
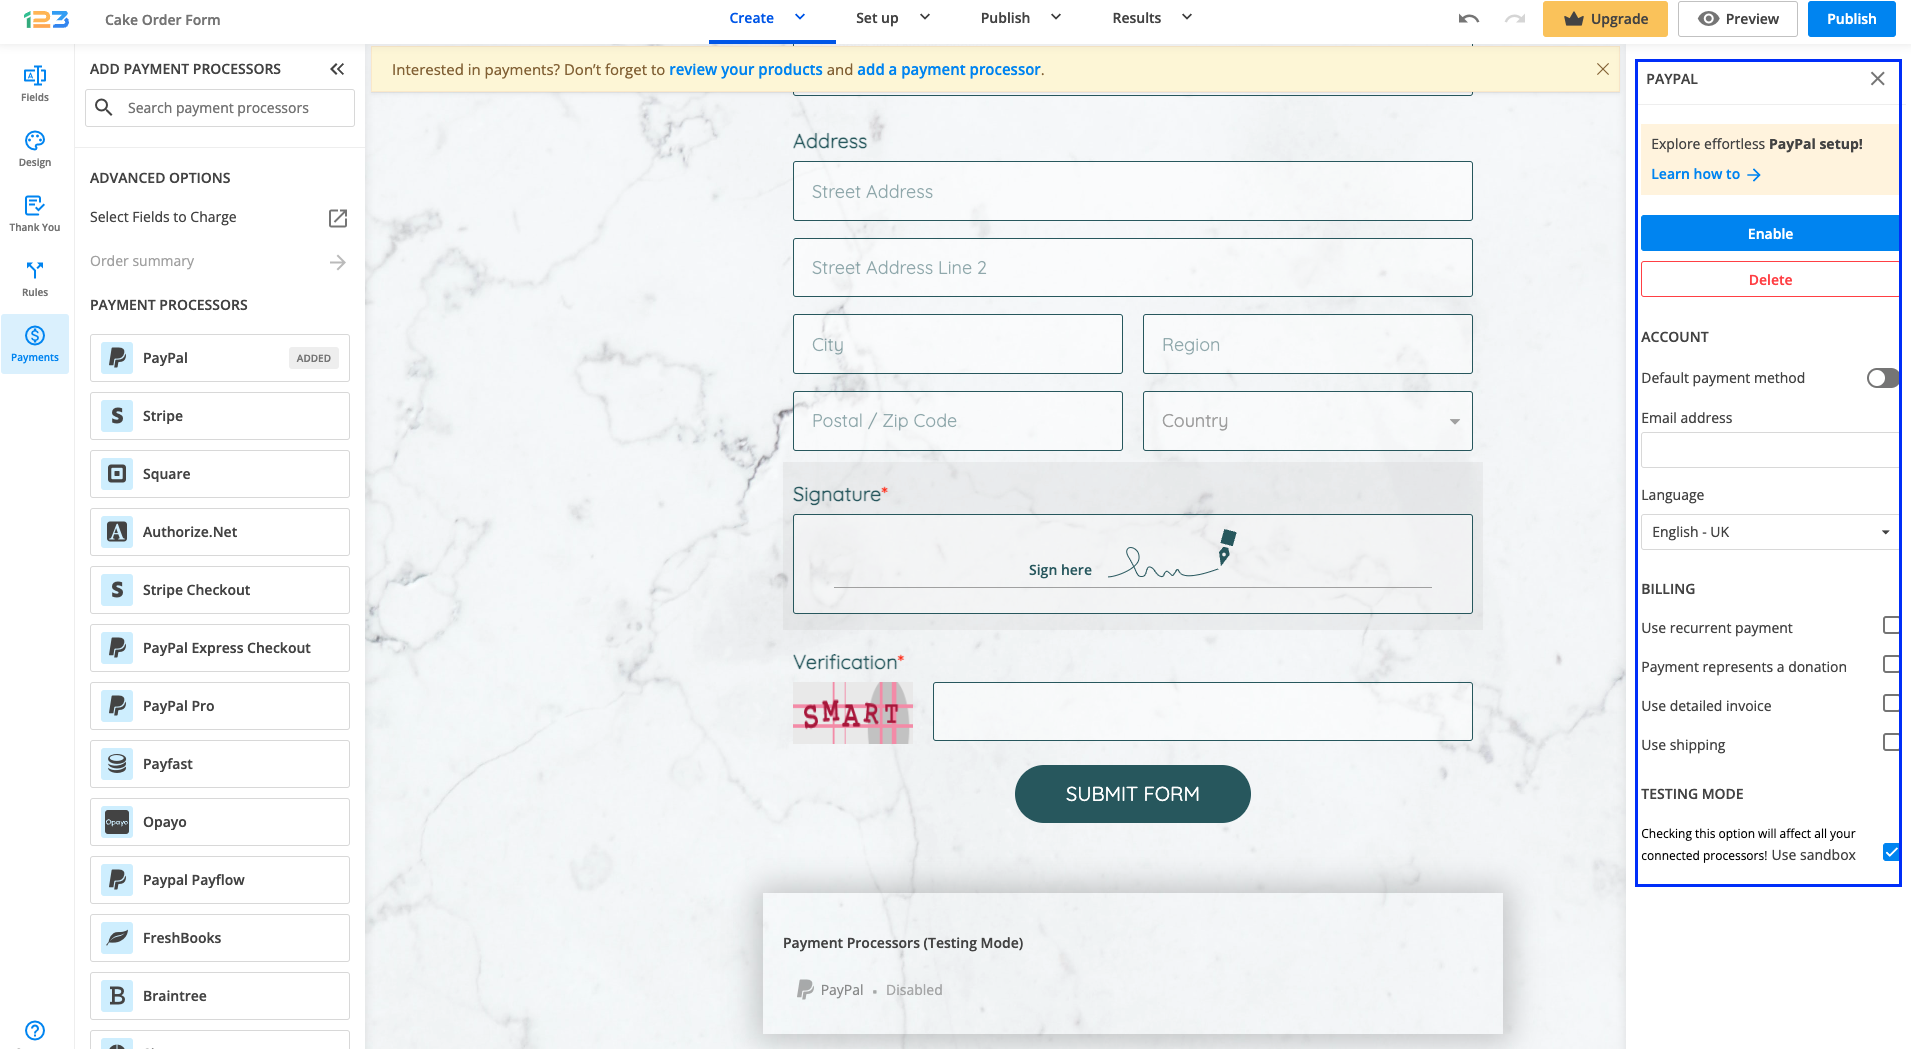
2. In your Form Editor, in the left side panel, you will notice the Payments section. By using the search bar, you can quickly find PayPal.
3. After adding PayPal on your form, you will notice a couple of changes: the PayPal payment processor has a tag near its name & the settings panel opens up to the right side of the page.
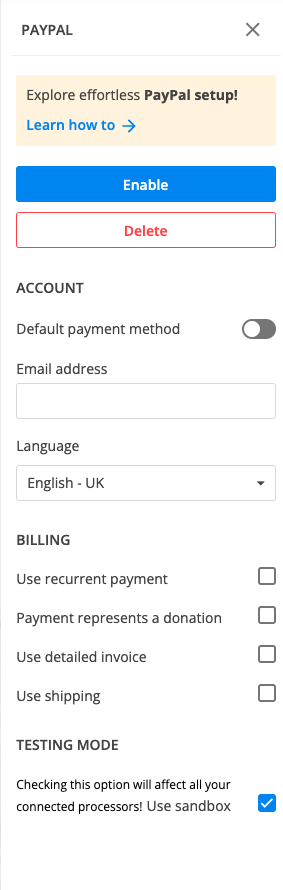
4. In order to set up the PayPal integration, you have to enter your PayPal email address and choose your preferred language from the dropdown list.
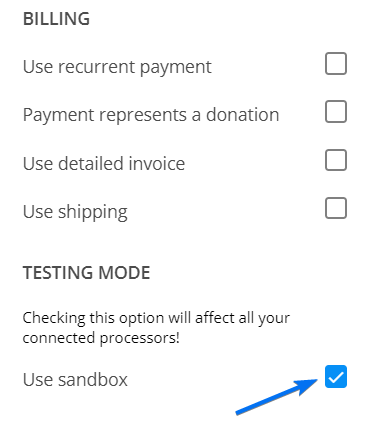
To test your PayPal integration with 123FormBuilder, you’ll need a sandbox account on PayPal. If you do not have one, go to https://www.sandbox.paypal.com to create one. Type in the email address of your sandbox account instead of the live account and tick the Use sandbox option on the bottom page.
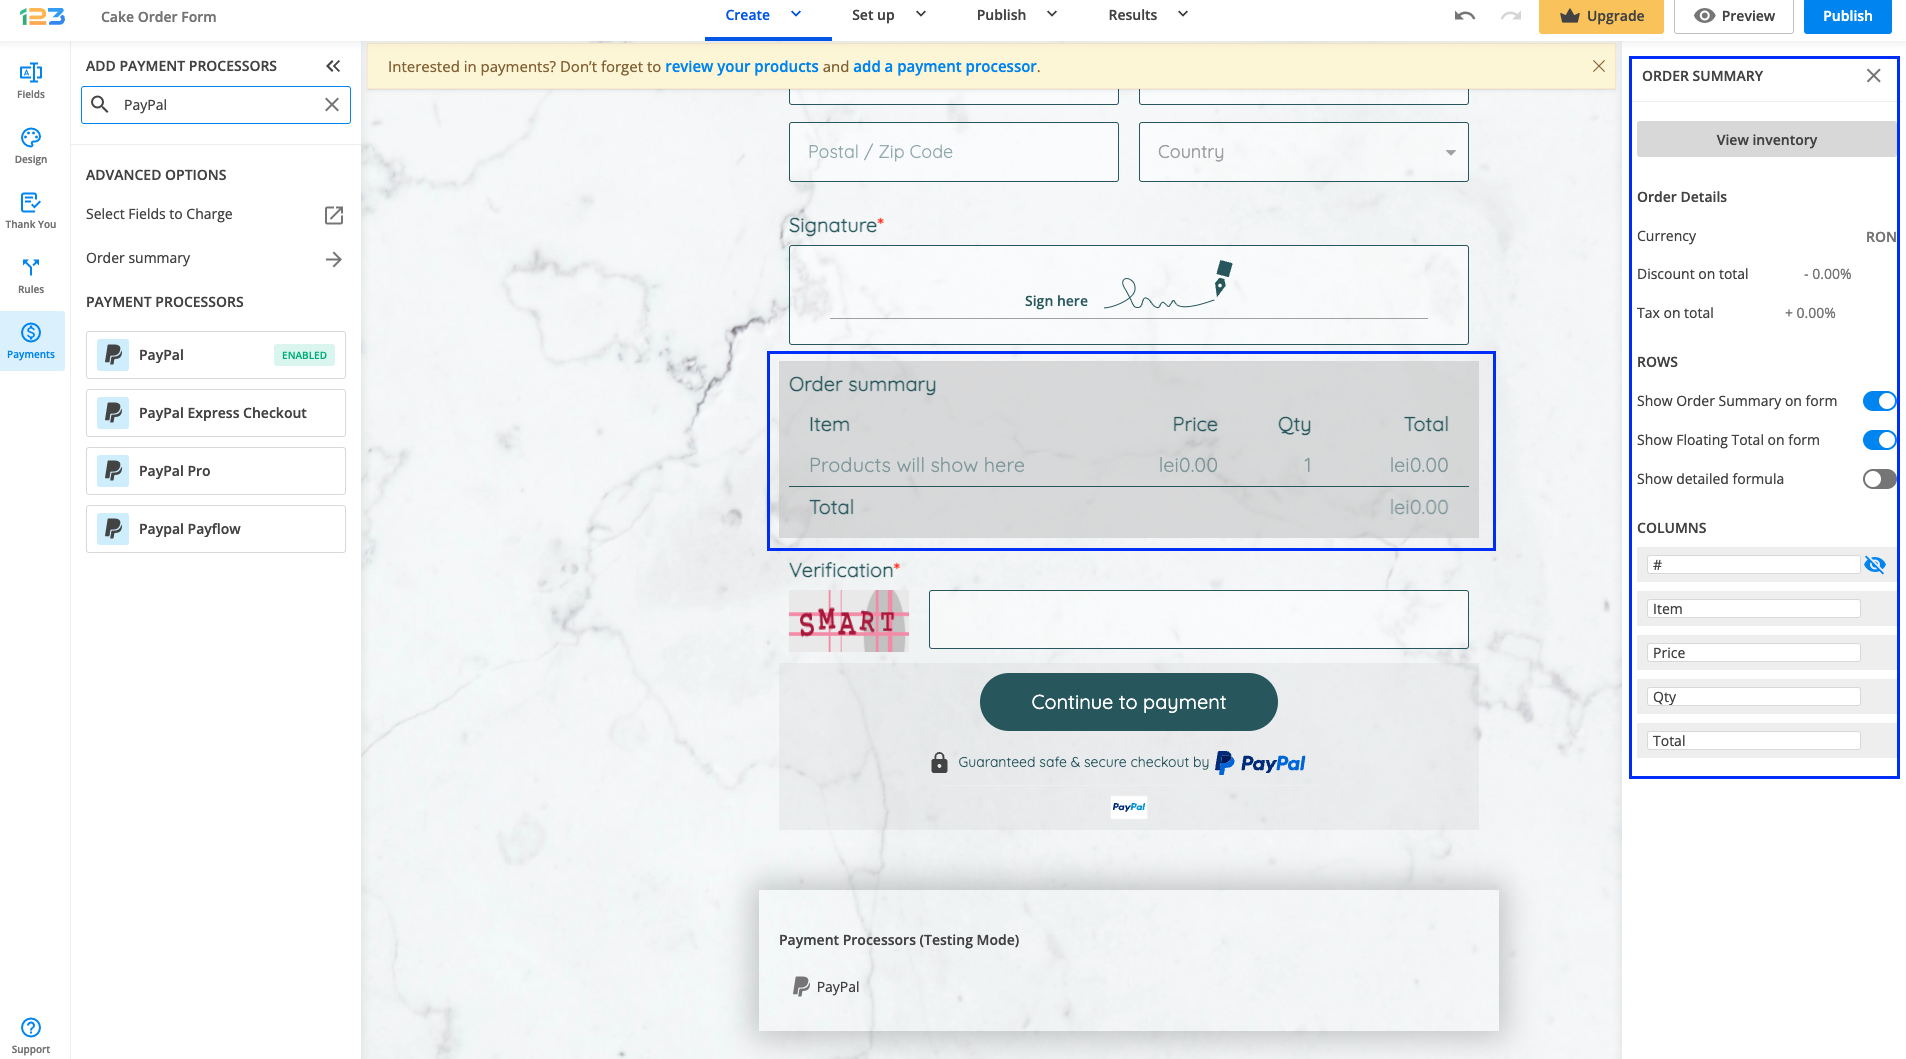
5. Enable the payment integration by clicking on Enable button. By enabling PayPal, you will notice a couple of changes on your form. The PayPal payment processor on the left side panel has an Enabled tag on it so you could easily scan which payment processor is enabled.
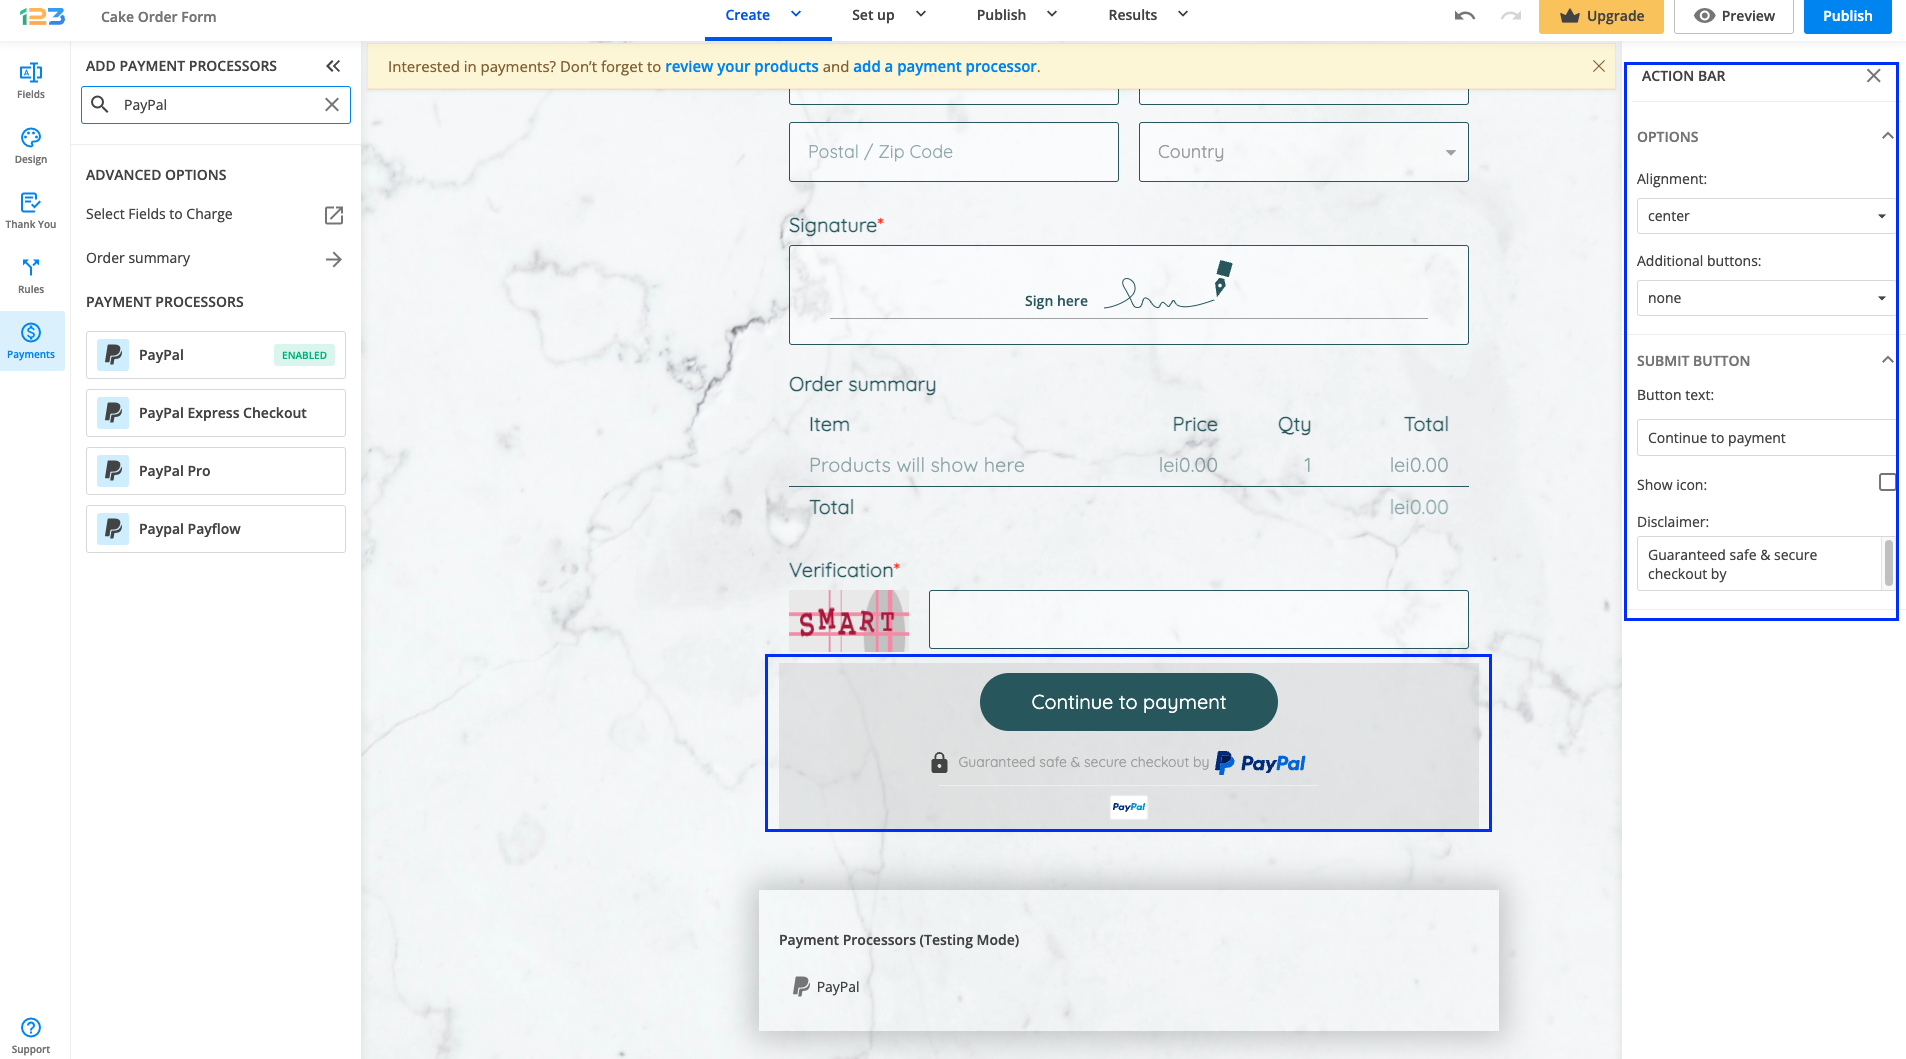
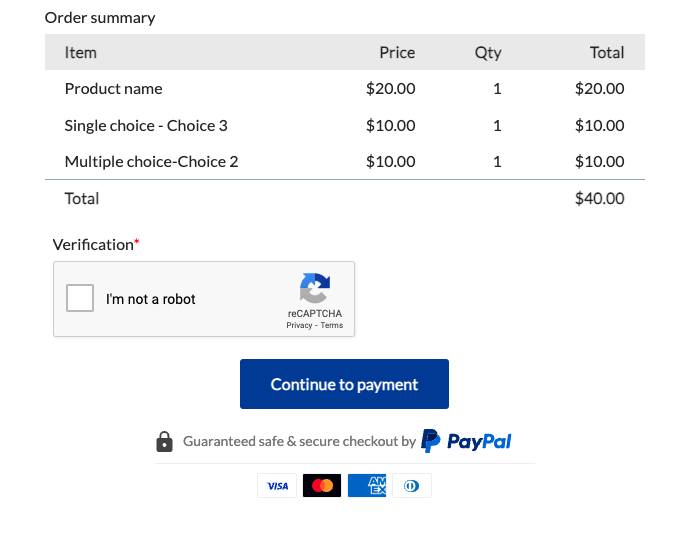
Another change is that on your form it will be displayed an Order summary. Here will appear all the products your respondents select on the form, together with the price per option, quantity and the total price. If you want to customize the order summary, all you have to do is click on it and the available settings appear on the right side panel.
Another change is related to the Submit button. Once your payment integration is enabled, the Submit button is changed to Continue to payment. Below it, we are displaying a disclaimer together with the PayPal logo so that respondents are aware they are proceeding to a payment.
Also, the accepted cards by the PayPal integration are visually displayed so that respondents know from the start what is the accepted payment method.
You can customize the action bar (everything that is related to the submit button, additional buttons, disclaimer, etc) by simply clicking on this area.
Another change that you might have noticed is that under the Continue to payment button, we are displaying a disclaimer text, together with the icon & logo of the payment processor and the accepted cards.
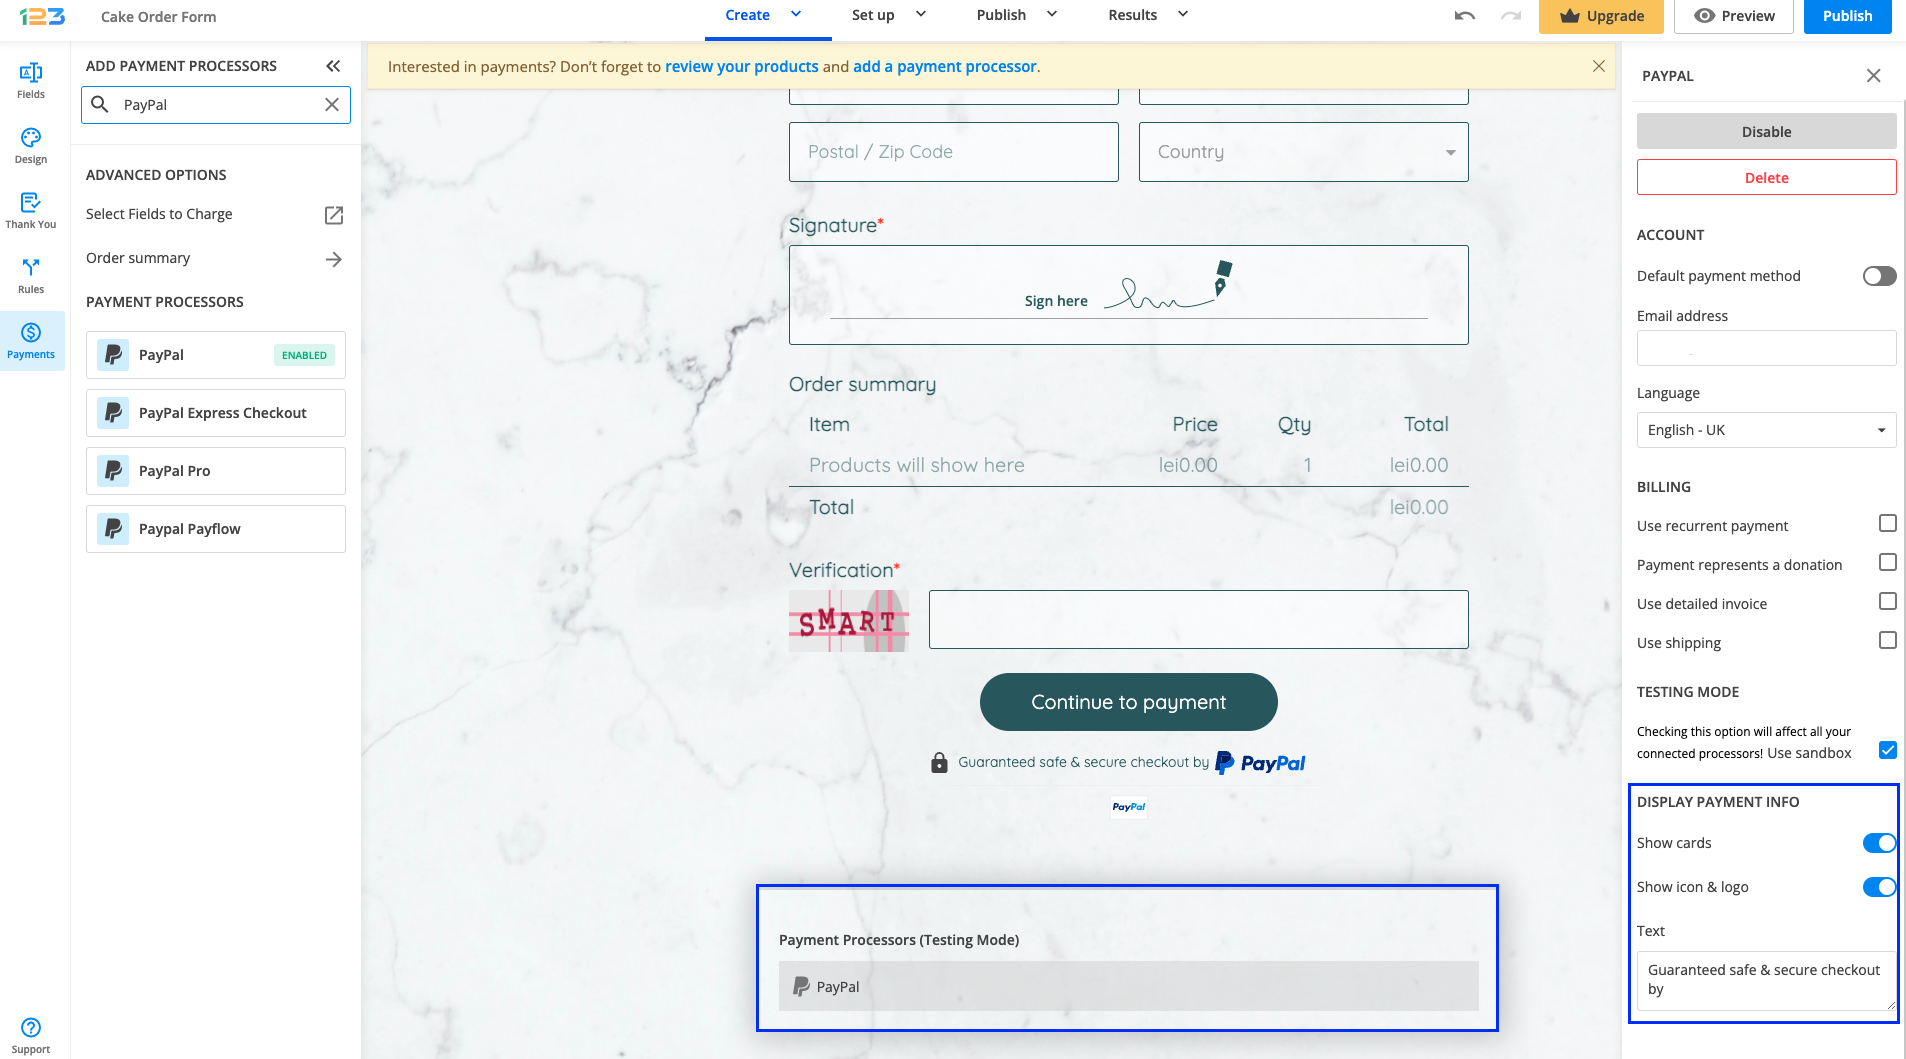
These settings are enabled by default, but you can change this by simply clicking on the payment processor and going to Display payment info.
Errors & what you need to pay attention to
1. PayPal live used as sandbox (or vice versa) without having them both working on live and sandbox If your account is working only in sandbox and you are using it for live payments (meaning you do not check the Use sandbox box), your respondents will be seeing an error page when they try to make the payment with the text Things don’t look to be working at the moment 2. Currencies not accepted by PayPal You need attention to what currency you have set up in Inventory/Order summary. If the currency set up in Inventory/Order summary is not accepted by PayPal, your respondents will be seeing an error message when trying to make the payment with the tet Things don’t appear to be working at the moment. You can see the currency list accepted by PayPal here https://developer.paypal.com/api/nvp-soap/currency-codes/#paypal 3. Amount is sent as 2 decimals for currencies that do not accept 2 decimals You need to pay attention to the number of decimals set to the inventory amount. There are currencies like Taiwan New Dollar who do not accept decimals. If your inventory amount has 2 decimals, but the currency does not accept 2 decimals, when your respondents try to make a payment, they will be seeing an error message with the text Things don’t appear to be working at the moment.
PayPal billing options
If you want to enable recurrent payment on your PayPal payment form, tick the option Use recurrent payment. If you want to create a donation form, tick the second checkbox – Payment represents a donation. Furthermore, the payment summary from your form is sent to PayPal’s order summary page. If you want to remove it from the page, simply uncheck the Use detailed invoice box from the PayPal billing options. The feature is not available if you use recurrent payment on the form.
Important Note
Donation forms cannot be set as recurrent, therefore the two options are incompatible and cannot be used together.
Once form users select their preferred products and/or services from the PayPal payment form and submit it, they are redirected to PayPal to perform the transaction. After that, they receive the confirmation message you have created in the forms Thank you Page section.
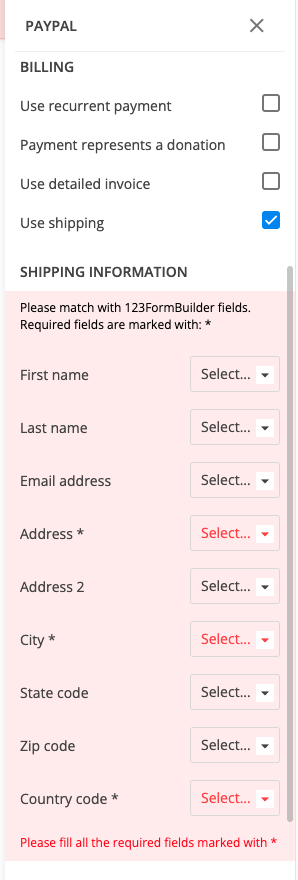
If you want to send additional information to the transaction page, enable the Use shipping options and match form fields with PayPal fields. Therefore, if your buyers do not own a PayPal account, they will not need to type in their information again. The fields will be prefilled with the data they submitted on the form.
You can add a payment processor by navigating to the Payments section. Depending on your needs, select your desired processor from the list and add your account credentials (username, password, API key, as requested).
Examples of setup
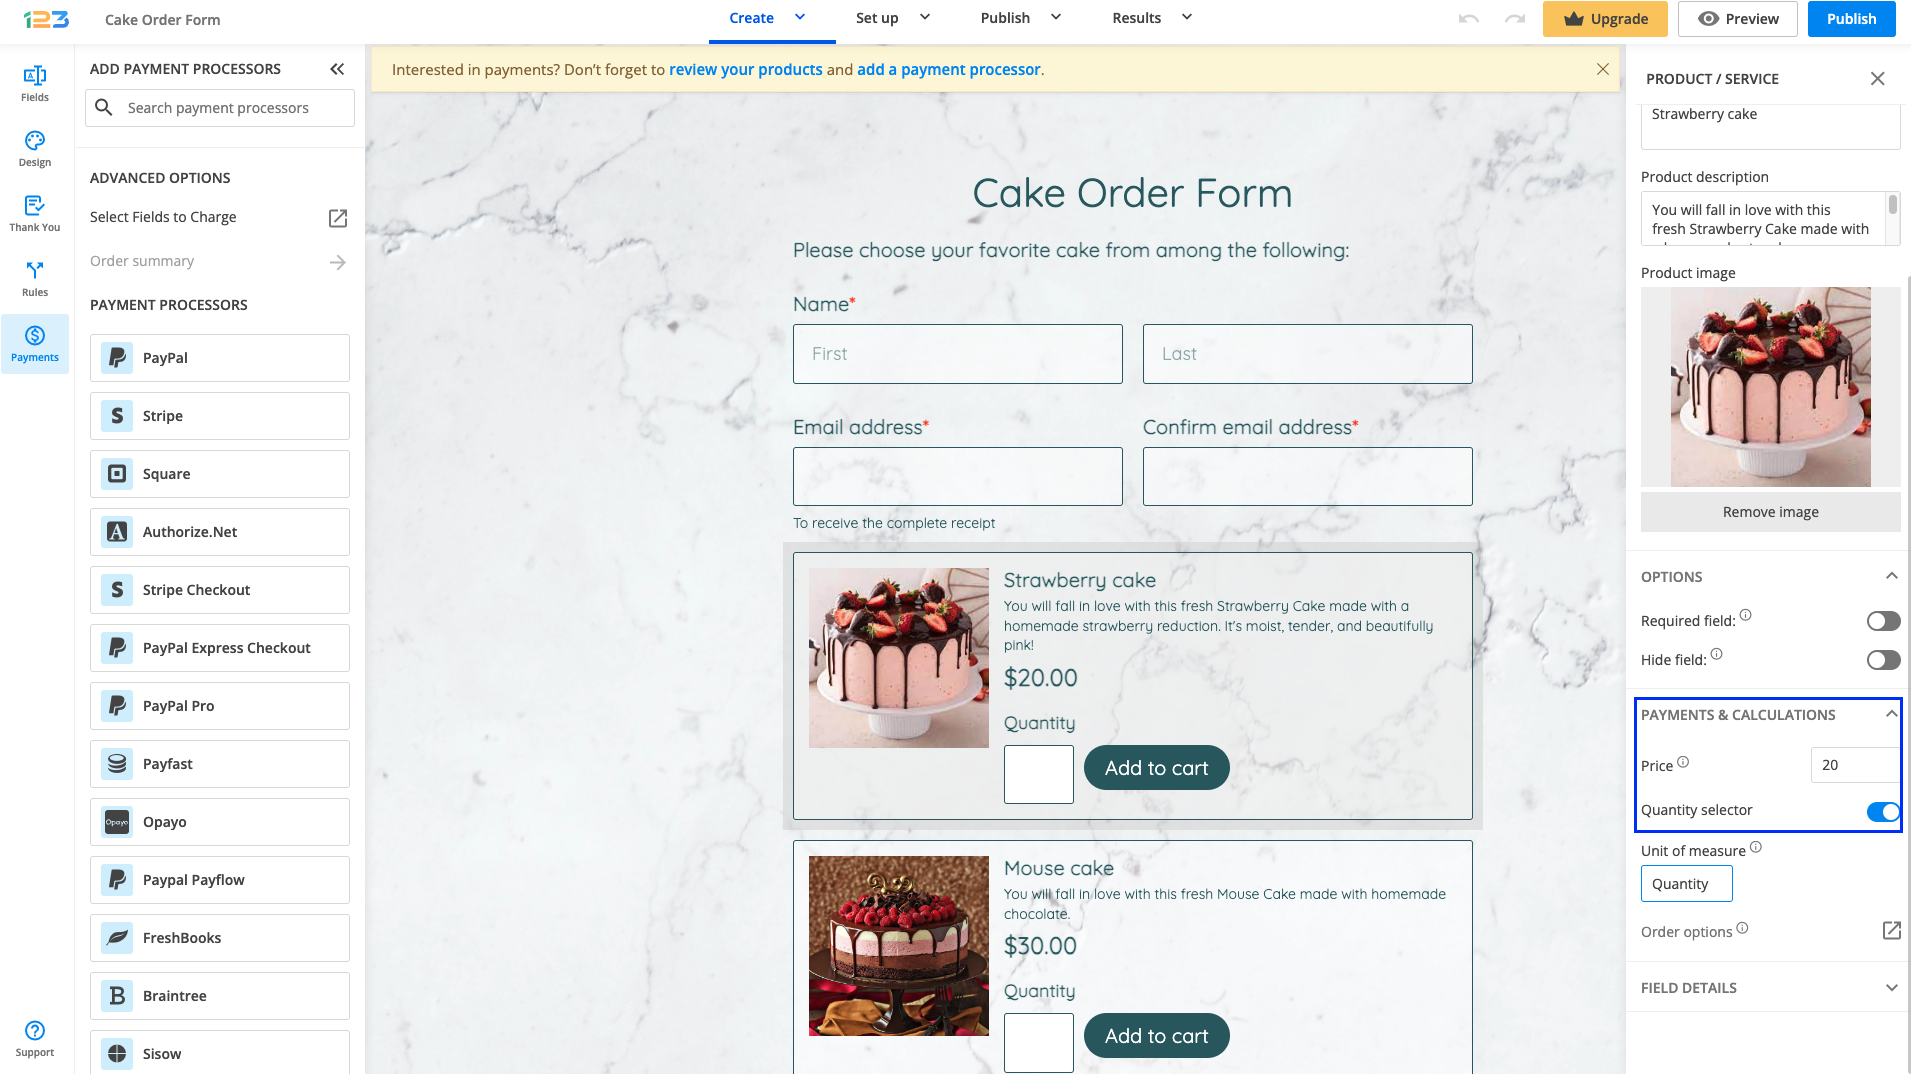
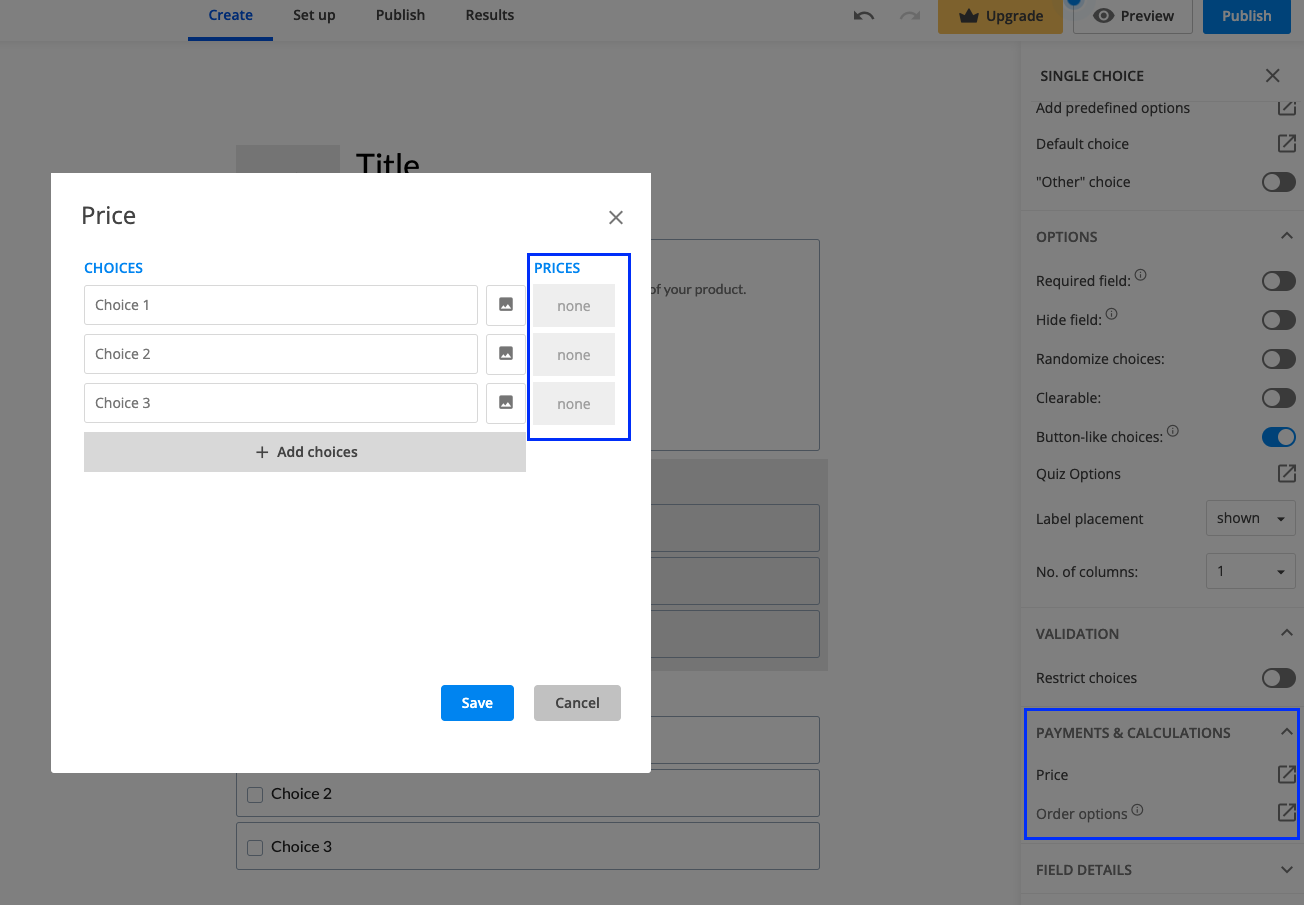
In order to have a payment processor working correctly, you have to assign prices to fields in your form.
Let’s take an example. We’ve created a form with 2 Product fields. All you have to do is assign a price to each of the product fields by going to the Payments & Calculations section and adding a Price.
For Single/Multiple choice fields, you can follow the same actions: go to the Payments & Calculations section and open up the Price modal. For each choice, you can now add its price and click on Save.
After adding prices to your fields/options, you can see an informative banner above your form. All you need to do now is to add a payment processor to your form.
To accept payments via PayPal, you will need to enter your PayPal email address and your preferred language.
For the Authorize.net integration, you will need your API Login ID and your Transaction Key. All this information is provided when you create your Authorize.net account.
Further, you can choose your desired currency and specify, if needed, the payment recurrence (daily, weekly, monthly, yearly). However, it is important to mention that not all payment processors offer a recurrent payment system. Visit our Payment Gateways Comparison Chart for more details.
Sandbox testing
If you want to test the way your payment processes work, enable the Use sandbox option. Don’t forget to disable this option before sharing your online form with your customers.
Respondent’s experience
Once you have added and enabled your payment processor on the form, you will notice some changes.
An Order summary is displayed on the form. Here will be displayed all the products/choices that your respondents choose and have a price assigned.
The Submit button is changed to Continue to payment – this is to help respondents understand that a payment will be performed. Thus, you are increasing your chances of having a complete submission with a successful payment.
Below the Continue to payment button, respondents can see what payment processor is used for making the payment. In our example, we have PayPal – and below the disclaimer that is meant to give respondents confidence in your form, they can see the accepted cards for making the payment.
Video tutorial
For more details, you can check out our short step-by-step tutorial on how to add payments to your forms:
Here is a list of the most frequently asked questions. For more FAQs, please browse through the
FAQs page.
Is this service free?
Yes, we offer a free form builder service. Just sign up to the Basic plan and you are all set. This plan is forever free, but you are limited with a few features only, such as 5 forms per account, 100 submissions per month and you have to keep the backlink to 123FormBuilder on your forms. Check out our features matrix for more information.
How many forms can I create?
It depends on the service plan you are on. Higher service plans enable more features, including more web forms for your account. If you need more forms, go to the My Account section of your account and click the upgrade button. To create an unlimited number of forms, either upgrade to the Platinum service plan or higher. Consult our features matrix for more information.
How can I publish my forms?
You can publish your forms in many ways, by using their direct URL or HTML link, embedding them with a JavaScript code, Inline HTML or iFrame, using the Facebook app or the WordPress plugin, using popups, the Blogger code snippet and many more. Once you have created and customized your form, go to the Publish section to complete your work. Read more in our documentation.
How do I change my form design?
You can change the design of your form for more information. in the Themes section, which is located in your form settings. We offer a set of more than 30 predefined form themes for your forms, but you can also create your own from scratch. You can customize the submit button, the logo and more. To apply your own stylesheets, all forms come with a custom CSS editor.