123FormBuilder Knowledge Base
Search our documentation platform for answers, service specifications and 3rd-party integrations.
Knowledge Base
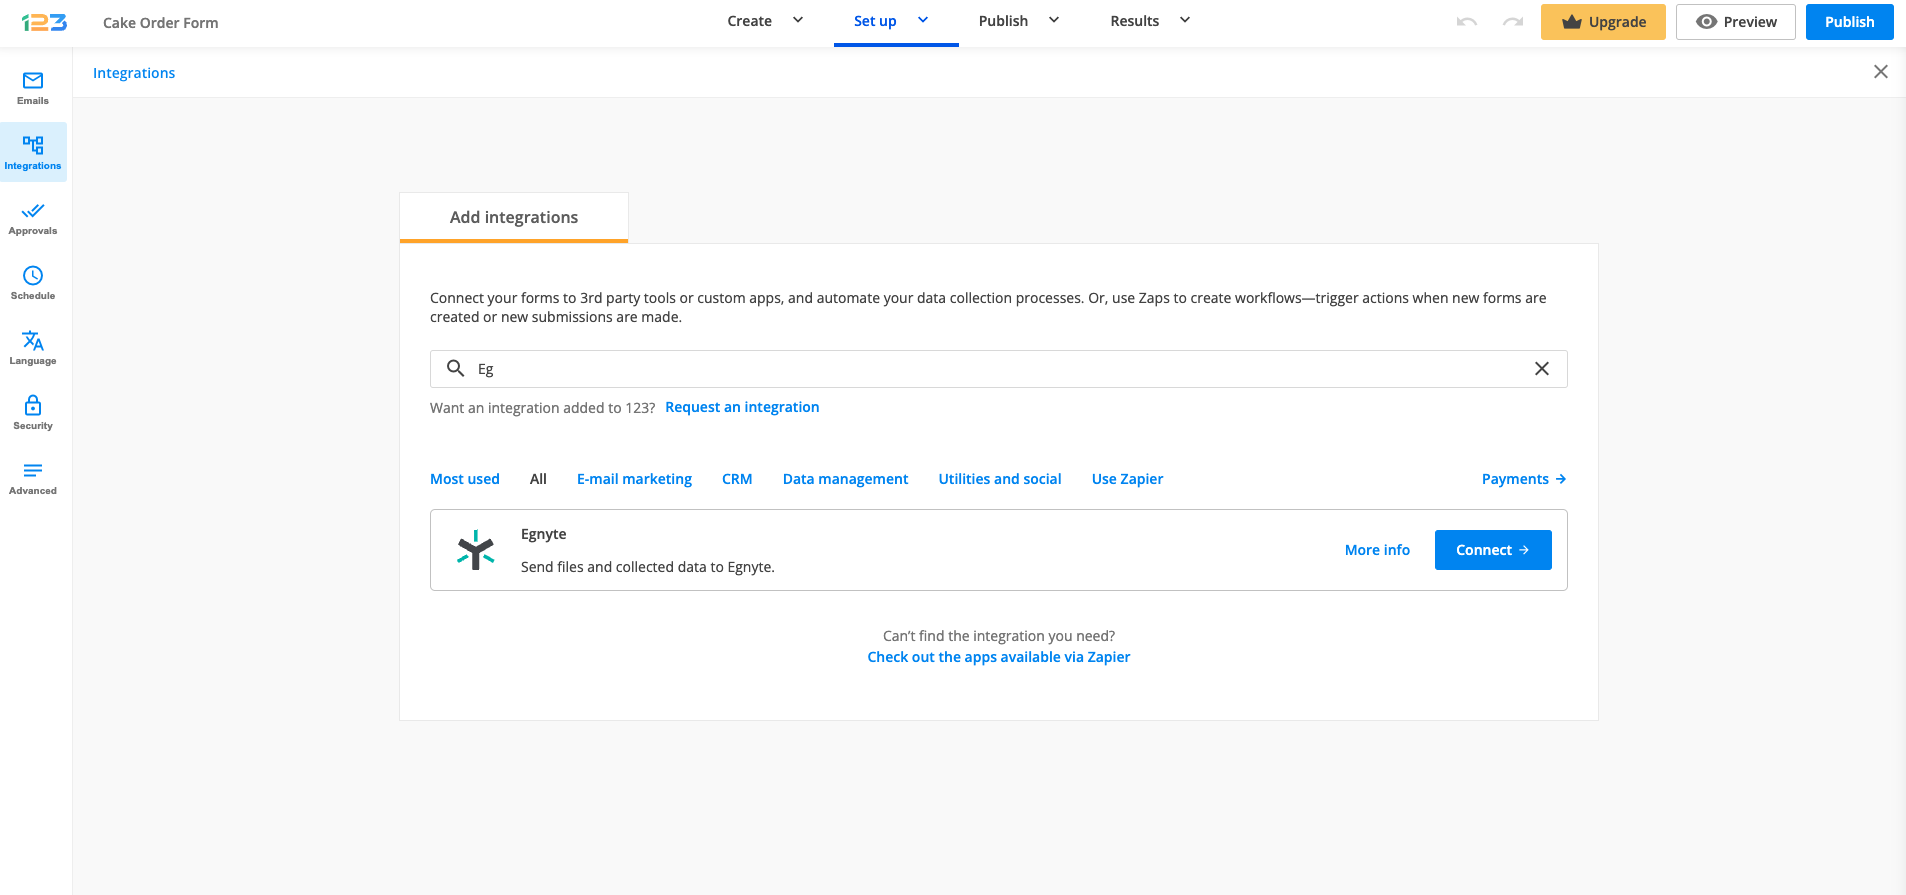
The Egnyte integration allows you to send form data or uploaded files to your Egnyte account.
The first step is to access the Integrations section of your form and search for Egnyte using the search bar. Click Connect.
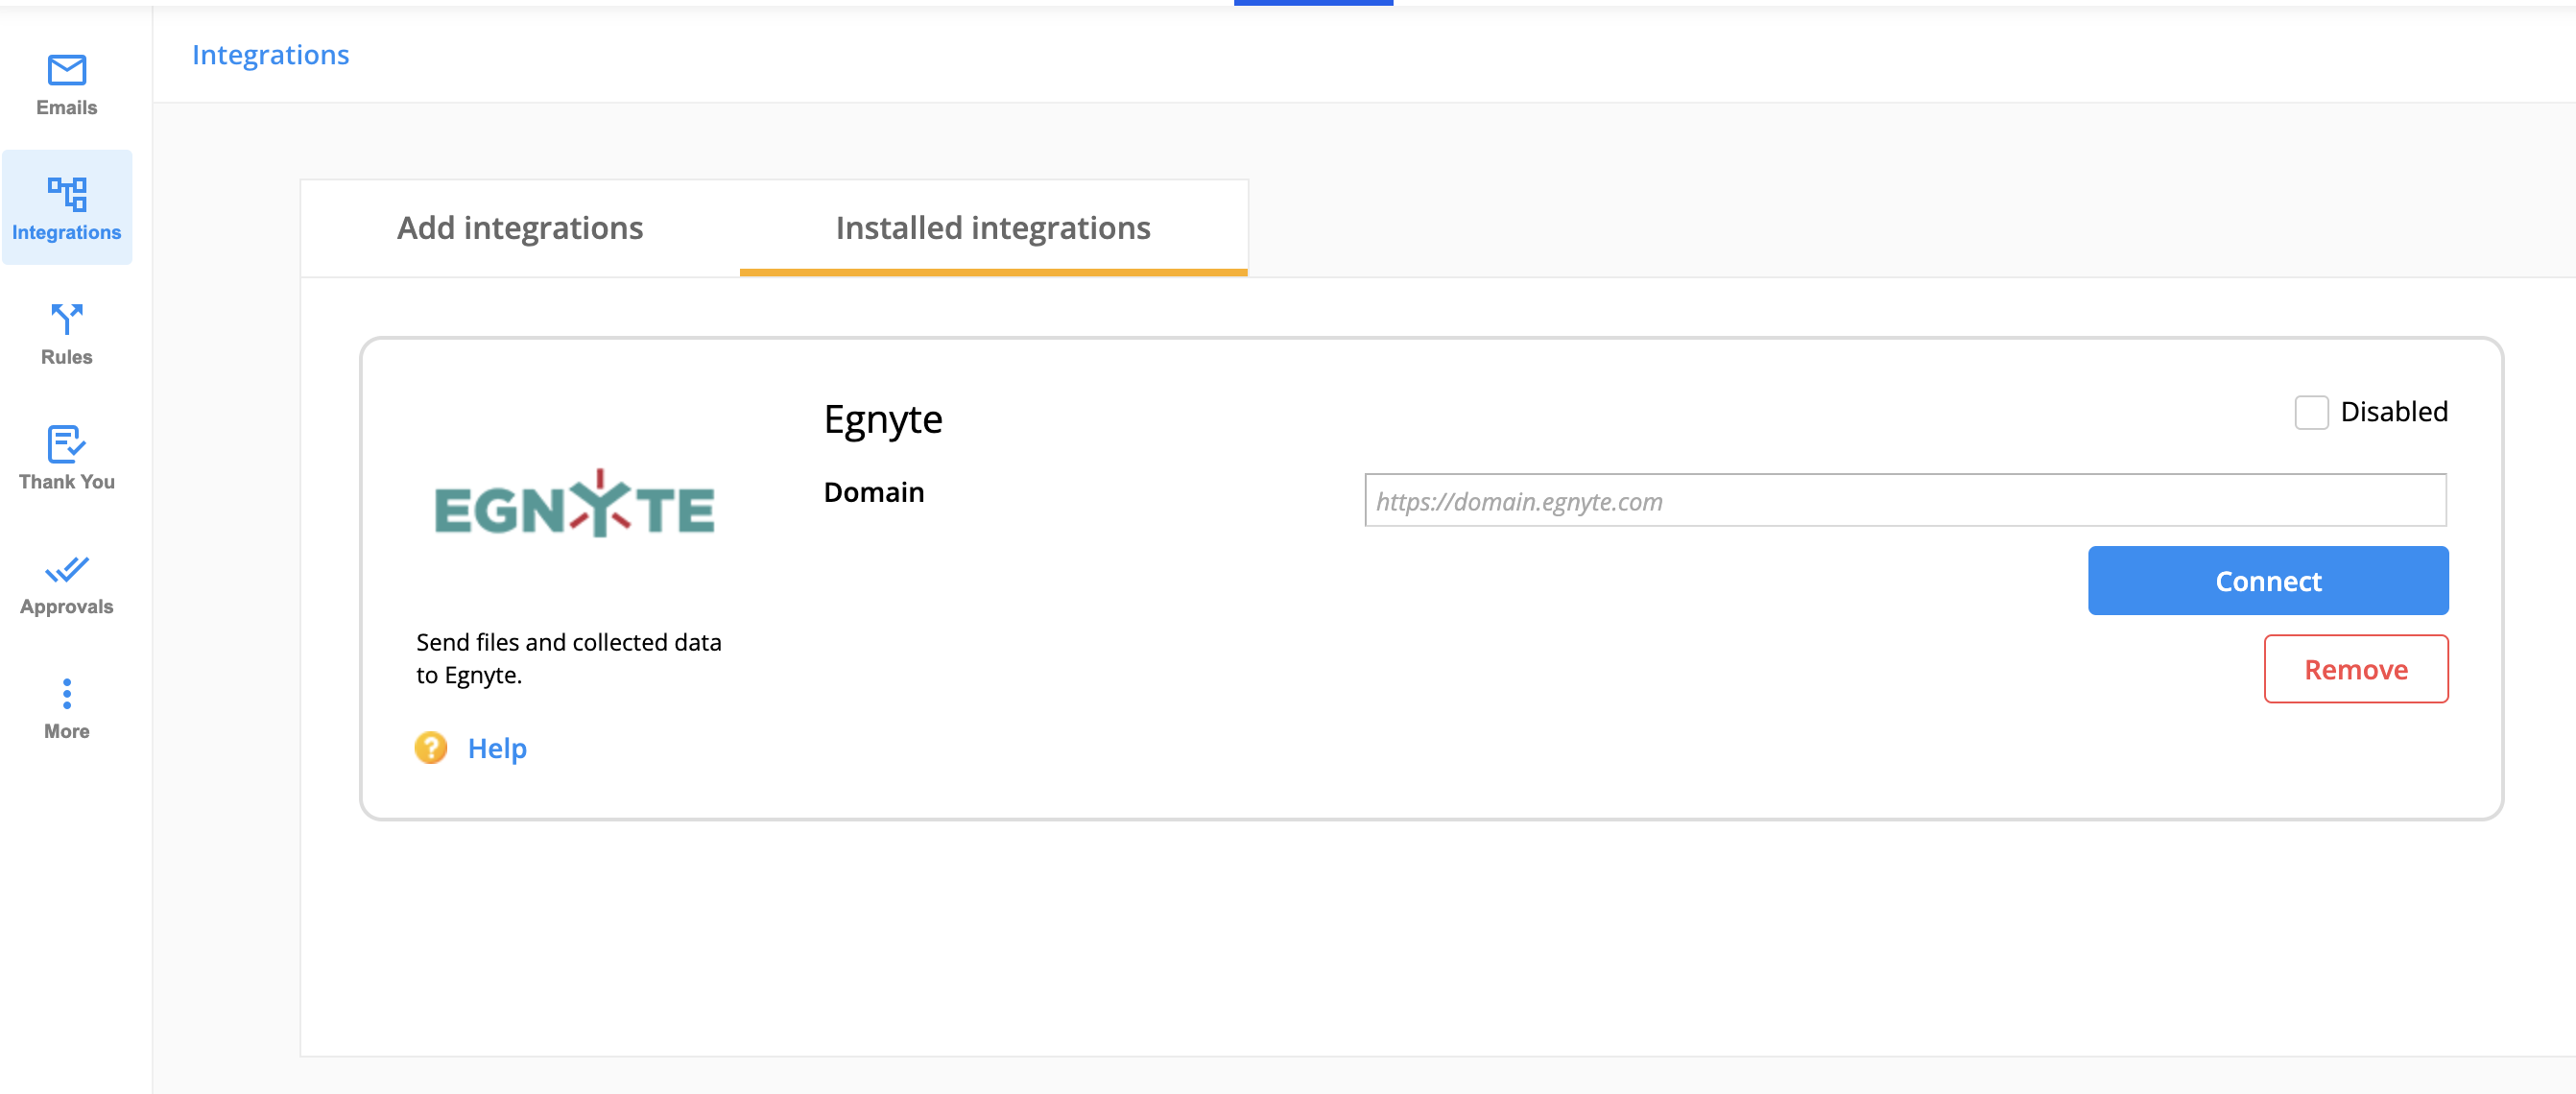
Next, you will be asked to add a valid domain and connect with it in order to customize what content will be sent to Egnyte.
You can send the content added through the File upload fields but also a PDF file that will contain the information your form was submitted with. Depending on what you enter in the Folder Path field, you will receive the files in the specified folder. If you enter a path that doesn’t exist in Egnyte, it will be automatically created.
Please note that the folder path will always have to start with /Shared followed by your desired folder name. Also, the name of the folder path can not have blank spaces.
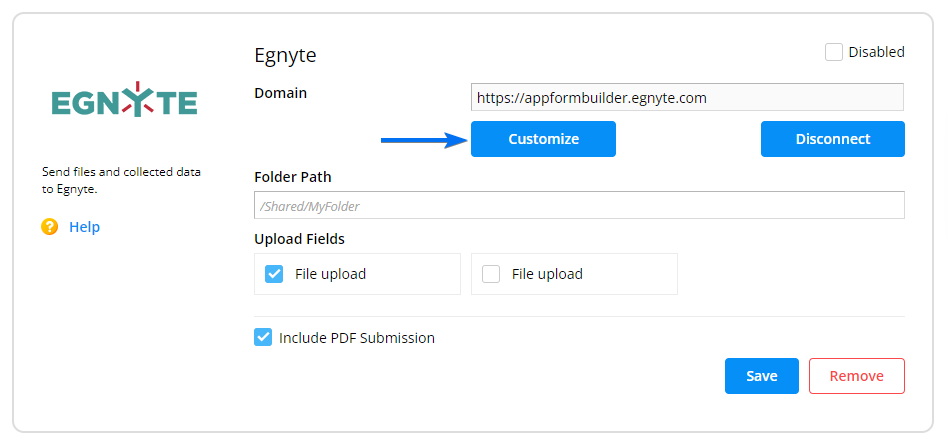
After you select what upload fields will be included in the process, don’t forget to hit Save.
You can now prefill your form fields with data, by simply typing the keywords based on which the information will be retrieved from Salesforce. Let’s take a look at a couple of scenarios to better understand how the dynamic prefill works.
1. Let’s say that you want to type an email address and prefill the form fields with some information found in one of your Lead records, where that email address exists.
The first step is to set up a lookup in the form builder. Here you have to take into account the fields based on which the search will be made (in this case the email is the filter) and the information you want to be returned.

The second step is to define the prefill. Follow the steps below to see how is this done.
1. Select the lookup you just created.
2. The trigger has to be the field you used as a filter when you set up the lookup. Why? Because you want to prefill form fields with data from your Salesforce record that contains that specific email address. Also, the field that is a trigger will always be highlighted.
3. For this specific scenario, you will want to load the data when the user starts to type.
4. Then map the form fields that will be prefilled and choose from what Salesforce fields that data will be retrieved.

2. Now, let’s take another example. You have a list of records in Accounts and you want the account names that pertain to each record to be loaded on the form. The question is why would you need to do this. The answer is very simple – you can choose from this entire list an account name and prefill form fields with data from the same record.
The same as for the previous example, the first step is to create your Lookup, but this time you won’t have any filter. The reason is that you want all account names from Accounts to load.

What changes in this scenario, in terms of prefilling options, is that you will load the data when the form is loaded (this is necessary if you use a dropdown field to contain the list of information). Also, the trigger will be as you can see in the image below, the Name field (dropdown field) because there is where we want all the account names displayed.

That’s it. Now you can easily retrieve data from your Salesforce records and pre-populate the form fields as you wish.
The levels of relationship between objects can be defined as a connection between a primary object and a secondary object related to it. But sometimes you might need relationships between secondary objects and a third level object.
Let’s have a look at the following example to see how they can be set:
1. You have an account where you store information about a company you are working with, this will be your main/primary object:
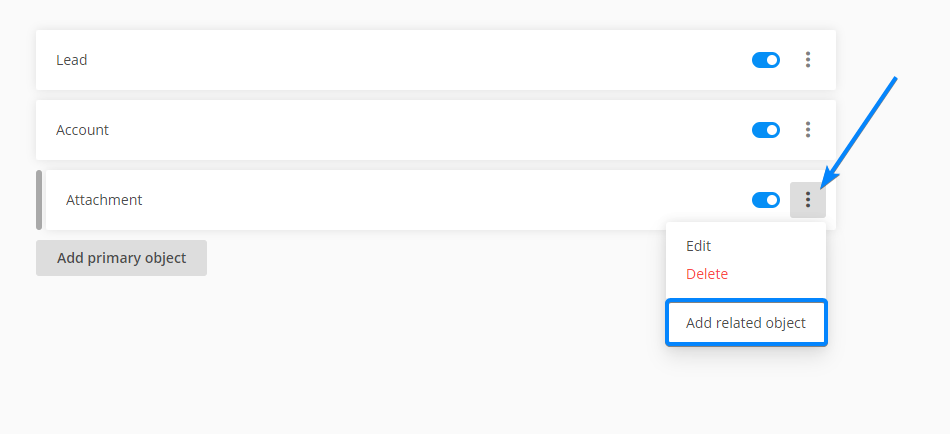
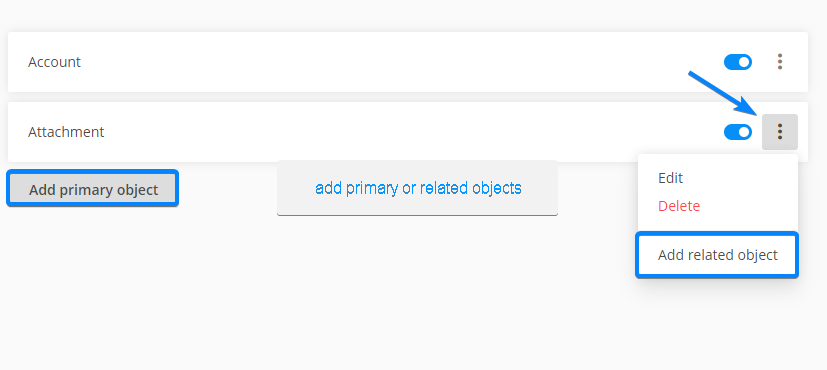
In order to add a related object to your Account primary object, click the Show more icon, and from the dropdown choose Add related object.
2. The employees of this company are the contacts you are communicating with. So the contacts are related to the account:
3. Each employee has to send you files according to the department they belong to and you want to know what files each contact has sent you. This is why you will add an Attachment as a related object to the contact:
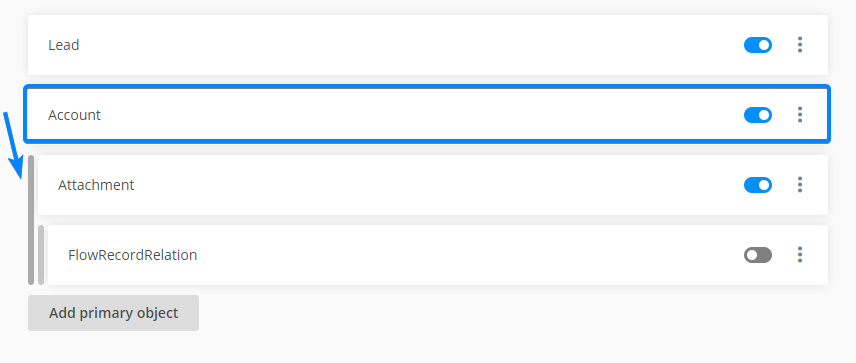
In the end, you will have a multiple level relationship like this:
Important! Related objects cannot be added for all objects, only for those that are set to accept them.
You might need to create records in your Salesforce account only if some conditions are met in terms of form fields content. For example, if a form field specified by you is not filled in by a user, no record should be created in Salesforce.
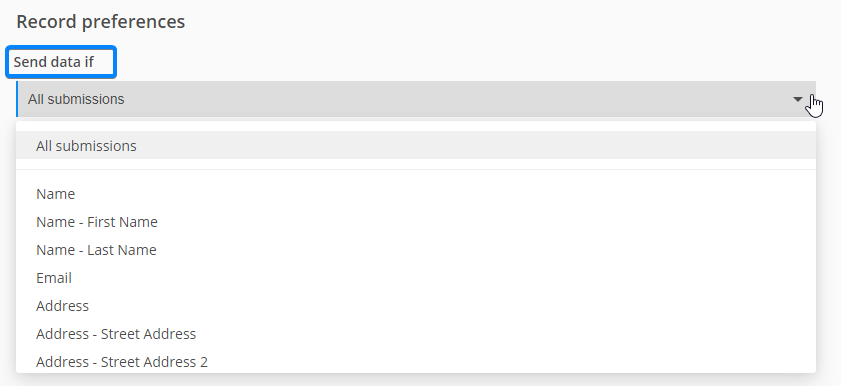
It applies to other conditions as well, like creating a record only if a certain field is empty. Here, you have to choose which field should not be completed:
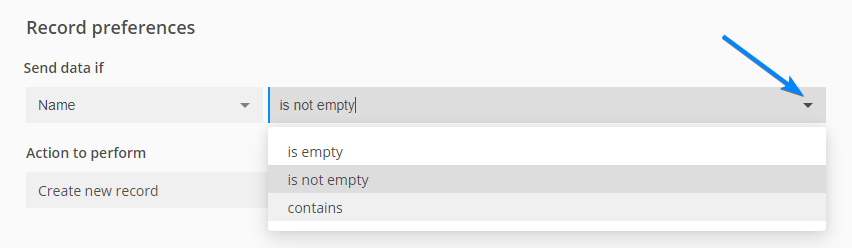
Or send data only if an exact option is selected either from a Single choice field or a Multiple choice field:
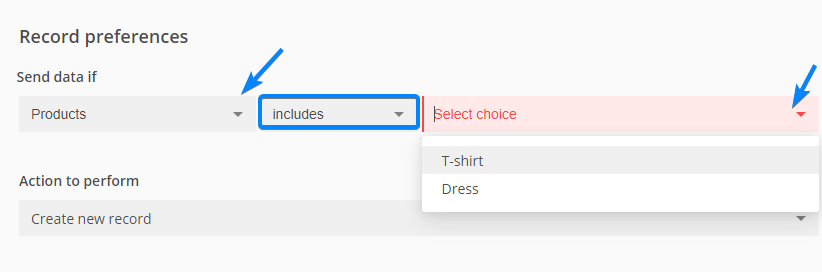
Just make sure you select the condition based on which the data will be sent to Salesforce and you’re all set!
With the prefill functionality, you can pre-populate form fields based on a lookup keyword entered in a predefined link. There are two parts to complete:
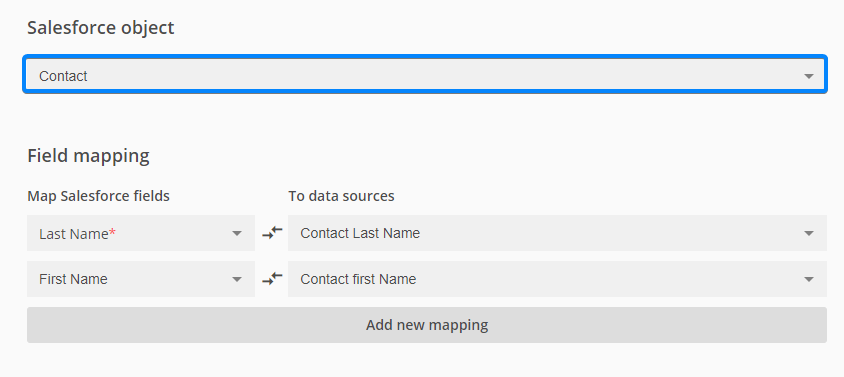
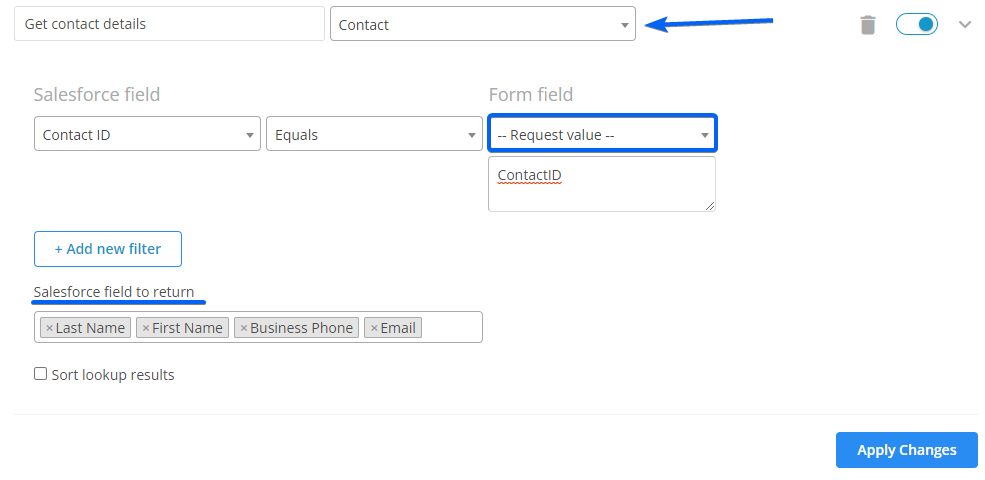
1. The first one is the lookup configuration. Go to the Lookup tab and select the Salesforce object where you want to search for the information (we will take Contact as an example).
Next, add a filter (this filter is in fact the information the search will be made by). You can filter the records by any field. We recommend using the Contact (record) ID value. From the dropdown select the Request Value option. In the input box type in the variable name. Then, select from what Salesforce fields the information should be retrieved.
2. Now we will move to the next part, prefilling the form. Therefore, head over to the Form Prefilling tab. Here you have to choose the lookup you’ve just created. No triggers are needed and the data should load when the form is loaded. Afterward, map the Salesforce fields with the form fields where you want to have the information loaded.
Don’t forget to apply the changes. You will find the link below to the associated fields.
As you can see, the variable value entered before at point 1, appears in your prefill link.
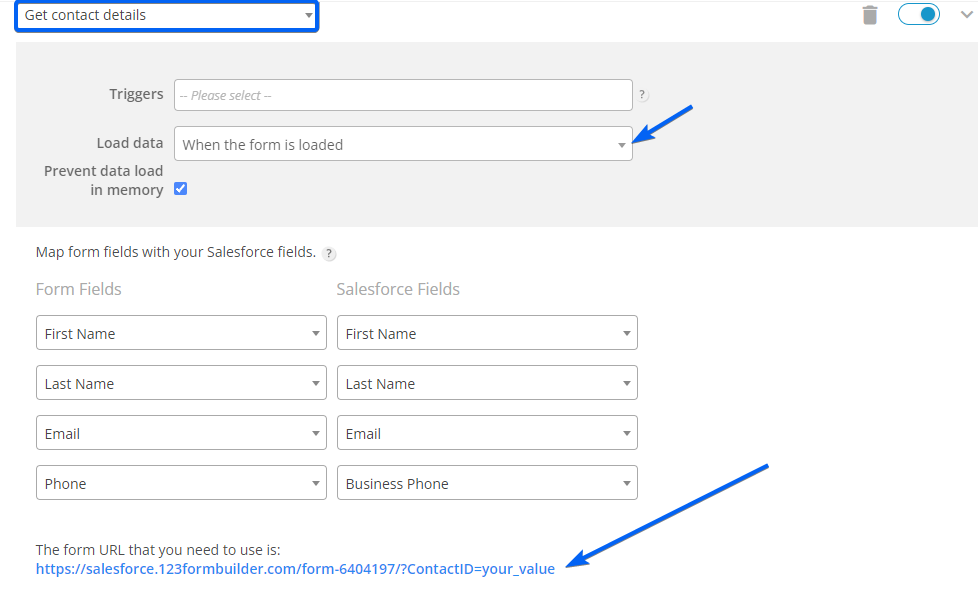
Instead of your_value, you need to replace it with the contact ID (the filter used). Use the generated prefill link to share the form from Salesforce and replace your_value with the Salesforce merge field ContactID.
With the 123FormBuilder package installed in your Salesforce environment, you’ll have the possibility to push form data into Salesforce objects, update existing records, prefill form fields in real-time and benefit from many other functionalities.
To get started, visit the 123FormBuilder listing on the Salesforce AppExchange. You’ll see two installation options at the top of the page:
- Get It Now – Use this option to install 123FormBuilder directly into your Production environment. This is ideal if you’re ready to deploy the app in your live Salesforce org and begin using it in real-world scenarios. Note: Once clicked, the installation process will begin for Production without an option to switch to a Sandbox.
- Try It Free – Choose this option if you want to test 123FormBuilder in a Sandbox environment first. It allows you to explore all features in a safe, isolated space before rolling it out to your Production org. This is highly recommended for new users or organizations with strict deployment workflows.

After choosing your preferred option, log in with your Salesforce credentials when prompted.
You’ll then be asked to confirm the installation details and agree to the terms and conditions. Click Confirm and Install, and log in again if necessary.

During the installation, you’ll need to specify who should have access to the app:
- Admins Only – Best for initial testing or setup by your Salesforce admin team.
- All Users – Grants access to everyone in your org.
- Specific Profiles – Lets you define access based on Salesforce profiles.
We recommend starting with Admins Only to configure and test the app before rolling it out more broadly.
Click Install, and Salesforce will handle the rest.

When the installation is completed, you should see the package installed in the Apps section of your Salesforce account. A few more steps are mandatory for a 123FormBuilder account to be created and connected to your Salesforce environment.

When you select 123FormBuilder from your list of apps, you’ll be redirected to a page where you’ll be asked to select the server where the data will be stored. You can choose between the EU and US servers.

The 123FormBuilder account that is created is a trial one and you’ll have access to all Enterprise features for 15 days. During the trial period, you can upgrade to one of the available plans by clicking on the trial indicator that you’ll see across the sections.

If your trial expired and didn’t get to chance to upgrade to one of the available plans, you can contact us at salesforce[at]123formbuilder.com.
Each Salesforce primary object can relate with one or more child objects. What does this mean? It means that in Salesforce, you have the possibility to see the records sent to the primary object and additionally receive other information related to those records.
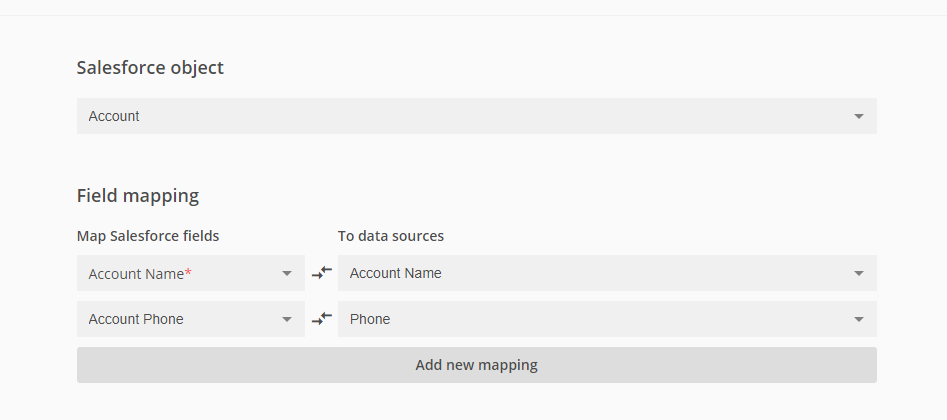
Let’s take an example and say that you want to create records in an Account object within Salesforce. First, you will map the Salesforce fields with the form fields for the primary object, which in this case is Account.
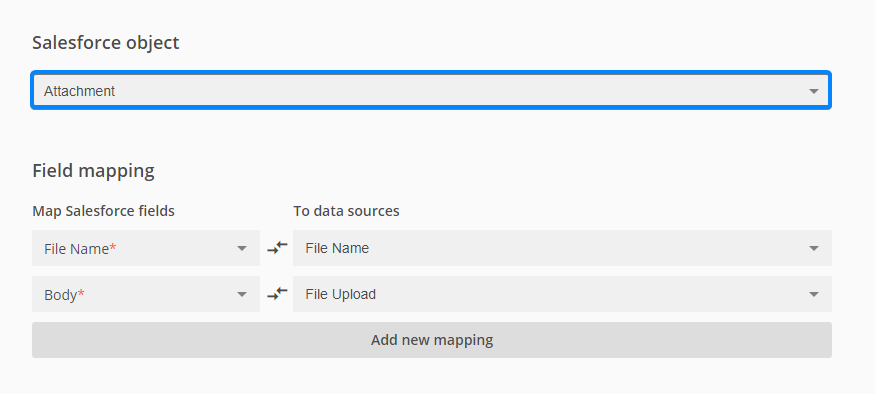
Then, add one or more related objects that will be in relation to the main one (in this example we added an Attachment object which will send a file to the lead).
To add a related object click the Show more icon next to the previous object listing.
Finally, apply the needed configuration in terms of fields association to the related object:
1. Choose an object from the dropdown (the objects displayed in the dropdown menu of the second object are changing depending on which is the primary object that you selected).
2. Choose an action to be triggered after submit (create records, or update existing records).
3. Map the Salesforce fields with the form fields.
4. Click Save.
Important! If you activate the main mapping but not the secondary one, records will be created only for the primary object (in this case Account). Related child objects will send the data to Salesforce only when their parent object is enabled.
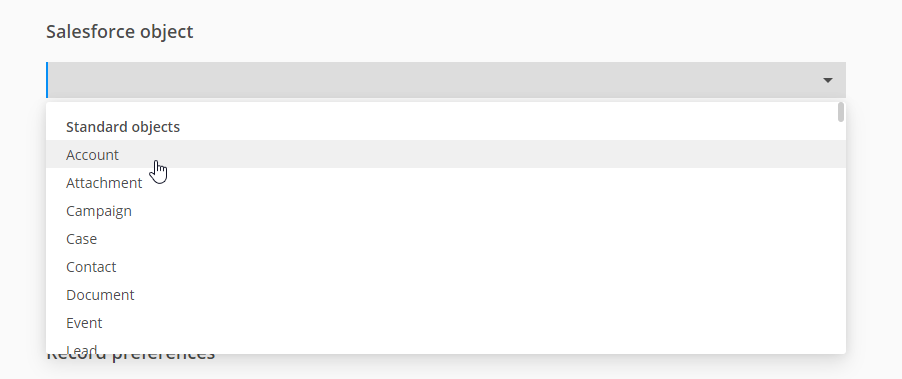
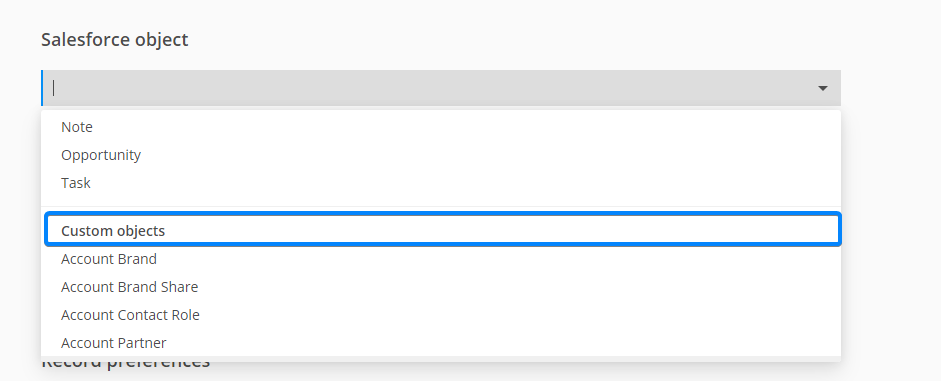
Standards objects are known in Salesforce as Lead, Account, Opportunity, Case, Task, Campaign, Event, Document, Note, and Attachment. To create new records in Salesforce, select a standard object listed in the searchable dropdown menu, where the entries should be saved.
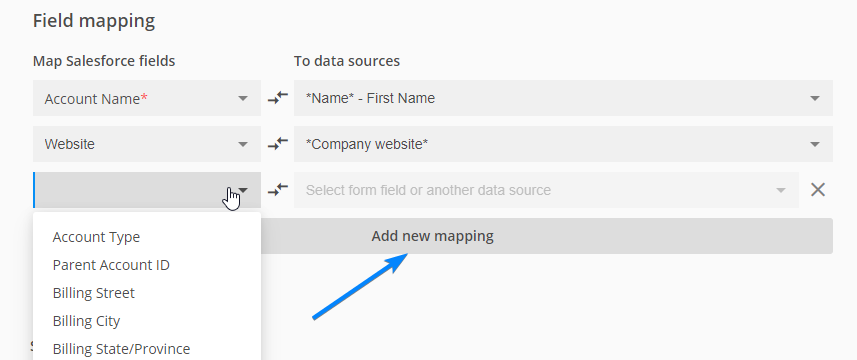
Then, map the Salesforce fields with the form fields. The Salesforce fields will load according to the object you select.
By using the Add new mapping button, you can add how many fields you need.

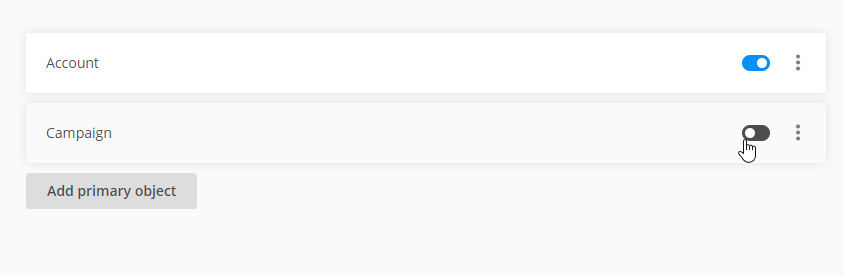
If you want to send the information to different objects, save your first object mapping. Next, click on Add primary object and apply again the configuration accordingly. You can add as many objects as you need.
In order to add a related object, click the Show more icon and choose to Add related object from the dropdown menu.
Finally, don’t forget to save your work and enable the mapping.
123FormBuilder is a form-building app that allows you to build any type of form, survey, or lead generation form. Its main purpose is to create and update records in Salesforce, but we integrate with Salesforce in various other ways.
Under the Salesforce integration tab, you’ll find the following sections:
- Object Mapping
- Form Prefilling
- Lookup
- Query
- Settings
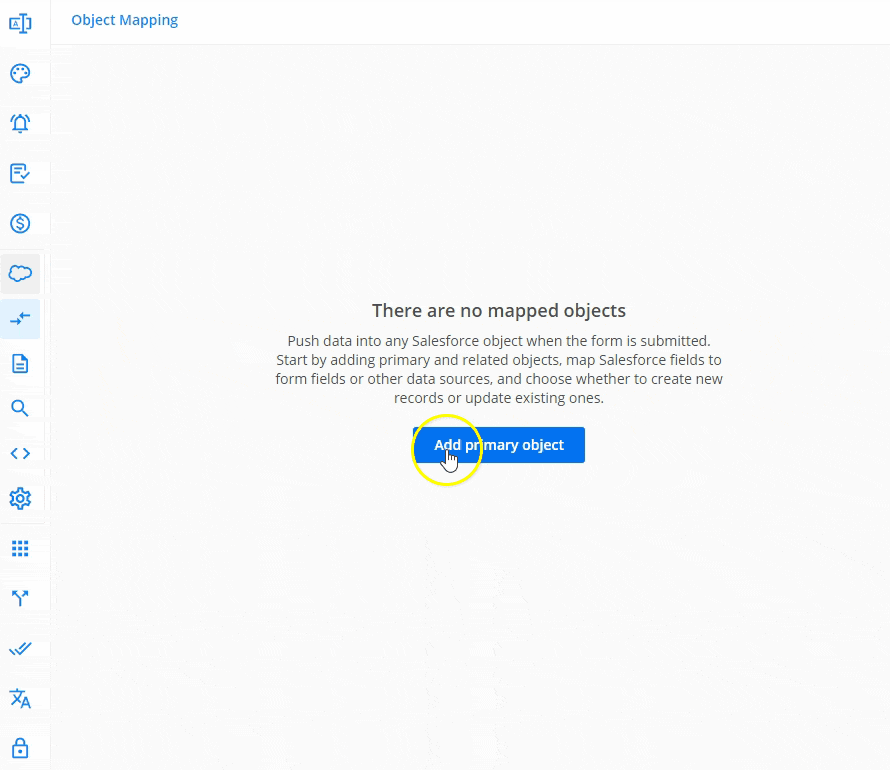
1. Object Mapping
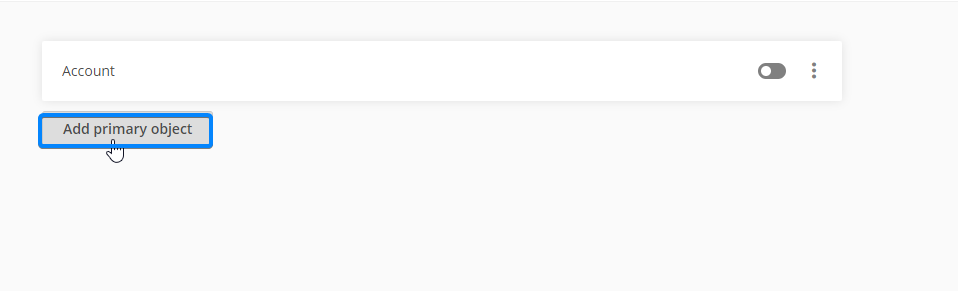
Object mapping has the purpose of creating or updating Salesforce records when a form is submitted. To map 123FormBuilder fields with Salesforce fields, head over to the Object Mapping icon from the sidebar menu.
Click on the Add primary object button and from the dropdown menu select the object where you want to send the data.
Afterward, associate Salesforce fields (the fields where the records from the form will appear) with form fields.
Choose an action. The actions refer to creating new records in Salesforce or updating existing ones.
When the customization is ready, save the changes and then enable the mapping.
You can add more than one object where to send the information the form is completed with.
2. Form Prefilling
With the prefill functionality, you can pre-populate form fields based on a lookup keyword entered in a predefined link.
Check this article for instructions on how to set up this feature.
3. Lookup
By using a Lookup field, you can search specific information within a Salesforce object and return the content of a field, a record ID, or an account ID in another object.
Find more details on how to use Lookup fields in this article.
4. Query
You can add queries to your online forms to search in your organization’s Salesforce data for specific information. Queries are more advanced lookups to pull data from Salesforce and are useful if you need to establish multiple filters.
In our Salesforce Queries article, you can find more details about queries, as well as a few examples.
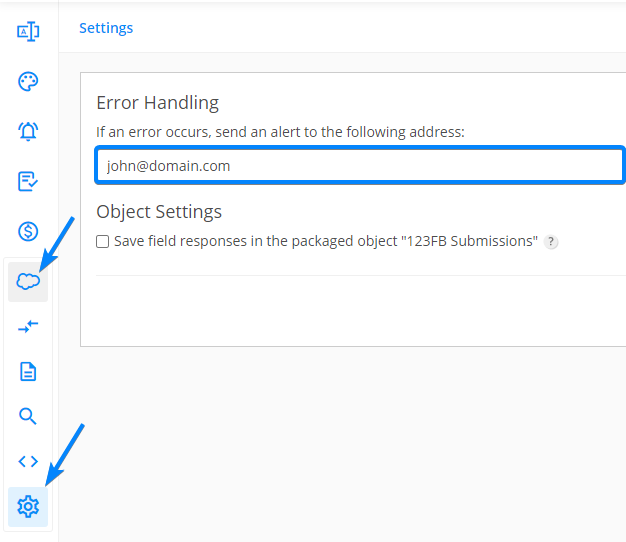
5. Settings
In case an error occurs, you can set an email address where this error will be sent under the Settings gear icon.

Important Note
The records will be registered in Salesforce up to 5 minutes after an entry is submitted.Related articles
In Settings, you will find the error handling options. When an error occurs, you will receive an email with the respective error. The email address set by default is the one associated with your account. However, you can change the existing address to another one.
The custom objects you create in Salesforce will appear in the Salesforce integration section of your form, under the Custom objects category, in the searchable dropdown menu. To create new records in Salesforce, select the custom object where the form data should be saved.
Then, map the Salesforce fields with the form fields. The Salesforce fields will load according to the object you select. By clicking the Add new mapping button, you can add how many fields you need.
If you want to send the information to different objects, just add another primary object and apply the configuration accordingly. You can add as many objects as you need.

In order to add a related object to a primary object, click the Show more icon. From the dropdown, select Add related object.

Finally, don’t forget to save your work and enable the mapping to start creating new records.
With 123FormBuilder, creating a contact form with reCAPTCHA verification is easy. Start by creating your contact form from blank or use our contact form template. If you’re new to our form builder, please follow our guide on how to create a contact form.
Now that you have created your contact form, it’s time to enable the reCAPTCHA functionality. You can do so by returning to the Form Editor and clicking the verification box at the bottom of the form. Afterward, hover on the right side of the page and select the option reCAPTCHA from the dropdown menu.
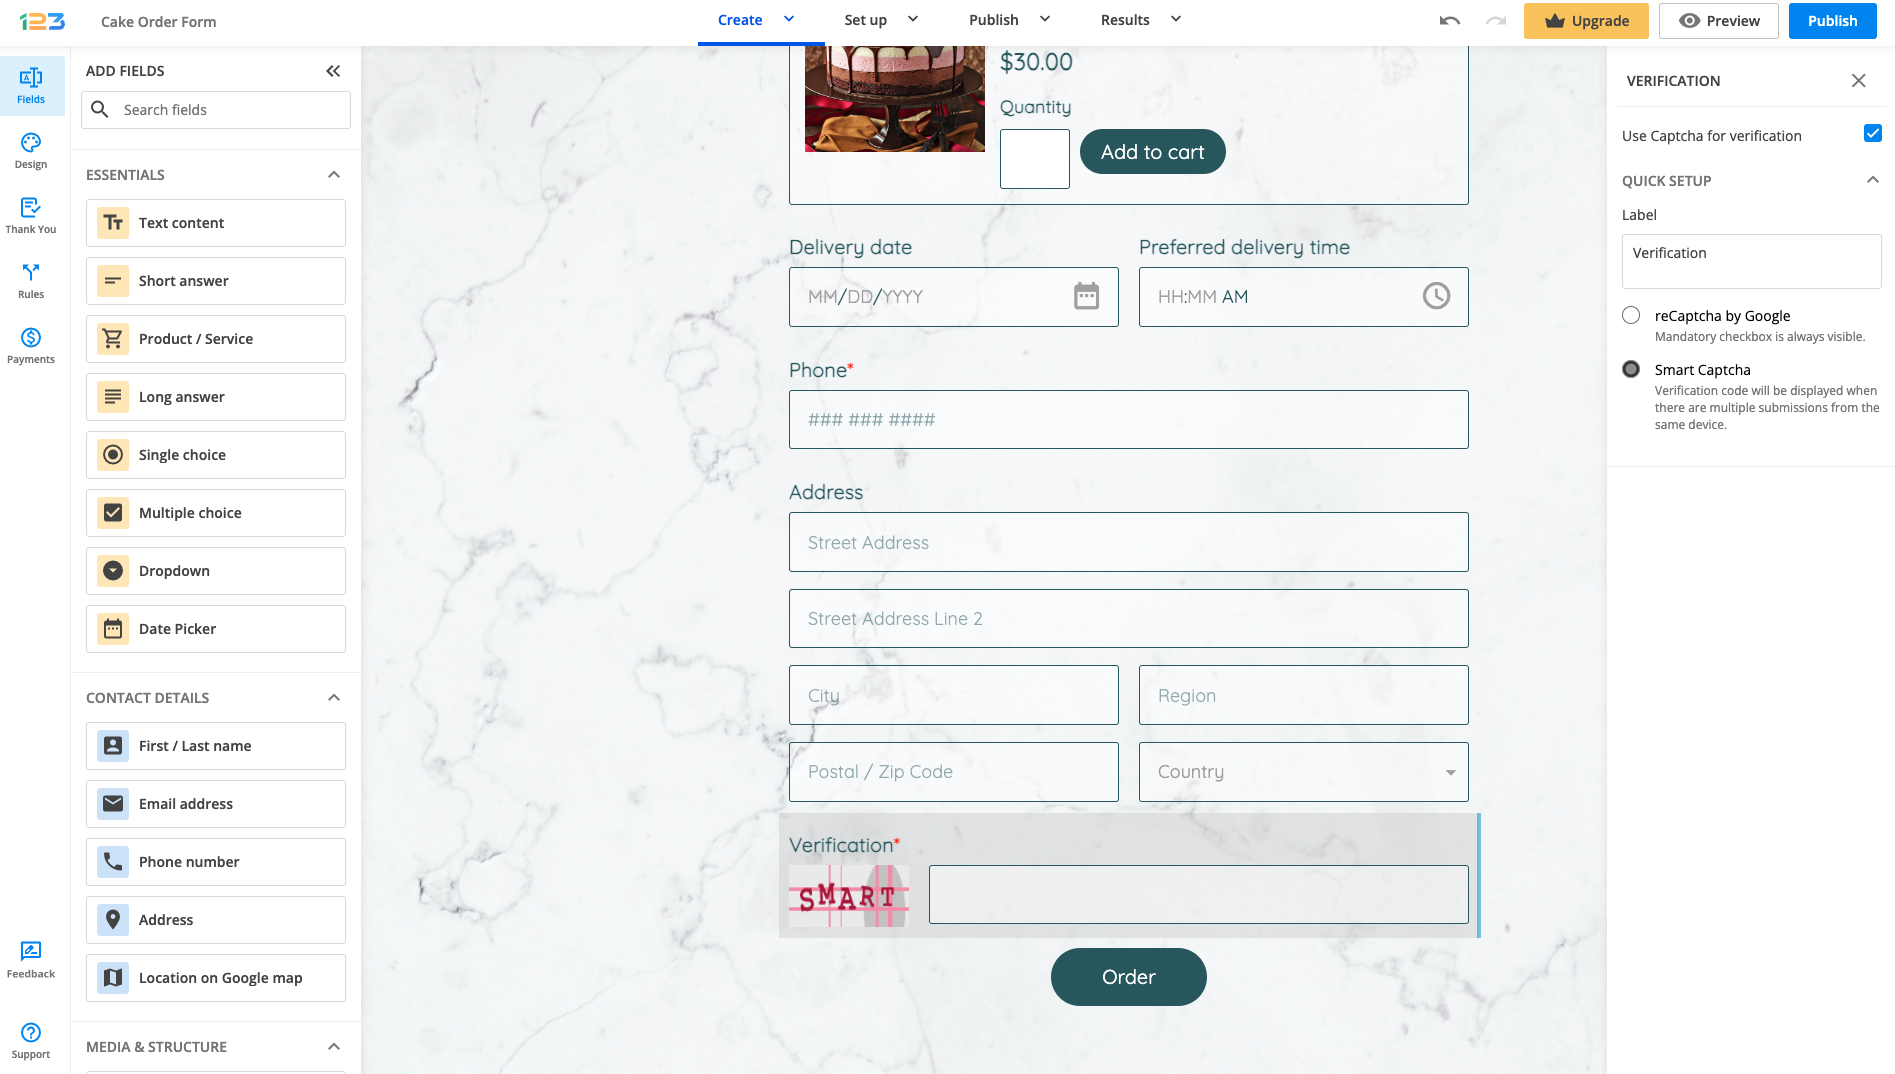
You don’t need to worry about finding a save button. All changes within the Form Editor are automatically saved, so once you have selected the option to use reCAPTCHA on your contact form, that’s it.
From this point on you can safely publish your contact form with the reCAPTCHA verification box located on the bottom of the form. Your respondents will just need to click the checkbox to successfully send their submissions and your contact form will be safe from spambots.
That’s how easy it is to create a contact form with reCAPTCHA verification.
Related articles
Most Popular
Frequently Asked Questions
Here is a list of the most frequently asked questions. For more FAQs, please browse through the FAQs page.