123FormBuilder Knowledge Base
Search our documentation platform for answers, service specifications and 3rd-party integrations.
Knowledge Base
To permanently delete your account, send us your request at customercare@123formbuilder.com from the email address associated with the account.
Once we receive the request, we permanently delete your 123FormBuilder account from our system. All the information related to your account and forms will be erased without the possibility to recover the data.
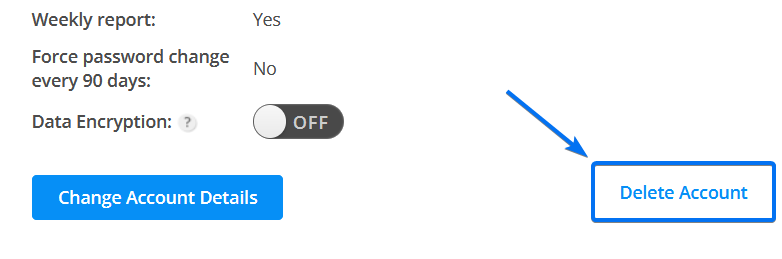
If you have a free 123FormBuilder account, there is no need to send us an email. Just head over to the My Account section. Here you will find a Delete Account button at the bottom right corner of the page. Once you click the button and submit the form that follows, we consider this to be your approval to permanently delete your account.
Compliance erase data request
You can choose to delete your entire account (all forms and data), or you can manually delete the data from each form’s submissions section. By doing this, you will not delete all your forms or your 123FormBuilder account, as you may want to come back and use your account in the future.
As per Article 17 of GDPR (Right to erasure/”right to be forgotten”), you can send us a request to delete your personal data. Request to erase any personal data we hold about you, as the email subject.
We encourage you to download your submissions before moving forward with the full deletion of your data.
How to delete personal information from Google
Google search results can still display details about your 123FormBuilder account due to Google’s cache system.
Google indexes pages on the internet and makes them available to what the world is searching for. Even if the data was removed from the website in question, the results in Google can still appear.
Following their indexing process, the deletion process on Google can take some time. If you need your information quickly erased, use Google’s URL Removal tool and request for the content to be removed right away. Provide Google the URL where your information is still public.
In this article, we illustrate how to manage your payment details associated with your subscription and how to view and download your invoices.
When you purchase a 123FormBuilder subscription for our form builder, the invoice is sent automatically to the billing email address provided at checkout. Additionally, a 2Checkout account is automatically created for you the moment you finish the payment.
2Checkout is the payment processor we use to charge our paying subscribers. In your 2Checkout account, you can see and manage your 123FormBuilder subscription details.
For each completed order, a payment receipt will be sent automatically to the billing email address provided. To change your subscription details, check out this article.
In order to download and view your invoices, simply log in to your 123FormBuilder account and go to the My Account section.
Afterward, press Change Payment Details.
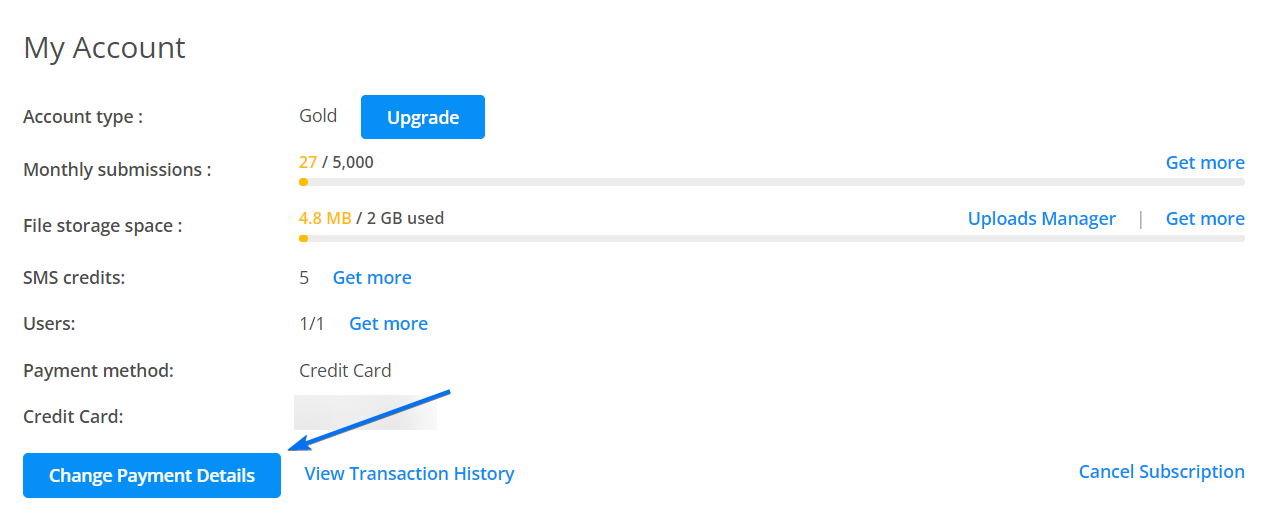
A lightbox will appear containing all of your subscription details. Then, go to the My Account tab.
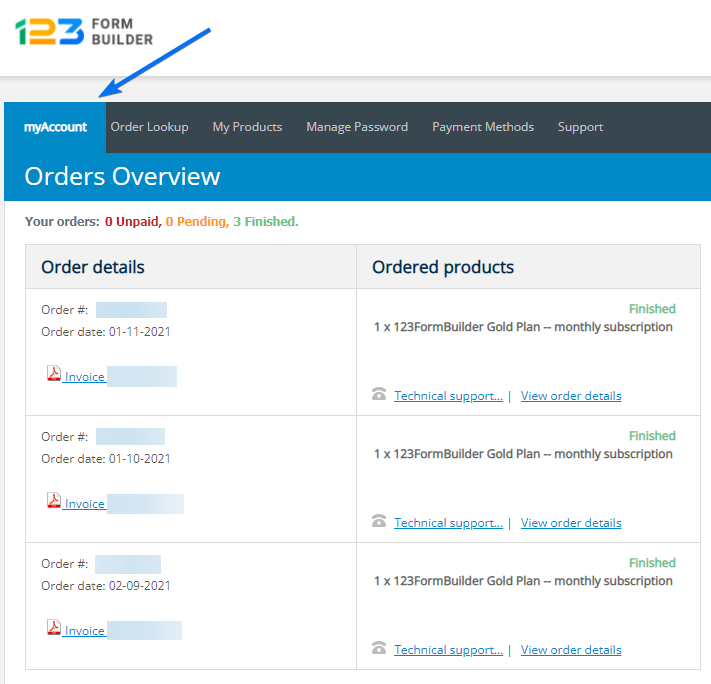
Here you’ll find an overview of your orders, see your invoices and download them to your device. All invoices are generated as PDF documents.
123FormBuilder is a powerful tool that helps you create online forms within minutes with a simple drag and drop interface. Dragging fields into your form saves you a lot of time and stress.
Adding, moving and grouping fields could not be easier.
How to add a field
After you have signed up for an account, click the New Form button to start creating your form. Choose a form template to customize it, or start with a blank form.
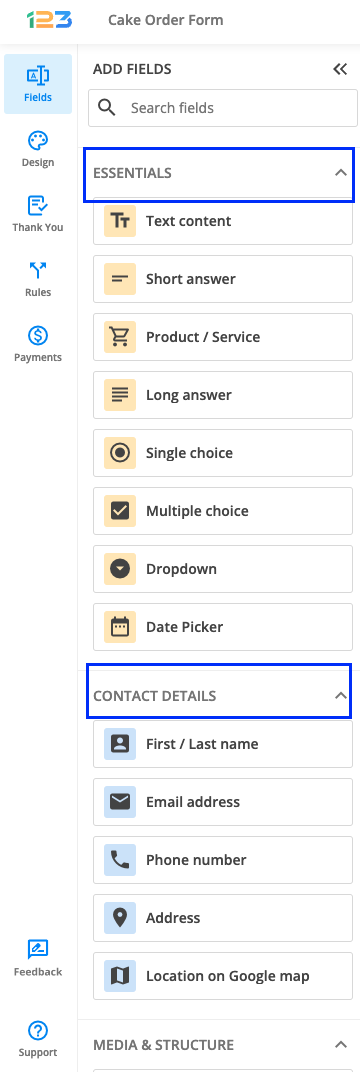
In the left sidebar, you can find all the fields that you can apply to your form, showcased with their corresponding image icon. On hover, each icon has a tooltip that expresses its associated section. Therefore, you can easily switch between sections to configure your form.
There are seven groups of fields: Essentials, Contact details, Media & Structure, Uploads & Consent, Date & time, Rating scales, E-Commerce & Calculations. 123FormBuilder incorporates the drag & drop functionality in real-time.
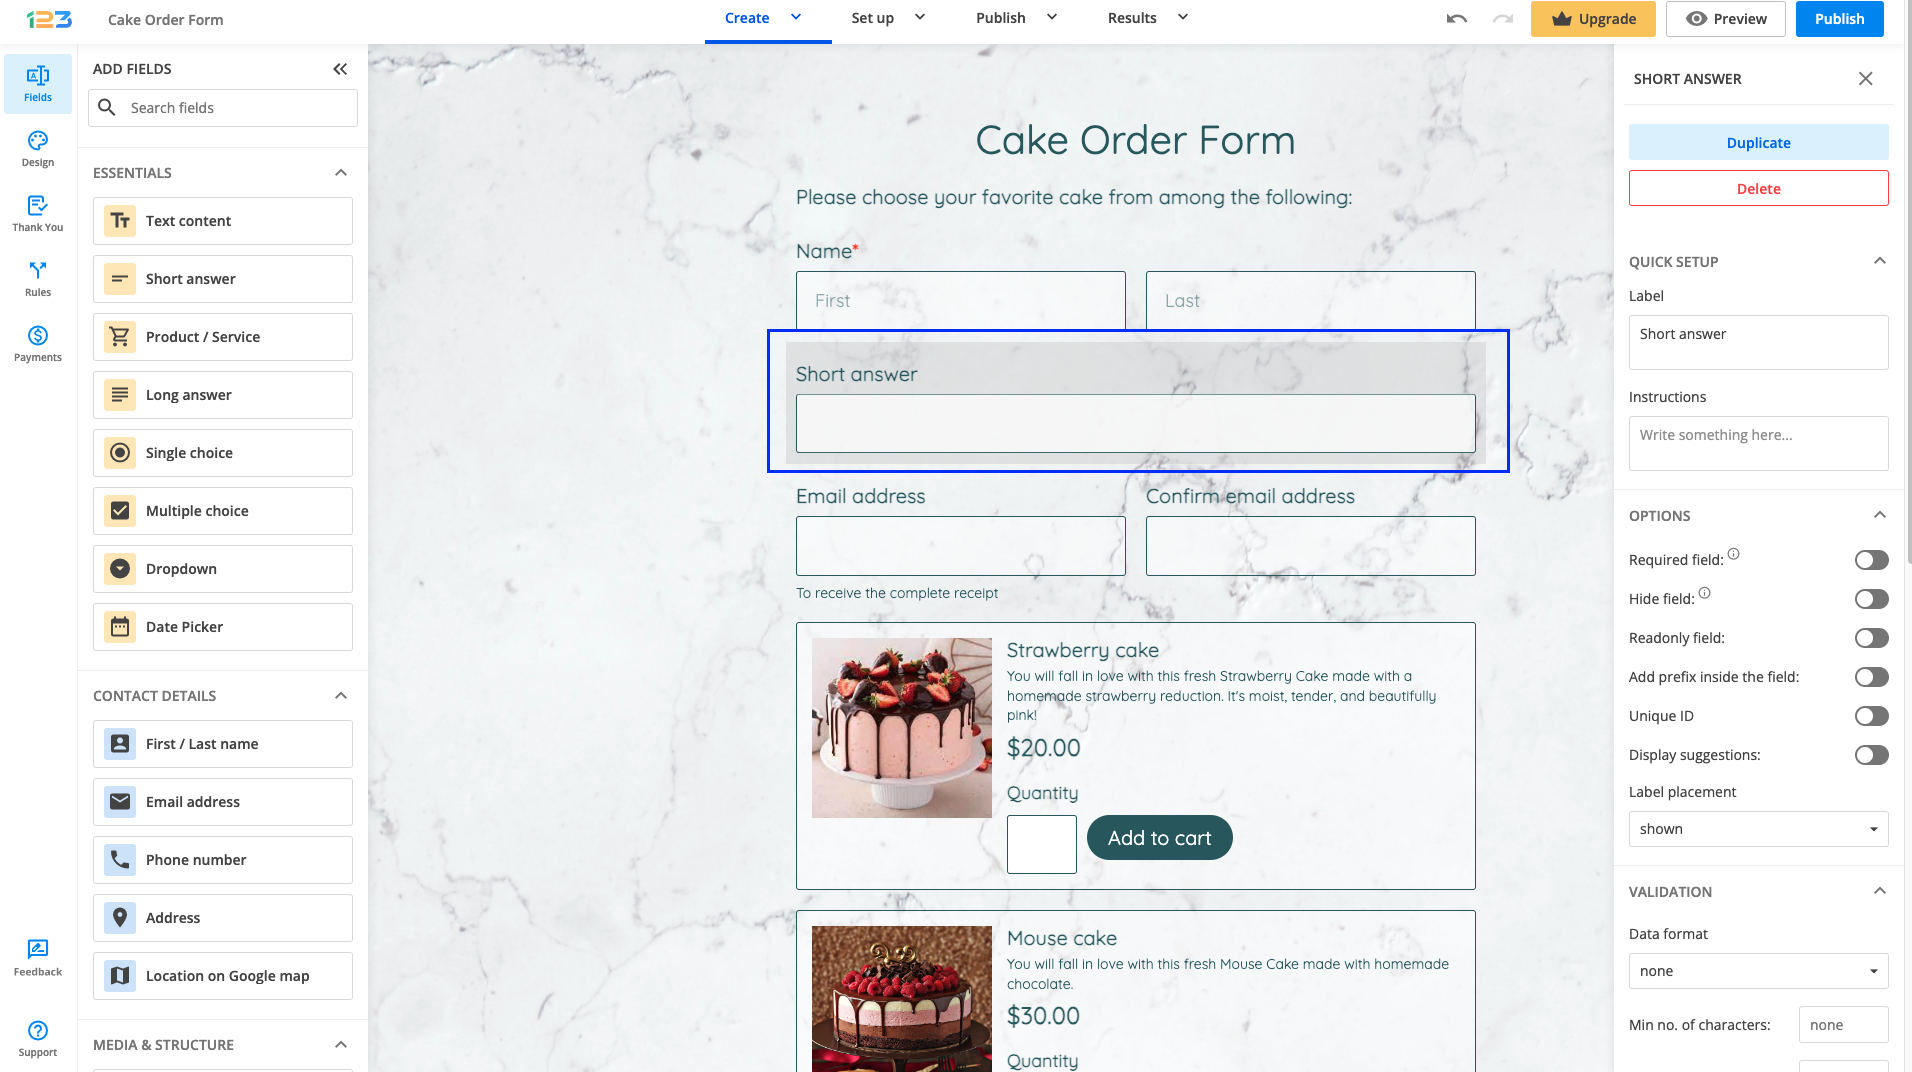
To add a field, you can simply click on the desired field or press and hold down the left mouse button to grab it. While grabbing it, move the mouse to place it on the form.
Note: if you have a field already selected on the form and you want to add a new field, the newly added field will be placed below the initial selected field and not at the end of the form.
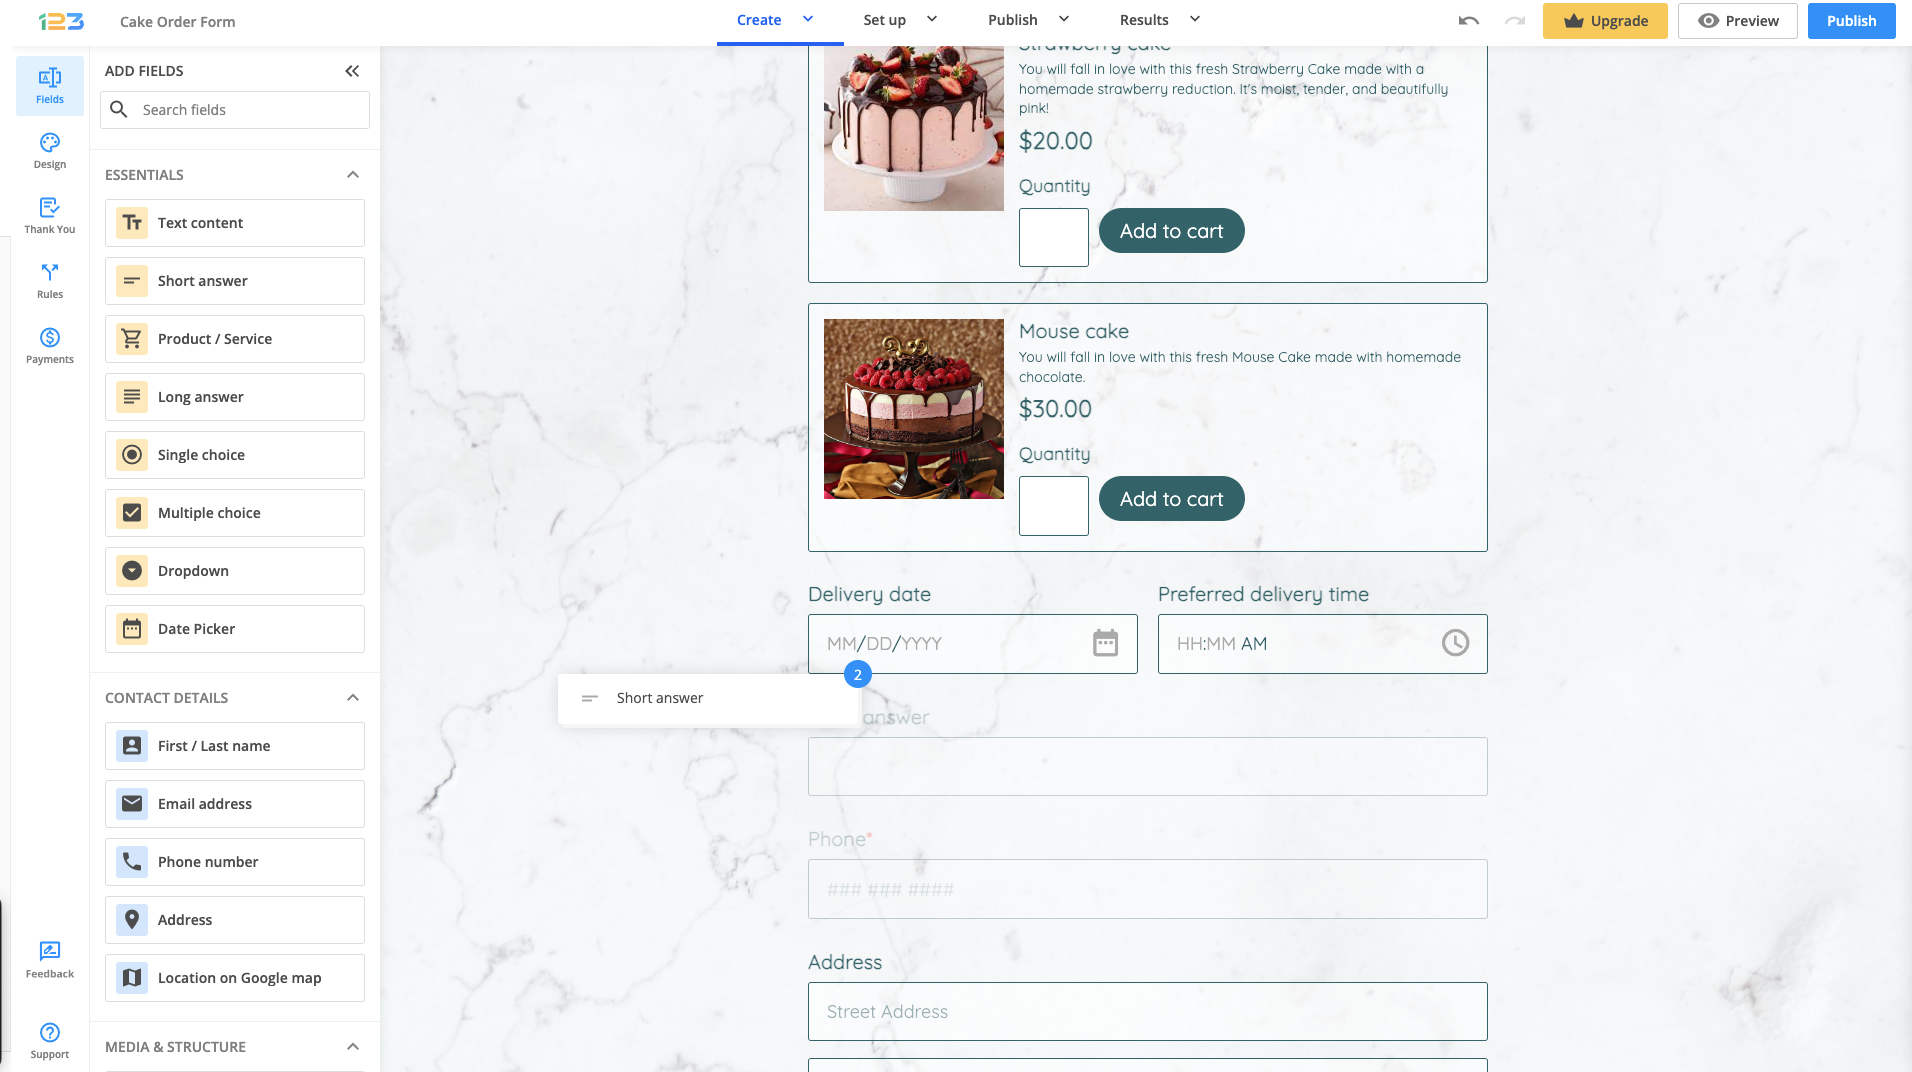
Let’s take an example: we begin with the below form and no field is selected on the form. We can either drag and drop of the fields from the left side or we can simply click on the field we want to add on the form.
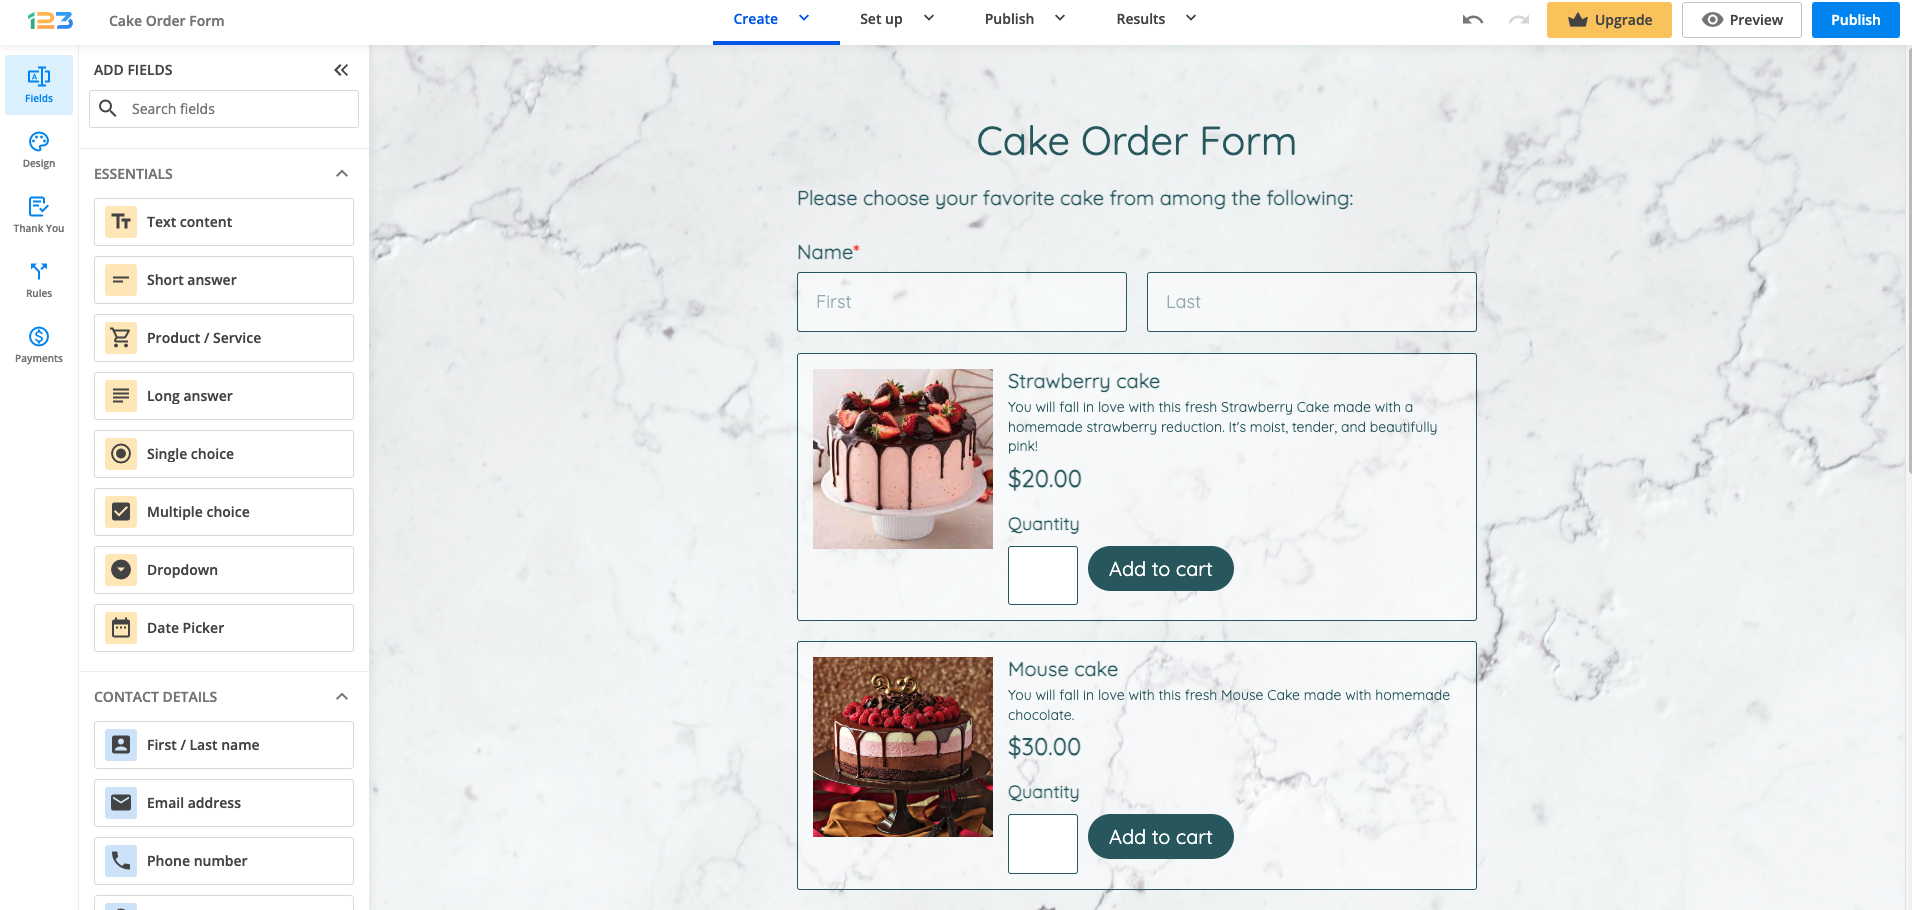
Since there is no field selected, then the newly added field will be placed at the end of the form.
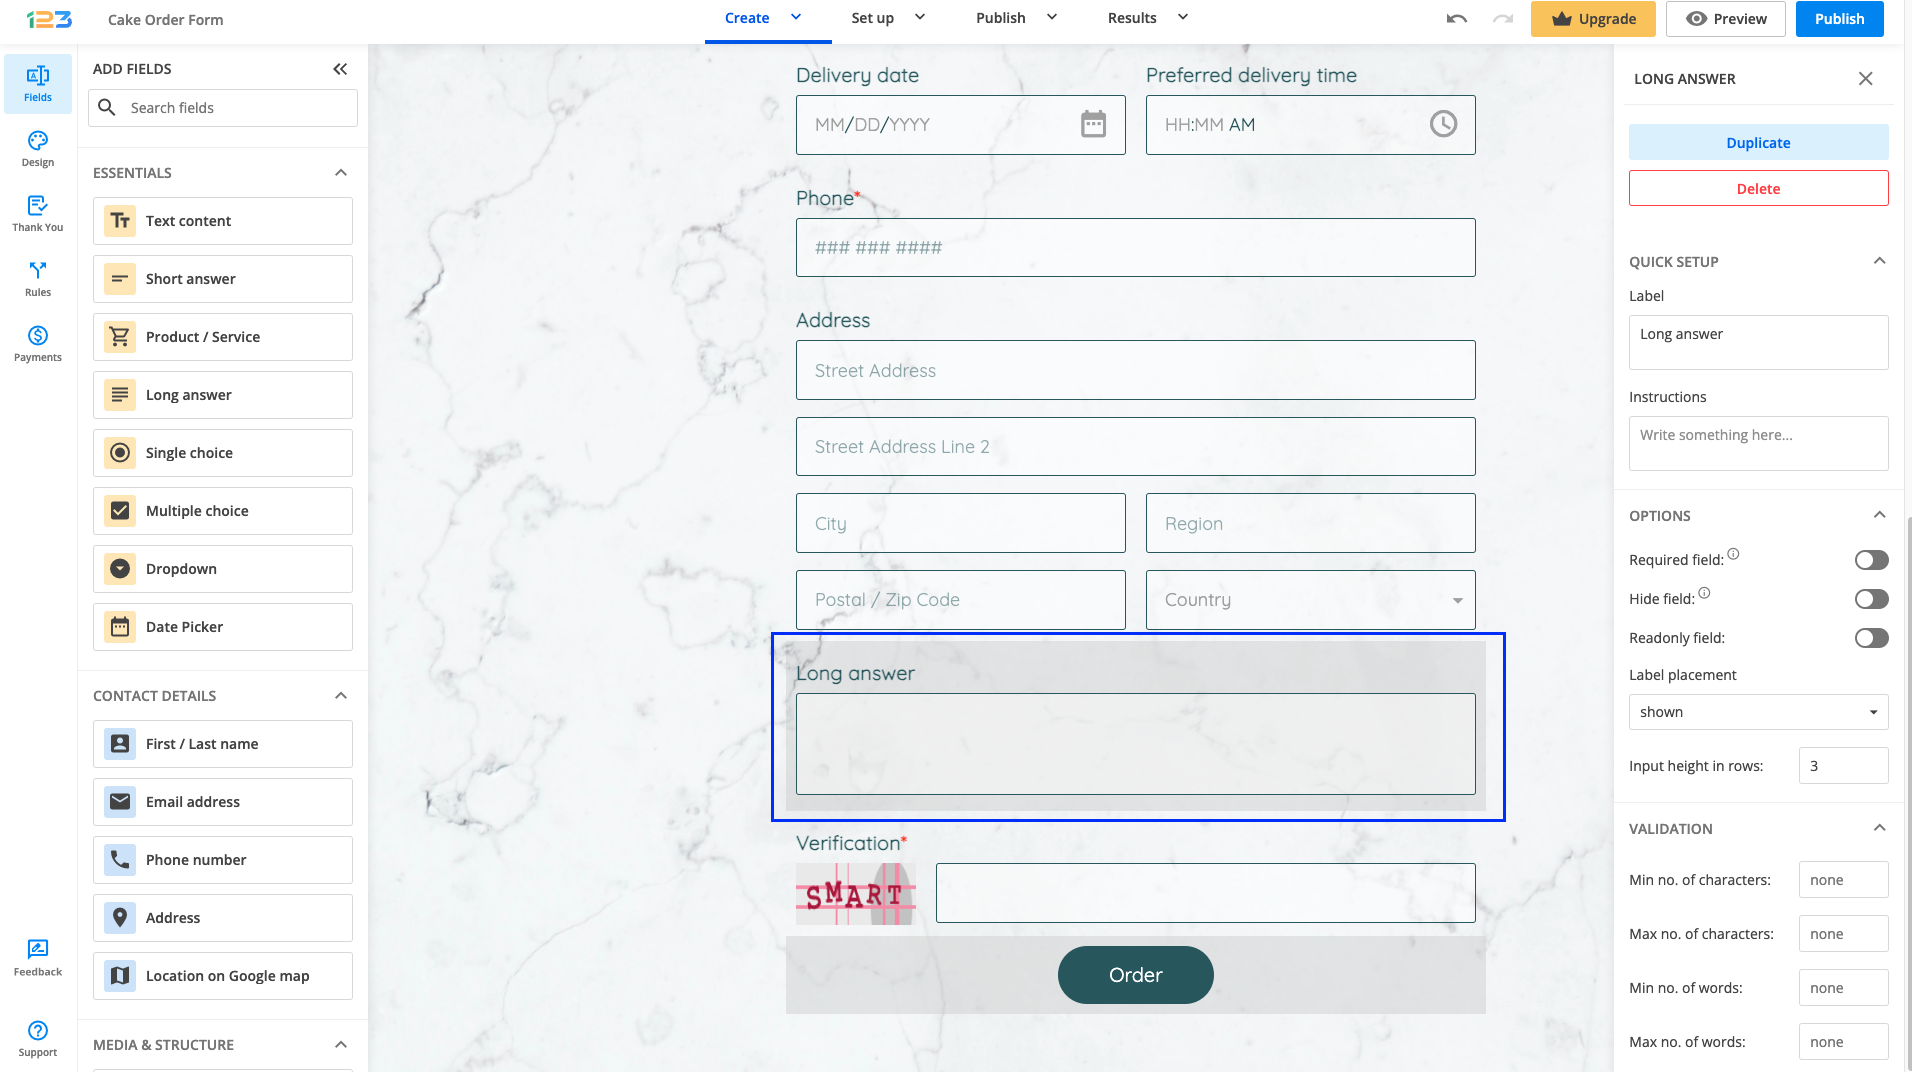
If we have a field selected on the form, like in the below screenshot, and you click on a new field to be added on the form, it will be automatically placed below the highlighted one.
How to move a field
If you want to move a field around, you can simply drag & drop it where you want to, by paying attention to the blue line. This represents the place where the new field will be added.

How to move a group of fields
Let’s say you have a multipage form and you want to move fields from the first page to the second page. Instead of dragging fields one by one, you can group fields.
Group them by holding down the CTRL or SHIFT key as you continue clicking on multiple fields.
On the left side of your screen, a counter is displayed to indicate the number of fields selected.
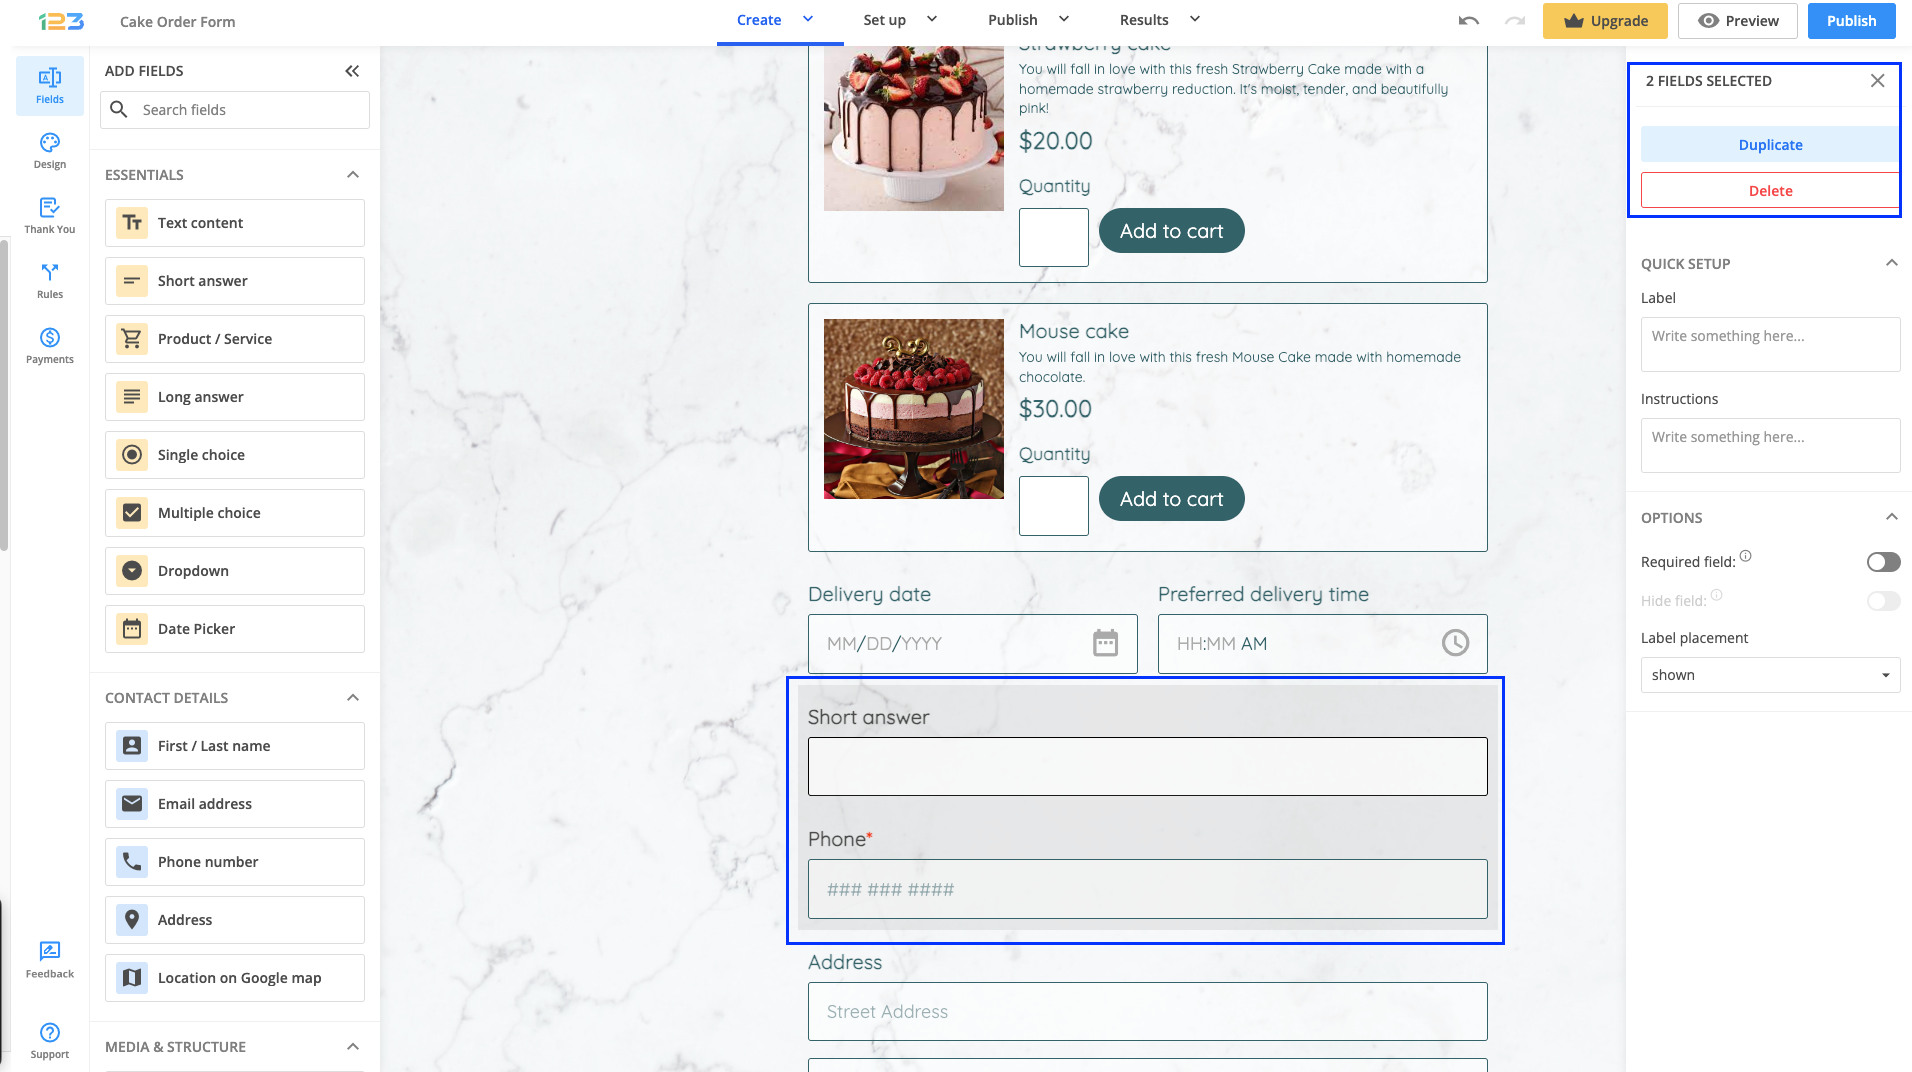
The counter and the first field are shown when moving the group of fields as well.
Related articles
Craigslist is one of the most popular advertisement websites in the United States that provides advertisements for services, jobs, housing, local community, and events. It is a powerful market web-based service that helps you sell products, generate traffic, leads, and increase your customer reach.
Providing contact information is essential in Craigslist listings since not all people are replying directly on Craigslist. A great way is to share a link that redirects them to a contact form.
Here’s how you can add your 123FormBuilder online form on Craigslist:
1. Log in to form builder account and open up your form. If you haven’t created it yet, follow this step-by-step guide.
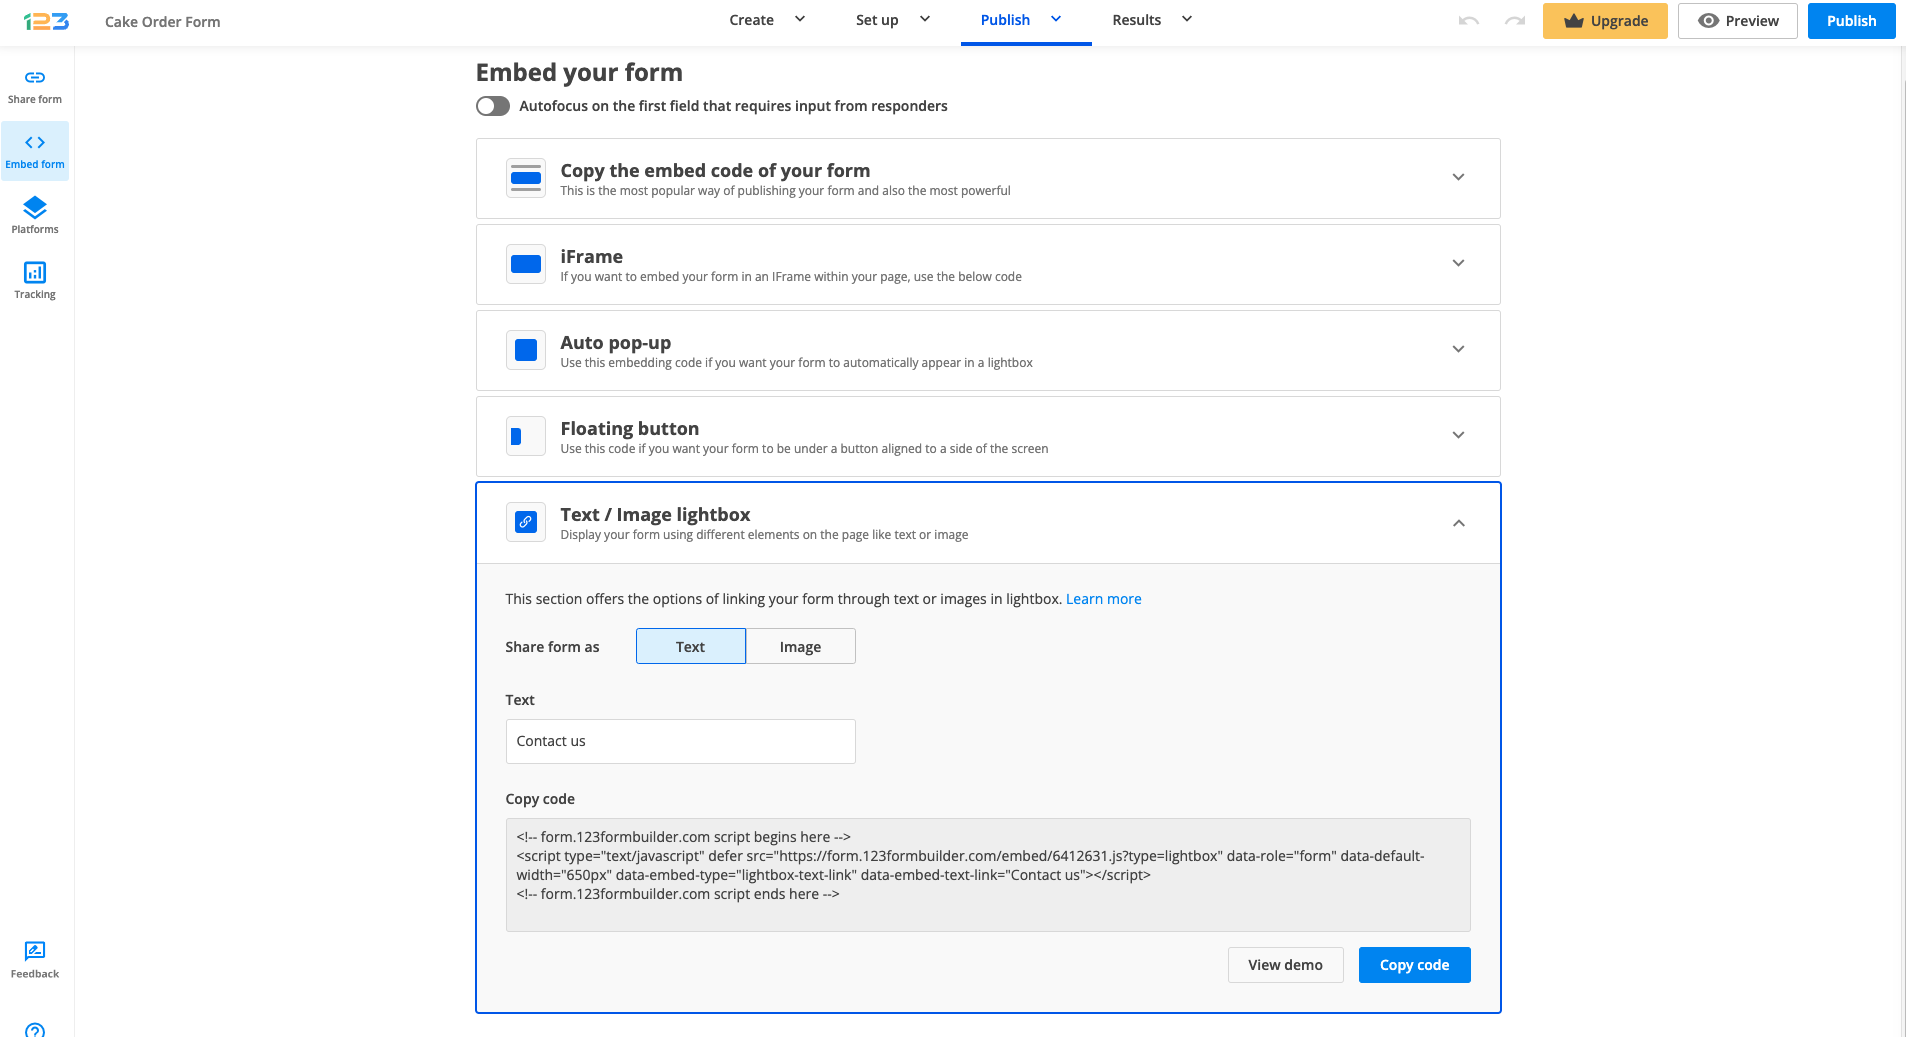
2. After opening the form you wish to share, hover over the Publish section and choose Embed form. Select Text/Image lightbox, make the necessary customizations and copy the code.
That’s it! Now your listing contains the form, and users can get in touch with you more easily.
First, be sure to check your Spam and Trash boxes. If submissions aren’t there, check if you’ve got the proper form configuration. Here are some tips for having your submission emails behave like regular emails.
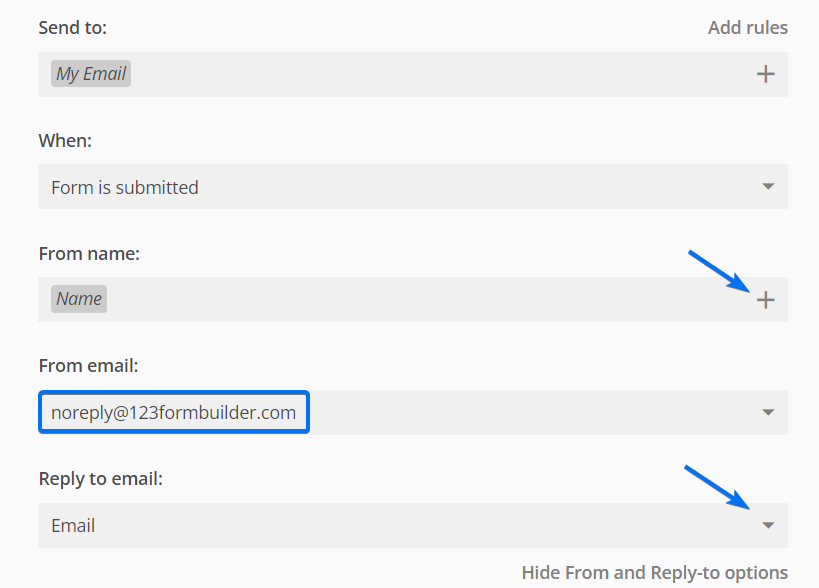
In the form builder, go to Emails, and collapse the Show From and Reply-to options section.
Now, select the following variables from the dropdown lists below: your submitter’s name for From name, noreply@123formbuilder.com for From email, and your submitter’s email address for Reply to email.
Also, create a whitelist in your email settings. This way, you’ll always find your form submissions in your Inbox.
Related articles
The SMTP feature is available starting from the Gold plan. With this feature, you can send notifications on submissions without the address noreply@123formbuilder.com appearing as the sender in the body of the email.
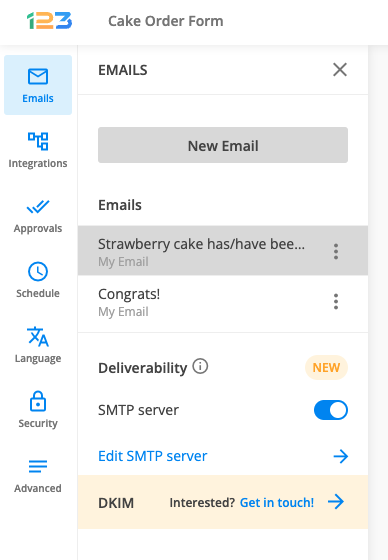
1. Go to the Emails section of your form and in the left-side panel, under the Deliverability subsection, enable SMTP server. Next, click on Edit SMTP server.
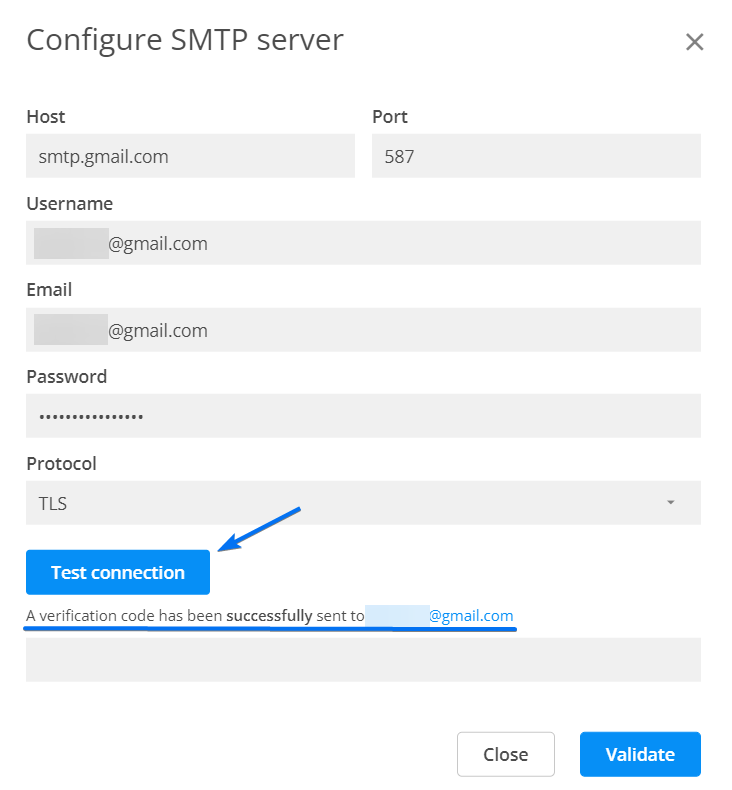
2. In the new lightbox window, insert the Host, Port, Username, Email, and Password of your SMTP server. Select the Protocol your server uses then hit Test connection. You will receive a verification code at the email address specified.
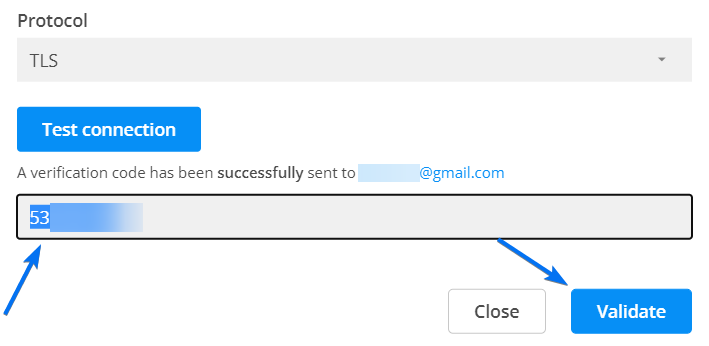
3. Once you have acquired the code, copy and paste it in the verification code box, back in 123FormBuilder. Click on Validate to enable the SMTP connection. From now on, all notification emails will be sent through your SMTP server. More exactly, the sender will no longer be 123FormBuilder, but the email address you have assigned in SMTP Options.
Open up the SMTP settings and double-check that the SMTP connection is enabled, under Deliverability section.
Related articles:
123FormBuilder links & mentions
This is where you define what links and mentions can be kept from our end on the white label platform, such as documentation or support links. Here, all options are unchecked by default, so the links are available for your sub-users.
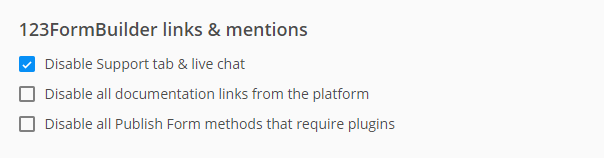
The following 123FormBuilder resources can be disabled and hidden:
Disable Support tab & live chat – unchecked by default. If checked will hide the support tab and chat widget from the interface.
Disable documentation links from the platform – unchecked by default. If checked will disable and hide all links that redirect to 123FormBuilder resources like Knowledge Base articles (for example the “learn more” links from the Publish section or the links from the tooltips that appear when hovering on the “help sign” icons from various sections of the platform). As a future improvement, this option will also hide the “what’s new” section from the Account Menu.
Disable all Publish Form methods that require plugins – unchecked by default. When checked the various publishing means that require 123FormBuilder plugins that can’t be rebranded, such as Shopify, BigCommerce, Facebook, Joomla, WordPress will be hidden.
Help section links
This is where you can define the links that are available for your sub-users when they access the Help section. By default, all of them redirect to 123FormBuilder resources, but they can all be replaced with custom links or completely hidden. The custom links should include http:// or https://.
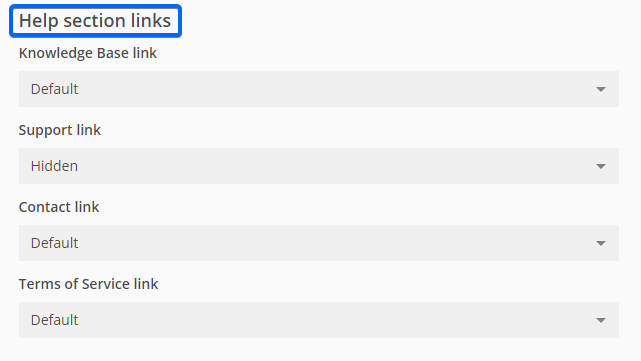
- Knowledge Base link – This is set to Default, meaning the 123FormBuilder Knowledge Base is accessible. The other options are Custom, where you can add a different link, and Hidden.
- Support link – This is set to Default, meaning the 123FormBuilder support form is accessible. The other options are Custom, where you can add a different link, and Hidden.
- Contact link – This is set to default, meaning the 123FormBuilder Contact Us page is accessible. The other options are Custom, where you can add a different link, and Hidden.
- Terms of Service link – This is set to Default, meaning the 123FormBuilder Terms of Service page is accessible. The other options are Custom, where you can add your link, and Hidden.
If all links are hidden, then the “Help” section will be completely hidden.
Related articles
These email instructions apply to the white label version of 123FormBuilder.
The Sender name and Sender email are mandatory and will be applied to all system emails. By default, the name and email associated with your account will be added, but they can be replaced.
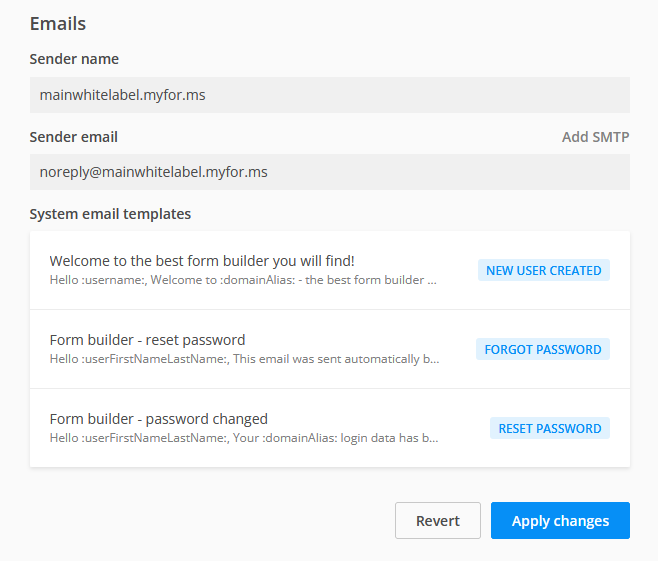
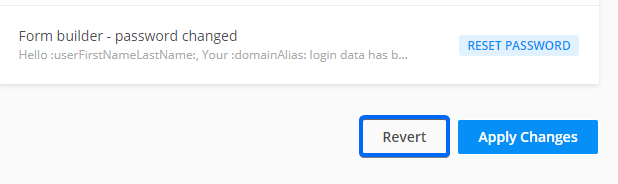
You have three standard system email templates in the White Label section:
New user created email – this is the email that is sent out when an administrator adds a new user. This email will inform the user of the username and system-generated password that they can change later.
Forgot Password email – this is triggered when users reset their password from the Login page, by clicking on the Forgot Password link.
Reset password email – This is triggered when admins reset the password of a user from the Users section.
Customizing the Email templates
All email templates have defaults for subject and body, but they can be edited. Clicking on the templates table will trigger a small pop-up where the emails can be edited either as plain text or HTML. If you are not happy with the customization, you can always reset the template to default.
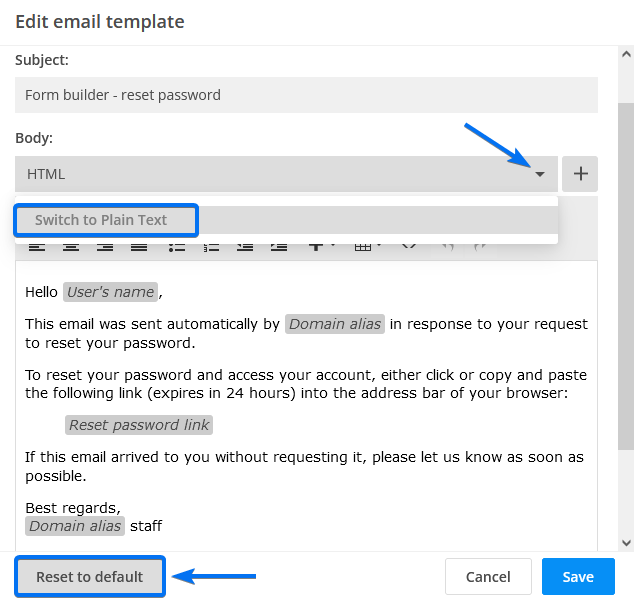
The subject line can be empty, but it’s recommended to include a subject, to avoid emails going into spam.
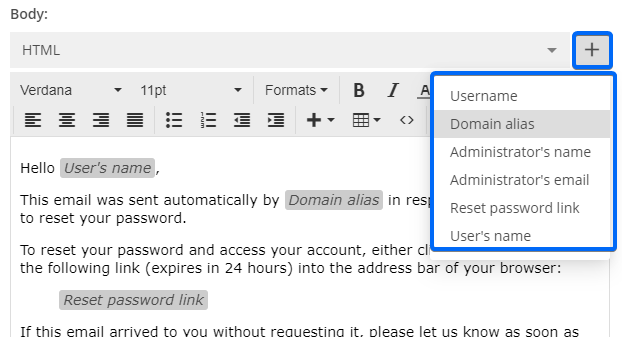
The email body can’t be empty. The custom variables, which will be replaced with relevant content when the emails are sent, can be included from the plus symbol next to the Body type dropdown. Images can be added to the body, but only via links.
All changes made on the White Label customization page will be saved and applied for your sub-users when they log in through the custom domain only after the Apply Changes button is clicked. If the page has errors (e.g. required fields are left empty or pasted links don’t have the required format) the changes can’t be saved. Clicking on the Revert button will cancel all unsaved changes.
Related articles
This section covers the form view style and features of the white label package by 123FormBuilder.
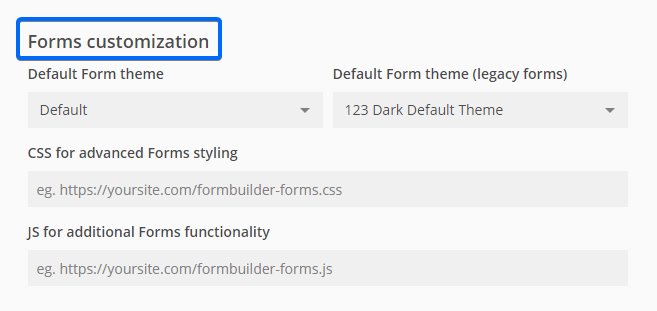
Default Form theme
You can set a custom theme that will apply to all new forms. Once applied, the theme could then be individually edited for each form in the Design section.
CSS for advanced Forms styling
This CSS will be applied to all forms. A URL for an online hosted CSS file should be added here. The URL should include http:// or https://.
JS for additional Forms functionality
This JavaScript will be applied to all forms. You can include a link to the online hosted JS script. The URL should include http:// or https://.
Related articles
The form builder platform can be customized through the use of custom CSS and JavaScript.
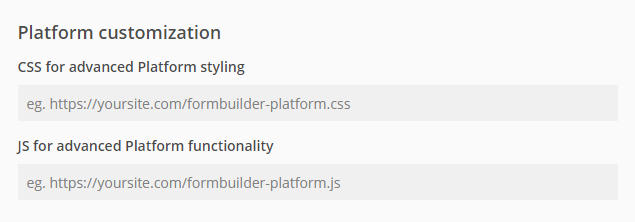
CSS for advanced Platform styling
This CSS applies to the entire app interface (all form builder sections: Dashboard, My Forms, My Account & Users). A URL for an online hosted CSS file can be added here. The URL should include http:// or https://.
JS for advanced Platform functionality
The JavaScript file added here applies to all form builder sections: Dashboard, My Forms, My Account & Users. A URL for an online hosted JS file can be added here. The URL should include http:// or https://.
Related articles
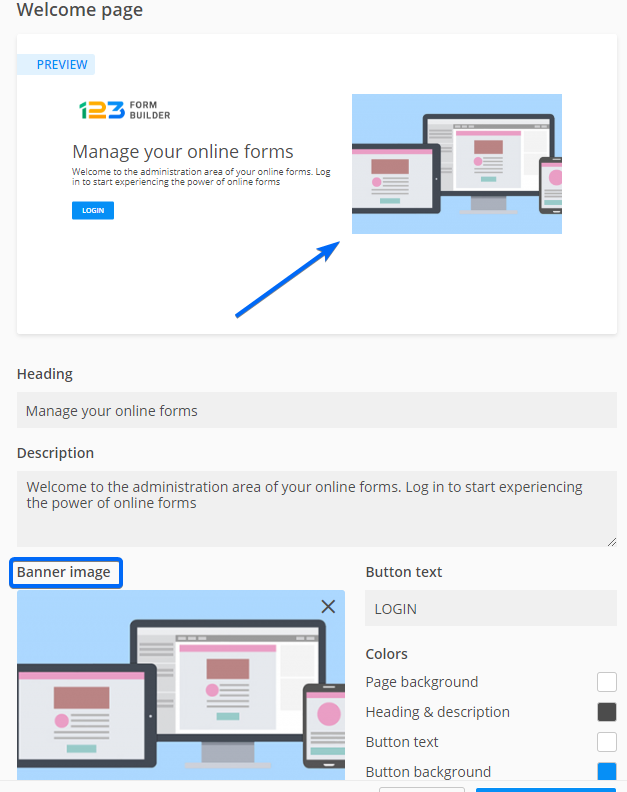
This page prefaces the actual login page of your white label form builder and contains a heading, description, optional banner image, and action button that redirects to the login page.
A preview panel will show the changes before they are saved and applied.
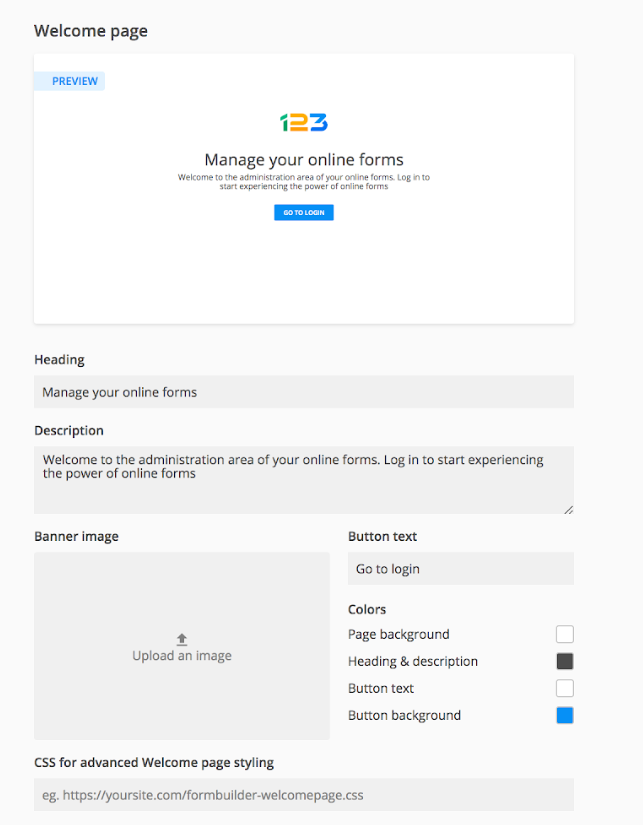
The heading can be changed from the Heading field. The style and size will match that of the login page and platform, however, the color can be customized.
The description can be changed from the Description field. The style and size will match that of the login page and platform, however, the color can be customized. There is no character limit, but long descriptions should be avoided, to maintain a balanced page layout.
CSS for advanced Welcome page styling is where you can apply your own custom CSS URL. The changes made through the custom CSS will overwrite all manual customizations related to the frontpage and will not appear in the preview section.
Optionally, a banner image can be added to the Welcome page. Applying a banner image will change the layout of the Welcome page, moving the logo, headline, and description to the left. Without it, the content will be center aligned.
Accepted formats include PNG, JPG, TIF, and GIF. Max image size: 1680x1120px. Max file size: 2mb. Recommended aspect ratio 3:2 (landscape). If the uploaded image has a different aspect ratio it will be cropped. Image files can be uploaded directly from your device.
The action button text can be customized from the Button text field. The character limit is between 2-30 characters. The size, style and hover state of the button are defined to match the login page, however, the color can be customized.
Color customization for the Welcome page is possible via a color picker, available for these elements:
Page background – this option is where you can change the color. The default is white, the same as the login page.
Heading & description – this is where you can change the color of the text.
Button text – this will change the text color for the action button. Clicking on the color box will bring up a color picker.
Button background – this will change the action button color, which is blue by default.
Related articles
123FormBuilder offers a white label form building package for companies that wish to integrate form building capabilities into their system.
By white labeling 123FormBuilder, you will be able to fully customize your 123FormBuilder backend and provide your own form building service to any number of sub-users you need.
The White Label solution provides our platform as a blank canvas for you to customize.
The domain, style, and platform text customization are done from the White Label Forms panel from the My Account menu.
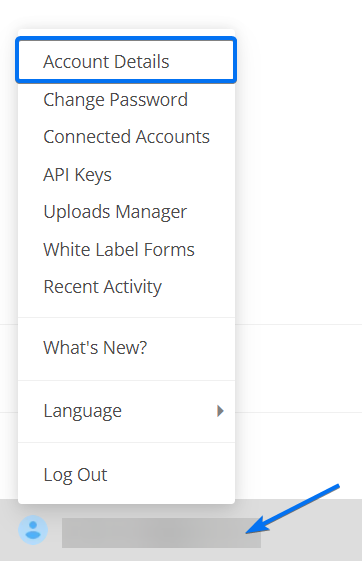
The My Account menu is accessible by clicking on your username.
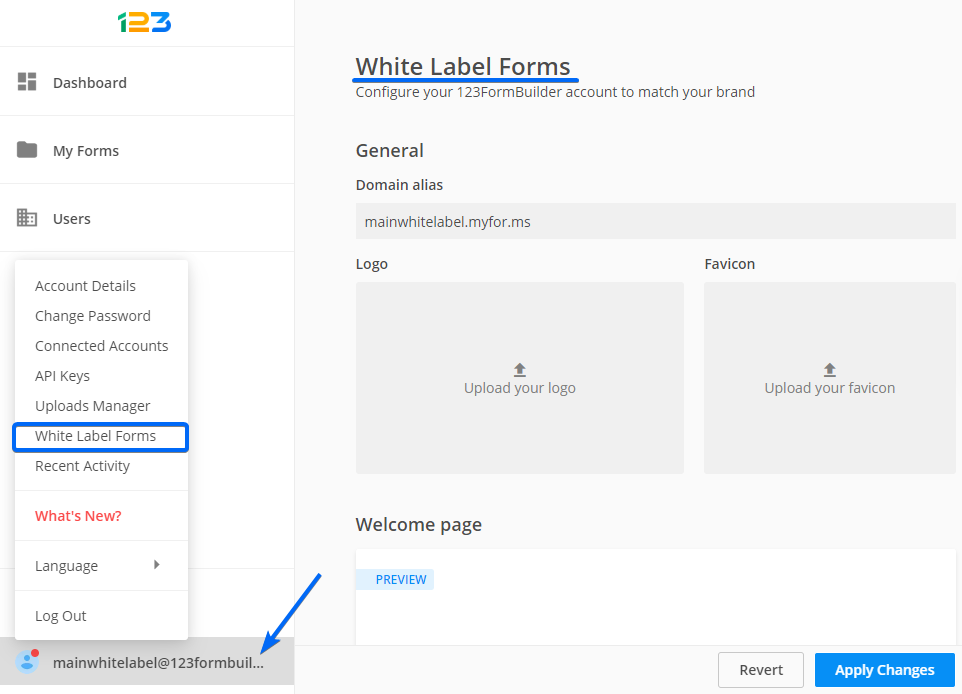
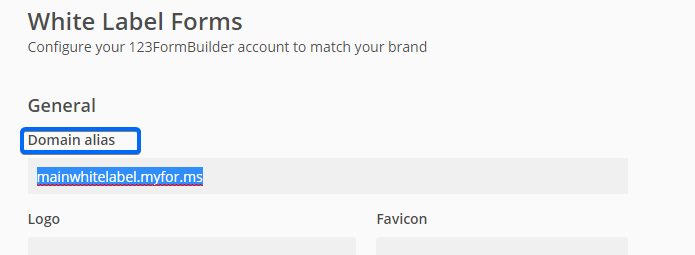
Domain alias
You need to add a custom domain, which will replace the 123FormBuilder domain and direct users to the Welcome page of the White Label solution. This step is mandatory.
The setup of the domain is done with the assistance of one of our consultants, as we will need to change a few things in our server configuration. We will then provide you with the endpoints that you should include in your server DNS.
Logo
You can customize the logo that will show up on the Welcome page, Login page, and across the platform by replacing the default 123FormBuilder logo with your own. When clicking on the default 123FormBuilder logo, an interface will pop up that will allow you to upload your own logo directly on the platform. If you don’t upload a custom logo, then the default 123FormBuilder logo will be applied.
Accepted formats for the logo image are PNG, JPG, TIF, GIF. The max image size allowed is 1024 x 256px. The max file size is 2MB. For best results, the logo width should be bigger than the height and white logos should be avoided, as they will not be visible inside the platform and the related pages.
Favicon
Customizing the favicon is optional. We include a default one, which, when removed, will leave the favicon blank, until you upload your own.
Accepted formats are PNG, JPG, ICO, GIF. The max image size is 32 x 32px. The max file size is 500kb. You can upload image files directly from your device. The Favicon applied in Account Details will not work if the White Label Form functionality is enabled.
Related articles
Most Popular
Frequently Asked Questions
Here is a list of the most frequently asked questions. For more FAQs, please browse through the FAQs page.