123FormBuilder Knowledge Base
Search our documentation platform for answers, service specifications and 3rd-party integrations.
Knowledge Base
123FormBuilder is hosted on Amazon servers with data centers across the US and EU.
Our form builder tool is already GDPR-compliant. However, if you prefer to host all your data on our EU database, sign up and use our EU website. To create a new account on our EU server, please contact us.
You can access the EU server by logging in to https://app-eu.123formbuilder.com/index.php?p=login
Related articles
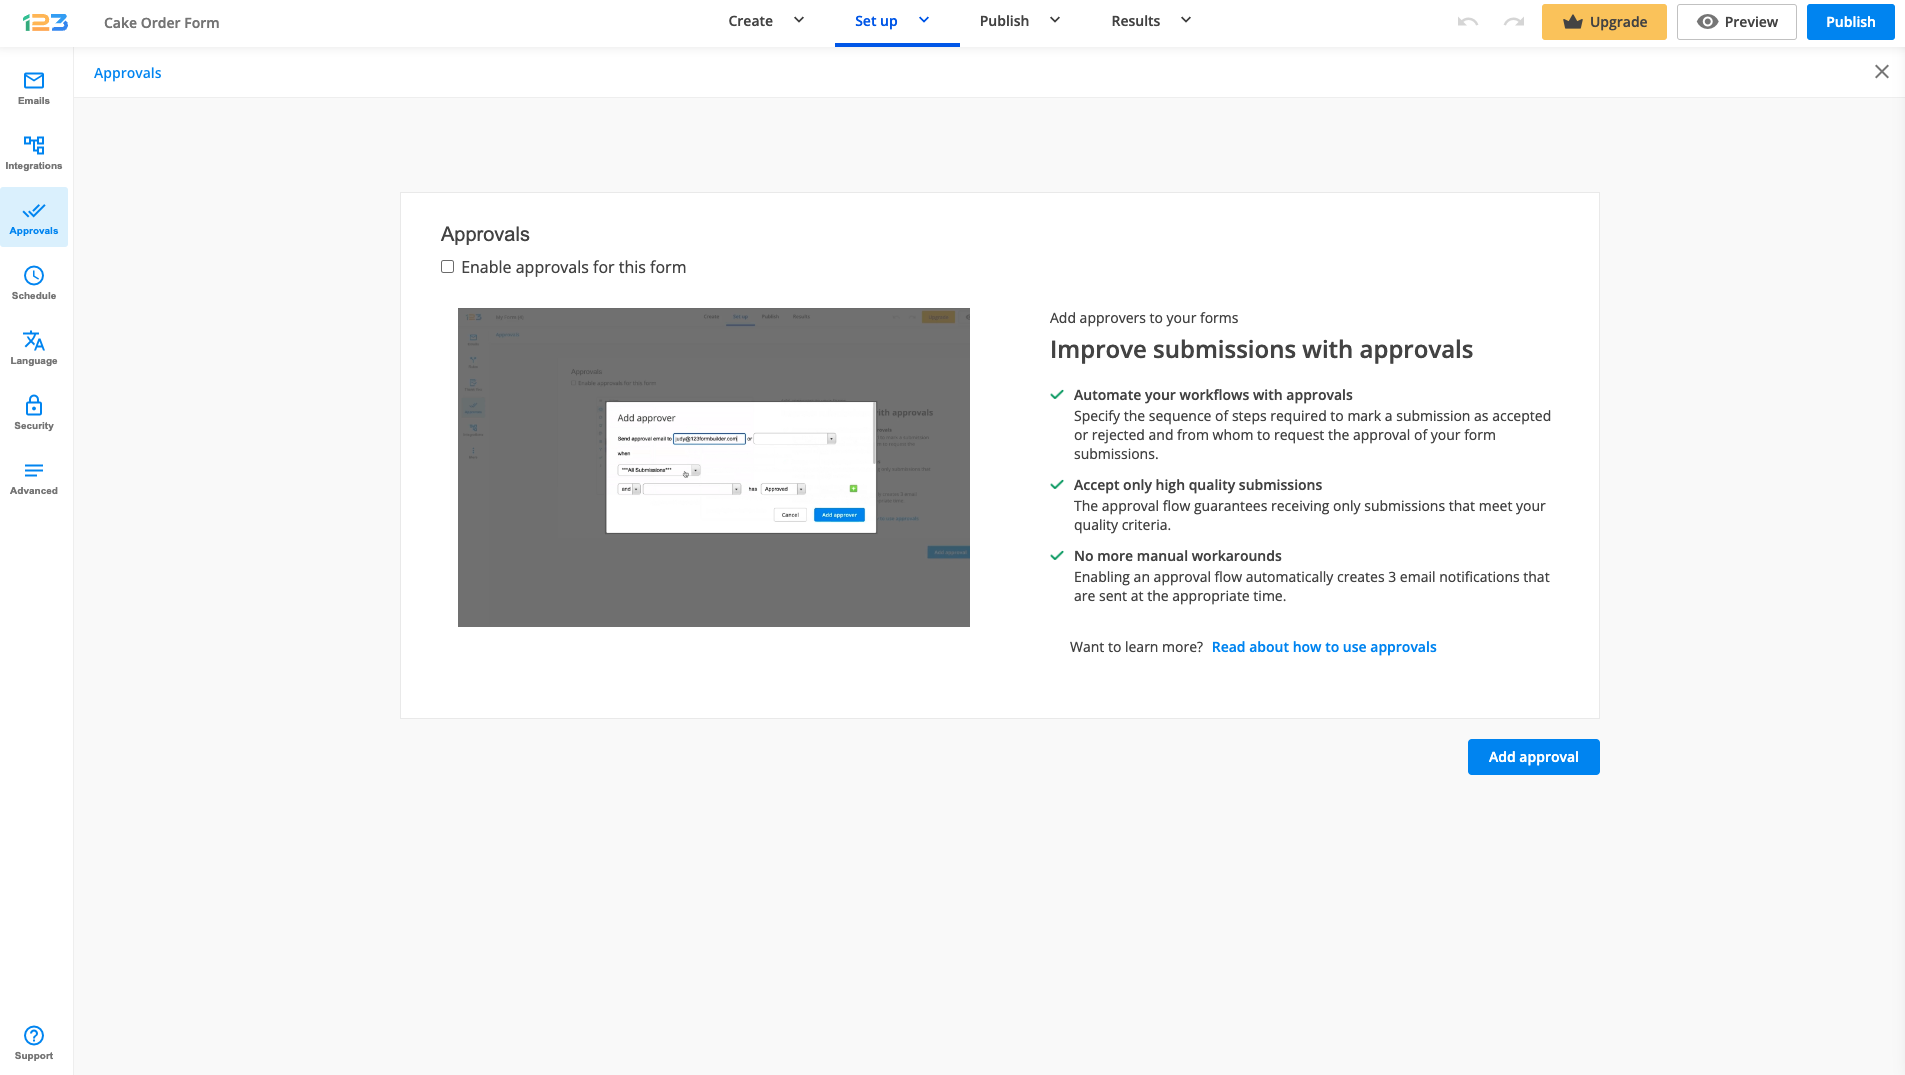
With the approval feature, you can specify the sequence of steps required to mark a submission as accepted or rejected and from whom to request the approval of your form submissions. You can request approval from a single person, or create a chain approval workflow.
It will transform your daily tasks into an automatic process. Build an approval workflow on your form, add the recipients and we will email them automatically.
Configuration
Start by going to your form’s Approvals section.

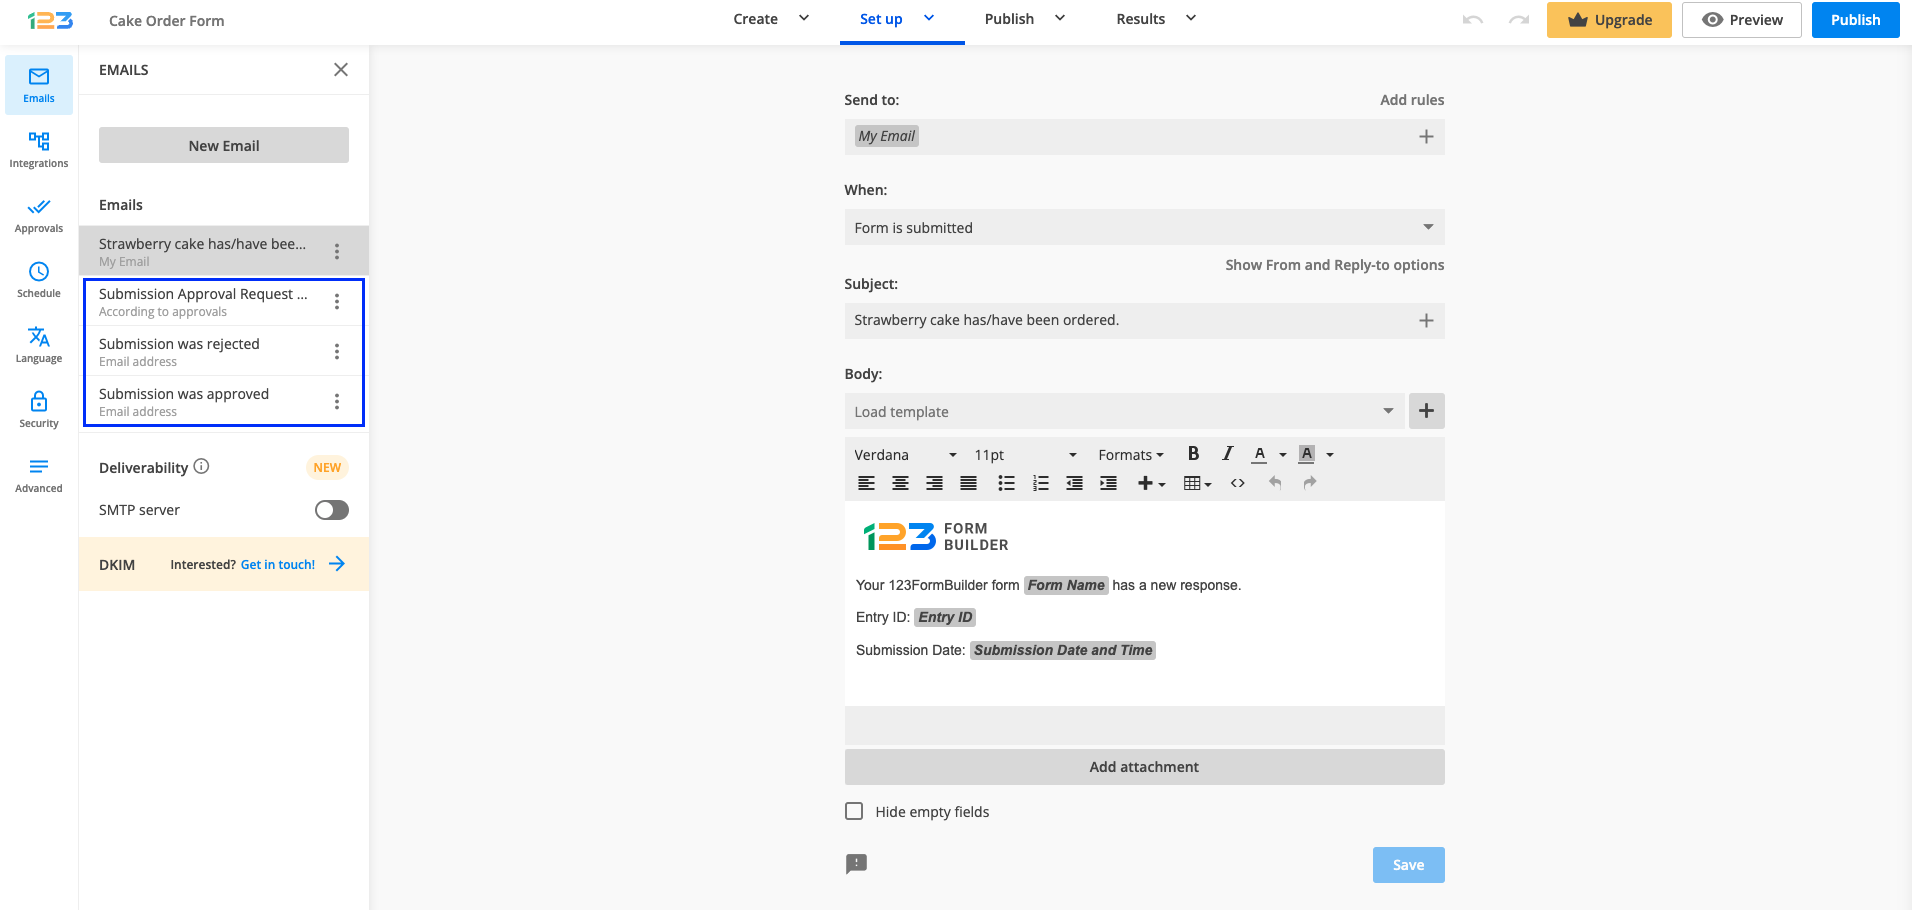
Enabling this feature will automatically create three email templates.
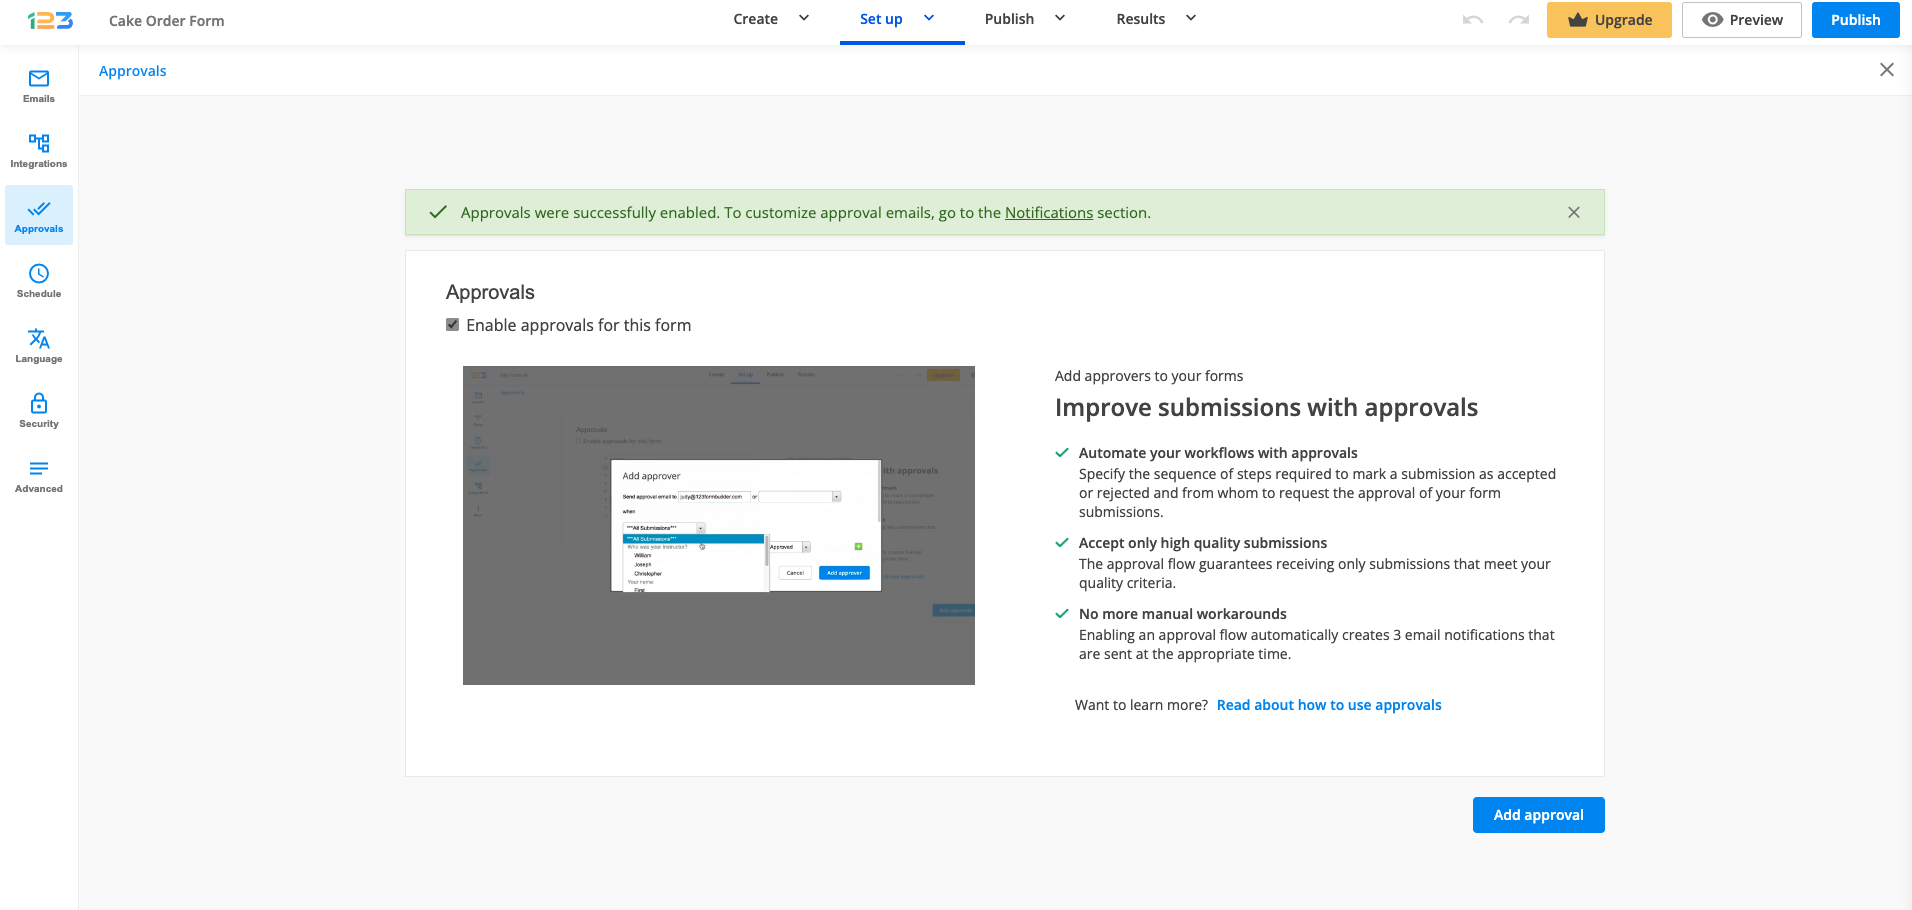
You can customize the email templates to your liking at any time by going to the Emails section.
Coming back to setting up Approvals, click on Add approver and type the email address of the person who will receive the submission. You can manually input the email address to which the approval email to be sent to or you can select a field from the form (in the below case, Email address field).

There are two options available in the first step: to email all submissions to the approver (this is selected by default, like in the above screenshot) or to establish some branching rules.
Let’s take an example of branching rules. For example, in the below screenshot, we are interested in the Date field. You have the option to select the rules that refer to Date field: is not, contains, does not contain, etc.
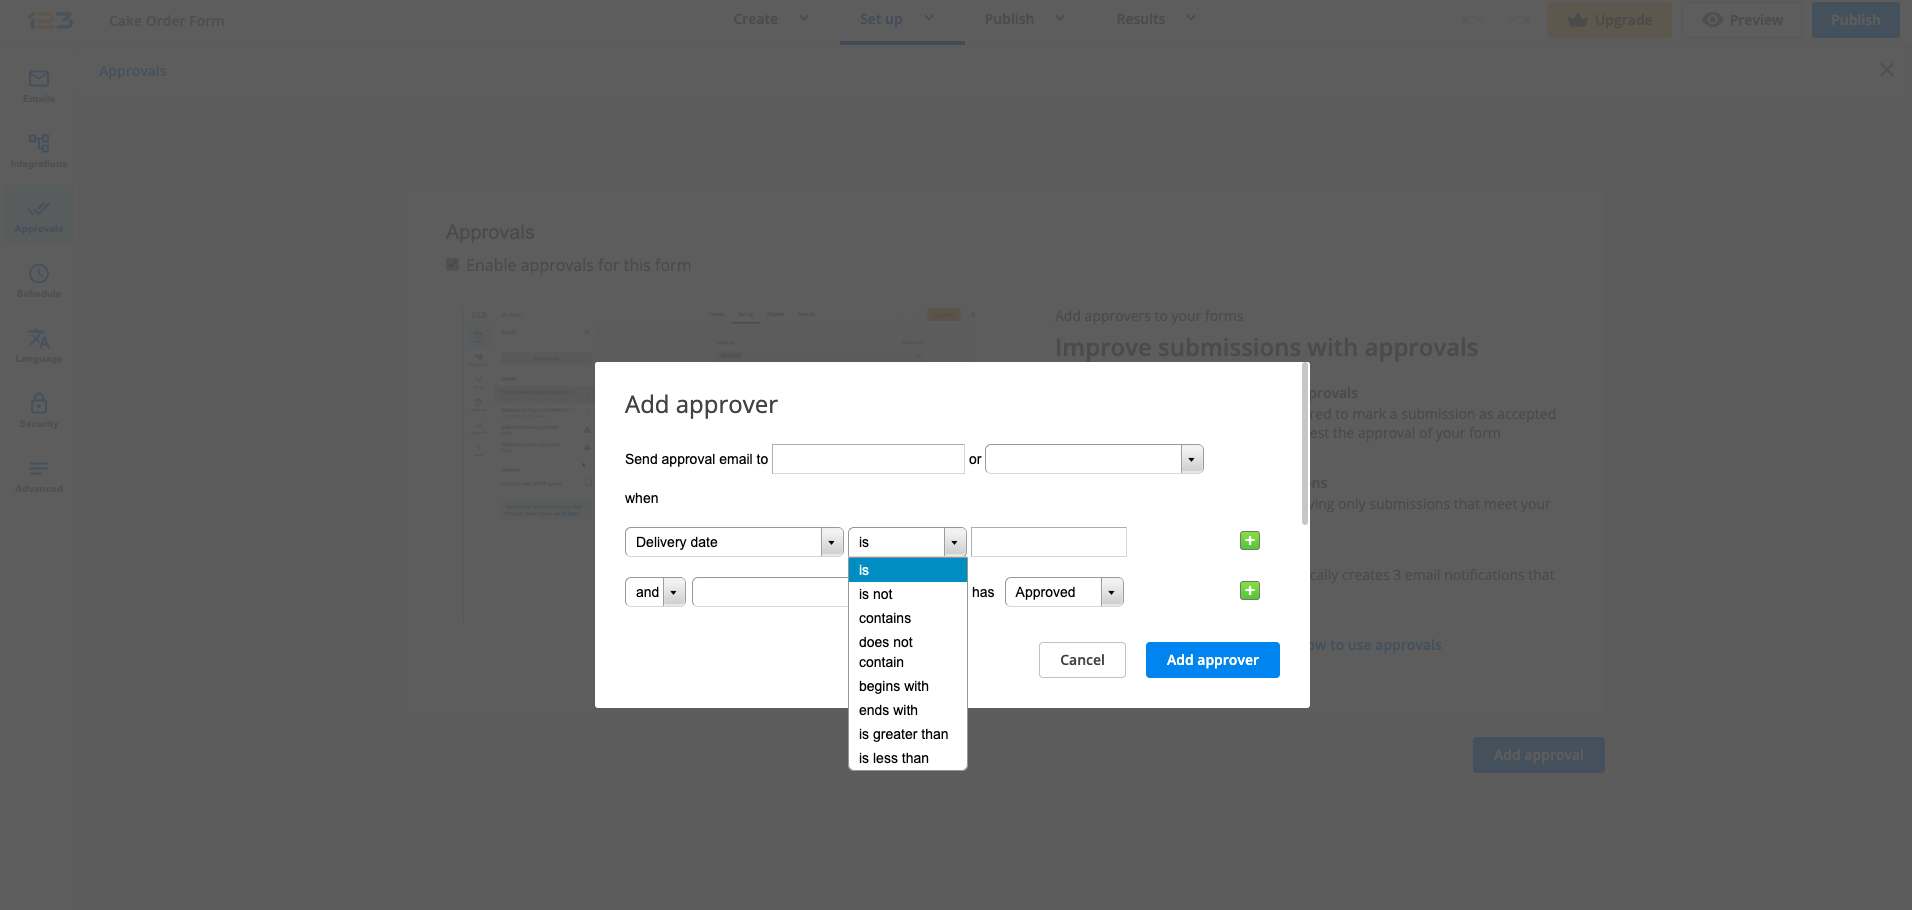
Once you have selected the condition, you have to input the logic based on which the approval email is sent.
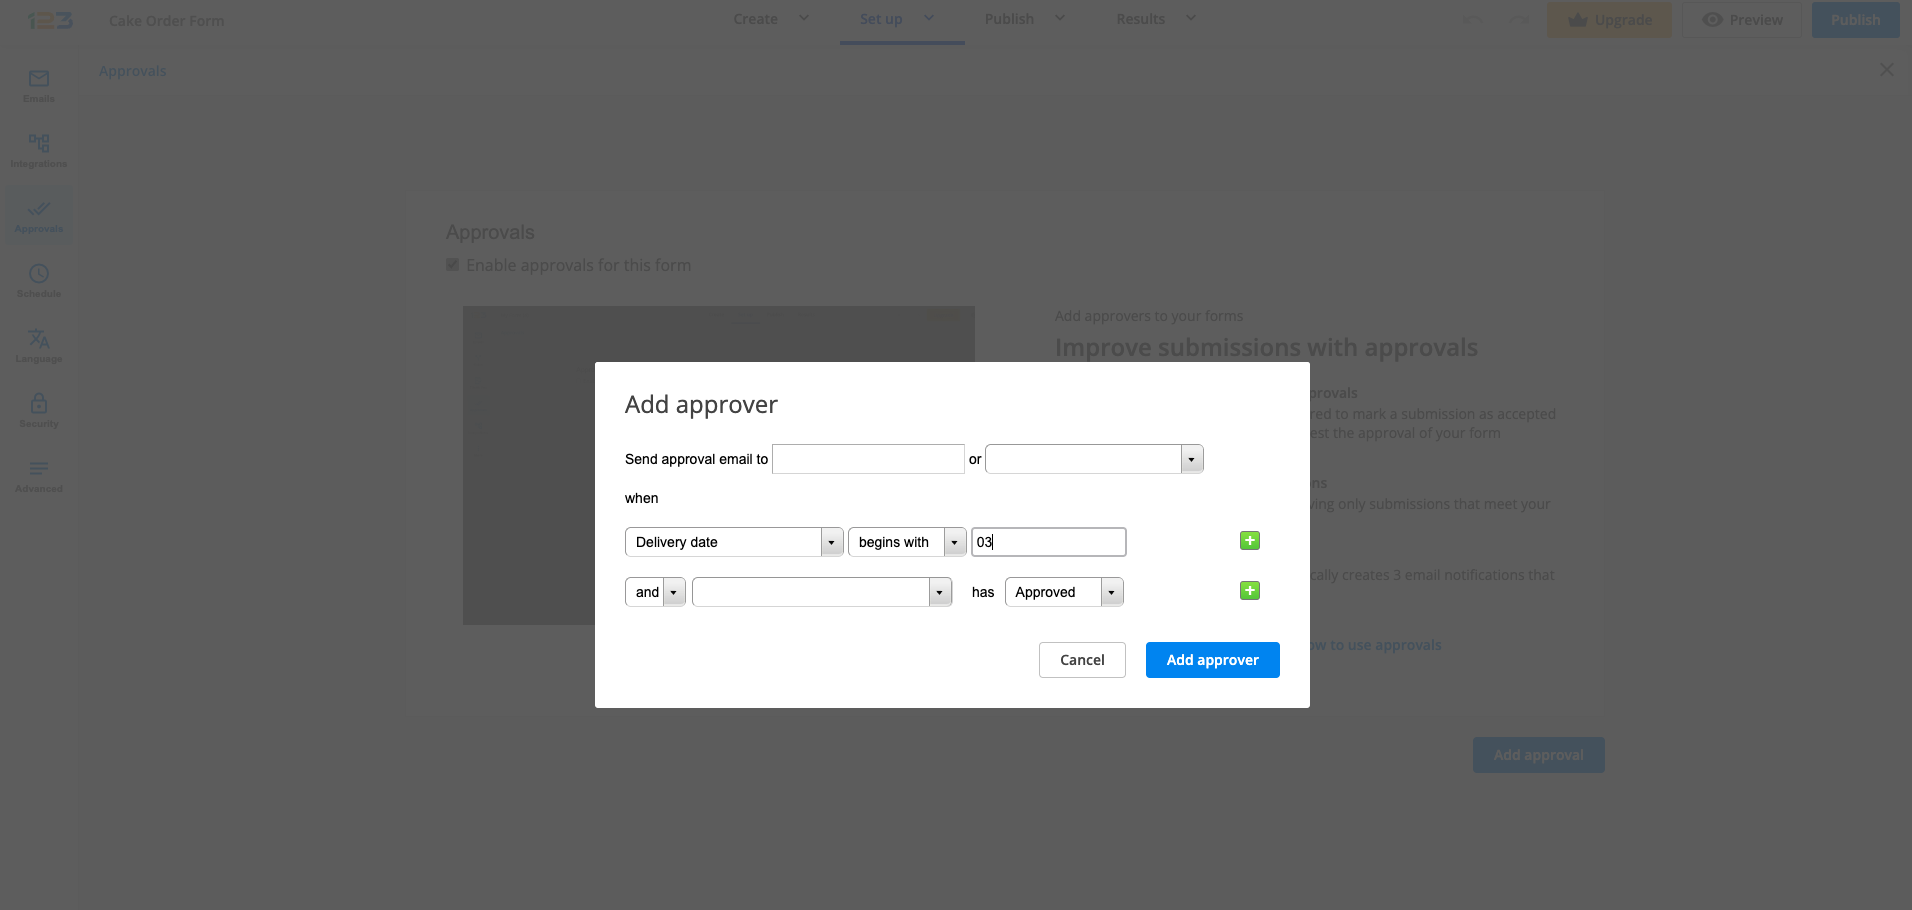
There might be cases in which one condition is not enough, so the plus sign allows you to add another rule.
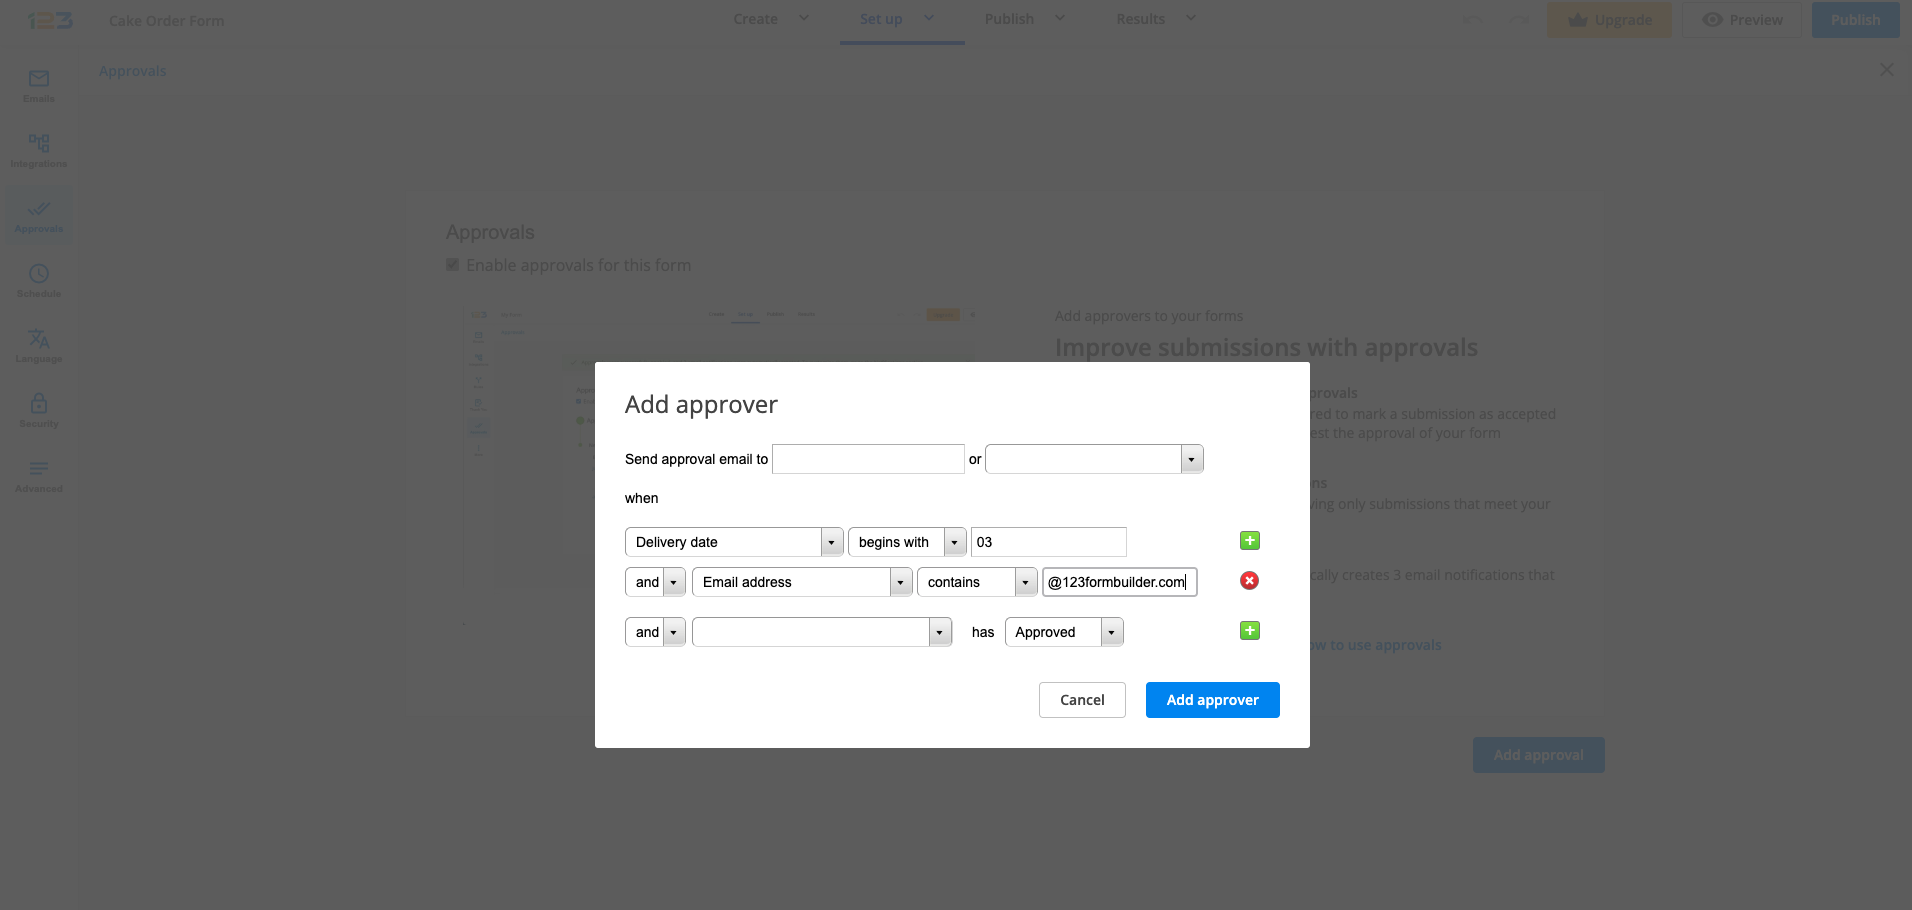
Use either the connector AND or OR to link your conditions. If you are familiar with our Rules feature, this follows the same structure and logic.
After saving the approval chain, here is how it is going to be displayed:
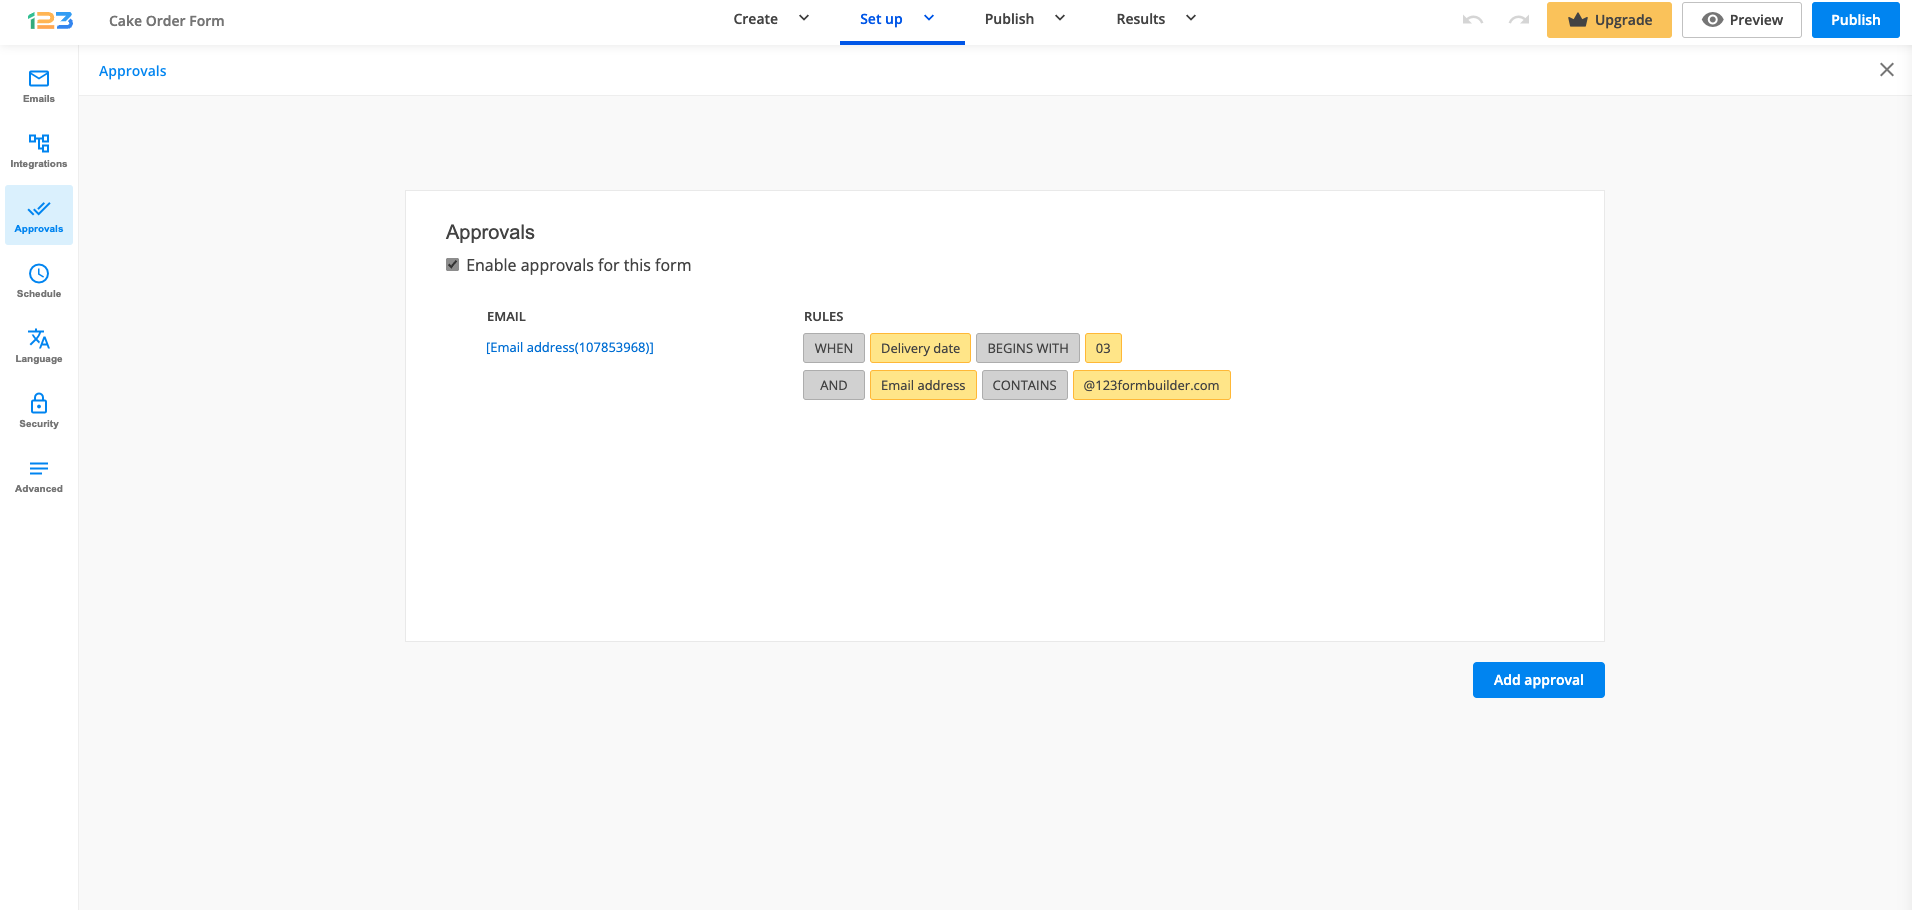
If you need to create a chain approval workflow, you can add a second approver by either selecting the email address field from the form or manually input an email address.
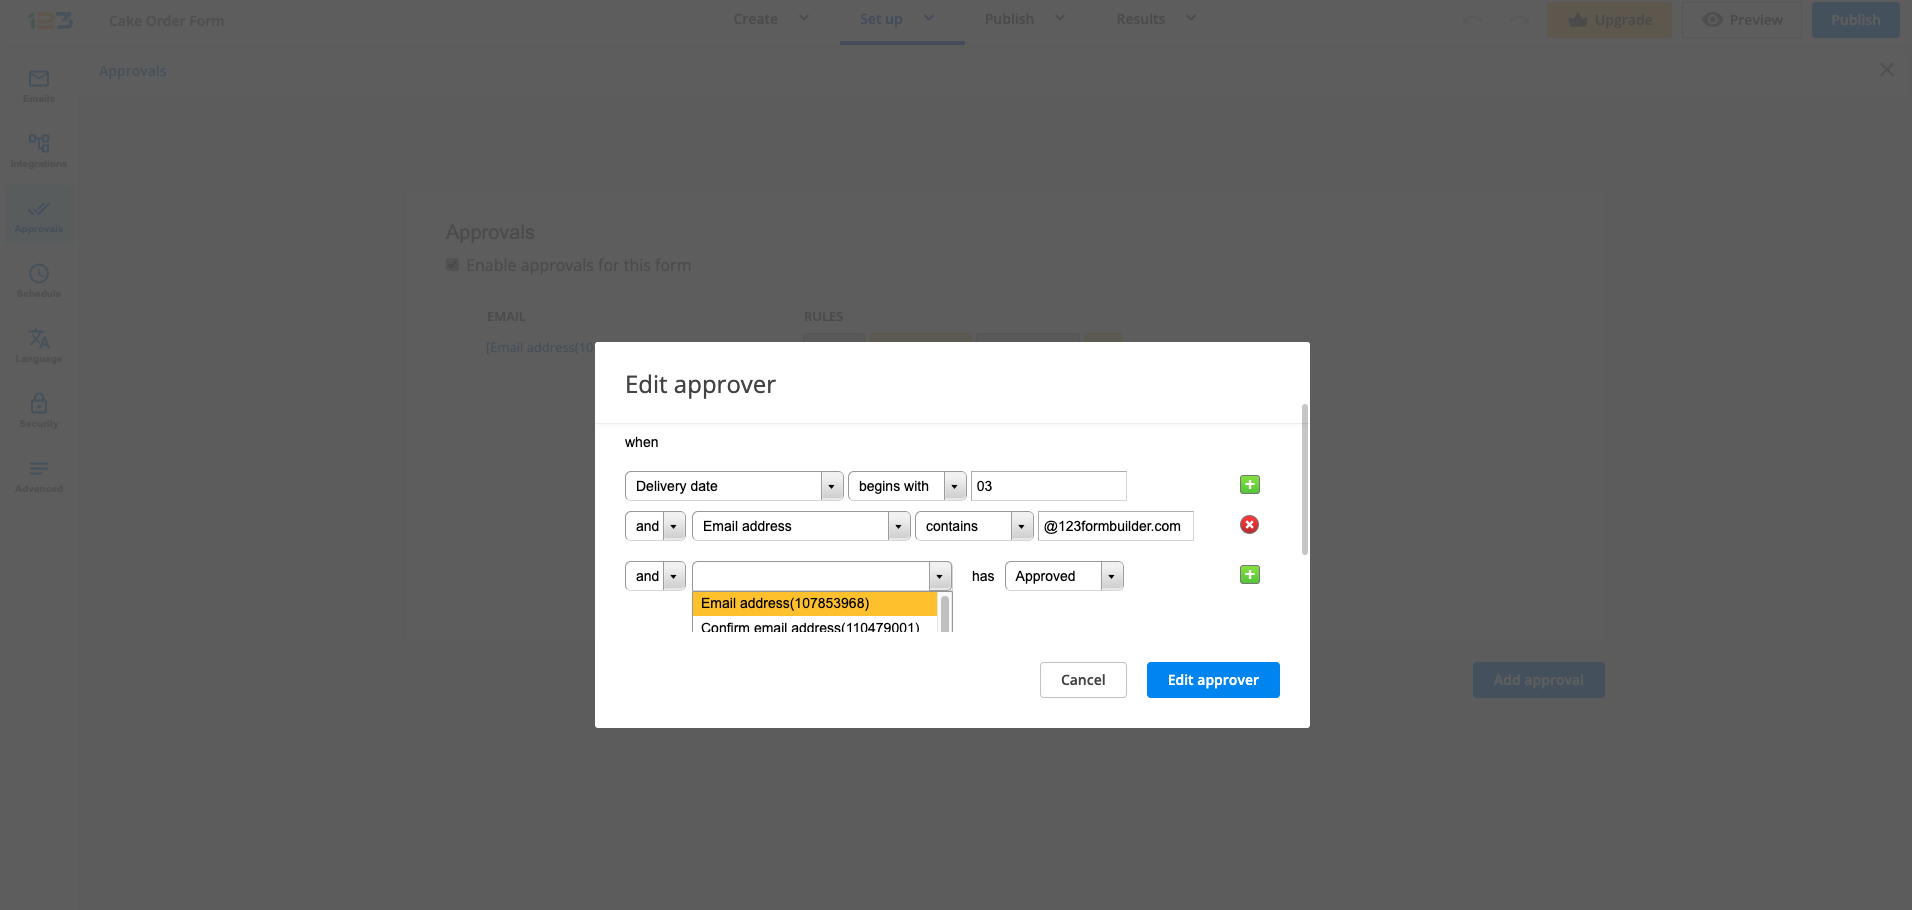
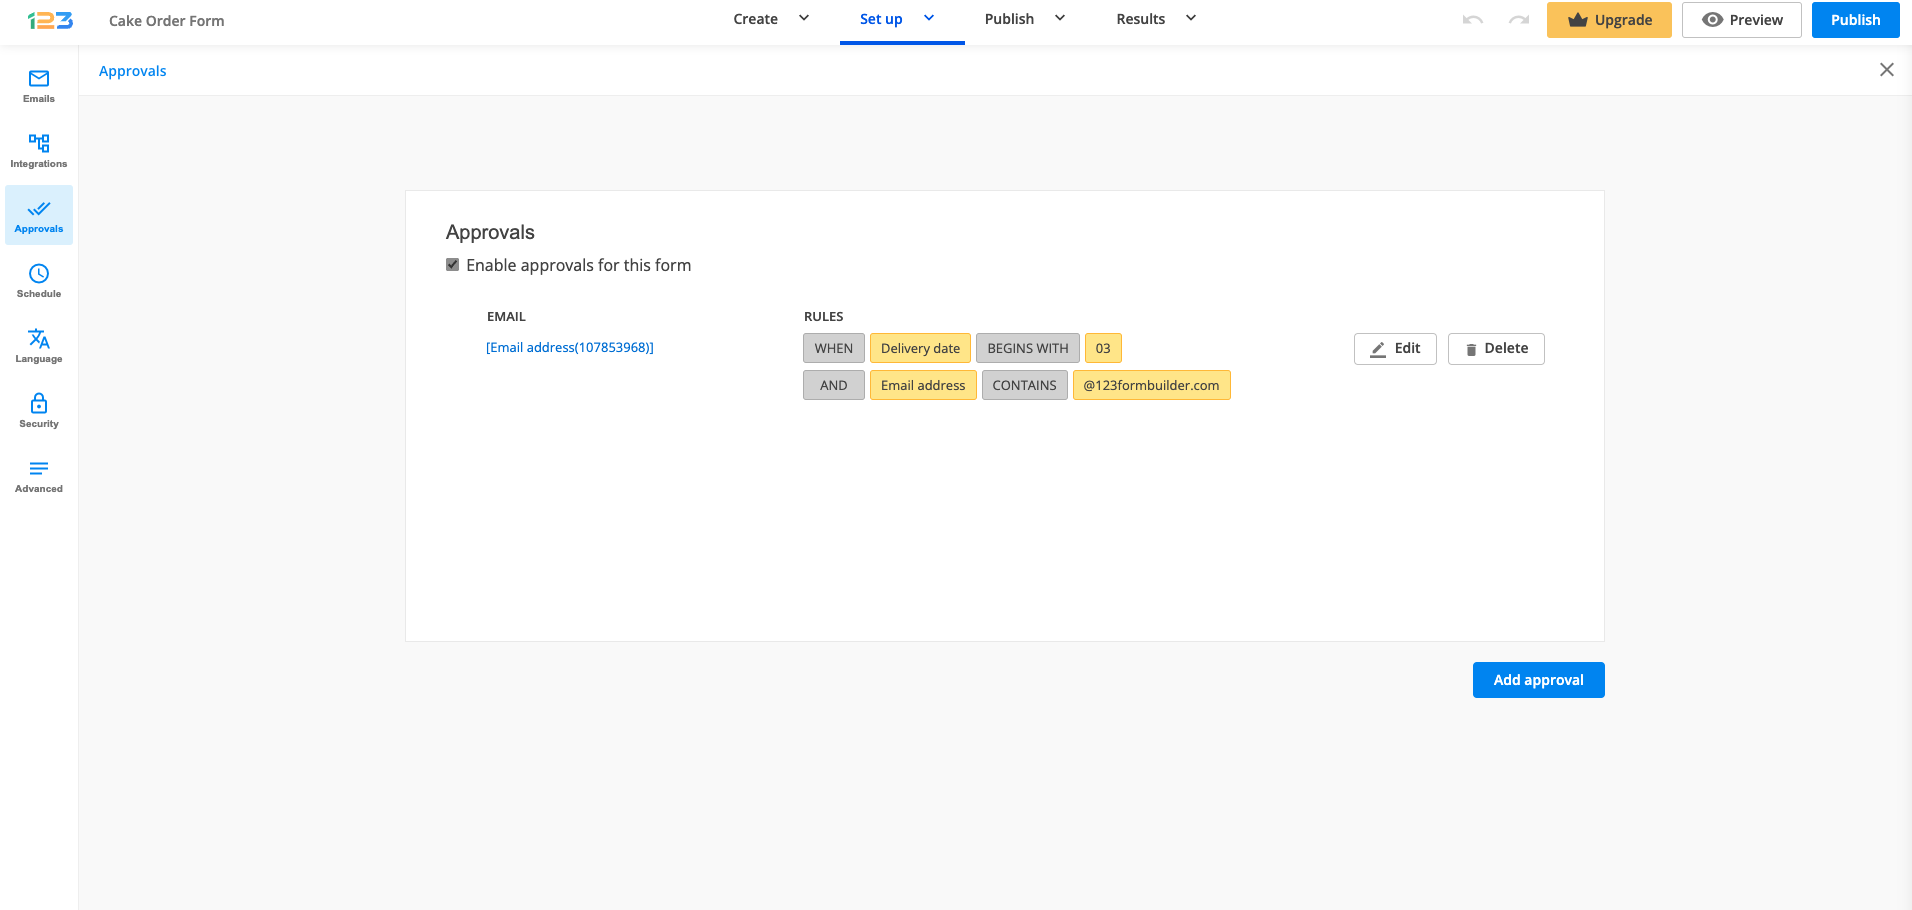
You can edit or delete your form’s approval rules at any given time by simply hovering over the approval rules and clicking on Edit or Delete button.
Important Notes
- The approval process will be stopped immediately when the submission entry was rejected by one person.
- The approval status can be checked in the Submissions table on every submission entry.
Related articles
We always strive to provide an intuitive user interface and fluent experiences. Here are the highlights of our enhancements to the user interface and navigation on 123FormBuilder.
Navigation
Once you start creating a form, you will notice we have 4 important navigation steps: Create – Set up – Publish – Results.
We will take each section one by one to explain them better, but the important thing is that each section has its own purpose in creating and defining your form better for you to make the most out of it.
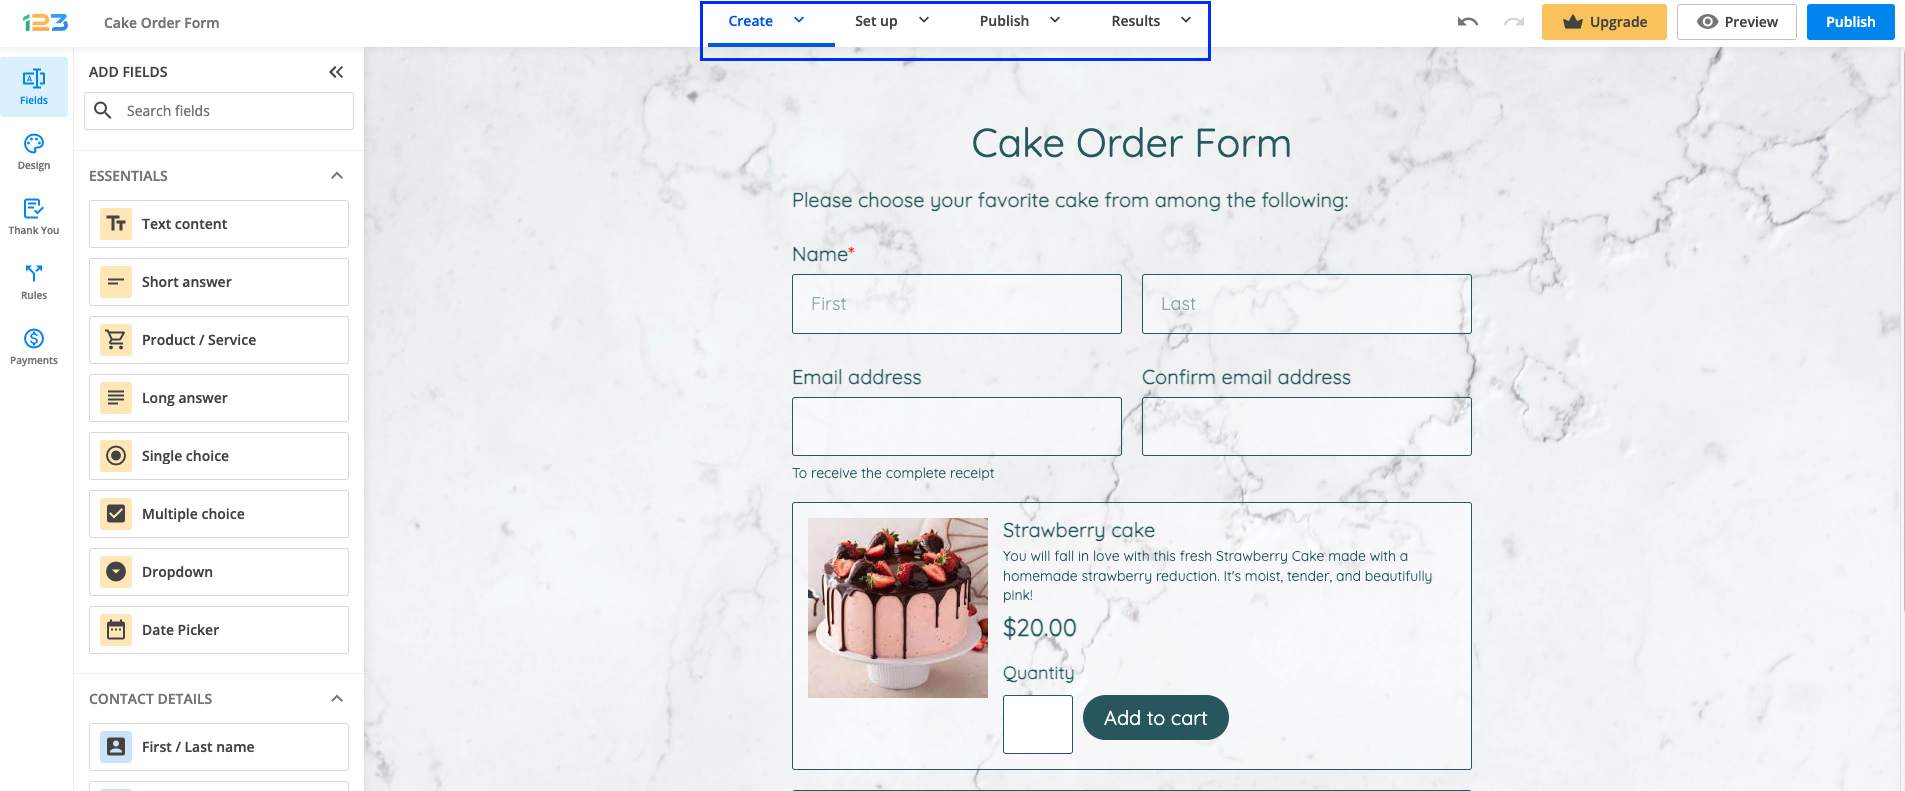
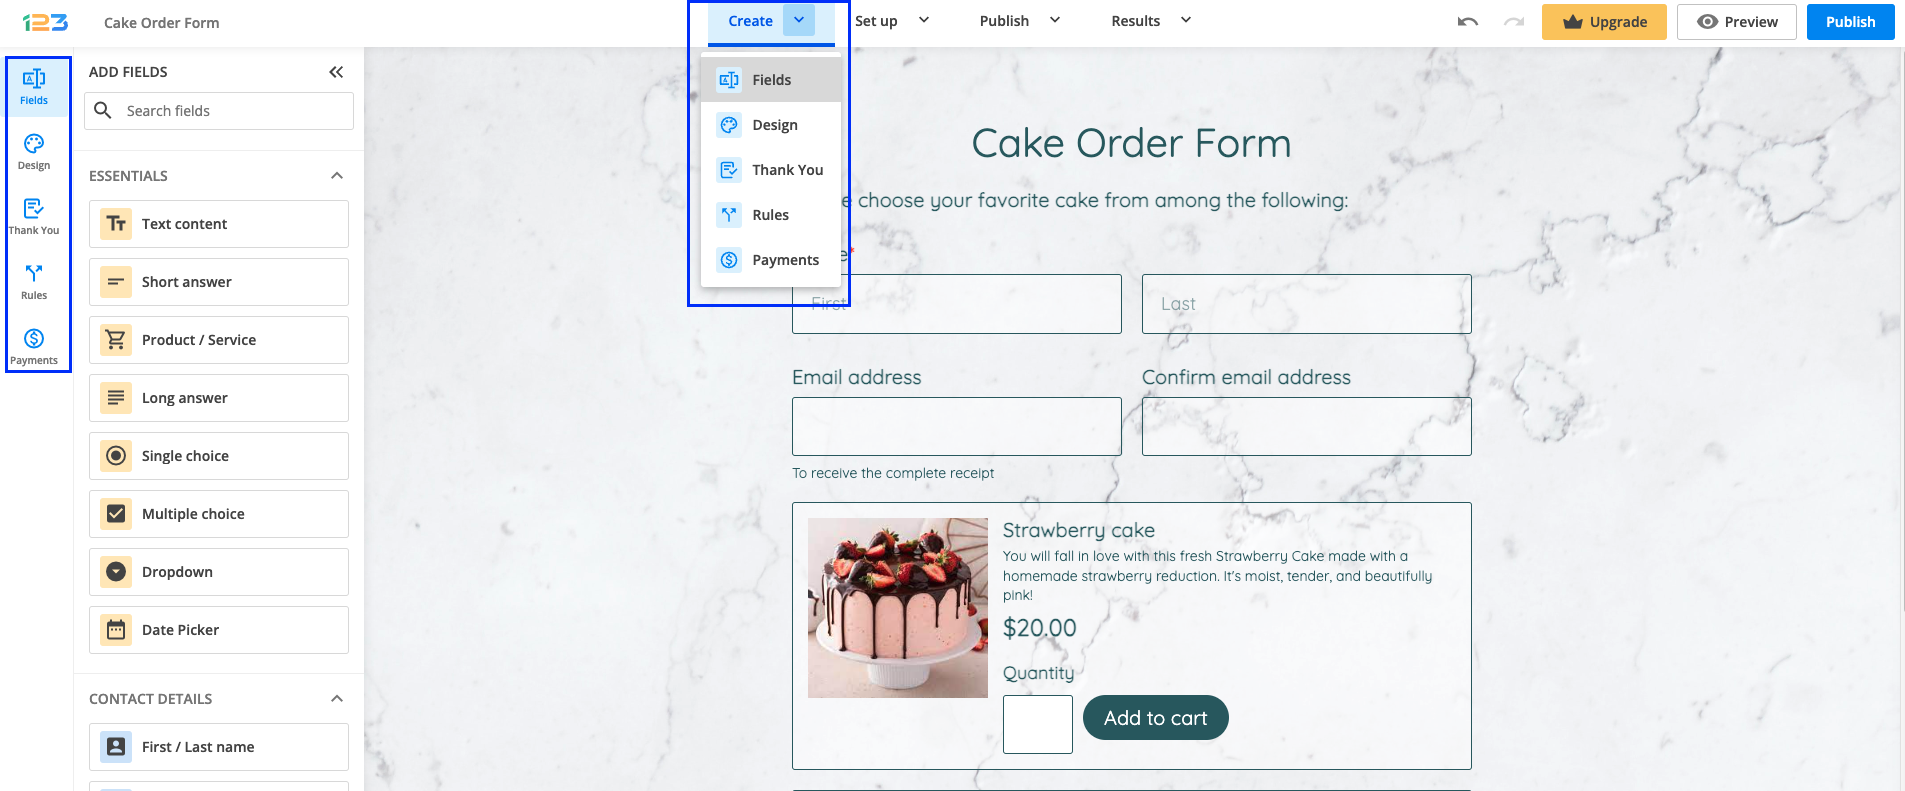
Create
You can easily switch between Fields (to add fields to your form), Design (to apply design changes to your form), Thank you (to configure the Thank you screen shown after submitting the form), Rules (to apply field rules & form rules) and Payments (to add & enable a payment processor on your form).
You can navigate from one subsection to another either by clicking on the left-side panel icons or by going to the main navigation and clicking on the arrow that expands all the subsections you can find within a section.
Fields
By default, the Fields section is selected when you start creating the form as it represents the core structure. This contains a list of fields organized under different categories in the Form Editor. There are seven categories: Essentials, Contact details, Media & Structure, Uploads & Consent, Date & Time, Rating scales, E-commerce & Calculations.
All fields can be dragged & dropped into the form and customized as you wish. Once you have added a field to your form, you will notice a side menu with a few options (Settings, Duplicate, and Delete). Clicking on the Settings option will open a panel on the right side. From here, you can customize the newly added field, such as marking the field as required or setting up a validation.
The field label (question text) and instructions can be edited inline. Each time you click on a field, the inline menu bar will display at the top of the field so you can customize the label text any way you see fit for your form.

Design
By navigating to the Design section, you can change just about anything on your form, from text font and color to the style of the submit button. Expand the section you want to apply changes to in order to find more design settings. From the Design section, you can also change the form’s theme by clicking on Browse other themes. Here you will find some predefined themes as well as the custom form themes that you created and saved.

Thank You
If you want to change the screen your respondents see after they submit the form, then you have to go to the Thank You section where you can find multiple options.

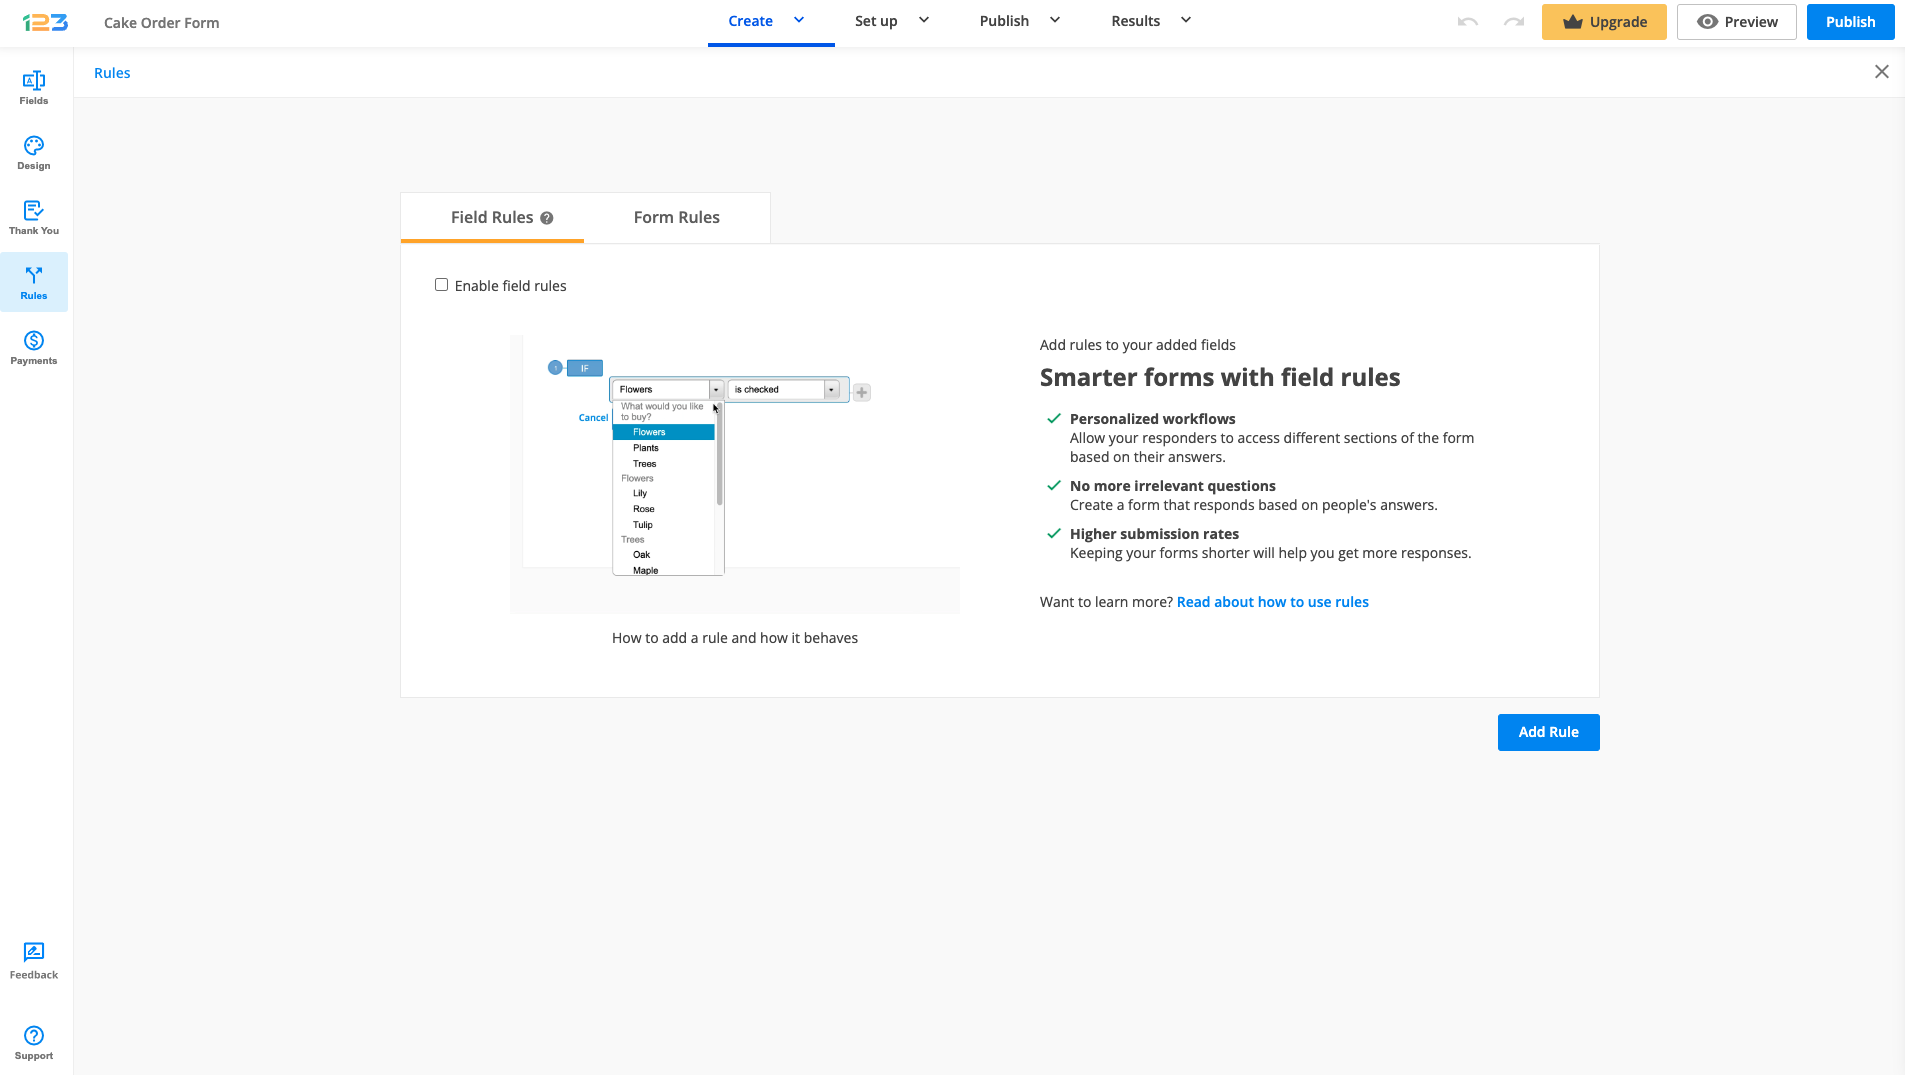
Rules
With 123FormBuilder, you can make your form more dynamic by changing its behavior based on the input provided by your respondents. Navigate to the Rules section where you can apply field rules & form rules.
Payments
One of the most important sections, especially if you are creating an order form, is Payments. From here, you can choose the payment processor that fits your needs. Once added to the form, in the right side panel, you will need to provide additional information to enable the payment processor.

Set up
After you have the structure of your form, you’ll most likely be interested in making it more powerful. With 123FormBuilder, you can easily achieve this. The Set up section offers you multiple customizations for your form, empowering you to tailor it to your exact needs.

Emails is the first section from Set up which opens by default. From here, you can create & customize the emails you want to send out after the form is submitted.

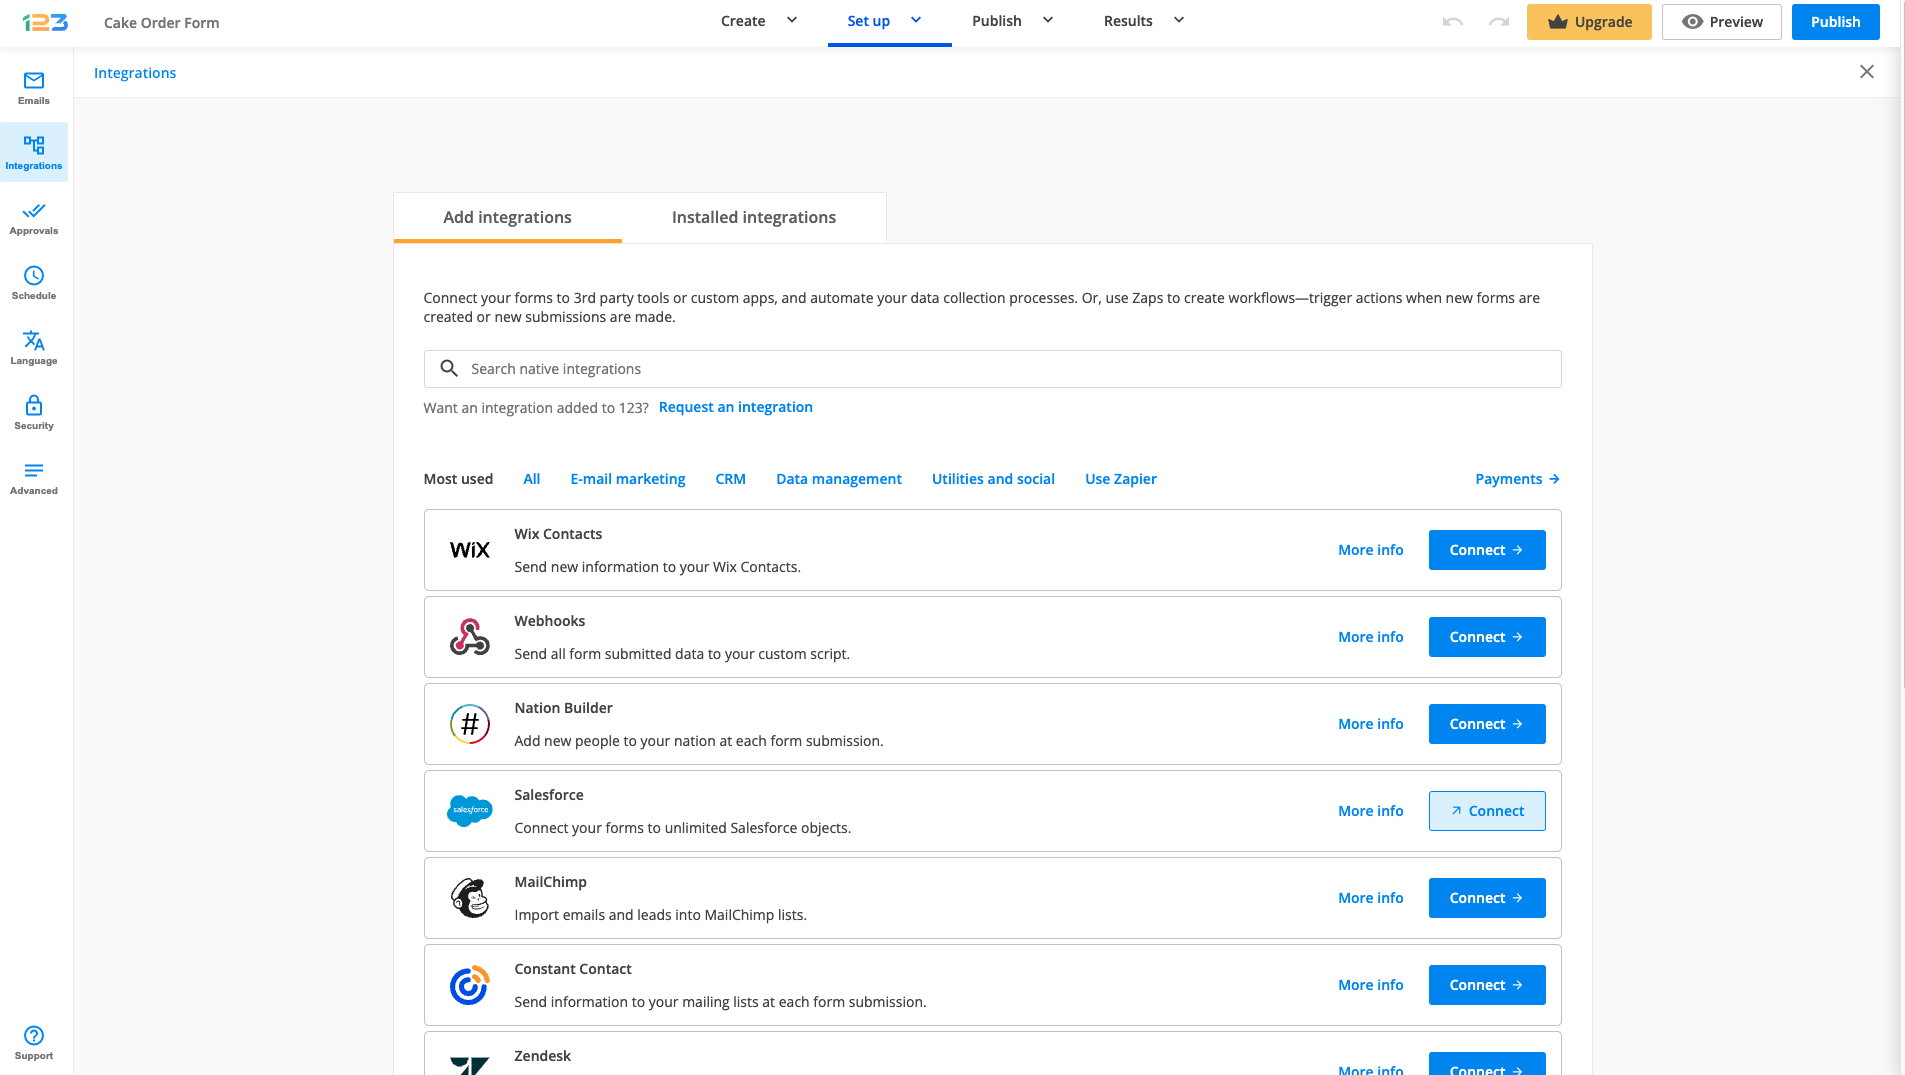
The Integrations section offers you multiple options for connecting with over 30 third-party app integrations. You will find 3rd party apps specialized in email marketing, CRM, Data management, Utilities, and social. We also included our Zapier most used connections.
You can even create a series of steps to accept submissions by setting up approval rules in the Approvals section.
Using the Schedule section, you can open your form to submissions within a predefined timeframe or only on selected days of the week. If you have subusers, you can also make your form active only for yourself and your team.

The Language section offers you the option to create a multilanguage form by adding translations for each language.

If you want to create a password for accessing your form, set a limit for your submissions, or add a Country filter, then Security is the place to do it.

Advanced is the section from where you can add scripts to your form, allow users to edit and save for later their entries, and many more.

Preview
You can preview the form by clicking on the Preview button. Here you can switch from a desktop view to either a tablet or mobile view. Additionally, for the Tablet & Mobile view, you can check two different views: Portrait & Landscape. These features are really helpful for you to test how the form would display on different devices to make sure your respondents have the smoothest experience when completing the form.
Extra tip: based on your form, we are calculating an estimated time it would take your respondents to complete the form. Pay attention to it and make sure your forms are easy and quick to fill out to make the best out of them.

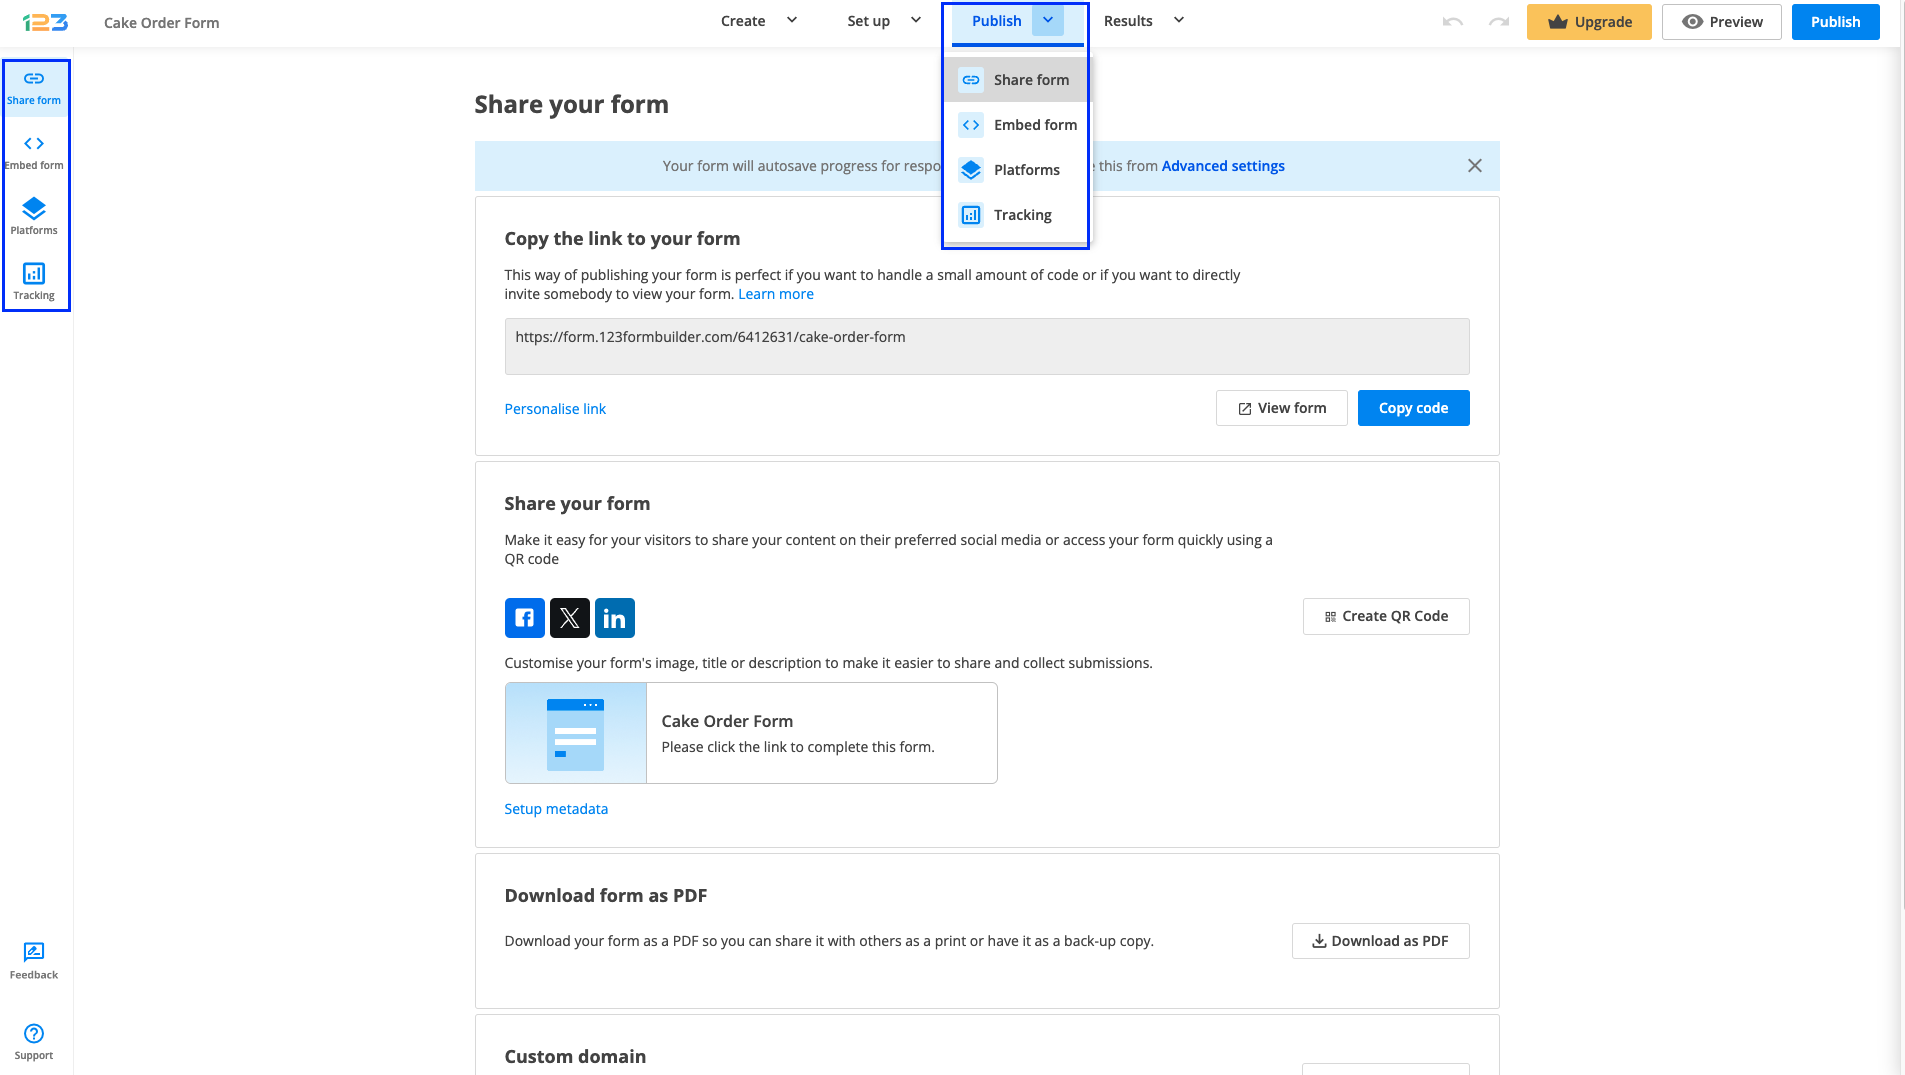
Publish
When you are satisfied with how your form looks and you have applied all the configurations that you need, all you have to do is Publish your form and share it with your respondents.
Share form is the first section of Publish. From here you can copy the link of your form, quickly share your form on social media, create a QR code for your form, or even download it as a PDF. The option that brings the best personalization to your form is adding a custom domain.
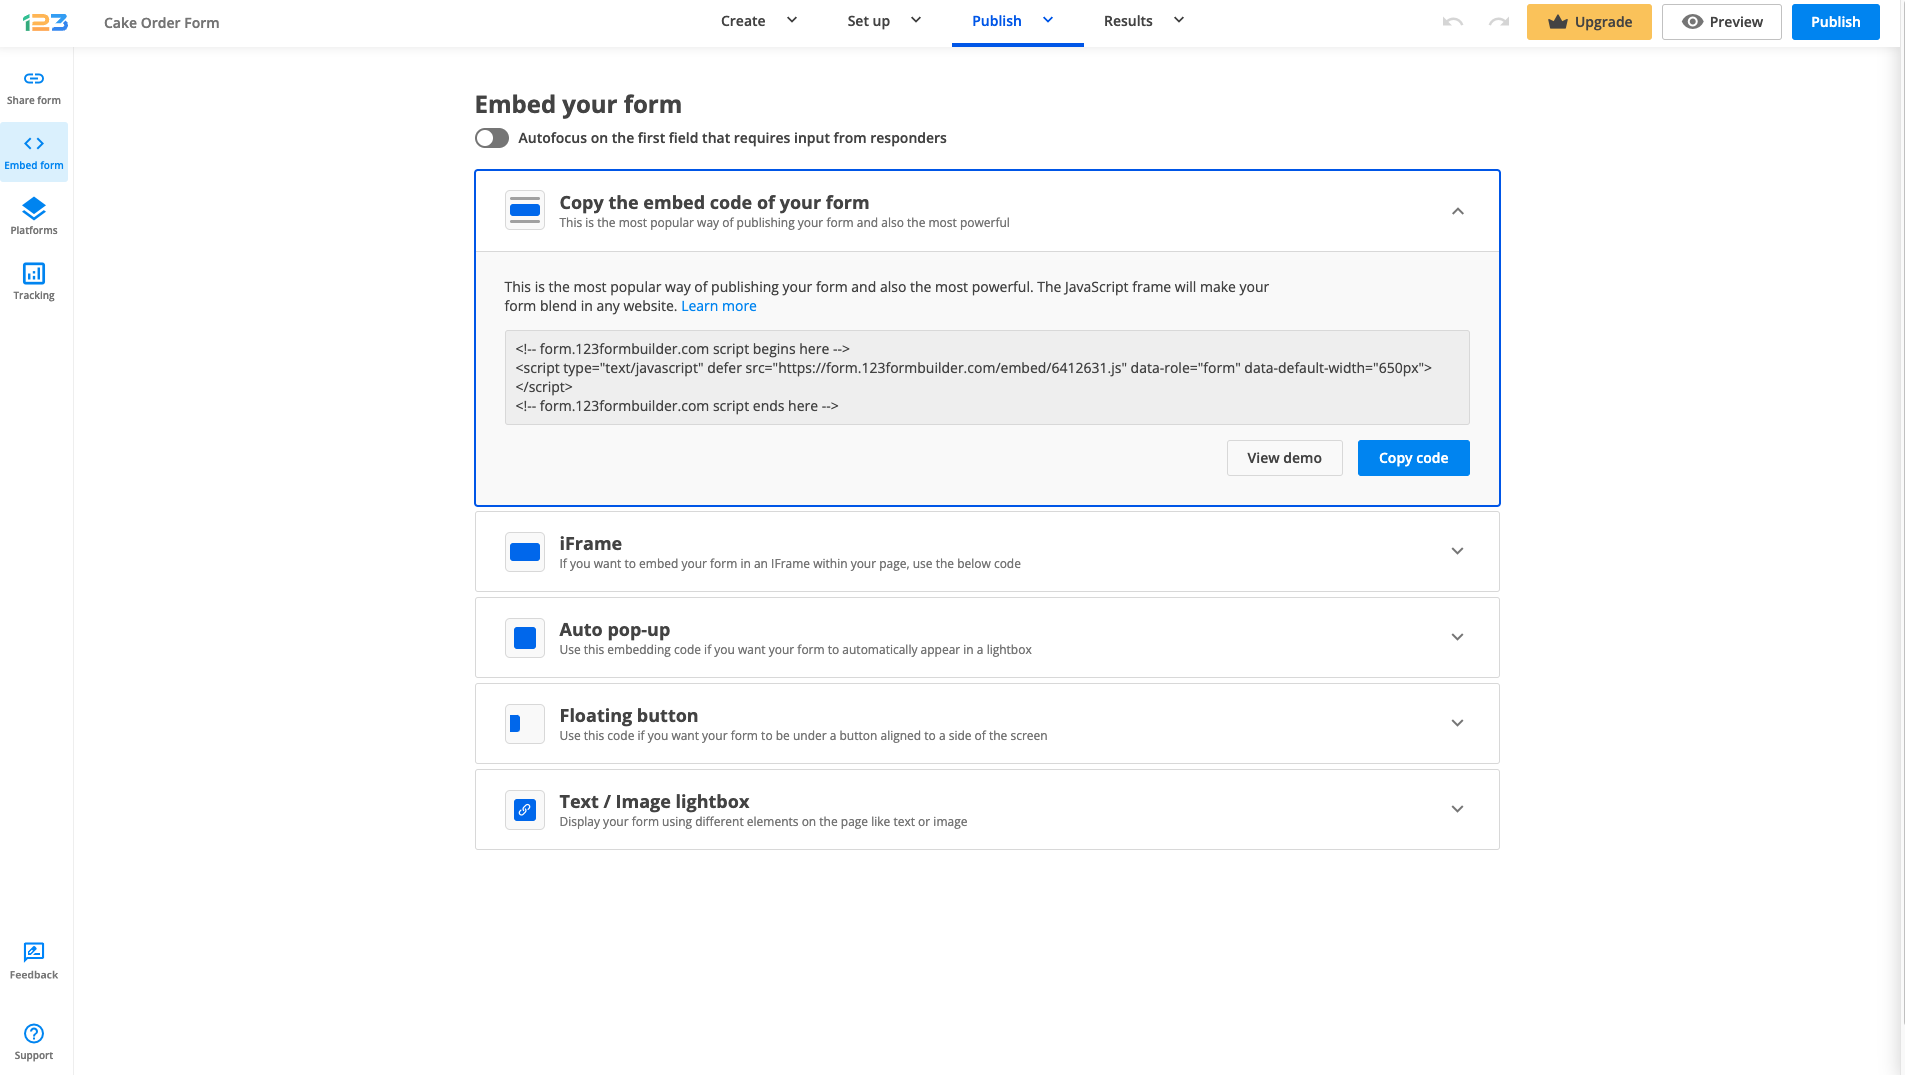
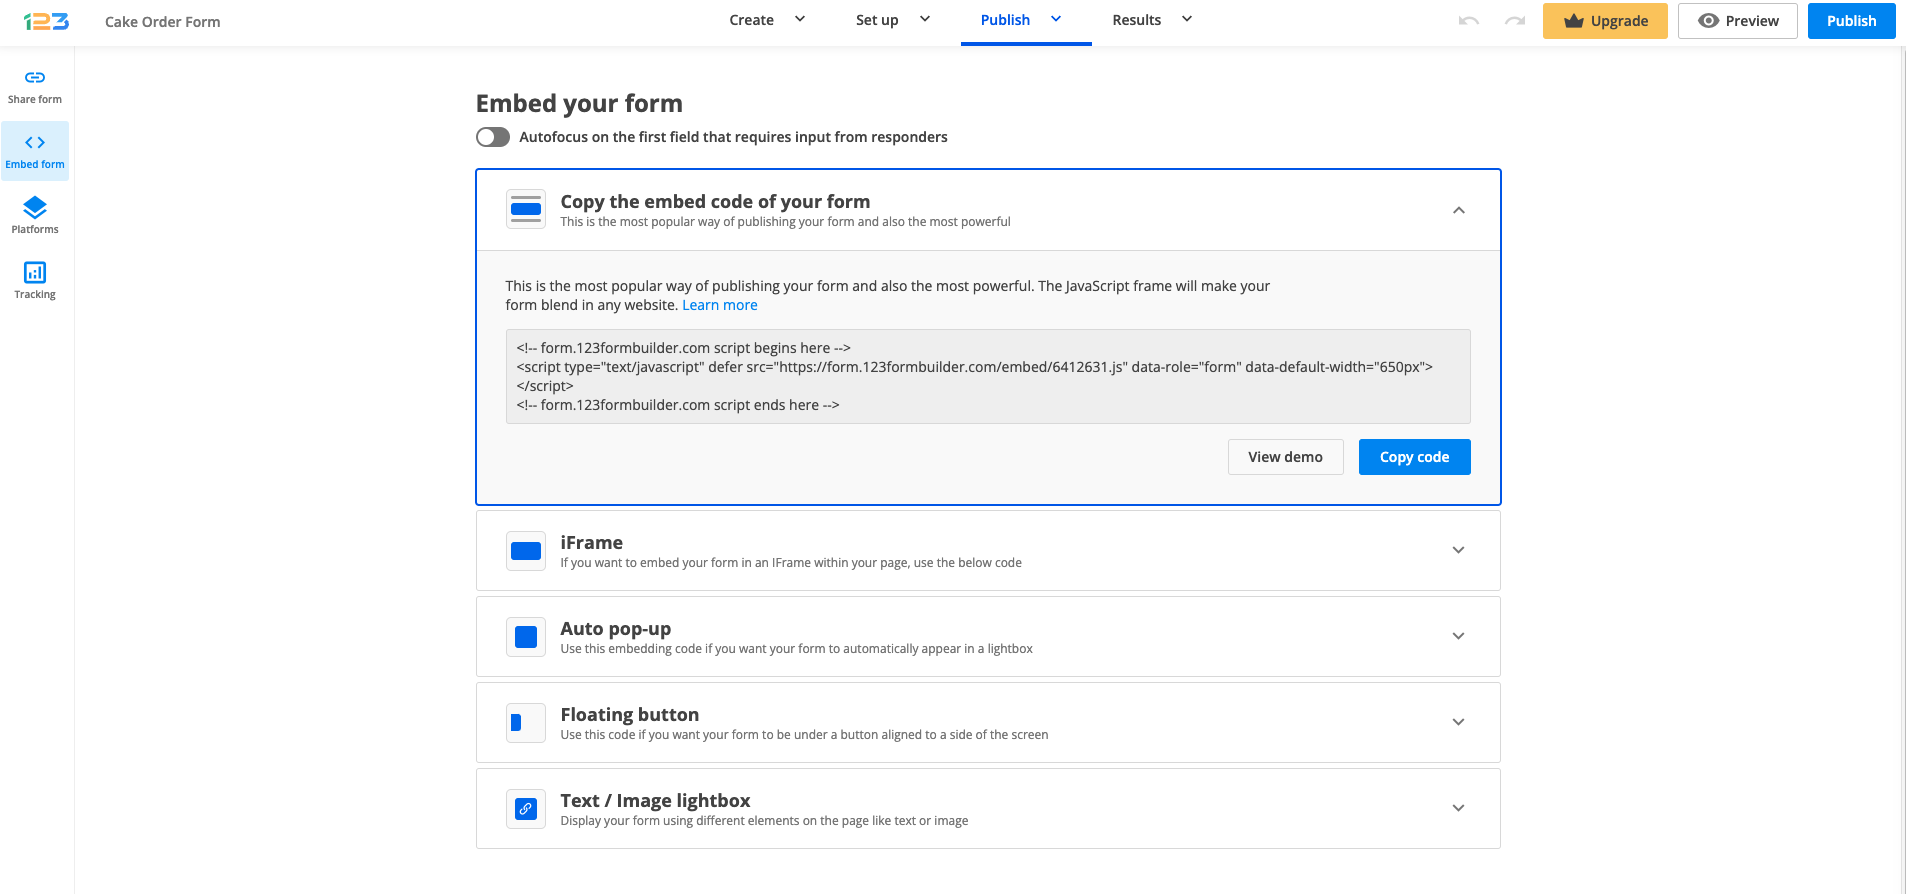
The Embed form section offers multiple embedding options: you can use the classic JavaScript code or switch to an iFrame. If you want your form to pop up on your website, simply select Auto pop-up and copy the provided code. A more modern approach would be embedding your form as a Floating button. Just customize the text, color, and alignment and there you go! The code is ready for you to copy and embed on your website.
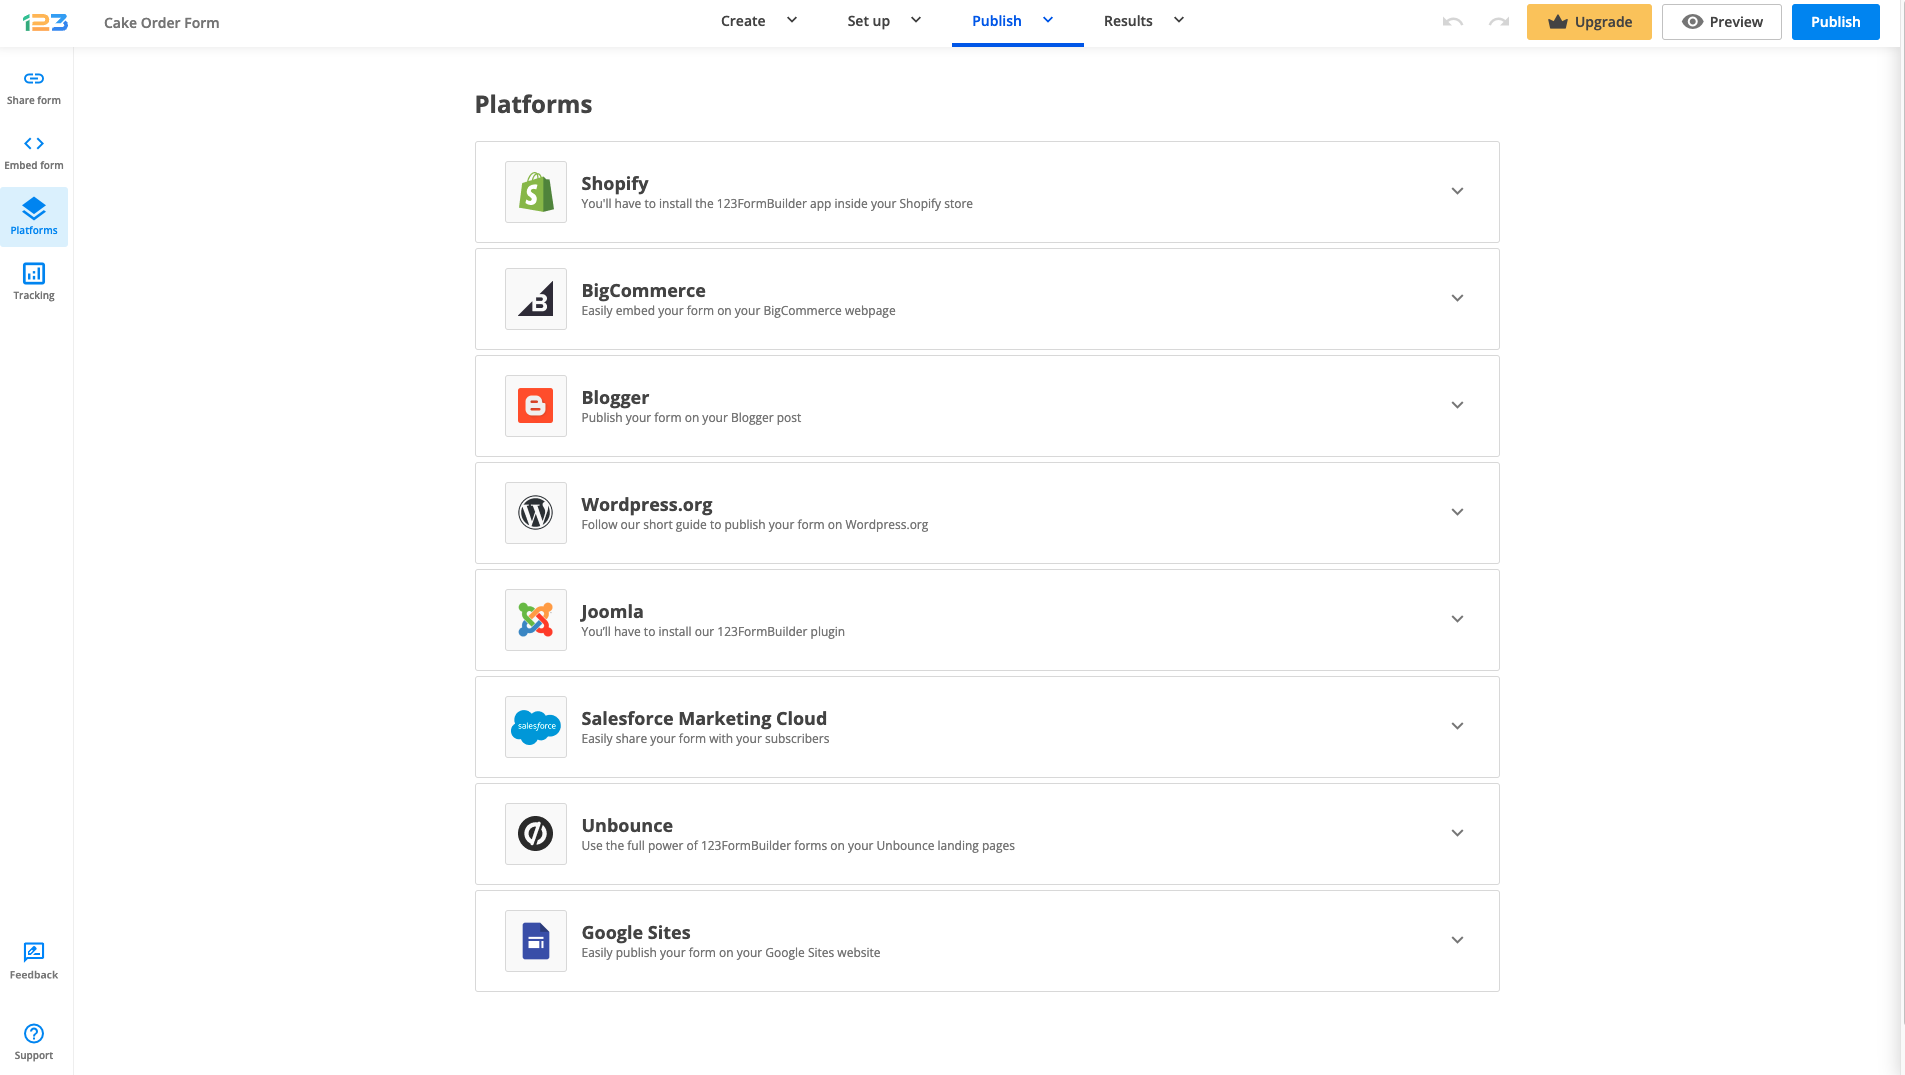
The Platforms section acts as a quick sharing method on one of the most popular platforms.
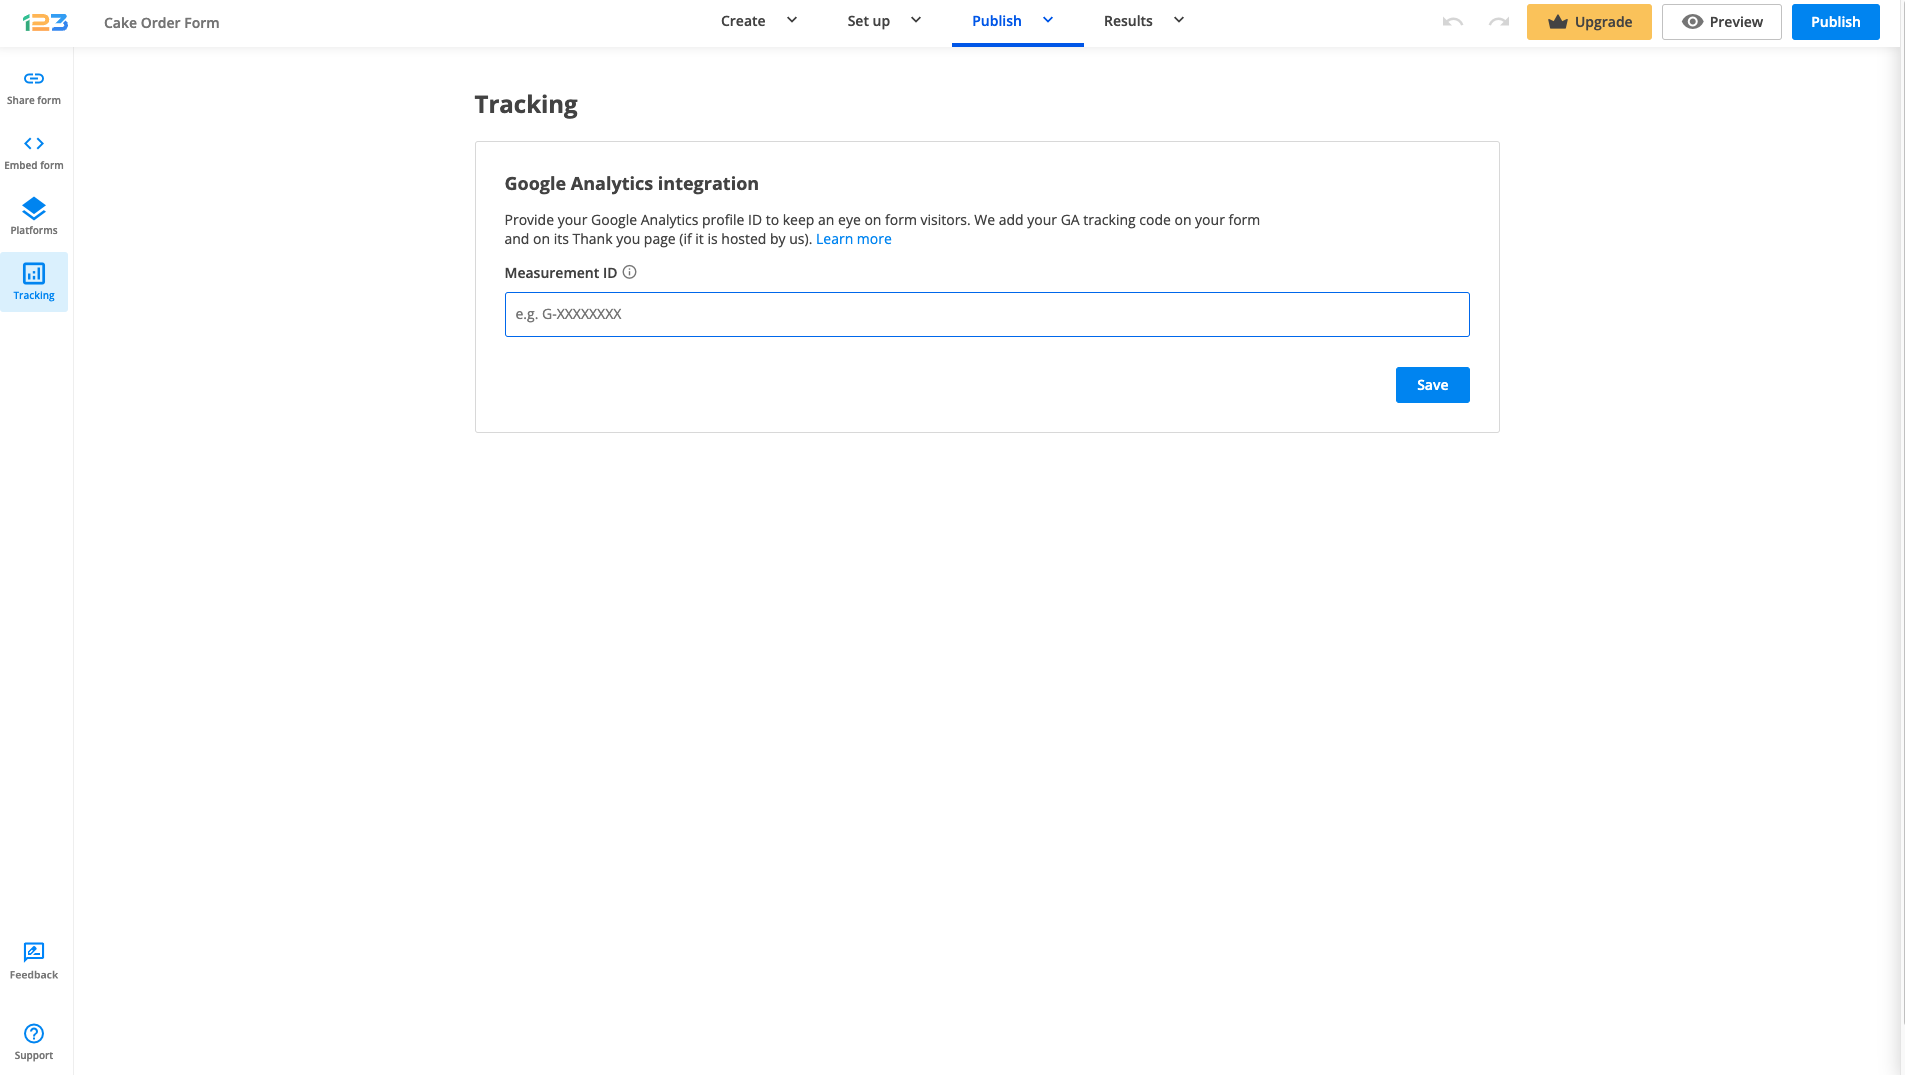
With 123FormBuilder you can also use Google Analytics to track your form’s performance. Just click on Tracking and provide your information.
Results
After you make a test submission or start to gather real submissions, the next step is to check your Results.
In the Results section, you can find all the collected data. This is divided into three sections: Insights, Submissions, and Reports and you can easily navigate between sections.
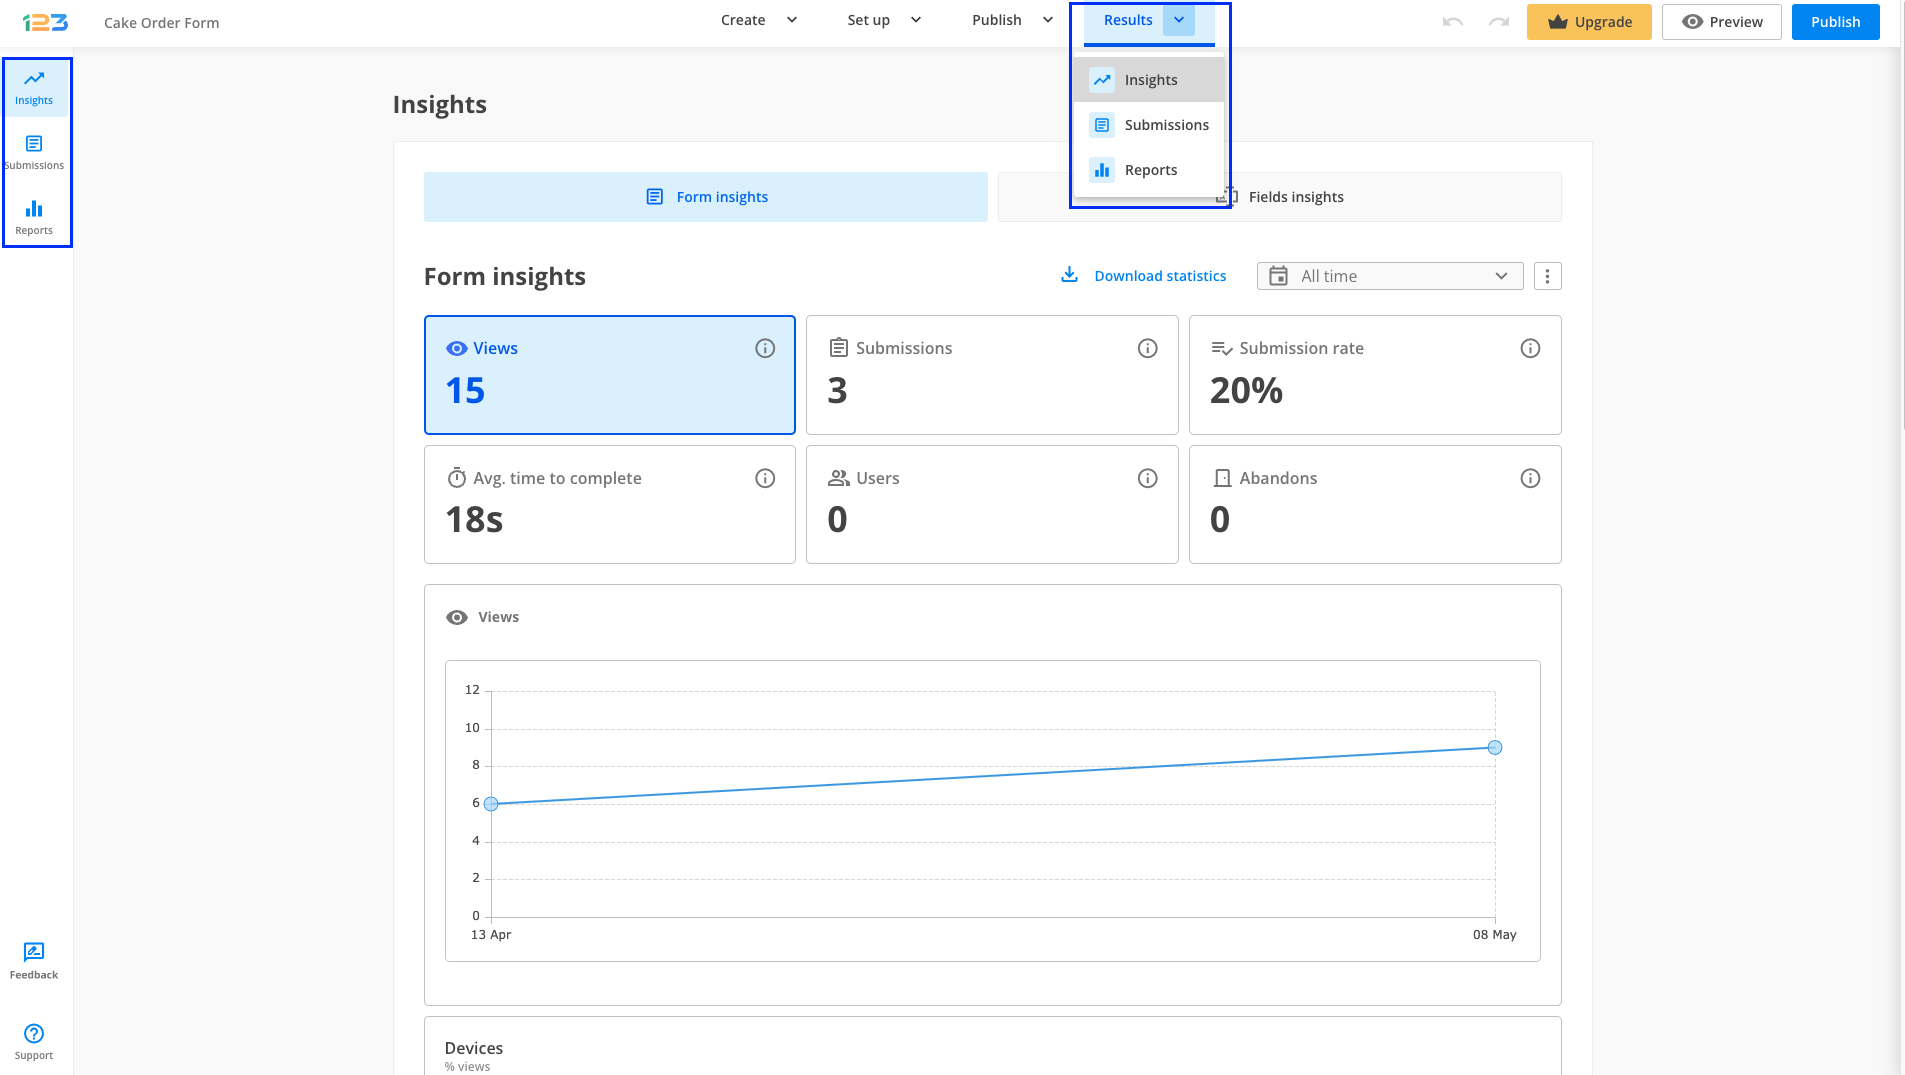
The first section is Insights where you can find quick information related to your form’s performance. 123FormBuilder gathers data on views & submissions, submission rate, and the average completion time of your respondents.
Additionally, you can find information related to the devices, referrers, and locations from where your respondents viewed and submitted the form.
By navigating to Submissions, you can check out the submissions table. 123FormBuilder gathers all of your submissions in one place. Here you can also filter and export your form data.
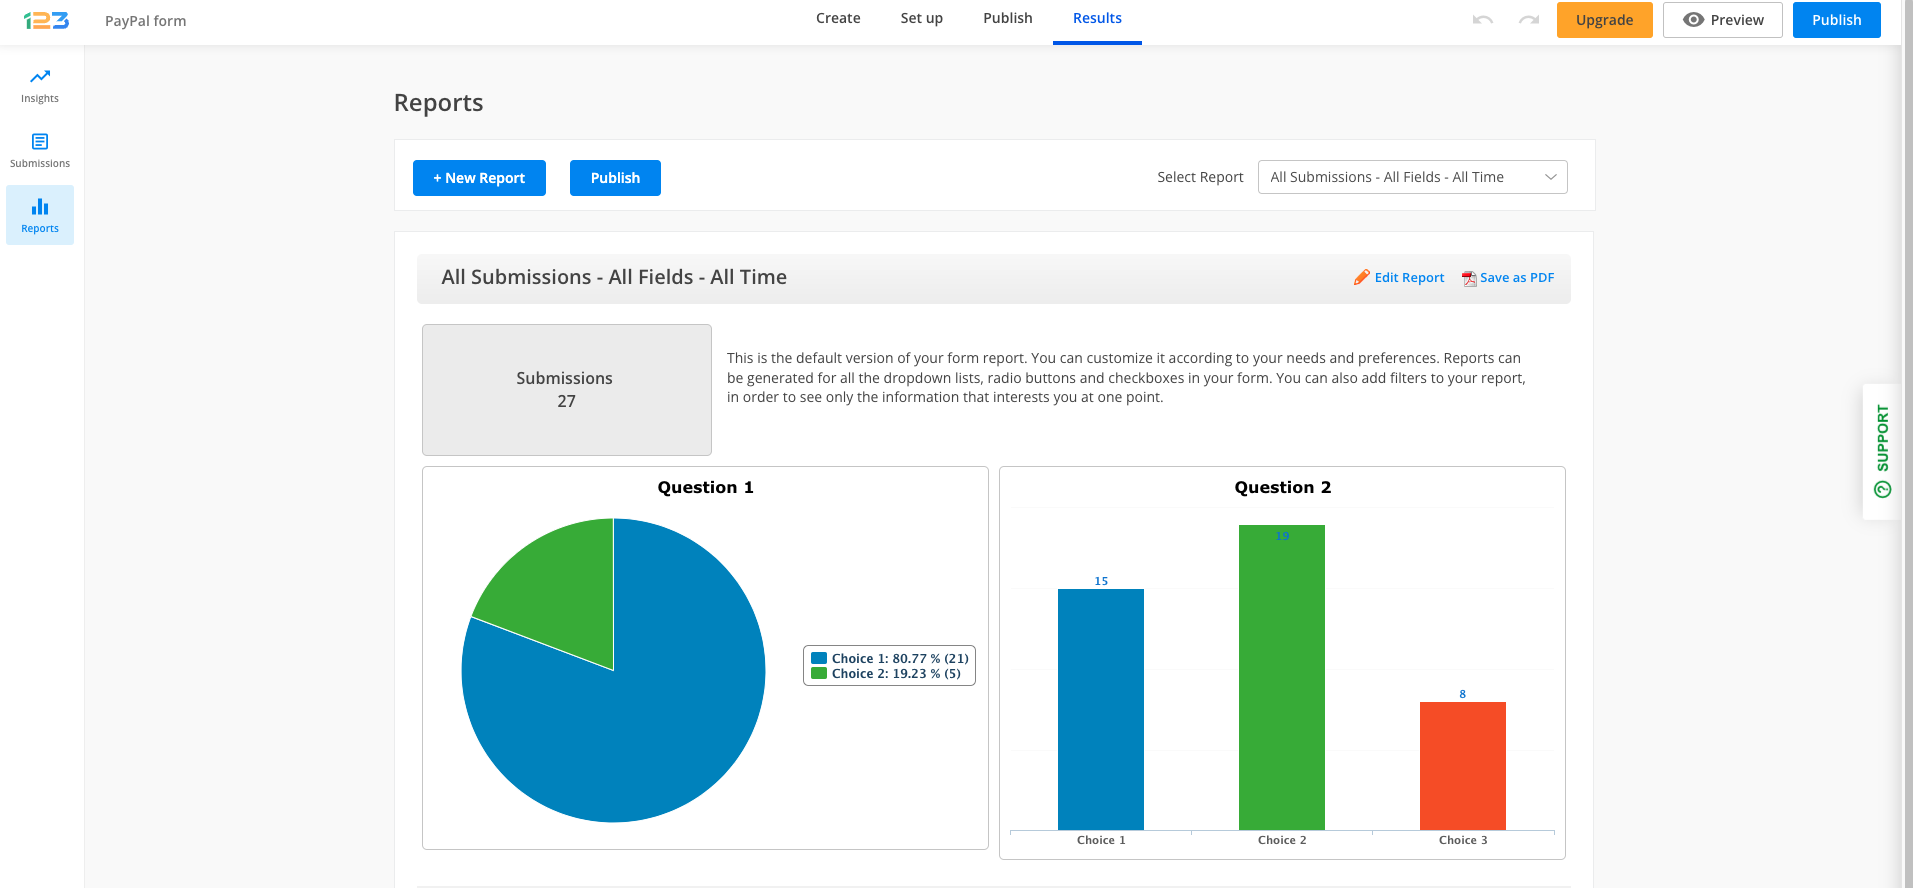
Reports offer you the possibility of creating custom reports, besides the default one. Here you can easily visualize the data your form has gathered as charts and graphs.
If you have an IM Creator website, follow this guide on how to add a contact form or any other type of form to your page.
In 123FormBuilder, copy the JavaScript code located in the Publish → Embed form section of your form.
Enter the editor mode of your IM Creator website and add a new Widget Section. Now you have to edit the widget and switch to the Code tab. Here you can paste the JavaScript code from 123FormBuilder.
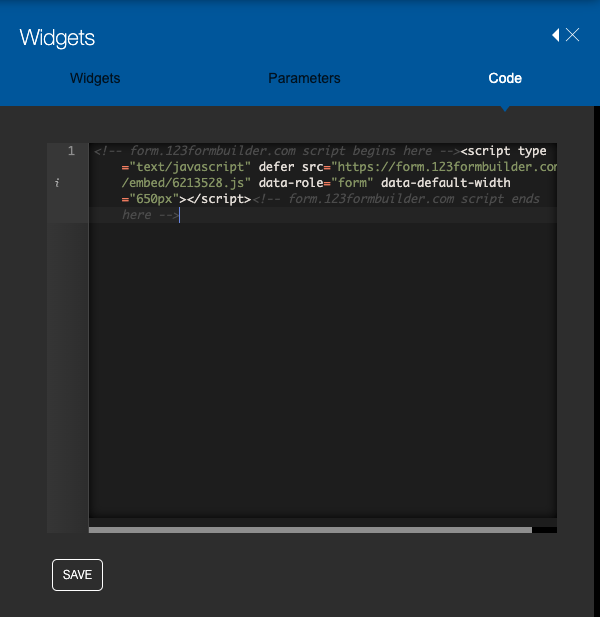
Save and Publish your changes so your site visitors could submit the online form directly from your webpage. All submissions are stored in the Submissions section of your online form in 123FormBuilder.
SPF filtering is a common anti-spam measure among email providers. It is designed to prevent your emails from being marked as spam. Prevent email spoofing and secure your domain by adding SPF records to your DNS.
What is email spoofing?
Email spoofing is when scammers send emails that appear to come from your domain with a fake reply-to address. They mimic your regular emails by using the same phrasing, email template, and signature to make the message appear legit. Users are prone to phishing attacks when replying to the fake reply-to address and their sensitive information can be stolen.
What is SPF record?
SPF – Sender Policy Framework – is an email validation system designed to prevent spam by detecting email spoofing. SPF records are TXT files that allow senders to include which hosts are authorized to send emails on behalf of their domain.
How to add SPF records?
Head over to your DNS hosting provider and edit or create a new SPF record at the Root Level of your Domain. Then, specify which hosts are allowed to send emails on behalf of your domain.
Edit or add the following SPF record in your DNS to authorize our form builder:
v=spf1 include:_spf.123formbuilder.com
Important Note
You do not need to set this up if you are using the default 123FormBuilder address (noreply@123formbuilder.com). If you have connected your SMTP server on your forms, SPF filtering is not required.Related articles
With our form builder, you can easily print the entries received on your forms. You can choose to print individual entries or multiple entries at once.
Printing form entries
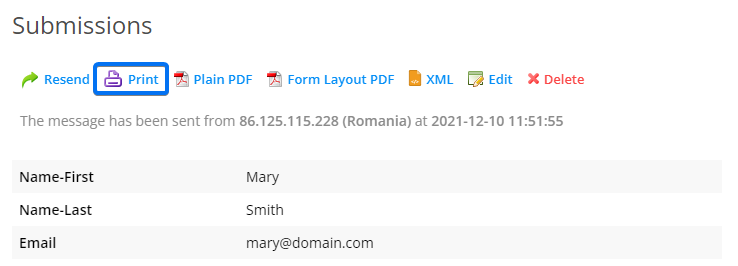
1. To print one entry:
- From the Form Editor, go to Results, click on a submission, and then select Print.
2. To print multiple entries:
- Check your submission entries.
- Select Print.
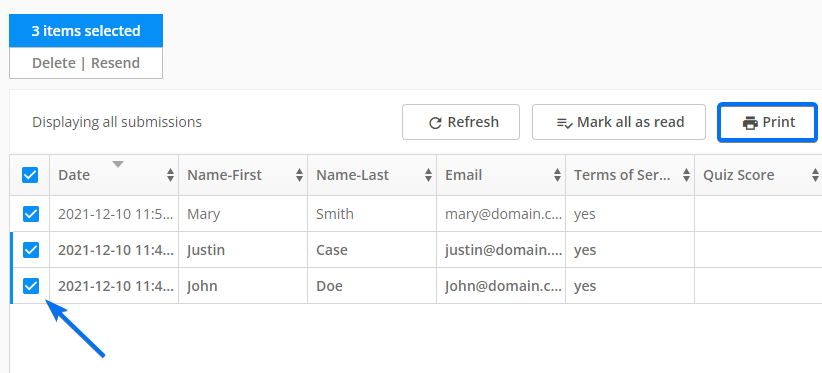
- Choose your preferred layout and click Print preview. You can choose to print each submission on a separate page, for better profiling.
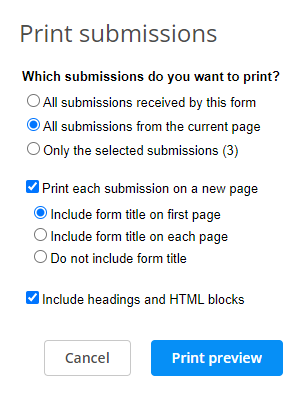
- Finally, click Print when you are done.

Print button for users
Enable a Print button on your form to give your users the possibility to have physical copies of their submission.
- Access the Form Editor and click on the Submit button.
- In the left-side panel click on Additional buttons to enable it.
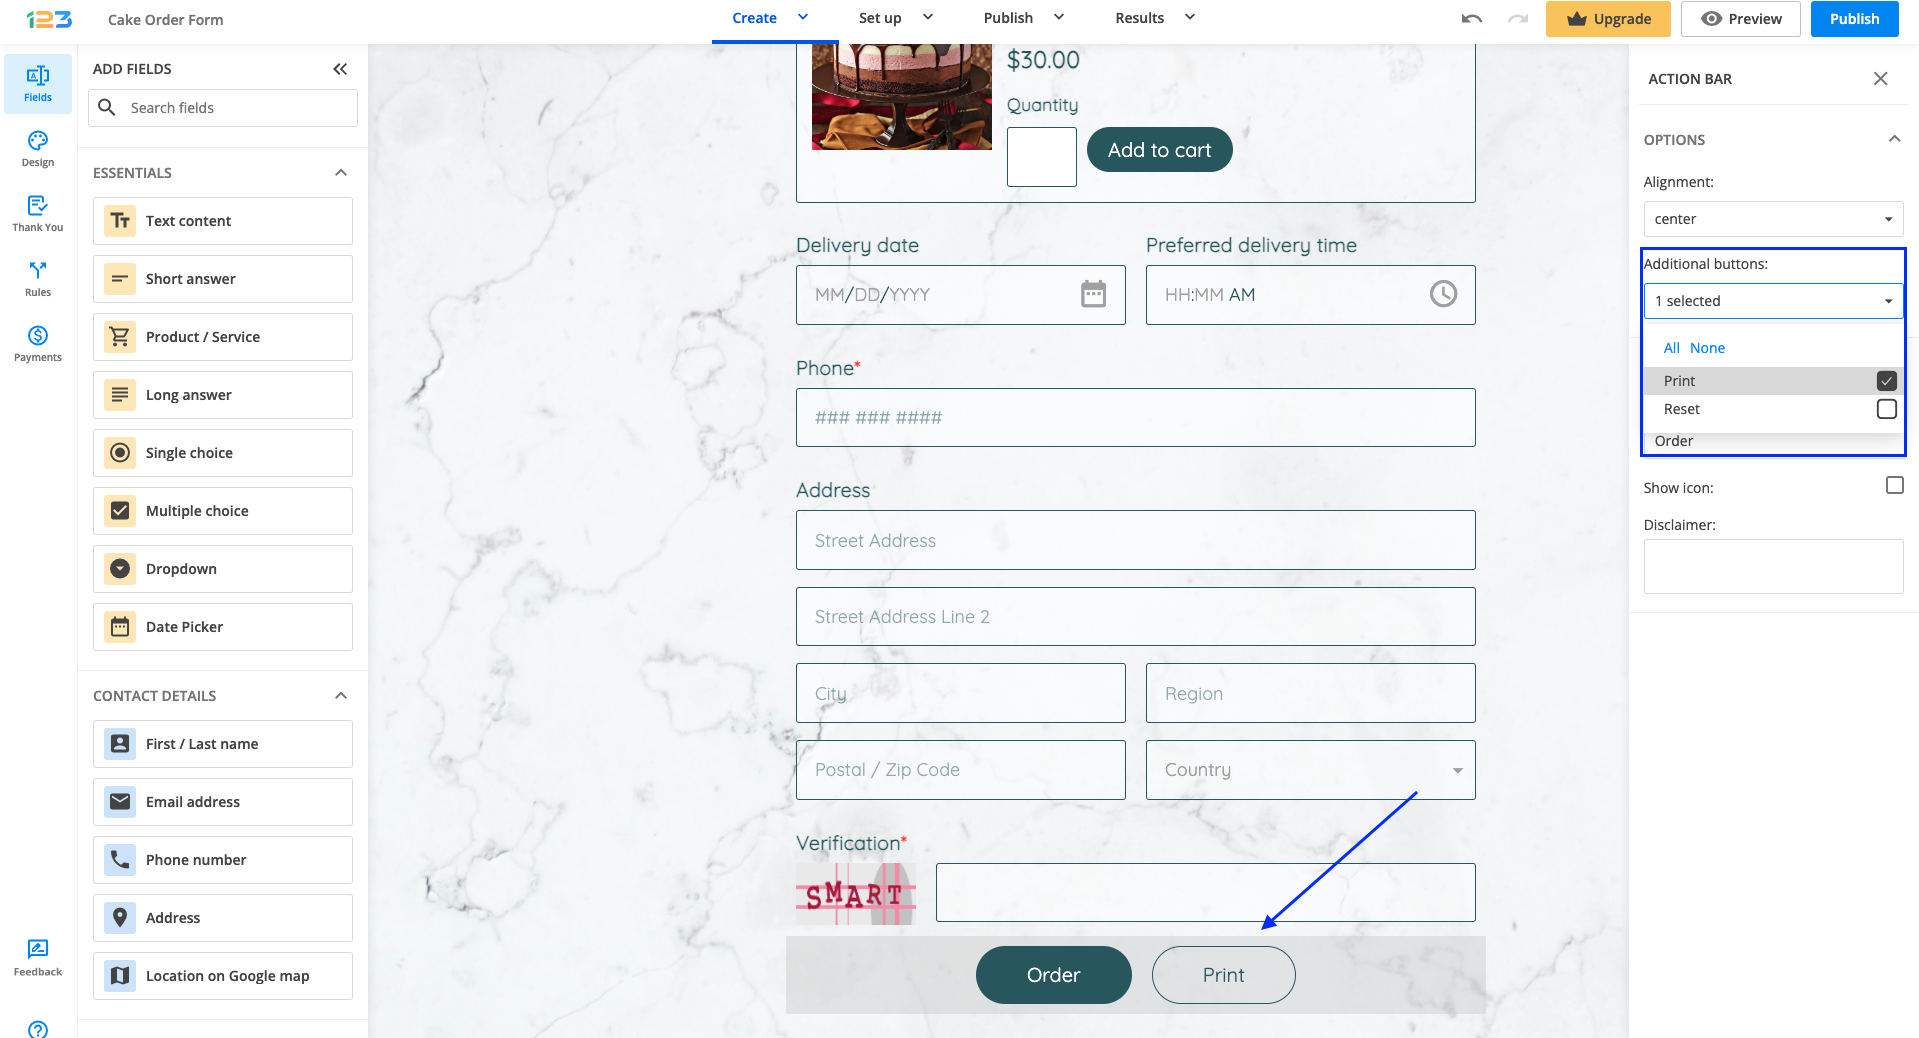
This option prints the input provided by users. If you are using multipage forms, the Print button is located on each page.
Once you click on the Print option, a preview page for the submission appears. This preview displays your browser’s printing options.
For the purpose of this article, we used Chrome as an example since its usage increased exponentially.
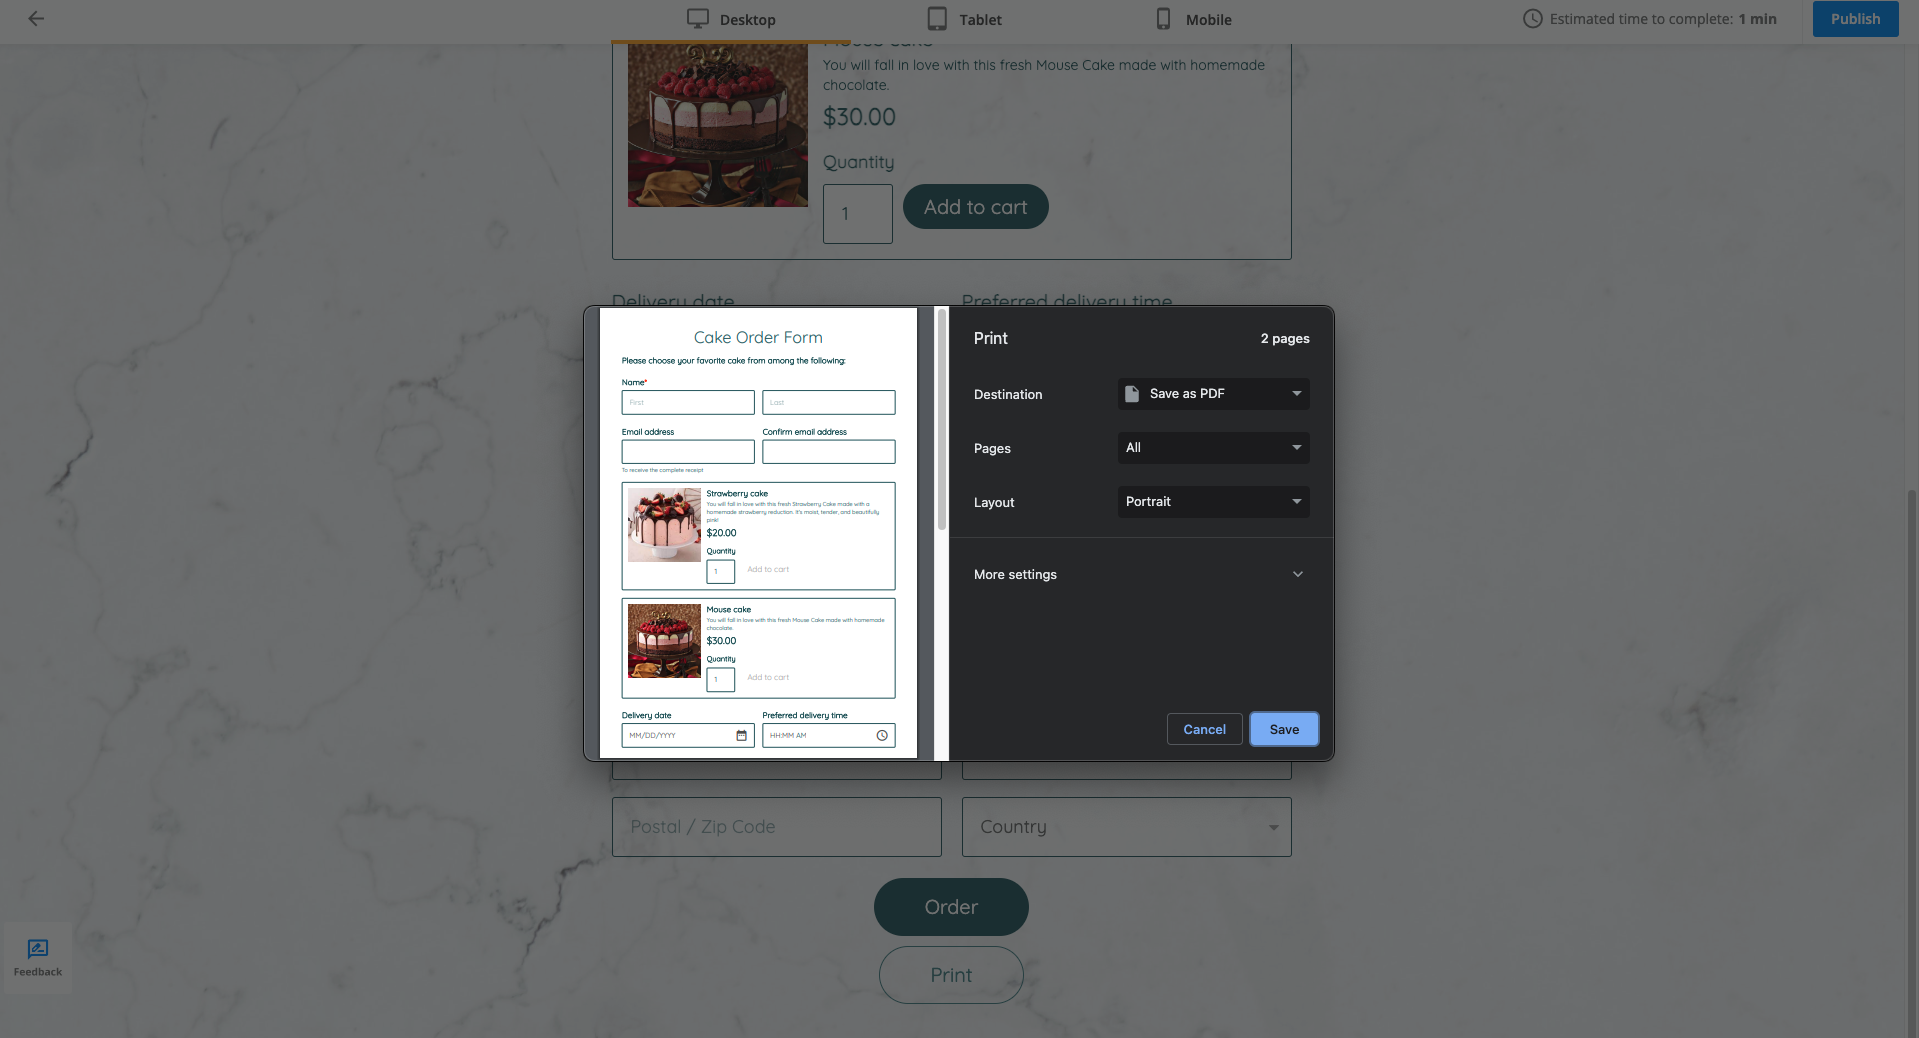
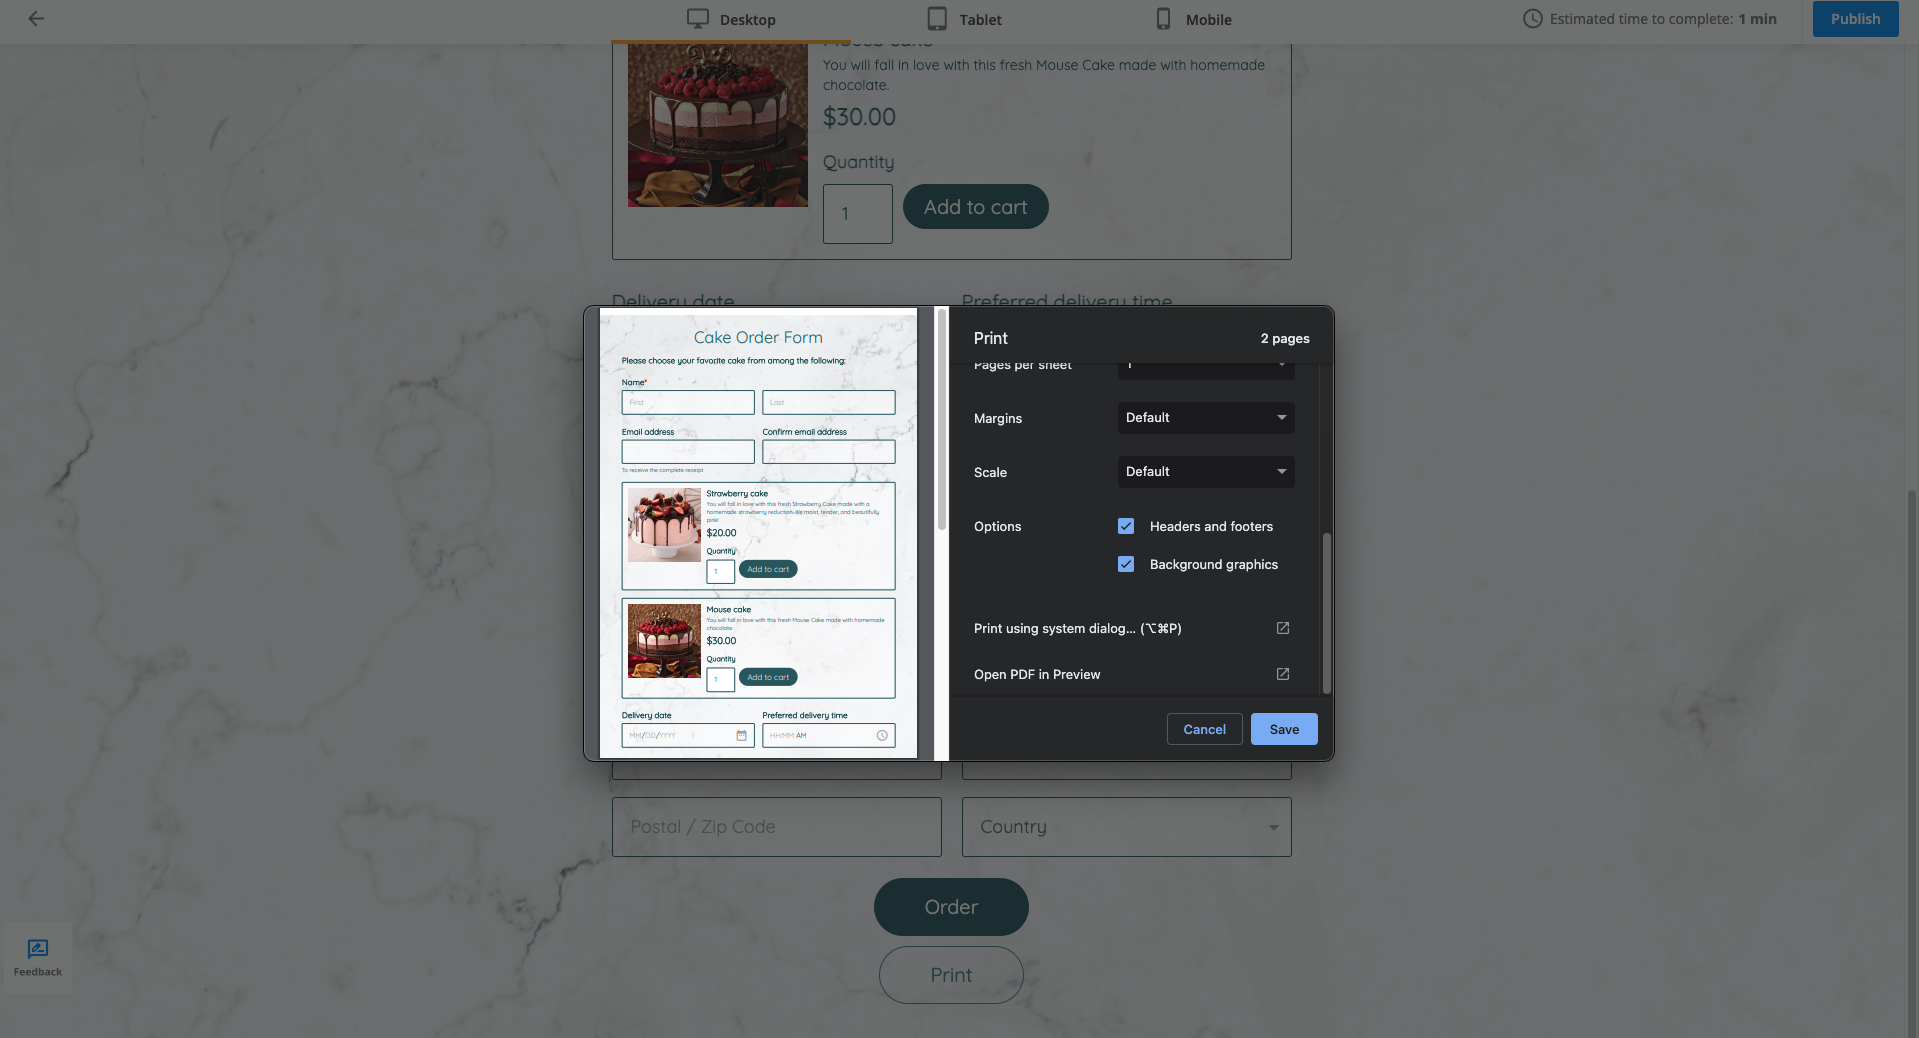
For displaying signatures and background colors, collapse the More settings menu, and check Background graphics.
Related articles
The Account Owner or a Super Admin can create User Groups from the Users panel within the form builder.
Once a Group is created under the Users panel, Users can be assigned to this Group. Users can be moved to other Groups at any point.
The Group Admin (role available only for Enterprise accounts) can create new Users as well, but only within the Group they are assigned to.
If sharing is restricted at the account level (globally) by the Account Owner, then only the Super Admin or Group Admin can give access to a form or folder outside of a Group.
User roles are defined depending on the level of access they are given when it comes to Forms, Folders, and other Users.
In order of permissions, we have:
1. The Account Owner. As the name suggests, this is the owner of the main 123FormBuilder account. They overview all aspects of the account settings, and have a permanent role, meaning no other User can edit them.
2. The Super Admin, who has access to all Forms, to manage them and their Results. They can manage all Users from the account, as well as the Forms and Folders created by them. They can also access the Uploads Manager and the Recent Activity for the whole account.
3. Group Admins (available only for Enterprise accounts), who have default access with “can edit” permission to all forms created by users from their group, regardless of their role or the folder in which the forms were created. They also can duplicate or share these Forms, but cannot rename, deactivate, delete or move forms created by other users in their group. They can create new Users (Viewers and Standard Users) in their group and edit the Permissions for them. They can create new Forms and manage them any way they wish, as well as create new Folders. They can share their own folders and folders shared with “can edit”.
4. Standard Users, who can create Forms and edit Form settings and Form Results. Their access to Forms created by other Users can be limited by the Account Owner, Super Admin, or a Group Admin. If assigned to a Group, they can only share Forms with Users from that Group. They cannot create or manage Folders.
5. Viewer Users, who can only submit Forms and view the Results. They can not share Forms with other Users, nor edit the Form settings or Results.
Related articles
Form sharing is available if you go to the form in My Forms and click on the dotted menu and then go to Collaborate.

By default, the Account Owner and Super Admins can share all web forms. Group Admins can be set to share only the Forms available in their Group, as can Standard Users.
Standard Users can share the forms that they created, and those that have been shared with them.
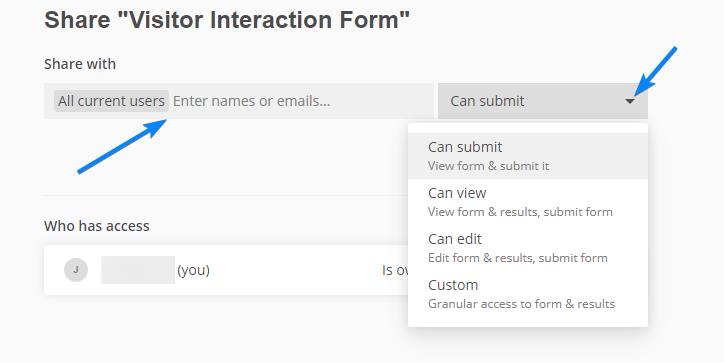
When accessing the Share option for the form, there will be a search field available, to find other users with whom you can share the form. You can search for the name or email address of the person you’re looking to share the form with, and this will bring up their User. You can add one User or multiple Users to the Sharing list in one go. They can be removed and added back to the list any number of times.
Since Account Owners and Super Admins have access to all forms within the account, their User will not figure in the search list and can’t be added.
Group admins will not appear in the sharing list for their Group, as they are given default access to all Forms created within the Group.
Of note, the Form Owner, which is the User who creates the Form, is always present in the share list and can not be removed.
Users that are added to the share list can have their form permissions edited individually.
When searching for users you will also see All Users or the User Groups. Clicking on All Users or Group of Users will update the sharing permissions for the existing users.
There are 3 predefined permissions, which depend on the level of access. These are:
- Can Edit – Users can access the form in View mode and can submit it, can edit the form settings and results, can duplicate the form template, and can see and edit the permissions to other Users in the Who has access list of the form.
- Can View – Users can access the form in View mode and can submit it, and can also View the Results section. The User can not change the form settings or Results.
- Can Submit – Users can access the form in View mode, and can submit it. They can not access form editing, and can not access and view the Results.
There is also a Custom option for permissions, which allows granular access to the Form sections. The Form is split into two sections:
- Form, which represents the editing sections, meaning the Editor and Settings.
- Results, which means the Submissions and Reports. Here, distinct access to Reports can be given as well, and that is to Specific Reports, which must be selected.
Sharing permissions can be edited at any point along with adding or removing Users
Sharing is centered around Users, the roles that they have, and the object of sharing forms/folders. These roles define certain permissions that make Sharing different for each user.
Sharing is comprised of the following key components:
1. User roles & User groups
These are the users that work within the 123FormBuilder account. Their user role can be that of a Super Admin, Group Admin, Standard User, or Viewer. Each role carries a different set of permissions when accessing and sharing forms.
2. Global sharing options and restrictions
These are the options that only the Account Owner can change and that affect all users within the account. The options can be changed from the My Account section.
3. Sharing forms
This functionality is available from My Forms → Form → Show More settings and allows the User to share particular forms with other Users.
4. Permissions page (overview of shared items)
Accessible from Users → User Permissions, this is a section available to administrator users and is a list of forms and folders that a user has access to.
Related articles
In this article, you will learn how to manage your custom email templates and understand how they work.
How to create and save custom emails
Start by customizing our default email template. You can add text, images, links, custom variables, and even customize its design with HTML code. For detailed instructions, check our How to set up the Body of your email notifications guide.
When your template is ready to use, click where it says Default notification template (edited) and choose to Make this draft a template. Give your template a descriptive name.
More details about email templates you can find in this article.
How to apply custom templates to different forms
Let’s say you want to use the same custom template on a new form. Since the field IDs are newly generated, you need to adjust the original template.
The Form Summary table will automatically render the form variables. If your custom template has field variables placed outside the table, you need to replace them.
Any form fields that aren’t located in the Form Summary table will show as Deleted fields. All you need to do is to replace deleted fields with your current form fields variables.
To replace Deleted fields, hover over each field and click to remove it.
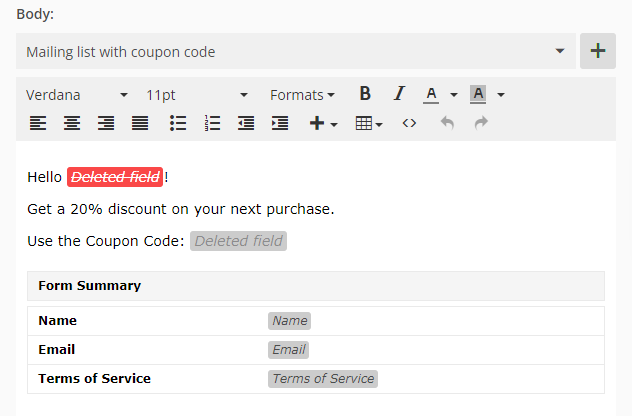
Next, click the plus sign displayed next to the Body dropdown. Choose your form fields one by one. This action will replace the old field IDs with your current fields.
Don’t forget to give your current template a new name and Save the changes.
Related articles
Let’s assume you want to bring all the available values from a specific Salesforce picklist, without manually adding those values in the 123FormBuilder field. The pre-selected value on the form must be the one selected in Salesforce on that specific record.
To walk you through the setup, let’s consider this scenario:
I want to prefill on the form the Lead Source dropdown, but also list all the other available choices from the Salesforce picklist, in case the person filling out the form needs to change the selected option.
- SF Object → Contact
- SF Picklist → Lead Source
Let’s get started. Follow this step by step guide:
Step 1. Import picklist values in the Form Editor
In the Form Editor section of the form builder, click on your choice field, and on the right-side panel click on Import From Salesforce.

Next, choose your Salesforce object and picklist field to retrieve their values:

Step 2. Create lookup to return from Salesforce the selected value for a specific record and prefill a text field
First, add a short answer field on the form. You can even set it to be hidden on the form, the prefill will work regardless of whether the field is displayed or not on the form.

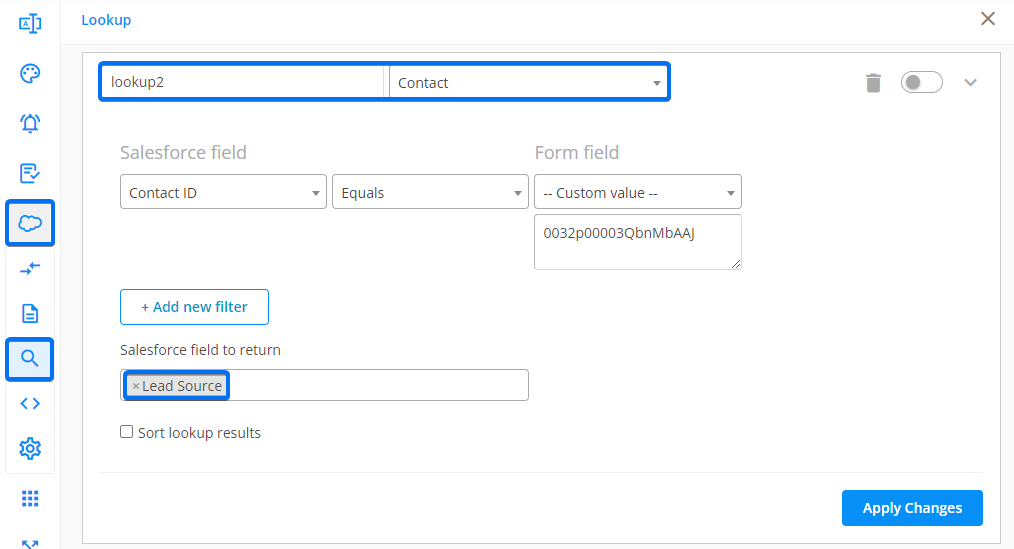
Create a new lookup and choose from which object you want the information to be prefilled.
Remember that in this scenario, I want to prefill Lead Source from Contact, so the new Lookup will be on the Contact object and I will return the Lead Source field from Salesforce:
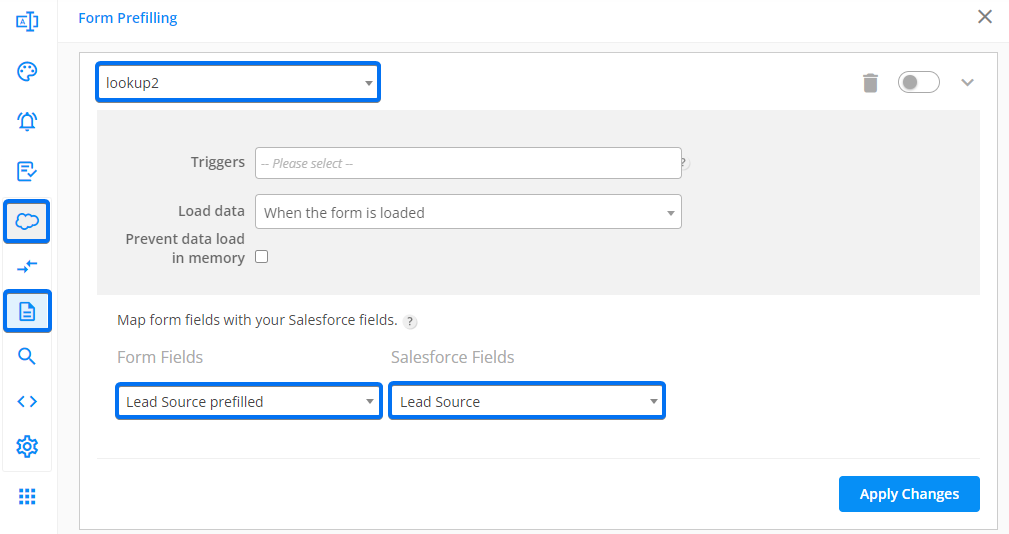
Now, let’s prefill the text field with that value.
Navigate to Form Prefilling, create a new prefill connector, and select the lookup created above. At Form Fields, choose your text field, and at Salesforce Fields choose the value returned from Salesforce.
Step 3. Create, upload, and add to the form this custom JS
This is the final step needed to return from Salesforce the selected value for a specific record and prefill a text field.
Copy the following script in a text editor:
(function()
{ window.addEventListener('load', function(){
loader.engine.on('compute-form-rules-done', function() {
var value = loader.getDOMAbstractionLayer().getControlValueById('34752448'); // '34752448' id of the control where the selected value is (the hidden input)
loader.getDOMAbstractionLayer().setControlValueById('34752445', value); //'34752445' id of the picklist values (the dropdown)
});
});
})();
Replace the field IDs that are bold in the script with your own field IDs.
To find your field IDs, right-click on the field, select Inspect Element, and hover the mouse cursor over your entire field. The ID will be listed after data-id. For more information check out this guide.
After you replace the field IDs, save the file with the .js extension and upload the JS script file on a secured hosting service.
Once you have the script URL, go to your form’s Advanced → Form tab section and paste the script under Add a JS script to your form.
If you use dynamic prefill, where the prefill is triggered by user input rather than on form load, then use the following script:
function theMainFunction(){ setTimeout(function() { var value1 = loader.getDOMAbstractionLayer().getControlValueById('2912856'); // '2912856' id of the control where the selected value is (the hidden input) loader.getDOMAbstractionLayer().setControlValueById('2900914', value1); //'2900914' id of the picklist values (the dropdown) var value2 = loader.getDOMAbstractionLayer().getControlValueById('2912858'); // '2912858' id of the control where the selected value is (the hidden input) loader.getDOMAbstractionLayer().setControlValueById('2900915', value2); //'2900915' id of the picklist values (the dropdown) }, 10000); //10000 = 10 seconds } window.onload = theMainFunction;Replace the field IDs that are bold in the script with your own field IDs.
In the script above, you can adjust the number of seconds for the script to load. For instance, 10,000 milliseconds equals 10 seconds. You can modify this based on the prefill loading time.
Related articles
Most Popular
Frequently Asked Questions
Here is a list of the most frequently asked questions. For more FAQs, please browse through the FAQs page.