123FormBuilder Knowledge Base
Search our documentation platform for answers, service specifications and 3rd-party integrations.
Knowledge Base
You can create a domain alias for the 123FormBuilder domain URL if you are a Platinum user or higher. It’s commonly referred to as domain aliasing (or domain mapping). This way, the form link you share with users will contain your own custom domain and no reference to the 123FormBuilder form builder.
Setup
Users who do not have access to the Custom domain feature according to their pricing plan (under the Platinum plan) will see a placeholder image with an Upgrade button.
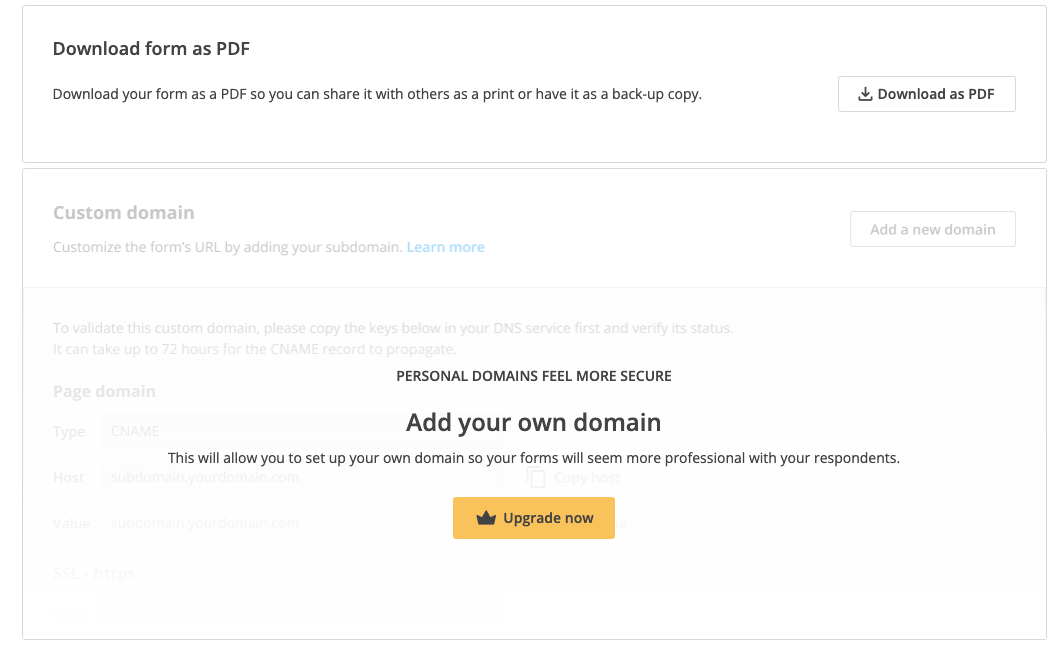
Starting from the Platinum plan, users who do not have custom domains on any of their forms will see the option of adding a new domain.
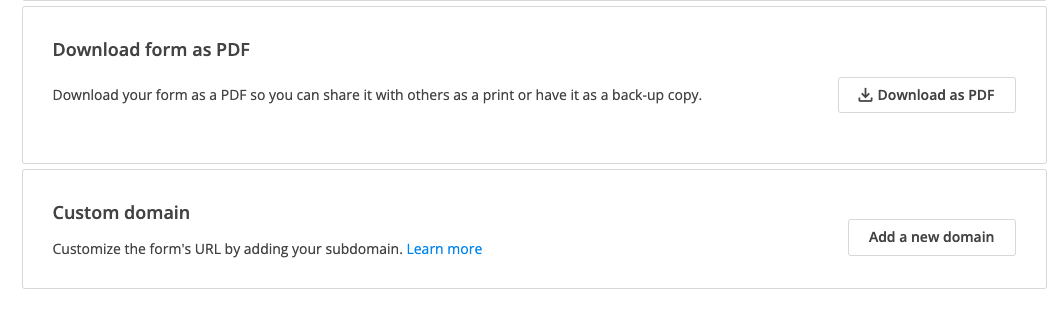
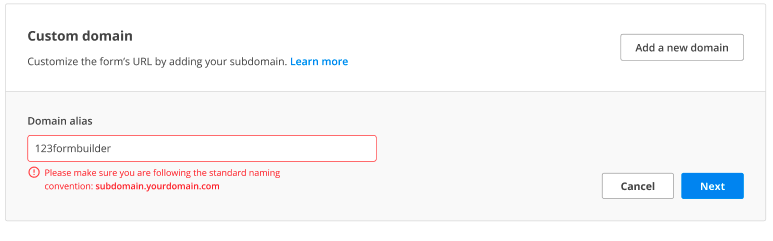
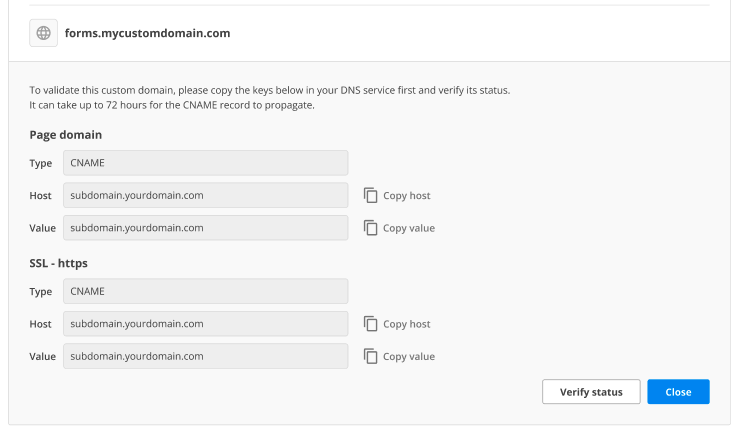
If you want to add a new domain, all you have to do is click on the Add a new domain button and the section will expand. You need to add your subdomain name following the standard naming procedure given as an example below and click on the Next button.

If the standard naming convention is not followed, you will receive an error as below:
Let’s say you have successfully provided your subdomain name and clicked on Next. Similar to the legacy setup, you need 2 CNAME records to successfully set up your custom domain and make it work on your forms.
Page domain keys
Your subdomain name is displayed at the top of the container and below you can find the page domain keys. The page domain keys are provided instantly. Below you have a placeholder example, but for you, they will be provided correctly.
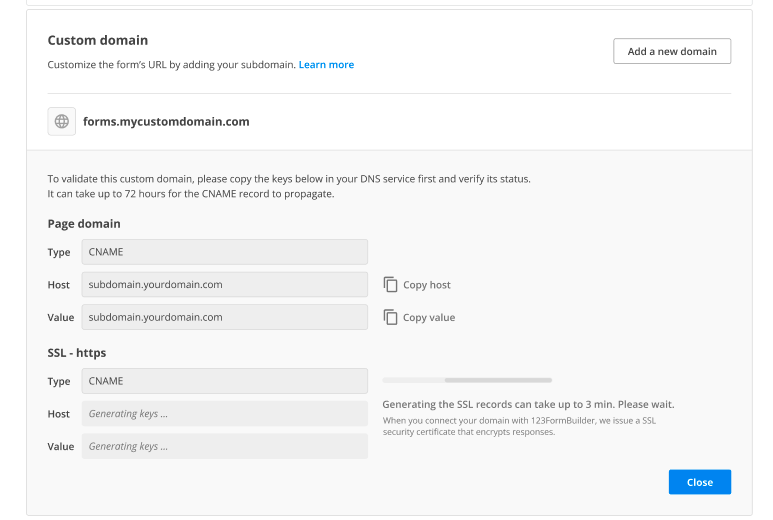
SSL keys
The SSL keys take up to 3 minutes to be generated. Until they are generated, you will see a loader and an explanatory text so you can know we are working on generating them.
Once the SSL keys are generated, they will be displayed as below.
All you have to do now is to copy the keys and set them up to your DNS. Set up your subdomain to point to the two CNAME records in order to establish the connection.
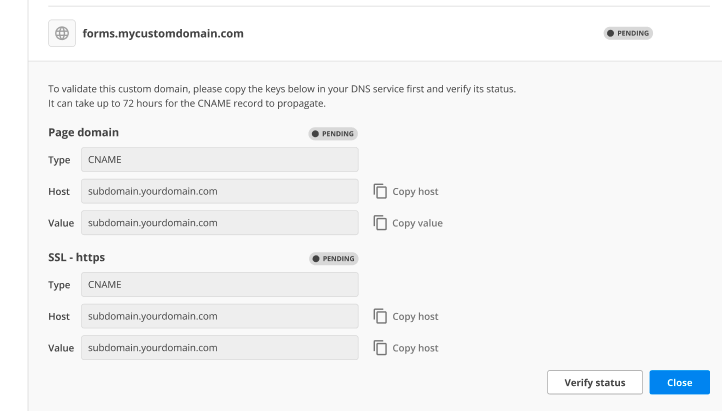
Statuses
Once you have done the setup on your end, click on the Verify status button. As we are working in the background to establish the connection, both of your CNAME records will have a Pending status – and your custom domain overall as well.
This is to show you that we are working behind the scenes in setting up your custom domain.
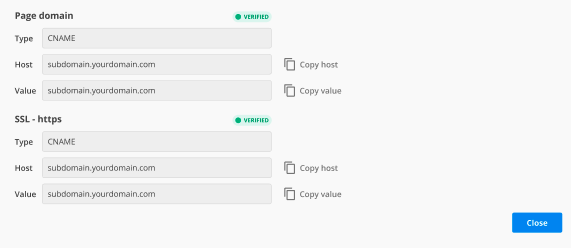
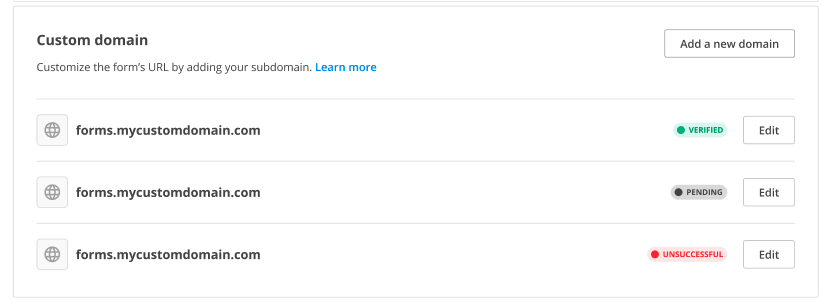
If the connection is established successfully, both CNAME records and the custom domain overall will have a Verified tag.
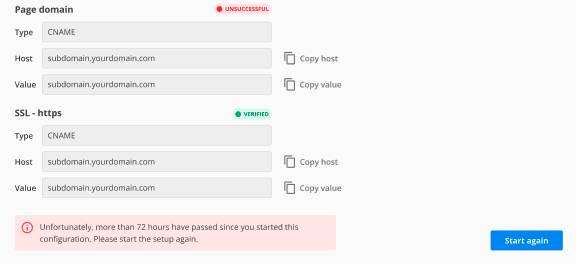
If the connection is not established successfully, you will be able to see which CNAME record has an error, as it will have an Unsuccessful tag near it.
The status of the custom domain overall will also be displayed in your list like the below example:
Choosing your custom domain
Once you have successfully set up a custom domain, you can choose to apply it to any of your forms. You can do this from the Publish section – Personalise link.
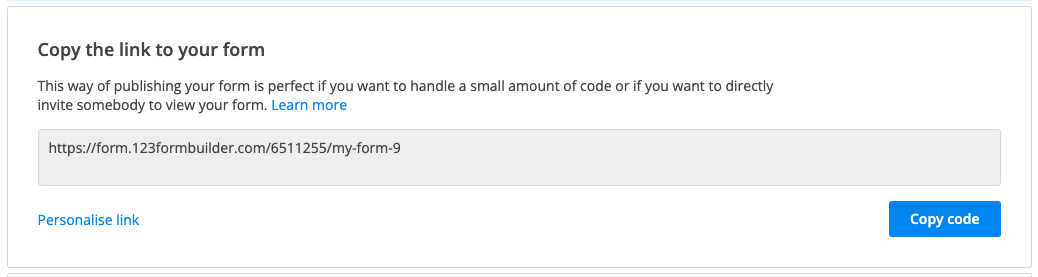
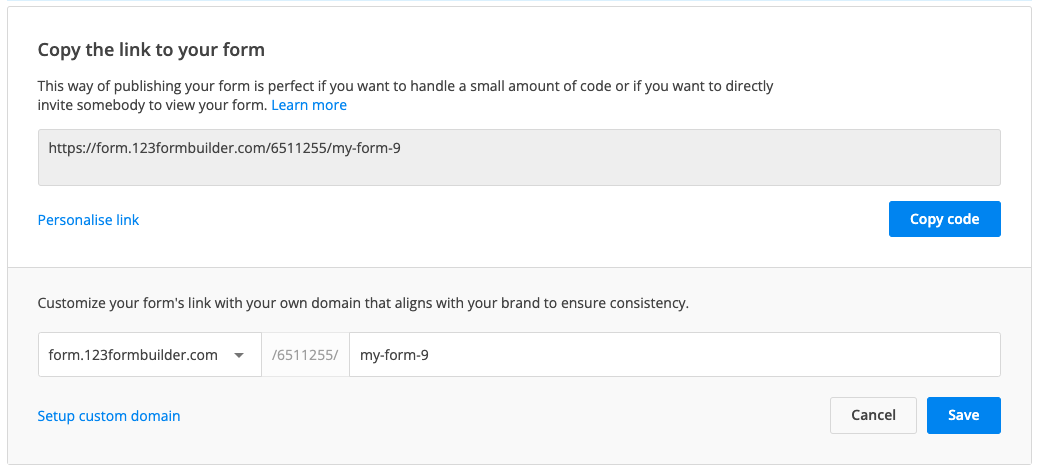
Click on Personalise link in order to expand the section. Once expanded, you can choose to personalize the end of your link or you can choose the custom domain that is verified by using the dropdown.
All the verified custom domains will be displayed in the dropdown form.123formbuilder.com so you can use them on any of your forms.
After making the changes, do not forget to click Save.
Legacy setup
In order to set up a domain alias, you first need to create a subdomain on your own domain. Then you will need to add new CNAME records to your DNS.
Once you set up your subdomain, all you need to do is contact us and specify which subdomain you would like to use on your forms. (e.g forms.yourdomain.com).
After the procedure is done on our end, you will receive two CNAME records (one for the subdomain, and another one representing an SSL certificate). Set up your subdomain to point to the two CNAME records in order to establish the connection.
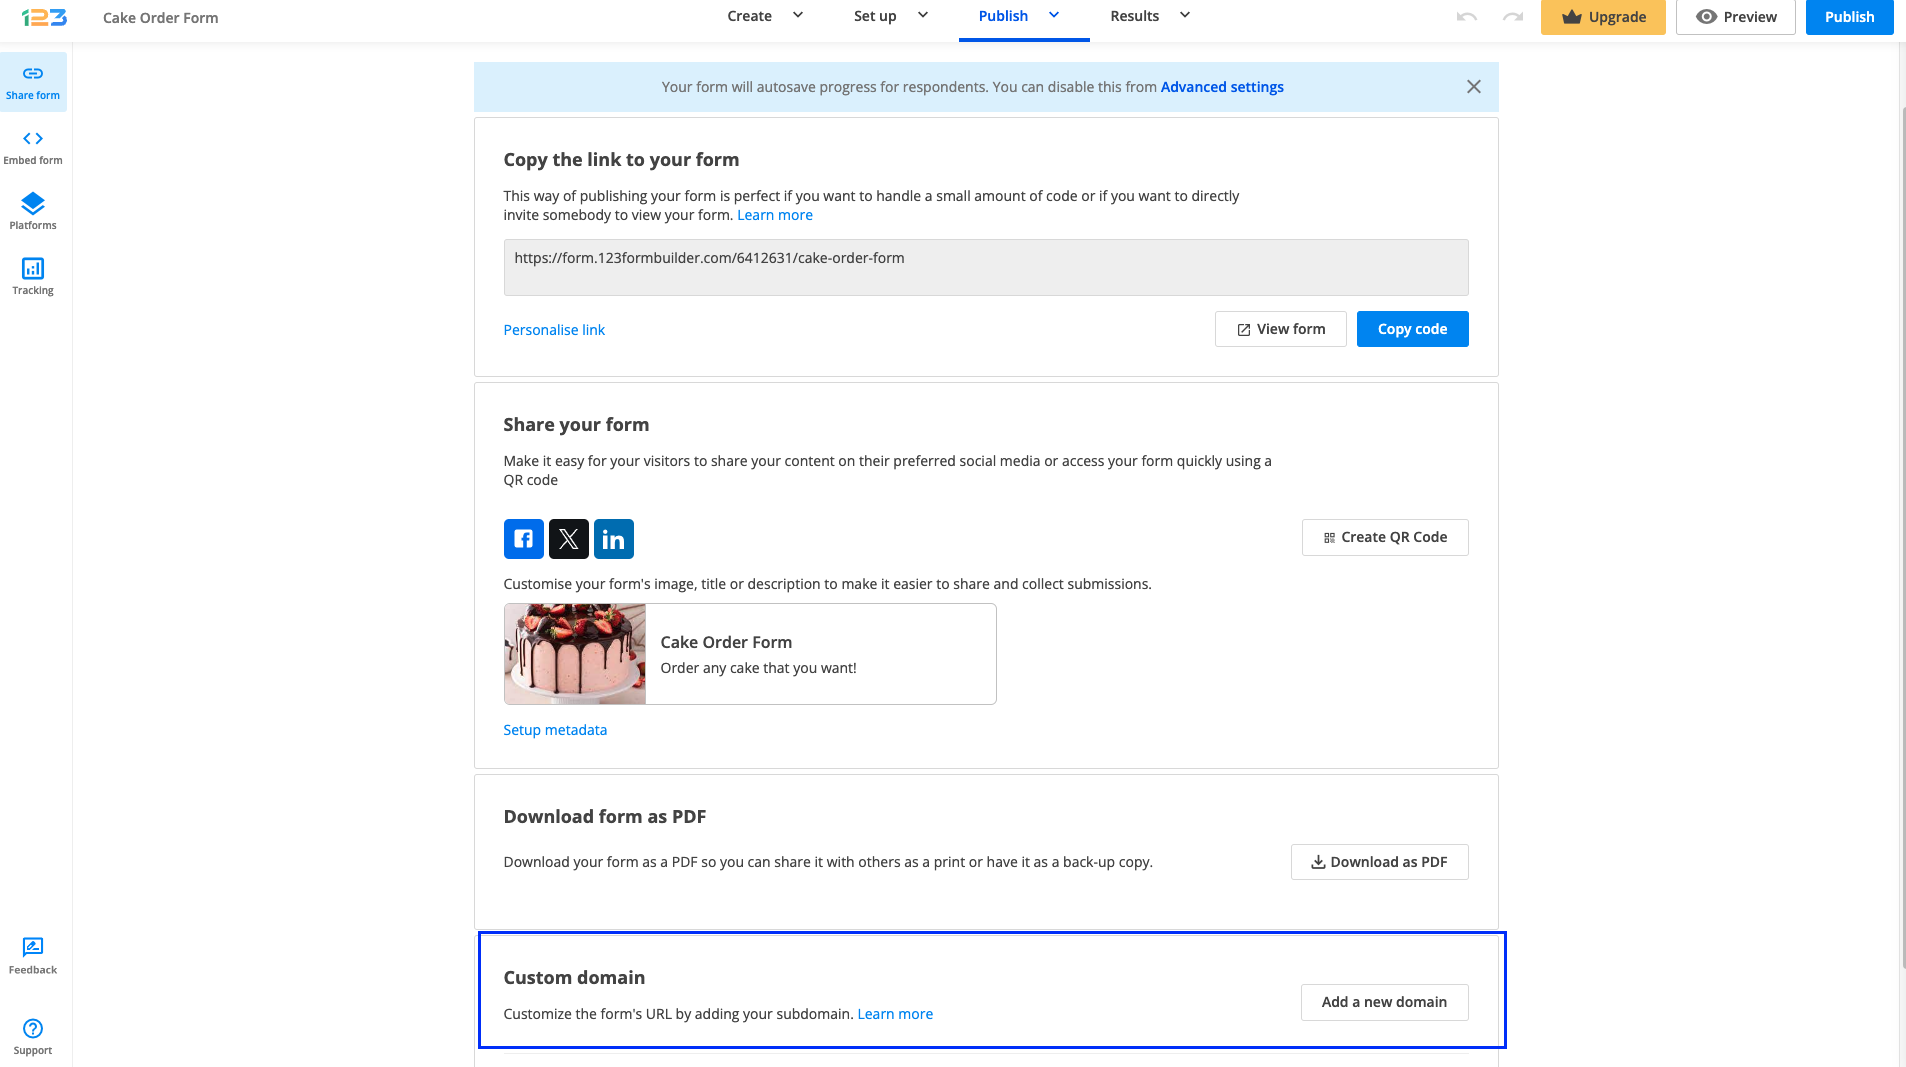
Finally, go to your form’s Publish → Share form section and scroll down to Custom domain.
After clicking on Add a new domain, enter your subdomain and click on Save domain.
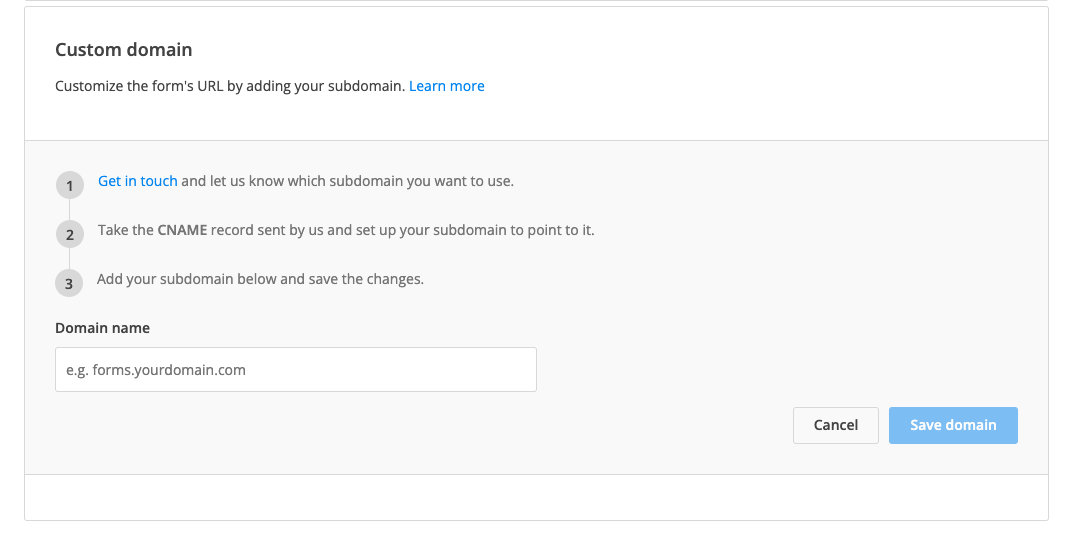
The subdomain is now active. The form URL has been replaced with the domain alias in all of the publishing options and it is secured. Copy/paste the form code normally. Your subdomain will be used instead of our domain name from now on.
Important Notes
- CNAME records require time to propagate. The propagation time depends on your hosting service. It can take up to 2 days.
- The SSL certificate is provided by us, free of charge.
Why does it show up?
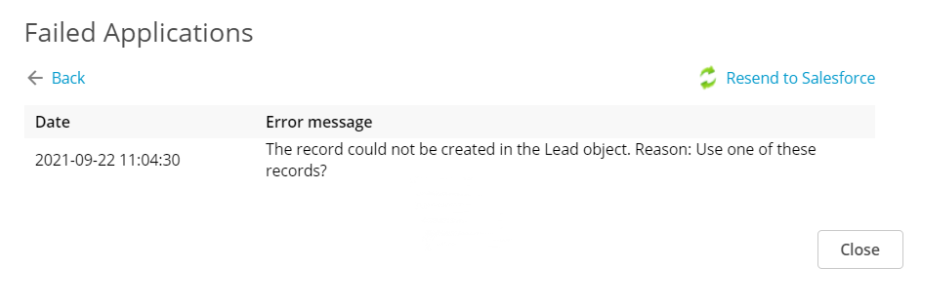
The error message indicates that you have a Duplicate Rule active in your organization, with the action set on Allow and Show alert.

When manually creating/updating a record in Salesforce – a prompt will show up with the Alert text and one can interact with that prompt. However, via API, no such interaction is available and 123FormBuilder app will fail to create/update the record, with the Alert text as a failed message:
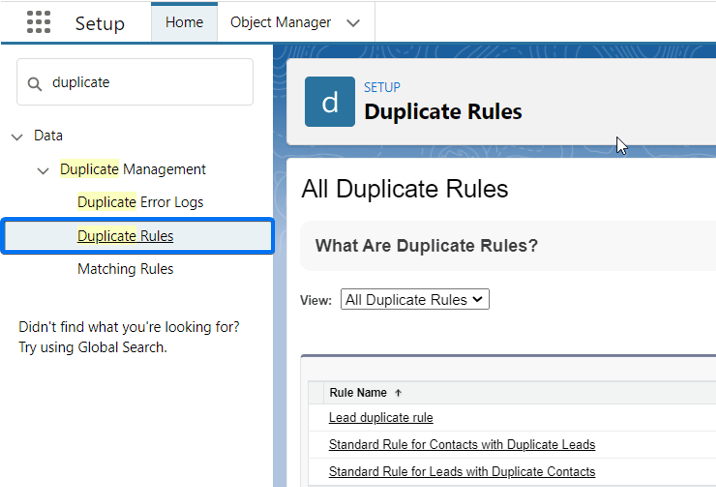
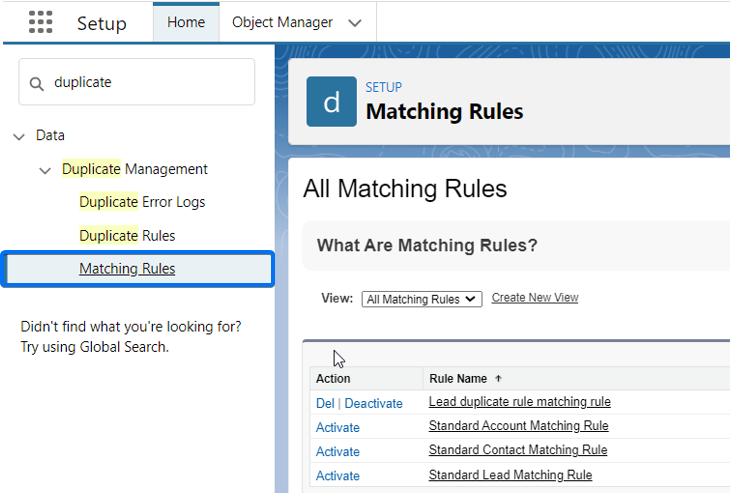
How to check for Duplicate or Matching rules
Check if you have an active Duplicate Rule for the object indicated in the error, and what is the criteria. In order to verify this, in Salesforce → Setup search for Duplicate Rule.
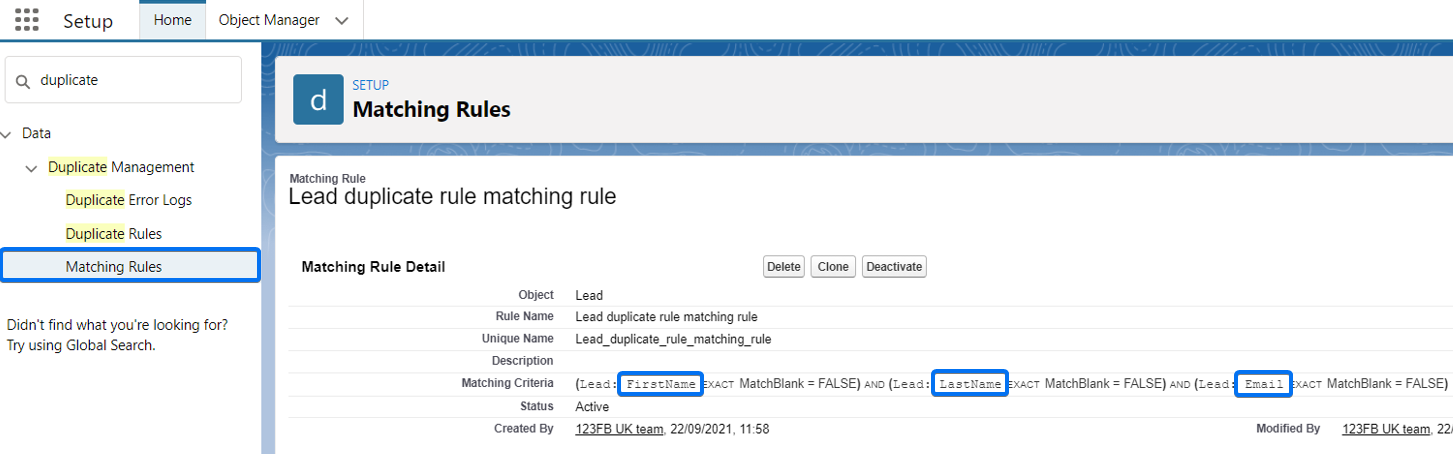
While still in Salesforce → Setup, check the Matching Rule to see what fields are verified to prevent duplicates.
How to fix it?
1. To avoid this error and make sure that upon submission the record will be created/updated when the Allow action is selected in the duplicate rule, you can enable the option Override Duplicate Rules when creating/updating record from the mapping interface, under Record Preferences:

Besides enabling the Override Duplicate Rules when creating/updating record option, we recommend setting the form to update based on the field you use in the Matching rule in Salesforce, or create a lookup/query with those fields to return the record ID. Details below.
2. For more complex Matching Rules:
Complex Matching Rules can involve multiple fields in the matching verification (e.g. FirstName, LastName, and Email in the screenshot below), or if another object is checked for duplicate values in relation to the mapped one.
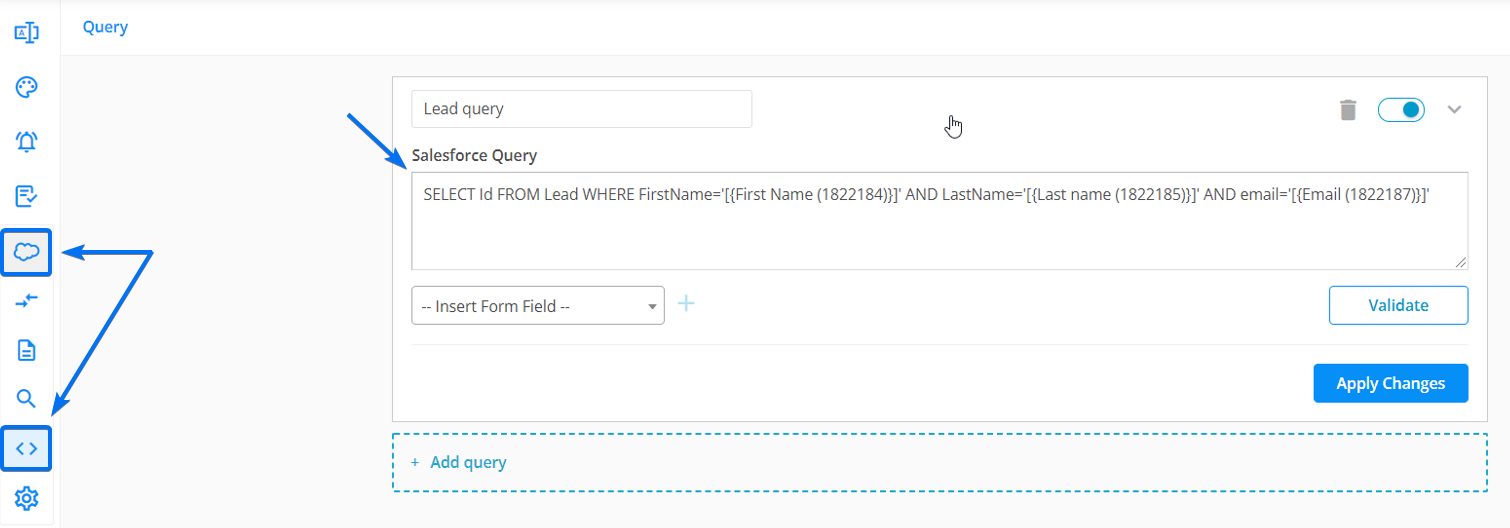
To fix this, you need to create a query that searches for the record ID of the object involved in the Matching Rule. The query result can then be used to update the records.
In the 123FormBuilder app, go to the Salesforce Integration → Query section and add your query.
Here’s a query example:
SELECT ID FROM Lead WHERE FirstName=`[{First NAme (1822184)}]` AND LastName=`[{Last name {1822185)}]` AND email=`[{Email(1822187)}]`
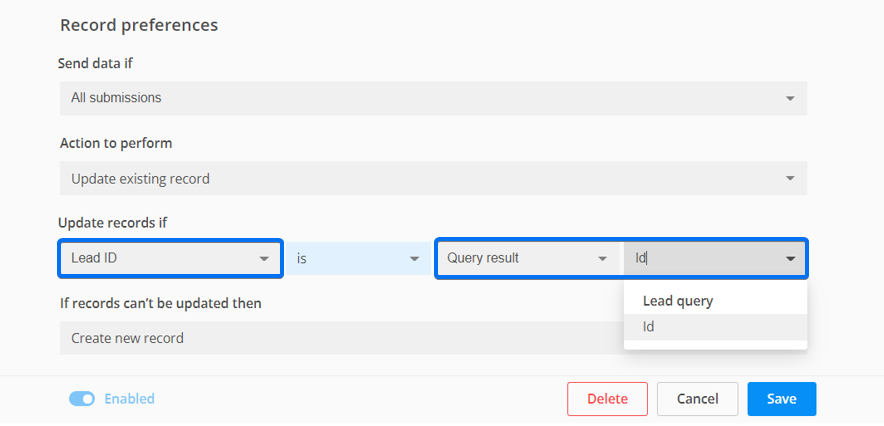
Once you validate the query, follow the same steps explained above. In the Object Mapping section, under Record Preferences choose Update records if Salesforce Record ID field is Query result, in this example, the Record ID:
Important Note
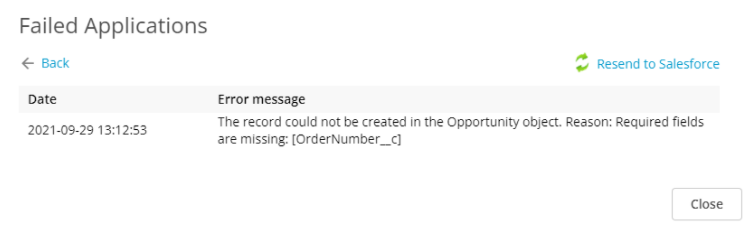
For existing entries with this error, you can update the mapping with the solution explained above. Then, from the Failed Applications tab in the forms Submission section, you can click on Resend to Salesforce to trigger the mapping again.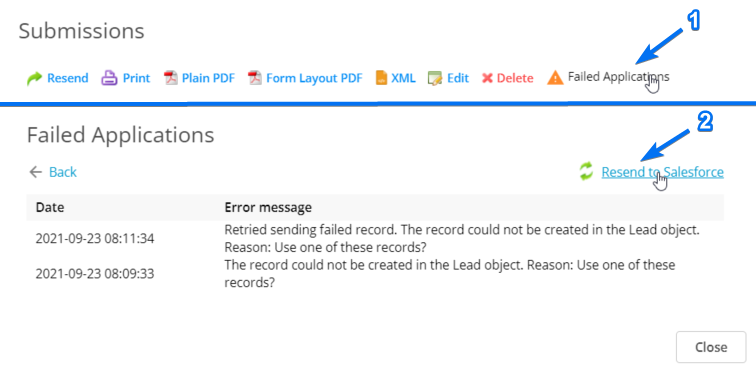
The “required fields are missing” error indicates that there is a required field in your Salesforce object that has not been mapped or has not received a value.
Why does it show up?
There are two possibilities:
1. When a required field in Salesforce is not completed on the form.
To solve this, we suggest making the 123FormBuilder fields required as well. This way users can’t send the submission without the information requested by Salesforce.
2. When not all required Salesforce fields are mapped.
When you add an object, all the required fields pertaining to that object will be automatically loaded and showcased with an asterisk. Check your form’s Object mappings to make sure that all required fields are listed.
In the following example, the Opportunity object has 3 Salesforce fields required: Name, Stage, and Close Date.
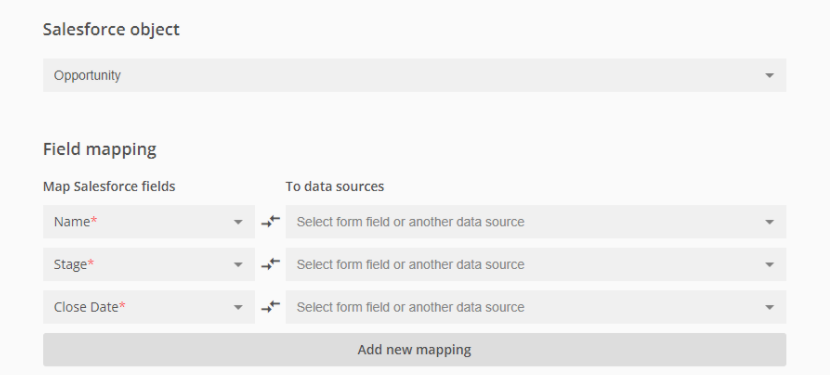
If the form is not loading all your required fields, delete the mapping and add it again. Once you have all your Salesforce required fields displayed on the left side column, map them with your form fields.
We recommend creating the 123FormBuilder Object Mapping after you finish customizing your Salesforce fields.
When/Why does it show up?
The Salesforce default error message for an invalid filter lookup data is “Value does not exist or does not match filter criteria”. When you attempt to save a record but the lookup field does not meet the filter criteria, you will receive this error. This can happen whether you create/update the record manually, or by using the Salesforce API.
Here is an example: Your custom Lookup Filter field to an Account has a filter that requires the Account to be of a specific record type: Patient. Now attempt to create/edit a record while the account listed in your lookup field has a different record type, not Patient. This will cause the error to display.

How to solve this error:
Because the error does not list the field, just the object, the first thing you need to do is to identify which field generates the error.
In Salesforce → Object Manager, view the fields of the Object that returned the error and identify all the fields with Lookup type. Check which one has a filter and review that filter.
Afterward, the next step is easy:
1. Delete the filter if it’s not needed anymore, OR:
2. Make sure that what you map in that specific field respects the filter criteria. If you are using a lookup result, the filter condition should be a part of the lookup condition too (e.g. Type = Patient).
CSS makes designing web forms so much easier. With basic coding knowledge, you can create stunning-looking forms and customize their design according to your needs. With CSS you can let your imagination and creativity go wild. We offer the possibility to add your own custom CSS codes to the form using our CSS form generator.
First things first, read our article about how to add dividers on the form, if you haven’t already.
Note: these CSS tricks apply to the divider created using the HTML block.
Any CSS code is placed in the Design → Add custom CSS section of your form within your form builder account. We will provide you with the CSS code for your dividers and show the final result. Just paste the code in the Design section and the changes will apply immediately. Of course, you can adjust the code by adding your own color code, adjust the border size, and so on.
Check our CSS examples for your dividers below.
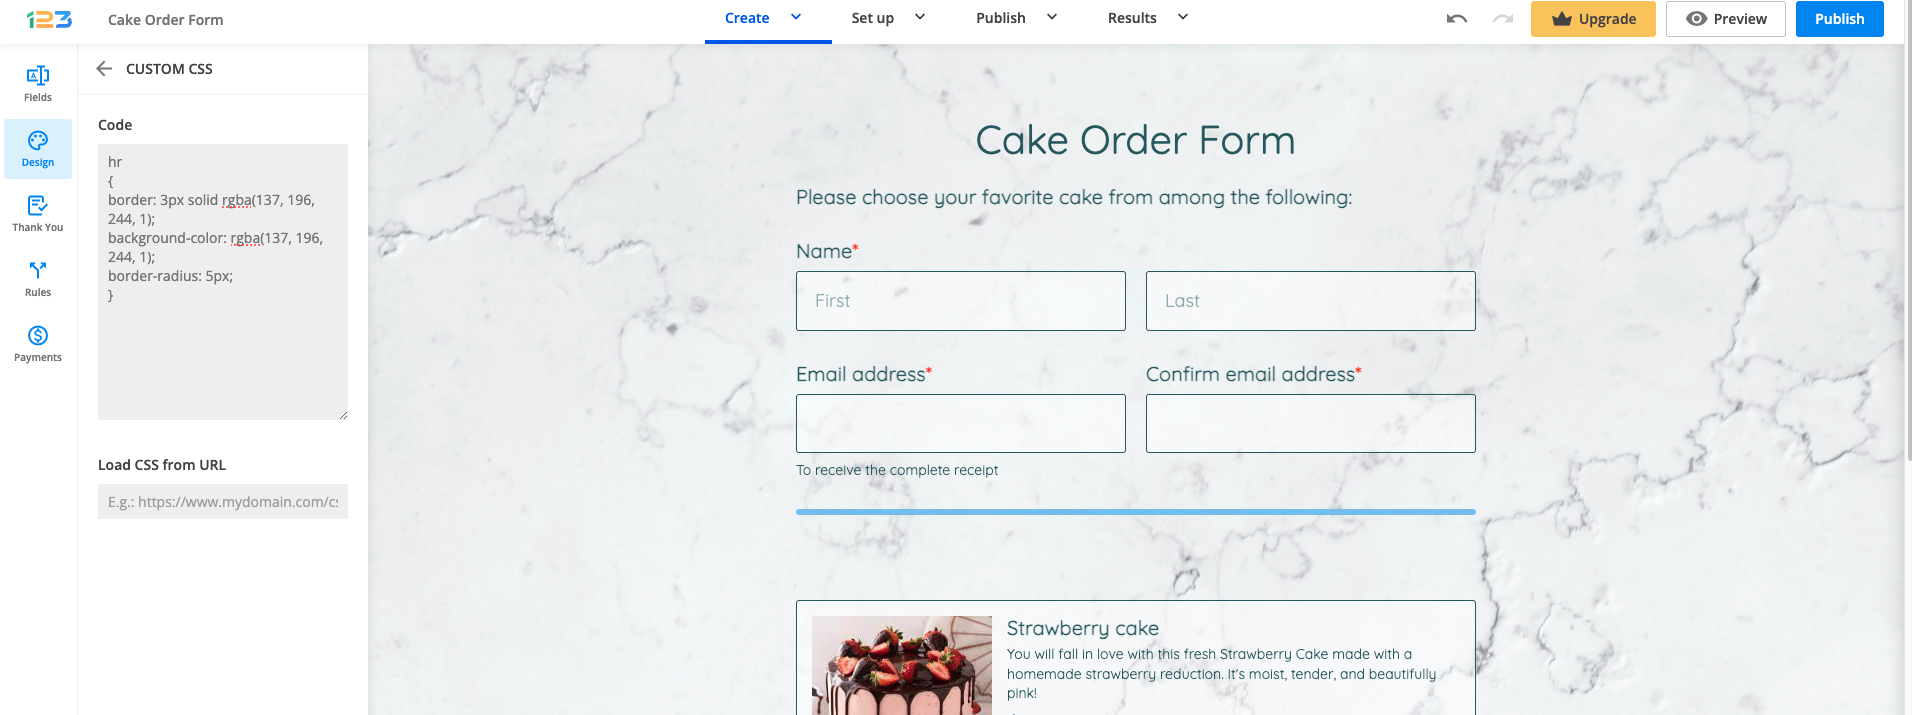
Example #1
hr
{
border: 3px solid rgba(137, 196, 244, 1);
background-color: rgba(137, 196, 244, 1);
border-radius: 5px;
}
This is the result:
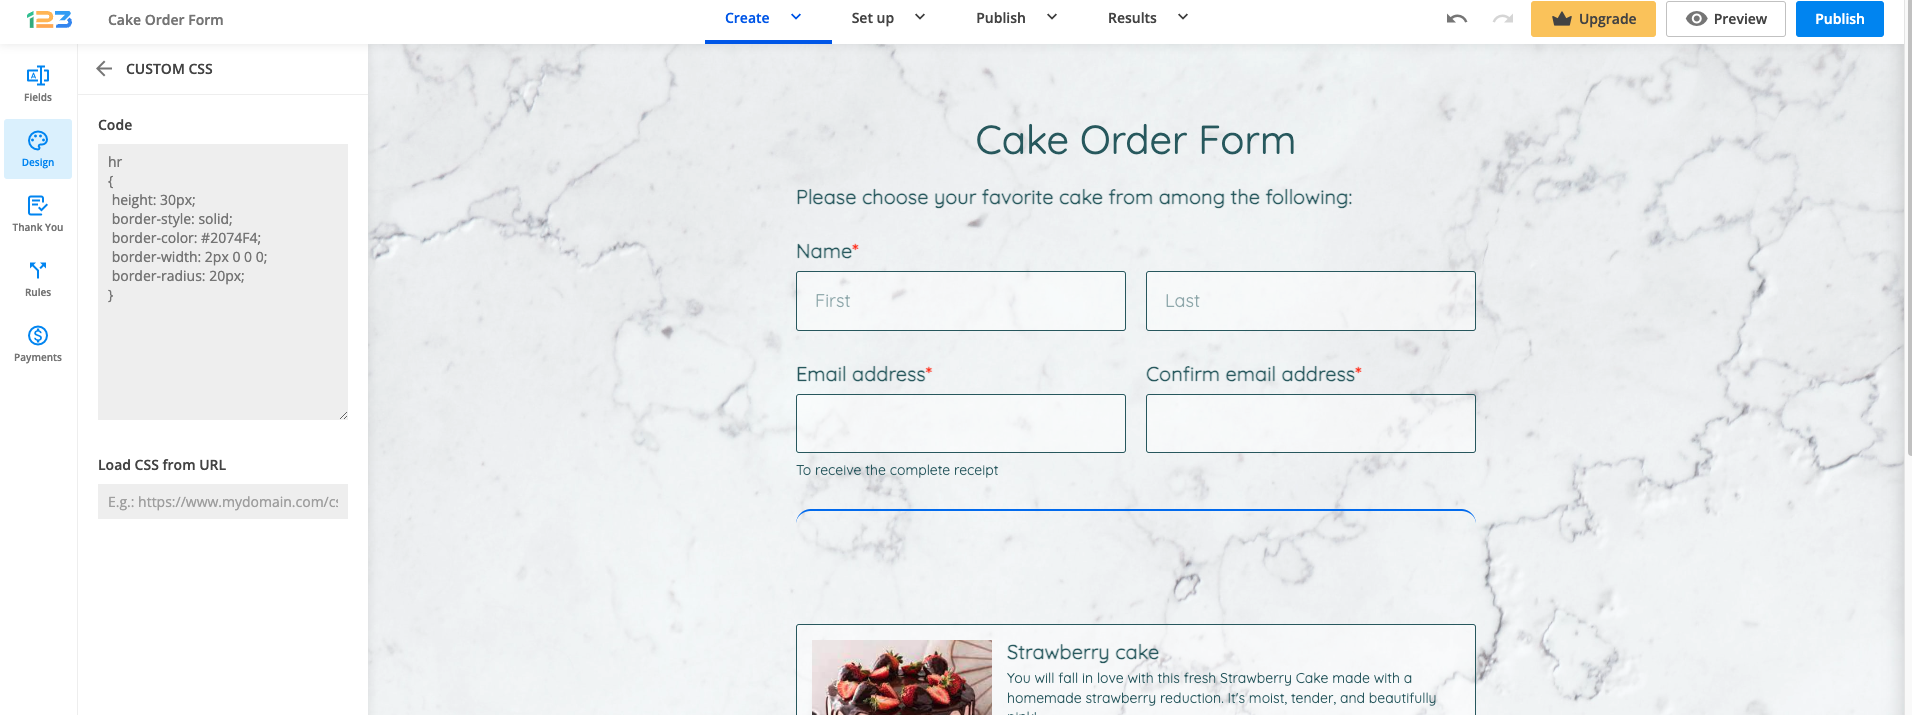
Example #2
hr
{
 height: 30px;
 border-style: solid;
 border-color: #2074F4;
 border-width: 2px 0 0 0;
 border-radius: 20px;
}
Here is the result:
Example #3
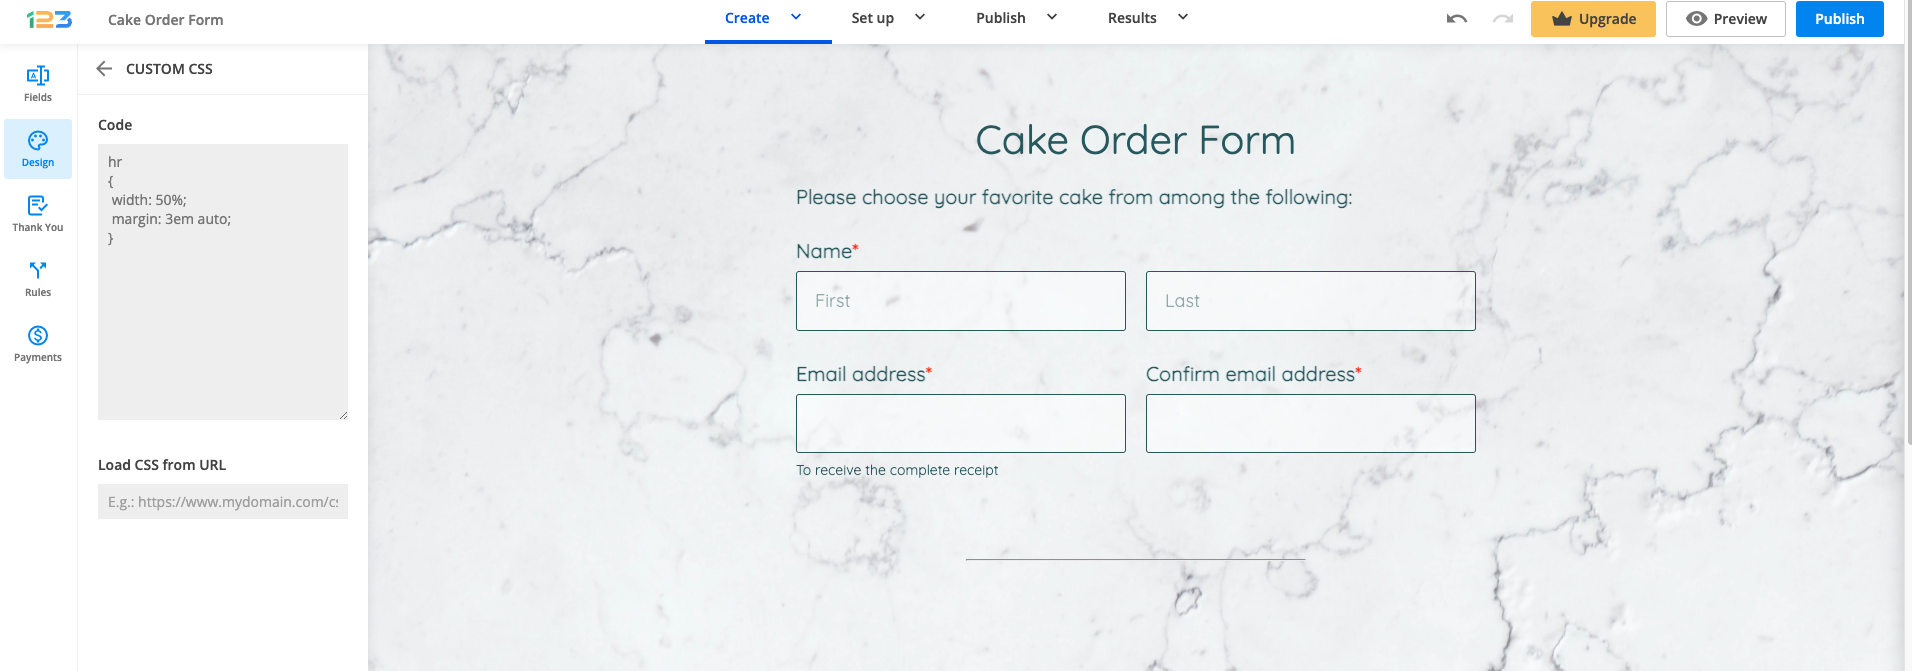
hr
{
 width: 50%;
 margin: 3em auto;
}
Edit your HTML block fields and center the text to have the same effect. Here is the result:
Important Note
Keep in mind that it is not our responsibility to fix the code once you have changed it.Check out the CSS tricks knowledge base section for more CSS articles.
Use the 123FormBuilder – Evernote integration to let your friends, business partners, colleagues, and clients send you notes and reminders in a private or shared notebook through form submissions. You can send the following information from your web forms to Evernote:
- Note Title
- Note Content
- Note Tags
- Reminder Time
- Reminder Done Time
- Source URL
- File Attachments
1.Go to Integrations section and click on Data management tab or you can use the search bar to look for Evernote.
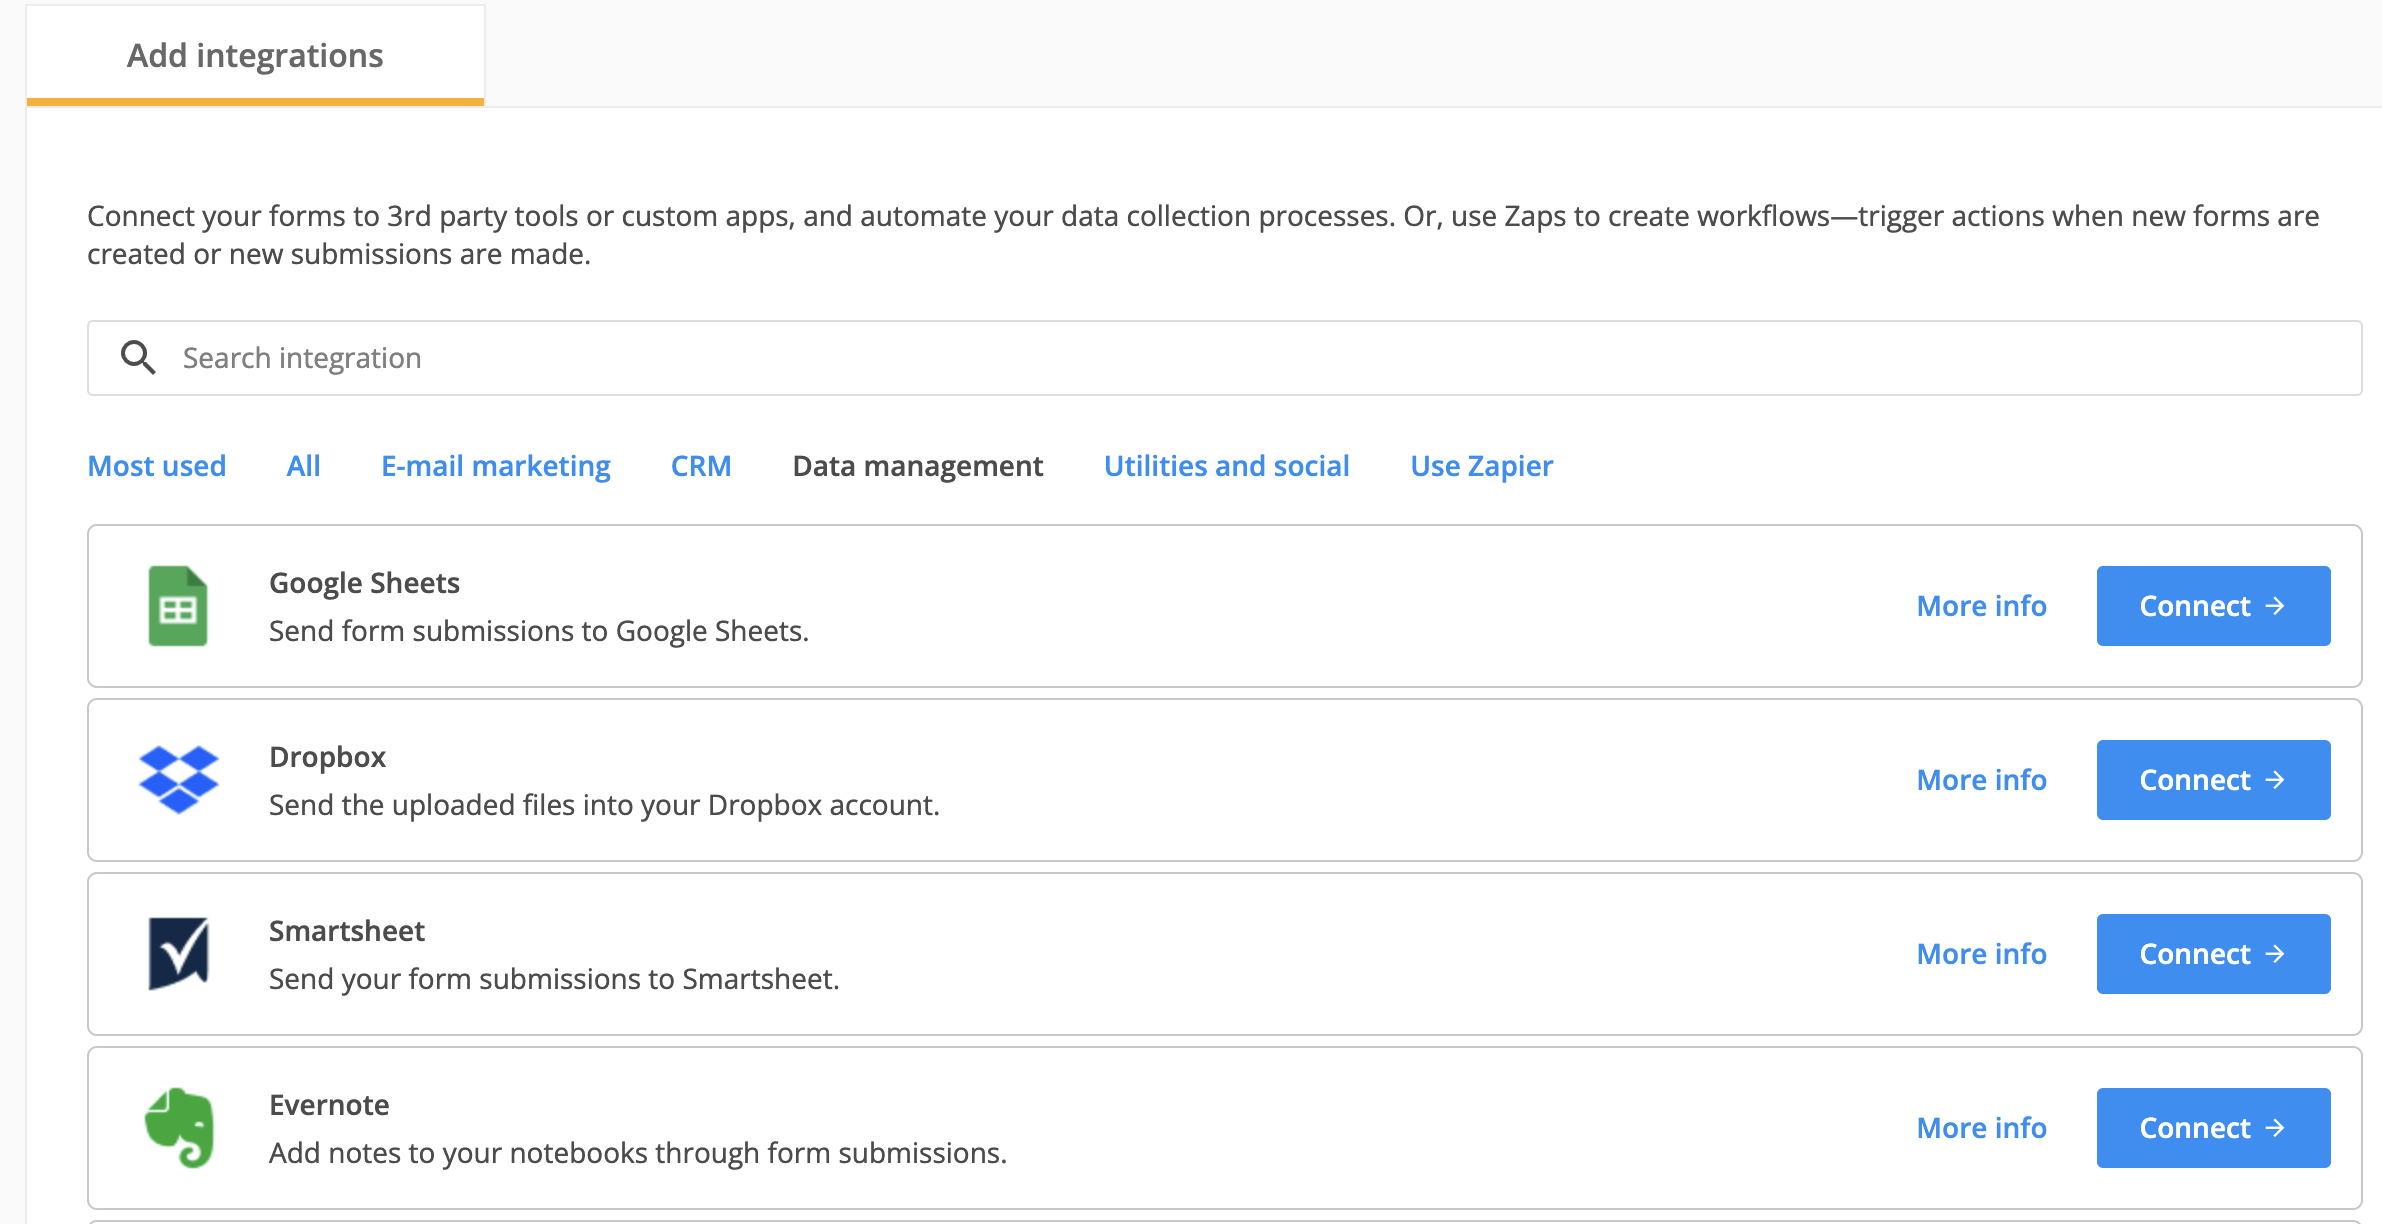
Press the Connect button.
If you’re not logged in, you will be redirected to the login page from Evernote where you’ll need to provide your username and password.
2. Hit Authorize or Re-authorize to give 123FormBuilder access to Evernote.
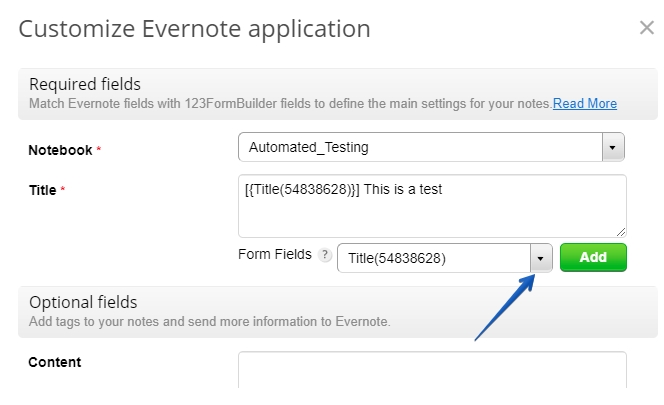
3. In the customization lightbox, in the Required Fields subsection, choose the notebook where you want notes to be sent. The notebooks listed first are your own, followed by the ones shared with you by other users and businesses. Each form submission will create a new note in the notebook you select.
Provide a note title in the box labeled Title and/or associate any appropriate fields from the dropdown list. If you use form fields, their shortcodes will be replaced with the user input provided at form submission. Mark the note title as a required field in your Form Editor, otherwise the integration may fail. Also, note that the note title length can not exceed 255 characters.
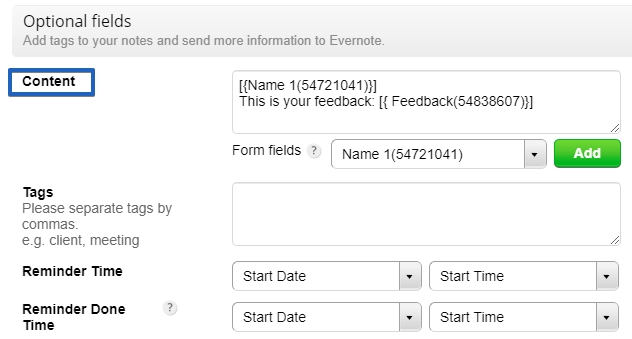
4. In the Optional Fields subsection provide the note content and/or the appropriate form fields. You can add some HTML and inline CSS for better styling.
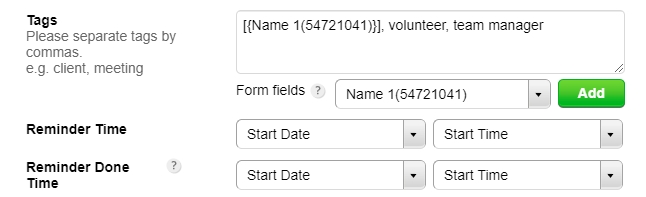
5. Use predefined values or field associations to add tags to your notes. Evernote standard users can add a total of 100 tags, while business users can add up to 10,000. A tag can not exceed more than 100 characters.
6. If you want form users to create reminders for the notes they send, you need to have a Date field and a Time field in your form. Match them with the Reminder Time and the reminder will be created at form submission. If you do not assign a start time, the reminder will be automatically set for 8.00 AM. If you also set a date and time for the Reminder Done Time parameter, then the reminder will be instantly marked as completed.
7. Match upload form fields with the attachments from Evernote to receive uploaded files as note attachments. You can create associations for a total number of 10 upload fields which, together, can not exceed 25 MB in size. You can associate a Website field (or a Text Box field with an URL validation) with the Source URL field from Evernote.

Images will be included in the body of the note, whereas any other files will appear as attachments, like in this example:

8. In Error handling, specify the email address that will receive any error messages that may occur while sending data. By default, the box contains the email address of the 123FormBuilder account owner.

9. Press Save and your integration is complete. From now on, each submission will be sent as a new note to your Evernote account.
| Salesforce Field Label | 123 Field Label |
|---|---|
| Lookup | Has to be mapped with a lookup you create under the Lookup tab. |
| Checkbox | Multiple Choice |
| Currency | Short Text |
| Date | Date |
| Email, Short Text | |
| Number | Number |
| Phone | Phone, Number |
| Picklist | Single Choice, Dropdown |
| Multipicklist | Multiple Choice |
| Text | Short Text, Long Text |
| Text Area | Short Text, Long Text |
| Website | Website |
| Address | Address |
| Attachment | Upload Field |
With many forms in your form builder account, it would be difficult to find a certain one if it weren’t for our filtering and sorting options.
Firstly, you can use the search function to search for your form either by its name or ID. When there are no results for your search, you’ll see a suggestive empty state like the one below.

In My Forms, you can filter the view to see all forms or just the unfiled ones – meaning they are not in any folder.

You can also choose the number of forms you want to display on the page. By default, it is set to 10.

A way of sorting the forms is by 4 types of criteria: the number of submissions, the oldest forms, the newest forms, and by name.

Another great feature is moving more forms at the same time to a folder. You can do this by selecting the forms you are interested in and then clicking on the Move to folder button.

A popup will appear on the screen asking for the folder where you want the selections moved.

Related articles
The Account Owner can access My Account to limit the sharing capabilities for Group Admins and Standard Users within the form builder. The available options are:
Standard Users & Group Admins can share Forms with all Users
This means that Group admins and Standard Users from a Group can find and share the Form with Users from other Groups as well. This option is selected by default.
Standard Users & Group Admins can share Forms only within their Groups
This will let Group Admins and Standard Users share Forms/Folders only with the Users from their own Group. They will only see the Users from their own Group in the list of sharing candidates.
Standard Users & Group Admins can’t share Forms
This blocks them from accessing the sharing functionality. With this enabled, no Group Admin or Standard User will be able to access the sharing interface from My Forms.
Important Note! The Account Owner and Super Admins are not impacted by these sharing preferences, as they can always share Forms and Folders with all Users from the account. At the same time, Group Admins can also still manage Form and Folder Access from the Users section, under Set Permissions.
With Salesforce Communities you can create a secure community and engage directly with your customers, partners, or employees. So let’s take a look at how you can integrate a 123FormBuilder form into your community.
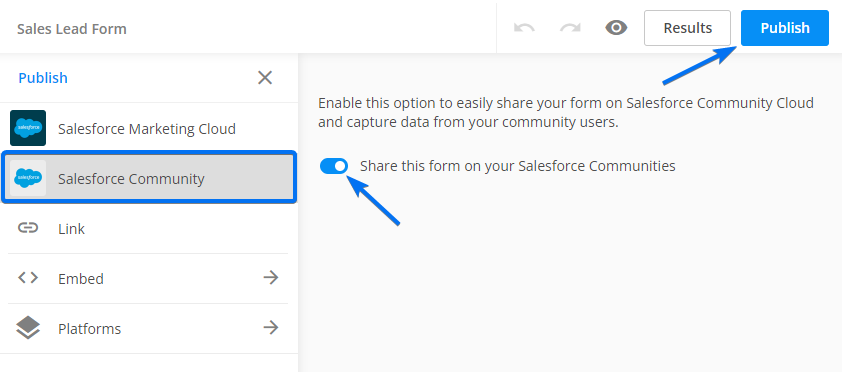
1. Go to the Publish section of your form, choose Salesforce Community from the left menu and mark the form as a Community form.
2. You will find the 123FormBuilder app inside your Community Builder page under the Components tab.
3. All the web forms marked as Community forms will appear inside the 123FormBuilder widget. Choose one and that’s it. Easy, right?
There are a few settings that you can double-check if the form is not published accordingly:
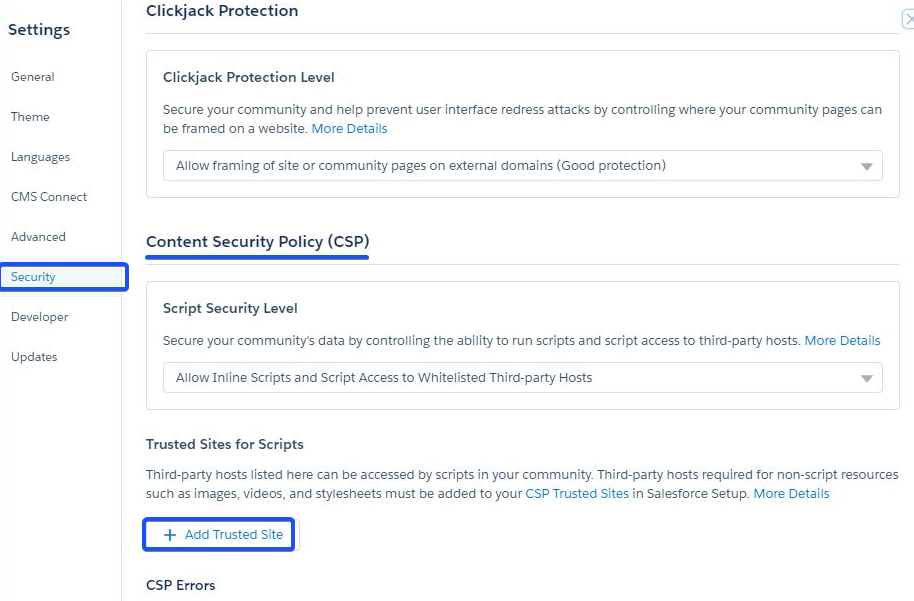
- Whitelist our host in CSP Trusted Sites in your Salesforce org. Go to Settings → Security → Trusted Sites for scripts → Add trusted site and insert the following: https://*.123formbuilder.com
- Ensure that your community user profile has the necessary permissions set to view the form. Therefore, go to Manage Users → Profiles → choose your user profile → Edit and head over to Custom Object Permissions. Here enable the View All permission for the following objects: Community Form, Forms, Form Fields, and Form Send Logs.
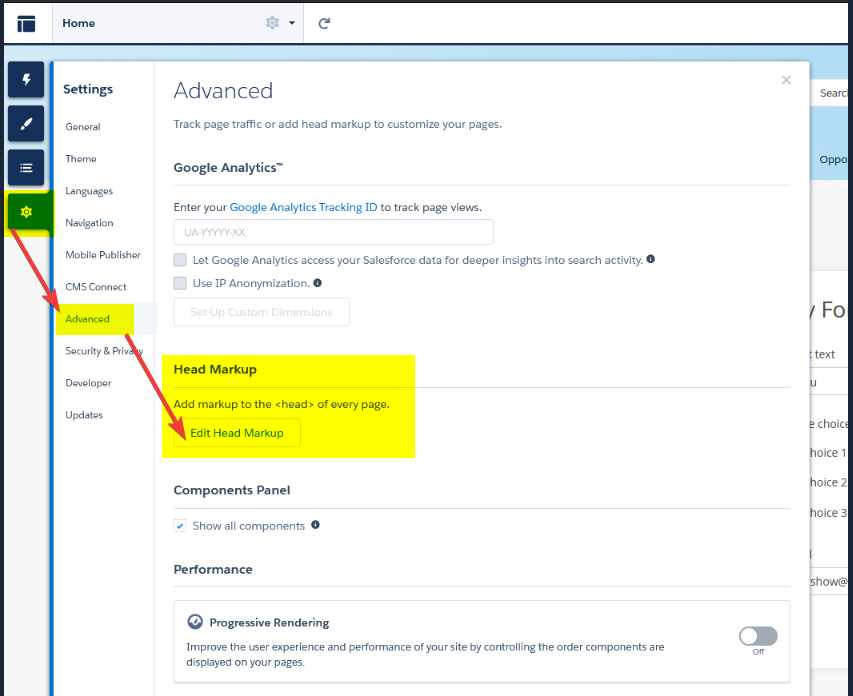
- If the form is left-aligned and is not displayed in the full-frame, you need to add the below style code in the Head Markup section:
<style>
.form-builder-iframe,
.cf123FormBuilder {
width: 100%;
}</style>
Here is where exactly you will add this code: Settings → Advanced → Head Markup
Important Note
If you uncheck the Share this form on your Salesforce Communities option, please make sure that the form is no longer published before you do this.In order to integrate your 123FormBuilder form with GetResponse, you’ll have go to Integration section and search for GetResponse.
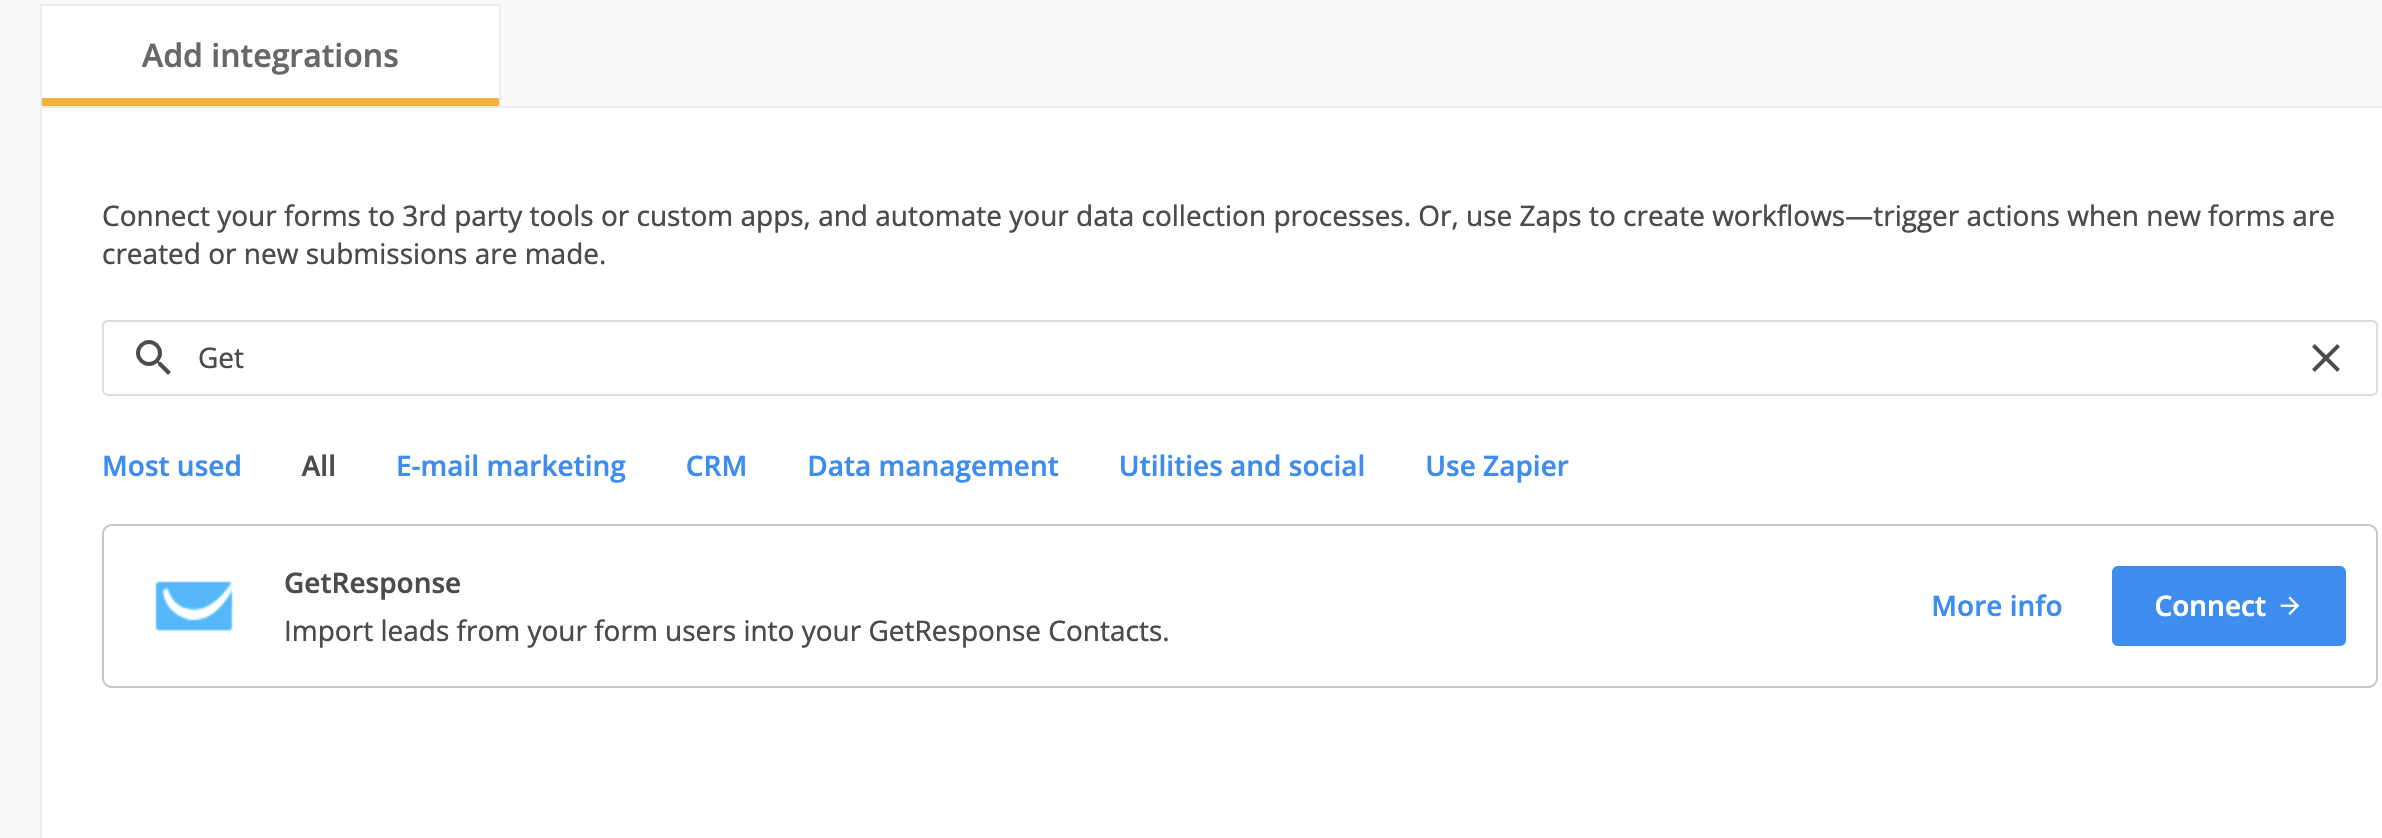
By enabling the GetResponse integration on your form, you will import leads from your form users into your GetResponse Contacts section. Provide your GetResponse API key and choose the Campaign you want to add contacts to from the dropdown list. Press Save. Make sure you have ticked Enable in the checkbox on the top right corner.
Next, click on Customize and define which form fields from the dropdowns on the right contain visitors’ name and email address, in order to import them correctly in your GetResponse database.

You can also take into account custom fields that you have created in GetResponse and associate them with fields from your 123FormBuilder web form.
Tick I want to use custom fields and create the match using the dropdown lists.
You can also place an opt-in checkbox on your form so that contacts will only be sent to GetResponse if they express their consent to subscribe to your list. Be advised that GetResponse already uses an opt-in system that sends your imported contacts an e-mail containing a confirmation link. Although the double opt-in system can be deactivated in your GetResponse account, the confirmation message is permanent.
Go to the Form Editor’s Payments section of your form, add the payment gateway you want to use, and tick the Use recurrent payment option.
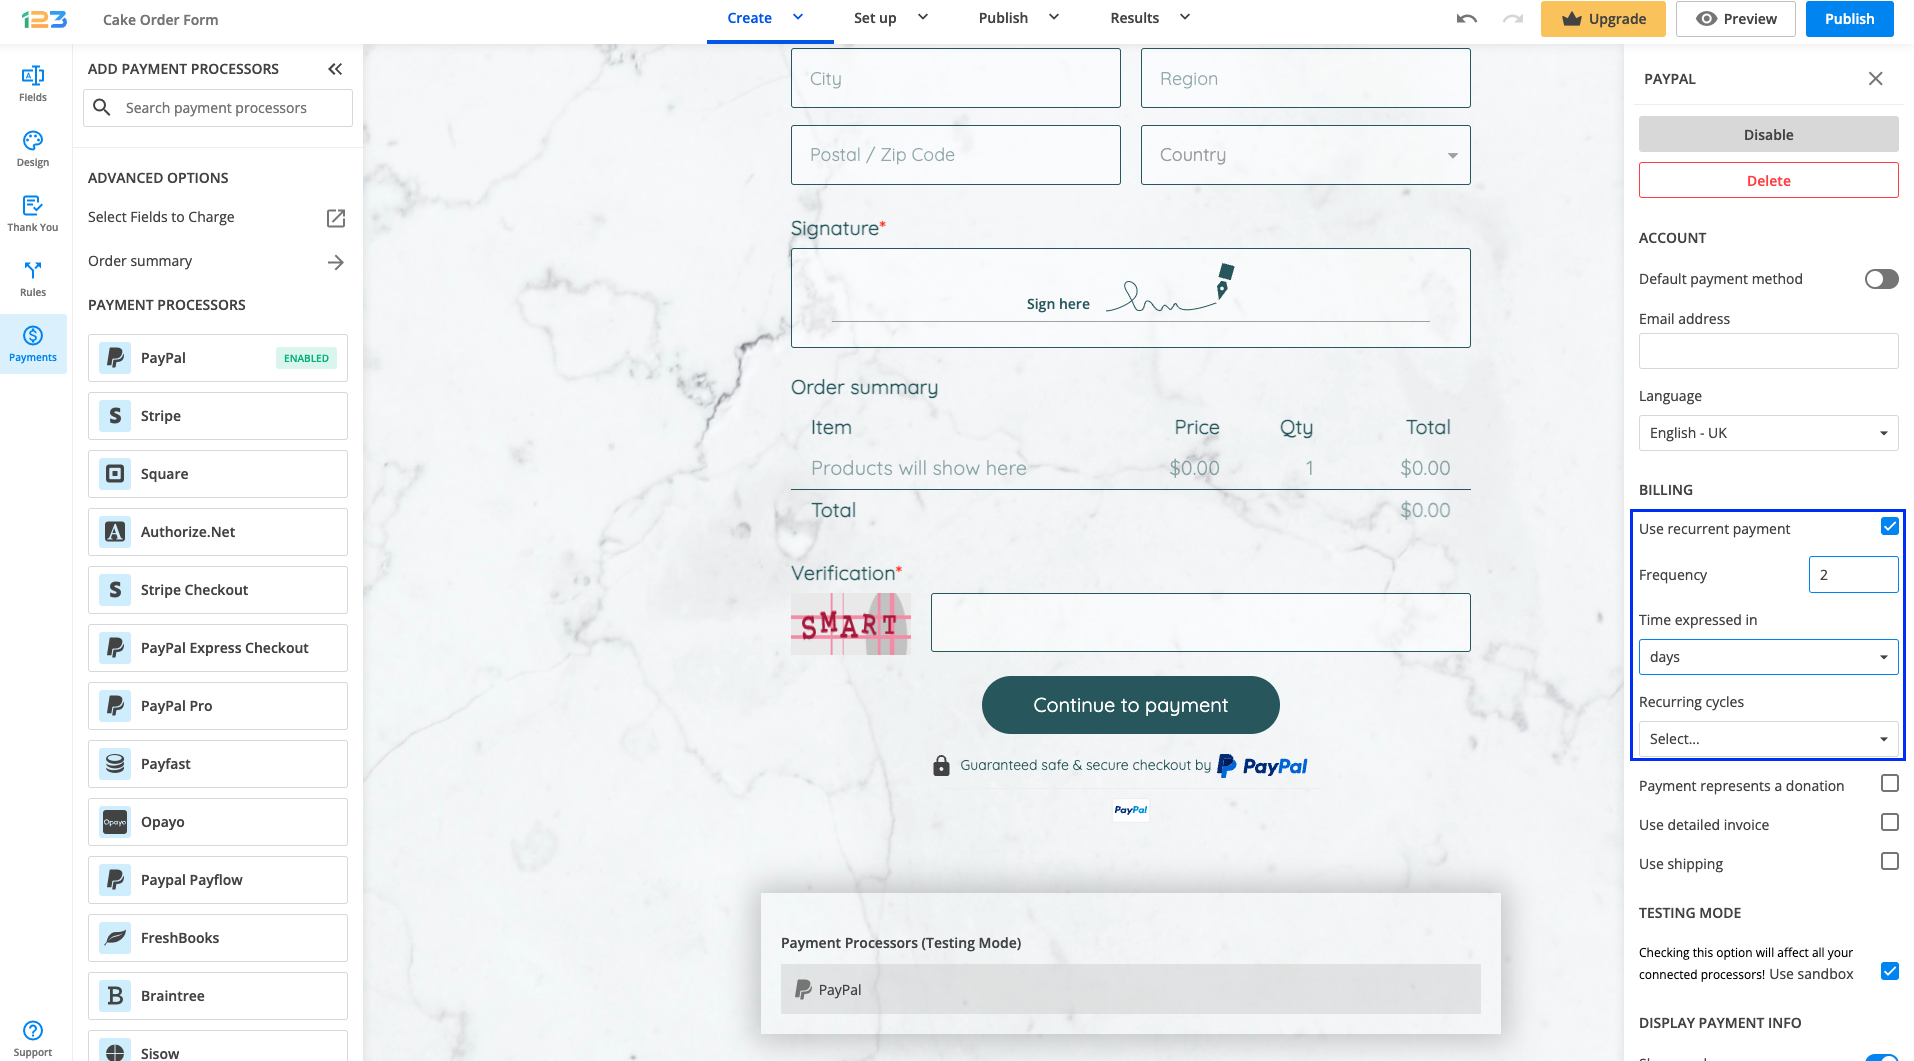
Next, set a regular basis when the client is billed (per days, weeks, months and years). That’s all that differentiates a subscription from a one-time payment. Payment gateways that support recurrent payment will have this option displayed in the integration box.
For PayPal and PayPal Pro you can also add the number of recurring payment cycles. This means you will limit the number of times the recurrent payment is applied.
Not all payment gateways have recurring payments. Here is our Payment Gateways Comparison Chart for more details.
Most Popular
Frequently Asked Questions
Here is a list of the most frequently asked questions. For more FAQs, please browse through the FAQs page.