123FormBuilder Knowledge Base
Search our documentation platform for answers, service specifications and 3rd-party integrations.
Knowledge Base
We have a new feature available for you in order to make your forms more successful: Estimated time to complete the form.
You may have noticed that in Preview, near the Publish button, we are displaying an estimated time to complete the form. Let’s dive into what it means.
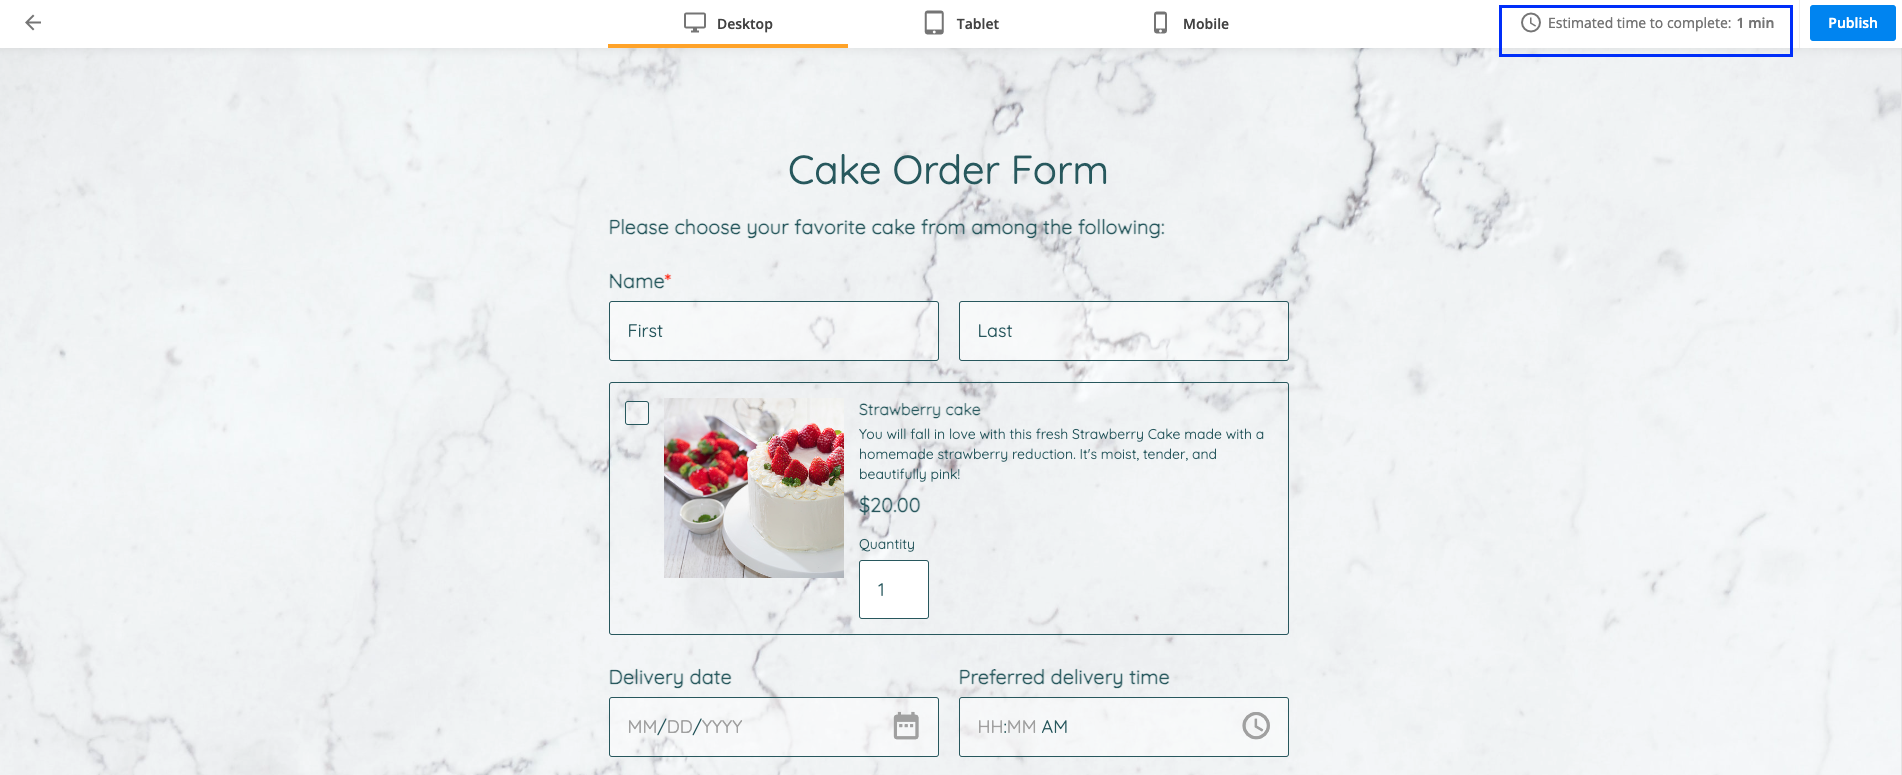
What is Estimated time to complete the form?
We are automatically calculating how much time it would take for a respondent to complete your form based on:
a. the type of fields on your form
b. the lengthy instructions that you have added for each type of field
c. if fields are read-only or require input from your respondents.
How do you calculate the estimated time to complete the form?
The formula we are using when calculating the estimated time to complete the form is based on a point system. We are taking into consideration the fields that you have added to the form and assigning points to each of them. Then, the total amount of points is divided by 8, getting the estimated time to complete the form. You might ask why divide everything by 8. Based on our research, it generally takes on average 1 minute for 8 simple questions to be answered.
We are assigning points as follows:
a. short/simple question → 1 point
b. grid format question → 1 point for each row
c. multichoice question → 0.5 points per answering option
d. mental calculation → 2 points
e. short open-ended questions → 3 points
f. lengthy instructions or questions that have a lot of words → 1 point for every 60 seconds.
Note: hidden fields and field rules are not taken into consideration when calculating the estimated time to complete the form.
How does the estimated time to complete the form help me?
According to our research, 27% of people abandon online forms because of their length. This is something that you might want to take into consideration when building up your form.
Also, research shows that the data quality tends to decline on forms that are longer than 20 minutes, so a good rule of thumb is to keep your form as short as possible, preferably under 20 minutes. A form that takes over 20 minutes loses more than 3 times as many respondents as a form under 5 minutes.
If you want to increase your chances of building a good converting form, the estimated time to complete the form comes in real help. When building up the form, always go to Preview to check how long it would take your respondents to complete the form, test out your form and you are ready to gather those submissions!
Analyse data and draw your conclusions
Let’s say you have published your form and gathered submissions. Now you can easily go to the Insights section and check out the average time to complete the form.
The main difference between the estimated time to complete the form and the average time to complete the form is that:
a. estimated time to complete the form shows you how long it would take a respondent to complete the form based on a predefined formula
b. average time to complete the form shows you the actual time it took your respondents to complete the form by calculating an average out of all submissions.
If you notice that your average time to complete the form is too high, you can always go back to your form to make the necessary adjustments and shorten the form in order to increase your submission rate.
Related articles
Our form builder offers you the possibility to apply diverse formats and validation options to your fields. For example, the Phone field will automatically format the number you introduce and you can have quite a few variants too. Have a look over our comprehensive guide on how to choose from the large selection of field formats we offer.
Nothing quite suits what you need? Read on for more advanced options.
First, let’s make sure we have the basics covered. Read here how to add a script to your 123FormBuilder form. Now, we can move on to the part that is more fun.
Change text input to lowercase/uppercase
The script examples provided below will help you to automatically format your clients’ answers to be in all caps or all lowercase. After they are done writing in a field, the text will change accordingly.
Add this script to your form in order to change an input to all lowercase:
function changeTextFormat() {
var valueOne = loader.engine.document.getElementById(00000000).getProperty('value.value');
loader.engine.document.getElementById(00000000).setValue(({"value": valueOne.toLowerCase()}));
}
window.onchange = changeTextFormat;
Add this script to your form in order to change an input to all uppercase:
function changeTextFormat() {
var valueTwo = loader.engine.document.getElementById(000000000).getProperty('value.value');
loader.engine.document.getElementById(000000000).setValue(({"value": valueTwo.toUpperCase()}));
}
window.onchange = changeTextFormat;
In both cases, you just need to replace “00000000” with the field ID of your own Short answer/ Long answer/ Email field.
In order to find the ID of a field, right-click on the field and use the Inspect option of your browser.
The result:
Add digits grouping/ thousand separators
Do you calculate and/or collect data with very large numbers on your forms? It comes very handy to automatically format the numbers that your clients input on the form (or the results calculated by a Formula field) with thousands separators. This ensures easier readability.
To use this script you will need to make sure you have a Number field and/or a Formula field, where the number is inputted/calculated, as well as a Short answer field, where the new number’s format is displayed. To not overcrowd your form, you can choose to hide either the Number/Formula fields or the Short answer field (depending on whether you want the form participants to see the formatted number or not).
Here is the script:
function addSeparators() {
var number1 = loader.engine.document.getElementById(000000000).getProperty('value.value'); // - formula field or number field
loader.engine.document.getElementById(111111111).setValue(({"value": number1.toLocaleString('en-US')})); //- short text field
};
window.onclick = addSeparators;
Replace “00000000” with the field ID of your Number or Formula field and then replace “111111111” with the field ID of your Short answer field. Remember, the Short answer field is the only field where the number is formatted.
See the result:
In the script above we used the ‘en-US’ locale, which formats a number like 123123123.45 into 123,123,123.45. However, if you need to use the 123.123.123,45 formatting method, replace ‘en-US’ with ‘de-DE’.
If you have more fields with numbers that need formatting, create for each field an associated Short answer field. Repeat the lines of code between the curly brackets {} for each pair of Number/Formula field – Short answer field. Make sure to change the name of the variable for each repetition (ex: var number2, var number3, etc.) and change it accordingly after setValue(({“value”: as well.
Related articles:
You can create a double opt-in flow using Approvals in order to verify if the submitted data is correct and/or confirm respondent’s identity. In this way, you can make sure that the respondents submitted the information themselves and weren’t impersonated by someone else.
After the form is submitted, respondents will receive a copy of the submission on email and will be asked to review & confirm the submission, by clicking on a link included in the email.
Use cases
The double opt-in flow can be used for:
a. forms collecting personal or sensitive information (e.g: information used for administrative, legal, financial or medical reasons)
b. lead generation forms, such as registration, sign-up & subscription forms
c. application forms
Benefits
a. this flow will allow you to get more done without the hassle of manual work.
b. you can have peace of mind that the collected data is correct, and that respondent’s identity & contact details are verified. In this way, you will no longer reach your respondents based on incorrect or incomplete data, and you will have insurance that they are not using fake email addresses or are not impersonated.
c. this will give more accountability for respondents; there will be less chances of changing their mind after the fact, which could mean less time wasted, even less refunds.
How to set up double opt-in flow
First thing would be to create the form that you need and make sure you collect the respondent’s email address using an Email field and make it required.
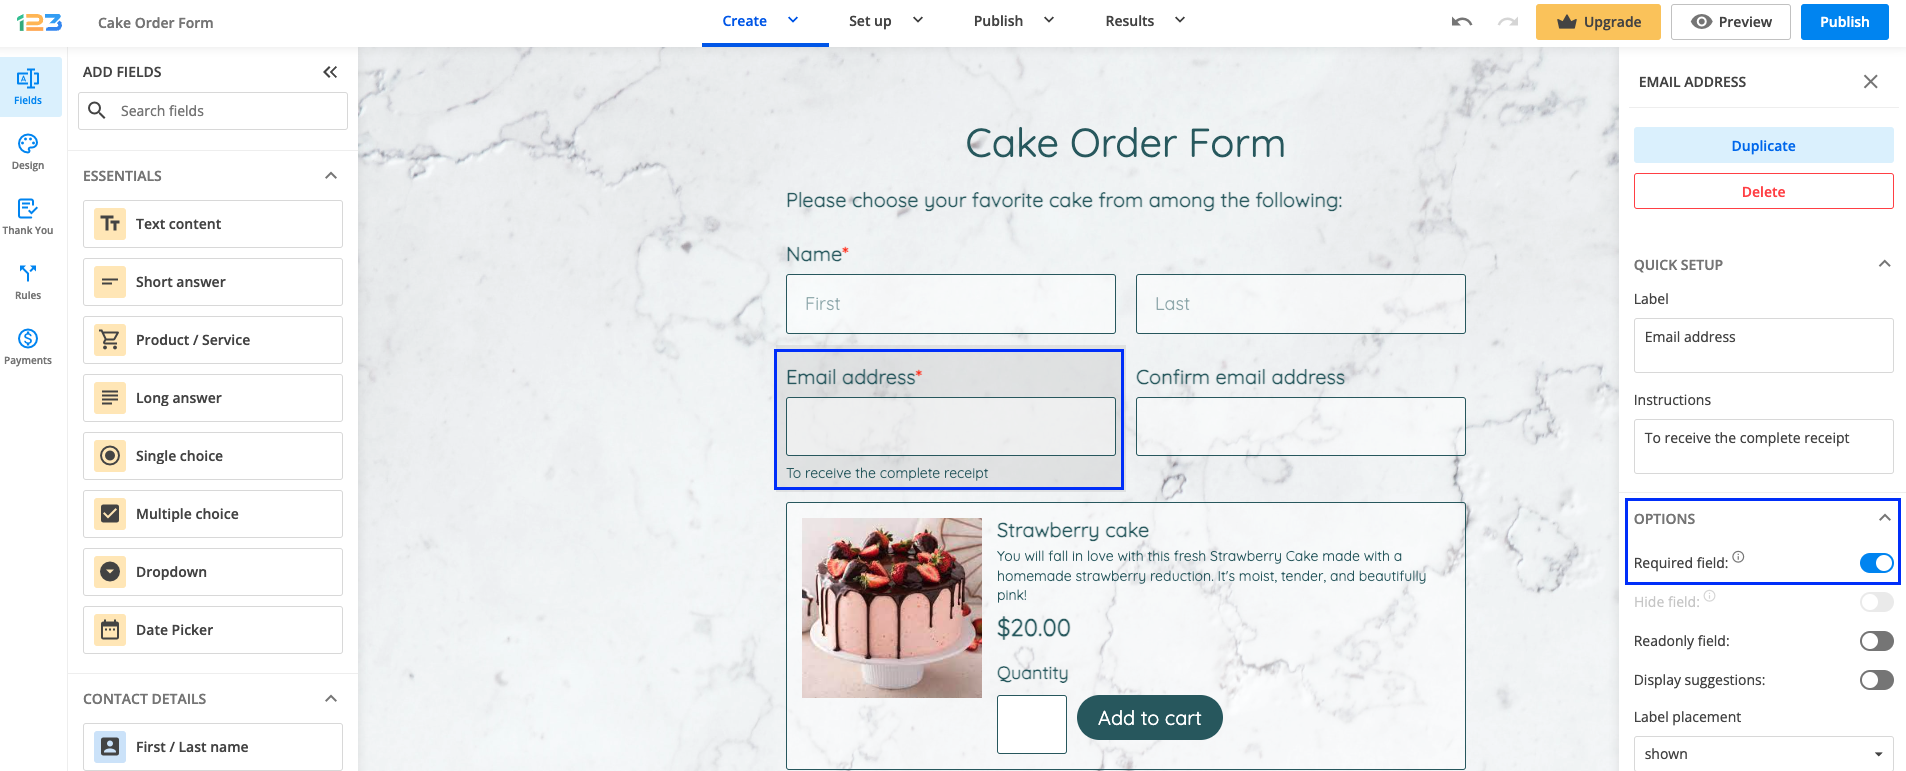
Tip: If you want to go the extra mile and ensure that there are no typos when respondents fill out their email addresses, you can ask them to confirm their email address by duplicating the Email field, and linking the second email field to the first use using the option Match another field value. Also, do not forget to make it required.
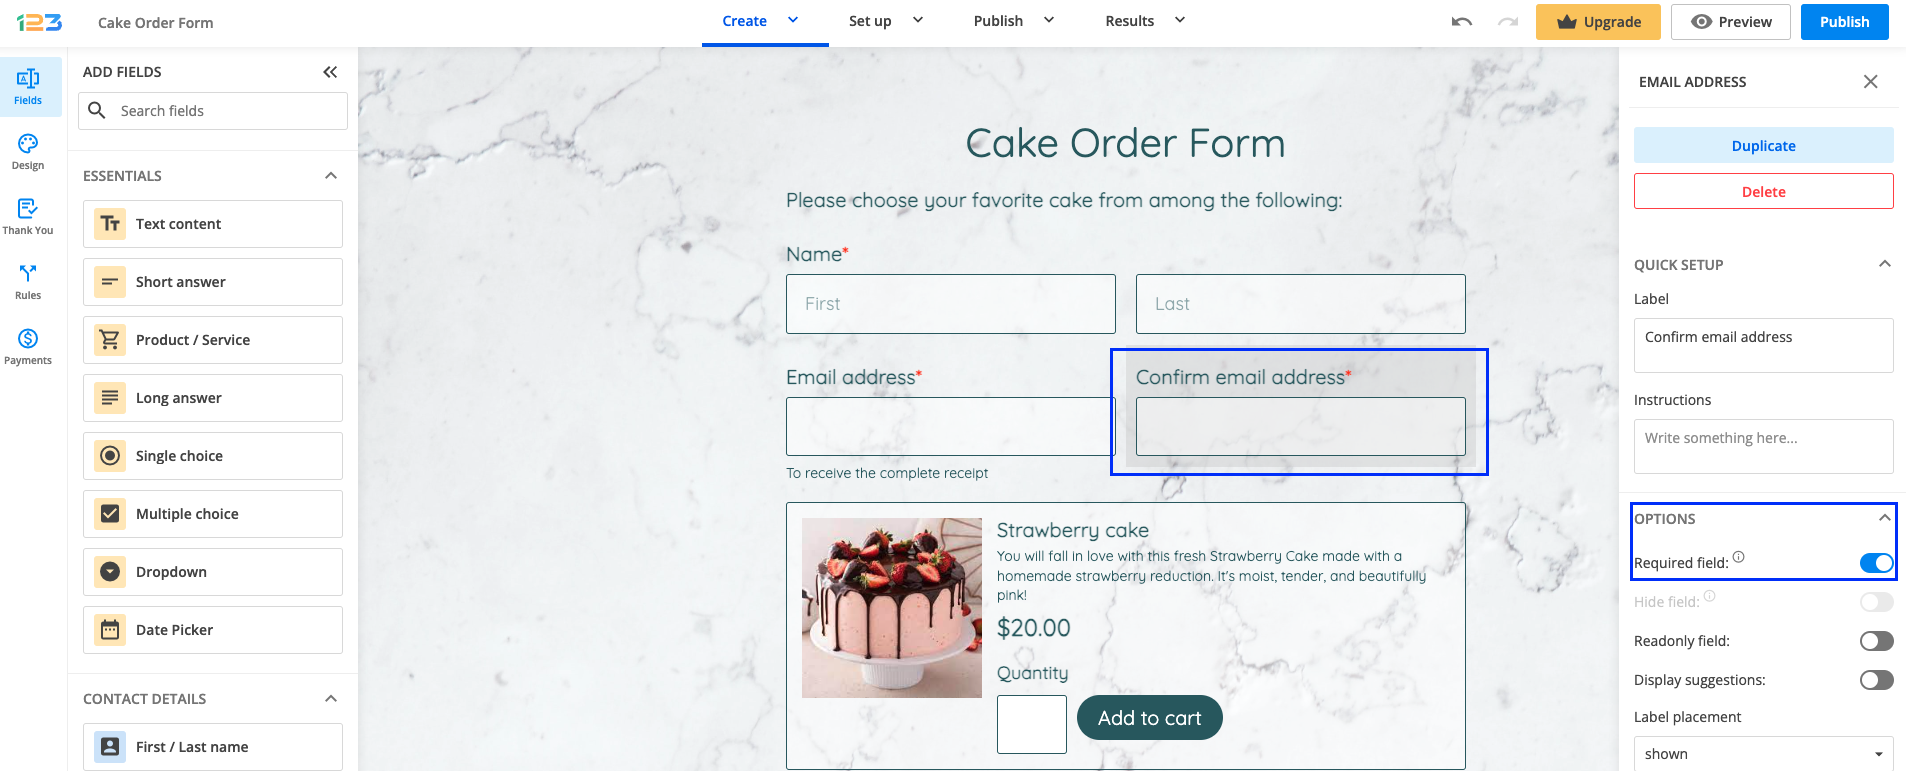
You can also add a Signature field at the end of the form and ask respondents to confirm that the filled-in data is correct.
Tip: if you want to ensure that respondents actually sign the form and avoid collecting simple doodles like dots or lines, increase the Signature complexity to medium or high, and don’t forget to make this field required as well.
The next step would be to go to Set up and visit the Approvals section. This will allow you to send out a confirmation email to respondents after the form is submitted and ask them to take action.
Tip: you might be tempted to use a simple email notification instead, but using Approvals feature will allow you not just to send out a custom email to your respondents, but also:
a. ask them to take action and confirm/cancel or edit their submission, directly from the received email
b. ensure that submissions remain in a pending state until you have the respondent’s confirmation or rejection in case they have changed their mind and cancelled their submission.
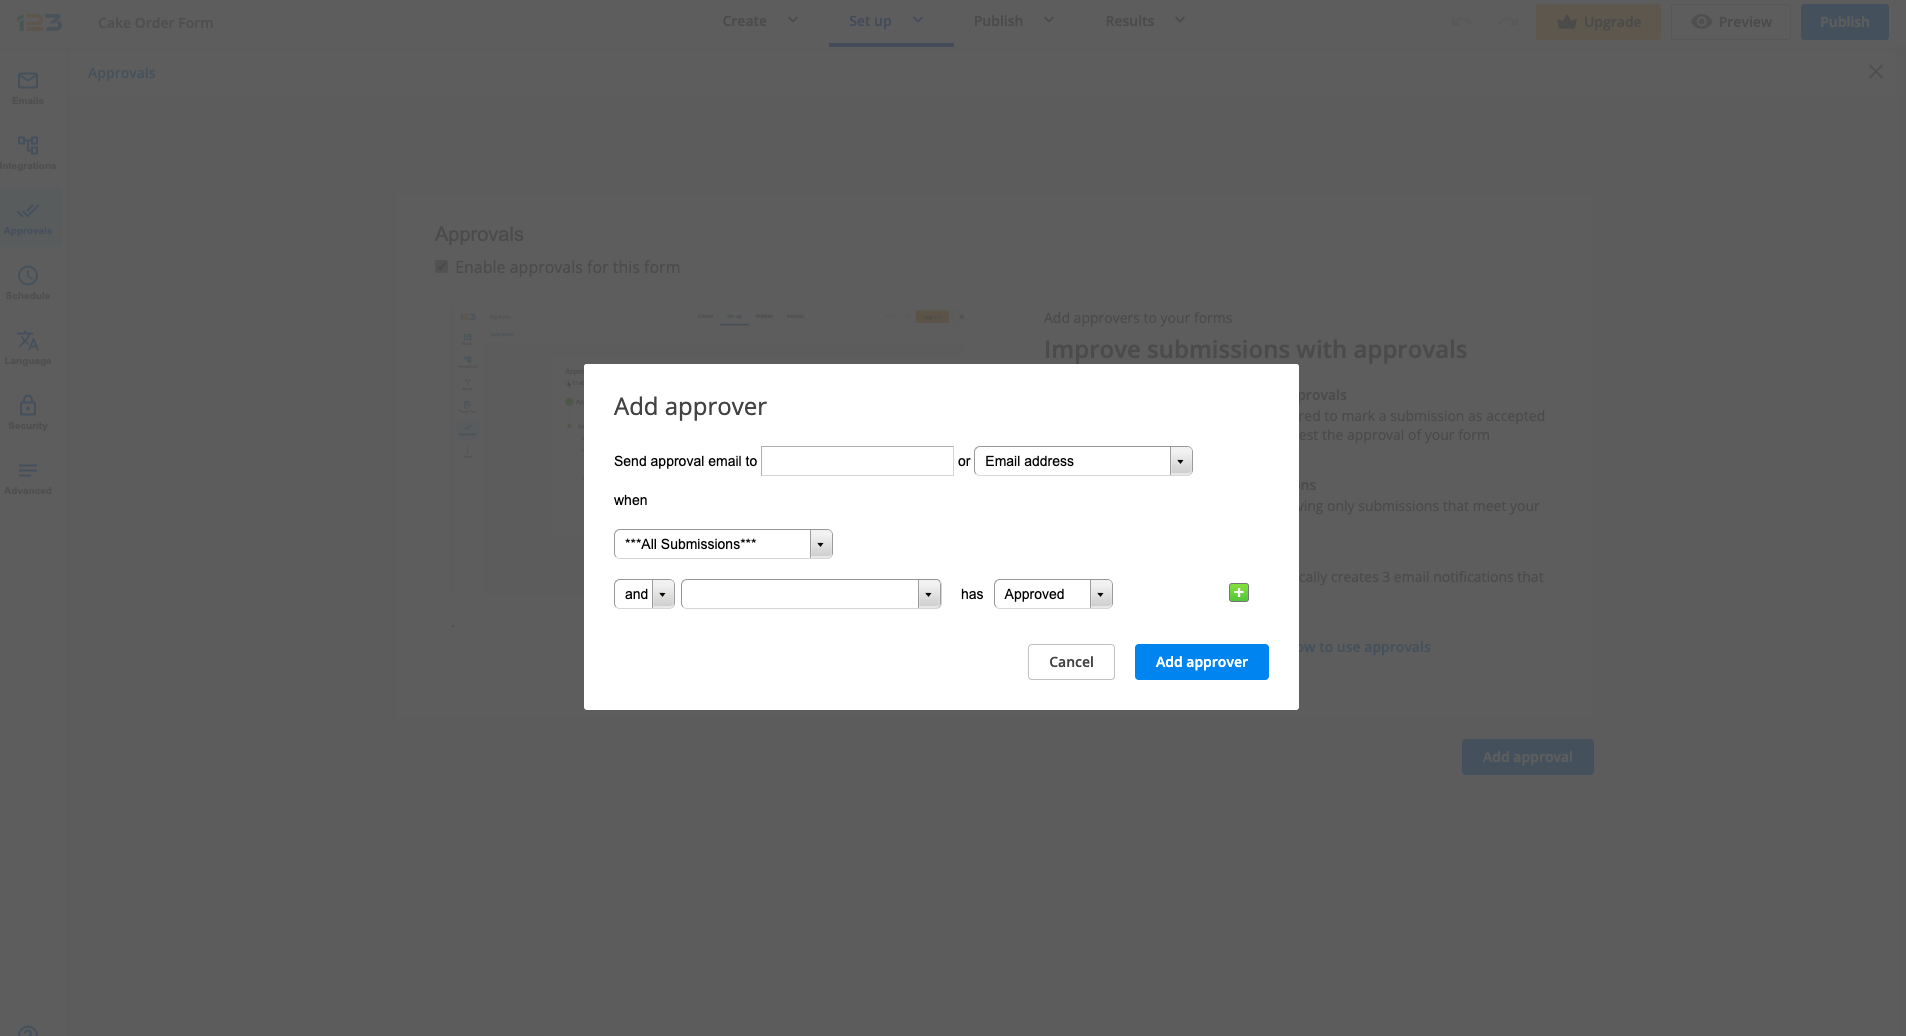
Start by clicking on the New Approver button in order to specify:
a. who should receive the confirmation email
b. when should the confirmation email be sent.
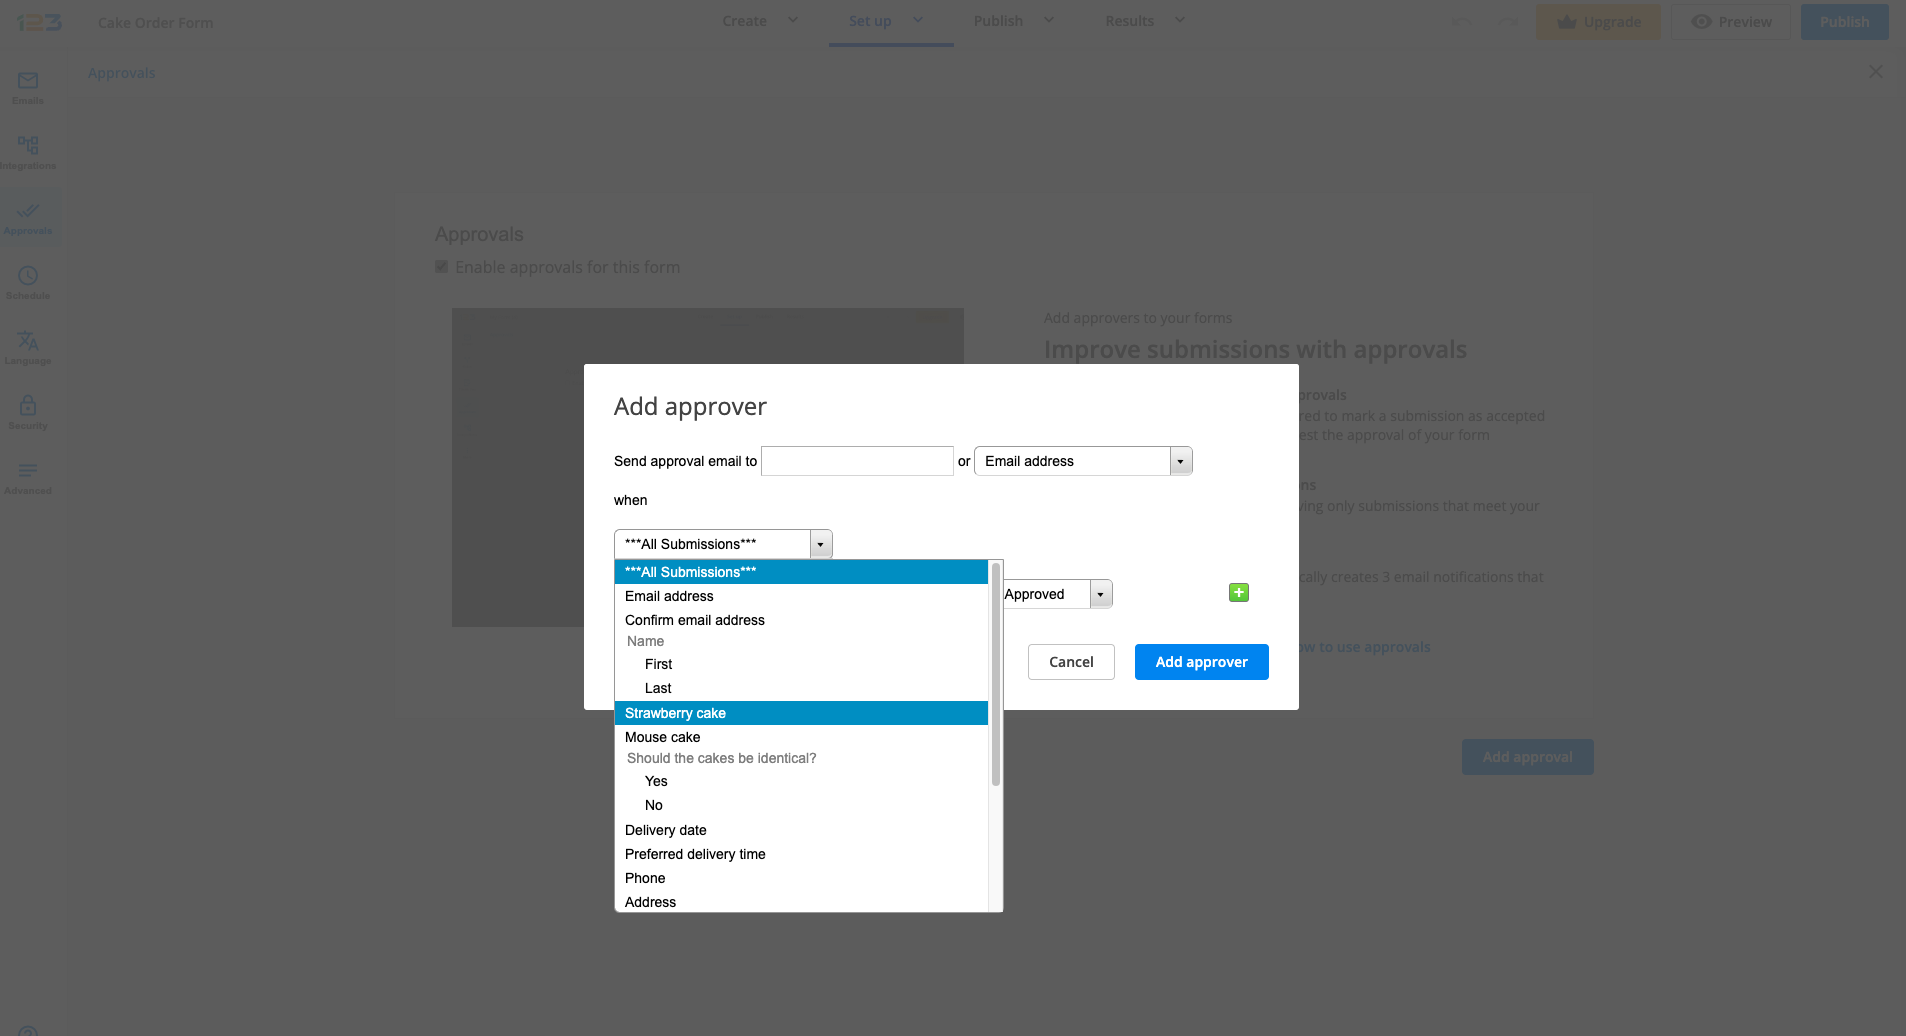
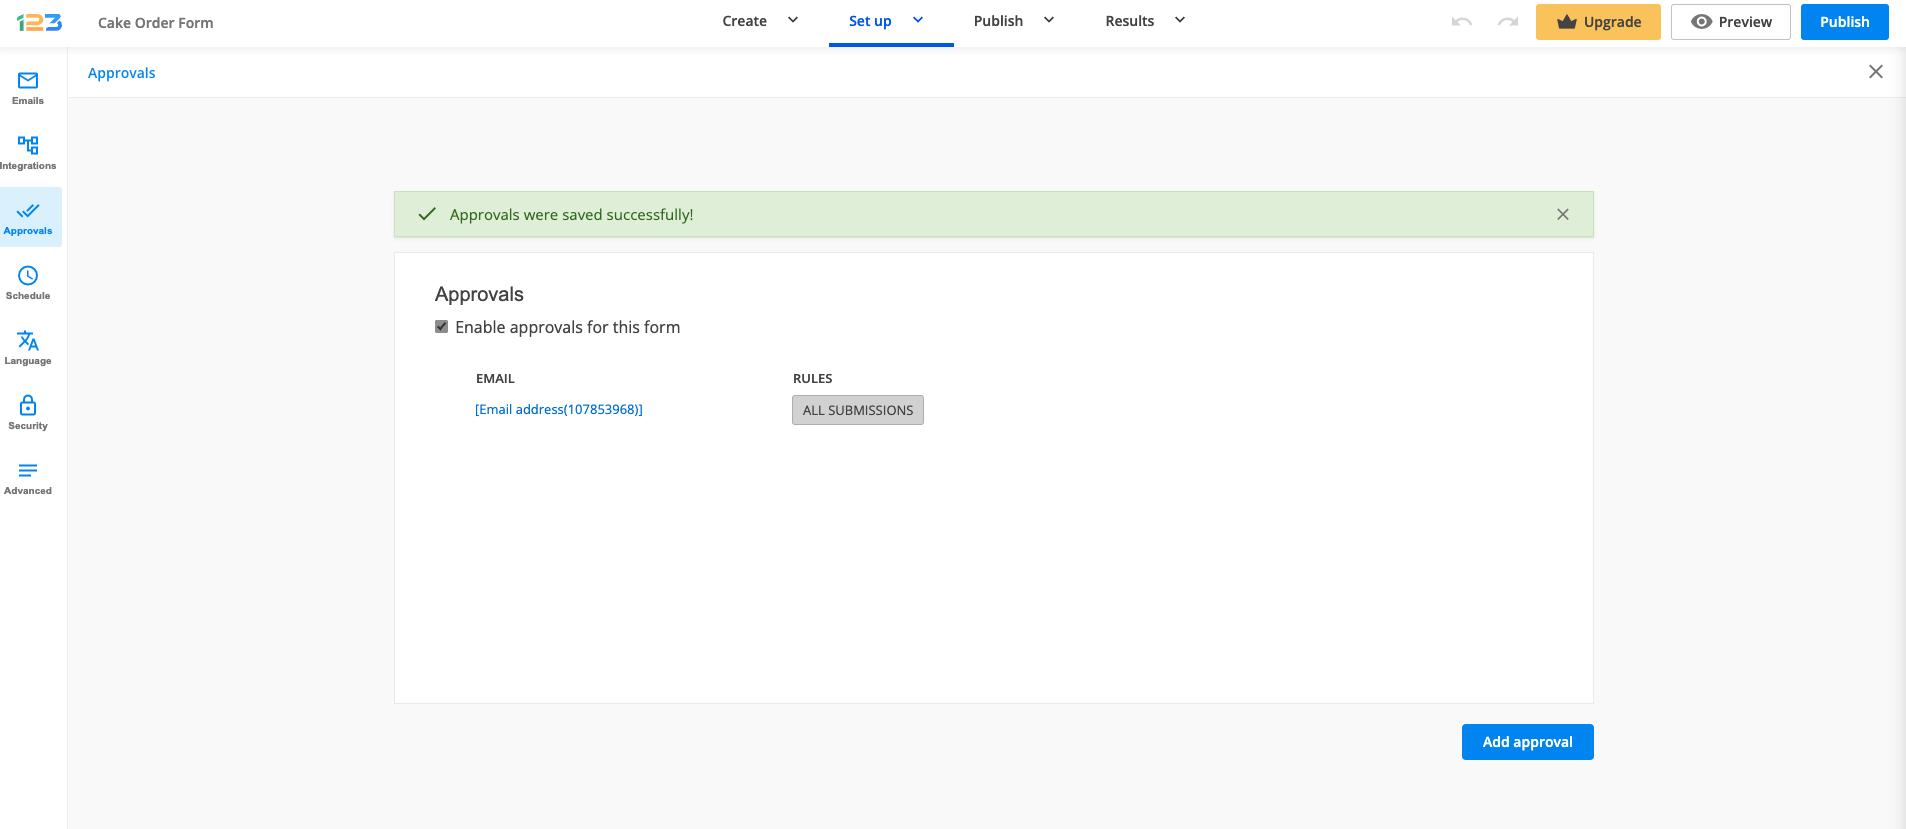
In the pop-up that opens, edit the first line called Send approval email to and select the email address field (through which you are collecting the respondent’s email address) using the dropdown displayed on the right. Go to the next line and make sure you select All submissions for when the approval email to be sent. For now, please disregard the options that appear after the and/or dropdown and go ahead and save the setup by clicking on Add approver.
Tip: If you need to apply another layer of filtering and disqualify specific submissions that don’t meet your criteria, you can choose to send the email confirmation to the respondent only if the submission contains specific information. For this, instead of selecting All submissions, select the fields that you want to review and create one or multiple conditional logic rules. These rules will allow you to customize specific “if this then that” scenarios, and ensure that the confirmation email is sent only when the submission data meets these conditions.
For example, in the below example, only if the Product 1 choice is checked, then an approval email is sent to the respondent’s email address.
After you add an approver, click on Enable approvals for this form. Once it is enabled, you will be invited to navigate to the Emails section, as three automatic emails have been created for you.
Once you have reached the Emails section, looking on the left side you will see a series of email templates. Let’s take them one by one.
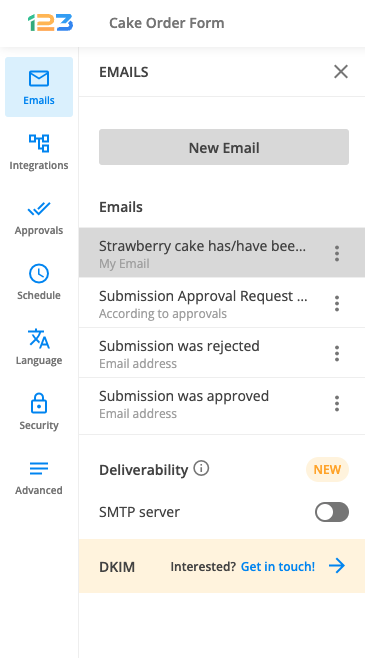
a. The 1st template called You received a submission for… is the email that you will receive as soon as the form is submitted (before respondents confirm or cancel the submission)
b. The 2nd template called Submission Approval Request for… is the confirmation email that will be sent to respondents once the form is submitted (based on the setup that you just defined in the Approvals section). More details will follow below.
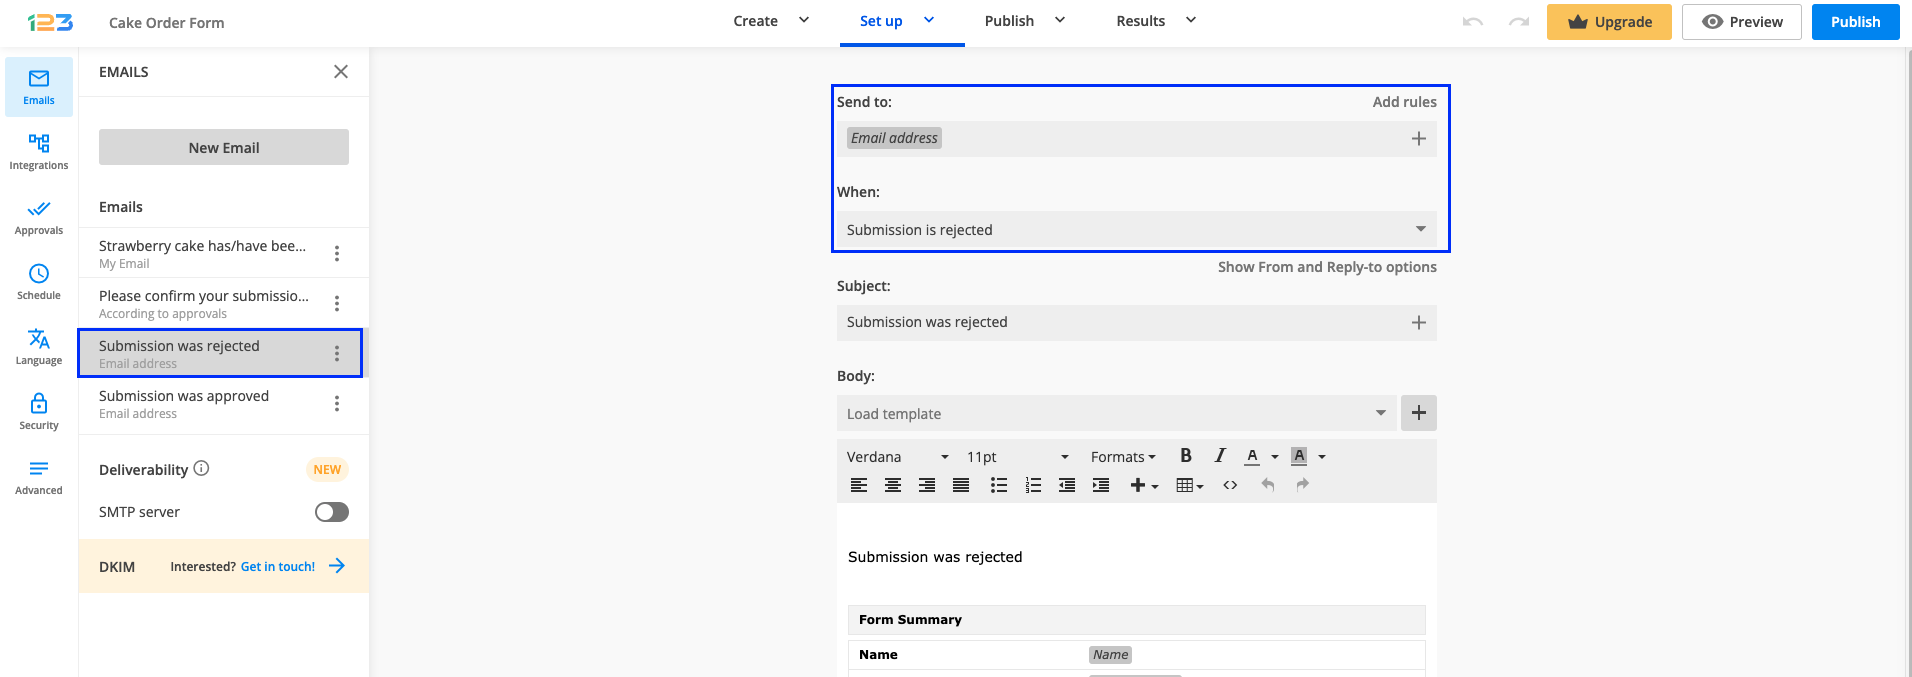
c. The 3rd template called Submission was rejected is the message that will be sent to respondents and optionally yourself after the submission was canceled by respondents.
d. The 4th template called Submission was approved is the message that will be sent to respondents and optionally yourself after the submission was confirmed by respondents.
The 2nd template, Submission Approval Request for… is essential for the double opt-in flow, as this is the email that will be sent to respondents after they submit the form asking them to take action, review the submission and confirm/cancel it.
There are a few steps that you should take into account while customizing it:
a. Skip the send to & when options, as you already defined them inside the Approvals section.
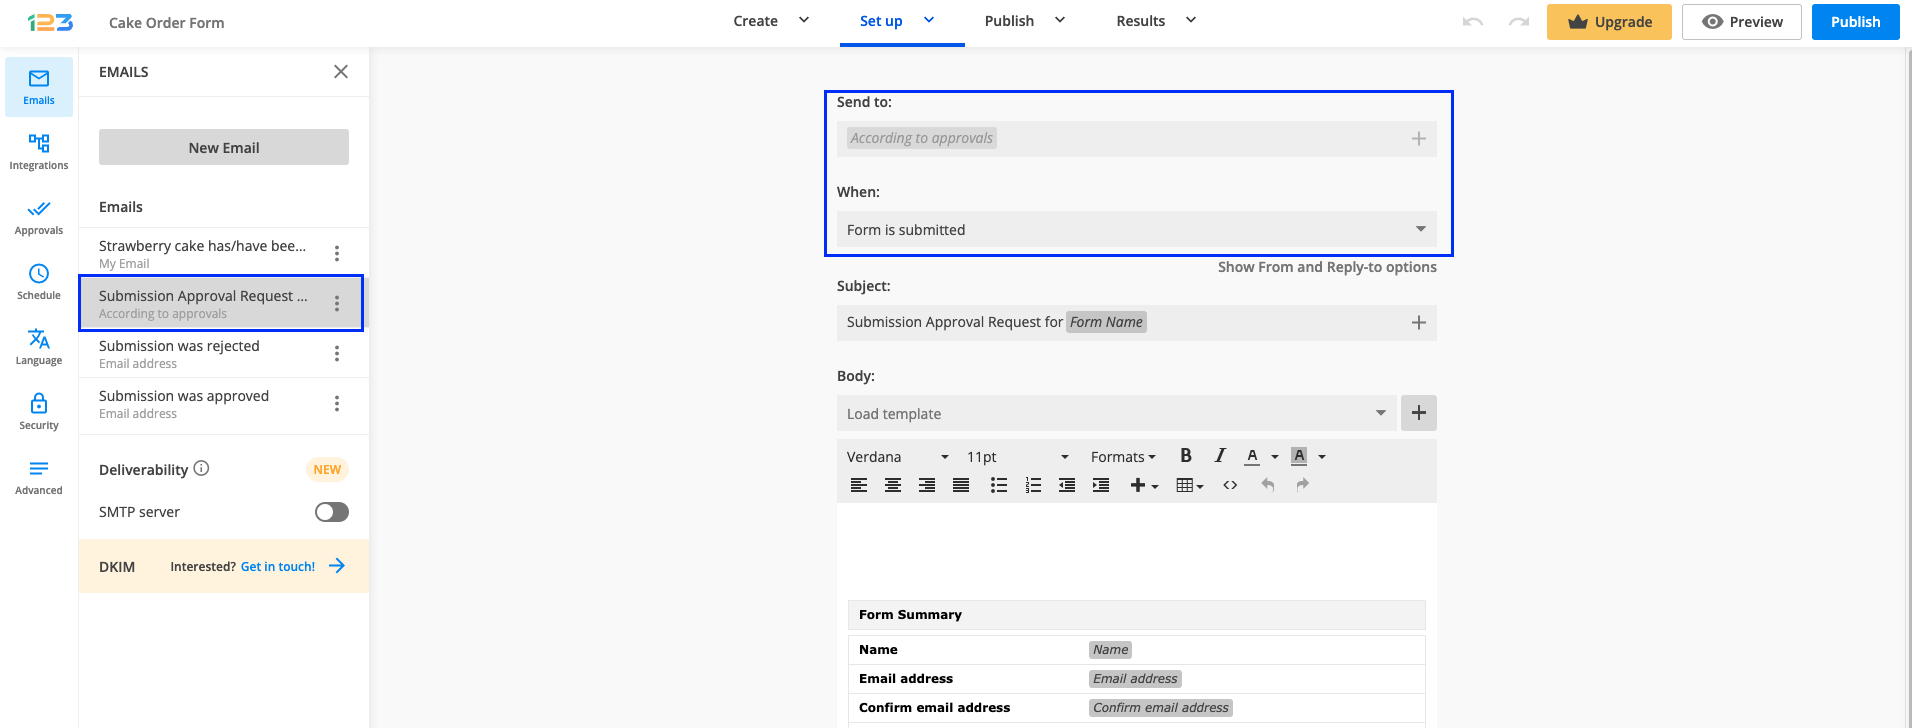
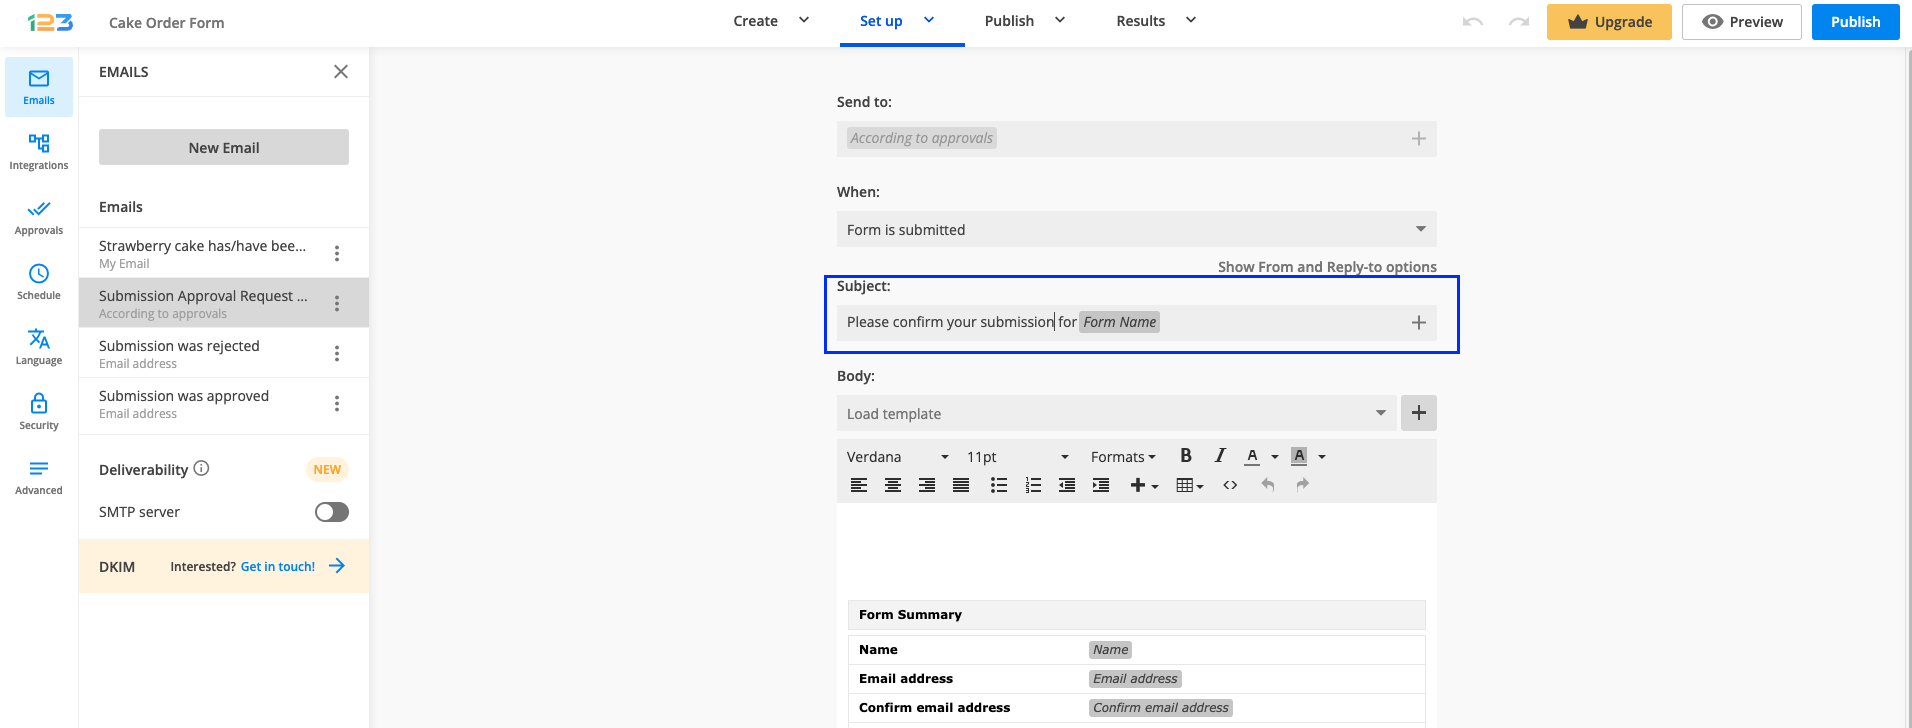
b. Edit the email subject, so respondents understand what the email refers to and the action that is required on their end.
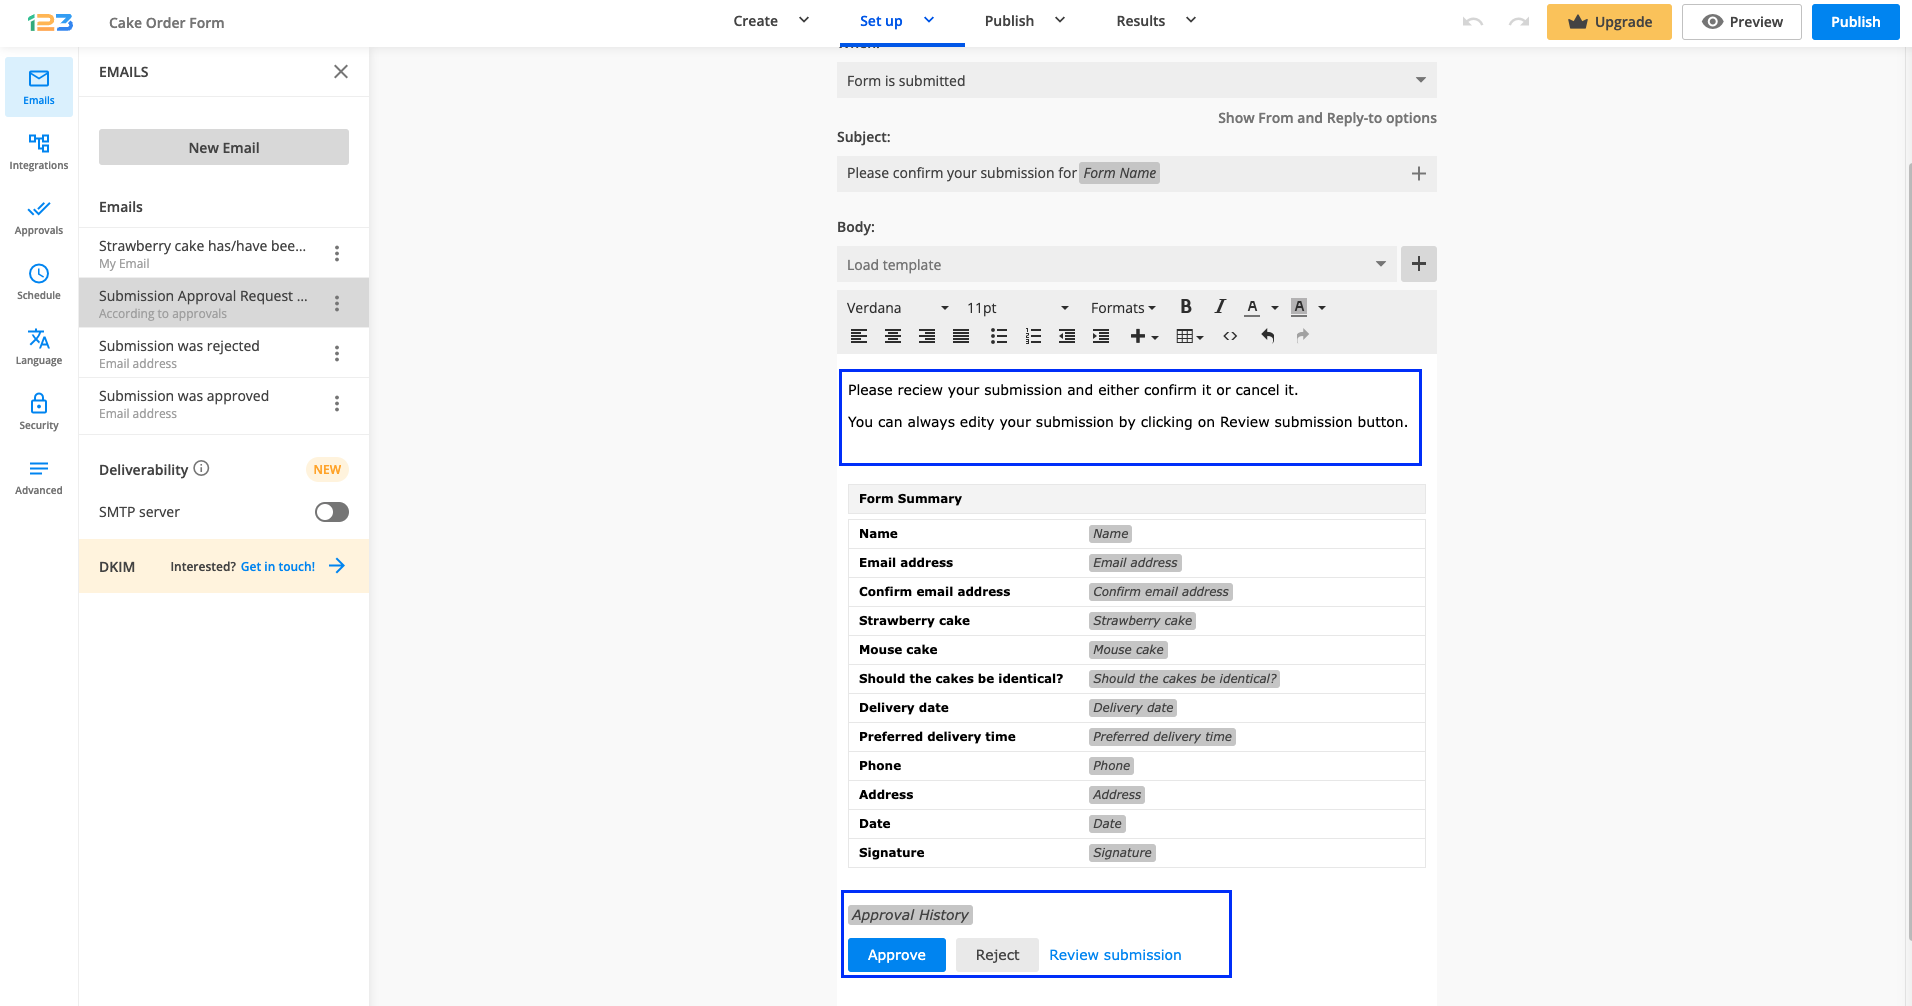
c. Customize the email body by:
– adding a suggestive message, so that respondents understand what is required of them and that the submission will be taken into account once it is confirmed
– keeping the form summary, so respondents can quickly review the submitted information directly by reading this message
– editing the button text displayed on the Approve button, so respondents understand that the call to action is to Confirm the submission
– editing the button text displayed on the Reject button, so respondents understand that the call to action is to Cancel the submission if they have changed their mind
– highlighting that they can edit the submission and complete missing details, fix typos or update information using the Review submission option.
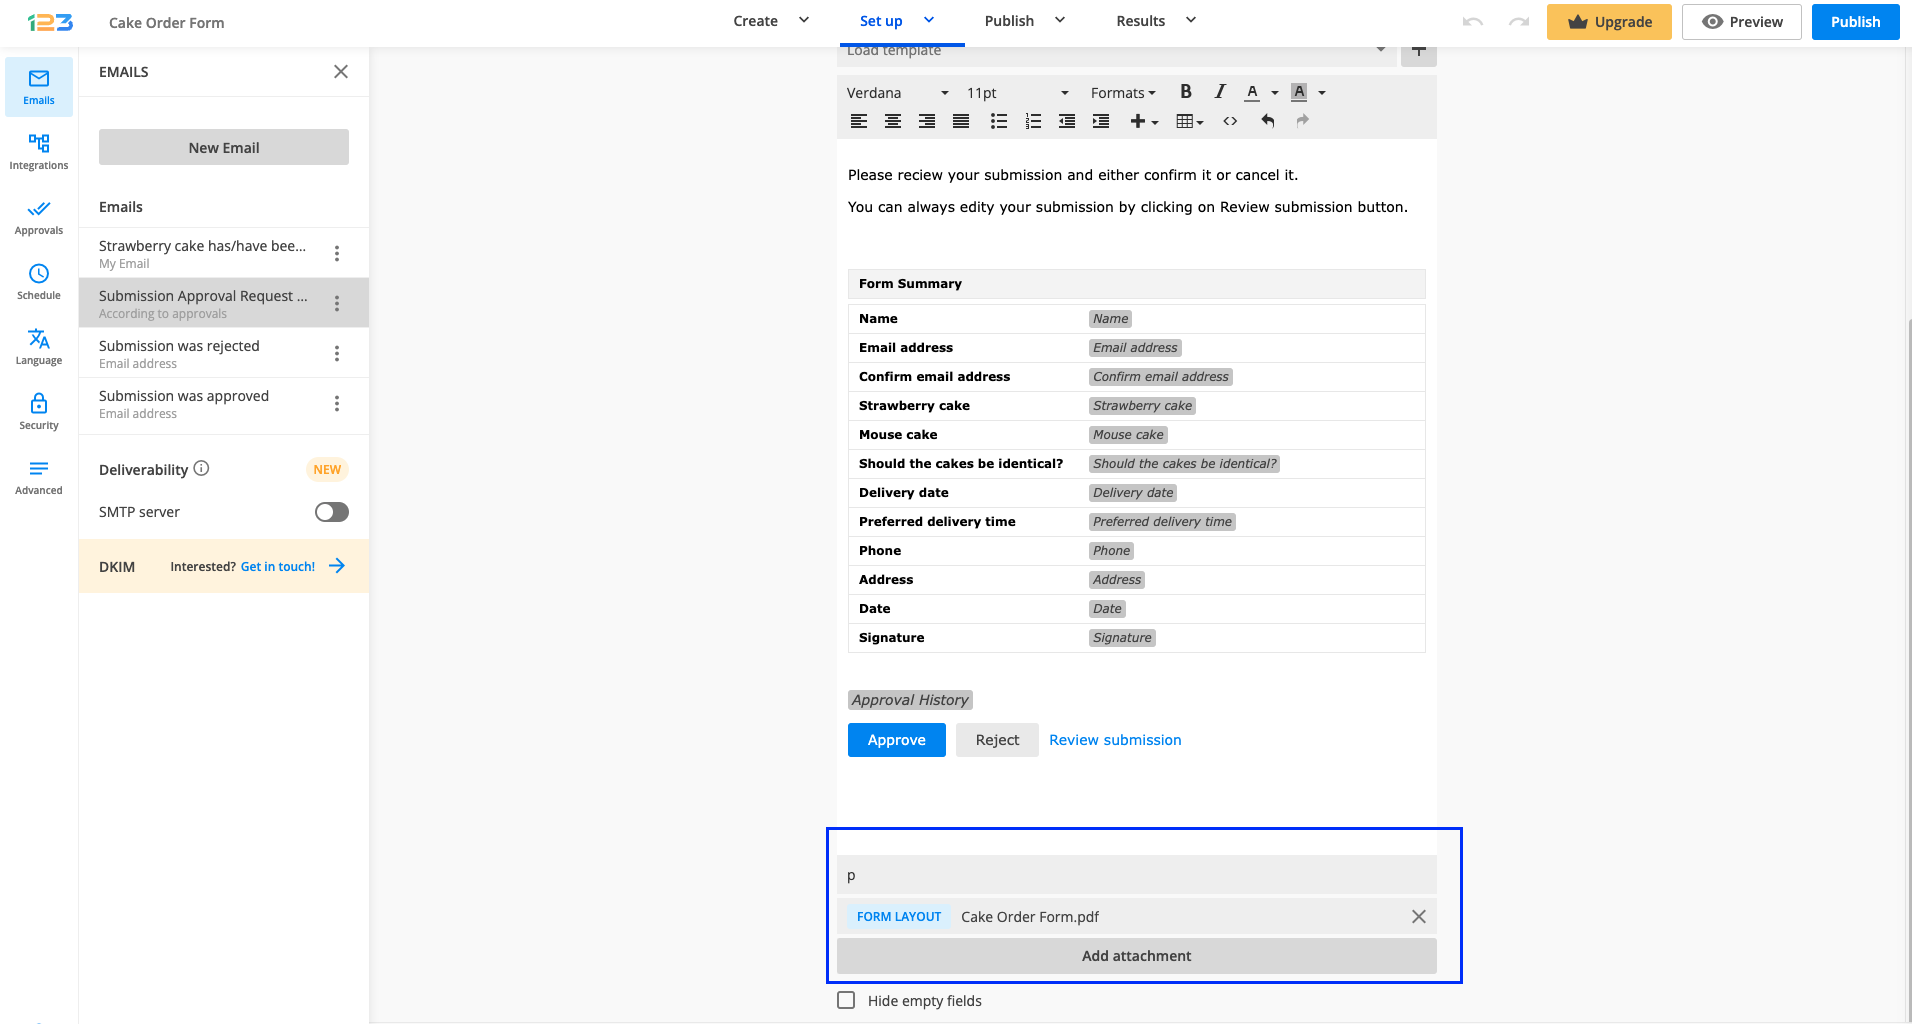
d. Consider attaching a copy of the submission as PDF. You can choose to attach a PDF that looks exactly as the form (Submission PDF using form layout) or one that looks more like a table, but that can be customized (Submission PDF).
d. Don’t forget to save the setup by clicking on Save button. You will also see an informative message that the email was saved.
As the last step, don’t forget to edit the Submission was rejected and Submission was approved templates and:
a. Add the email address field through which you collect the respondent’s email addresses as a recipient, and your email as well in case you want to be notified when the submission is confirmed/canceled.
b. Edit the email subject and body, and include messages that are more appropriate for your use case
c. Attach a copy of the submission as PDF, to have a snapshot of the final version just in case it was edited in the previous step
d. Don’t forget to save the setup for each email notification.
And you are done, but before publishing the form, we recommend previewing the form, filling it out and making a test submission.
Tip: fill in your own email address on the form, so you can receive the email notifications and test the end-to-end flow. While experiencing the flow the same way your respondents would, you can easily spot where to make improvements if needed.
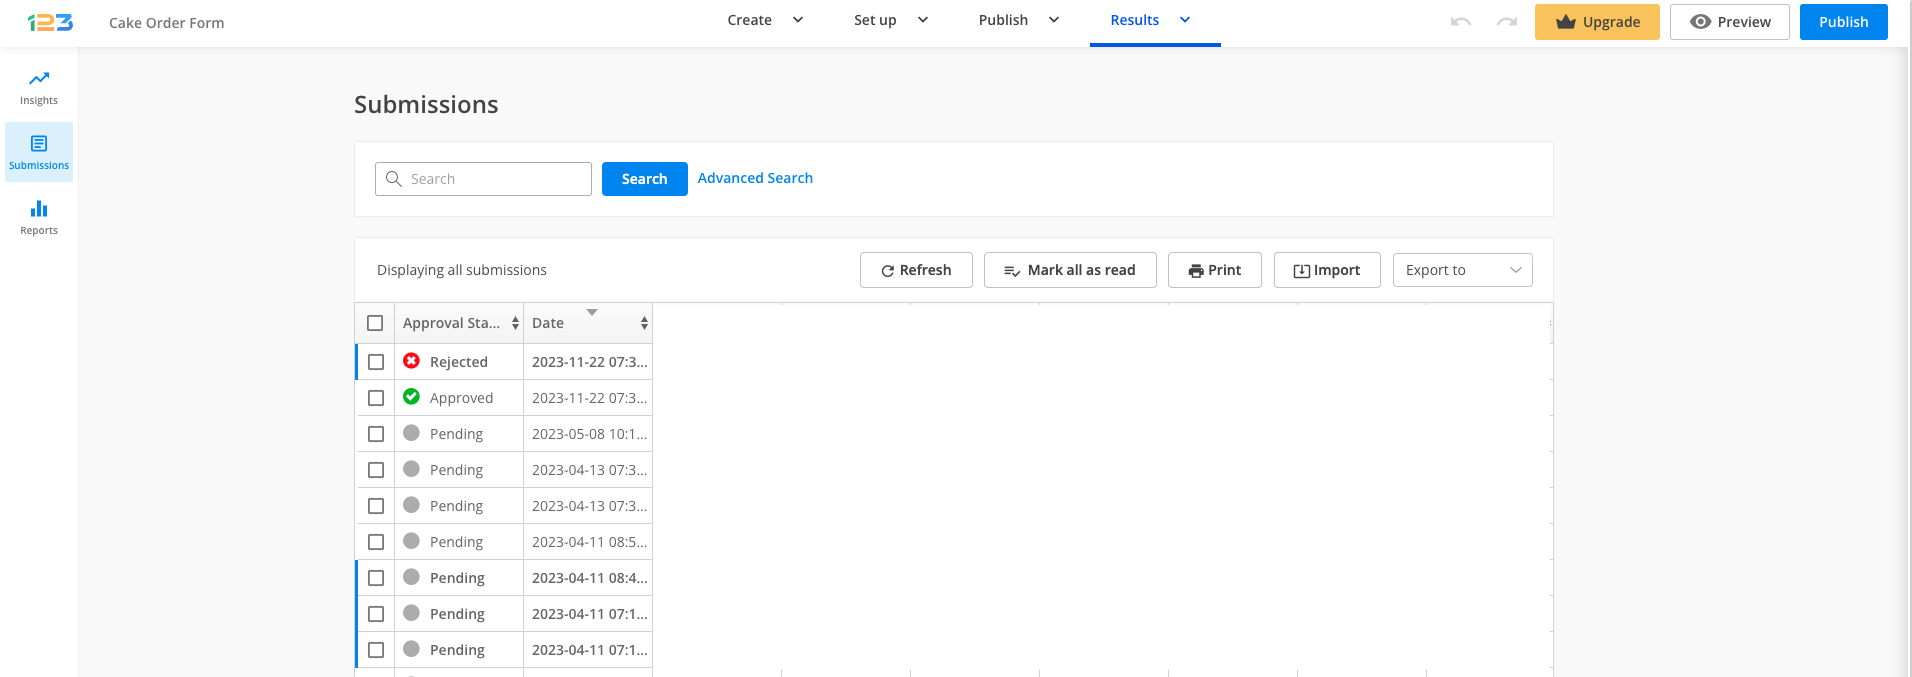
If you navigate to Submissions section, from the Results tab, you can also check the status of the submission and notice how it changes from pending (after the form is submitted), to approved (after the submission was confirmed) or rejected (after the submission was cancelled).
Related articles:
Creating multiple conditions when setting up a Salesforce record update currently works only for form fields. Query result will be addressed later on, as an improvement to the current implementation.
For each object mapping instance, you are able to set up multiple conditions for updating an existing record or updating all existing records.
When creating a primary object or a related object, the record preferences will be set by default on sending data for all submissions and the action will be to create a new record.
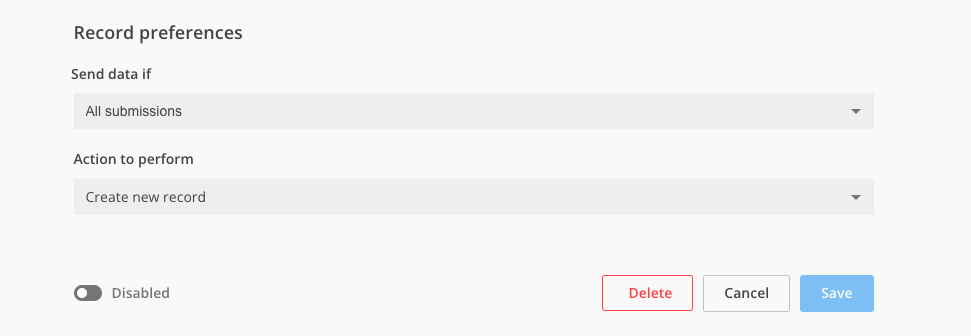
For Action to perform you are able to choose other 2 variants: Update existing record or Update all existing records.
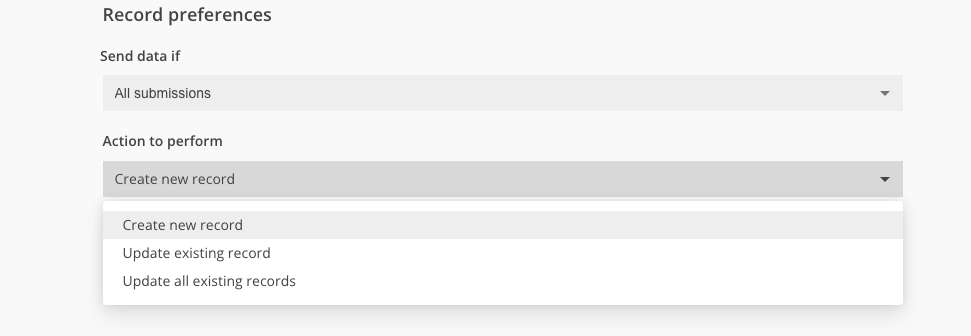
When you want to update either an existing record or all existing records, you are able to create multiple rules based on which the update is made on.
For example, let’s say we are interested in Updating all existing records. Once this is selected, you can create the first rule.
You have to select the Salesforce field, the conditional logic and the form field.
By clicking on Add rule button, you can specify a second rule to be created. The rules will be separated by 2 operators: AND and OR.
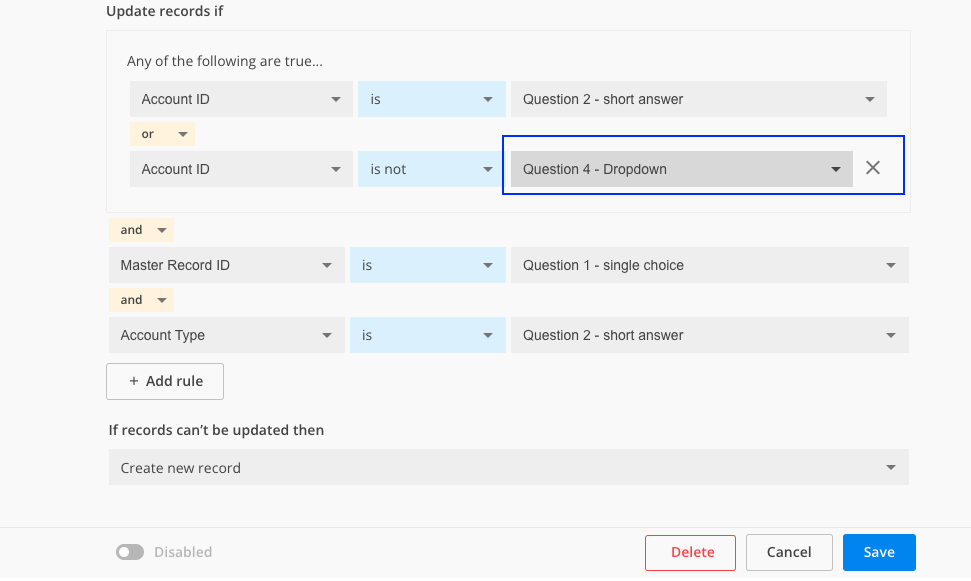
Important note: when the OR conditional operator is selected, the rules are grouped together, so when any of the rules separated by OR is true, then the condition is met.
You can add a maximum of 5 rules – after adding the 5th rule, the Add rule button will no longer be available.
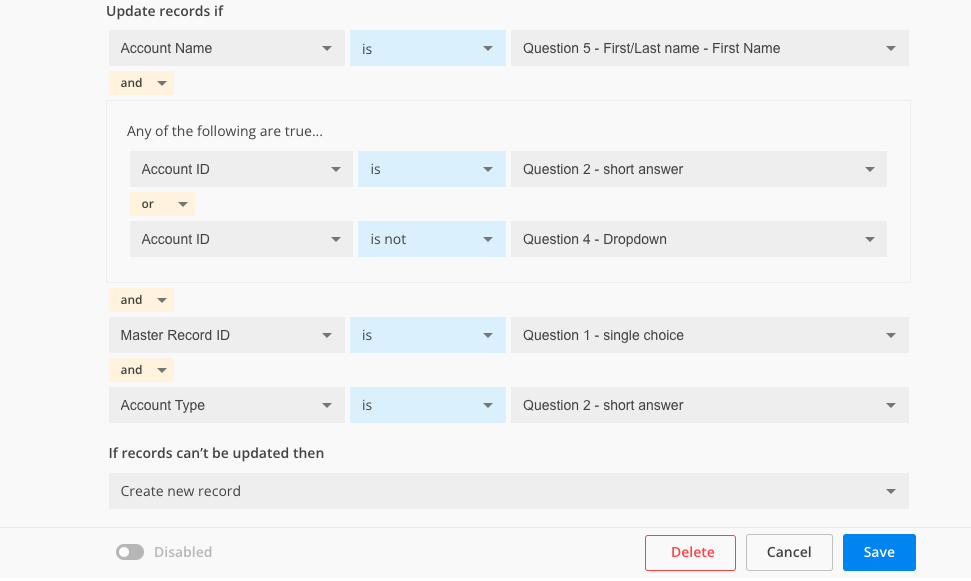
You can always delete a rule if you no longer require it, by hovering over each rule and clicking on the X icon.
The conditional operators can be changed even after creating the rules.
When you are ready setting up the Salesforce object and the necessary rules, just click Save and you are ready!
Related articles:
How to name object mapping instances
Multiple level of relationship between object mapping instances
If you are looking to automate the offer request process, this article will help you create a price configurator form.
Let’s take an actual example so that it would be easier to follow and understand.
John is a contractor and is offering woodworking services for homeowners and businesses. His goal is to create a price configurator form so that he wouldn’t spend so much time on the phone or exchanging emails anymore.
First thing he has to do is to create a new form from blank and change the name of the form by typing Price offer for woodworking services in the label box for Title field.
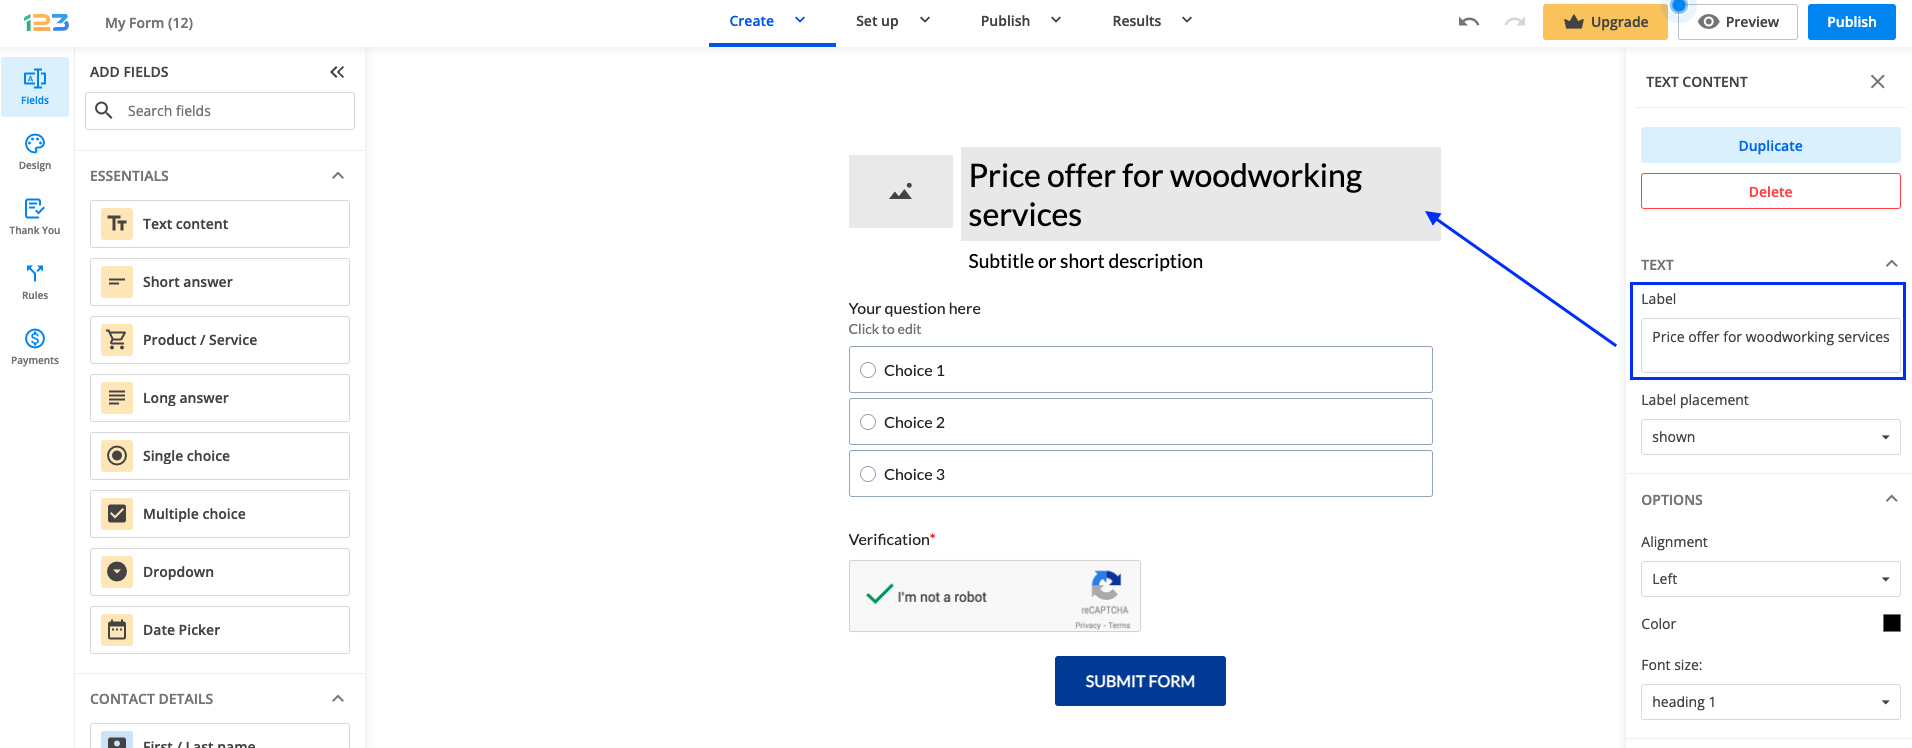
For the Subtitle or short description, let’s add the company’s name, East Woodworking Inc. Also, in the Embed image field that comes by default, he could add a company logo, so that everything looks on brand. The image can also be resized by dragging and dropping the field handles.
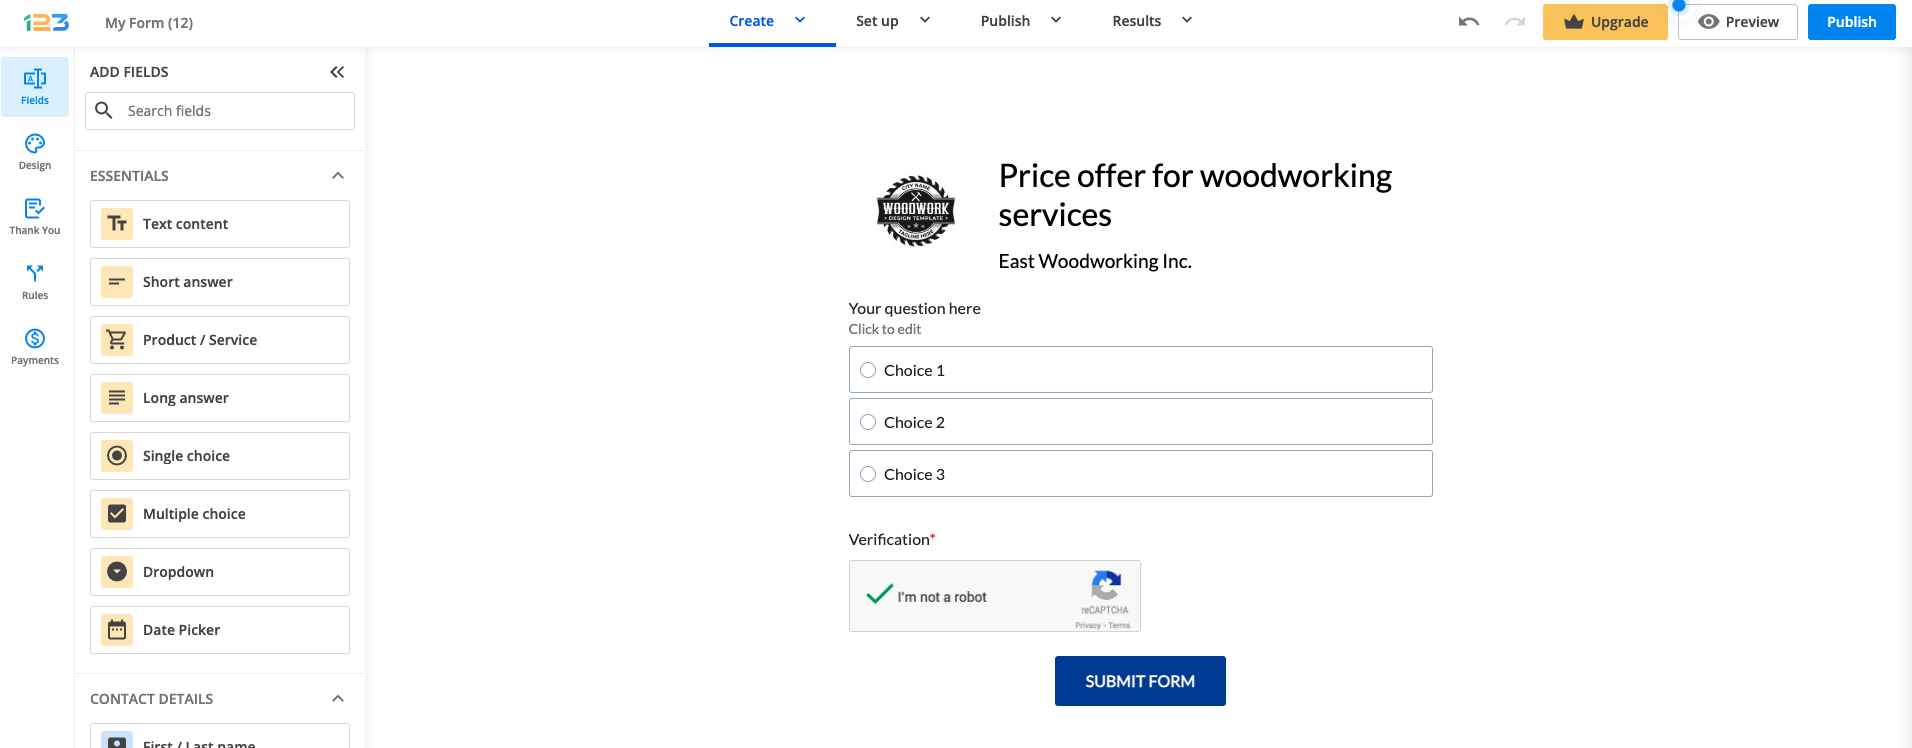
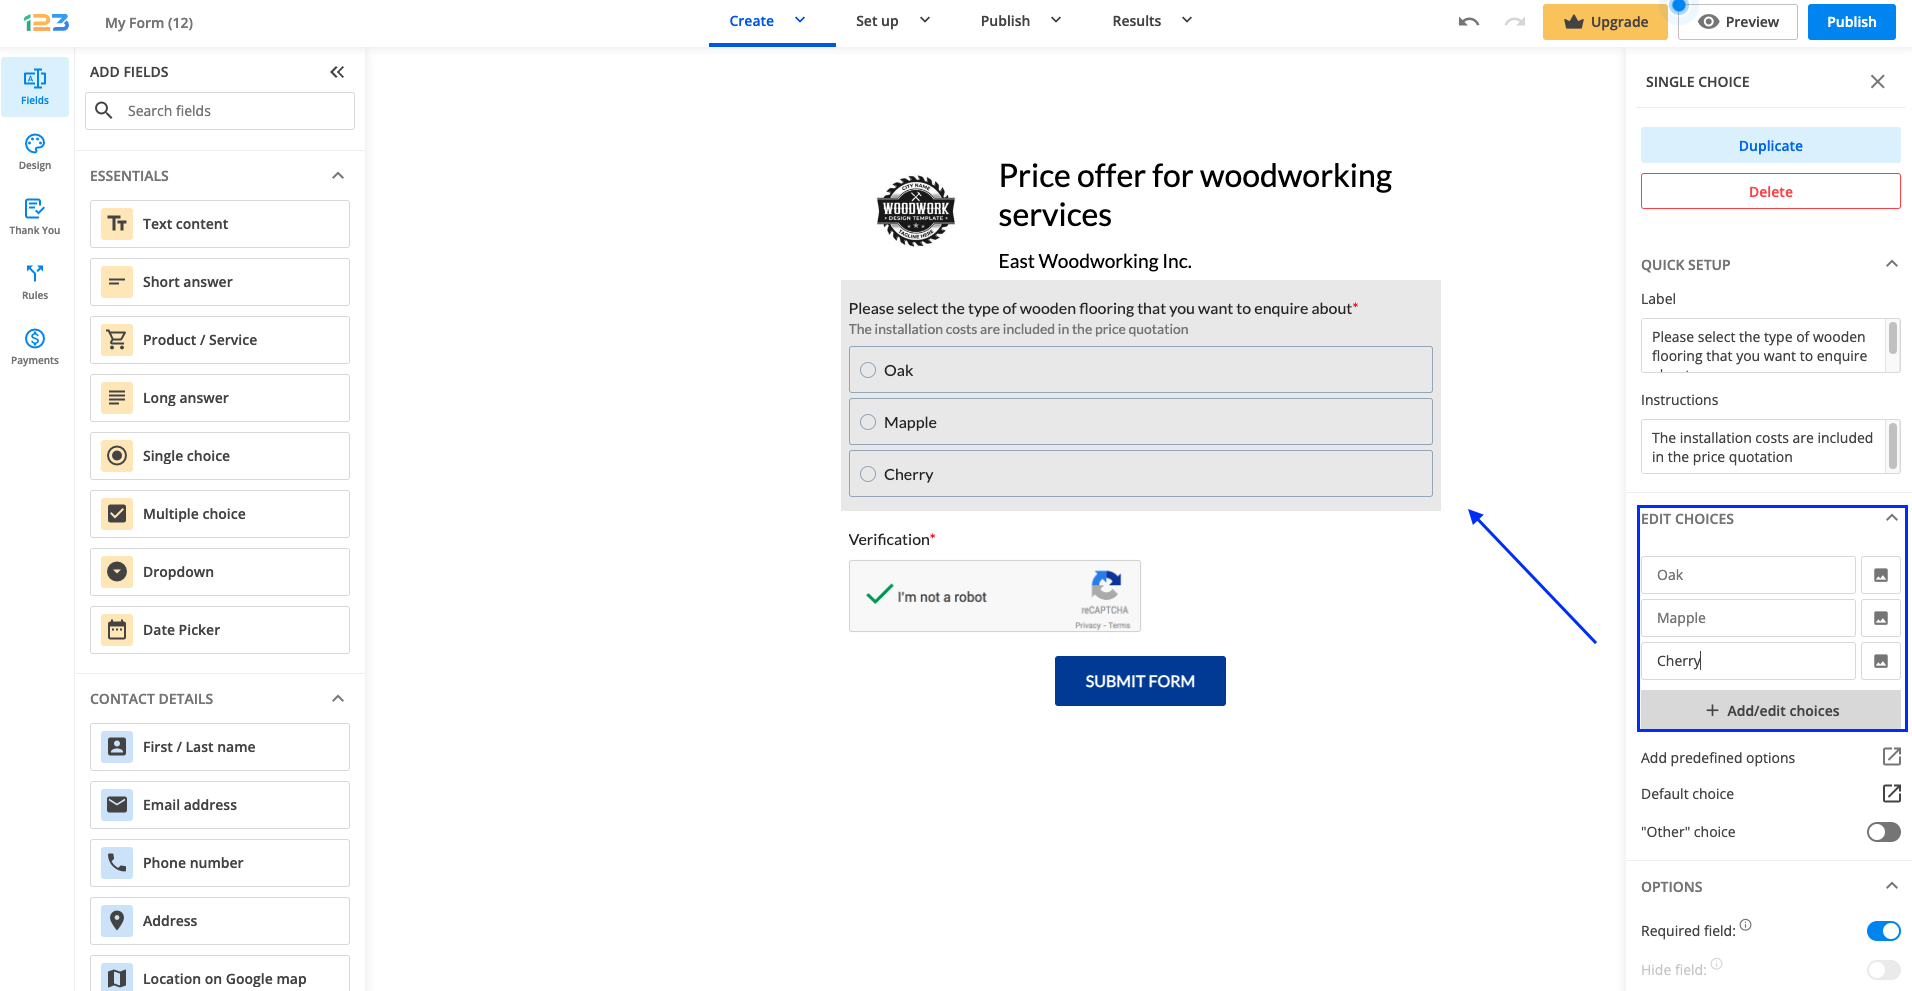
John is offering three different types of wooden flooring: oak, maple or cherry. In order for respondents to choose their option, he adds a Single choice question and makes it required so that the form could not be submitted without having an answer to this question.
In the Label section on the left side panel, he has to input the question’s text: “Please select the type of wooden flooring that you want to enquire about”. In the Instructions section, he could add additional information for his respondents: “The installation costs are included in the price quotation”.
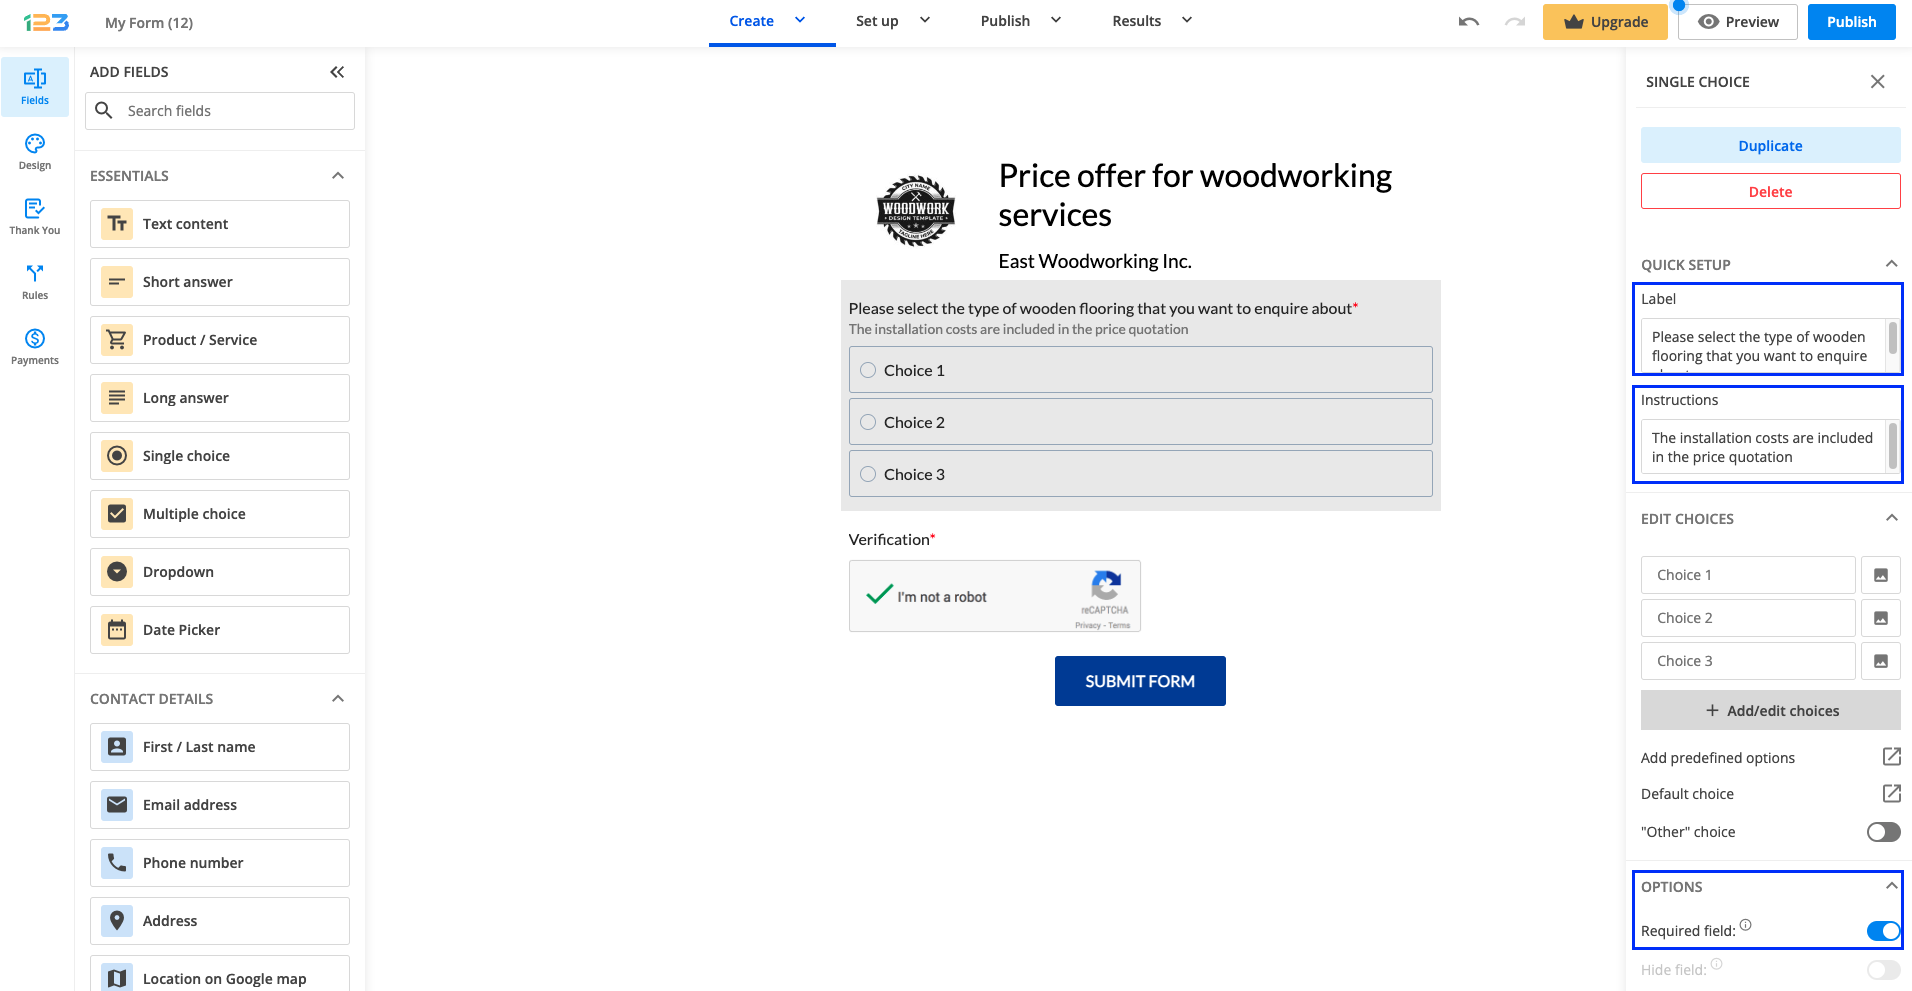
Because John is offering only three different types of wooden flooring, he has to edit the default choices of the Single choice question, which can be found under Edit choices.
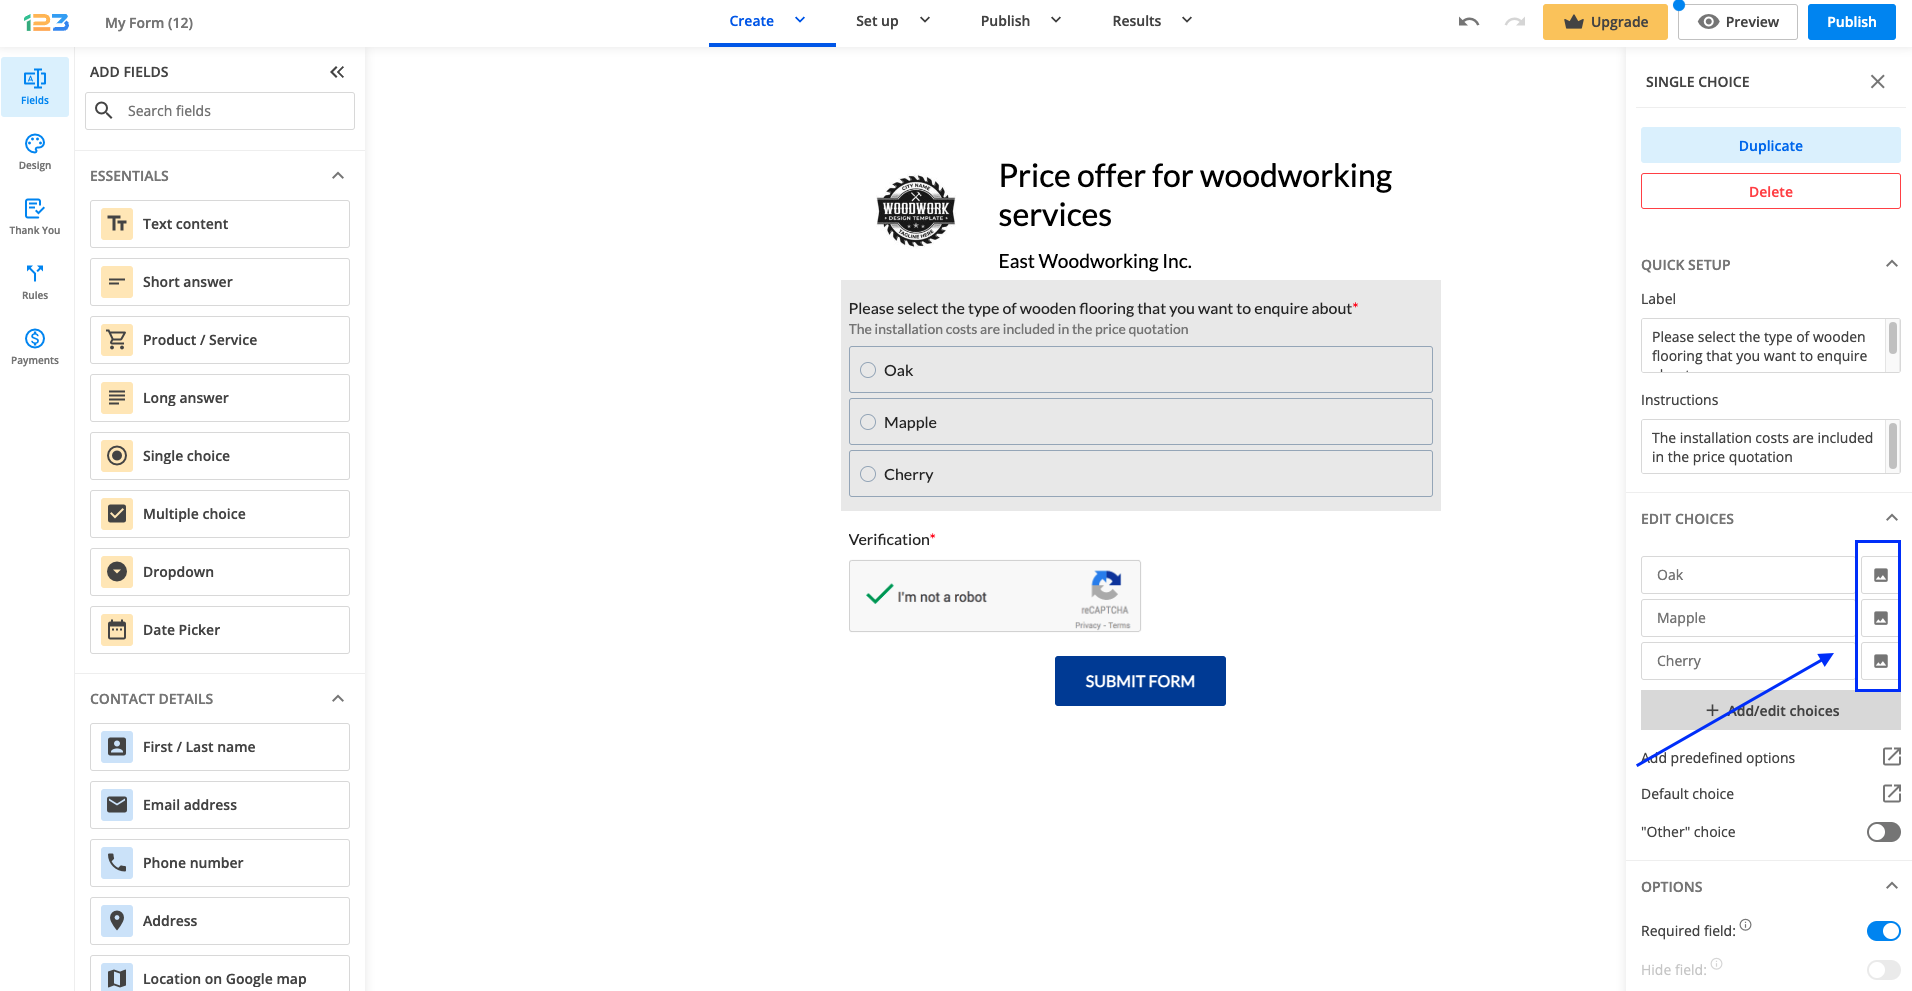
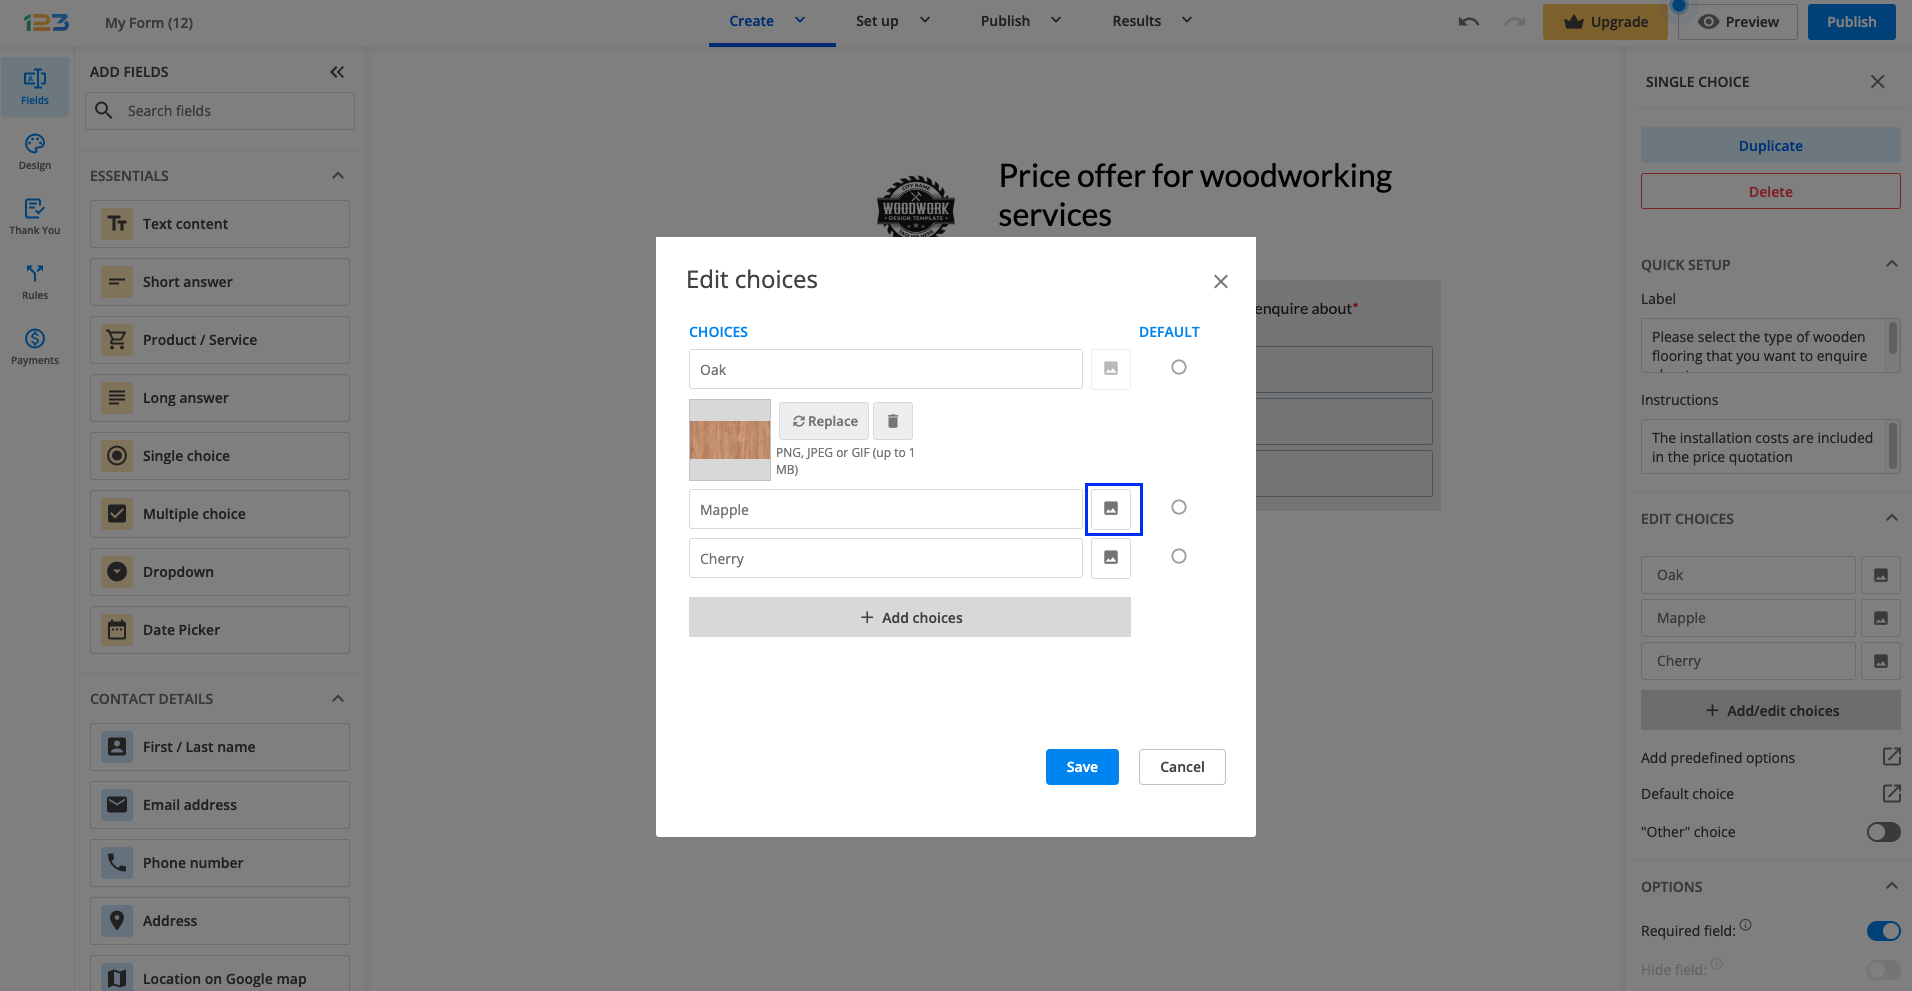
A nice addition would be to add image choices for each possible choice. This can be done by clicking on the image icon for any choice.
In the pop-up, he can upload an image for each possible option and then click Save.
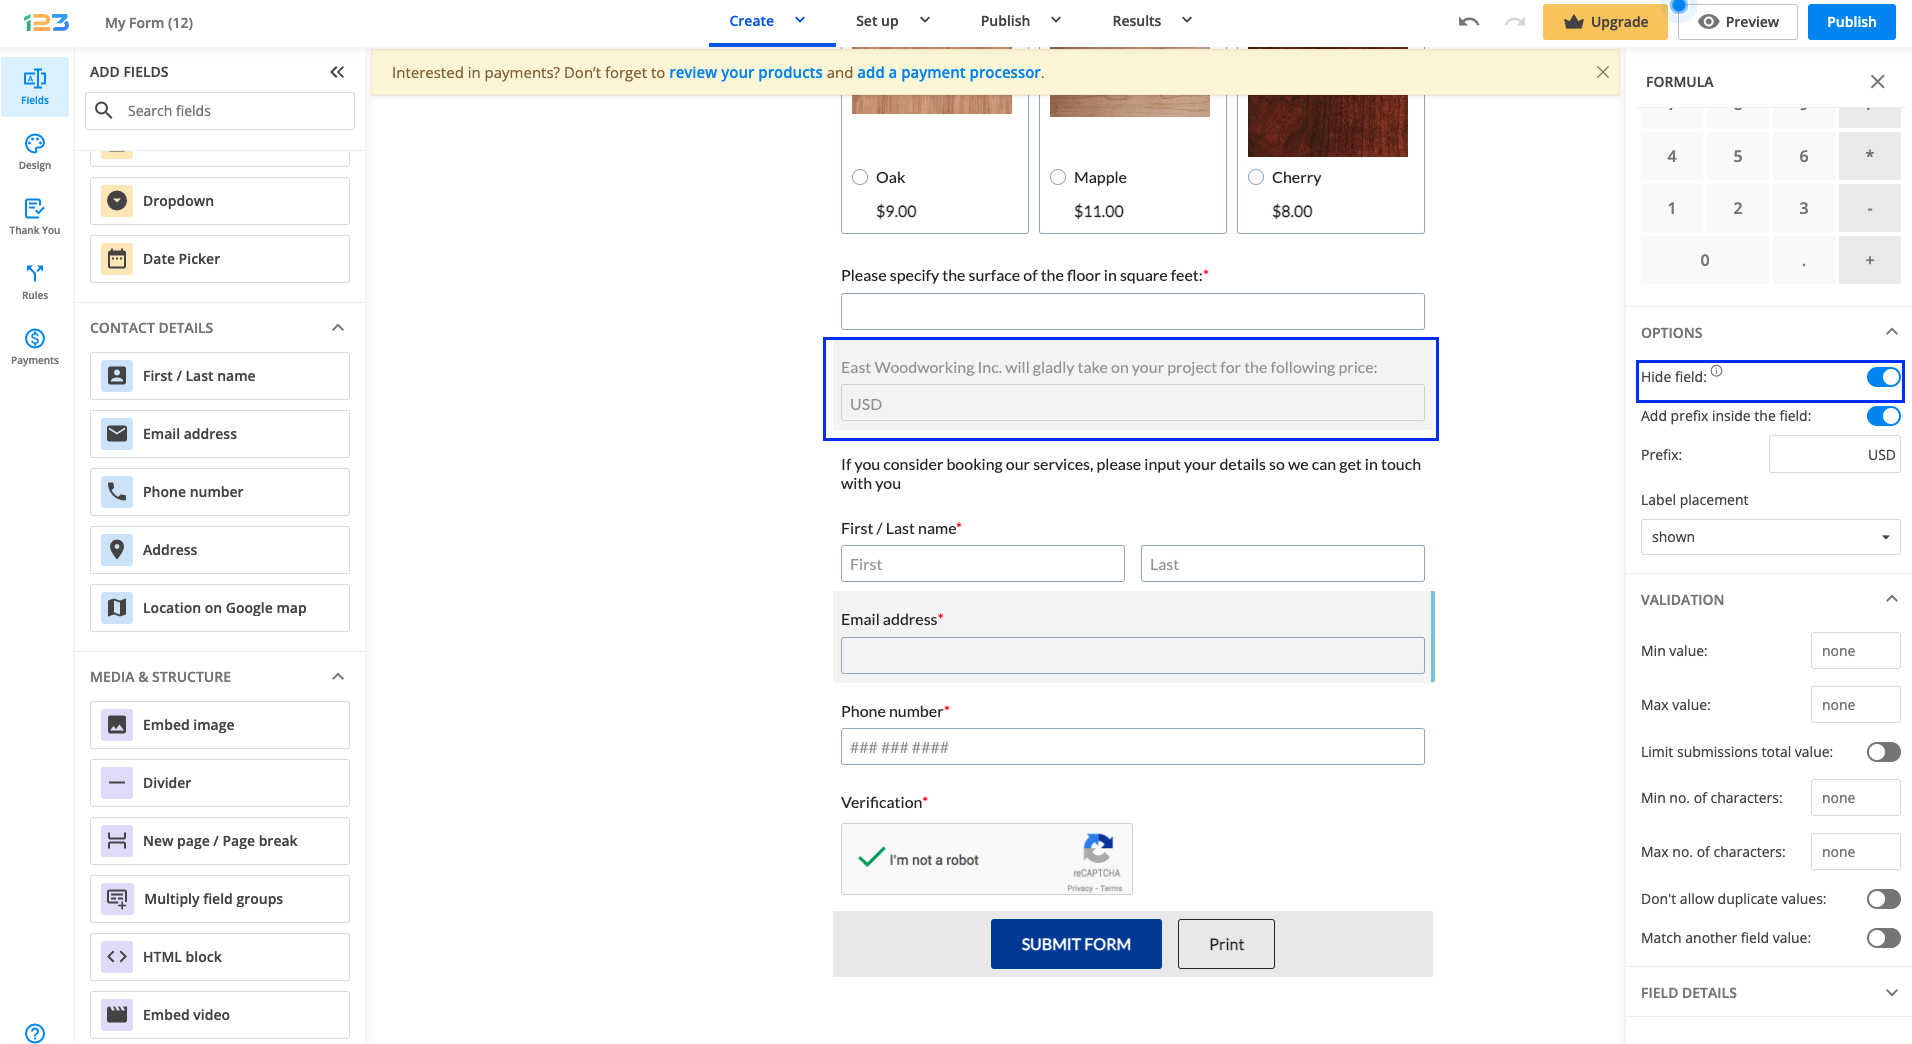
Once all images have been uploaded, this is how the form would look like:

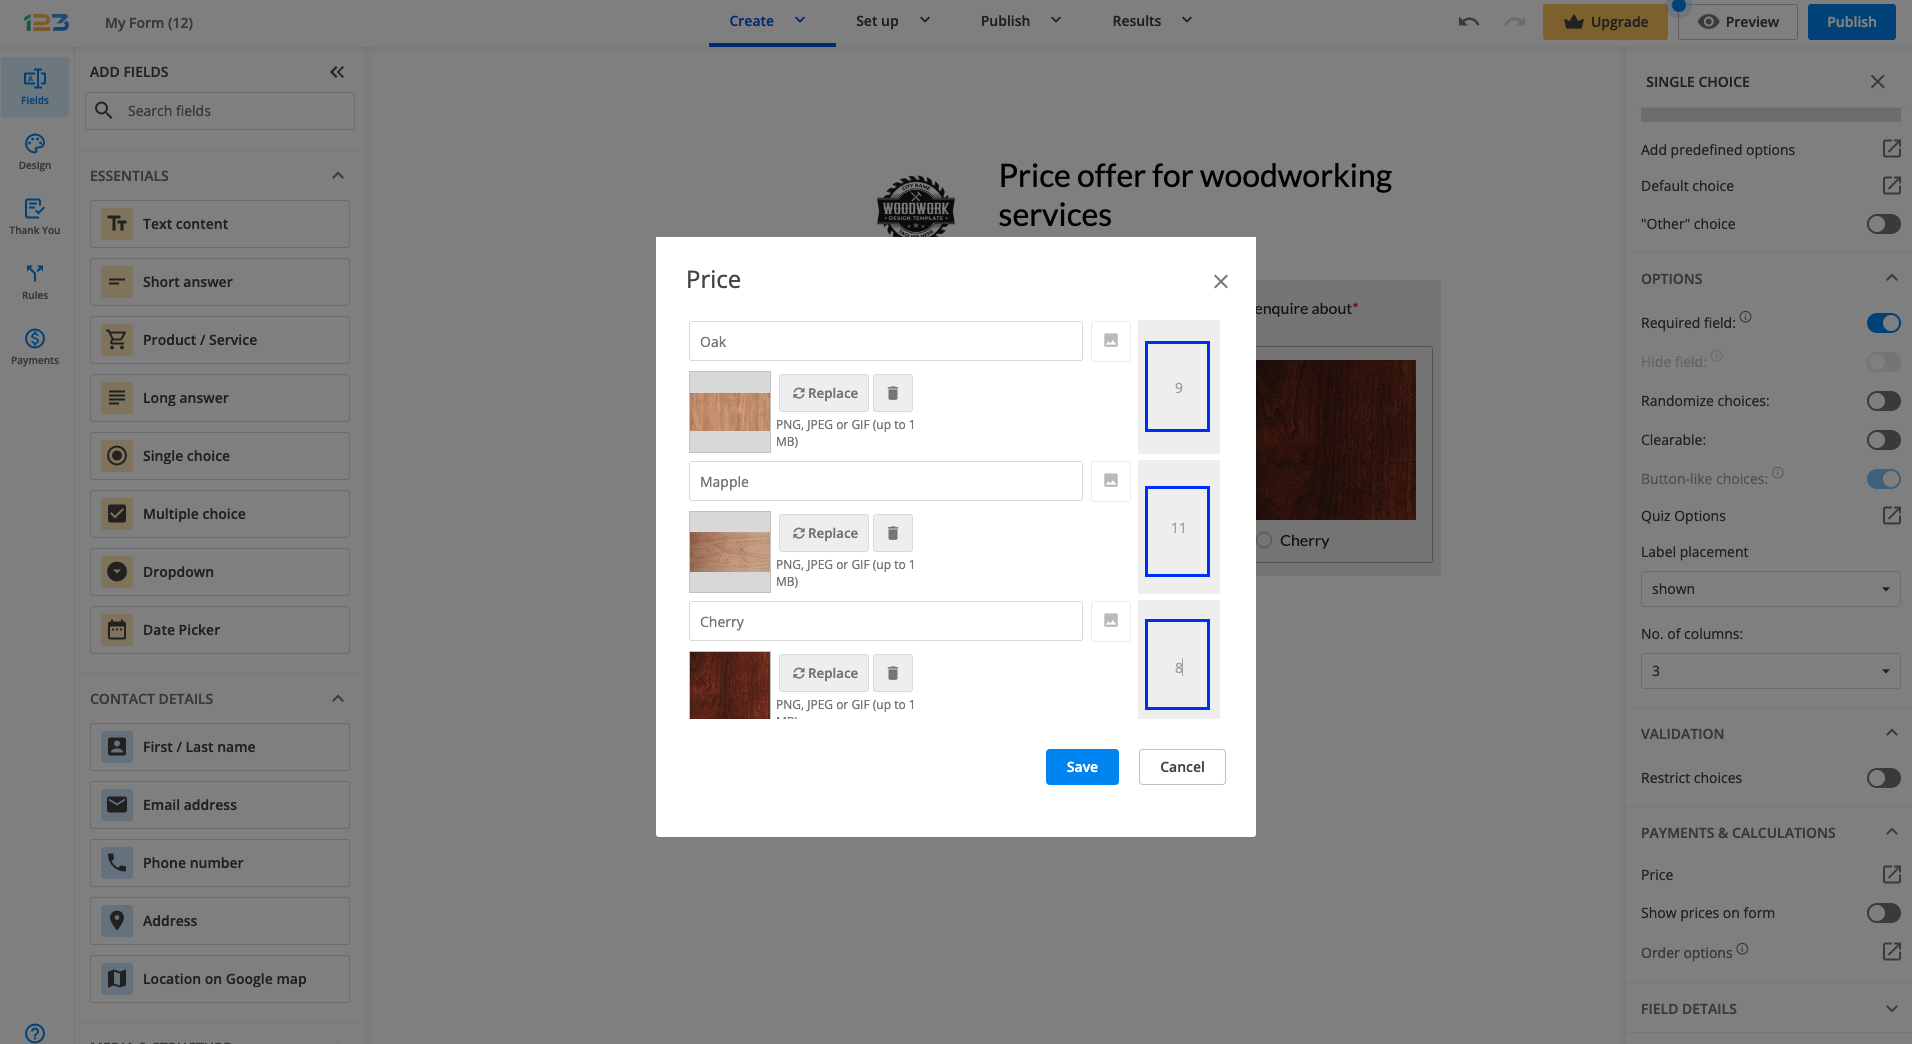
The next step would be for John to add price information for each option. In order to that, he has to navigate to Payments and Calculation in the left side panel for the Single choice and select Price.
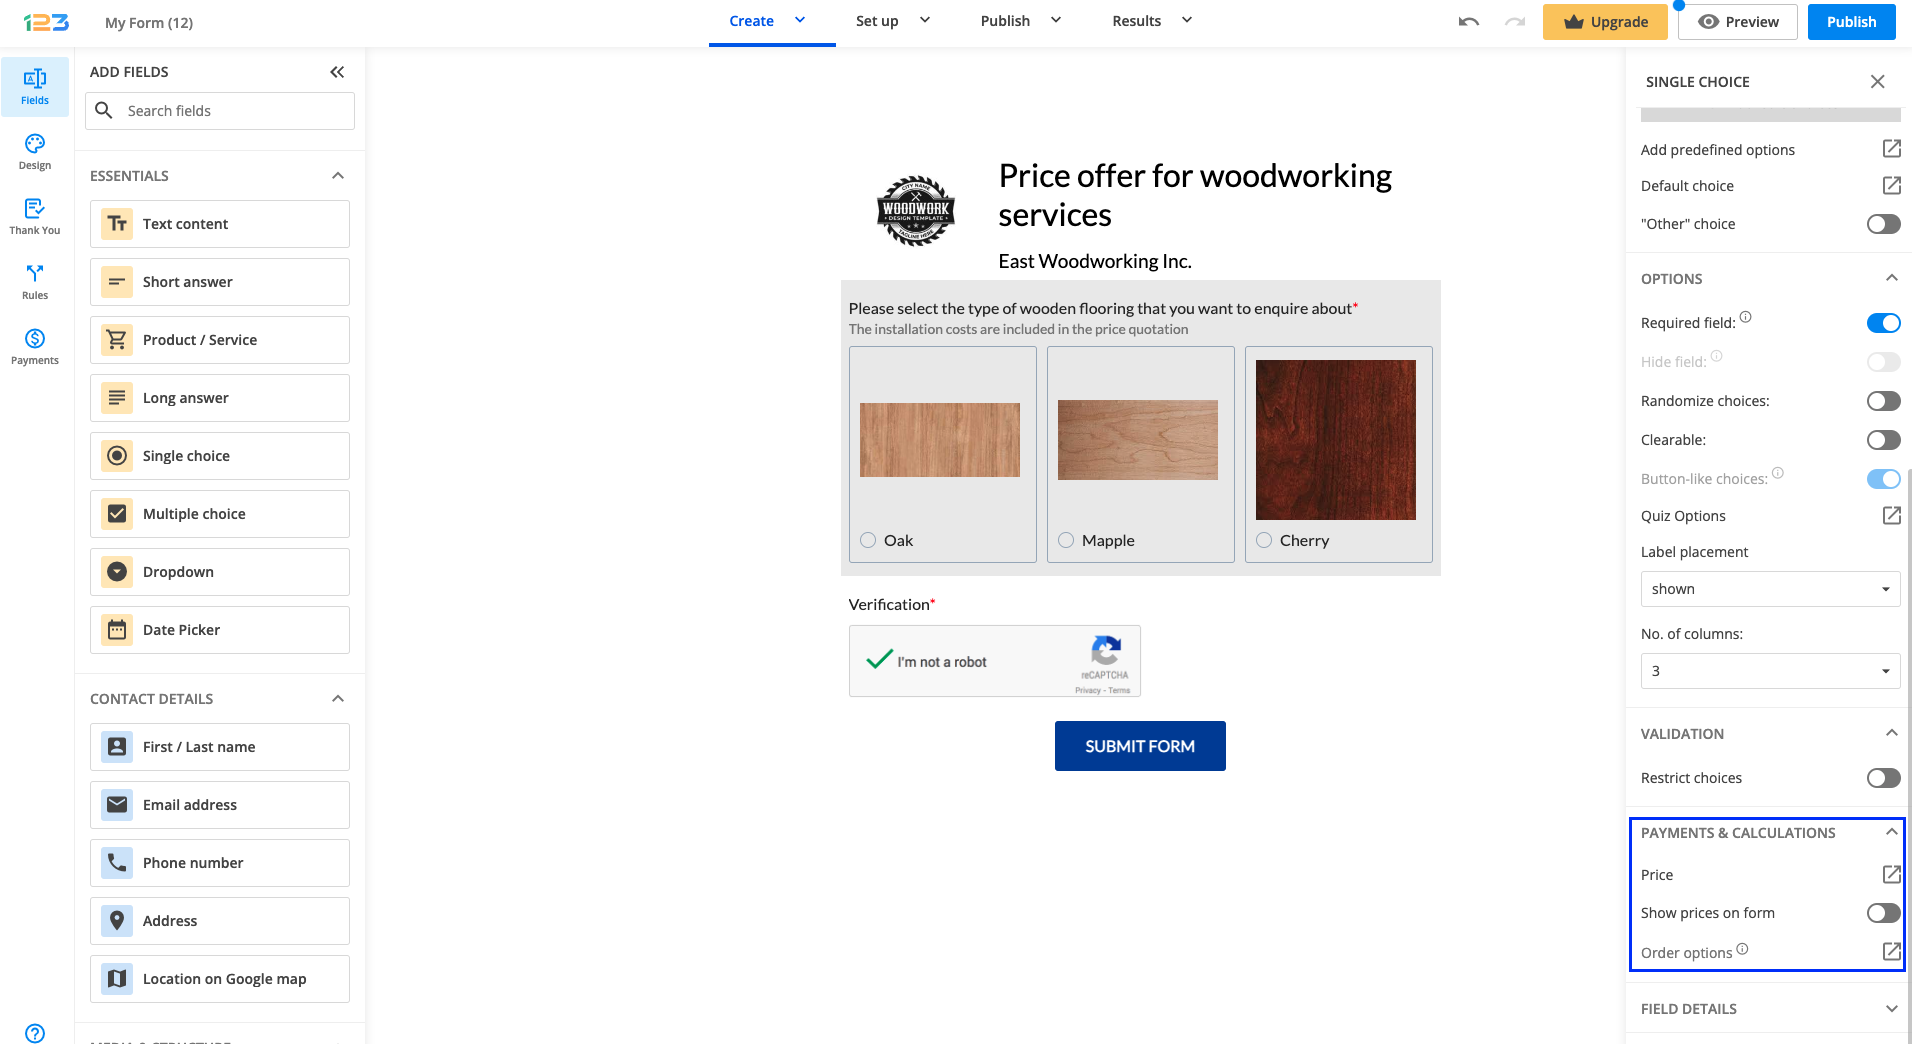
In the pop-up window that opens, each option can have a price configured. Let’s say that John has 9 USD for 1sqf of Oak, 11 USD for 1sqf of Mapple, 8 USD for 1sqf of Cherry.
Note: The prices applied to choices are not visible for respondents, but they can be manually added to the label in case you want to offer this level of detail for your respondents.
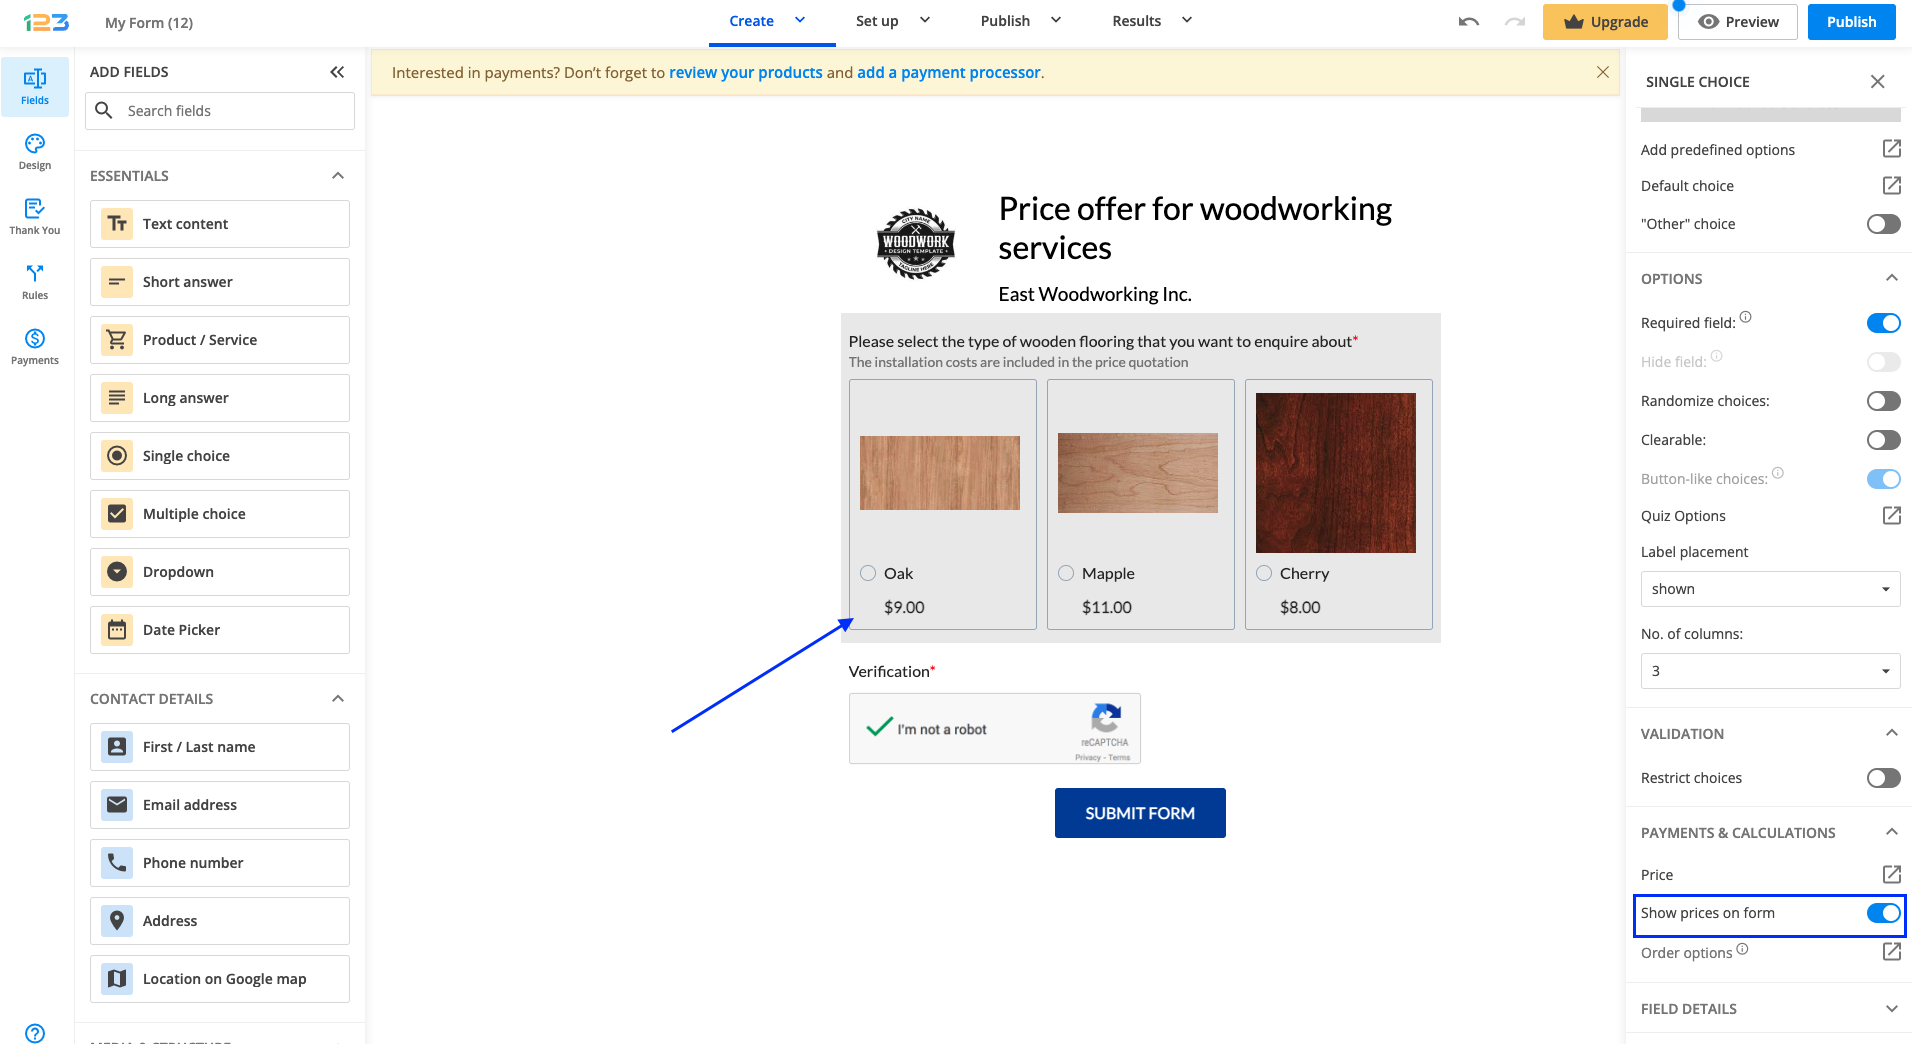
You can also choose to show prices on form by enabling this option. Each choice will have the price assigned displayed under the text.
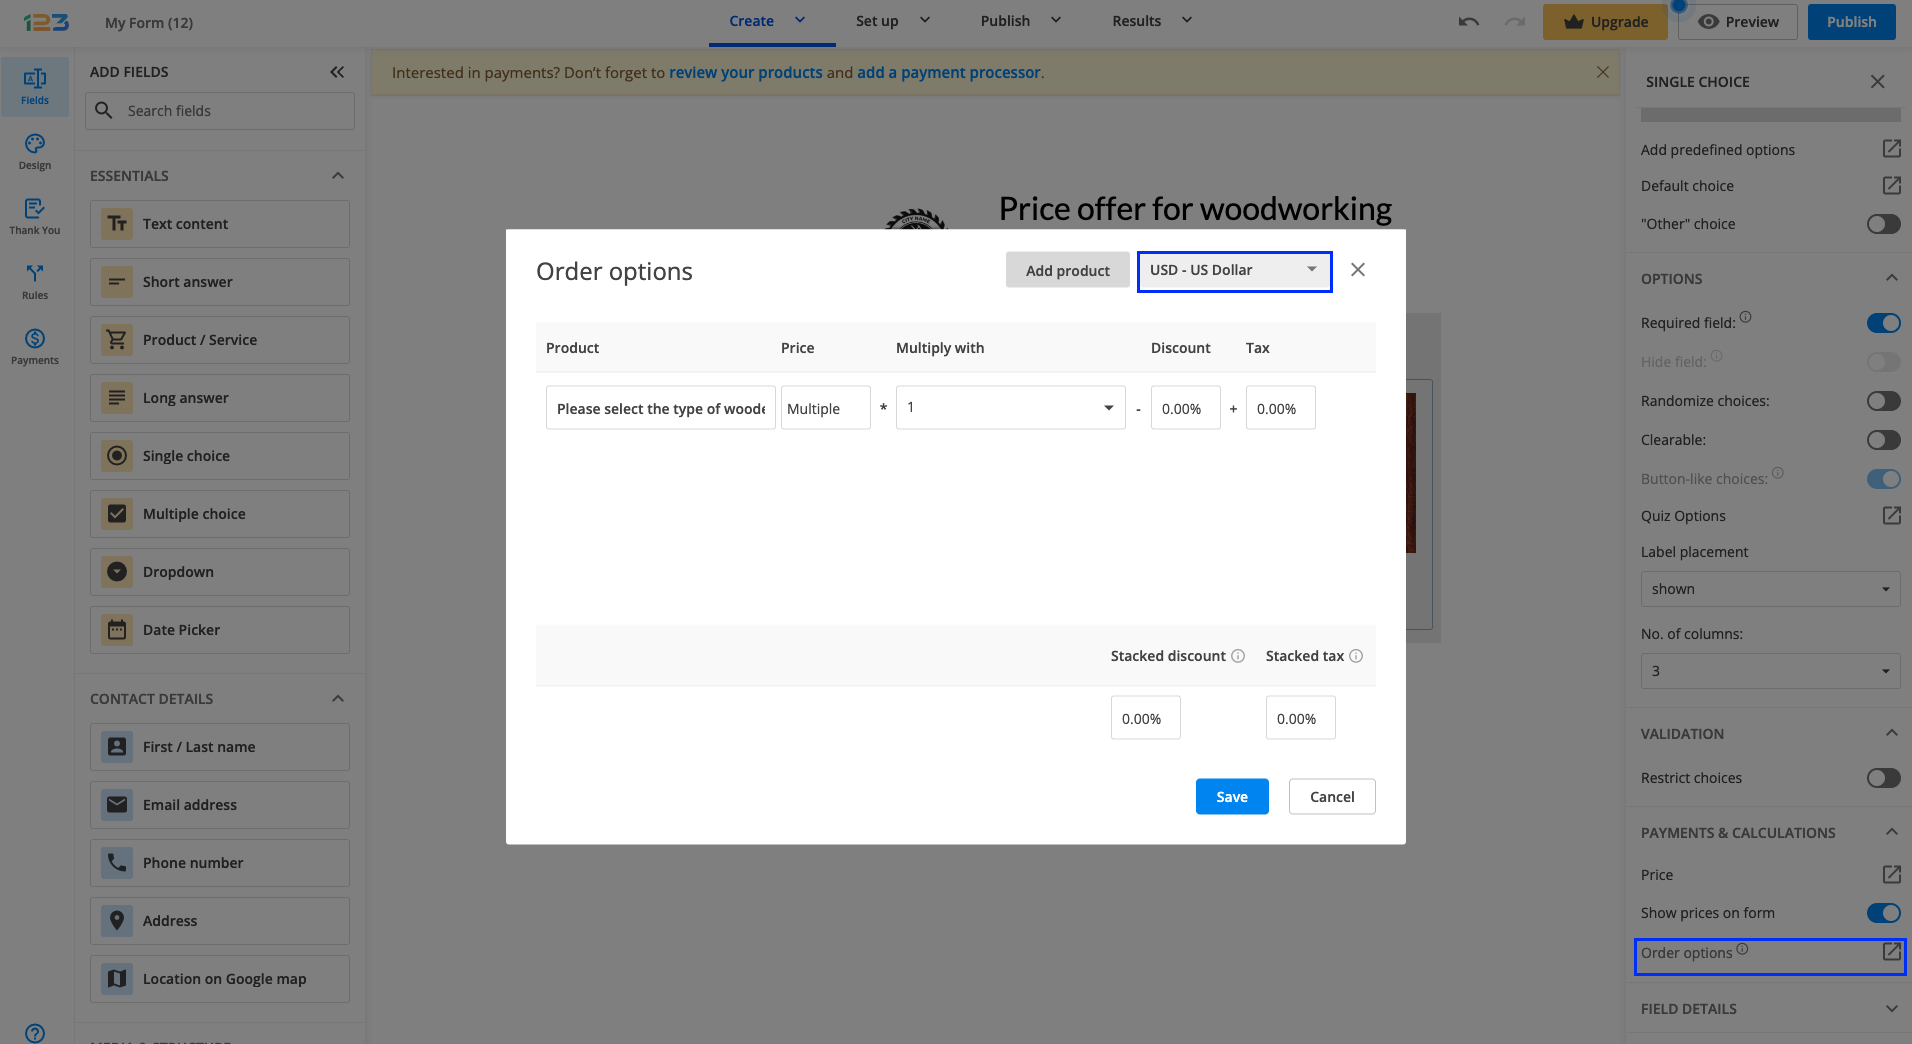
Next step would be to click on Order options in order to make sure the currency John wants to use is selected.
John also wants to collect information about the surface of the flooring from his customers. In this case, a Number field has to be added on the form. As this information is essential, the field has to be marked as required.
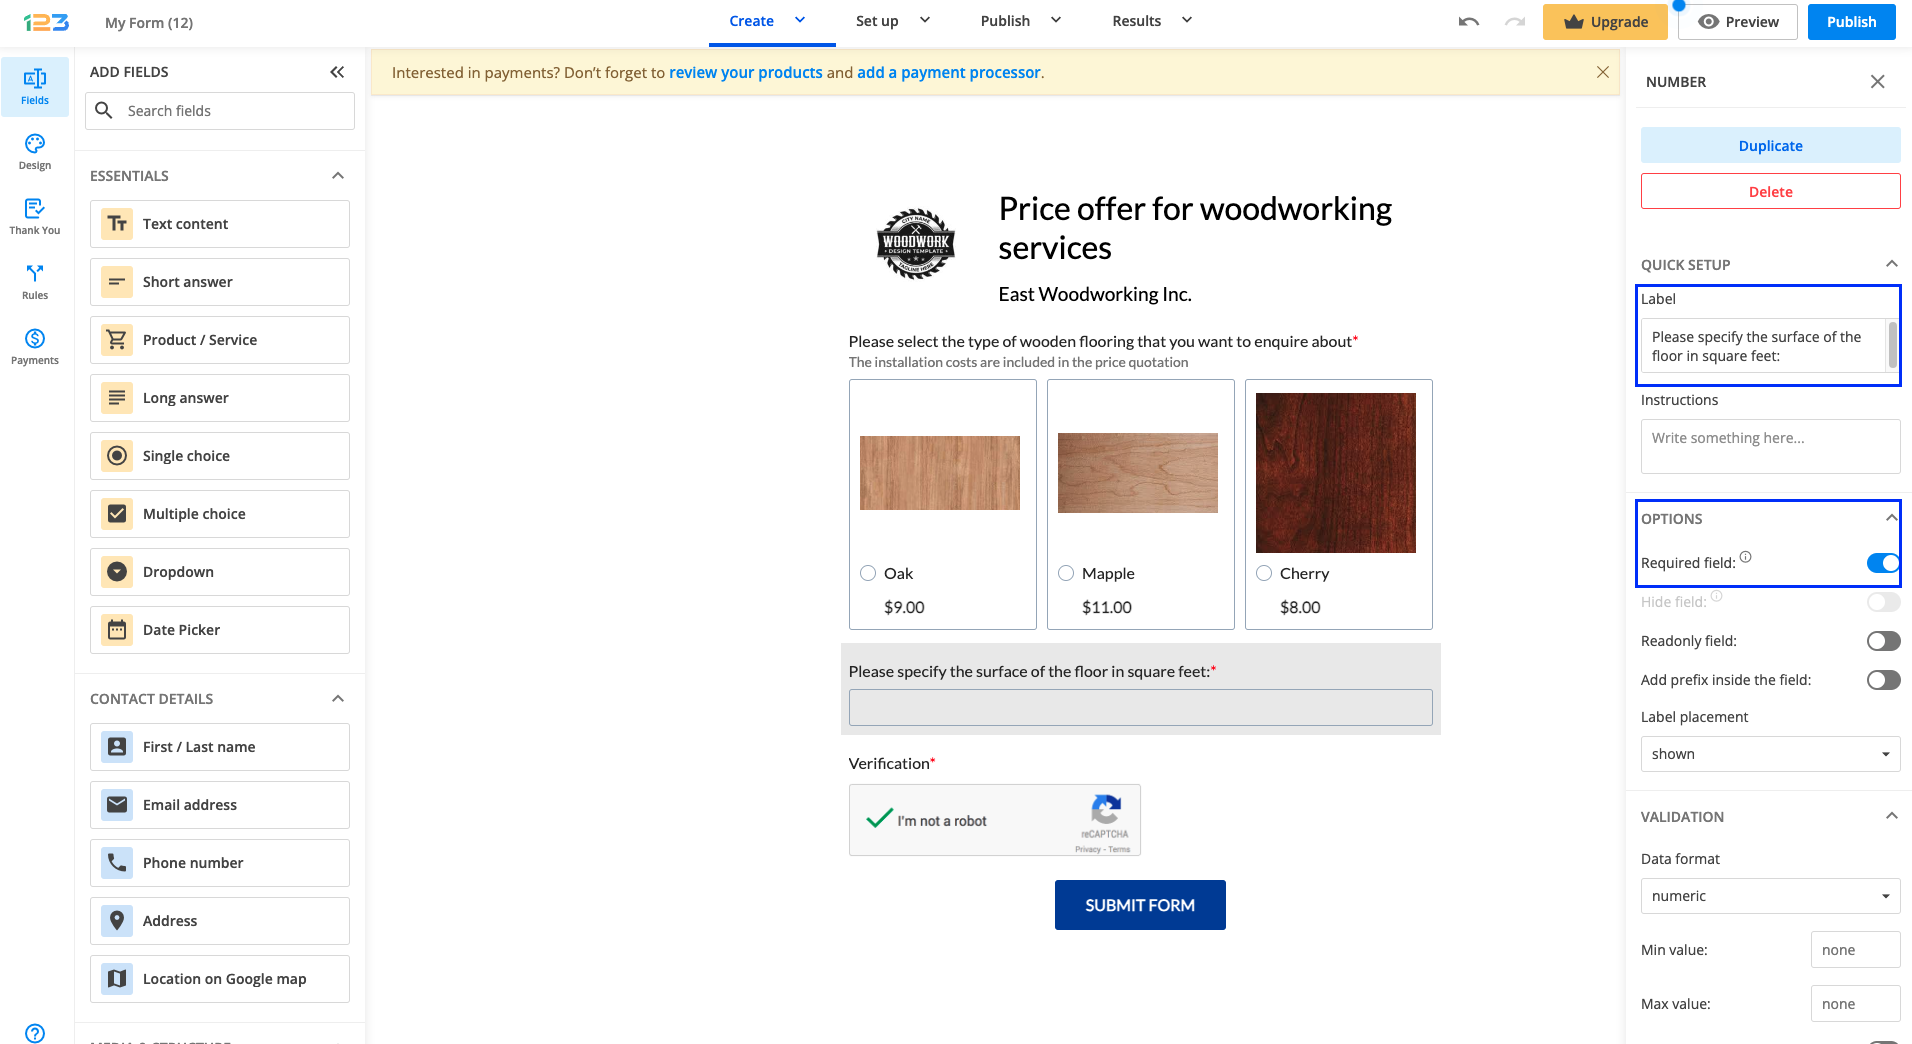
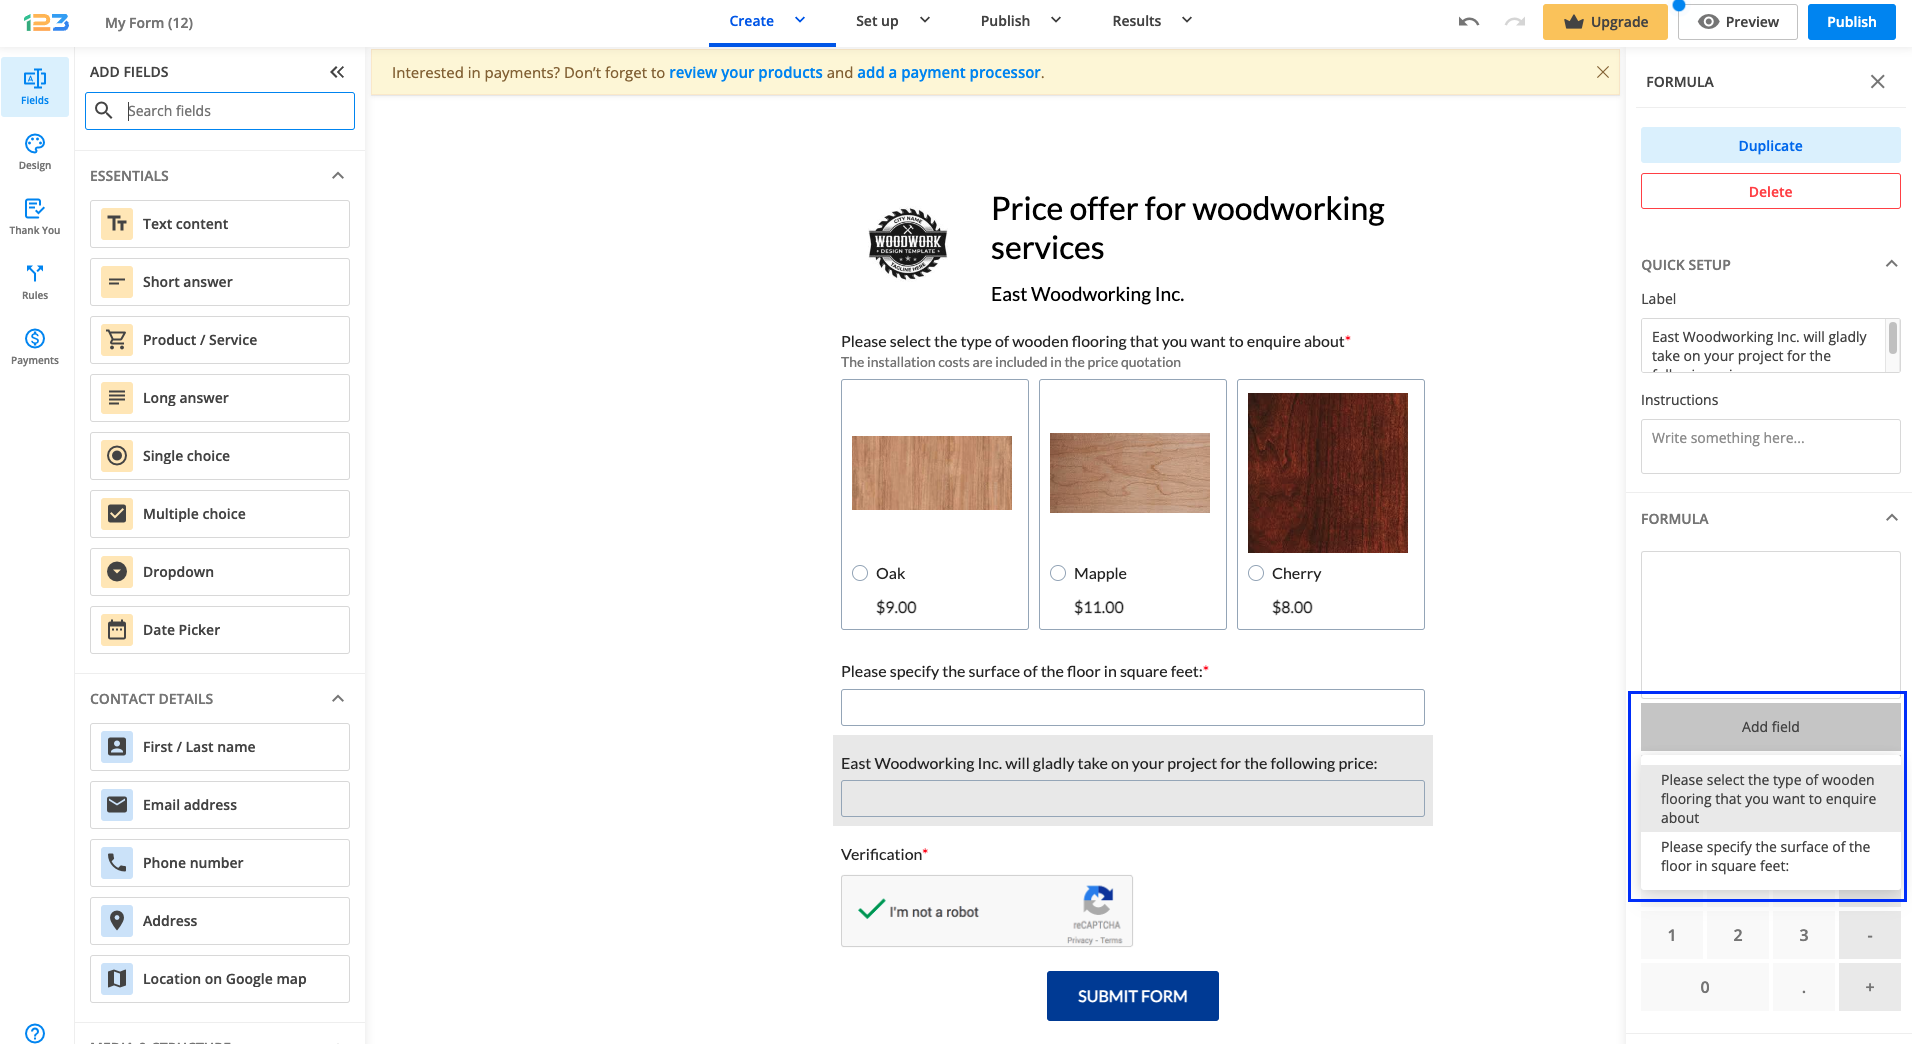
Since John wants to display a calculated price based on the selected wood type and the surface, he has to use a Formula field. Under the Label option, John has to input the question text: “East Woodworking Inc. will gladly take on your project for the following price:”
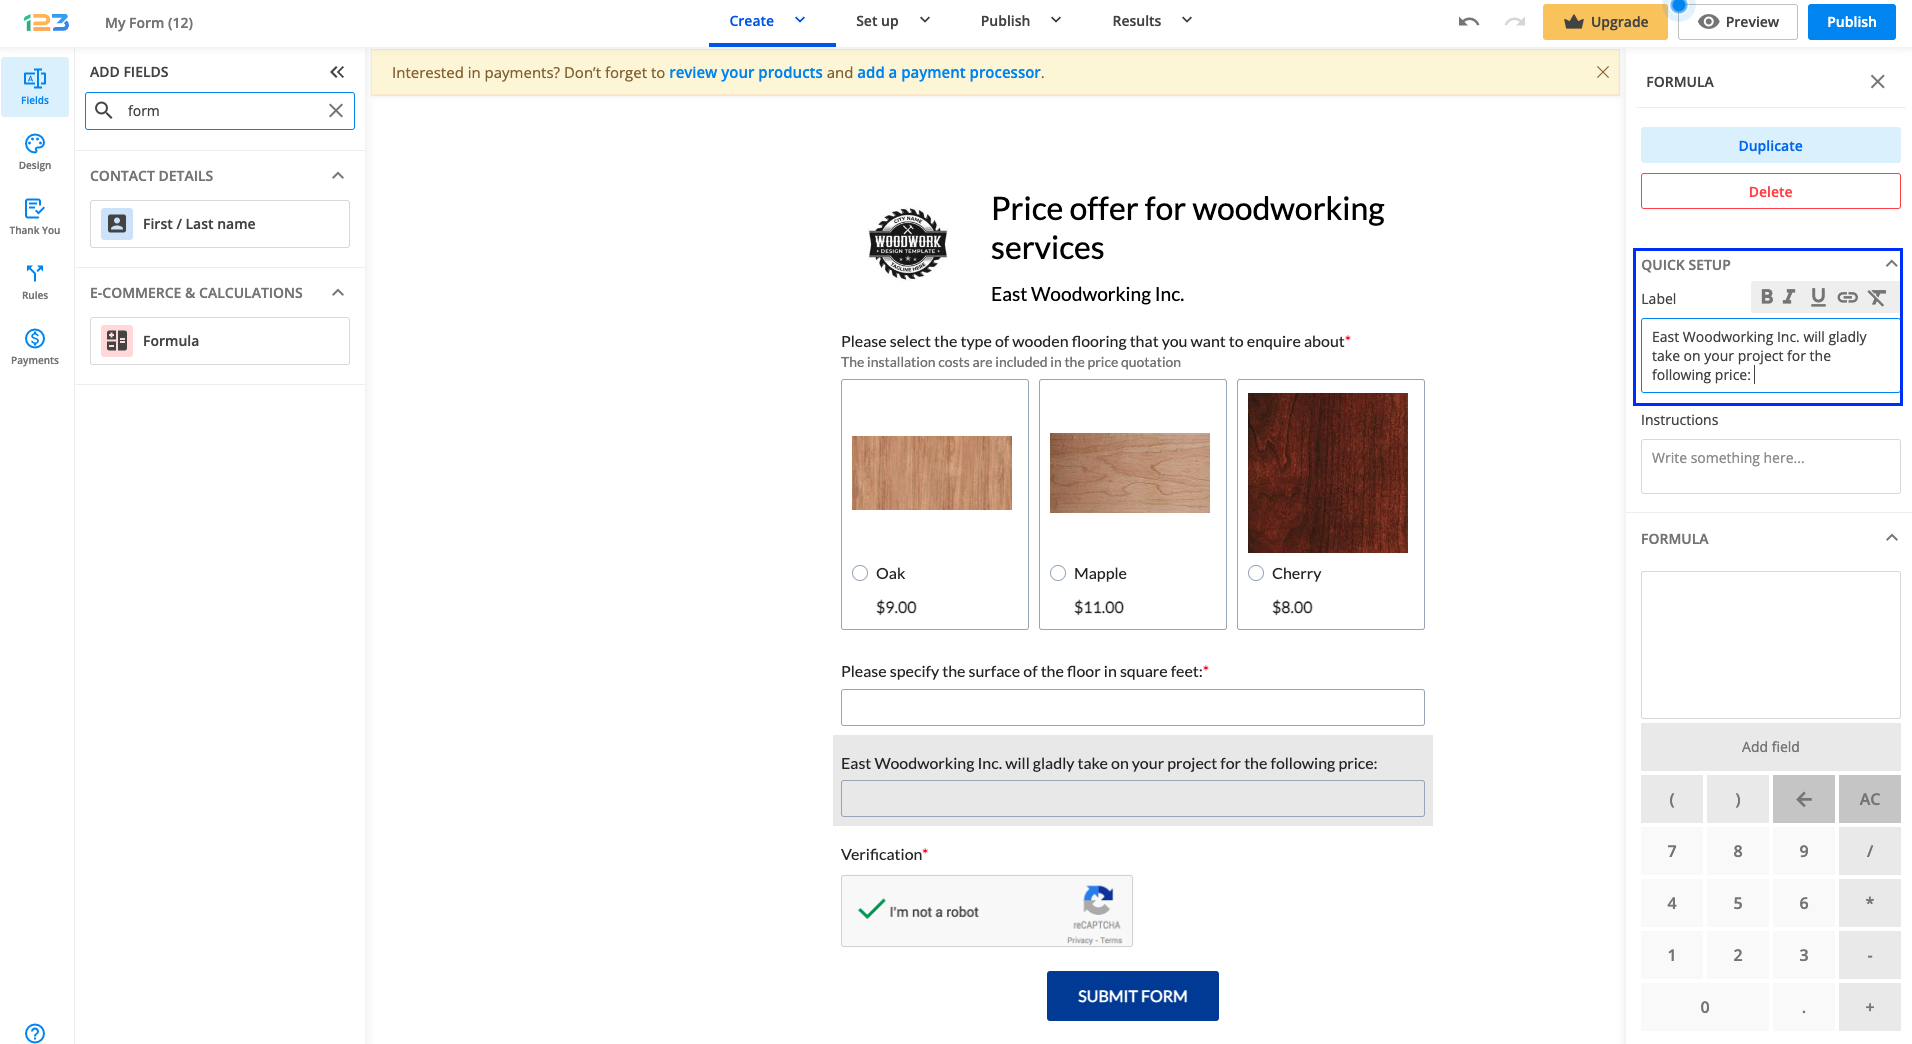
What is missing now is the actual formula to be created. John has to click on Add field button and select the field with the flooring options, which will then be multiplied by the value of the field containing the surface information.
Once created, the formula will look like below:
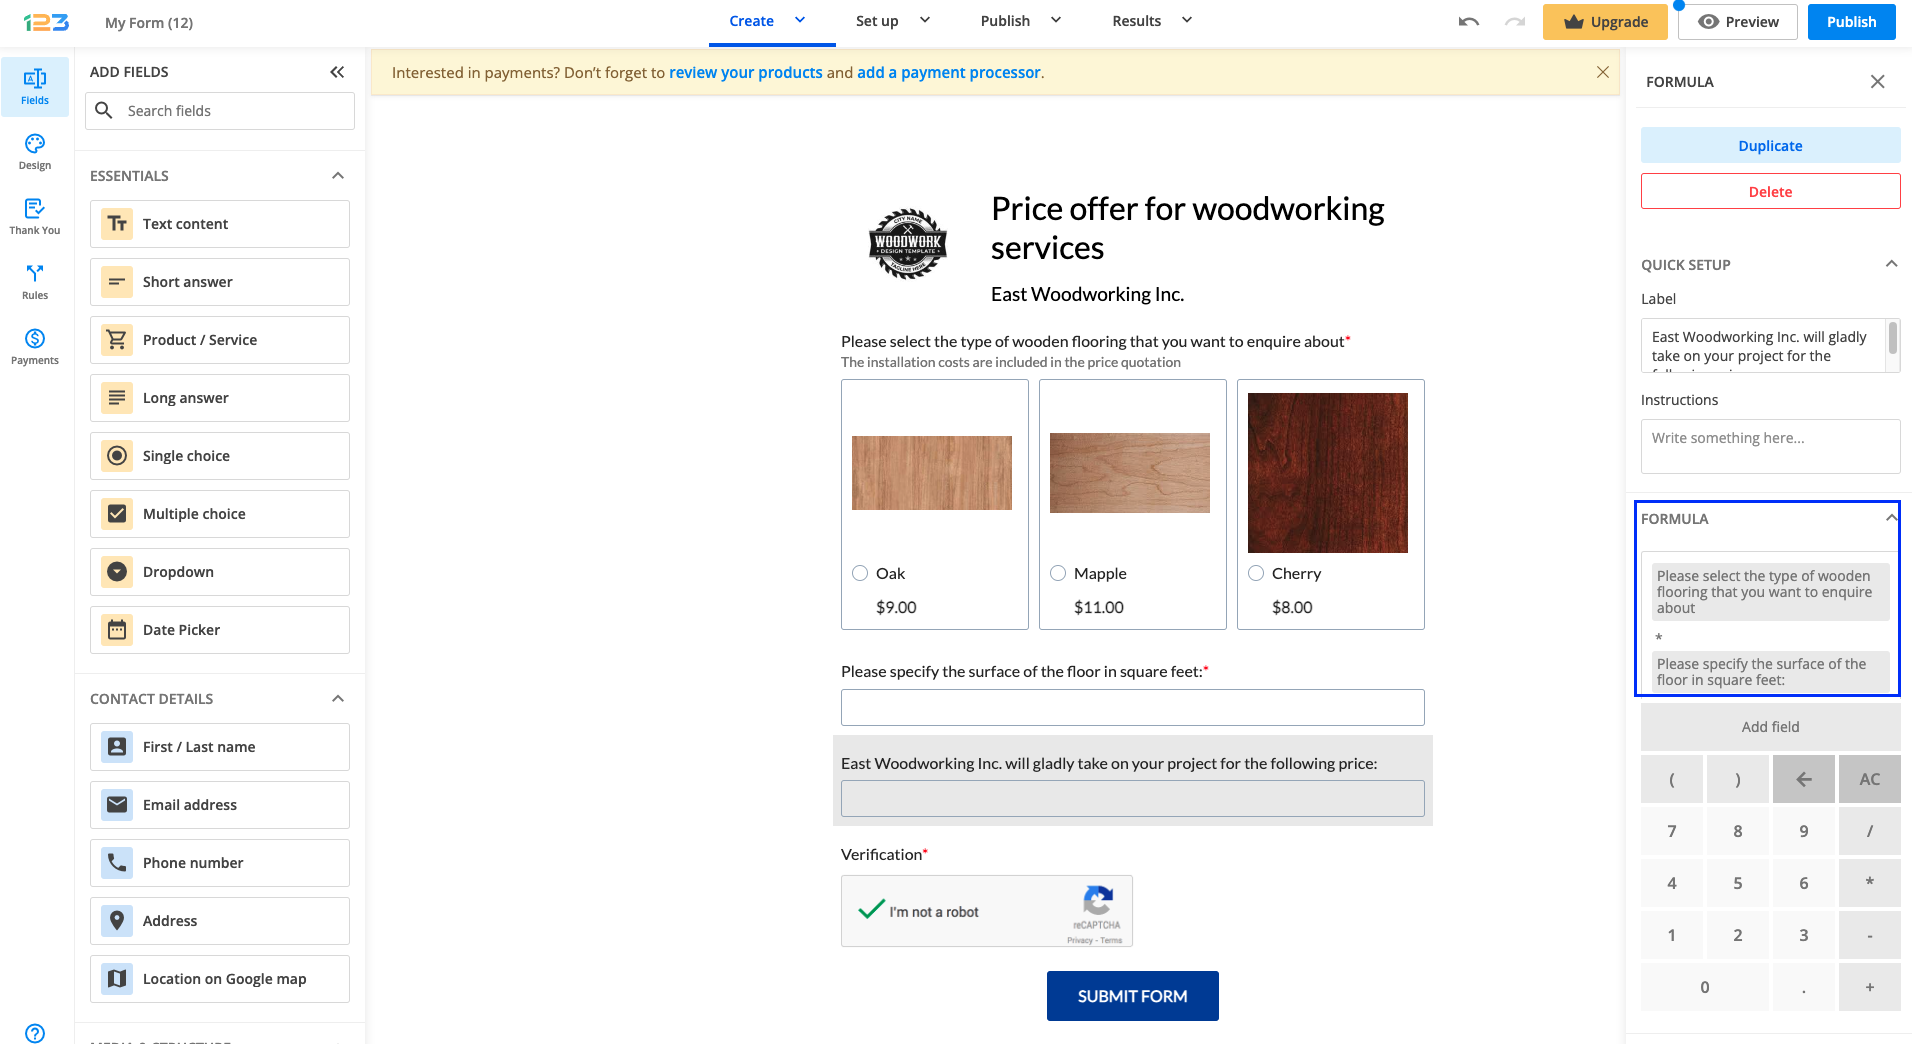
If John wants to have the currency displayed next to the resulting value, then Add prefix inside the field has to be checked.
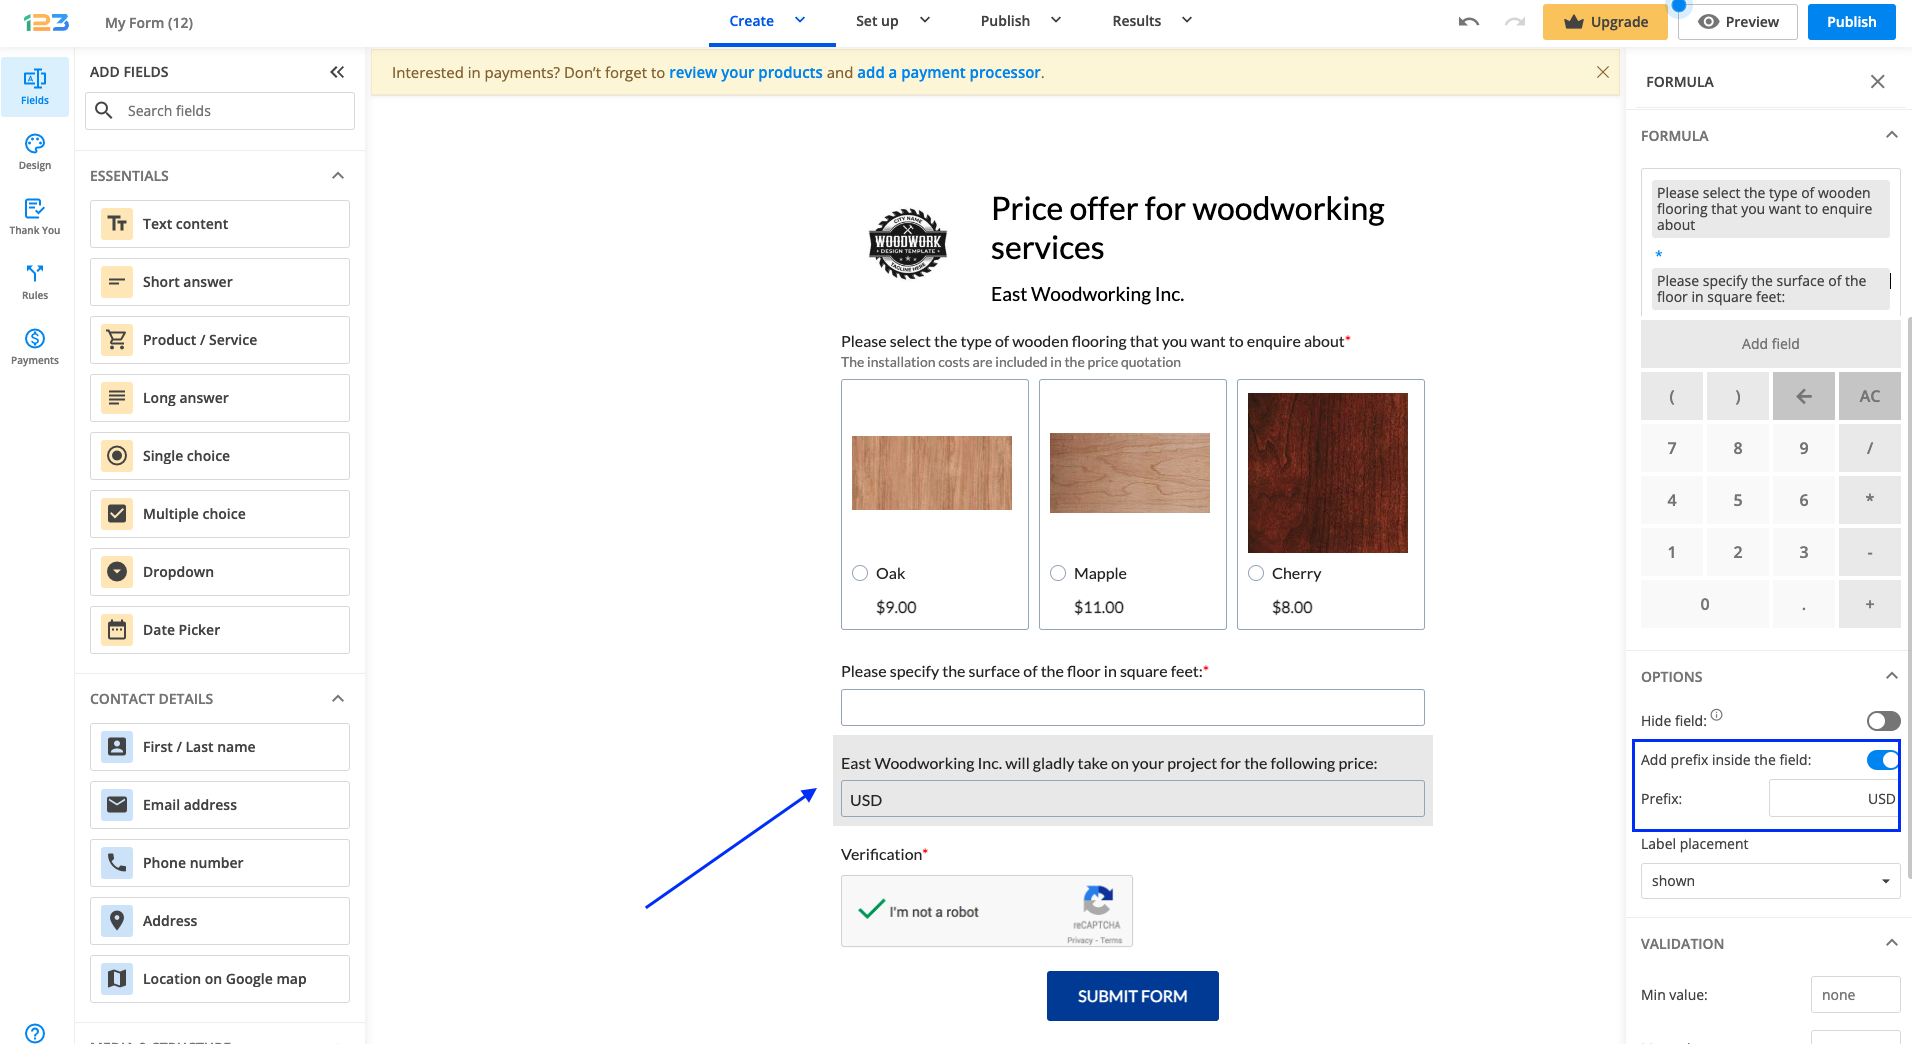
Important note: Formula field behaves differently than any other field. It is a read-only field in which only the total amount will be displayed.
This form can totally be improved, so let’s take it step by step. Let’s assume that respondents find the offer highly competitive and want to get in touch with John.
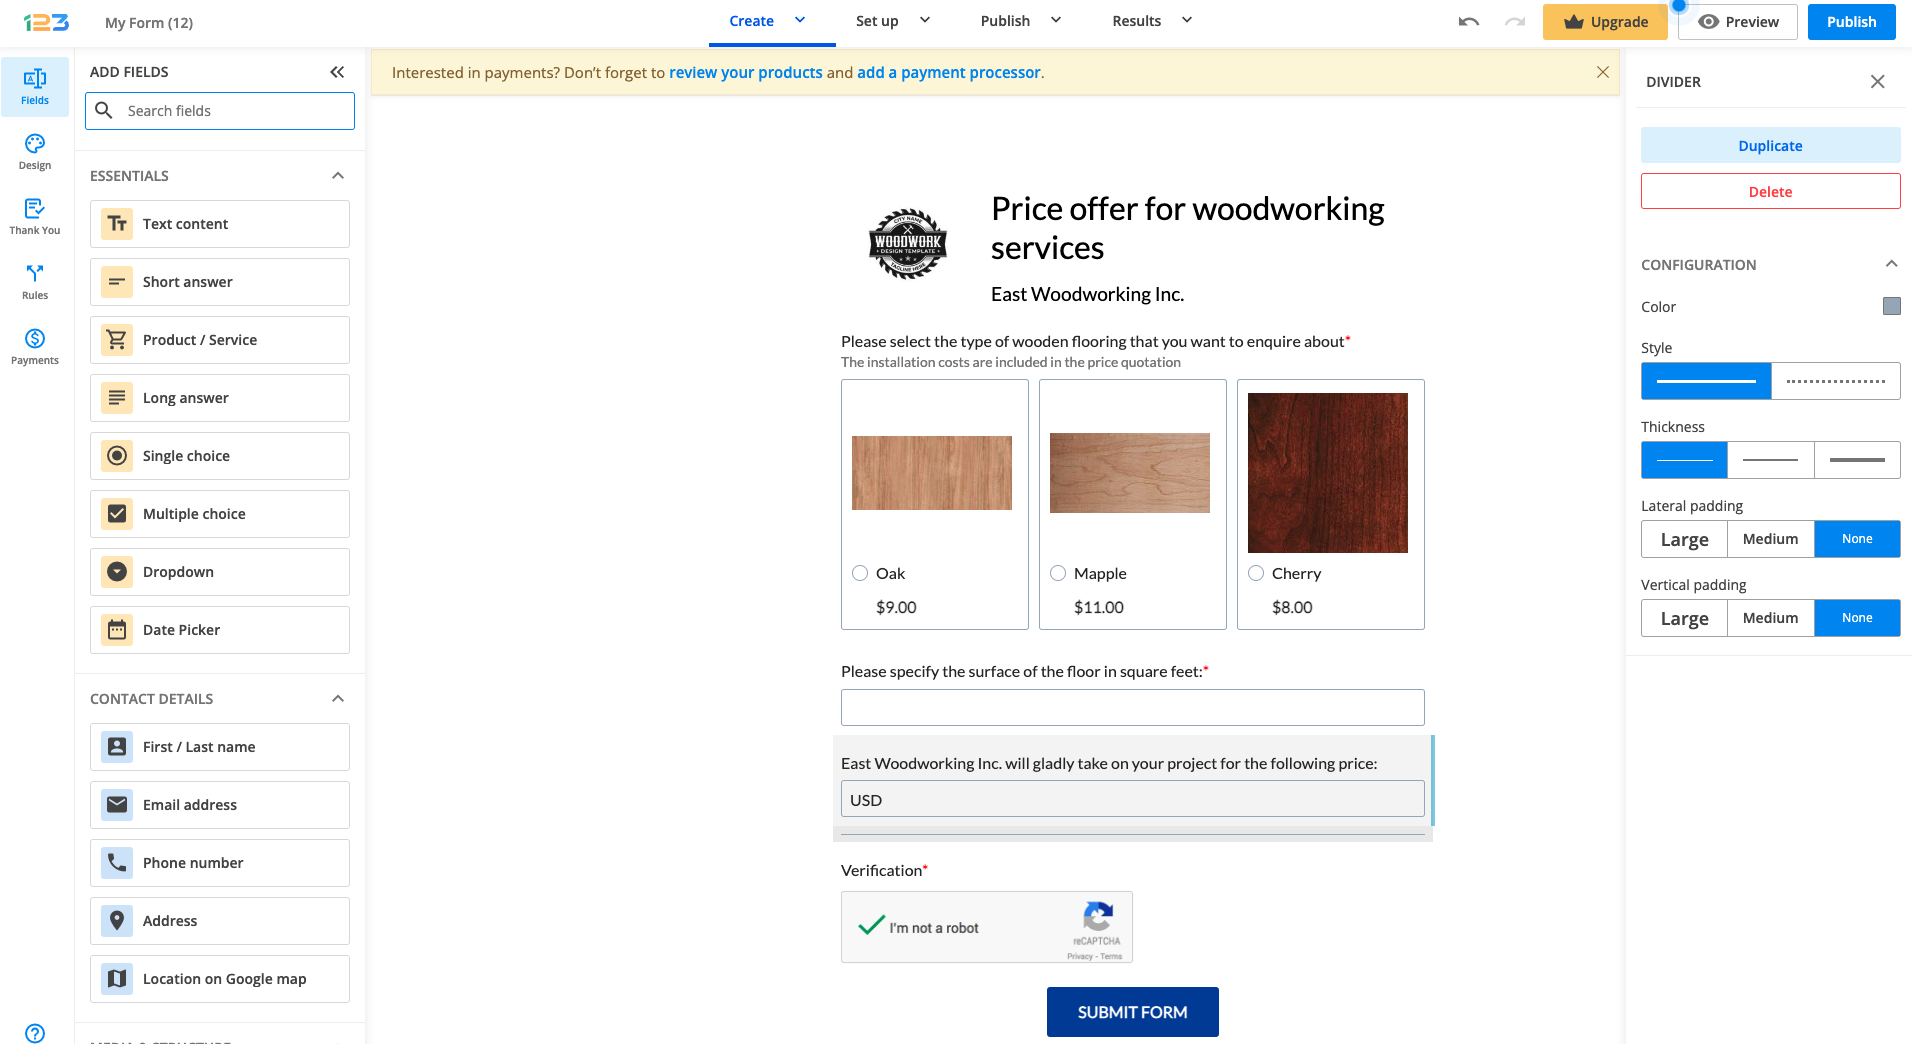
Firstly, we can add a divider field as we are going to ask respondents contact info and we want to split the form into different sections. The divider field can be customised according to your needs.
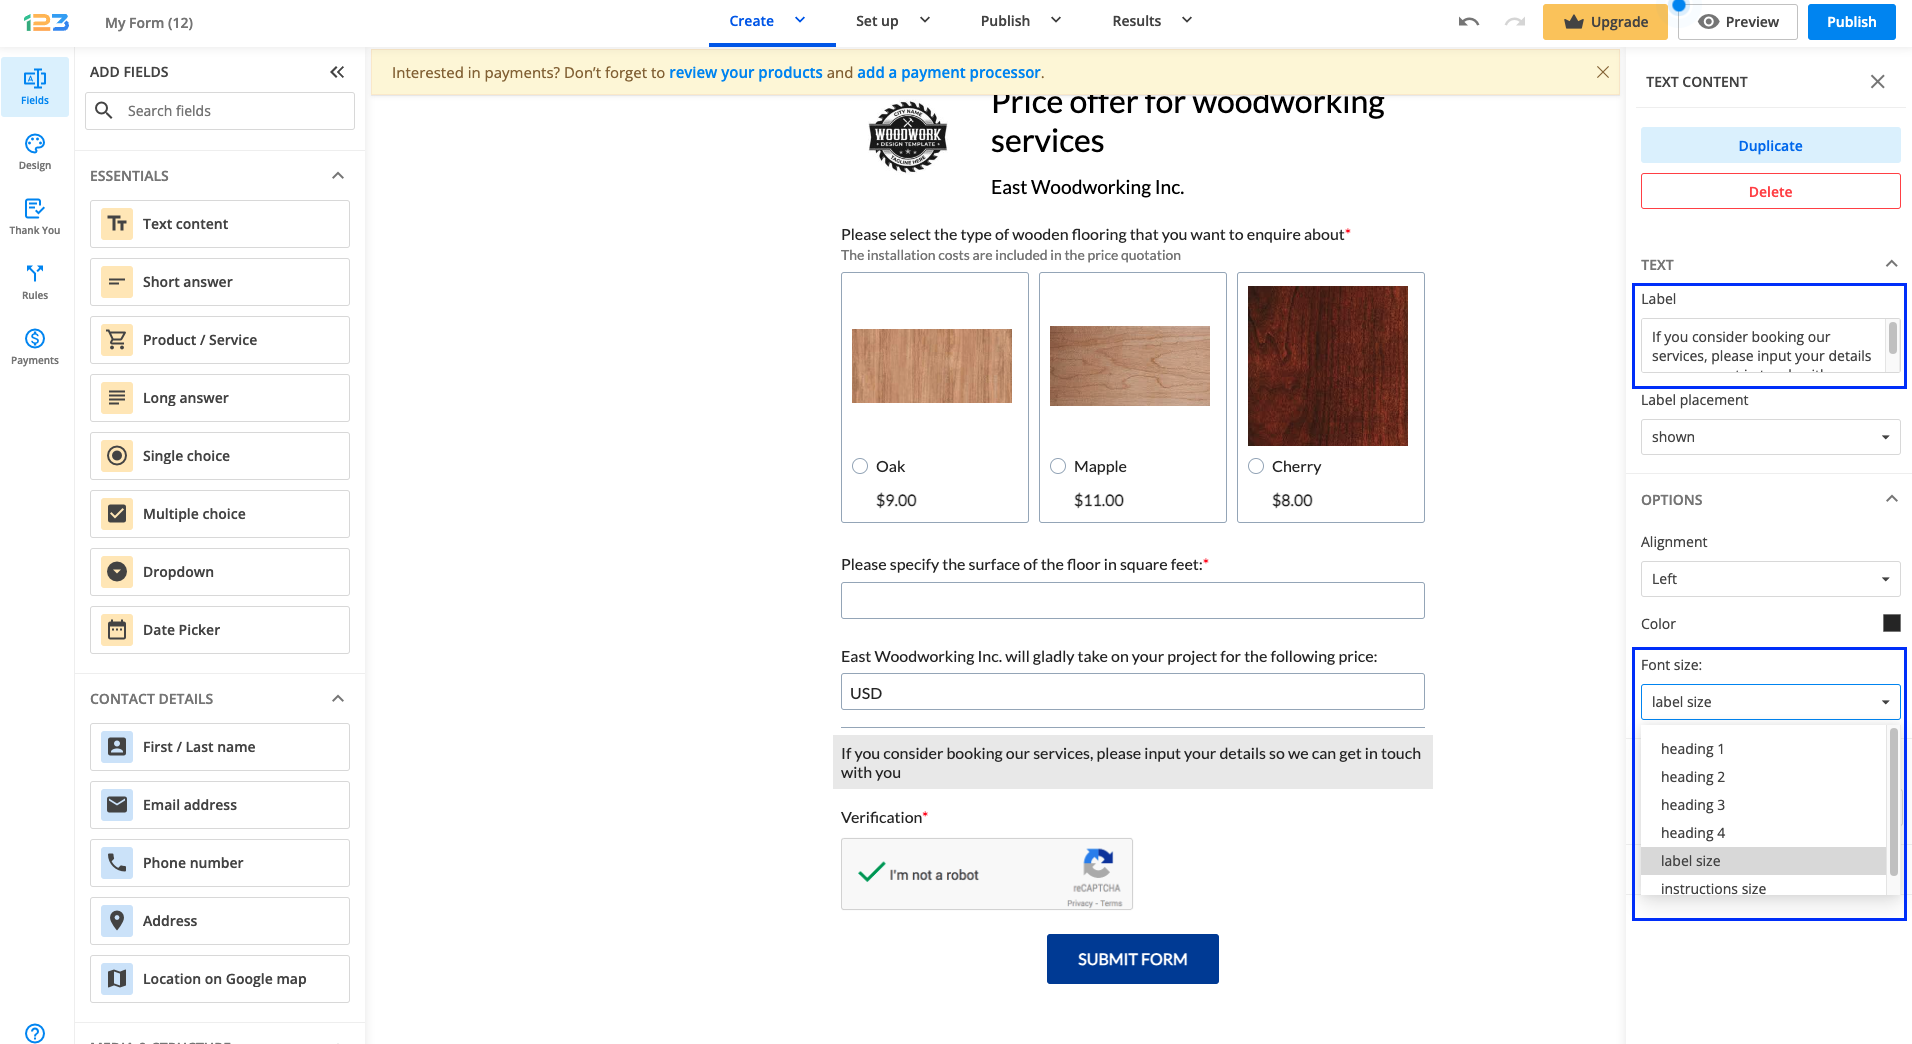
A Text field can be added to the form where respondents are informed why John is asking for contact information, with the text: ” If you consider booking our services, please input your details so we can get in touch with you”. The label size can be changed so that it looks like the rest of the form.
Next step would be to add appropriate fields for collecting contact information, such as First/Last name, Email address and Phone number and also make them all required.

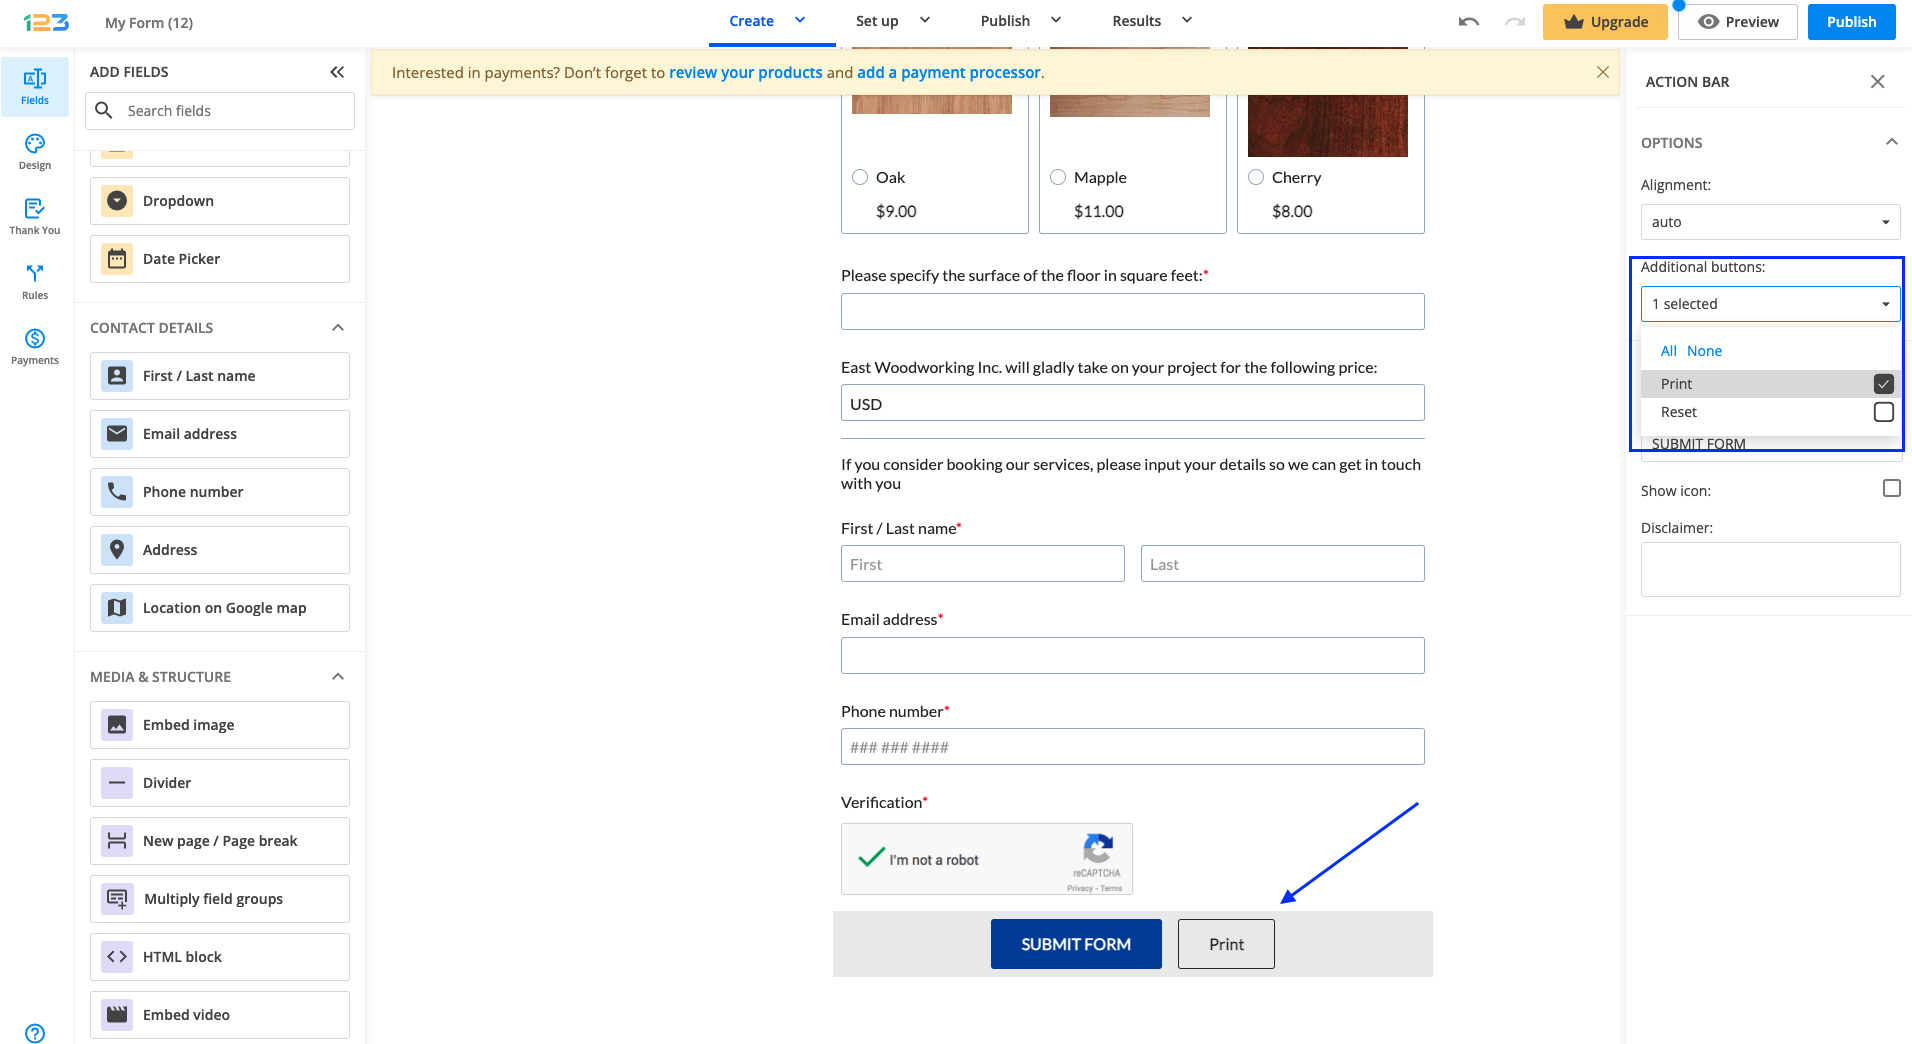
If John wants to offer his respondents the option to print the form, this can be done by clicking on the Submit button and adding an additional Print button.
The pricing information can be presented as part of the Thank you message. In this case, the Formula field has to be hidden on the form. This can be done by clicking on the Formula field and checking Hide field. Once this is enabled, the Formula field will be greyed out on the form.
Going further, to modify the Thank you page, John has to navigate to Set up section and Thank you page.
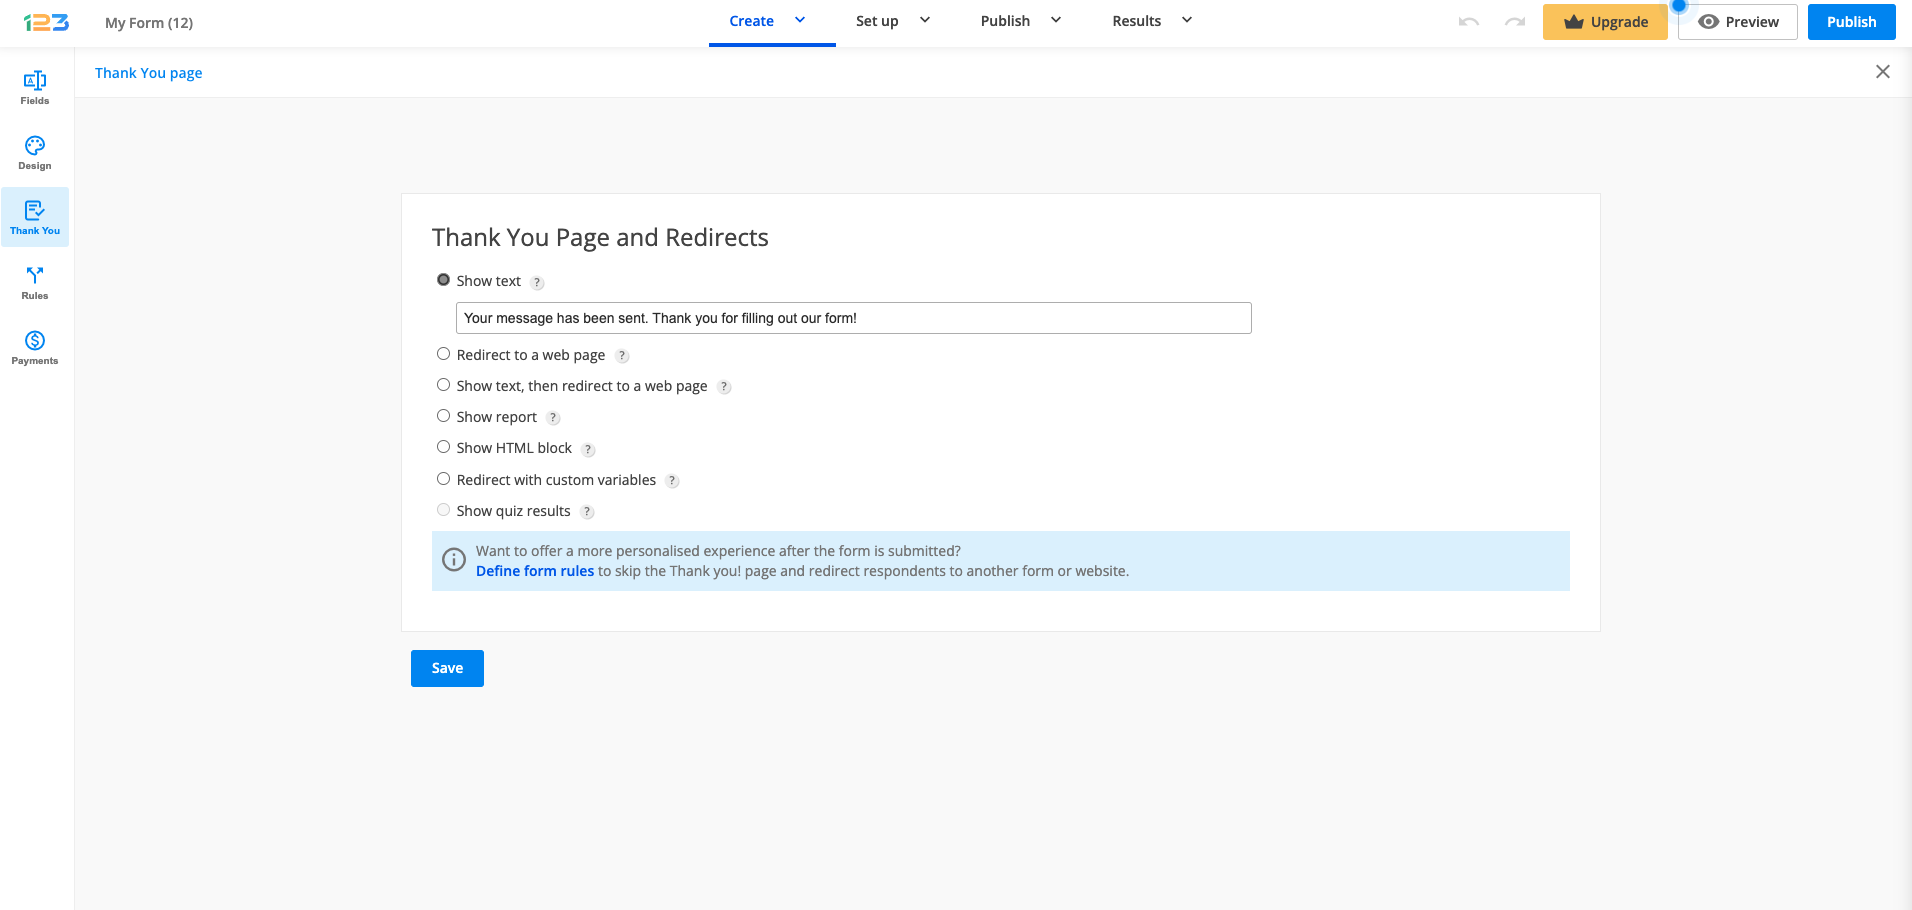
John has to select the option Show HTML block and then using the dropdown menu, select the field from the form and add it to the Thank you message by clicking on Add button.
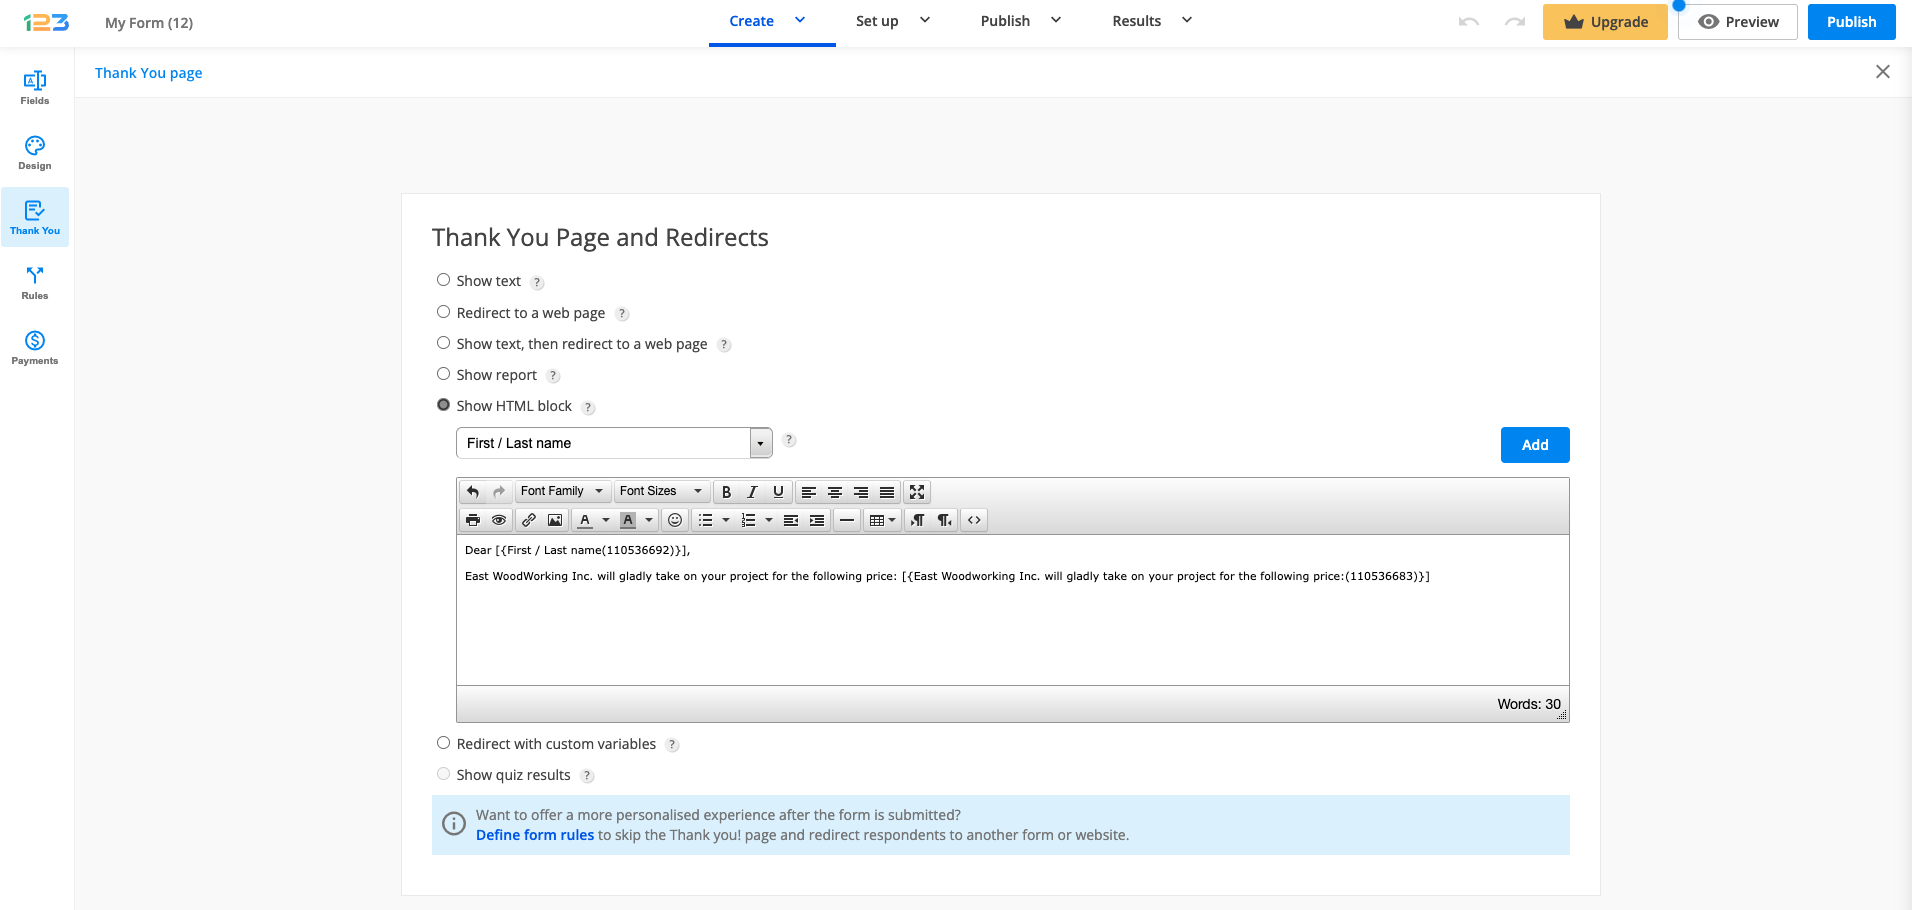
If John wants to see how everything turned out, he can always use Preview and make a test submission.
Related articles:
When setting up an Attachment object mapping, you have the option to map which PDF template to send to Salesforce.
Let’s take it step by step.
If you have no object mapping created, all you have to do is click on Add primary object.
You have to look for Attachment in the Salesforce object dropdown.
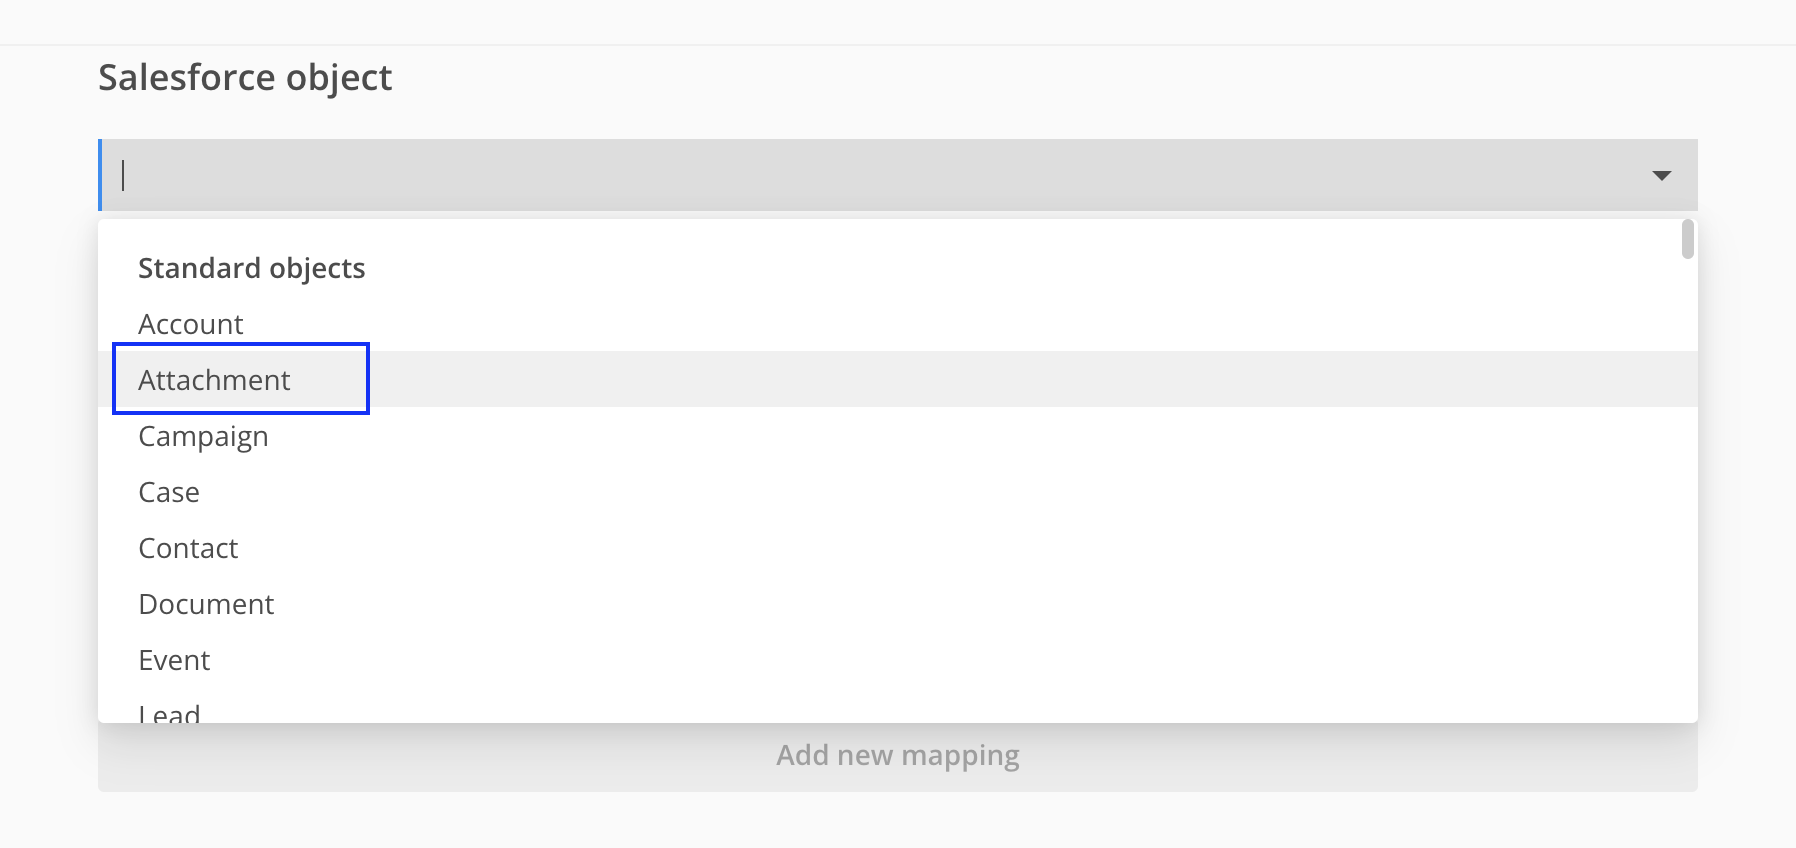
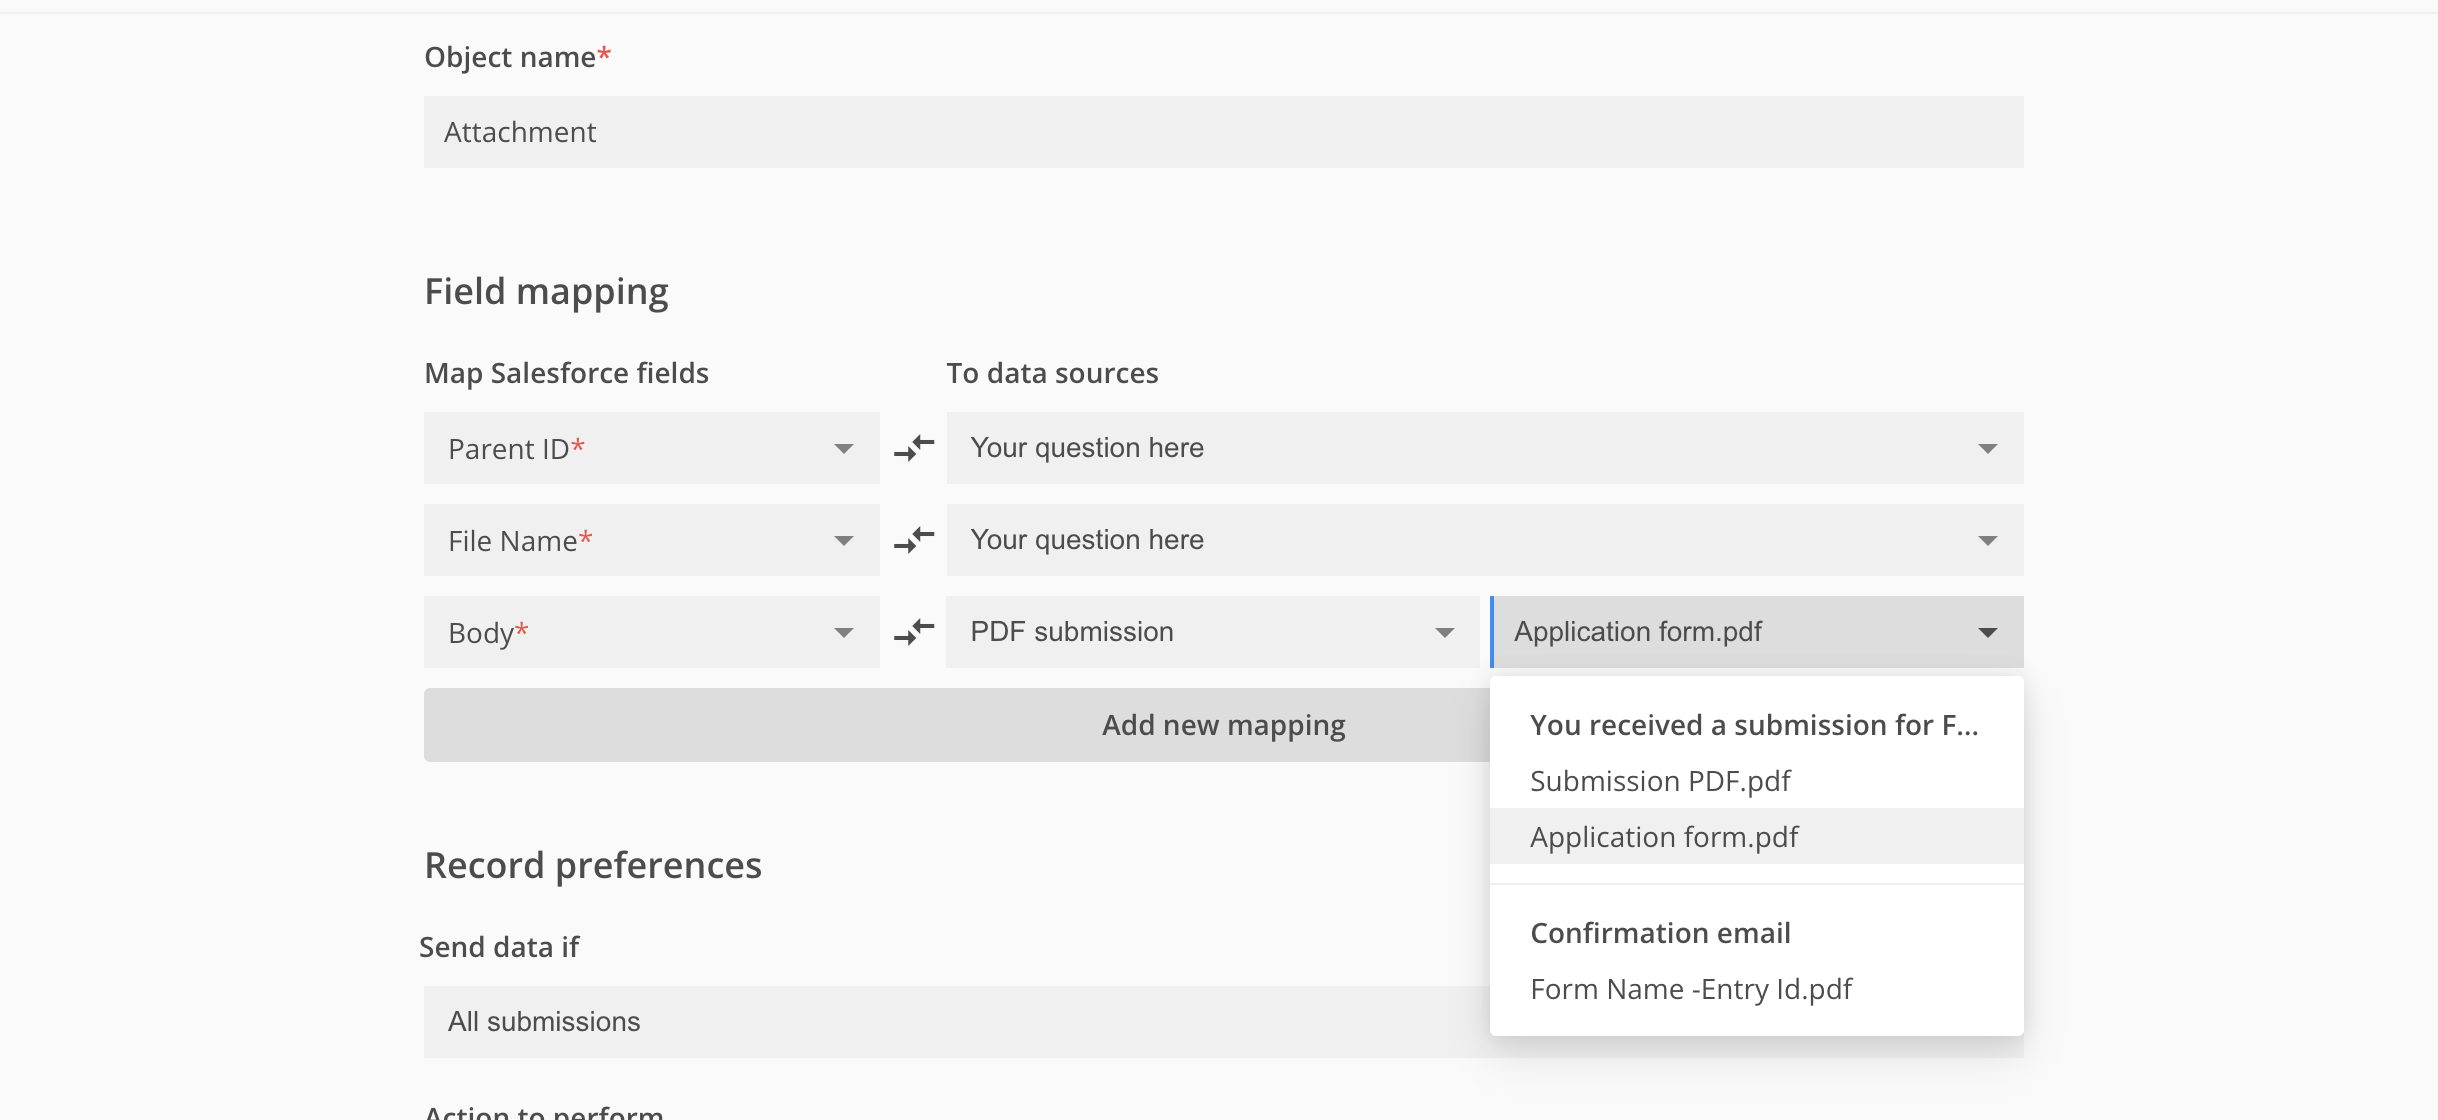
Once selected, the rest of the fields will be automatically preselected based on the Salesforce object: Parent ID, File name & Body.
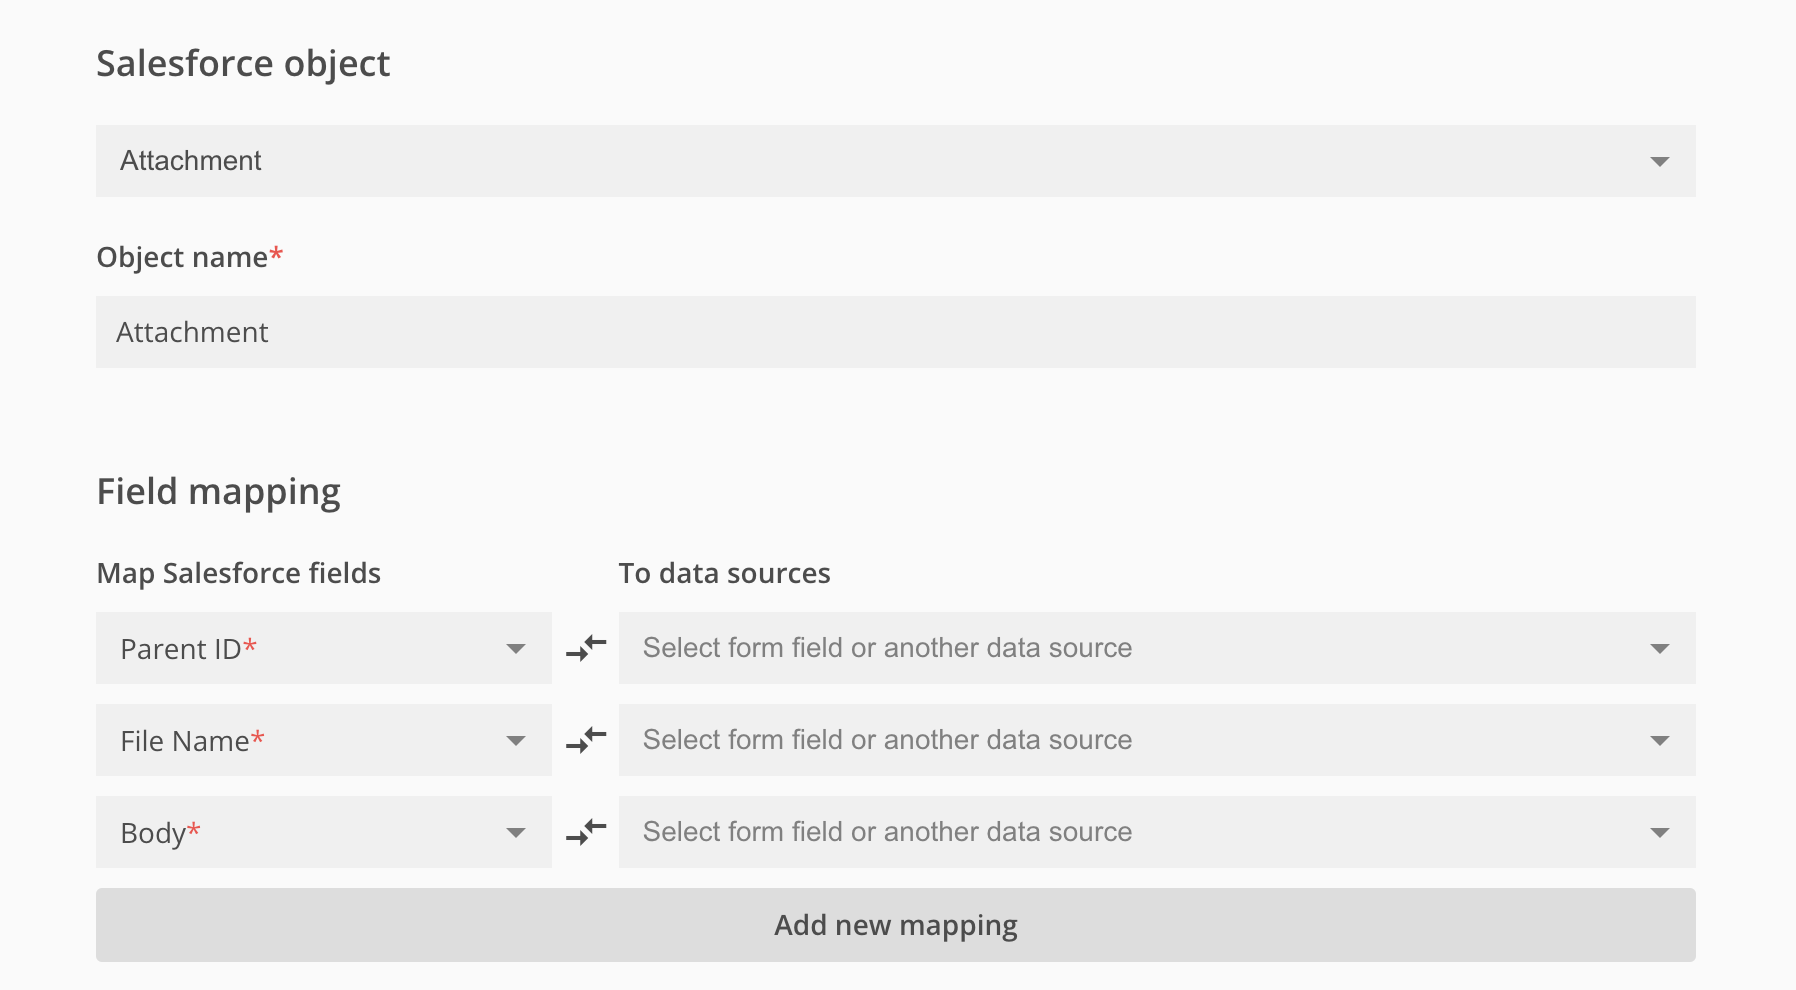
For the Body Salesforce field, you have several options to choose from: Custom value, Lookup result, PDF submission, Query result and Lookup relationship. In this article, we are going to focus on PDF submission.
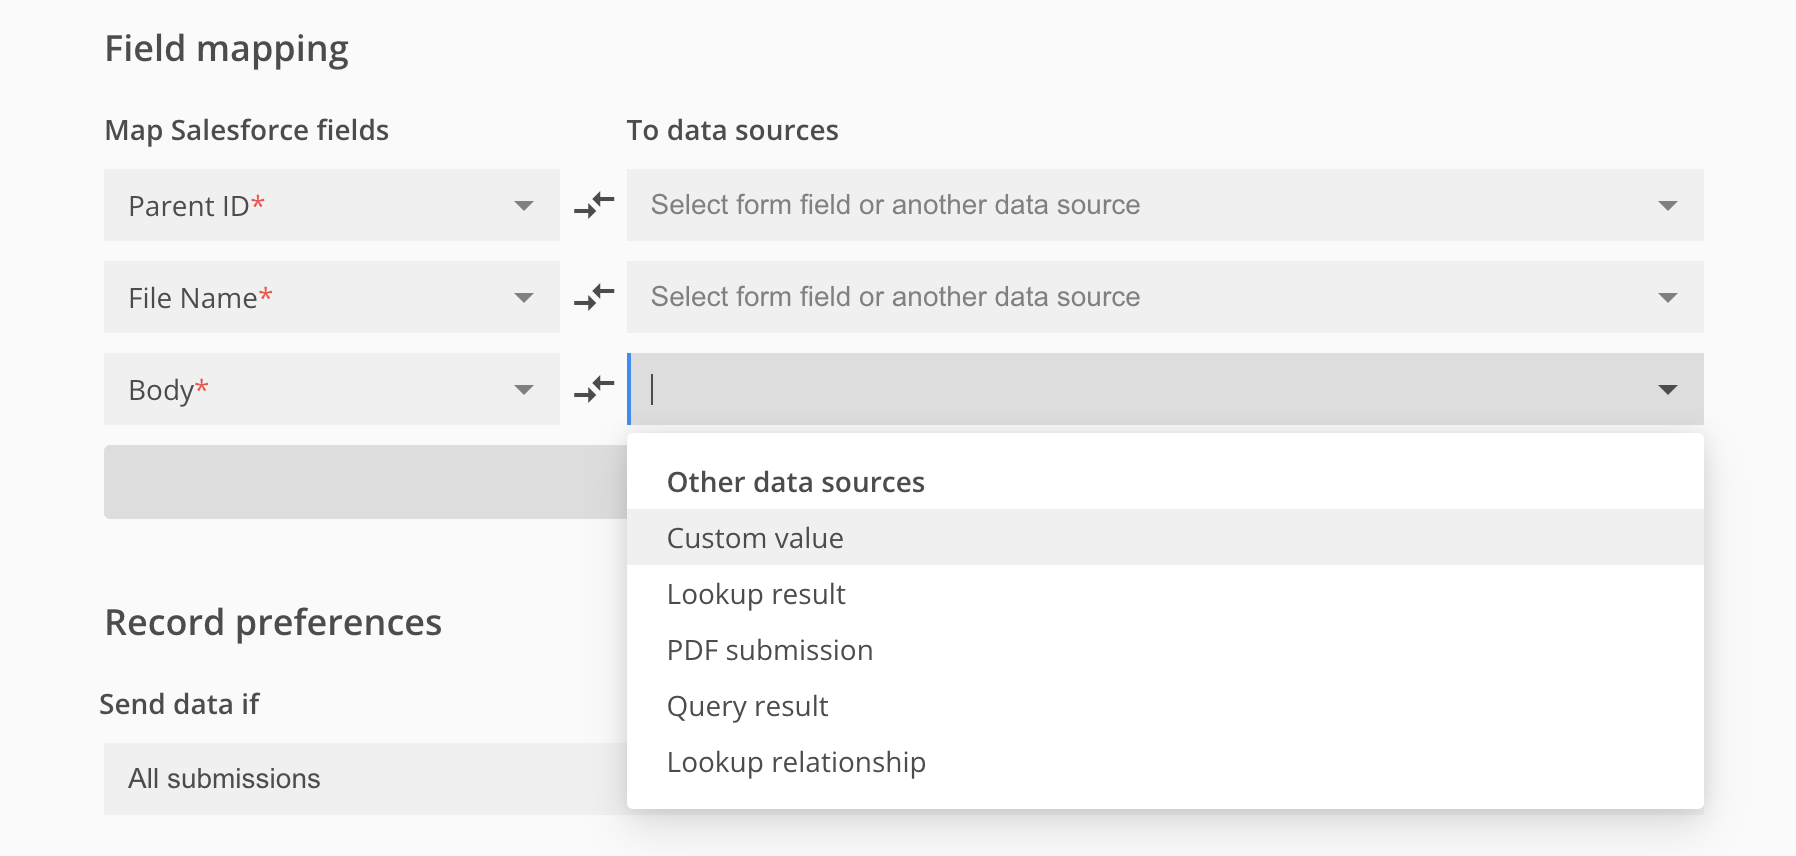
If you want to map Body Salesforce field to a PDF submission, you will have to have an email notification set up with a PDF attached to it. Otherwise, there will be no option to choose from.
For this article, we have set up an Application form that has an email notification created, with 2 PDFs attached to it: the standard PDF and the form layout PDF.
When going back to set up the Attachment object, for the Body field – PDF submission, you have an additional dropdown, with the text Select a PDF template. Once clicked, it will open up all the email notifications that you have created on the form with the PDFs that are attached to it.
For example, in our scenario, we have an email notification with the subject “You received a submission for Application form” with 2 PDFs attached to it: Submission PDF and Application form. In this case, when opening the “Select a PDF template dropdown”, you will be able to see each email notification with its subject in order to be easily identifiable and every PDF that is attached to that email notification.
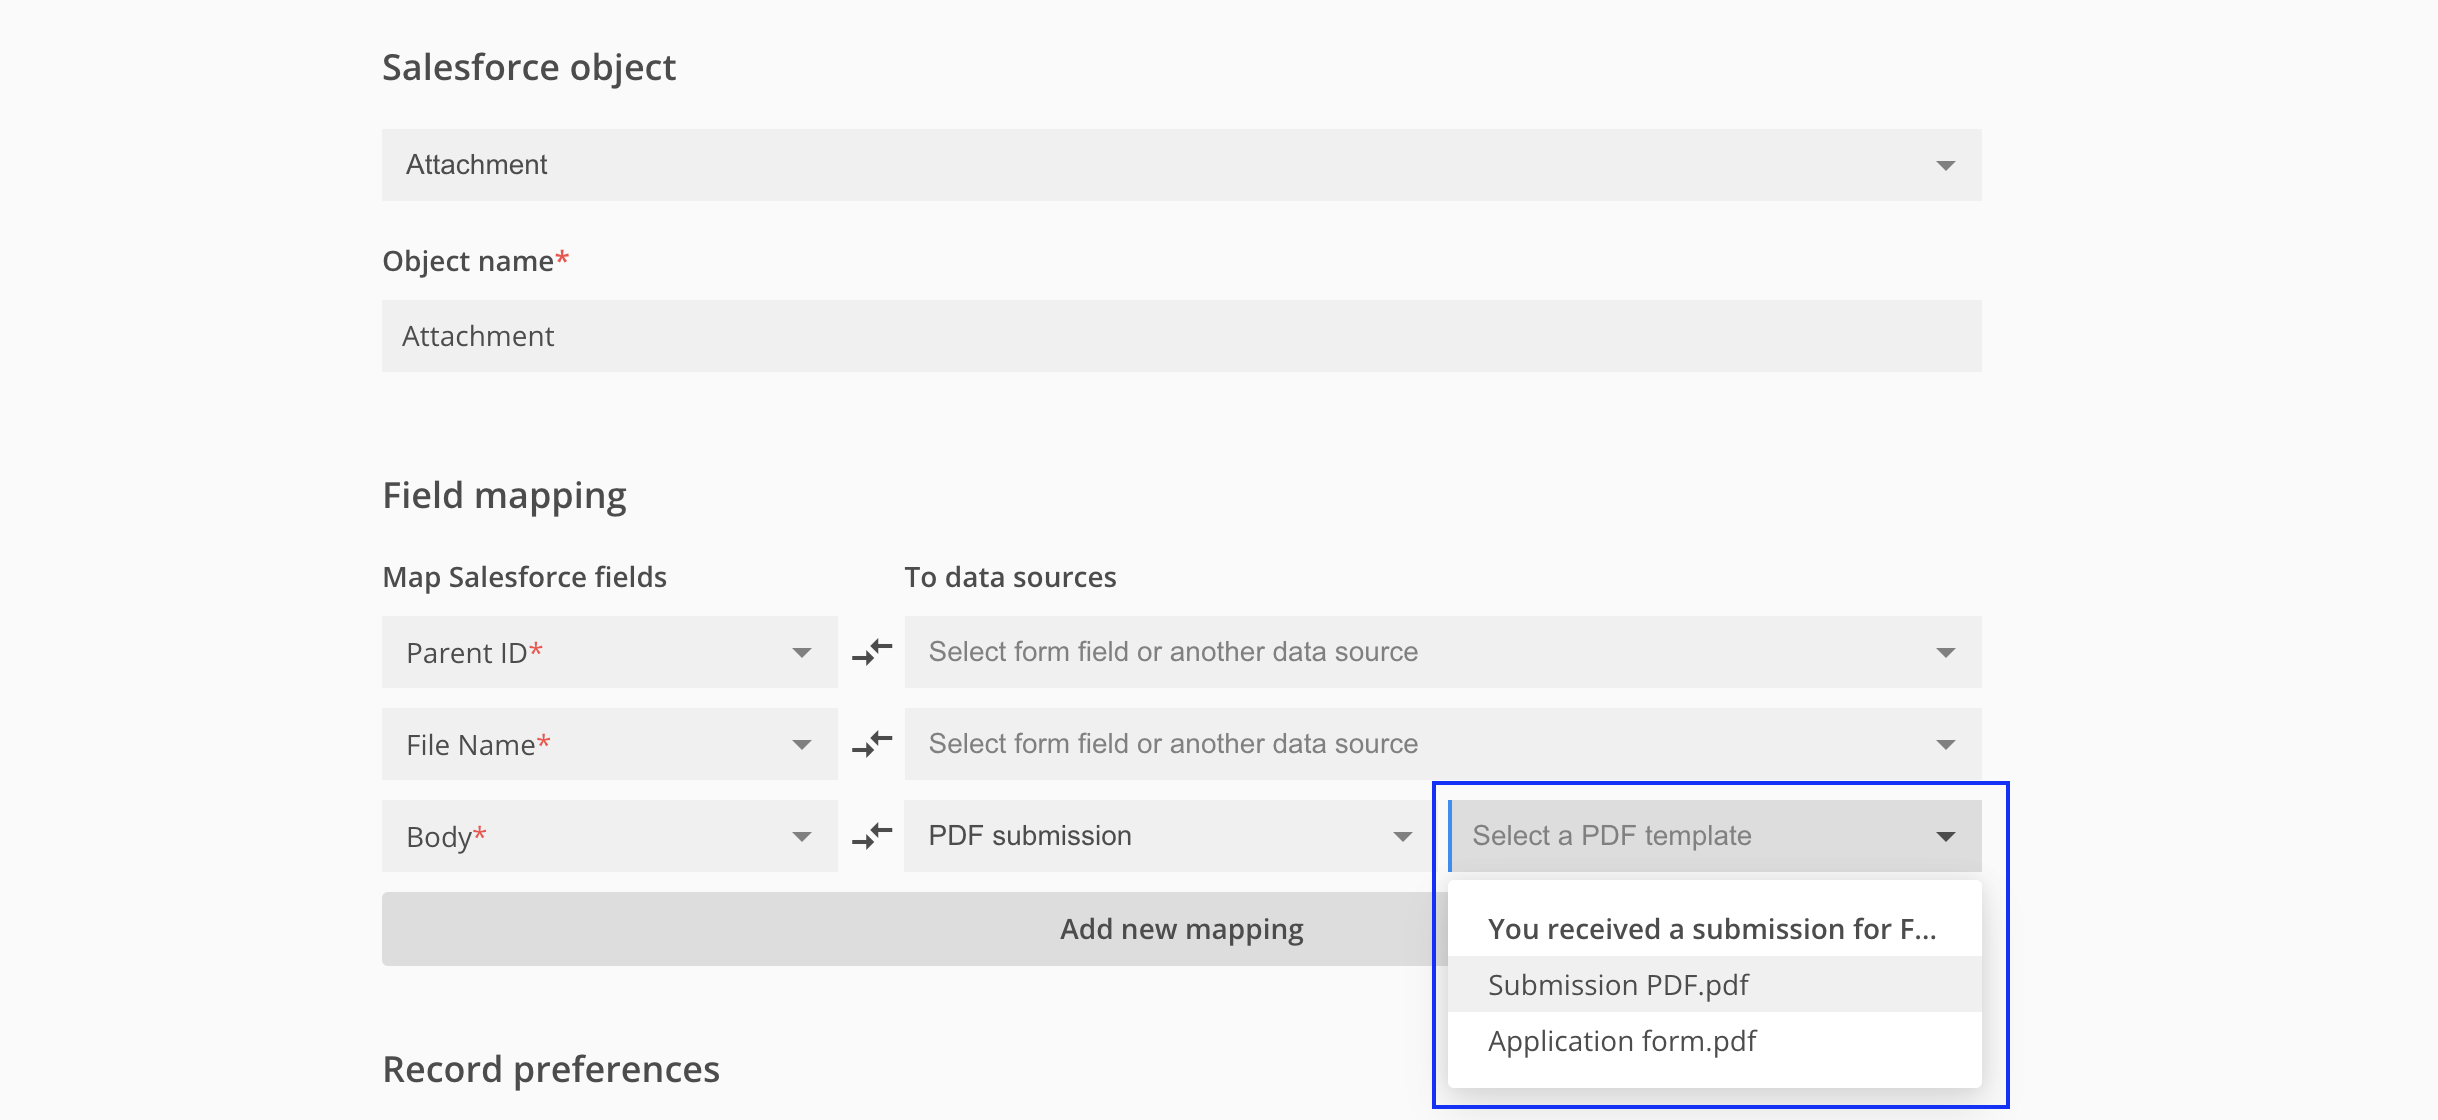
If you have more than one email notification with PDF attachments to it, you will be able to identify which PDF you want to map as each email notification will appear with its subject (You received a submission… or Confirmation email, in our scenario), together with the PDFs that are attached to each email notification.
Salesforce objects and related objects can be easily duplicated by clicking on the dotted menu for the object or related object that you are interested in duplicating.
You will notice four possible options: Edit, Duplicate, Delete and Add related object.

In this article, we are going to talk about the Duplicate functionality.
The duplicate functionality is really easy to use. All you have to do is to go to the dotted menu of the object or related object you are interested in duplicating and click on Duplicate.
There are two scenarios that you have to take into consideration.
Duplicating a primary object
When duplicating a primary object, the new primary object created will take all the settings of the duplicated one and it will be placed at the end of the list of object mapping instances. The name of the new primary object will follow a standard naming, Copy of + name of the duplicated primary object.
Duplicating a related object
When duplicating a related object, the new related object created will take all the settings of the duplicated one and it will be placed at the end of the list of the related objects of the same primary object. The name of the new related object will follow a standard naming, Copy of + name of the duplicated related object.
You can always change the name of the primary or related object. For more info, you can check out the article on how to name an object mapping instance.
Related articles
We’ve made it easier for you to name any object mapping instance or related object. Whenever a new object mapping instance is created, you will have the option of naming that object mapping. In this way, it would be easier for you to identify a certain object mapping in the mapping list.
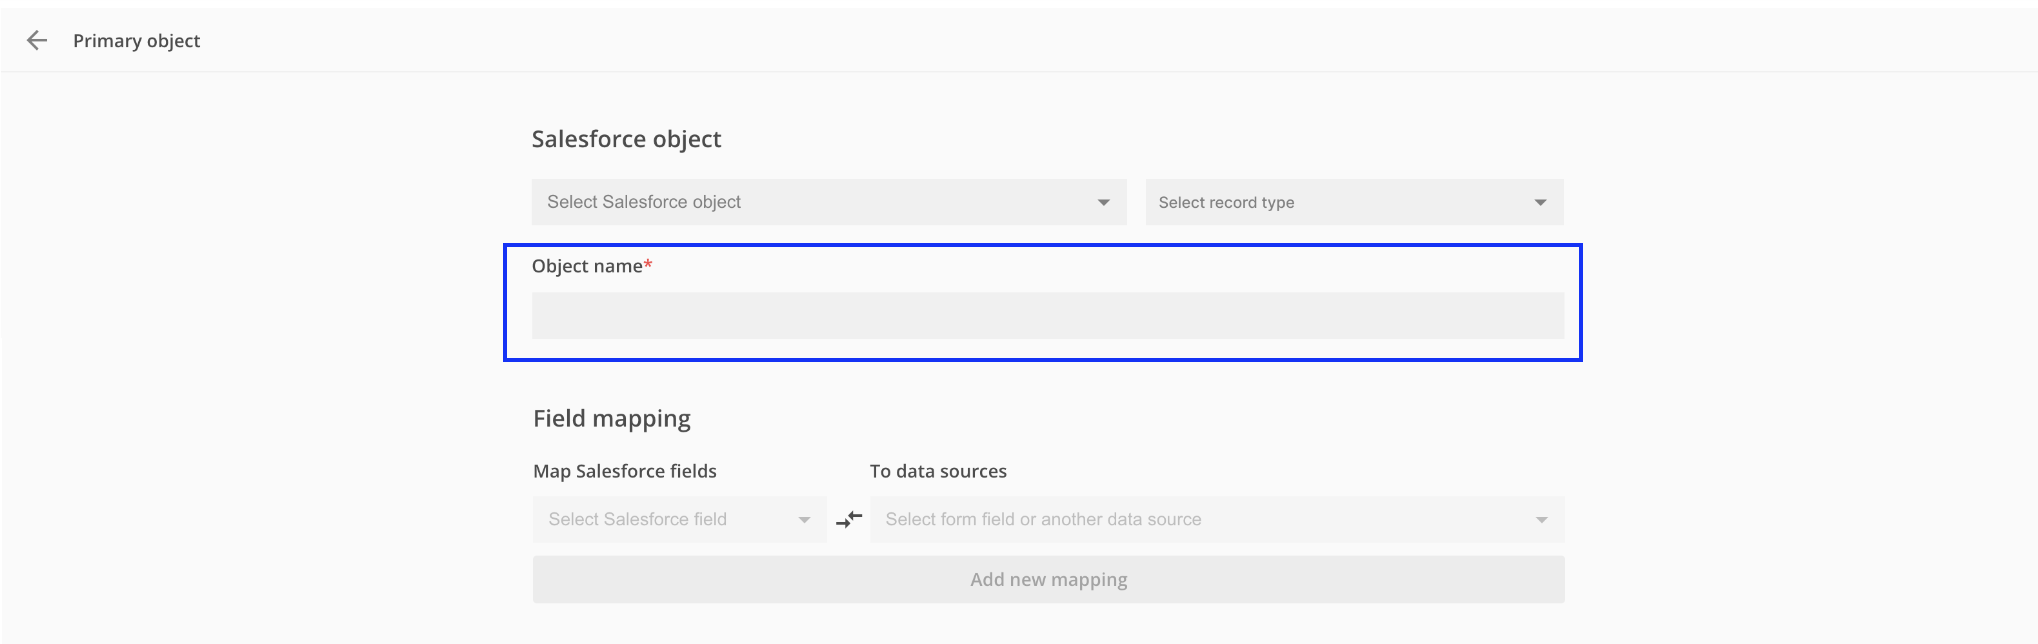
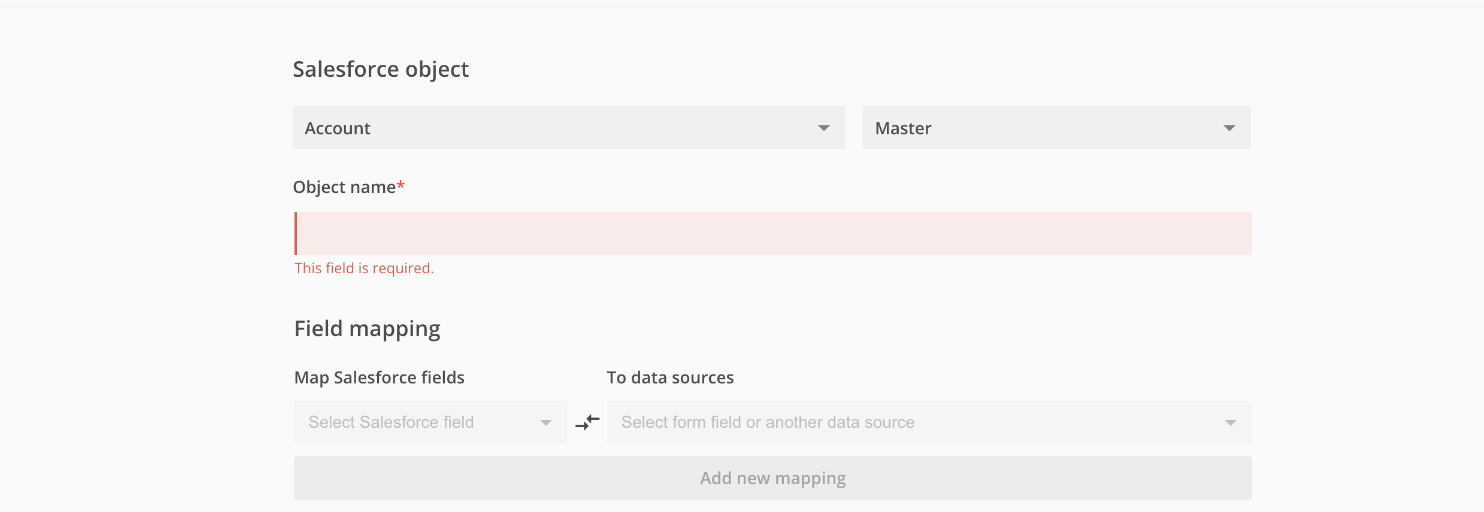
After choosing the Salesforce object and the record type (where applicable), the Object name will automatically populate based on these two choices. For example, if you are creating an Account object with the Master record type, the Object name will automatically be Account – Master.
The Object name field is editable, so you can easily change the name as you wish. If no name is provided and you are trying to save the object mapping, you will receive an error as below:
If you decide to name the Object mapping instance before choosing a Salesforce object and a record type (where applicable), the name you have provided will not automatically change. For example, let’s say you are naming an object mapping as Object mapping 1 and then choose Account as a Salesforce object and Master as a record type. The Object name will not be changed from Object mapping 1 to the default naming of Account – Master (in this specific example), but we will keep the naming provided by you.
There are 2 scenarios that are worth mentioning related to the Object mapping name
1. You have created an object mapping instance and have left the default name, applied all the necessary settings and saved the object mapping instance. When coming back to it to edit the Salesforce object and/or the record type, the default Object mapping name will be automatically modified so it would reflect the correct Salesforce object and/or record type.
2 You have created an object mapping instance and have provided an Object name (thus modifying the default one), applied all the necessary settings and saved the object mapping instance. When coming back to it to edit the Salesforce object and/or the record type, the Object mapping name will not be automatically modified to reflect the new Salesforce object and/or record type, as we do not want to modify your input. Do not forget that the Object name field is editable, so you can modify the naming as you wish.
Related articles:
If you need to automate your data collection processes, and retrieve collected data or perform various tasks related to your 123FormBuilder account without manual work, you can also achieve this through our public API.
Please take a look at the attached documentation to find out more about the authentication flow, available endpoints & operations.
Related pages
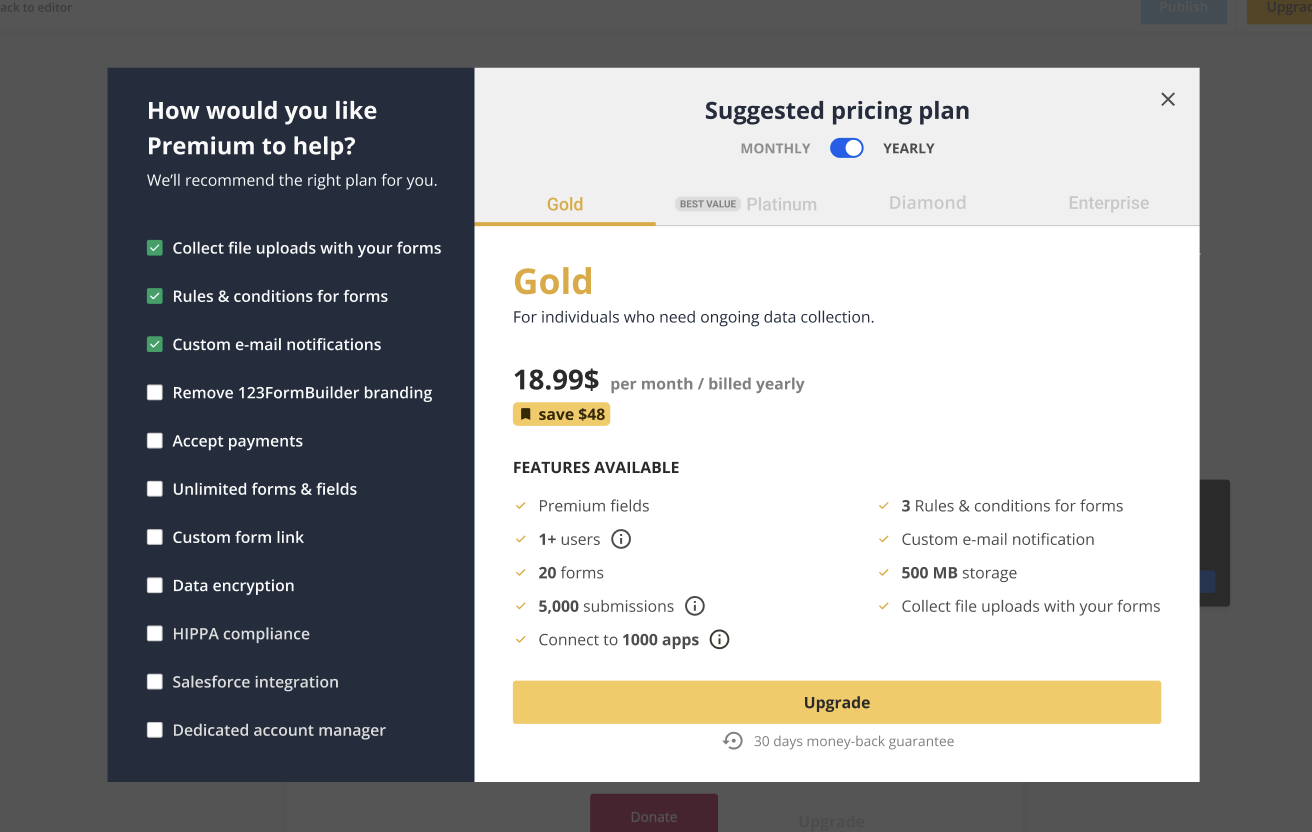
123FormBuilder is a user-friendly web form & survey builder for any type of business. There are four standard plans to choose from: Basic, Gold, Platinum, and Diamond. Here is our Features Matrix with all the details.
Let’s look into the features available on the Basic free plan.
Account Features
- You can create 5 forms within your account.
- On your forms, you can add 10 fields.
- 100 submissions per month on your account. The submission limit is reset on the first day of each month.
- Create a connection path between your 123FormBuilder account and other services to execute certain operations. With the Basic free plan, you have available 100 API calls per day.
- Create 1 custom report. Apply custom filters to your report.
- Connect to multiple Wix sites.
- Live Chat Support.
Form Configuration
- Add up to 1 email recipient.
- 1 default email notification template.
- Add up to 3 Likert Scale statements.
- Multiple publishing methods available.
- Track the form’s activity by adding your Google Analytics Profile ID and domain.
- Create an anti-spam form by adding our security options. You can protect your Inbox from spam by using Captcha verification images, limiting form submissions from the same IP to one per day, rejecting submissions coming from specific countries, and even limit the total number of submissions.
- Overview of the default report, which contains all form fields, shown in pie charts, in the order that they appear in your form.
- Add custom scripts on the form and on the Thank You Page.
- Advanced features such as: save for later, edit submission, and preview submission.
- Custom Thank You Page.
Third Party Applications
If you do not find what you are looking for with the Free plan, you can always select the features you are interested in from the left side panel and we will recommend the right plan for you.
Related articles
We know it’s important for you to have an interactive and easy-to-fill-out form, so we have one of the coolest features: Button-like choices.
For any Single or Multiple choice field, you can customize the choices to look like clickable buttons as easily as 123!
By default, any Single or Multiple choice field will have this option enabled, but you can always disable it if you don’t feel this layout fits your form. All you have to do is to go to Layout → Type and select the Text layout type. If you’ll be adding images to your choices, then the Layout type will switch to Card.

To give your choices a true button-like feel, disable the Show selector toggle to remove the radio buttons or checkboxes from your options. When the selector is removed, your buttons will inherit the properties from the Design → Fields → Field hover & Field focus sections.

You can also change the number of columns. Below the Layout types, you can find the No. of columns dropdown where you decide how you want to display your choices: under 1/2/3/4 columns.

Related articles
What is Insights section?
With our Insights section, you can now review relevant analytics related to your form. Insights section is meant to help you get more information on the performance of your form, making it easier for you to assess if the form needs to have some changes in order to be more successful.
How do I get to Insights section?
If you are in My Forms, you can easily navigate to Insights section by hovering over the form you are interested in and clicking on Results. Let’s say you are in Editor -> the same applies, by clicking on Results you will be redirected to Insights section.
From the Insights page, you can check your Submissions or Reports, so you have all the collected data in one place.
What does it offer?
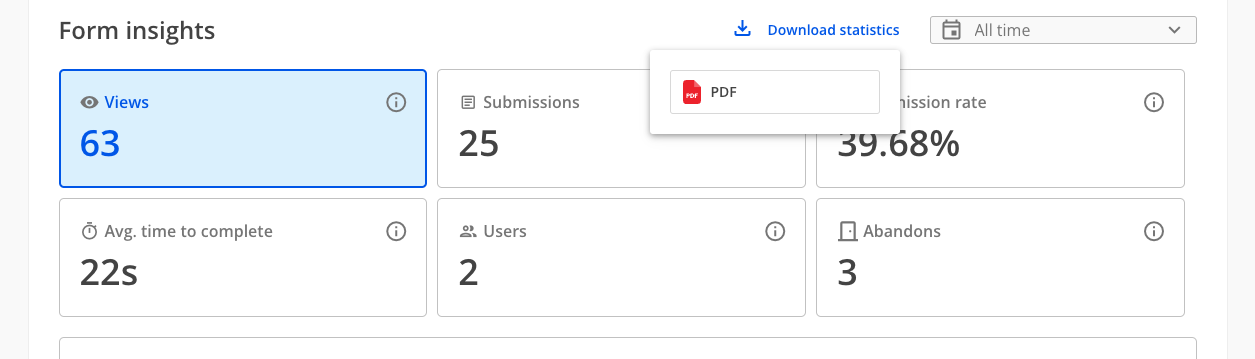
Form insights
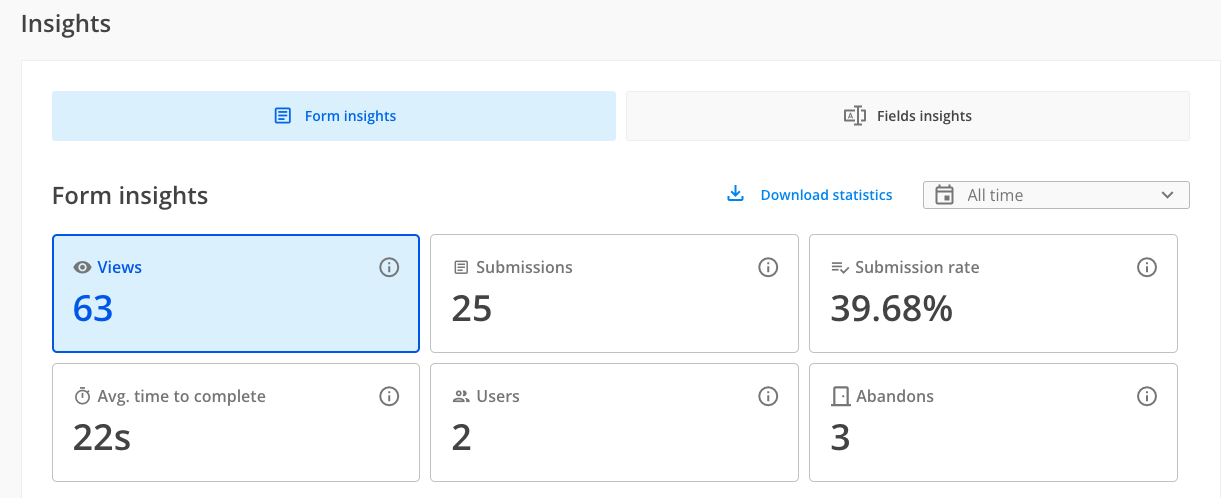
Views: this represents the number of views your form has registered. Please keep in mind that this registers all views, not unique ones.
Submissions: this represents the number of submissions your form has collected.
Submission rate: this is calculated taking into consideration the total number of submissions and the total number of views.
Average time to complete: this takes into consideration how much time it took your respondents to complete the form, displaying an average of all submissions.
Users: this represents the number of respondents who interacted with at least one field from your form
Abandons: this represents the number of respondents who interacted with at least one field from your form, but did not submit the form
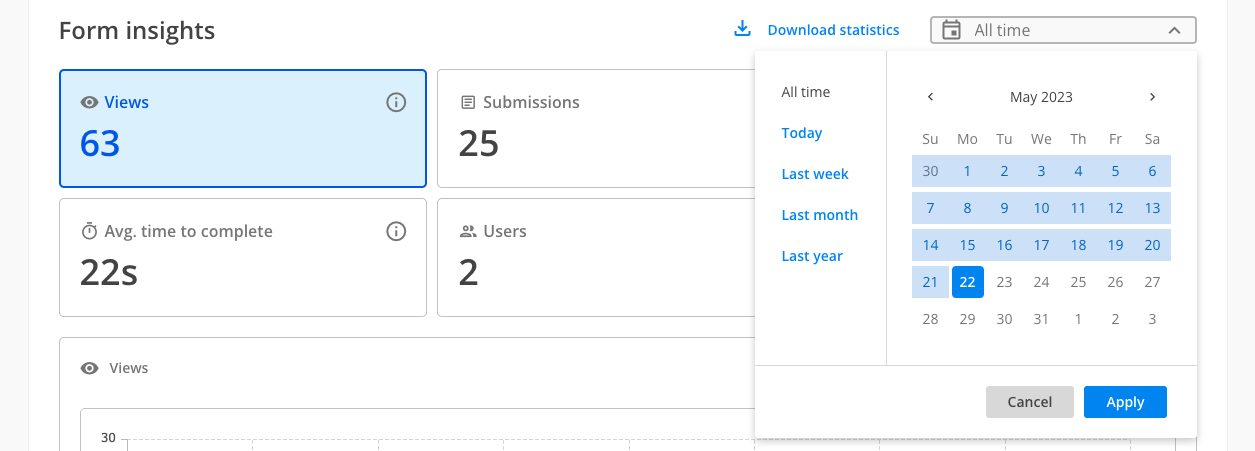
By using the date picker, you can select the time frame you are interested in. We are offering predefined timeframes, such as Last week, Last month, Last year.
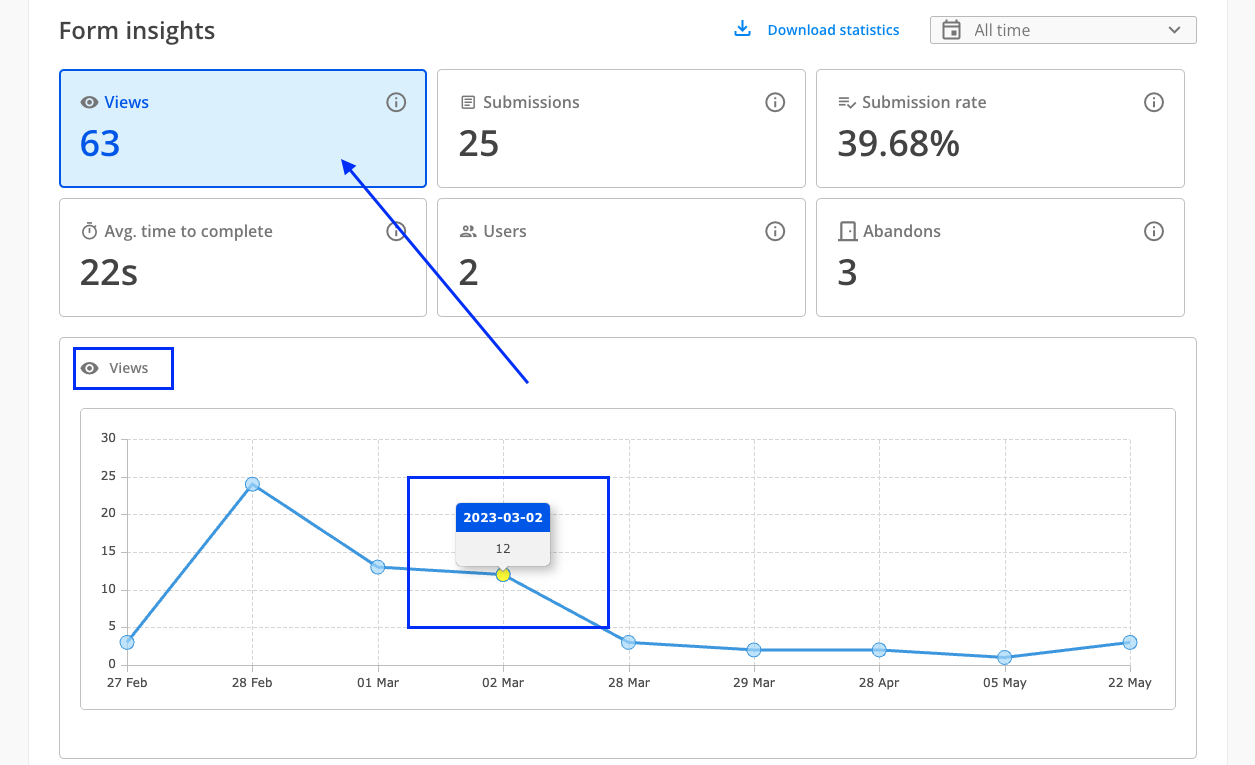
Form insights charts
Below the form stats, for an easier visualisation, Insights section offers charts for each type of form stat. By clicking on each Form insights card one by one, the chart will display the data for the selected card on a chart.
When hovering over the bullet points on charts, you can easily see the date and the form stat data.
Download statistics
If you are interested in quickly sharing the stats of your form with somebody else, you can use the Download statistics feature. Once clicked, it will open up a dropdown from where you can select PDF format. A PDF will automatically download within browser with a snapshot with your current filters that are applied on Form Insights.
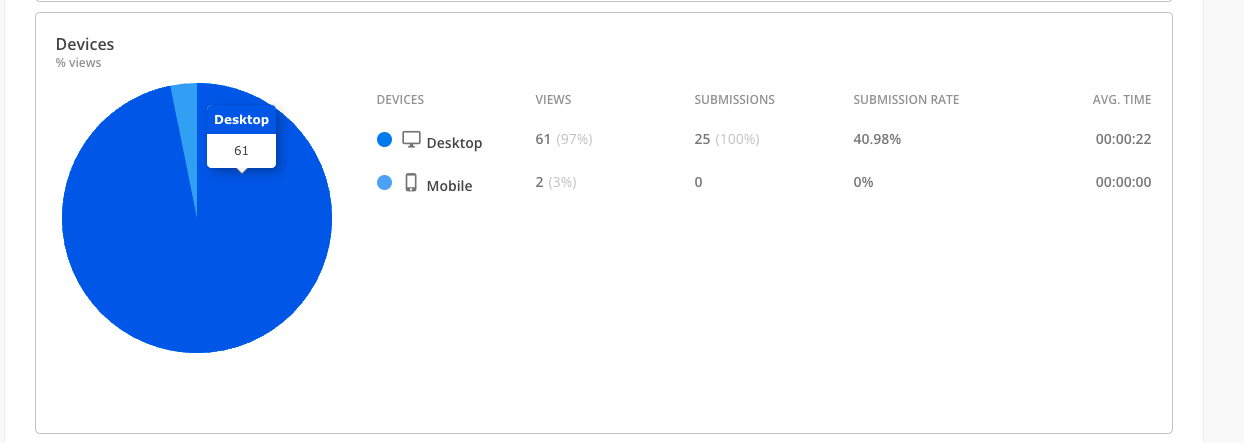
Devices, Referrer, Location
Based on the card selection, below Insights charts, we are displaying information related to the devices your respondents have viewed and submitted the form from, the referrers that have led them to your form and the location from which they have viewed & submitted the form from.
Device card
In the below example, the Views card has been selected in Insights. As such, the Devices card shows the information for views. For example, from Desktop, our form has registered 61 views (97% of total number of views registered on the form) and from Mobile we have 2 views (3% out of total number of views registered on the form). Also, you can hover on the pie chart to see exactly each slice data.
The entries are displayed in descending order based on the card’s selection (in this case, based on Views).
Referrer card
Following the above example, our form has registered 3 different referrers that are placed in descending order based on the card selection (in our example, the Views card is selected). When hovering over the pie slice, you have the value for each referrer.
Note: if we can not detect a specific referrer (e.g: the form has been accessed/completed directly from the form link), then we are using the No referrer terminology. This is only one example and not limited to this scenario only.

Location card
Following the above example, our form has registered 3 different locations that are placed in descending order based on the card selection (in our example, the Views card is selected). When hovering over the map, we can see the country name and the data that belongs to it.
Note: if we can not detect the country from which the form has been viewed/submitted, the Country will be displayed as ZZ in the location table info.
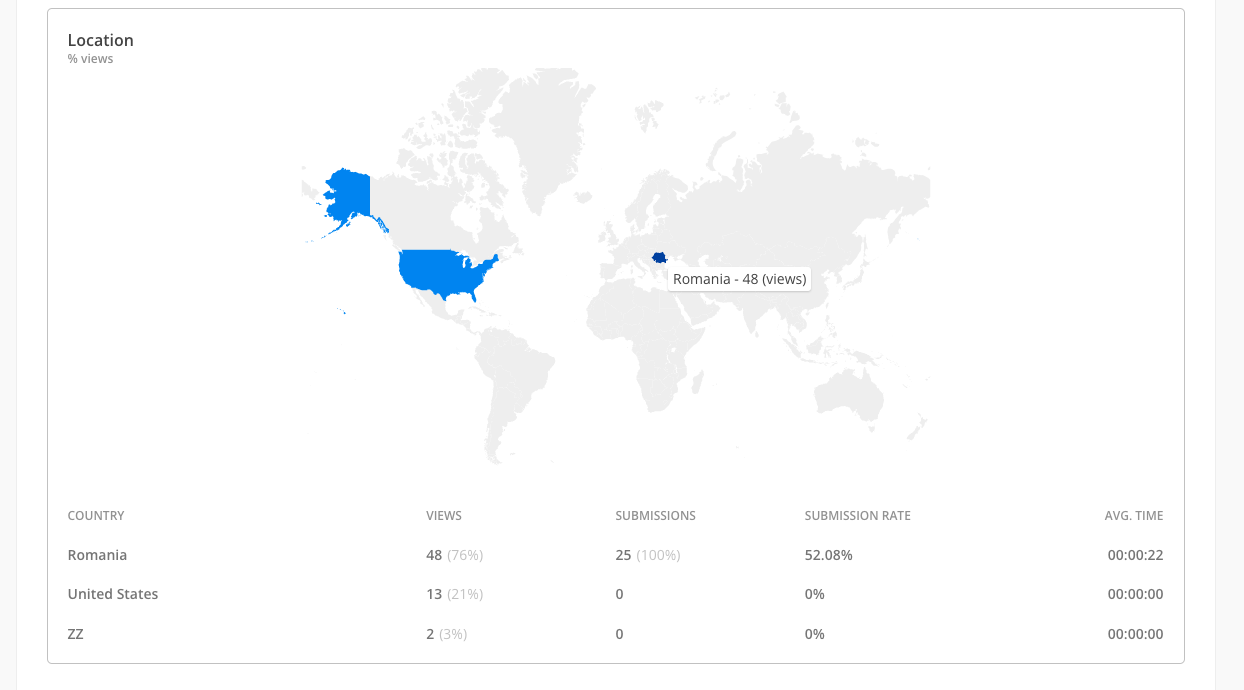
Note: currently, we are offering the device, location & referrer information only for Views, Submissions, Submission rate & Avg time.
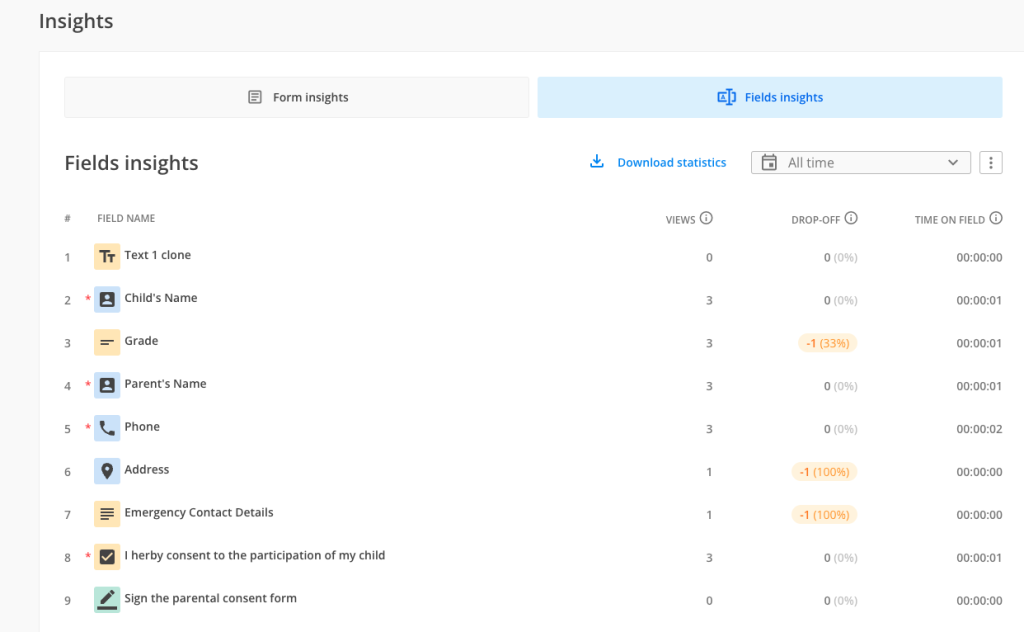
Fields insights
Fields insights section offers you in-depth form analytics. Here you have access to the performance of each question that is currently on your form. For more details on how it works and how to interpret the data, please check this article.
How does it help me?
Let’s say you have created your form and shared it with your respondents, but no submission is coming through. By using the Insights section, you can now check if your respondents have viewed your form or not so you can take action by following-up with them.
If your form has gathered a lot of views, but no submissions, maybe there is something that is stopping respondents from submitting the form.
Having a high average time to complete the form could be a warning for you: respondents might abandon submitting your form because it takes too long to be completed.
The number of users that interact with your form is quite important, as when compared with the total number of views, it tells you how appealing the form is, how much your respondents interact with it or only look at it and abandon submitting it. The number of abandons tells you that your respondents have interacted with your form, but something has prevented them from submitting it – either there is a problem with the form itself (wrong validations, Submit button not being displayed correctly, various reasons and scenarios) or your respondents have a different reason why they do not want to submit their information (here each case needs to be treated independently as it may vary from form to form).
By paying attention to all these details, you can improve your form so you can have as many submissions as possible and get value out of it.
Release dates
On EU server, Insights section is available for forms created after 9th of November 2022.
Forms created before the above dates will have incomplete data, starting from the release date until the present day.
Importing submissions
Related articles:
Most Popular
Frequently Asked Questions
Here is a list of the most frequently asked questions. For more FAQs, please browse through the FAQs page.