123FormBuilder Knowledge Base
Search our documentation platform for answers, service specifications and 3rd-party integrations.
Knowledge Base
This happens when you access the download link from a different browser than the one in which you are logged in to your form builder account on 123FormBuilder.com.
For example, let’s say that you normally use browser A when working with your forms. But browser B is set as default for opening email links. The download link will not work, because it will open up in browser B, whilst you are authenticated on your 123FormBuilder account in browser A.
Therefore, make sure that you are logged in to your 123FormBuilder account in the same browser in which the download link opens.
Related articles
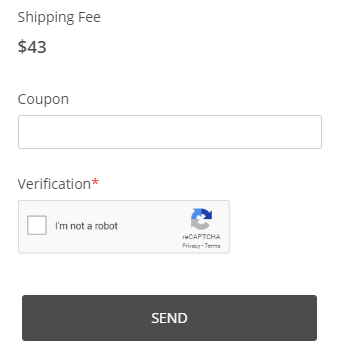
In some browsers, the verification code, even if typed correctly, is not accepted. To solve this, make sure that cookies are enabled in your browser. If they’re not, enable them. Type in the verification code again and submit the form. If cookies were already enabled in your browser, delete them (Clear cookies), type in the verification number, and submit the form.
To avoid cookies completely, set the Captcha protection to No Captcha and protect the form by limiting the number of submissions received from an IP address to 1 or 2 per day. This way, your form will not be spammed and the verification image will not be required anymore.
123FormBuilder comes equipped with a wide range of features for creating powerful forms and is the go-to solution if you want to generate leads, capture complex data, and automate workflows.
In this article, you will learn how easily you can incorporate Google Calendar invites in your email notifications.
Let’s get started. Follow these simple steps:
1. Export your Google calendar
Open up your Google Calendar in your web browser.
Next, select your calendar, click on Calendar Settings, and hit the Export calendar button.
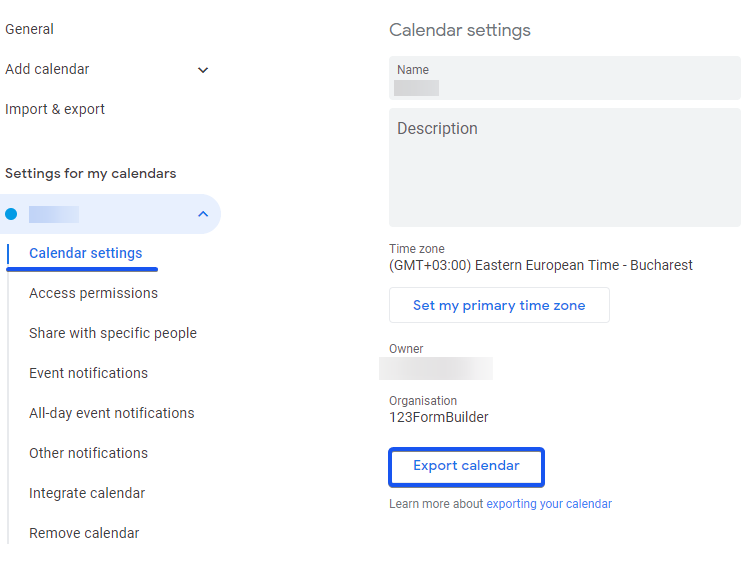
In the new pop-up window choose the location where you want to download the zip file of your calendar.
Extract the ZIP file downloaded on your device.
2. Incorporate calendar files into emails
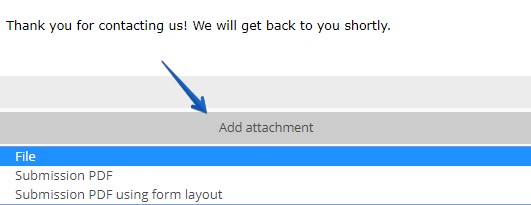
Head over to Emails on your form to edit your email template.
At the end of the template, you will see the option called Add attachment. From the dropdown list select File and upload the calendar file. Save the changes.
3. Email Notification Invite
Finally, make a test submission and check your mailing inbox. Email notifications will contain the Google Calendar invite as an attachment.
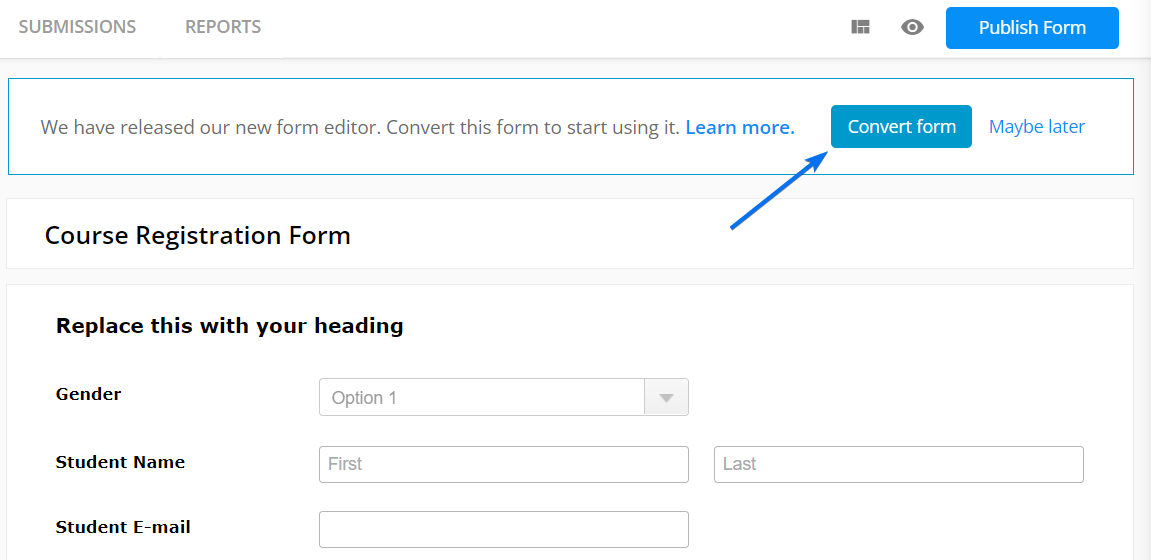
When you are switching to another form building service, you don’t want to spend hours recreating all your web forms. 123FormBuilder (an alternative to JotForm) offers you the possibility to easily import forms created by JotForm into your new 123FormBuilder account.
To import forms you need to retrieve the API Key associated with your JotForm account. Follow these easy steps:
1. Log in to your JotForm account and click on Settings.
2. In the left-side panel go to the API section.
3. Ensure that you have Full Access to the API key under the Permissions column.
4. Copy your API key.
The next step is to head over to 123FormBuilder and log in to your account.
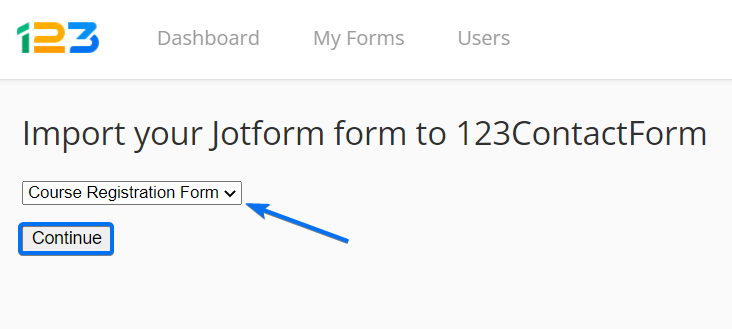
Access the following link and insert your JotForm API key: app.123formbuilder.com/index.php?p=jotform. Choose from the dropdown the form you wish to import and hit Continue.
123FormBuilder will recreate the form in a few seconds.
Finally, after importing the form, click on the Convert form button. Now, you can start customizing the form with our new features.
123FormBuilder forms work great on all mobile devices and tablets and offer a user-friendly experience on any device.
Our forms are by default mobile responsive, however, you can tweak your existing web forms design with our CSS form generator. In this article, we will show you a step-by-step guide on how to accomplish that.
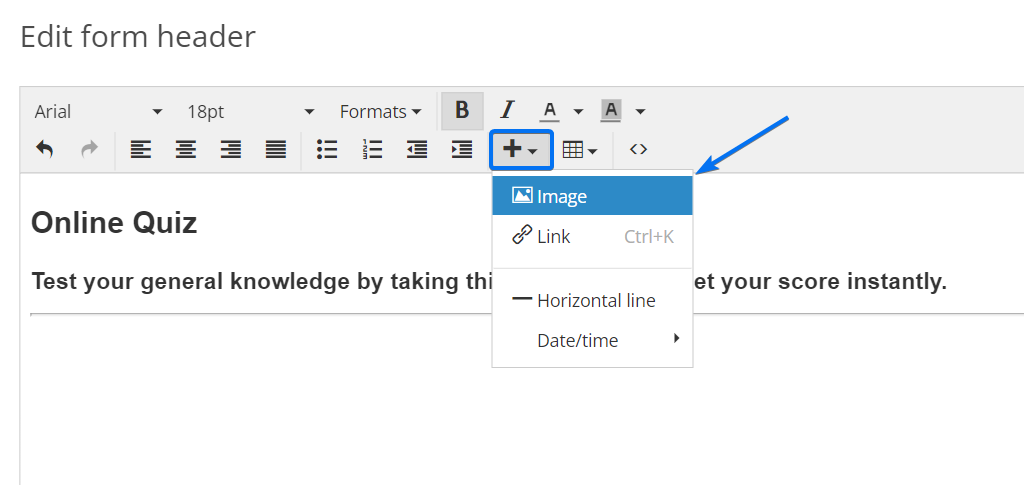
Form Images
When you insert an image in the Form Header or HTML blocks you will need to specify the best settings to ensure that it will be mobile responsive. In the editing mode of your HTML field click the plus sign and select Image.
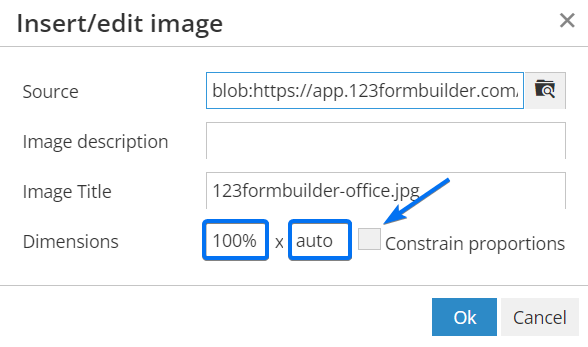
After you upload the image, in the Dimensions section, type 100% in the first box (width) and auto in the second one (height). Disable the Constrain proportions option to maintain the original width and height dimensions.
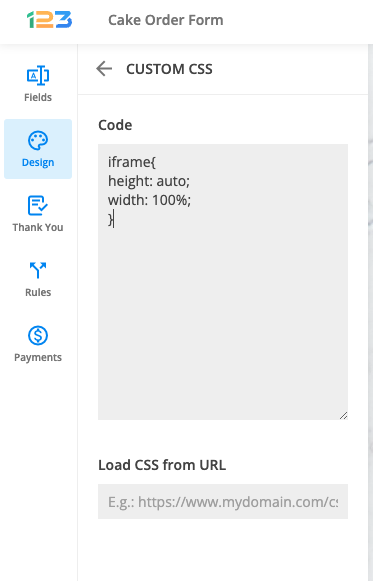
Video
When you add an iframe to display a video you can use a custom CSS code to make it work perfectly for mobile devices. The CSS will be placed in the Design → Add Custom CSS section. This method applies to all iframes. Simply copy-paste the code from below:
iframe{
height: auto;
width: 100%;
}
Font Size
Font size may seem like a small thing, but it is an important element, especially for mobile readers. You can use the following CSS and adjust the number of pixels (12).
@media only screen and (max-width: 550px) {
#form *{
    font-size: 12px!important;
    }
}
Submit Button
Enlarge the submit button to have better visibility. The CSS code from below will make the submit button wider.
@media only screen and (max-width: 550px){
#form button[data-role] {
padding: 0px 33%;
  }
}
Decrease the percentage number if you want the submit button to be more narrow or increase the number (33%) to make it wider.
To make the font size of the submit button smaller simply adjust the number of pixels.
@media only screen and (max-width: 550px){
#form button[data-role] {
font-size:12px;
  }
}
That’s it! Now your forms are fully mobile responsive and form visitors will have the best user experience with these design tips.
You can use a lookup to search for specific information within a Salesforce record or object and return the content to the form for further use. This can be done in two ways:
- To map the information to another Salesforce record (use it in the Object Mapping);
- To prefill form fields (use it in Prefill Section).
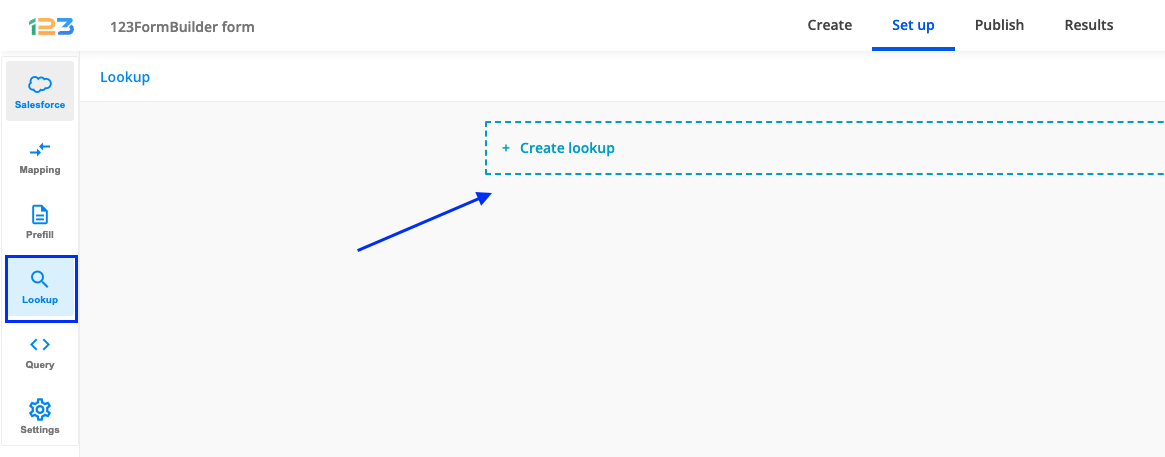
How to Set Up a Lookup in 123FormBuilder
1. First, go to the Lookup section on the left menu and click Create lookup.
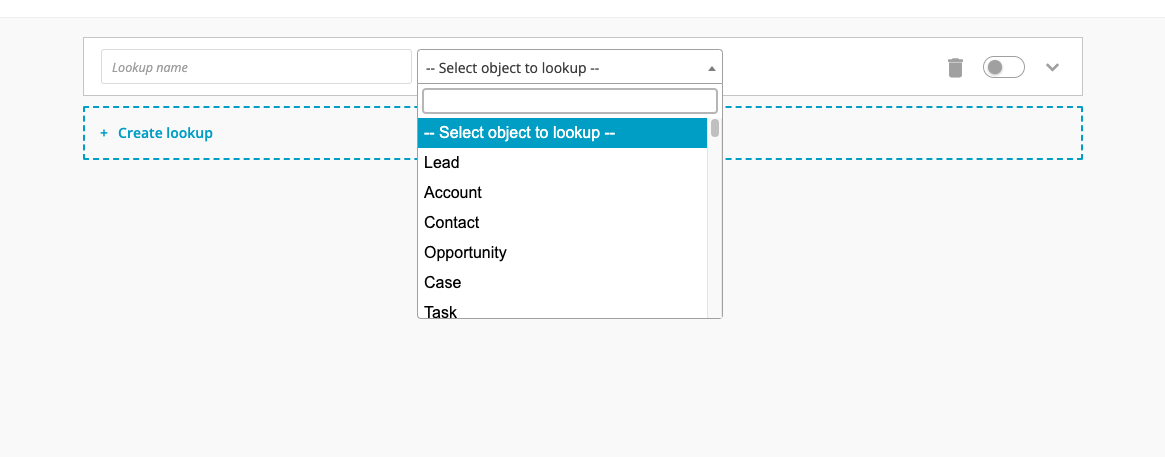
2. Afterward, select the Salesforce object where the search should be made to find a record.
In this case, the object will be Lead.
3. Give a name to your lookup. You might create more than one.
4. The lookup can be based on an entry (or multiple entries) made on the form. You need to add a filter and select the form field(s) that will be used to search in the Lead object.
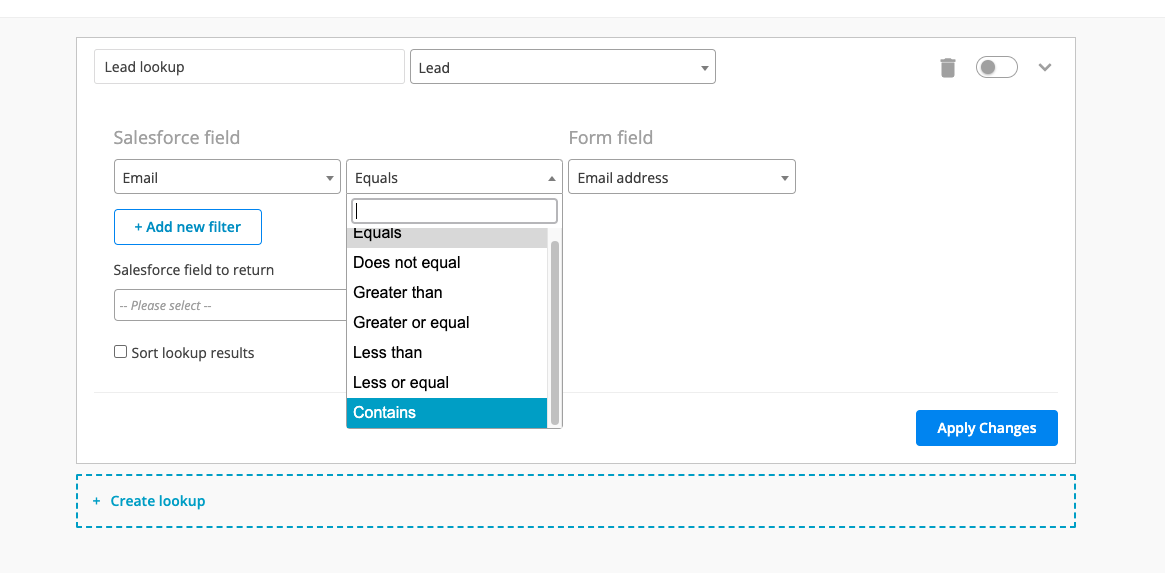
Note: If you want to return information from all records in a specific object, there’s no need to add a filter. For example, if you want to display a list of all company names from Salesforce on the form, simply create a Lookup in the Account object without applying a filter, and select the Company Name field to return.
5. You can add multiple filters by clicking on Add new filter. By default, between the two filters, the AND logic operator is chosen, but you can change it to OR.

6. If multiple records match the filters, you can select which one should be returned from your object. This option is helpful if there are duplicate records in your ORG:

7. Once you’ve set up the filters and defined what happens if multiple records match, proceed to the Salesforce fields to return section. Here, you can choose the Salesforce fields you want to retrieve from the record. These fields can then be used to prefill form fields or sent back to Salesforce as information for another object

7. Lastly, save the settings by selecting the Apply Changes button.
How to use the lookup results in the Object Mapping:
1. Go to the Object Mapping section and select the object where the field from Leads will be returned, in this case, Account.
2. Select the Salesforce field where the data should be returned and match it with the lookup object you created.

How to use the Lookup results for Prefilling form fields
The lookup data can also be used to populate form fields with information from Salesforce.
1. Navigate to the Prefill Connector.
2. Click Add prefill connector.
3. Go to the Prefill Connector section and select your Lookup:

4. Define Prefill Triggers (if any).
5. Map your Salesforce returned fields to your Form Fields:

Form fields will now be prefilled with the existing Salesforce data retrieved through your lookups.
Note: Ensure that the field types in your form match the corresponding field types in Salesforce. This includes aspects like input types, date formats, and character or value limitations.
There are different types of prefill, each with its own setup process. To learn more, read the articles on this topic:
- URL prefill setup (when the form is shared/used from the Salesforce side – eg: form link is sent in an email).
- Dynamic Prefill (used when you need input from the form visitor to trigger the lookup & prefill).
- Experience Prefill (the form is published on an Experience page).
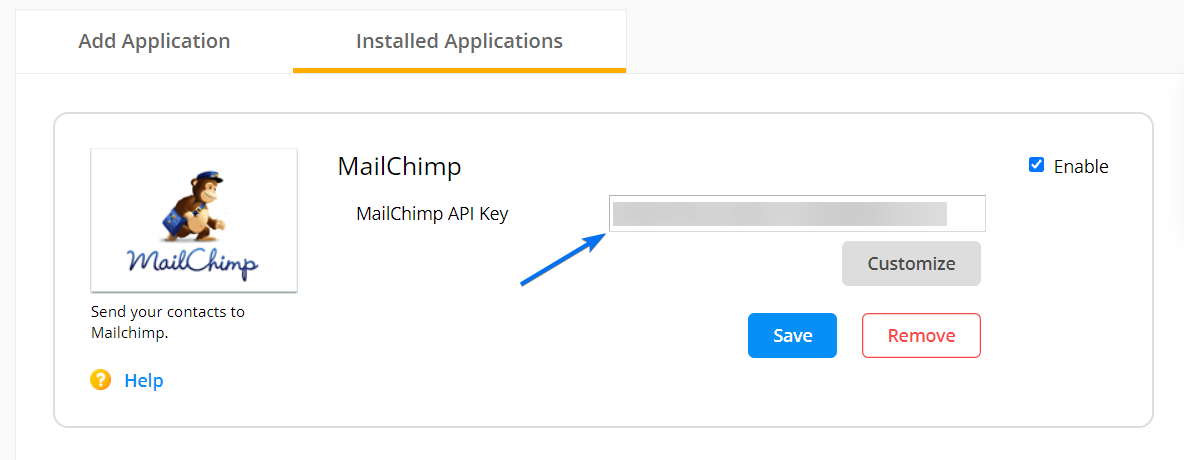
With the 123FormBuilder – Mailchimp integration, you can import emails and leads from your submitters to your Mailchimp lists or unsubscribe them. Provide your Mailchimp API Key and select Customize to set up your integration.
Mailchimp API key
To retrieve the API key of your Mailchimp account, follow the steps below:
1. Log in to your Mailchimp account and go to your account settings (your username → Account).
2. Afterward, go to Extras and select API keys from the dropdown list.
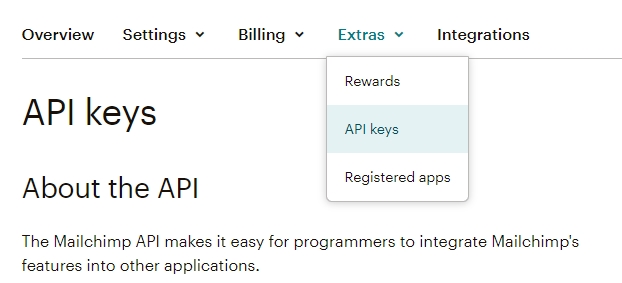
3. Press Create A Key and a code will be generated on a line below Your API keys. That is your API key.

4. Copy-paste the API key in the Mailchimp application box from your form builder account.
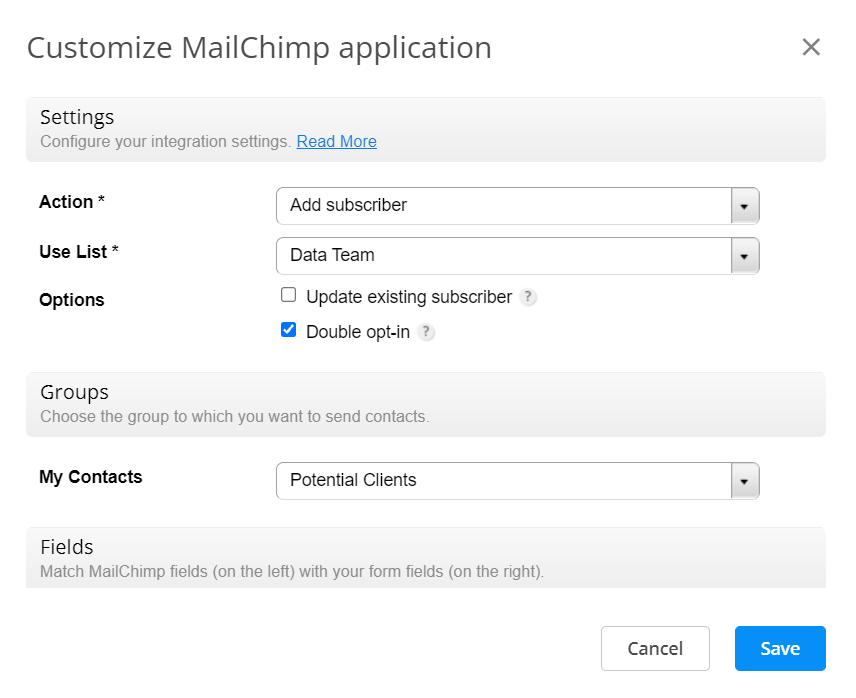
Customizing the integration
In the Customize lightbox, use the Action dropdown to select any of the two available options:
- Add subscriber
- Unsubscribe email
You cannot select more than one action per integration. The first action will create a new subscriber in the mailing list you have selected in the Use List dropdown. The second action will unsubscribe the email address that has been specified on the form.
In Options, you can choose to update existing subscribers or add a double opt-in to request confirmation before adding new subscribers to your list. It’s important to mention that the two options do not work together.
Use the Groups subsection if you have groups in the selected list.
In Fields, match Mailchimp fields with your form fields. If you have required fields in Mailchimp, it is necessary to match them with the corresponding field on your form. For the integration to work properly, we strongly recommend making the form field required as well.
Lastly, use the Error Handling subsection to set the email address that will be informed of any errors that might occur upon submission.
Due to security reasons on behalf of Mailchimp, you cannot embed online forms in email marketing campaigns. Therefore, we recommend you add the link to your form in the email template, if you want to send it to your subscribers. Embedding forms in any email represents risks and there are very few services that support it, not to mention that there is a high chance end users will not be able to complete the form within the content of the email, as a reply.
Pro Tip: You can enable multiple Mailchimp integrations on the same form.
By default, you log in to your 123FormBuilder account in a one-step verification process: your username and password. If you want to increase the security of your account, you can opt to activate the multi-factor authentication option in My Account which adds an extra step to your login.
A multi-factor authentication process implies the presence of two or more verification steps, independent of one another. There’s the information that only the user knows (such as the password of the account), but also the information that only the user owns.
With the option Multi-Factor Authentication Device, you can use an MFA application on your smartphone to scan and generate a code that you can use for each login. The code changes after a period of time, therefore the same code cannot be used twice, as a security precaution.
If you do not own a smartphone, you can use an authentication device for your operating system, such as WinAuth for Windows or Authy. The steps to activate the feature are the same in both cases.
How to use Multi-Factor Authentication Login
To enable the Multi-Factor Authentication Device option, follow the steps below:
1. In your form builder account, go to the My Account → Change Password section, then to Multi-Factor Authentication Device, and click on the Add now button.
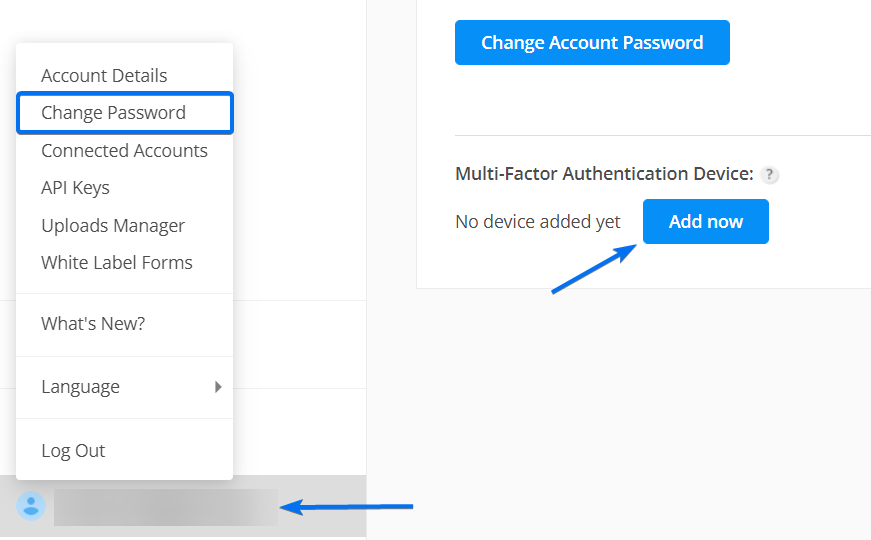
2. Download an MFA app for your mobile device (we recommend Google Authenticator) and scan the QR code that appears on the screen with your mobile device. You’ll need to scan the QR code only when you use this option for the first time.
Download Google Authenticator for Android | iPhone
Download Authenticator for Windows Phone
3. The email address associated with your 123FormBuilder account will appear partly hidden in the MFA application interface of your mobile device (e.g. jo*****@). Under the email address, you’ll see a 6 digit code and a countdown timer clock on the right.
4. Back in Multi-Factor Authentication Device, enter the code that appears in your mobile device’s MFA interface inside the text box above Activate Code and press the button. Done!
You can disable this option at any time. Return to My Account → Change Password → Multi-Factor Authentication Device and click on Disable.
Now when you log in to your 123FormBuilder account, you’ll have to pass two verification steps. One is the one where you need to submit the username and password associated with your account. The next steps will require the 6 digit code that appears in the MFA app of your mobile device. Once you have submitted this code, you’re good to go.
If your 123FormBuilder – Google Sheets integration fails to work, check that all your form fields are labeled. If at least one form field hasn’t got a label name, the integration will fail.
Before integrating with Google Sheets there are a few things that you should be aware of:
- Do not delete any form columns.
- Make test submissions after applying changes, to update on both sides.
- Selecting a group of cells and sorting/filtering data will break the integration.
Once you have finished applying the changes to your form, disconnect and reconnect to your Google Sheets account in the Integrations section. Your 123FormBuilder – Google Sheets integration should now work accordingly.
You can incorporate more than one field in the same row using our form builder. This feature helps you structure forms precisely as you wish.
Click and hold the mouse button over a field, drag it to the end of the row, and release the mouse button when you see a blue line.
When you select a field, you will notice that the field has two grab handles: one at the beginning of the field, and one at the end. These will help you adjust the field’s size. If you have the label’s placement set to Left in the Design settings, you can also adjust the space between the label and the input box.
You can group two or more fields into a container to resize them quickly. Add two fields to the first row. Now drag the third field below the first field and drop it when the blue line highlights only the first field. Hover over the sides of the fields to see the container’s grab handle, which will allow you to resize all the fields that you grouped. You can also resize individual fields inside the container, but you cannot make a field larger than the container width.
To remove fields from the same container, drag a field below another until the blue line crosses the entire width of the form. Now you can resize only that field alone, without influencing the fields next to it.
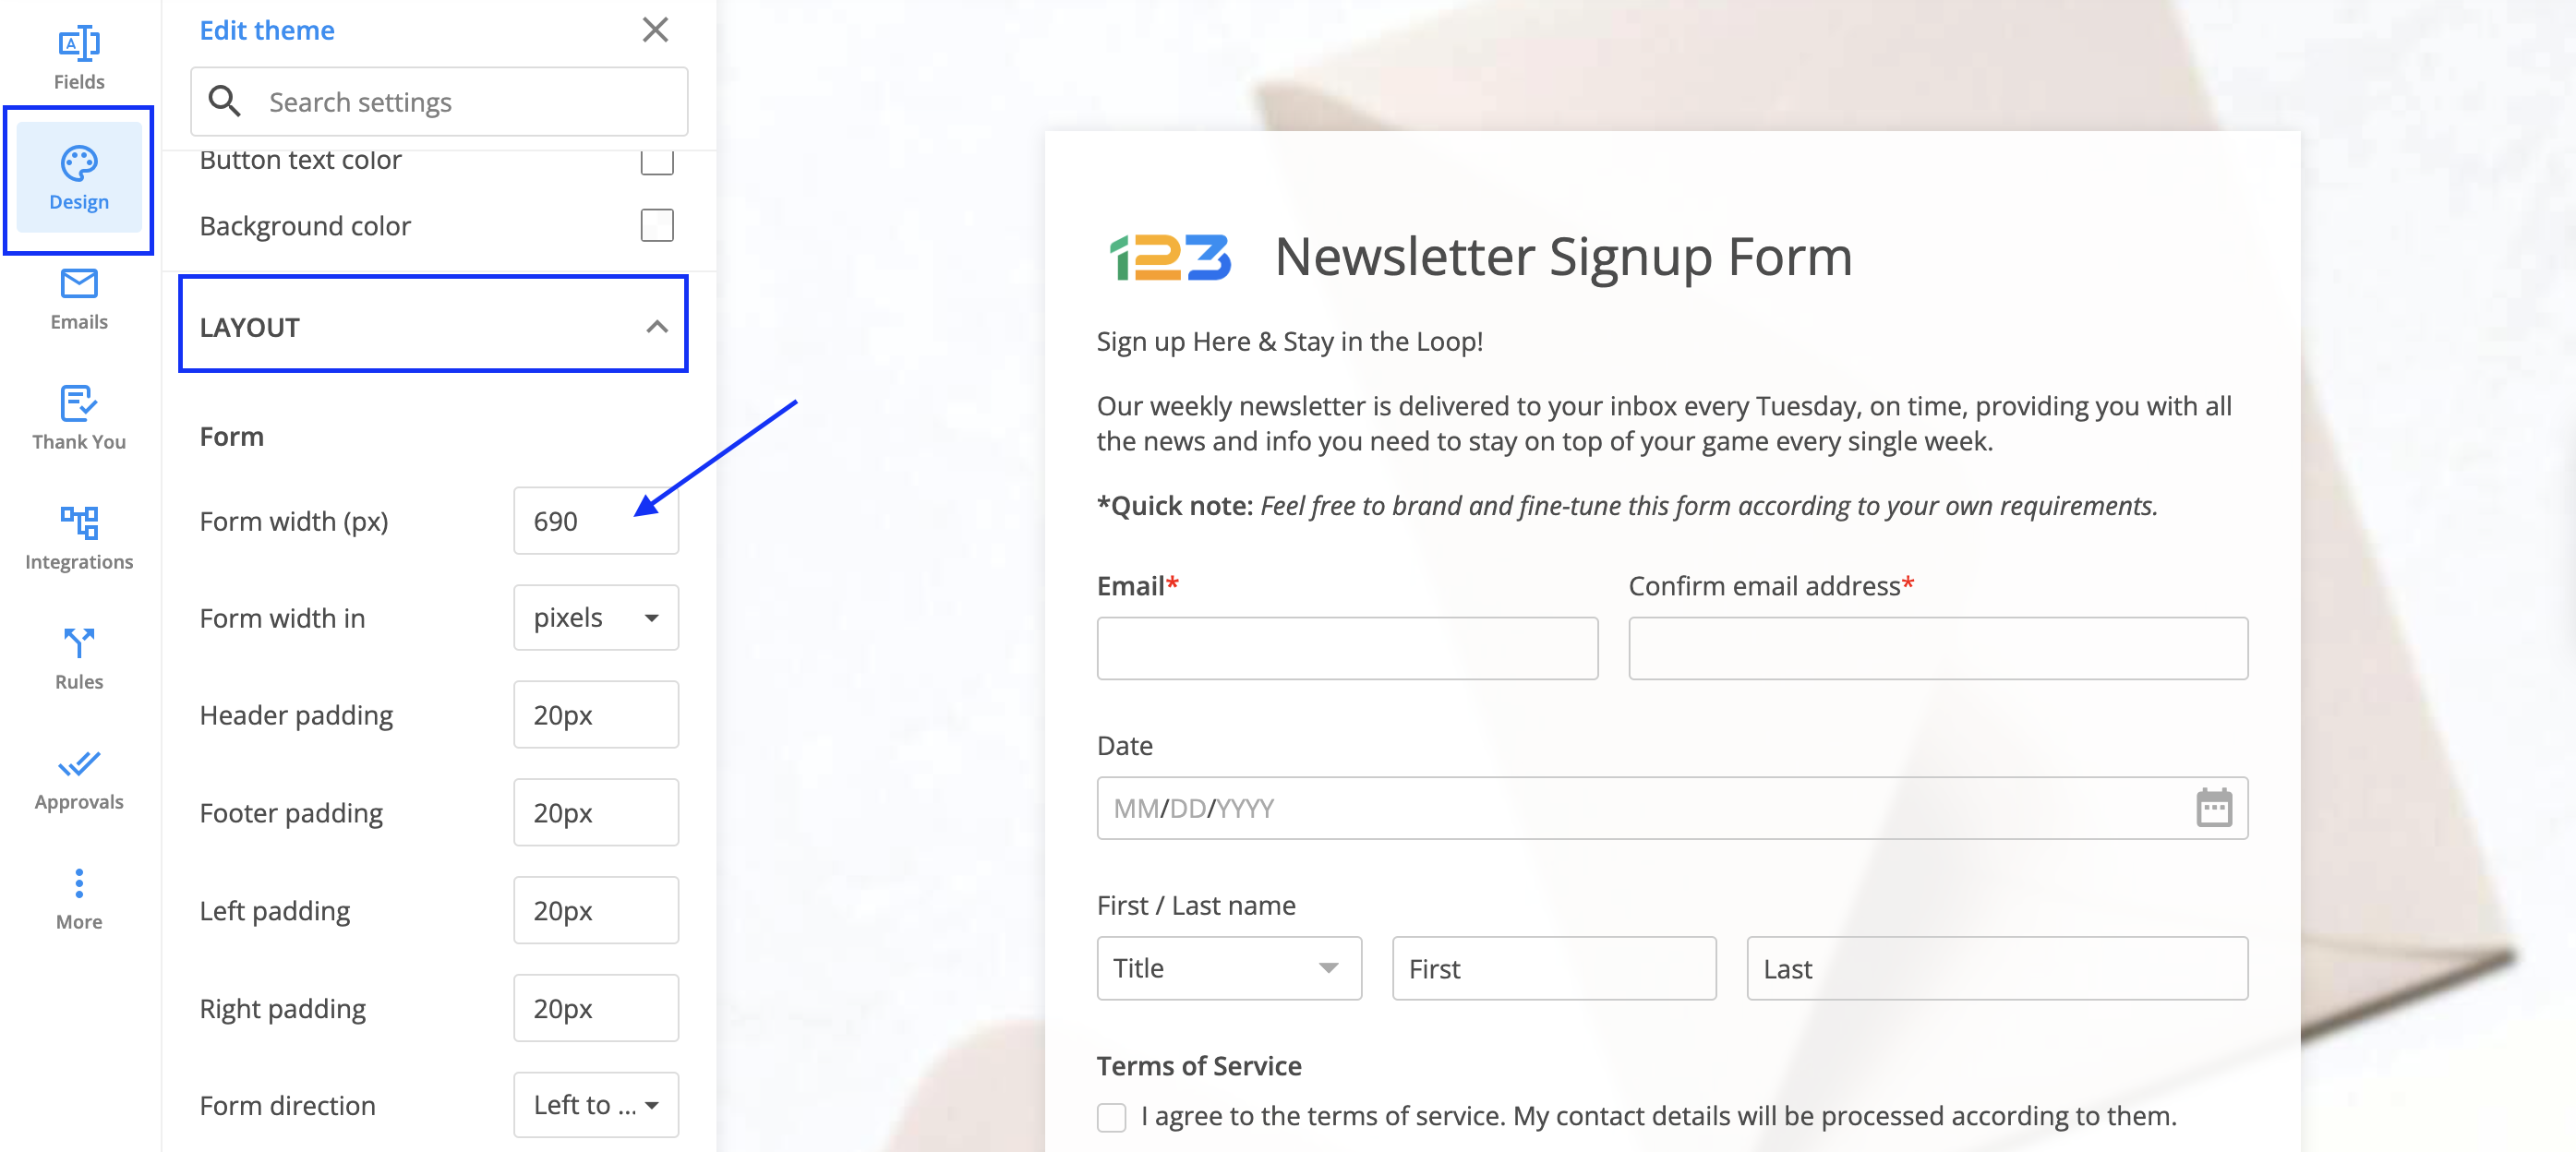
If you added multiple fields on the same row and they seem too crowded, you can always go to the forms Design → Layout → Form section and increase the Form width.
Related articles
There are two main reasons why email templates might look weird in your inbox:
1. Form fields have been changed. When building a custom email template in the form builder, you have the possibility to add variables correspoding to form fields. These fields insert user input into the message. For example, if you use the Name variable, this will be replaced, in the actual message, with the form user’s name. Now, if you change form fields, the variables change accordingly, but the email template stays the same (with the old variables), which makes it impossible for it to work properly.
Whenever changing form fields, be sure to make any necessary changes to the custom email template.
2. The email template belongs to another form. Custom email templates are stored in the same place, irrespective of the form they have been built for. In other words, when you create a new email template for a particular form, you’ll be able to view it in the Email Templates list of any form in your account.
Be sure not to apply the email template created for a form to another form. You can give templates suggestive names, so as to remember quickly what forms they belong to.
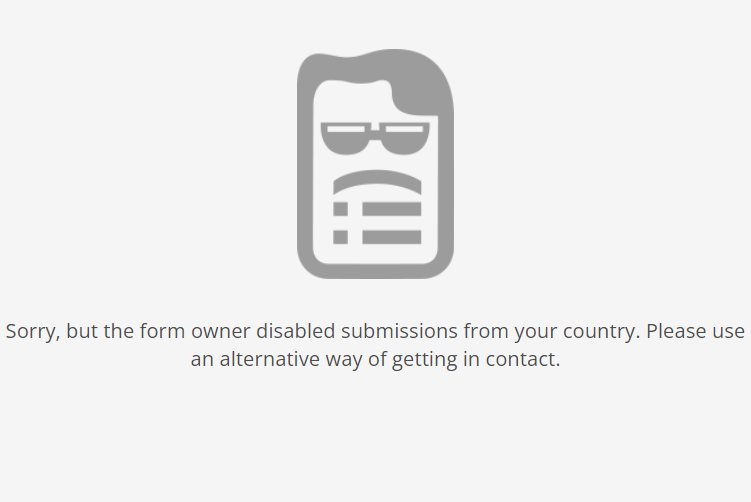
Some situations might occur when your form is set to accept submissions (only) from your country. Sometimes, you might not be able to view the form yourself. You could be using a public network from the organization or company you are working at, which uses a proxy server to bypass websites that might block your private IP from viewing their content.
Note that only some proxy servers are able to do this but not the ones hosted by your Internet Provider. This is the case for companies that work online to promote and expand their work on a global scale and require special proxy services to bypass certain country filters.
Another factor could be that you’re using an IP blocker installed on your Internet browser that hides your geographical location. Your online form cannot recognize it, therefore it’s blocking any access. If you have restricted your form to accept submissions only from your country, but you cannot access it at all, it’s because your IP address is not visible.
How to fix this?
A first step would be to check if you’re using an IP blocker and disable it. There could also be other factors. You could be using a reserved IP (the Loopback) – the one with 255.xxx.xxx.xxx. This is not actually considered a usable IP to identify your location. IP addresses are unique identities of the device you are using to browse the Internet.
If you’re trying to access the form at work, speak to the network administrator to solve your issue.
Some Internet browsers could be hiding your IP address, browsers such as TOR. If you’re browsing from a home network, look for any installed add-ons which might have blocked or hidden your IP from being detected by other admins from the web.
In conclusion, your IP address contains the code of your country. If you hide it or block it, the form won’t be able to detect from which country you are accessing it. In such cases, it will display the following message:
Most Popular
Frequently Asked Questions
Here is a list of the most frequently asked questions. For more FAQs, please browse through the FAQs page.