123FormBuilder Knowledge Base
Search our documentation platform for answers, service specifications and 3rd-party integrations.
Knowledge Base
Build effective online tests using our free online quiz maker.
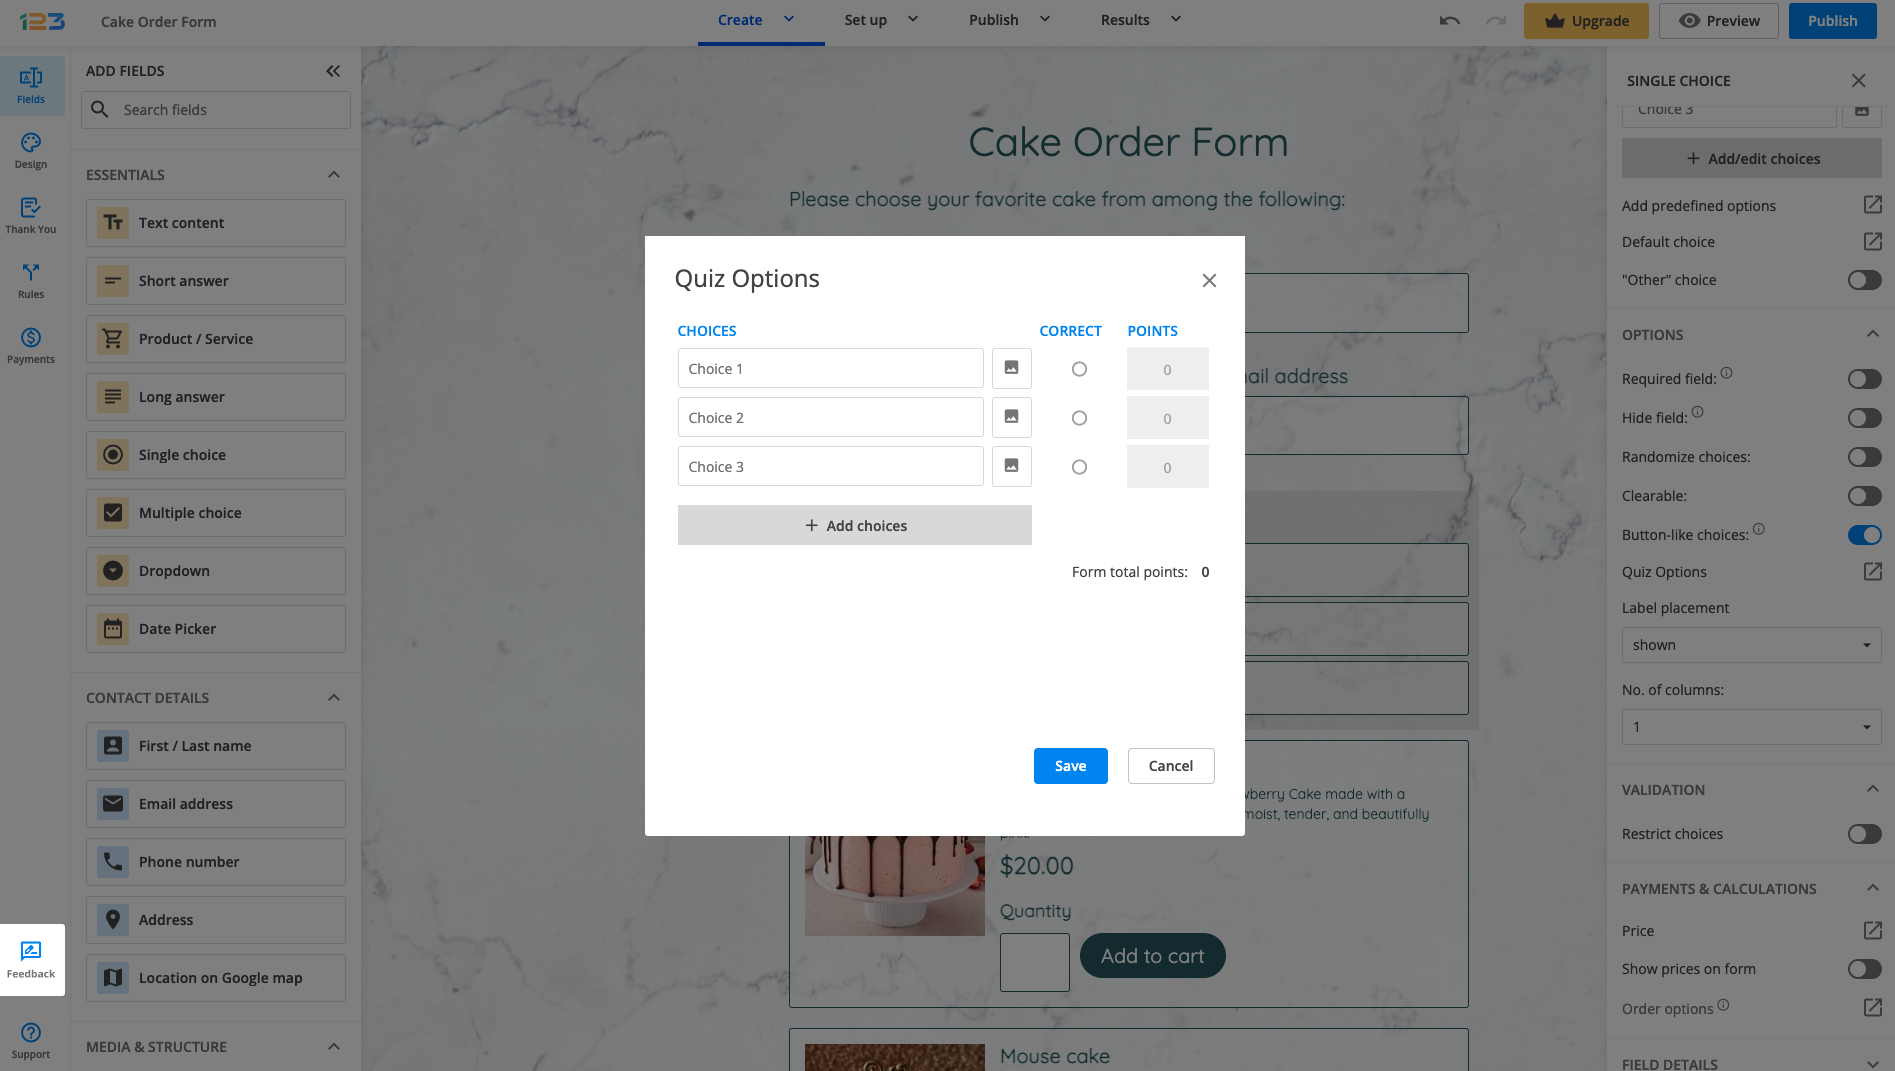
Points are the main goal of an online quiz as they highlight the knowledge level of each respondent in particular. You can easily assign points for each question; let’s show you how!
Select a question that you have added on the form. In the right side panel, under Options, you will find Quiz options.
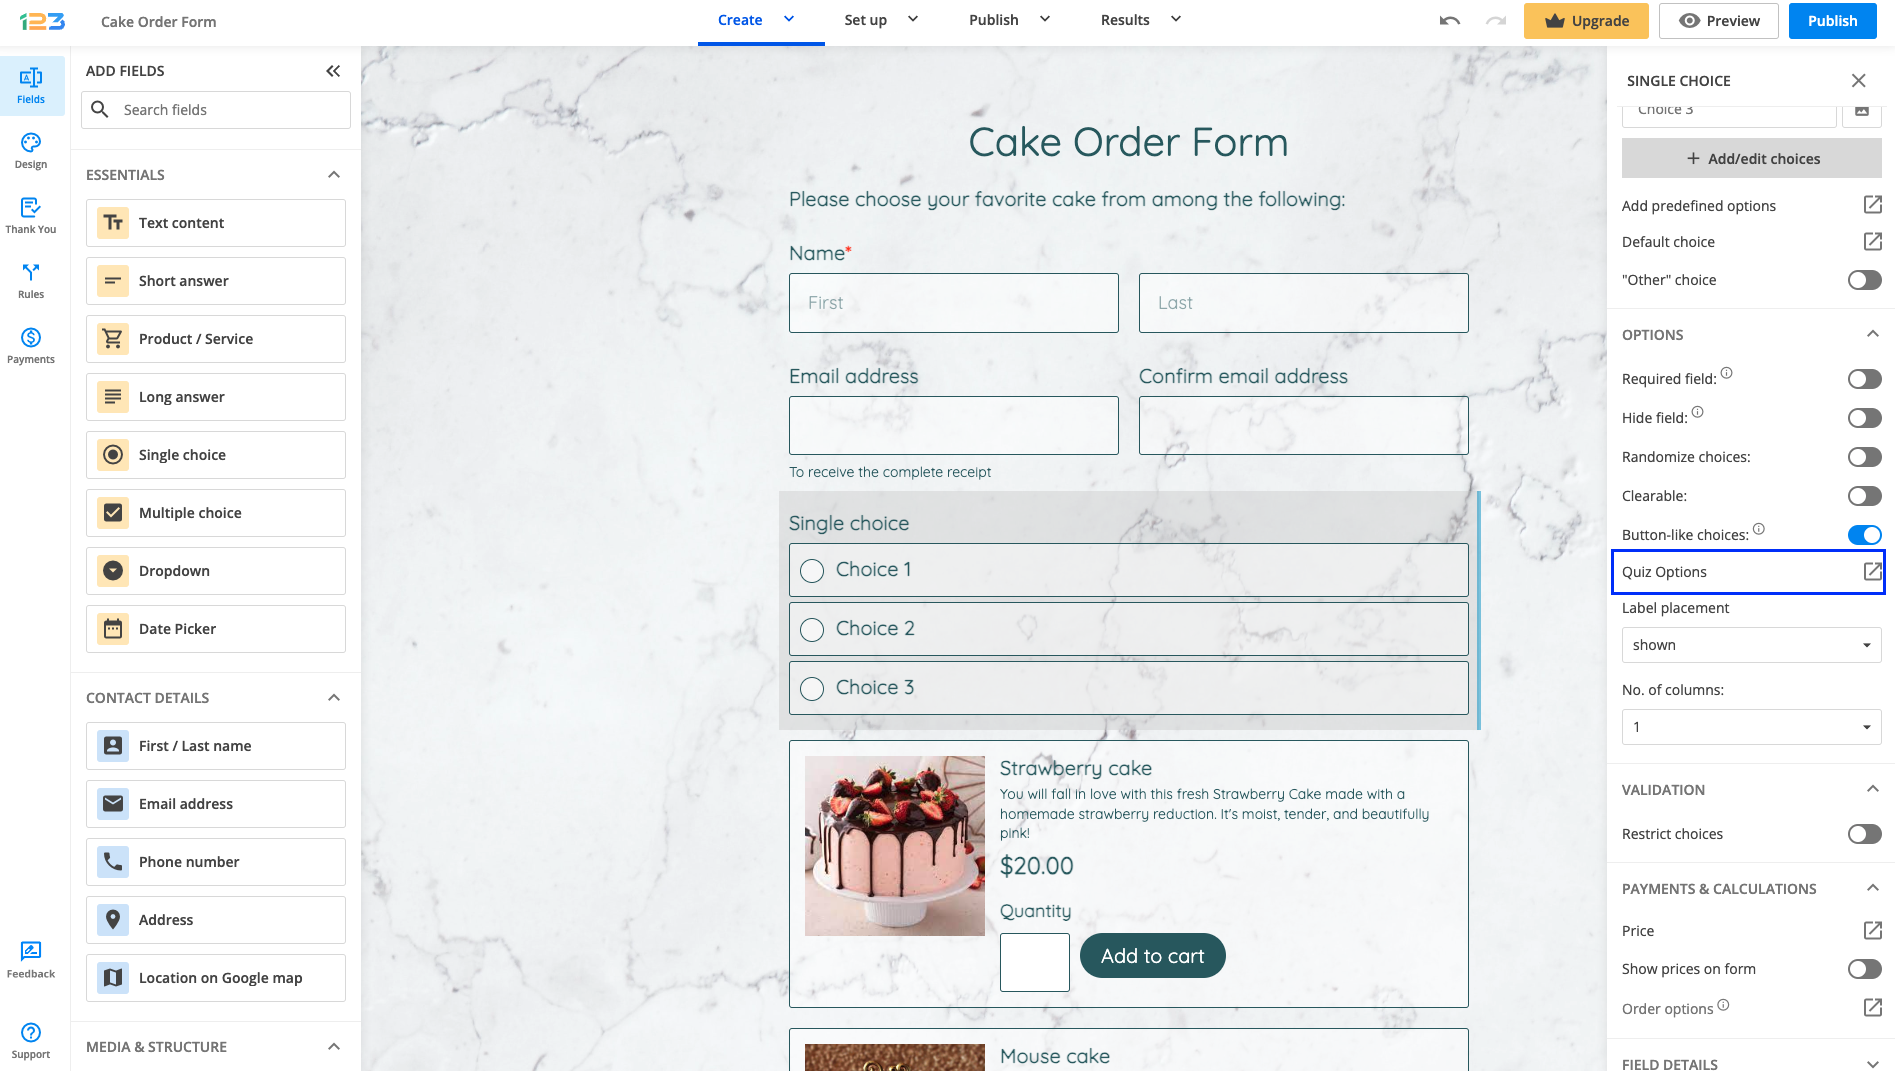
Once clicked, a pop-up opens where you can assign points to each answering option and mark which one is correct. On the bottom right, you’ll notice the Form total points assigned so far for your online quiz. Each time you assign new points, the changes will automatically take effect in this box. This will help you keep track of how many points are assigned to your online quiz at that moment.
Related articles
To learn how to add a countdown timer to your online quiz, you can also check out our tutorial:
Visitors could search the Web for the correct answers while completing your online quiz. Because of this, we have provided you with the countdown timer option. This will submit the quiz automatically after the time has elapsed. Visitors will be against the clock upon completing the online quiz and will not have enough time to look up the answers from other sources.
To enable this option on your online quiz in our form builder, simply go to the Advanced → Quiz section of your form and tick the Show countdown timer option.

In the dropdown list, you can set the online quiz to count the time in seconds, minutes, or hours. In the box on the left, add the exact amount of time you want to set the countdown timer. Lastly, hit Save from the bottom of the page, and you are done.
Important Note
You cannot set two base units for the countdown timer. If you require the timer to be set to an hour and a half (1:30), you’ll need to add it all in minutes, as in 90.How the countdown timer works
From now on, respondents will see a countdown timer on the top right corner of the quiz. Once the time elapsed, the quiz will submit automatically.
It’s important to note that when the countdown finishes, if the respondent has not filled out anything on the form, they will see a message saying “Sorry, time’s up! You can’t submit your answers anymore”. No submission will be created since nothing was filled out, so you will not see it in the submissions table.
However, if the respondent has filled out the form partially but did not have time to submit it, once the countdown finishes the form simply submits automatically and a new submission, with the partial answers, will be created in the submissions table.
Pay attention if you have required fields on your form because the form will not be able to submit once the countdown ends, if required fields are left empty. Therefore, a new submission will not be created. We recommend for timed quizzes to not use required fields on your form.
Related articles
To learn how to show quiz results after submission you can also check out our small tutorial:
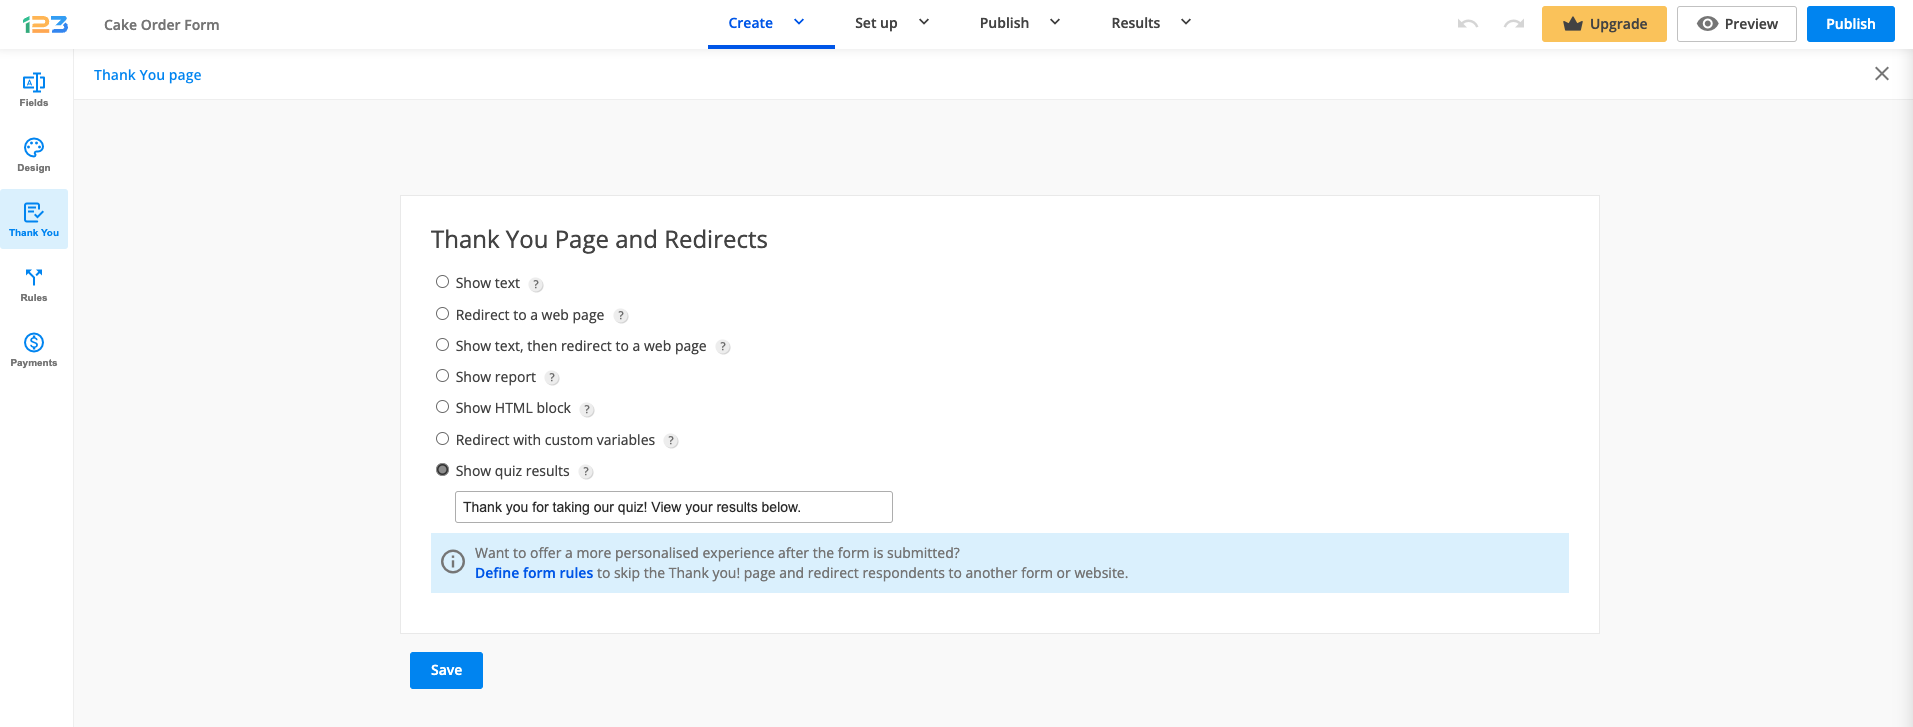
Quiz results can be published on the Thank You page immediately after the submission is made. To enable this option, access the Thank You page section and select Show quiz results.
You can also add a custom message to appear on this page. Just edit the default message from the text box under the Show quiz results option.
Enable the Show missed answers option from the Advanced → Quiz tab to show all the missed and the correct answers to your users after submission.
The quiz results of each submission will be present in the Submissions section of your form, under the column header Quiz Score. Furthermore, you can also include the quiz score in report filters and rules.
You may even add the quiz score to the content of your email templates. This way, you can send your form respondents the quiz score that they’ve received via email. Set up your custom email by going to the Emails section. Afterward, select the plus sign from the email Body to add the Quiz score variable. Check out our guide for more detailed instructions.
If you’ve started using our online quiz maker and need to count partial answers in your quiz results – this is the tutorial for you.
Partial answers are designed for multiple choice fields where respondents can select more correct answers for the same question. You can add two different types of partial answers on your online quiz: with deduction or without deduction.
You’ll find them in the Advanced → Quiz section of your form.
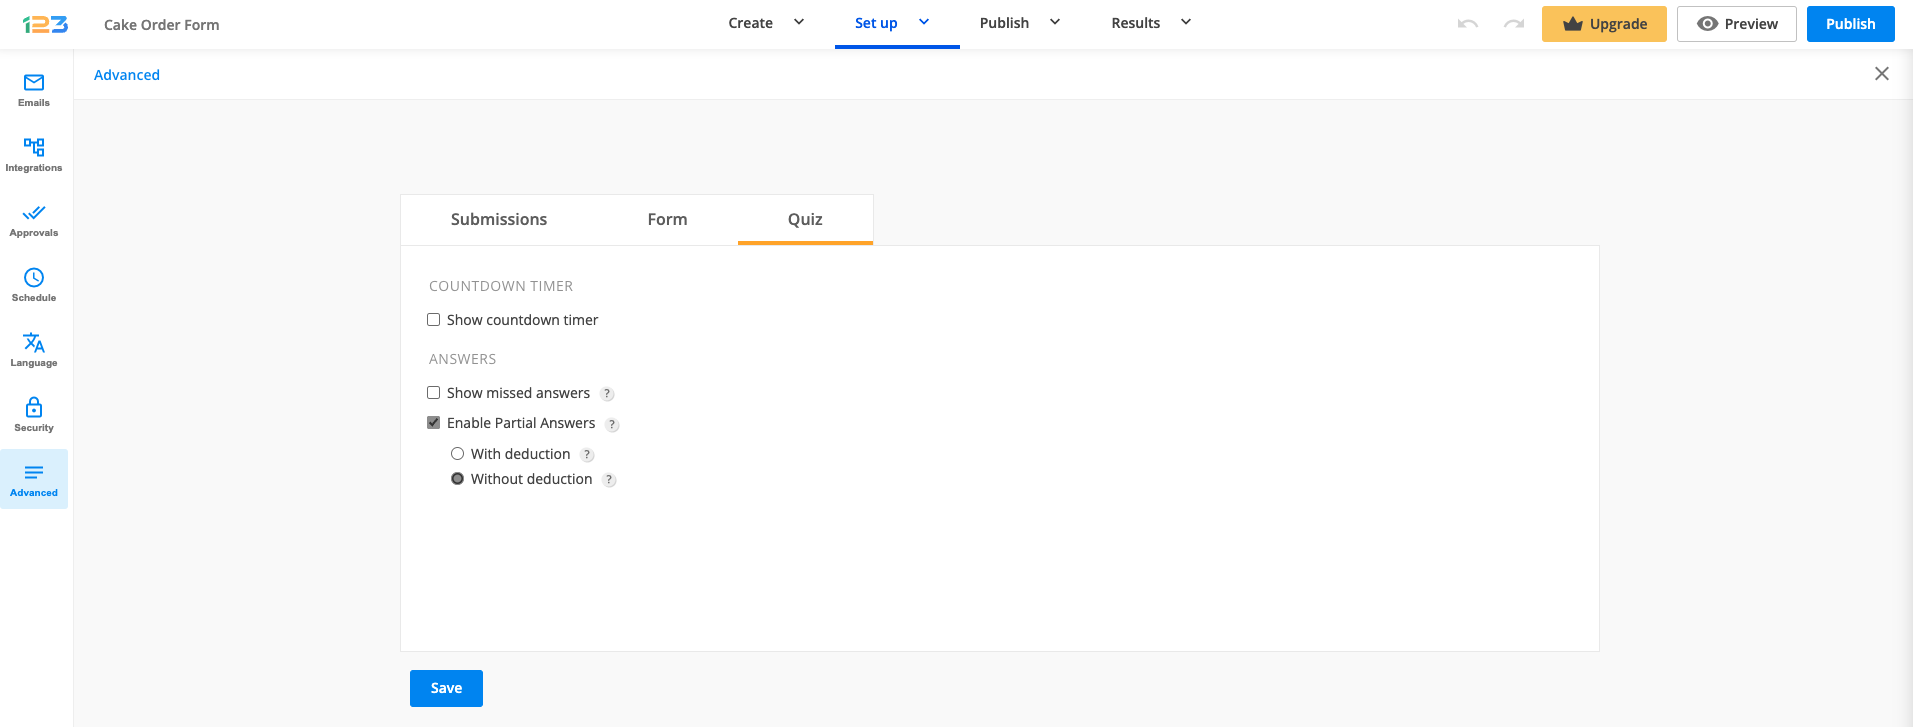
By ticking the option Enable Partial Answers, you’ll need to select one of them to use for your online quiz.
Both of these options calculate the success rate in the percentage of each question after submission. Given that an unchecked incorrect answer is considered a correct choice, it will receive the same amount of percentage as a correct answer. This means if correct answer A is checked and incorrect answer B is not, both of them are worth the same.
Related articles
API calls are operations performed when another service communicates with ours. For example, if you use Zapier, each time the two apps in a zap are synced, a certain number of API calls is needed. The syncing interval is either 5 or 15 minutes.
On the Basic free plan of our form builder, you can use up to 100 API calls per day.
If you are a Wix Premium or Weebly Silver user, you have unlimited API calls/day.
On our native paid plans, the number of API calls that you can use is also unlimited. If you want to use more API calls per day, upgrade your account to Gold, Platinum, or Diamond.
Related pages
Are you worried about spam compromising your online forms? Explore the significance of verification codes on 123FormBuilder. Discover how these codes bolster security by preventing malicious bot attacks and maintaining data integrity.
Imagine organizing an event and using 123FormBuilder to create an online registration form where participants can sign up for the event. However, as the registration form is being shared with the public, you encounter a sudden surge in suspicious registrations.
The influx of spam registrations not only clutters your database with irrelevant information but now you are also spending time deleting the submissions made by spambots.
Spam and bot attacks make it vital to take steps to protect your data. 123FormBuilder offers a solution consisting of verification codes. They add an extra layer of security to your forms by requiring users to prove they are human.
By doing so, they prevent malicious bots from accessing your data and keep your information safe from harm. Additionally, verification codes help maintain data integrity by ensuring that only legitimate form submissions are accepted.
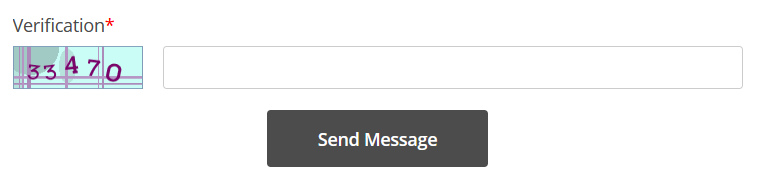
A verification code is a security protection method used by form owners to prevent Internet robots from abusing and spamming their forms. The code is usually a combination of letters and numbers that the user must enter correctly before submitting the form.
There are different verification code types, but the most commonly used is CAPTCHA. This generates a random code within an image next to a text box. The form visitor has to type in the exact code for the form data to be sent.
Owners have the option to disable web form verification codes on 123FormBuilder. However, this makes the forms more vulnerable to spam attacks.
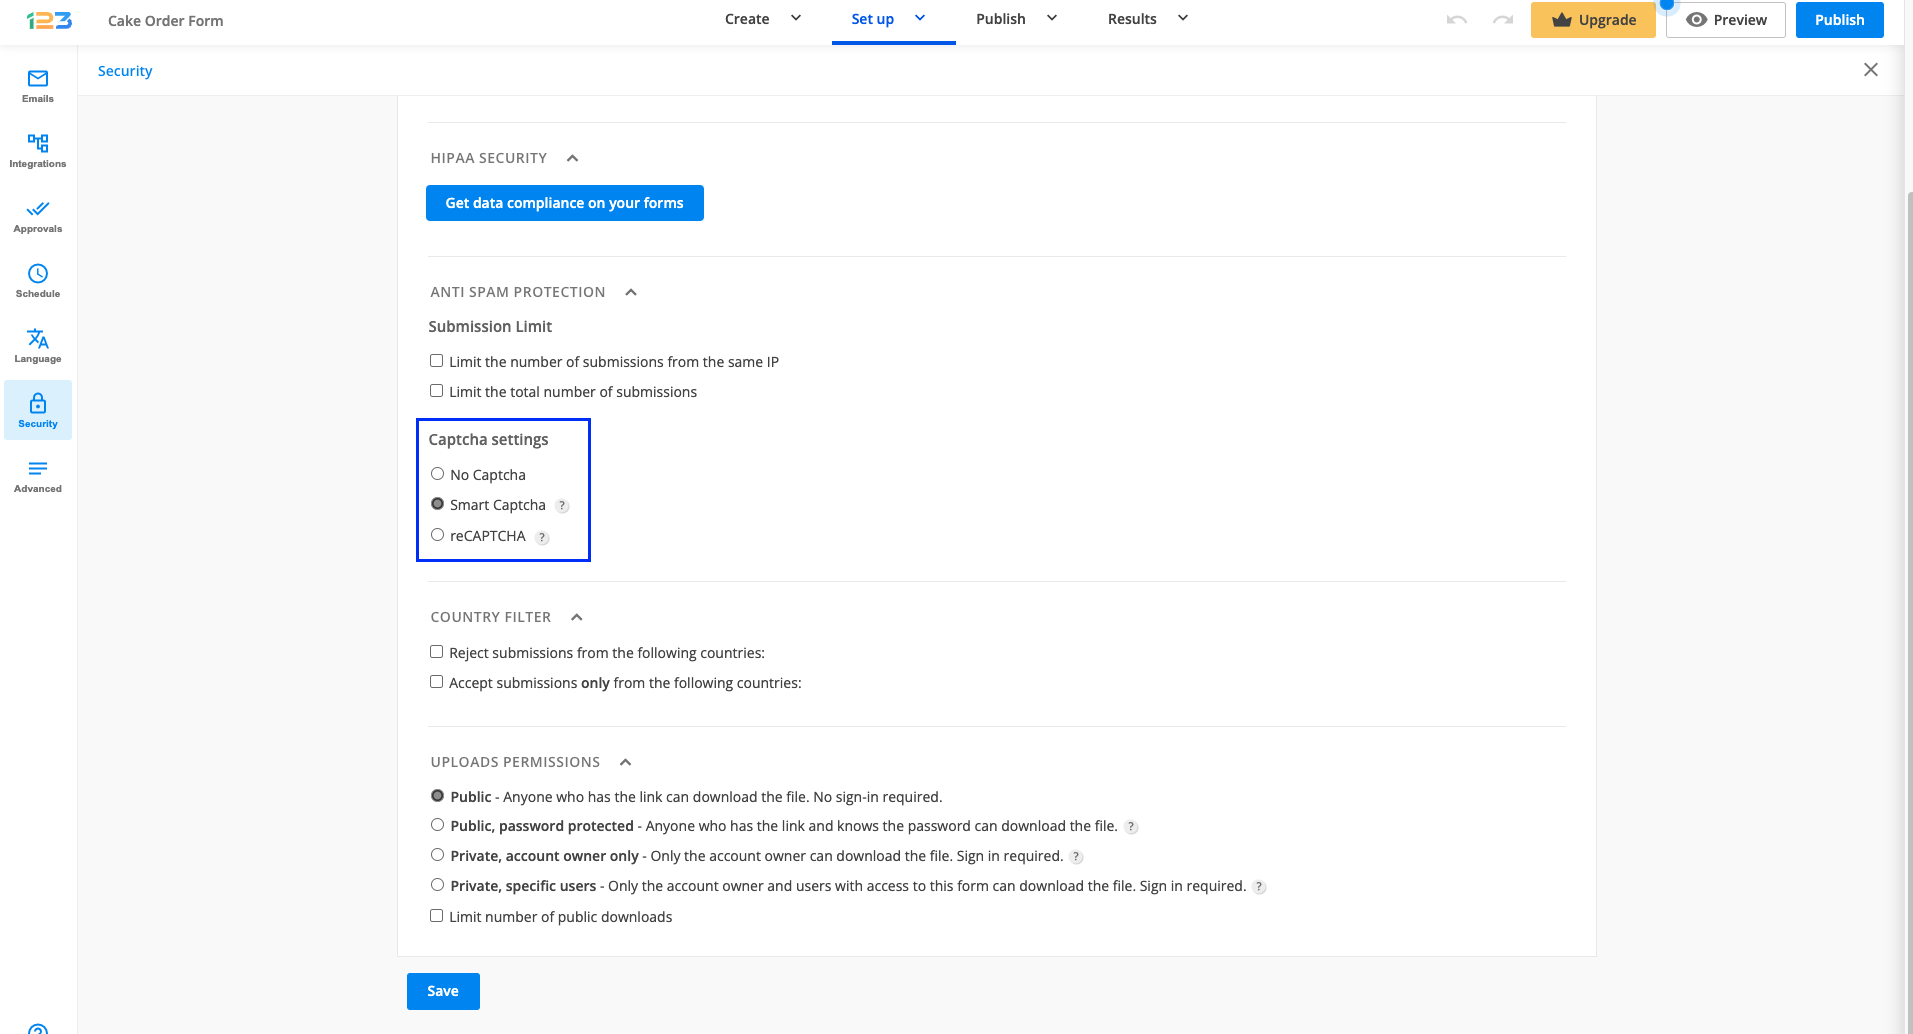
We encourage our form builder users to use verification codes whenever possible on their forms. You can find them in the Security section of the Form Editor, under Captcha settings, and at the bottom of your form in the form editor.
Smart Captcha – this verification code will appear only when your form is abused
reCAPTCHA – the verification code will always be displayed
Verification codes, such as Smart Captcha or reCAPTCHA, can enhance the security of online forms, prevent spam, and protect data legitimacy. Implementing these codes can provide peace of mind, safeguarding online interactions from malicious entities. Don’t leave your online security to chance; take advantage of 123FormBuilder’s verification codes today!
FAQs
1. What is the purpose of a verification code on a form?
The verification code serves as a security measure to prevent spam and malicious bot attacks on online forms, ensuring that only legitimate users can submit data.
2. How does a verification code enhance data integrity on forms?
By requiring users to prove they are human through a verification code, the form ensures that only genuine submissions are accepted, maintaining the integrity of the data collected.
3. How can I activate the verification code feature on my form?
To enable the verification code on your form, go to Set up -> Security and select one of the options from the Captcha settings. Additionally, you can find the Captcha verification option at the bottom of your form in the form editor. Click on it to open the menu on the right side and turn on Captcha verification.
Related articles
 |
|
 |
|
 |
|
 |
|
 |
|
Payment gateways that include the sandbox mode for merchant accounts in our form builder are:


New Thank You page
123FormBuilder allows you to redirect your respondents to a webpage after they complete a submission on your form. To set this up, from the Create tab of your form, select Thank You on the left-side panel.

You will find the Redirect to URL option at the top of the right-side menu. Once you enable this feature, more options will open below.

First, add the URL where you want to redirect your form respondents. Optionally, you can also type in a Title for your link. You can choose to open the webpage on the Same page or in a New tab.
If you want to redirect your users automatically, then disable the Show “Thank You” Page toggle. Otherwise, your users will reach the Thank you page and be redirected after a few seconds. You can even set the Seconds until redirect: between 5 and 60 seconds.
Legacy Thank You page
You can redirect users to a web page URL after they submit your form. To enable this feature in the form builder, from the Form Editor select the Thank You section.
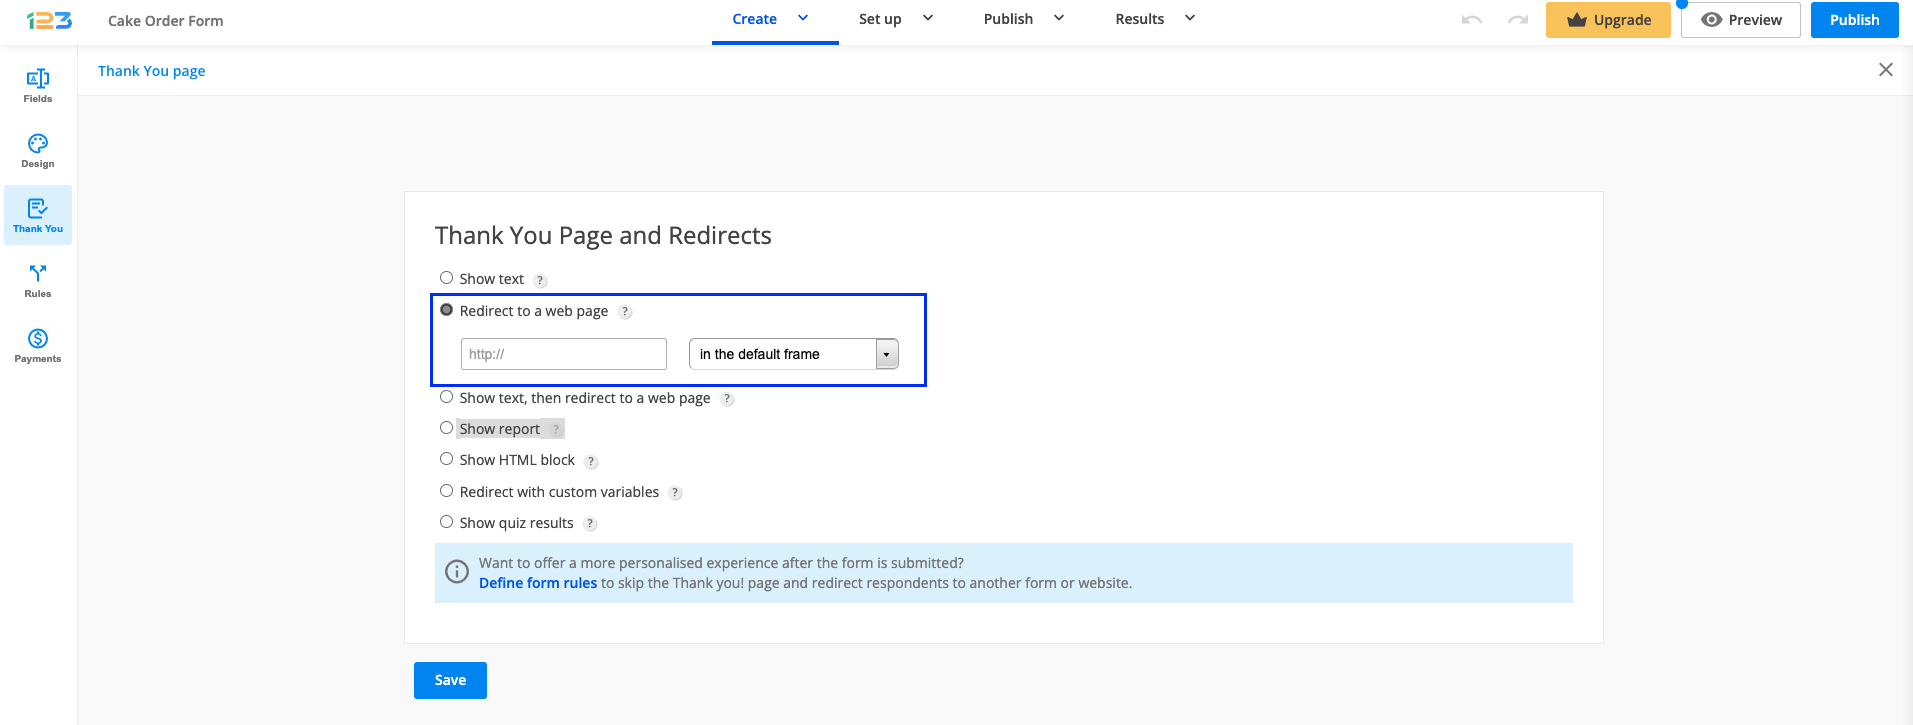
After that, click the Redirect to a web page option and add the URL in the box below. Make sure to use a secured URL (starting with https).
You can choose to open the web page in four ways:
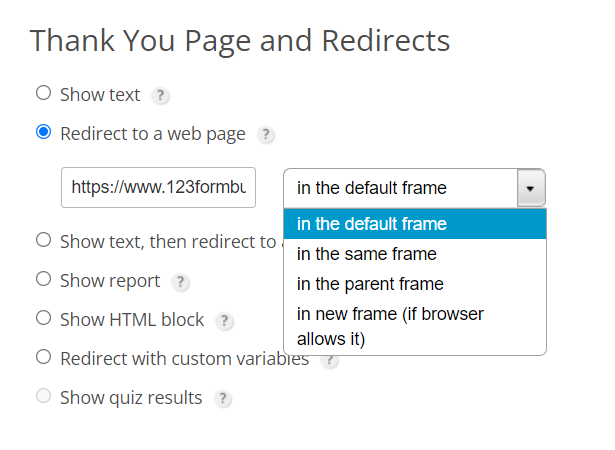
- in the default frame. This depends on the situation. This option is selected by default to let our platform pick the most suitable way to open the webpage, depending on aspects such as the browser the form visitor is on.
- in the same frame. The webpage opens within the same window. However, when the form is embedded, it might open inside the layout of the web form.
- in the parent frame. The webpage opens in the same tab of the browser, on the entire window. The same goes when the form is embedded on a website.
- in new frame (if browser allows it). The webpage opens in a new window. If form visitors use popup blockers on their browsers, chances are the webpage will not show after submitting the web form.
Related articles
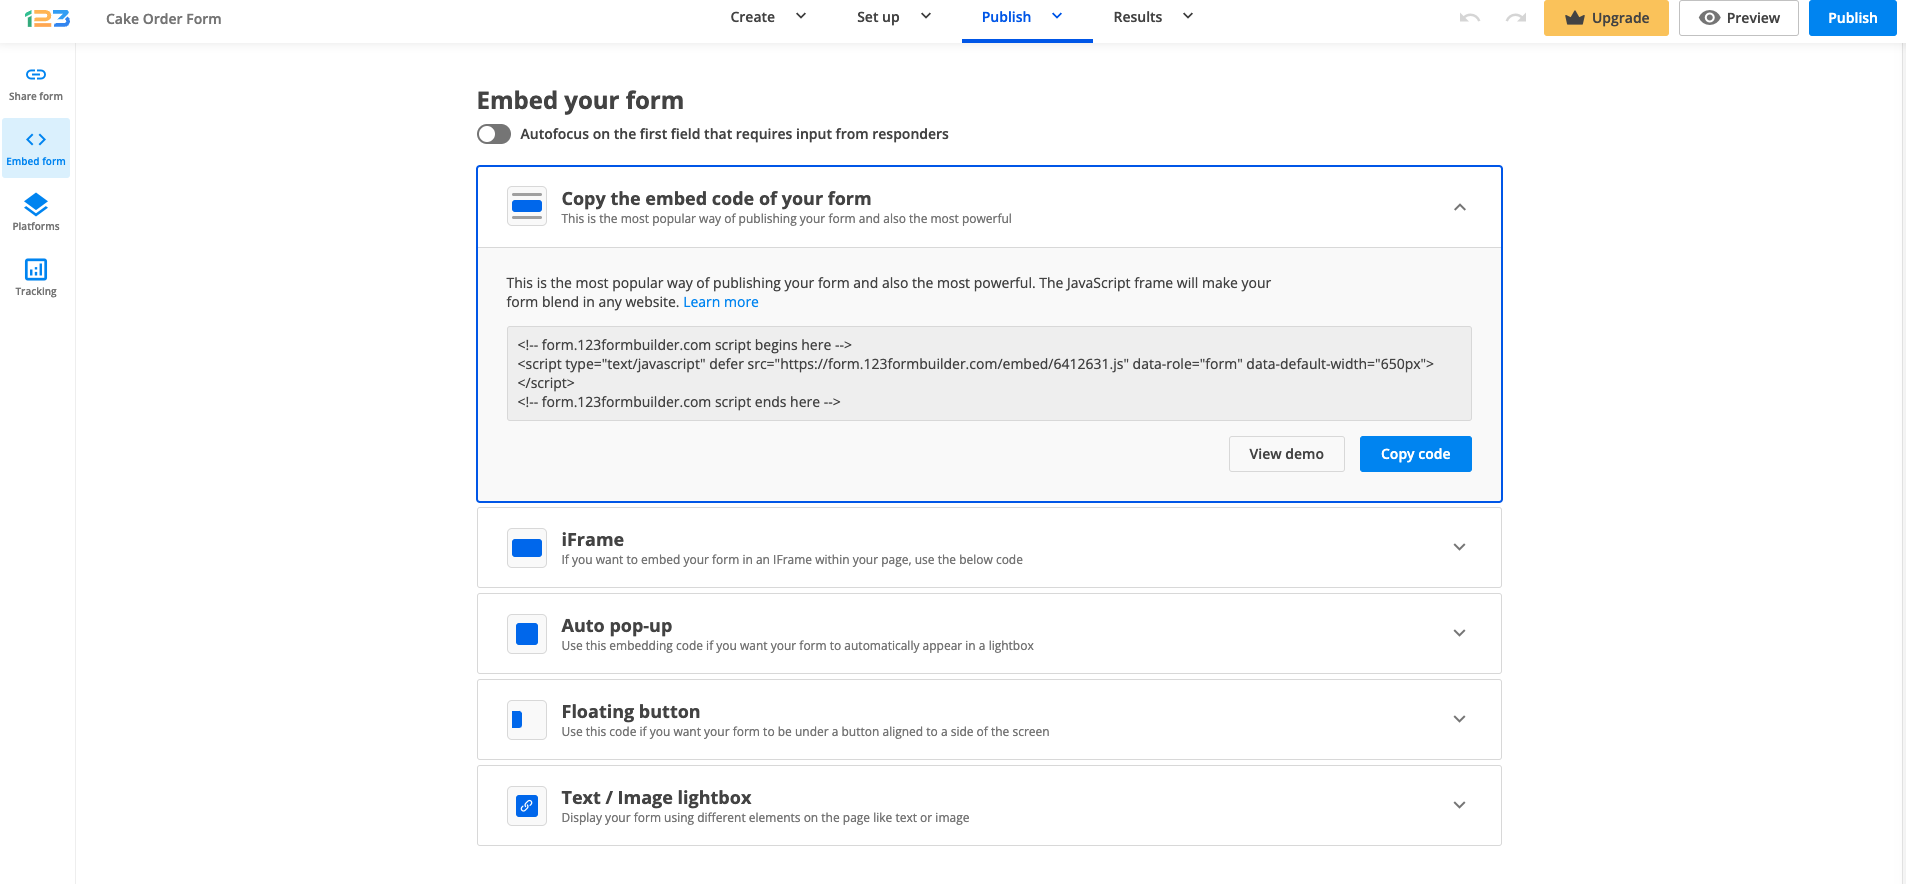
The best way to publish an online form on any of your websites would be by embedding it with the JavaScript code we have provided for you. Go to the Publish → Embed form section of your form within the form builder to copy it.
To publish online forms on Yola, enter the editor of your Yola webpage and add the HTML Code widget on your page.
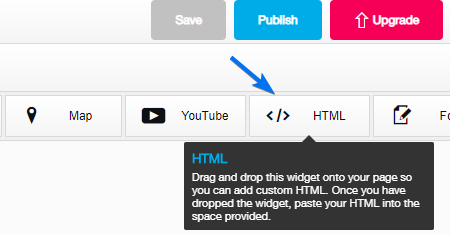
Paste the JavaScript code from 123FormBuilder in the HTML Code widget and hit Save. If the form is not visible in the editor, preview your webpage and you will see it there.
Save changes and publish your webpage. From now on, people will be able to submit data from your Yola website to your 123FormBuilder account.
You can import translations from one web form to another within your form builder account. This way, you can save yourself some time. Here’s how you can import translations into your form.
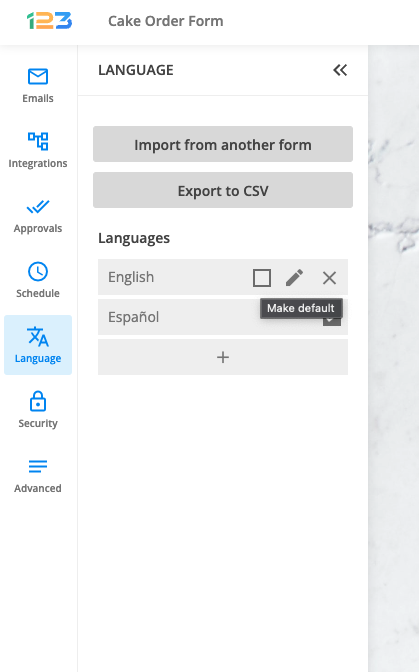
Go to the Language section of your form and set the default language from the left-side panel.
Click on the Import from another form button and in the lightbox select the form with the translations you want to import. Click on Import and you are done. The translations have been successfully added to your web form.
Important Note
Form fields translations are not imported, only System messages, Email notifications messages and Payment messages can be imported.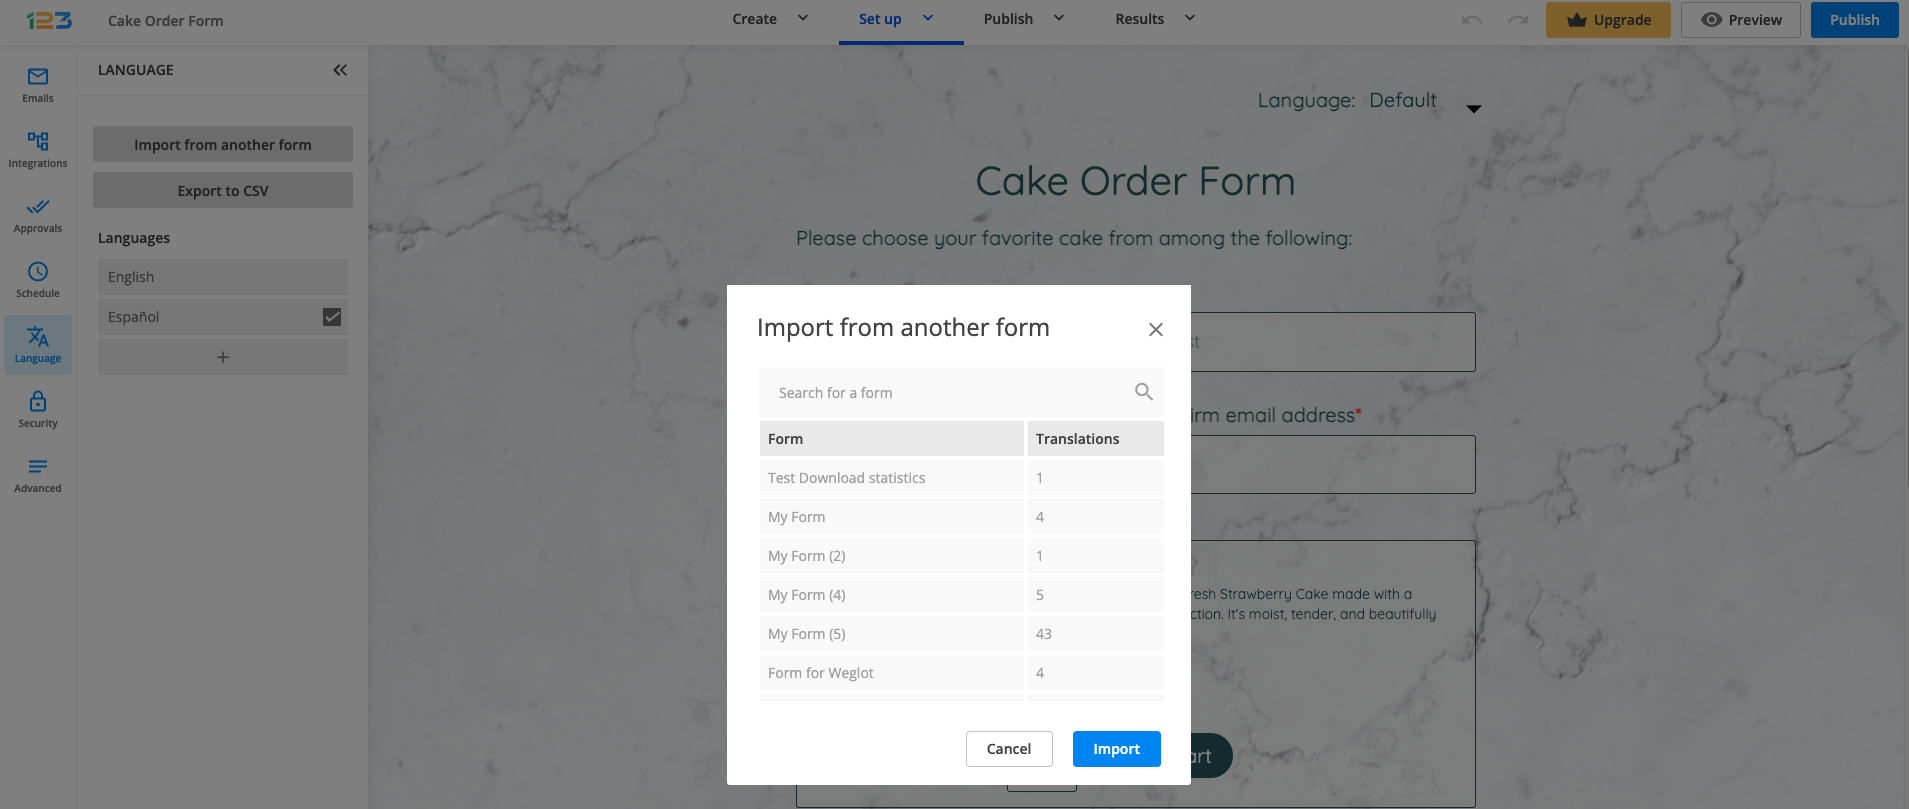
You can click on the Customize button at any time to make any needed adjustments. Hover over the language and press the Customize button that appears.
If you want to change the default language, simply hover over the language you want to set as default and press the Make default checkbox that appears on the line.
To embed an online form on one of your Moonfruit websites, go to the Publish section of your form in the form builder and copy the Javascript code.
Next, log in to your Moonfruit account and access your website’s editor.
1. Press the Insert button and add the HTML Snippet object to your website.
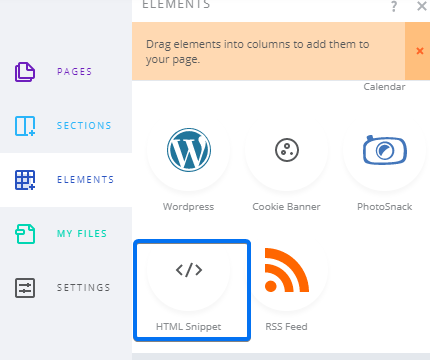
2. In the Editor panel of the selected, open the HTML Snippet Options.
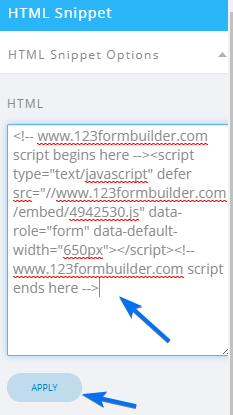
3. Paste the Javascript code of your form in the Setup box and hit Apply. Adjust the size and position of the object according to your needs.
4. The online form will not be visible inside the editor. Save your changes and check your webpage to see how your form is embedded.
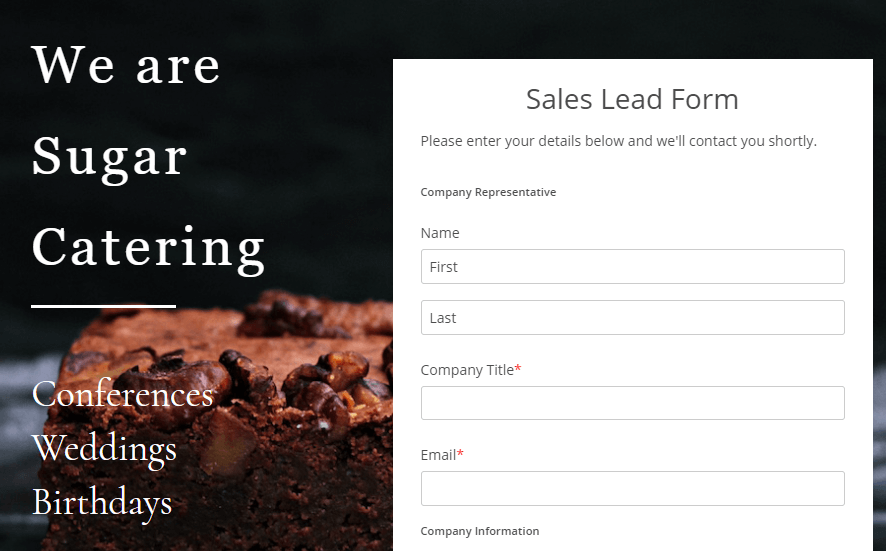
Here is an example:
You can add more than one online form on the same page. Follow the steps above each time you want to add a new online form on one of your Moonfruit sites.
Learn more about building Moonfruit forms with 123FormBuilder.
You can easily integrate Braintree with your form. This means you can trust our form builder services when receiving money in your Braintree account from your clients through form submissions.
Setting up your Braintree integration.
1. Click New Form from your account dashboard and start creating your payment form.
You can use choice fields (single/multiple choice and dropdown lists) to display the products on sale or, even better, Product field.
2. In your Form Editor, in the left side panel, you will notice the Payments section. By using the search bar, you can quickly find Braintree.
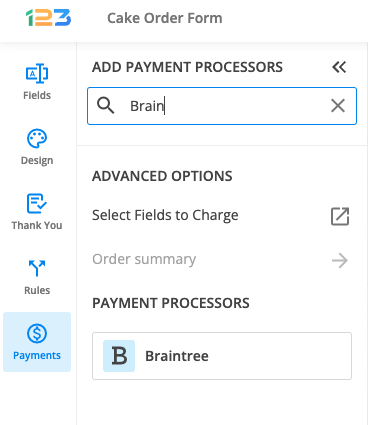
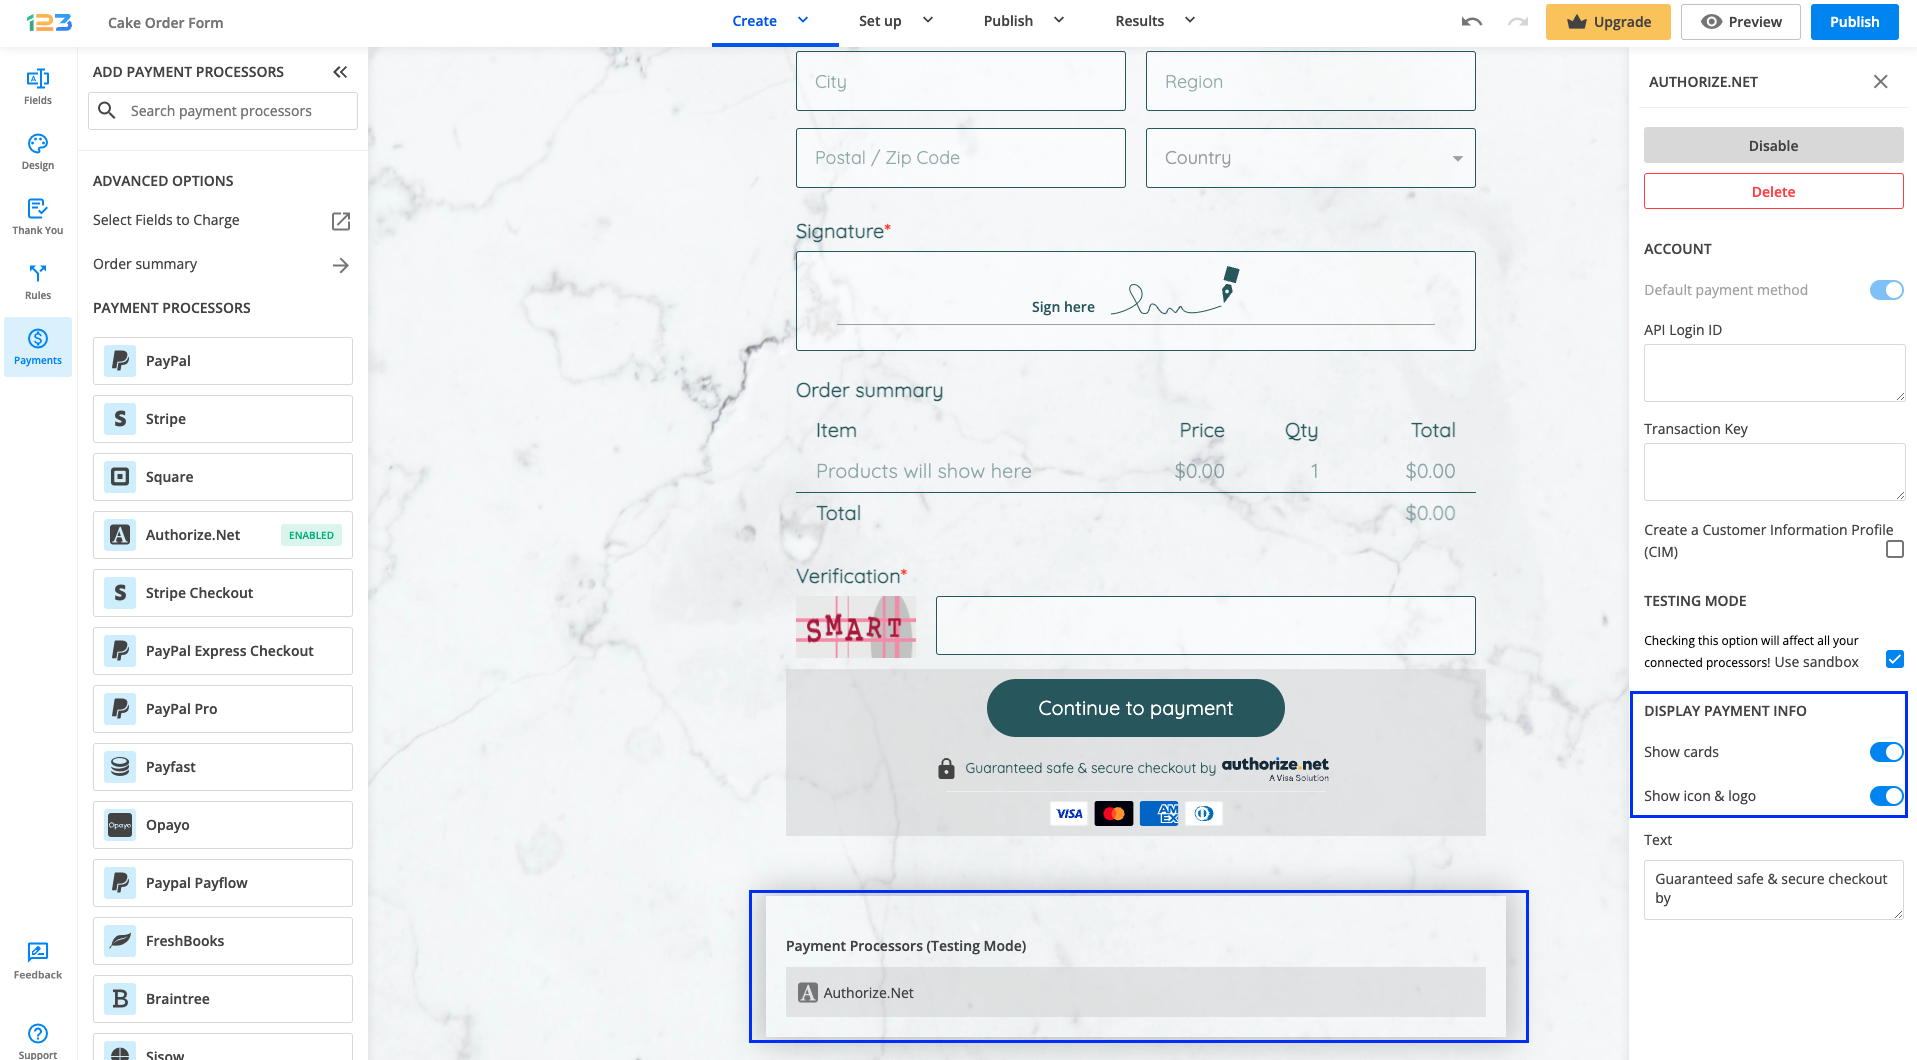
3. After adding Braintree on your form, you will notice a couple of changes: the Braintree payment processor has a tag near its name & the settings panel opens up to the right side of the page.
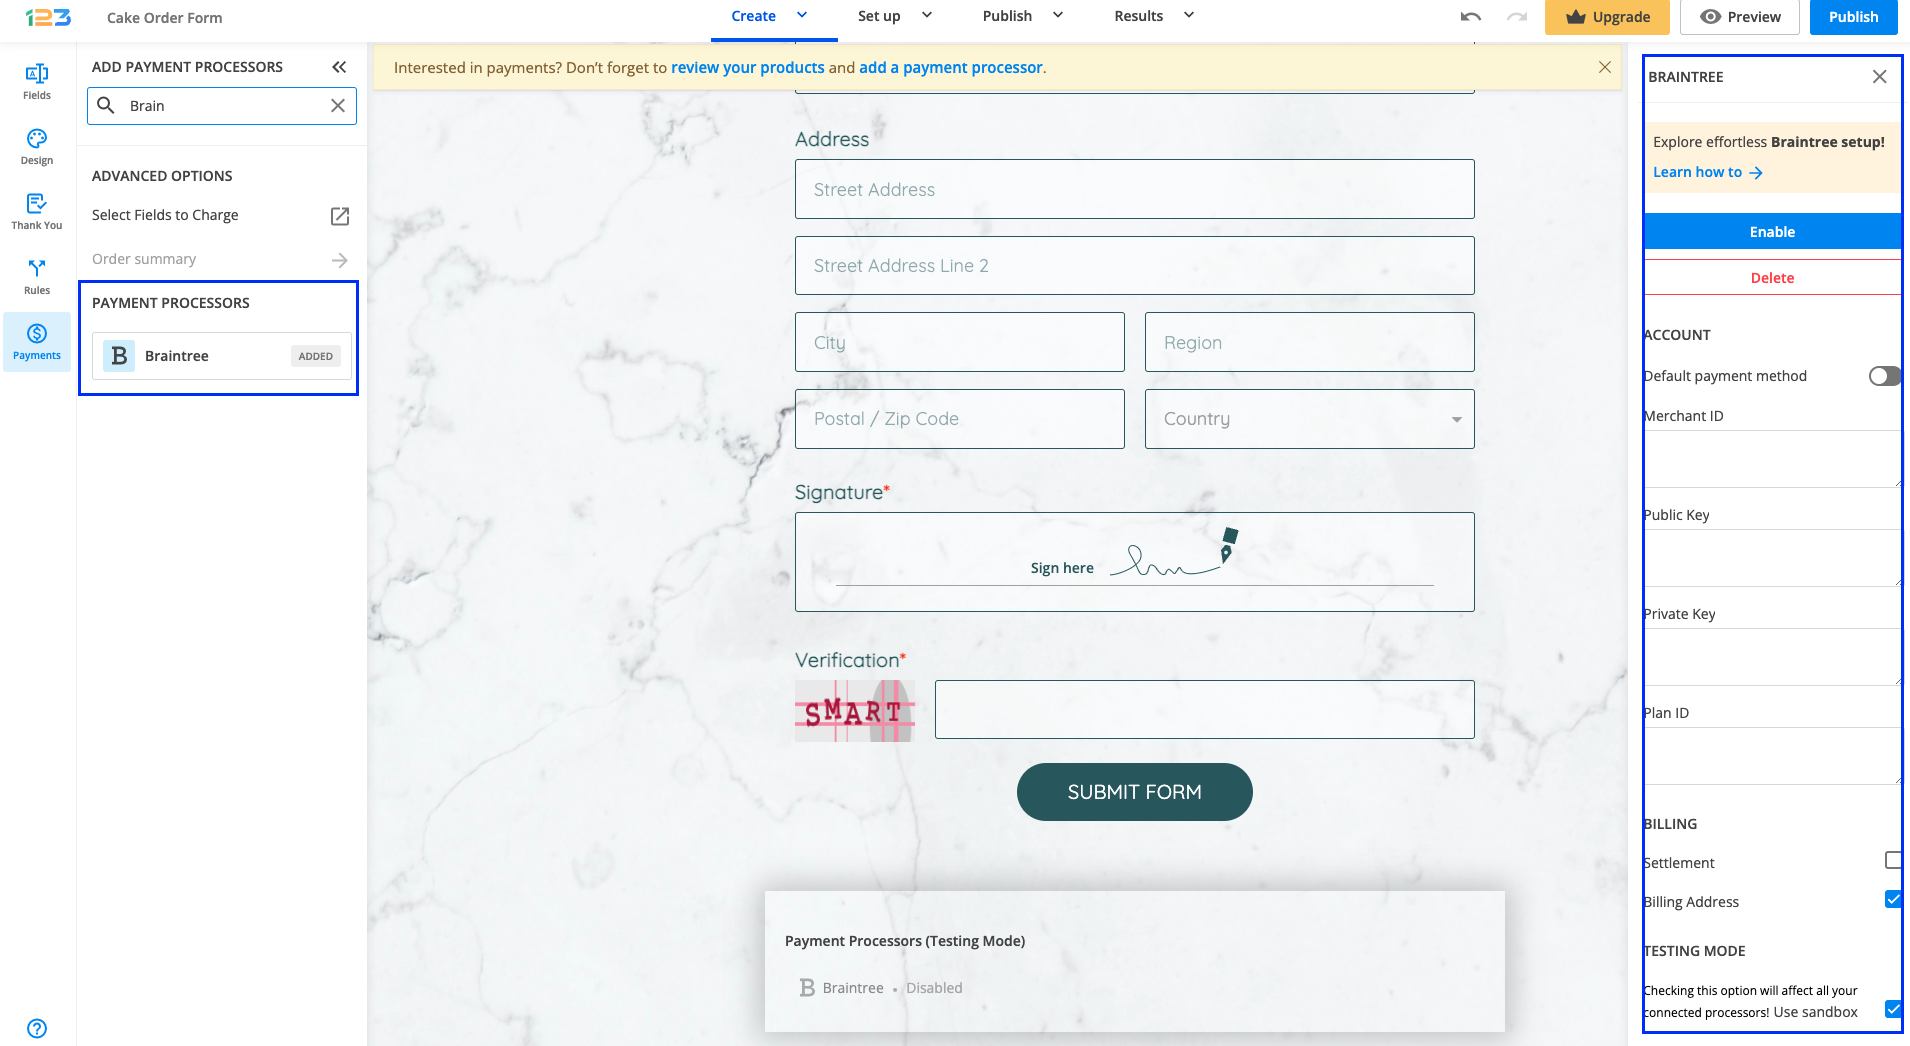
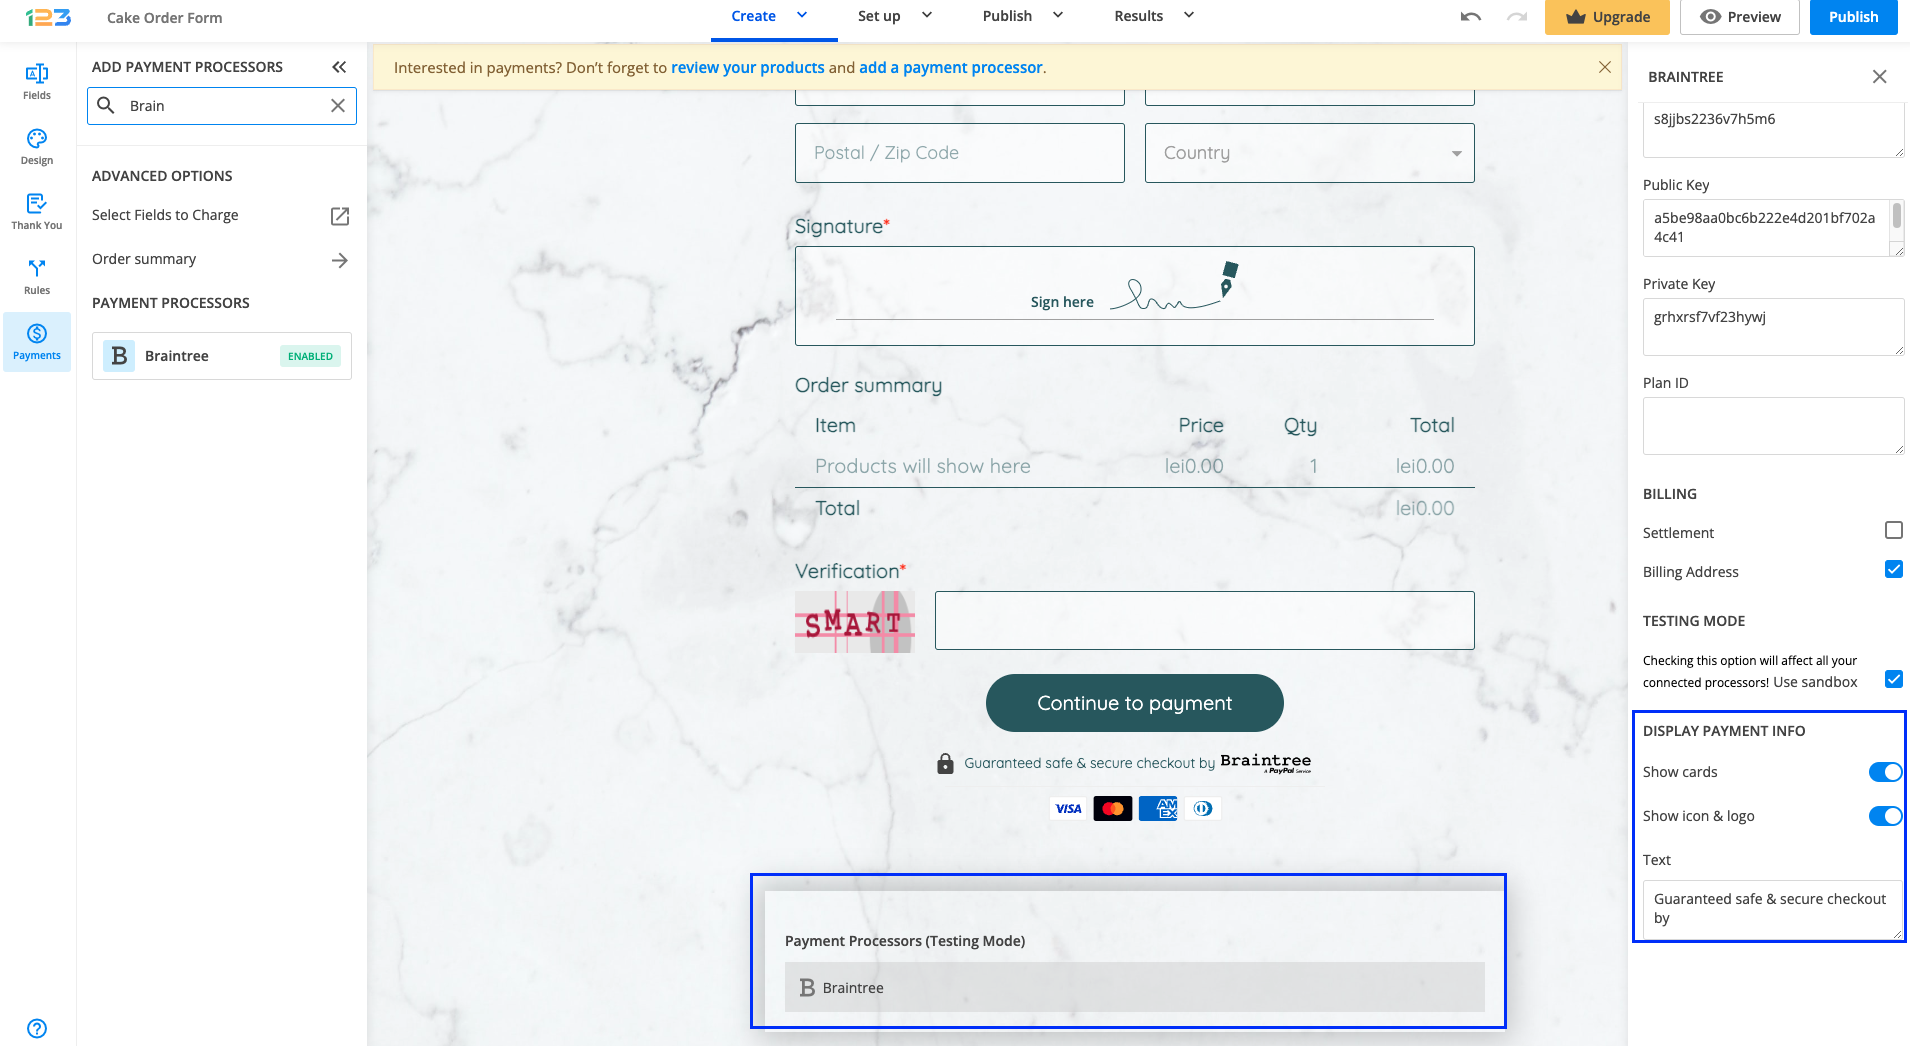
4. In order to enable Braintree, you need to provide the Merchant ID, the Publich Key, Private Key and Plan ID.
5. Enable the payment integration by clicking on Enable button. By enabling Braintree, you will notice a couple of changes on your form.
The Braintree payment processor on the left side panel has an Enabled tag on it so you could easily scan which payment processor is enabled.
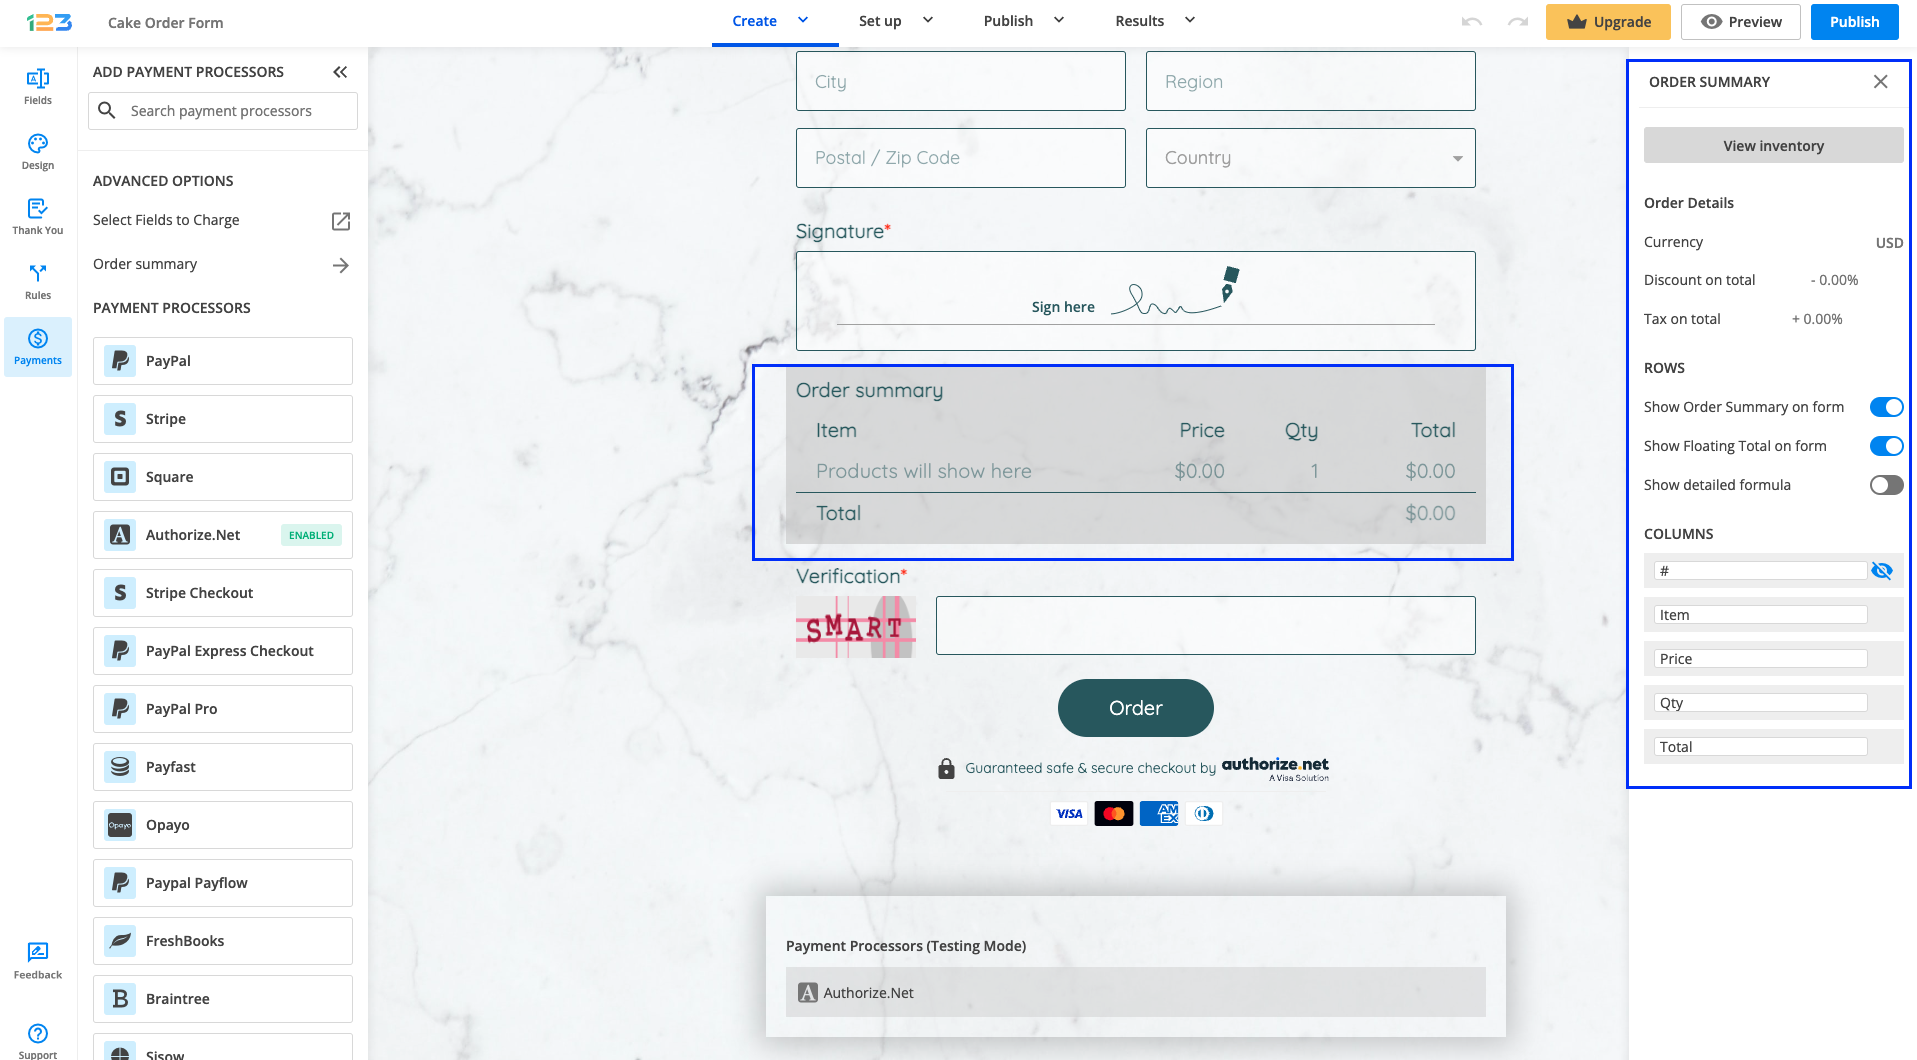
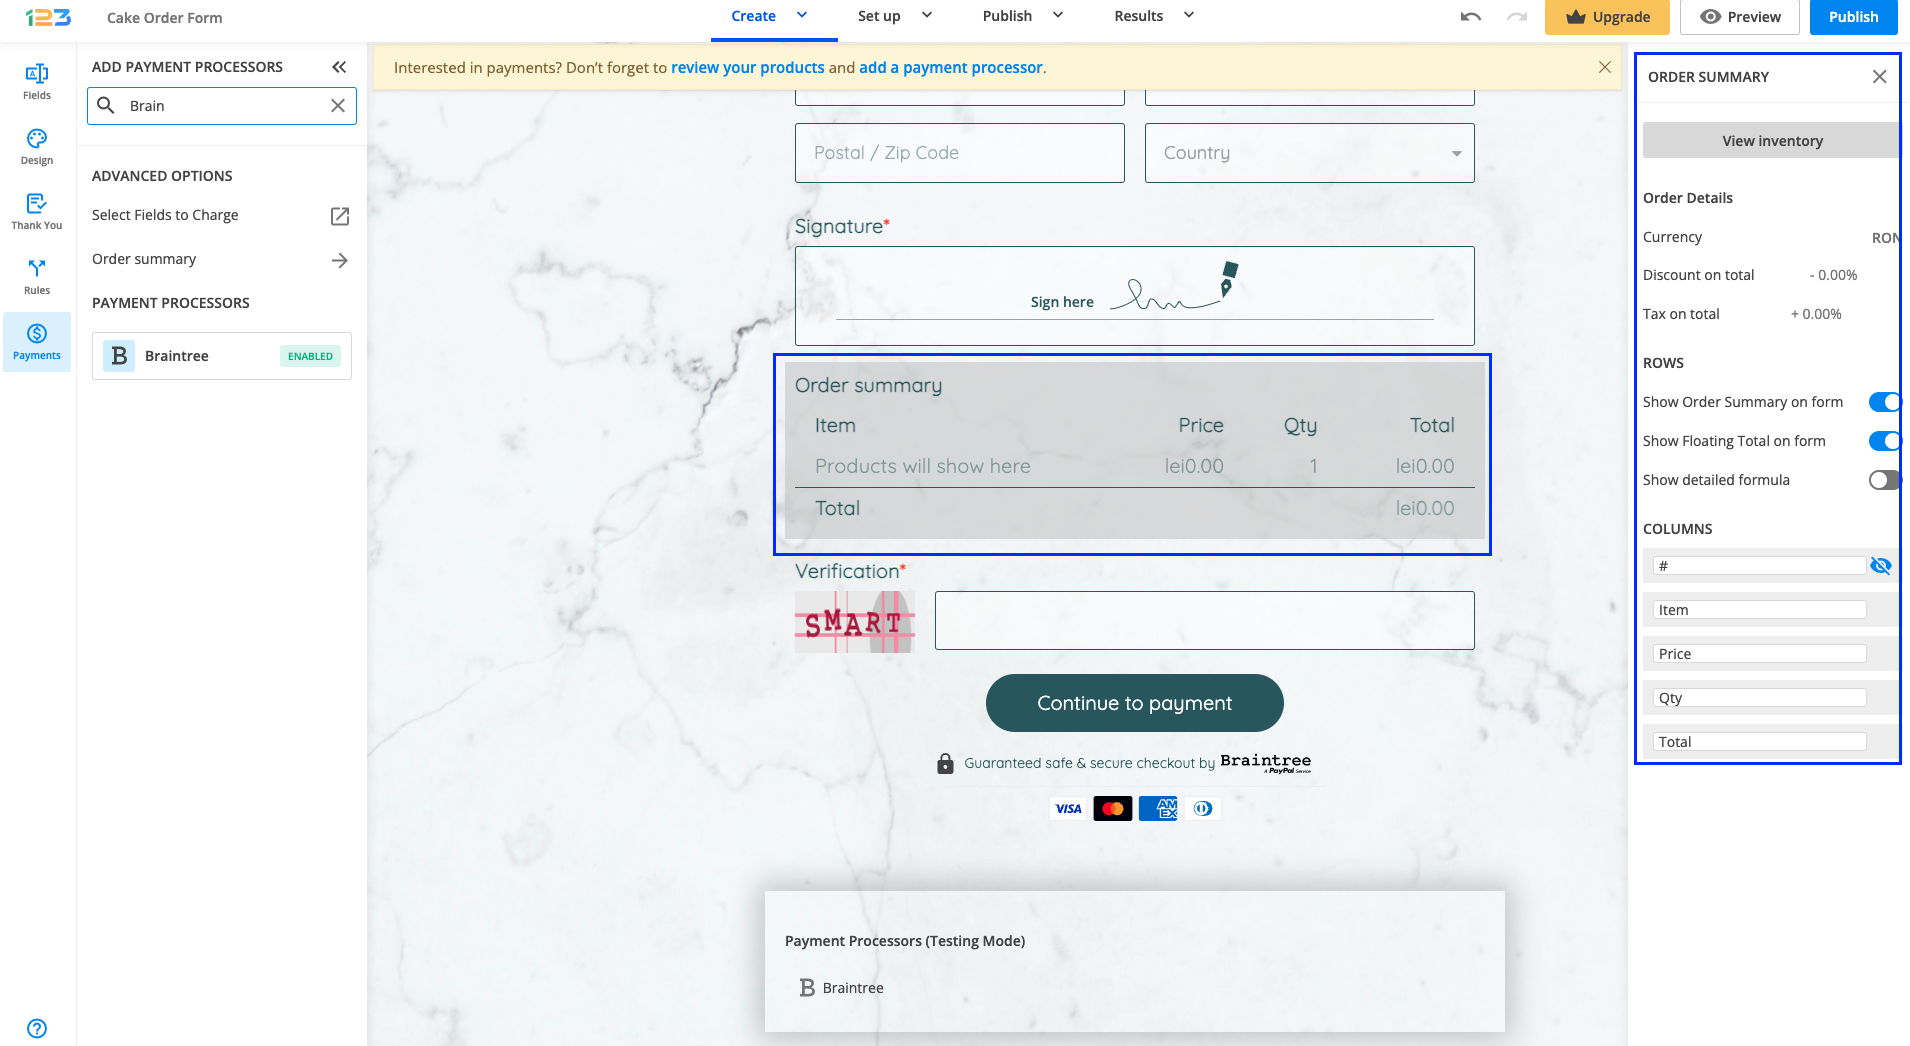
Another change is that on your form it will be displayed an Order summary. Here will appear all the products your respondents select on the form, together with the price per option, quantity and the total price. If you want to customize the order summary, all you have to do is click on it and the available settings appear on the right side panel.
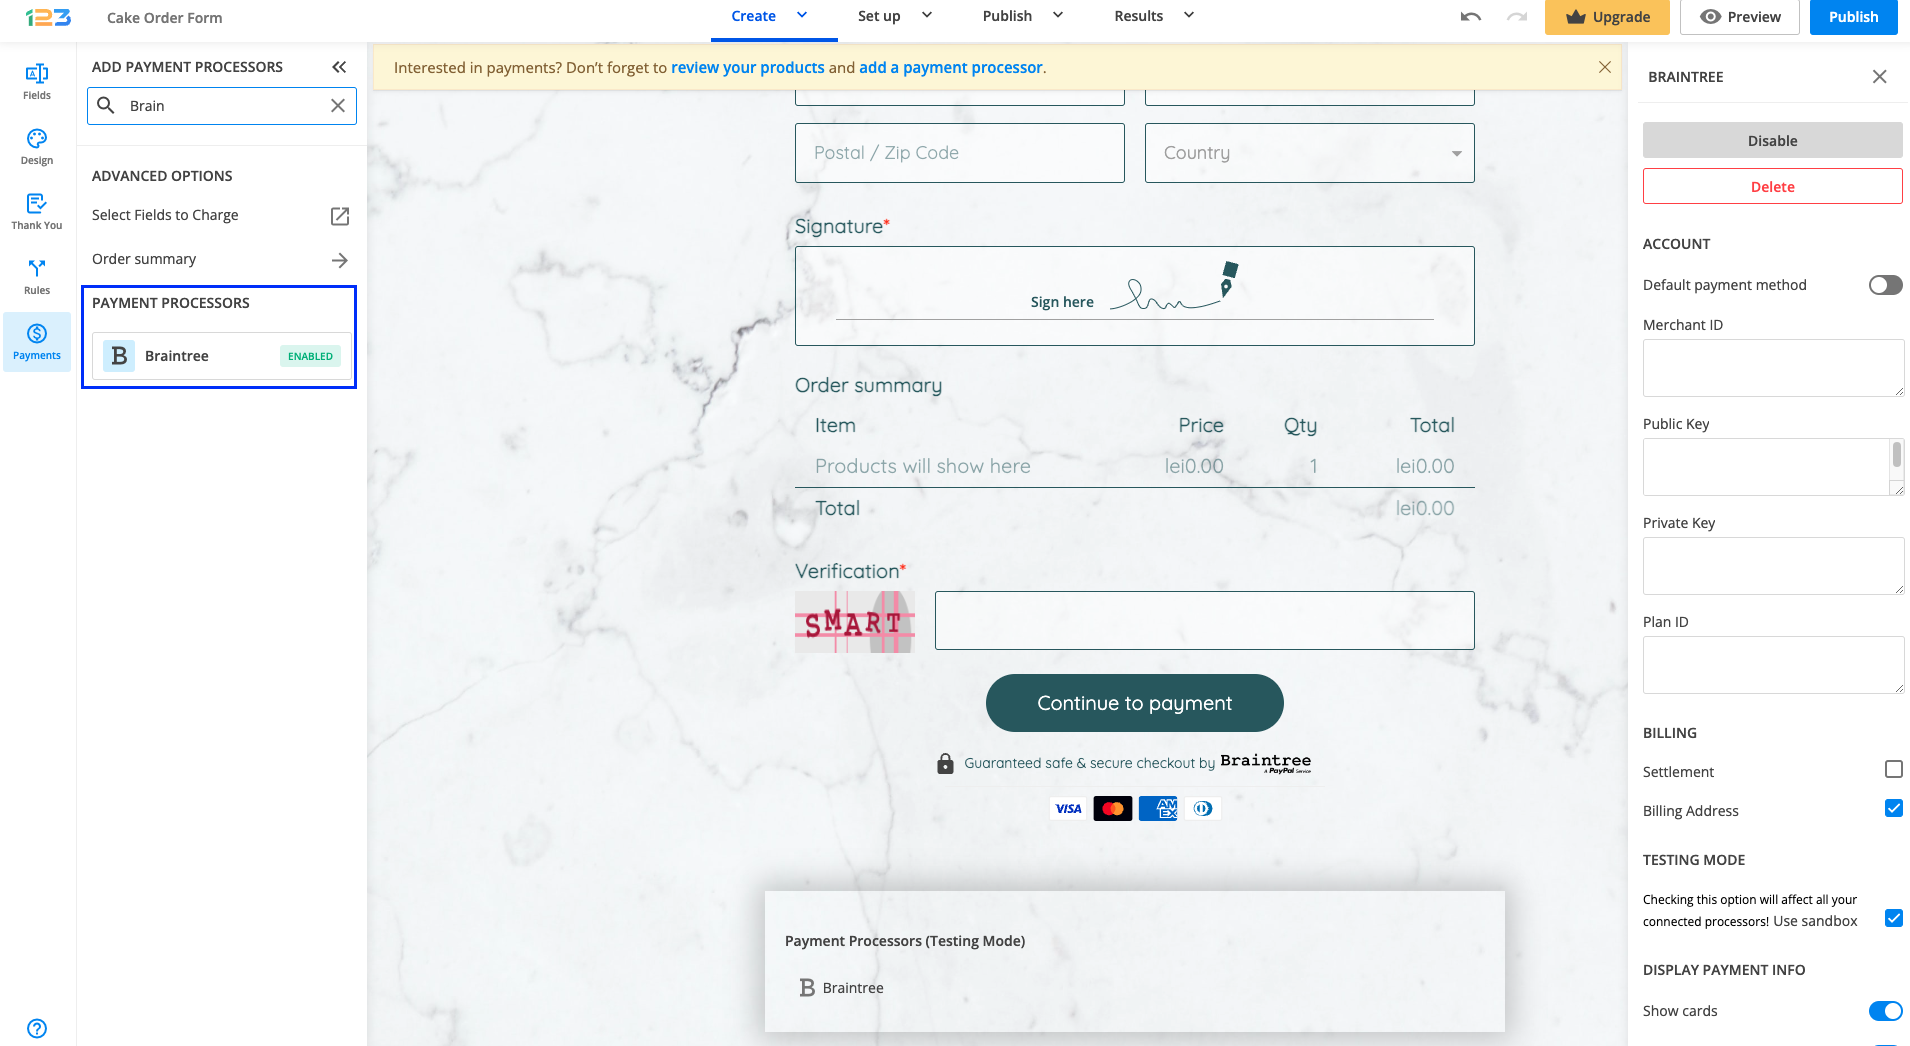
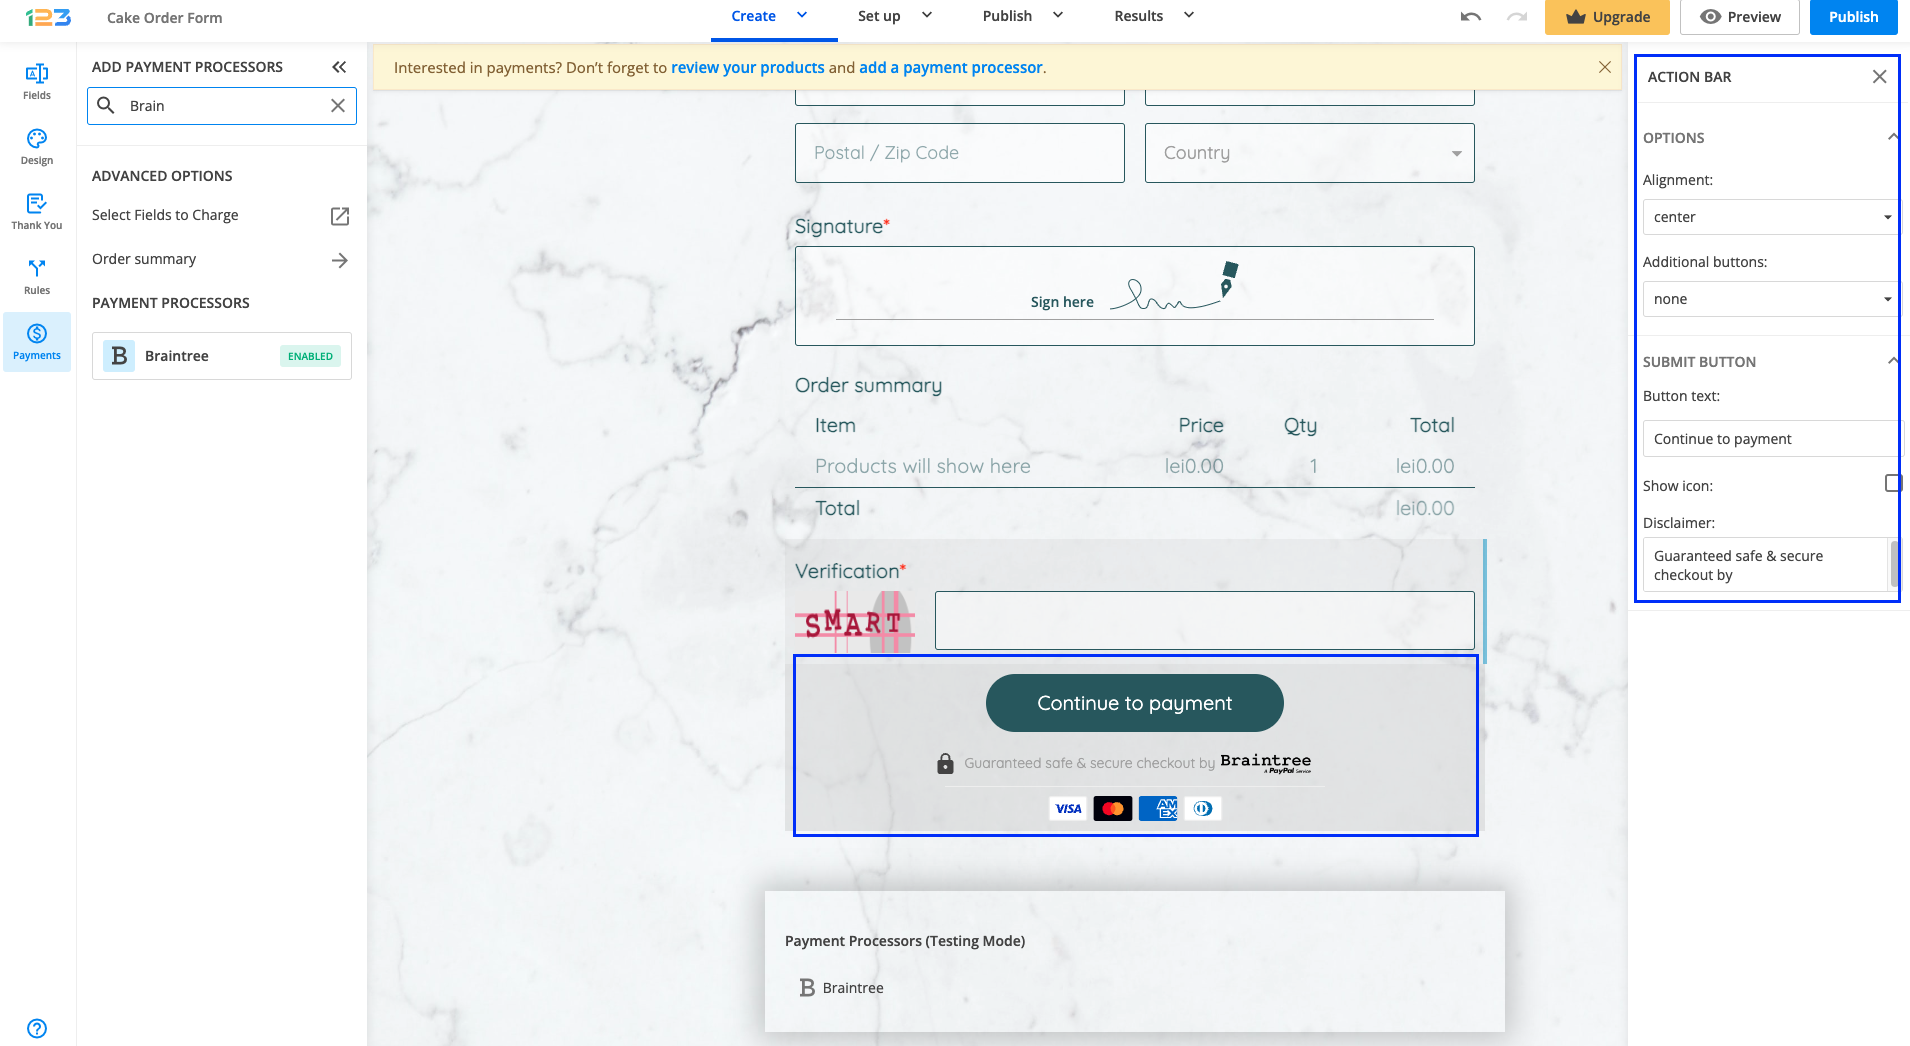
Another change is related to the Submit button. Once your payment integration is enabled, the Submit button is changed to Continue to payment. Below it, we are displaying a disclaimer together with the Braintree logo so that respondents are aware they are proceeding to a payment.
Also, the accepted cards by the Braintree integration are visually displayed so that respondents know from the start what is the accepted payment method.
You can customize the action bar (everything that is related to the submit button, additional buttons, disclaimer, etc) by simply clicking on this area.
By clicking on the Payment processor below the form, the settings for the payment processor are opened to the right side panel. Another thing that you can customize is whether you want to show the accepted cards & the icon and logo on the form. By default, they are on.
Braintree is an easy solution for merchants, who seek the ideal payment gateway for their online businesses. Its services are available in Europe, the United States, Canada, Australia, Singapore, Hong Kong SAR China, Malaysia, and New Zealand. Payments can be made in over 130 currencies, shown in the table below.
Here is what you can benefit from by using Braintree:
1. Processing payments through your website or by mobile phone.
2. Use recurring billing, which must be set in your Braintree account and not in the Payments section of your 123FormBuilder account.
3. Customized pricing offers if you’re running a company that processes thousands of transactions per month.
For more information follow Braintree’s frequently asked questions section.
Start your online business and make money by integrating Braintree into your 123FormBuilder forms.
Braintree – Available currencies
| United Arab Emirates dirham | Armenian dram | CFA franc | Argentine peso | Australian dollars |
| Zambian kwacha | Azerbaijani manat | Bosnia and Herzevina Convertible Marks | Barbados dollar | Bangladeshi taka |
| Bulgaria lev | Zimbabwean dollar | Bahraini dinar | Bermudian dollar | Brunei dollar |
| Bolivian boliviano | Brazilian real | Bahamian dollar | Botswana pula | Belarussian ruble |
| Belizean dollar | Canadian dollars | Swiss franc | Chilean peso | Chinese Yuan renminbi |
| Colombian peso | Costa Rican colon | Serbian dinar | Cape Verde escudo | Cyprus pound |
| Czech Republic koruna | Djiboutian franc | Danish krone | Dominican peso | Algerian dinar |
| Estonian kroon | Egyptian pound | Ethiopian birr | Euro | Fiji dollar |
| Falkland Islands pound | British Pound Sterling | Georgian lari | Ghanan cedi | Gibraltar pound |
| Gambian dalasi | Guinea franc | Guatemala quetzal | Guinea-Bissau peso | Guyanese dollar |
| Hong Kong dollar | Honduras lempira | Croatia kuna | Haitian gourde | Hungarian forint |
| Indonesian rupiah | Israeli shekel | Indian rupee | Iceland krona | Jamaican dollar |
| Jordanian dinar | Japanese yen | Kenyan shilling | Kyrgyzstan som | Cambodian riel |
| Laos kip | Comoroan franc | South Korean won | Kuwaiti dinar | Cayman Islands dollar |
| Kazakhstan tenge | Lebanese pound | Sri Lanka rupee | Lithuania litas | Latvia lat |
| Libyan dinar | Moroccan dirham | Moldova leu | Mongolia tugrik | Macanese pataca |
| Mauritanian ouguiya | Maltese lira | Mauritius rupee | Maldiveres rufiyaa | Malawi kwacha |
| Mexican peso | Uzbekistan som | Malaysia ringgit | Nigeria naira | Nicaraguan cordoba |
| Norwegian krone | Nepalese rupee | New Zealand dollar | Omani rial | Panamian balboa |
| Peru Nuevo sol | New Guinea kina | Philippine peso | Pakistan rupee | Poland zloty |
| Paraguayan guarani | Qatari rial | Romanian lei | Tanzanian shilling | Russian ruble |
| Rwanda franc | Saudi Arabian riyal | Solomon Islands dollar | Seychelles rupee | Swedish krona |
| Singapore dollar | St. Helena pound | Slovenian tolar | South African Rand | Sierra Leonean leone |
| Somalia shilling | Sao Tome & Principe dobra | Swaziland lilangeni | Thailand baht | |
| Tonga pa’anga | New Turkish lira | Trinidad and Tobago dollar | New Taiwan dollar | |
| Vanuatu vatu | Uganda shilling | US dollar | Uruguayo peso | |
| Venezuelan bolívar | Vietnam dong | Yemeni rial | Ukraine hryvnia | |
| East Caribbean dollar | CFP Franc | Samoan tala | Tunisian dinar |
Most Popular
Frequently Asked Questions
Here is a list of the most frequently asked questions. For more FAQs, please browse through the FAQs page.