123FormBuilder Knowledge Base
Search our documentation platform for answers, service specifications and 3rd-party integrations.
Knowledge Base
How can I disable or enable this option?
Why am I not allowed to enable Allow autosave progress for all respondents?
Are respondents informed that their progress has been restored?
Can my respondents’ data by accessed by anyone else?
For example, if you share your form on your website and it can be accessed by anyone, chances that two different people complete the same form using the same browser and device are really low.
On the other side, if you have an operational form that is being completed by multiple respondents using the same browser/device, then it might be better to turn Allow autosave progress for all respondents off. Having it on means that the following employee could access data from another employee just because they are using the same browser and device and the form was not submitted.
How does this work if I’m using prefill for any form fields?
When accessing the form the second time, the prefill works as usual – the fields are prefilled according to your settings. If we detect that there is data provided by the respondent saved for this form, from the same browser/device, then we are automatically retrieving it and overwrite the prefilled data if it was modified by your respondent.
I have the following use case: I have some data in Salesforce that is prefilling my form. My respondent accesses the form, starts providing information, but abandons. In that 15 days timeframe, I’m updating the Salesforce data. What does my respondent see when accessing the form again within that 15 days timeframe?
When you have this option enabled, we are storing in the respondents browser the information they provide. Here are two possibile scenarios:
1. Your respondent modifies a field that was prefilled from Salesforce – in this case, when your respondent accesses the form the second time, within that 15 days timeframe, we are automatically retrieving the information your respondent has provided.
2. Your respondent does not modify a field that was prefilled from Salesforce – in this case, the Saleforce prefill works as usual. If you have updated the data in Salesforce in the meantime, when your respondent access the form the second time within that 15 days timeframe, then the new data from Salesforce will be prefilled.
Will this data arrive in any third-party app?
Will this data be available in Submissions table?
You have asked, we have listened! You can delete data from Insights with the click of a button.
Let’s say you have tested your form with various team mates. In this case, your Insights data reflects inaccurate data once your form is shared with your respondents.
Once all your tests are ready and you want to share your form with your respondents, you can delete the data from Insights.
Form insights
You can delete the data from Insights directly from Form Insights section, as per below video.
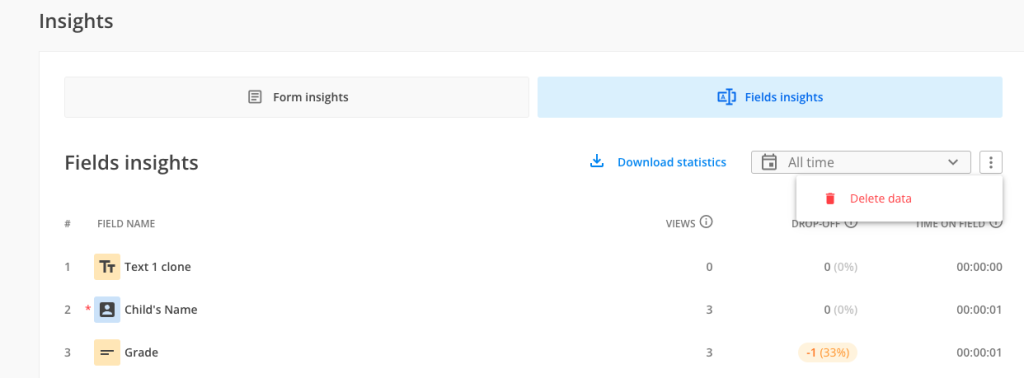
Fields Insights
The data from Insights can also be deleted from Fields Insights section, following the same steps as described above.
Important Note
Deleting data from Form Insights has an effect on Fields Insights data as well. Deleting data from Fields Insights deletes the data from Form Insights.This action can not be undone.
Related articles
What is Sisow?
How does Sisow work?
Is Sisow secure?
Is Sisow international?
What payment methods does Sisow offer?
Does Sisow charge any transactional fees?
- iDEAL: 45 cents per transaction
- Bancontact: 25 cents per transaction
- Credit card (Visa/Mastercard): 1.5% per transaction
How can I integrate Sisow with my 123FormBuilder form?
Related articles
What is PayPal Payflow?
How does PayPal Payflow?
After the payment information is verified, and if it is authorized, the transaction is processed and the funds are transferred from your respondent’s account to your account. At the end of each day, PayPal Payflow settles the transactions and deposits the funds into your bank account.
Is PayPal Payflow secure?
Is PayPal Payflow international?
What payment methods does PayPal Payflow offer?
Does PayPal Payflow charge any transactional fees?
- Domestic transactions: PayPal Payflow charges a transaction fee of 2.9% + $0.30 per transaction for credit and debit card payments
- Cross-border transactions: PayPal Payflow charges a transaction fee of 4.4% + fixed fee based on the currency used + $0.30 per transaction for credit and debit card payments
Note that the fees may be subject to change so it is advised to check the most up-to-date fee schedule on PayPal’s website.
How can I integrate PayPal Payflow with my 123FormBuilder form?
In order to enable it, you need to provide the username, merchant, partner and password. This information can be retrieved from PayPal Manager. You can also set the payment as a recurrent one.
Related articles
Step by step guide on 123FormBuilder and PayPal Payflow integration
What is PayFast?
How does PayFast work?
Is PayFast secure?
Is PayFast international?
However, PayFast does support payments from international customers if they have a South African bank account or a card issued by a South African bank. Other currencies are also accepted, but the funds will be converted to South African Rand before being deposited into your account.
What payment methods does PayFast offer?
Does PayFast charge any transactional fees?
- Credit card payments: 3.5% + R2.00 per transaction for Visa and Mastercard payments/4.5% + R2.00 per transaction for American Express payments
- Debit card payments: 2.5% per transaction
It’s important to note that PayFast may also charge additional fees for certain services, such as chargebacks, refunds, and account withdrawals. You should carefully review the PayFast pricing page for a complete list of fees and charges.
How can I integrate PayFast with my 123FormBuilder form?
In order to enable it, you need to provide your Merchant ID and Merchant Key – these can be found in your PayFast account, under Merchant identifiers.
Related articles
What is SagePay?
How does SagePay work?
Once the payment is authorized, Sage Pay sends a payment confirmation to you. The payment is settled into your account, typically within a few days.
Is SagePay secure?
Is SagePay international?
What payment methods does SagePay offer?
Does SagePay charge any transactional fees?
For example. In UK, Sage Pay’s transaction fees for debit and credit card payments start at 2.9% + 30p per transaction for businesses processing up to 1,000 transactions per month.
How can I integrate SagePay with my 123FormBuilder form?
In order to enable it, you need to provide Vendor name and Encryption password. These two are delivered to you in the confirmation email send by Sage Pay when you create your account. Also, you can set up the Vendor Email and Partner ID: Vendor Email is the email address that will receive order confirmations and failures, while Partner ID can be used if you are a Sage Pay partner and if you want to flag transactions with your unique partner ID.
Related articles
What is PayPal Pro?
How does PayPal Pro work?
Is PayPal Pro secure?
Is PayPal Pro international?
However, the availability of PayPal Pro and the specific features it offers may vary depending on the country in which you are located.
What payment methods does PayPal Pro offer?
Does PayPal Pro charge any transactional fees?
- Credit and debit cards: there is a transaction fee of around 2.9% to 3.5% of the transaction amount, plus a fixed fee (usually around $0.30 per transaction). The exact fee depends on the country you are located, the currency used for transaction and the type of credit card used by respondents.
- PayPal Accounts: PayPal Pro charges a transaction fee of around 2.9% to 3.5% of the transaction amount, plus a fixed fee (usually around $0.30 per transaction).
How can I integrate PayPal Pro with my 123FormBuilder form?
In order to enable it, you need to provide the API Username, API Password and API Signature (the credentials can by taken from your PayPal Account Profile). You can also set the payment to be a recurrent one.
Related articles
Step by step guide on 123FormBuilder and PayPal Pro integration
What is PayPal Express Checkout?
How does PayPal Express Checkout work?
Is PayPal Express Checkout secure?
Is PayPal Express Checkout international?
What payment methods does PayPal Express Checkout offer?
Does PayPal Express Checkout charge any transactional fees?
- Domestic transactions: within the same country, PayPal charges a fee of 2.9% of the transaction amount plus a fixed fee based on the currency used. For example, in the United States, the fixed fee is $0.30 USD.
- International transactions: charges of 4.4% of the transaction amount plus a fixed fee based on the currency used.
- Currency conversion: PayPal charges a currency conversion fee of 2.5% to 4% of the transaction amount.
What payment methods does PayPal Express Checkout offer?
After adding PayPal Express Checkout to your form, in order to enable it, you need to provide your Client ID. You can also customize billing settings, such as detailed invoice or using shipping.
Related articles
Step by step guide on PayPal Express Checkout integration with 123FormBuilder
What is Braintree?
How does Braintree work?
The payment information is securely transmitted to Braintree’s payment gateway for processing.
After being validated, checked for fraud, ti is transmitted to the relevant payment processor or bank for authorization.
After the payment is approved, Braintree receives the payment authorization response from the payment processor and transmit it to you, receiving a payment confirmation so you could fullfil the order or service requested by your respondents.
Is Braintree secure?
Is Braintree international?
What payment methods does Braintree offer?
Does Braintree charge any transactional fees?
How can I integrate Braintree with my 123FormBuilder form?
Related articles
What is Freshbooks?
How does Freshbooks work?
Once your payment gateway is connected to FreshBooks, you can create and send invoices to your respondents with the payment options embedded directly in the invoice.
When your respondents pay an invoice online, the payment is automatically recorded in the FreshBooks system, making it easier to keep track of transactions and maintain accurate records.
Is Freshbooks secure?
Is Freshbooks international?
What payment methods does Freshbooks offer?
Does Freshbooks charge any transactional fees?
However, if you use a third-party payment gateway such as PayPal or Stripe, you may also incur transaction fees charged by those providers.
How can I integrate Freshbooks with my 123FormBuilder form?
In order to enable it, you need to provide the some information: URL (of your FreshBooks account, Token key of your account. You also need to match the 123FormBuilder fields with your client information and you can also write some internal notes and choose to update the client if the email already exists.
Related articles
What is Authorize.net?
How does Authorize.net work?
Is Authorize.net secure?
Is Authorize.net international?
What payment methods does Authorize.net offer?
Does Authorize.net charge any transactional fees?
- Transaction fees: Authorize.net charges a per-transaction fee for processing payments, typically 2.9% plus plus $0.30 for credit card transactions
- Monthly gateway fees: Authorize.net charges a monthly fee for using their payment gateway. The fee varies based on the pricing plan selected, starting at $25 per month and going up to $99 per month for more advanced features.
- Chargeback fees: The fee is currently $25 per incident.
It’s important to review the fees associated with using Authorize.net carefully and choose a pricing plan that aligns with your business needs and transaction volume.
How can I integrate Authorize.net with my 123FormBuilder form?
You will have to provide the API Login ID and the Transaction Key in order to enable Authorize.net on your 123FormBuilder form. This information can be retrieved from your API Credential & Keys section in Authorize.net. Additionally, if you want to save client profiles in your account based on the submitted credit card number from the first purchase of your respondents, don’t forget to enable Create Customer Information Profile.
Related articles
Can I integrate my 123FormBuilder order form with Authorize.net?
What is Square?
How does Square work?
Is Square secure?
Is Square international?
What payment methods does Square offer?
Does Square charge any transactional fees?
How can I integrate Square with my online form?
Related articles
Most Popular
Frequently Asked Questions
Here is a list of the most frequently asked questions. For more FAQs, please browse through the FAQs page.