123FormBuilder Knowledge Base
Search our documentation platform for answers, service specifications and 3rd-party integrations.
Knowledge Base
You can set up your form to be active on certain days of the week directly from Schedule section. Schedule section can be found under Set up section.
By default, your form is set up to be always active. Always active option is selected and an informative banner is also shown so that you could easily scan the info: Your form is OPEN to new submissions.
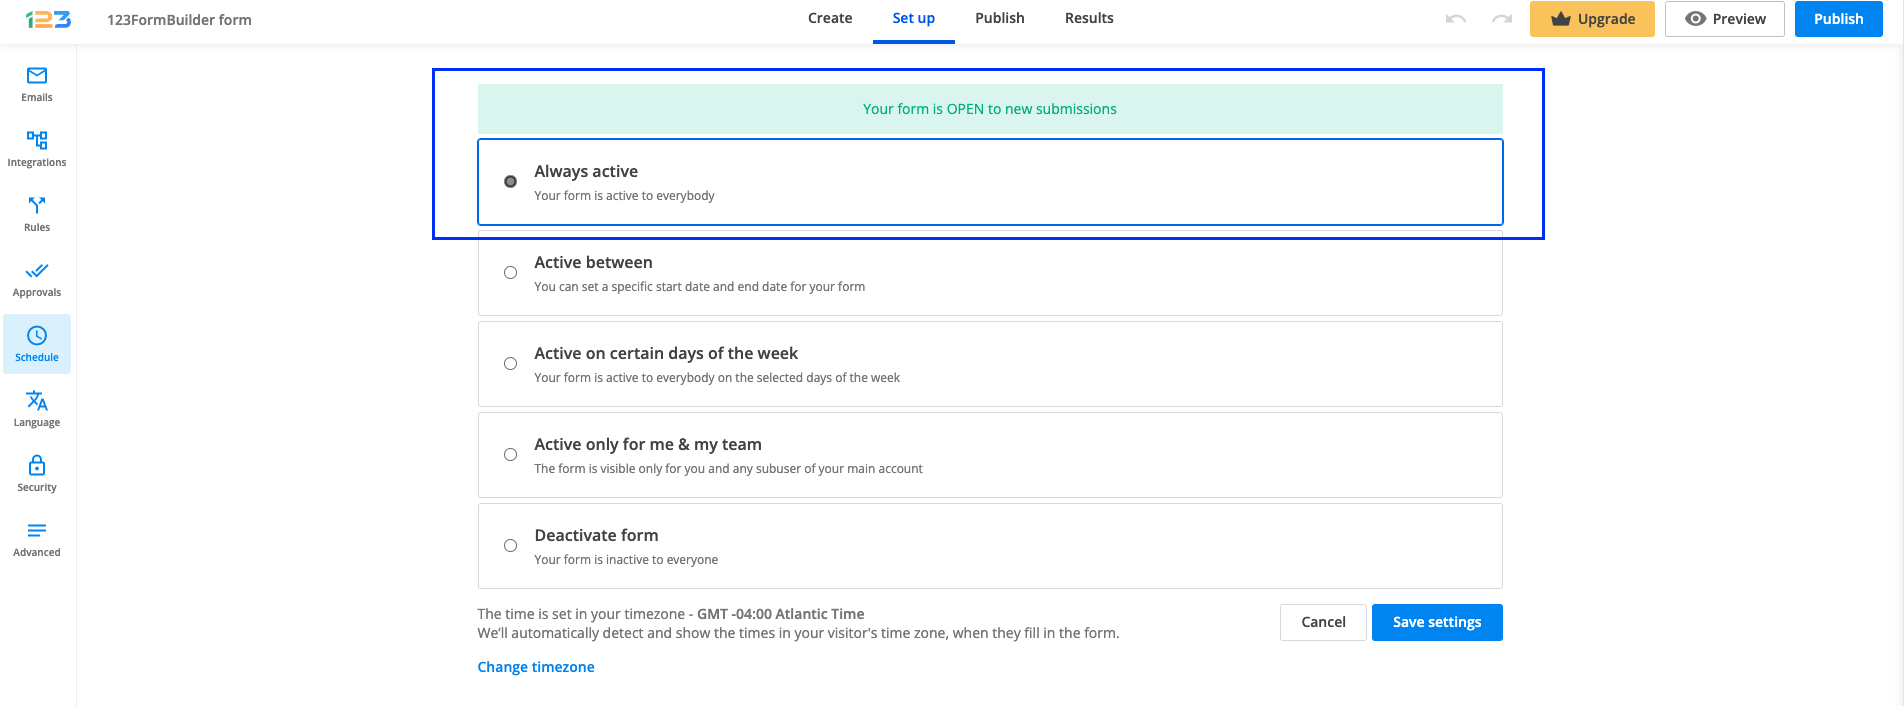
If you want your form to be active only on certain days of the week, you can simply do this by selecting the third option from Schedule: Active on certain days of the week.
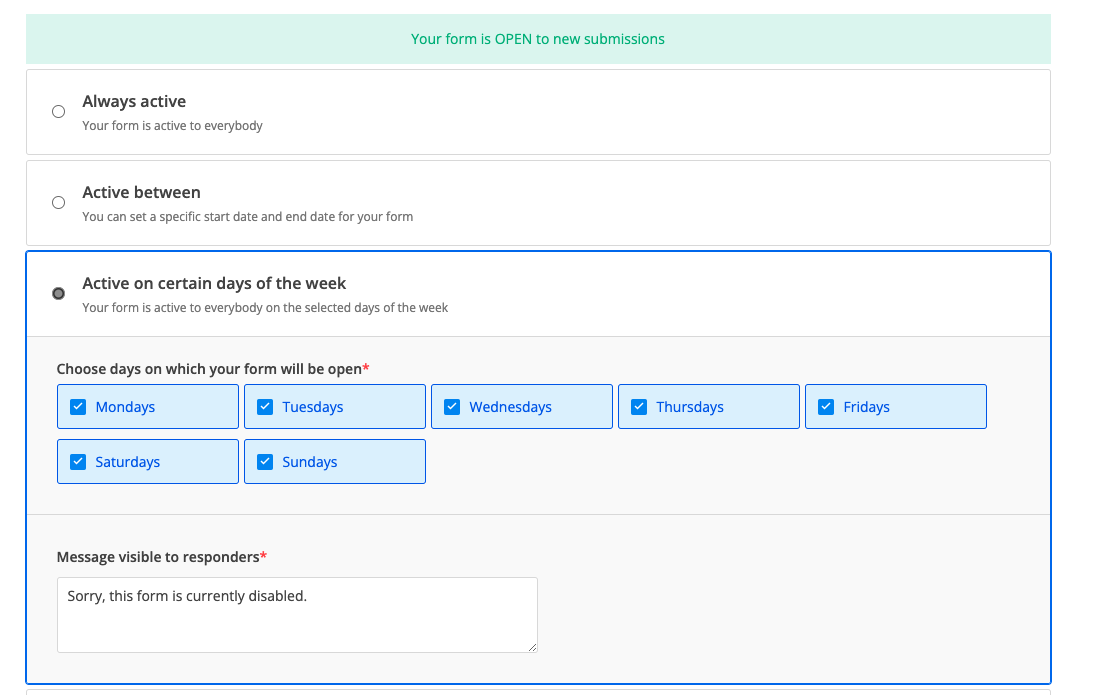
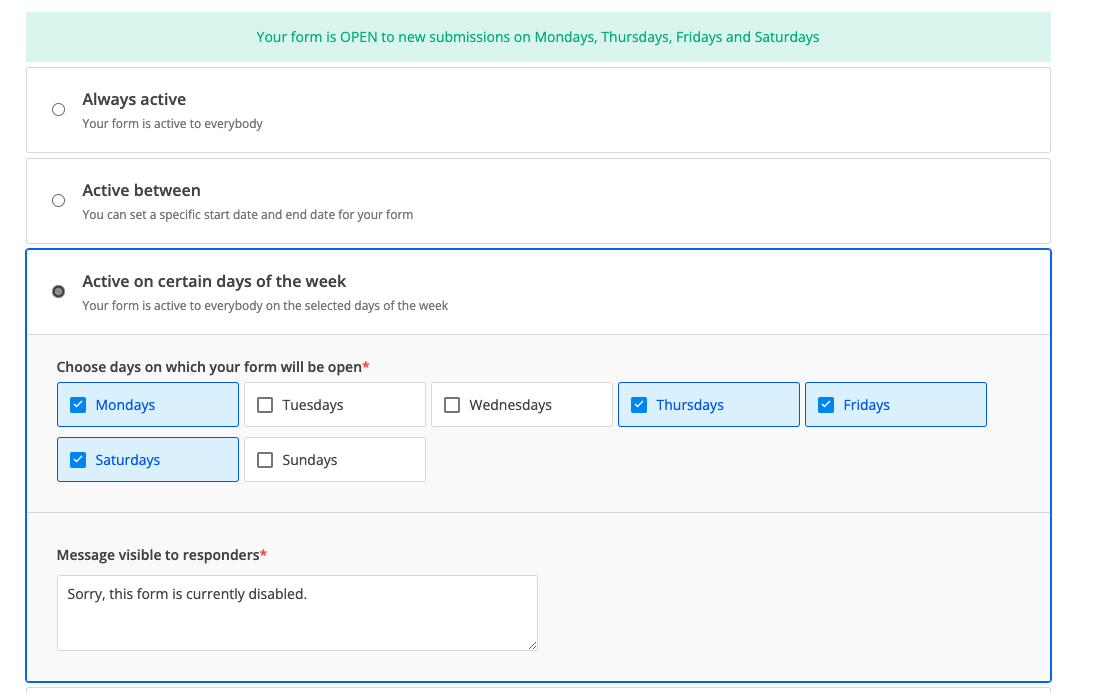
You can chose the days on which your form will be active or open. By default, all days are checked, but you can easily uncheck the ones when you want your form to be inactive.
Message visible to responders
By default, the message shown to respondents is set as below:

If respondents access your form during the inactivity period, they will see a page with the message provided in Schedule section.

Once you update the text in Schedule section and save the changes, it will be automatically updated for respondents as well.
Save changes
After you have made all the necessary settings, do not forget to click on Save settings button. After the settings have been saved, the top informative banner will be updated so you could easily scan the form status.
Related articles
You can set up your form to be inactive directly from Schedule section. Schedule section can be found under Set up section.
By default, your form is set up to be always active. Always active option is selected and an informative banner is also shown so that you could easily scan the info: Your form is OPEN to new submissions.
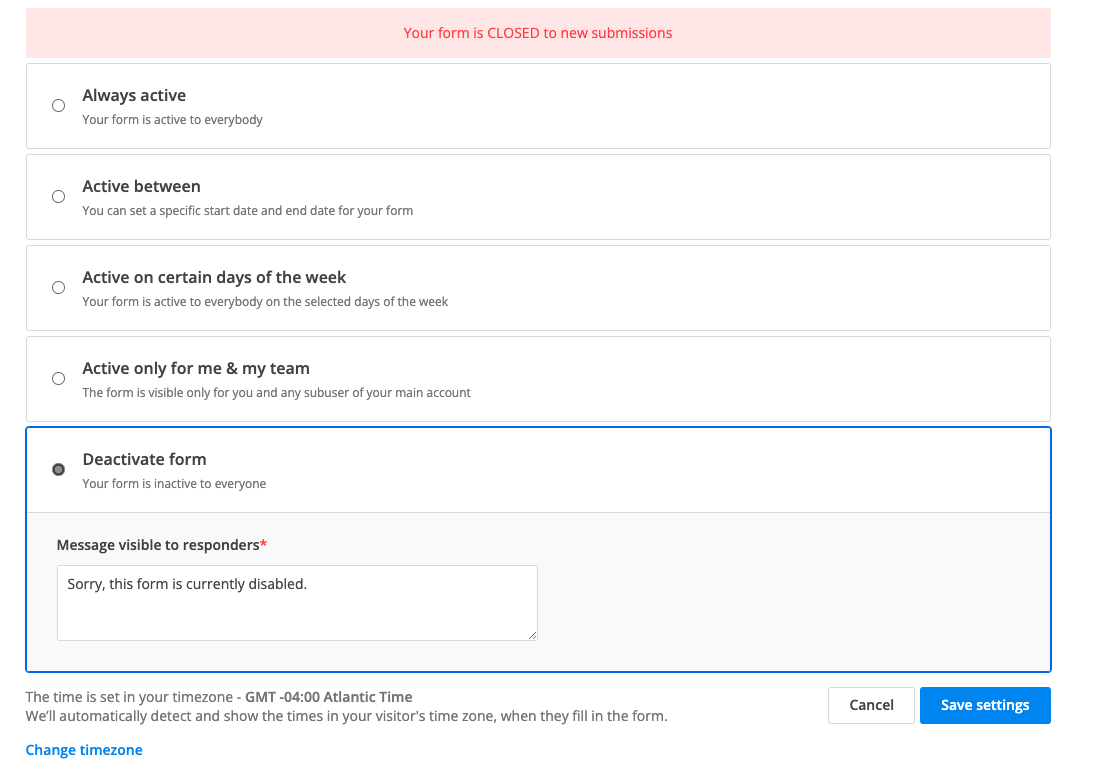
If you want your form to be inactive, you can simply do this by selecting the option Deactivate form from Schedule section.
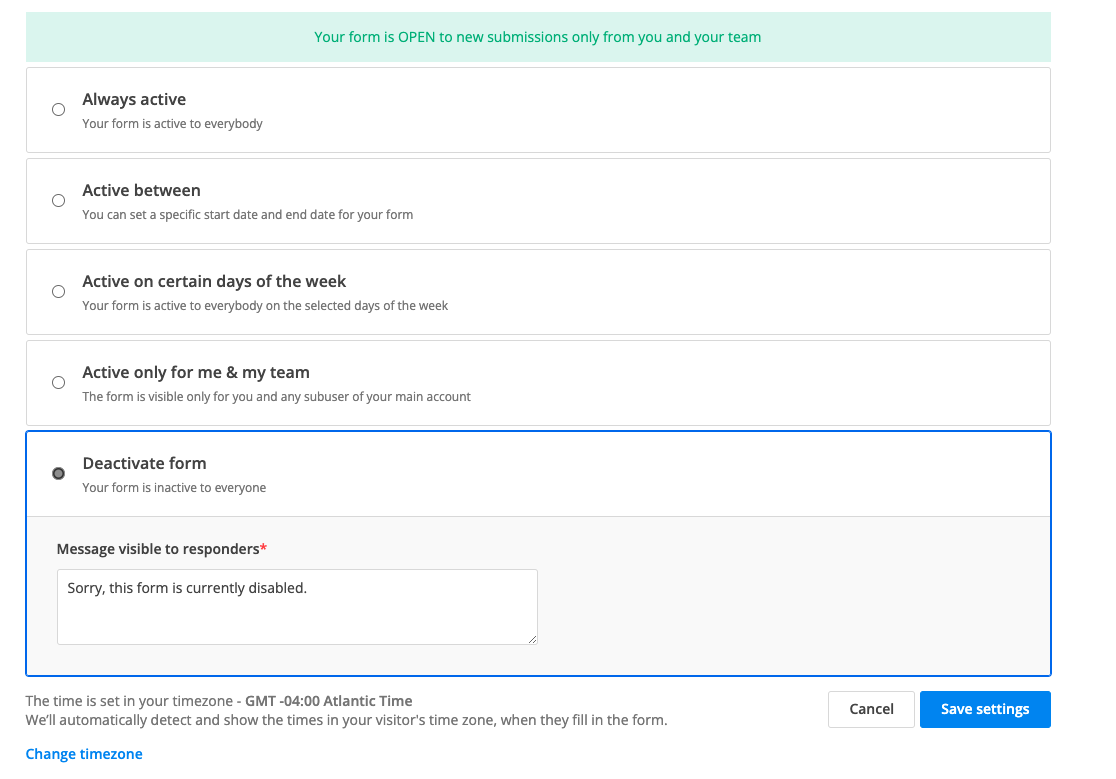
Message visible to responders
By default, the message shown to respondents is set as below:
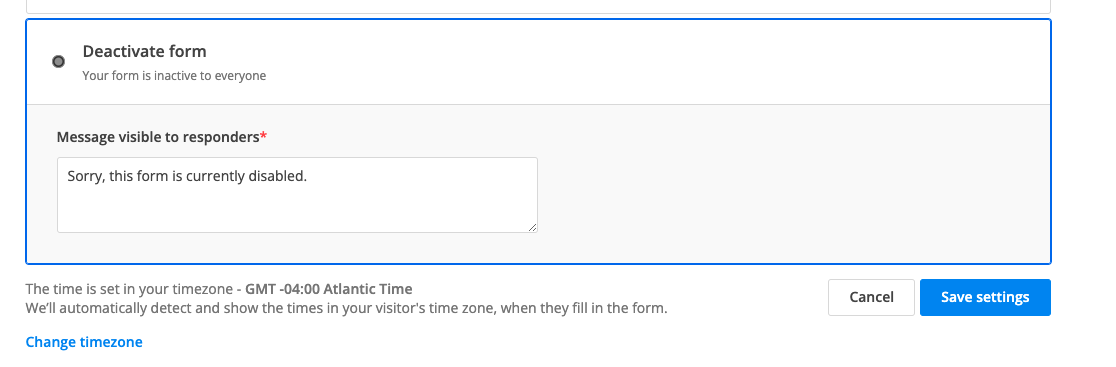
If respondents access your form during the inactivity period, they will see a page with the message provided in Schedule section.
Once you update the text in Schedule section and save the changes, it will be automatically updated for respondents as well.
Save changes
After you have made all the necessary settings, do not forget to click on Save settings button. After the settings have been saved, the top informative banner will be updated so you could easily scan the form status.
Related articles
You can set up your form to be active only for you & your team directly from Schedule section. Schedule section can be found under Set up section.
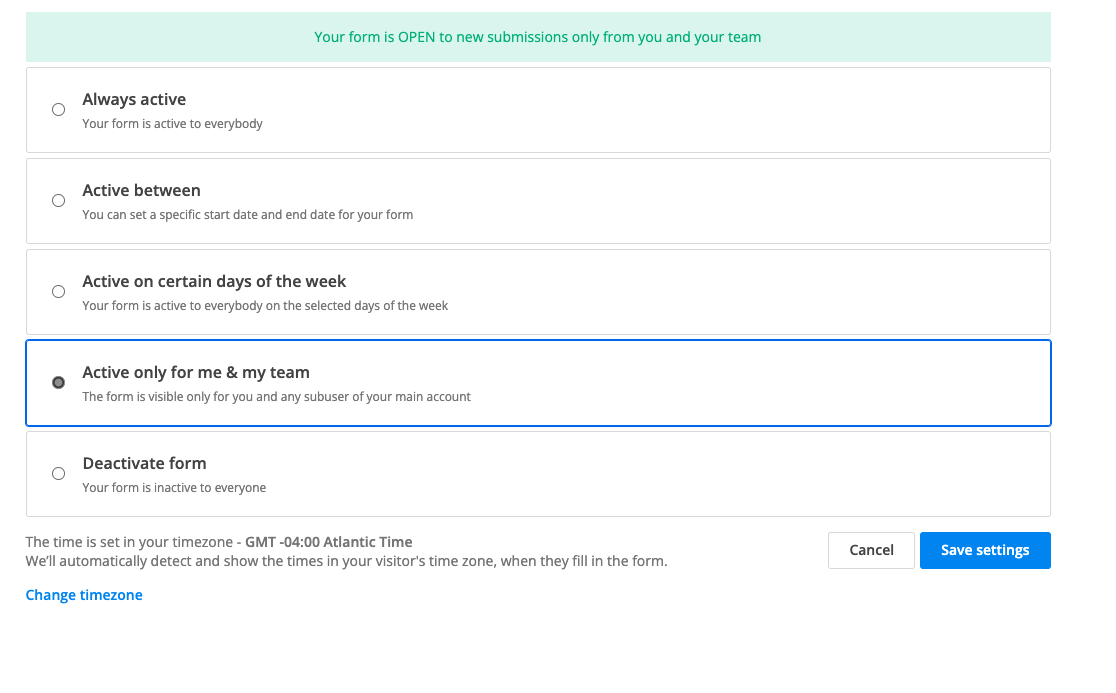
By default, your form is set up to be always active. Always active option is selected and an informative banner is also shown so that you could easily scan the info: Your form is OPEN to new submissions.
If you want your form to be active only for you & your team, you can simply do this by selecting: Active only for me & my team.
This option is very useful when you have your form under construction and you don’t want to have it accessed by someone outside your team, for example.
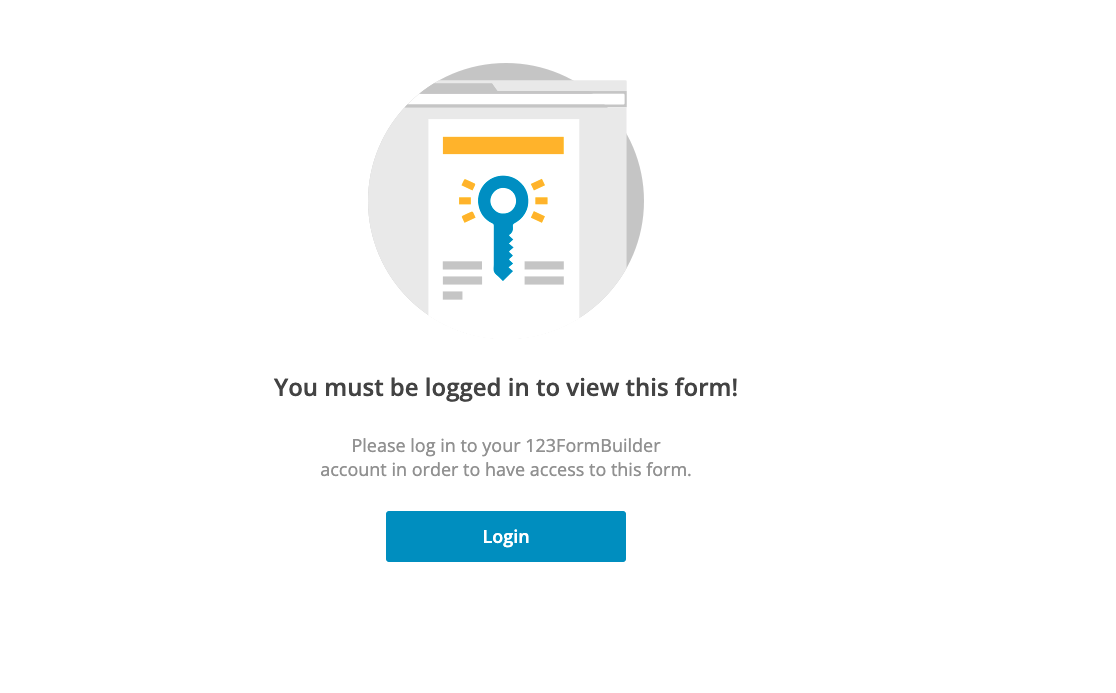
When someone outside your team accesses the form, they are seeing the below screen that redirects them to log into 123FormBuilder.
Save changes
After you have made all the necessary settings, do not forget to click on Save settings button. After the settings have been saved, the top informative banner will be updated so you could easily scan the form status.
Related articles
Importance of the currency set in Inventory/Order summary
Note: If the currency set in Order summary/Inventory is not accepted by the payment processor, your respondents will not be able to pay.
PayPal
You can find the currency codes accepted by PayPal in their official documentation.
PayPal currencies
| Currency | Currency code |
| Australian Dollar | AUD |
| Brazilian Real | BRL |
| Canadian Dollar | CAD |
| Czech Koruna | CZK |
| Danish Krone | DKK |
| Euro | EUR |
| Hong Kong Dollar | HKD |
| Hungarian Forint | HUF |
| Israeli New Sheqel | ILS |
| Japanese Yen | JPY |
| Malaysian Ringgit | MYR |
| Mexican Peso | MXN |
| Norwegian Krone | NOK |
| New Zealand Dollar | NZD |
| Philippine Peso | PHP |
| Polish Zloty | PLN |
| Pound Sterling | GBP |
| Russian Ruble | RUB |
| Singapore Dollar | SGD |
| Swedish Krona | SEK |
| Swiss Franc | CHF |
| Taiwan New Dollar | TWD |
| Thai Baht | THB |
| U.S. Dollar | USD |
Stripe & Stripe Checkout
Currency codes accepted by Stripe can be found in their official documentation. Stripe accepts over 135+ currencies.
Square
All Square charges are made in the currency of your country of activation. For example, if you are US based and created your Square account in US, then the charge is made in USD. However, your respondents can pay using a different currency than yours, and the respondent’s bank will handle the conversion/exchange rate.
Authorize.net
According to their official documentation, Authorize.net accepts payments from merchants located in the United States, Australia and Canada.
Authorize.net currencies
- United States, Canada – USD, CAD
- United Kingdom, Europe – CHF, DKK, EUR, GBP, NOK, PLN, SEK, USD
- Australia – AUD, NZD, USD
PayFast
The official documentation of PayFast does not explicitly list the supported currencies. However, according to multiple support documents, they are supporting around 7 currencies: South African Rand (ZAR), US Dollar (USD), Euro (EUR), British Pound Sterling (GBP), Australian Dollar (AUD), New Zealand Dollar (NZD), Canadian Dollar (CAD).
FreshBooks
According to their documentation, FreshBooks supports multiple languages and currencies. On every invoice, you have the option of selecting the language & currency and those become the default ones.
FreshBooks supported languages & currency
- English
- Danish
- Dutch
- Estonian
- French
- German
- Greek
- Italian
- Norwegian
- Portuguese
- Romanian
- Spanish
- Spanish (Latin America)
- Swedish
Braintree
Braintree supports multiple currencies, entirely described in their documentation.
Sisow
Sisow, otherwise known as Buckarroo, supports around nine currencies, according to this article.
Sisow supported currencies
- EURO (EUR)
- British Pounds (GBP)
- Polish Zloty (PLN)
- Danish Kroner (DKK)
- Norwegian Kroner (NOK)
- Swedish Krona (SEK)
- Swiss Francs (CHF)
- US Dollars (USD)
Related articles
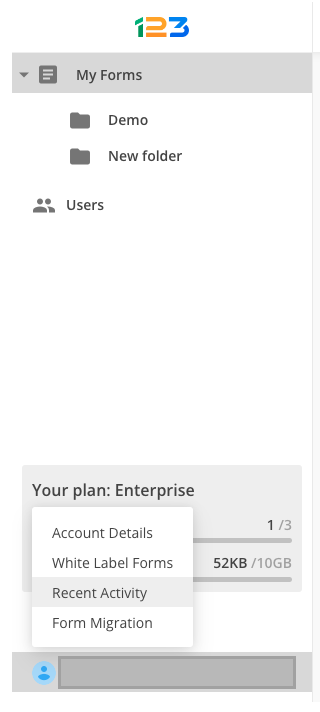
Tracking the activity for Salesforce has never been easier. Now you can go to My Forms -> click on your username and select Recent activity.
Once you’ve opened up Recent activity, you have access to multiple information related to the activity of your account and forms.
To start with, you can filter the activity based on diferent criteria:
-select a start and end date of the activity
-what is the activity type you are interested in
-what is the user you are interested in (especially if you have multiple users)
-a specific IP address
-what form you are interested in.
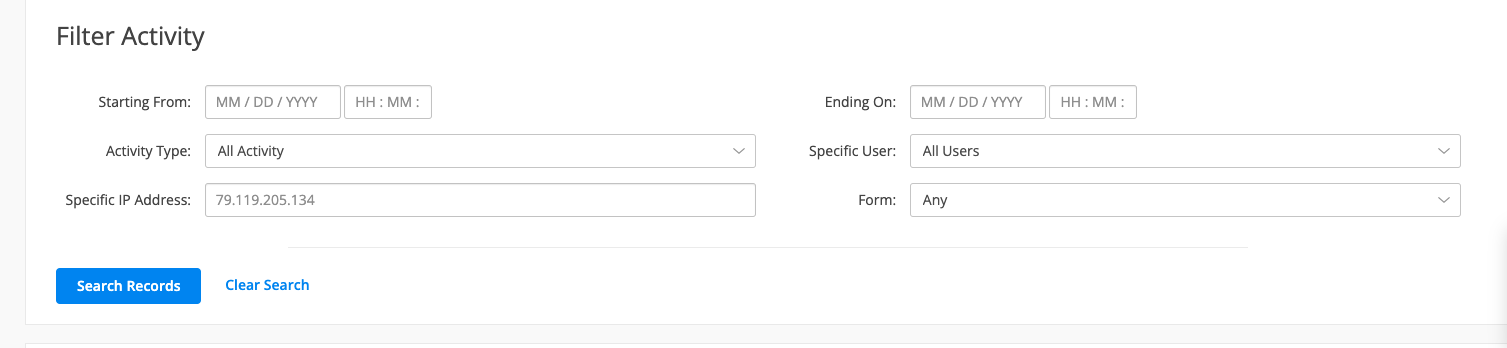
By default, below the Filter activity, we are displaying all the information related to the activity of both your account and forms.
Specifically for Salesforce, we have introduced new types of activities so you could easily track the actions, the users who took those actions and the forms involved.
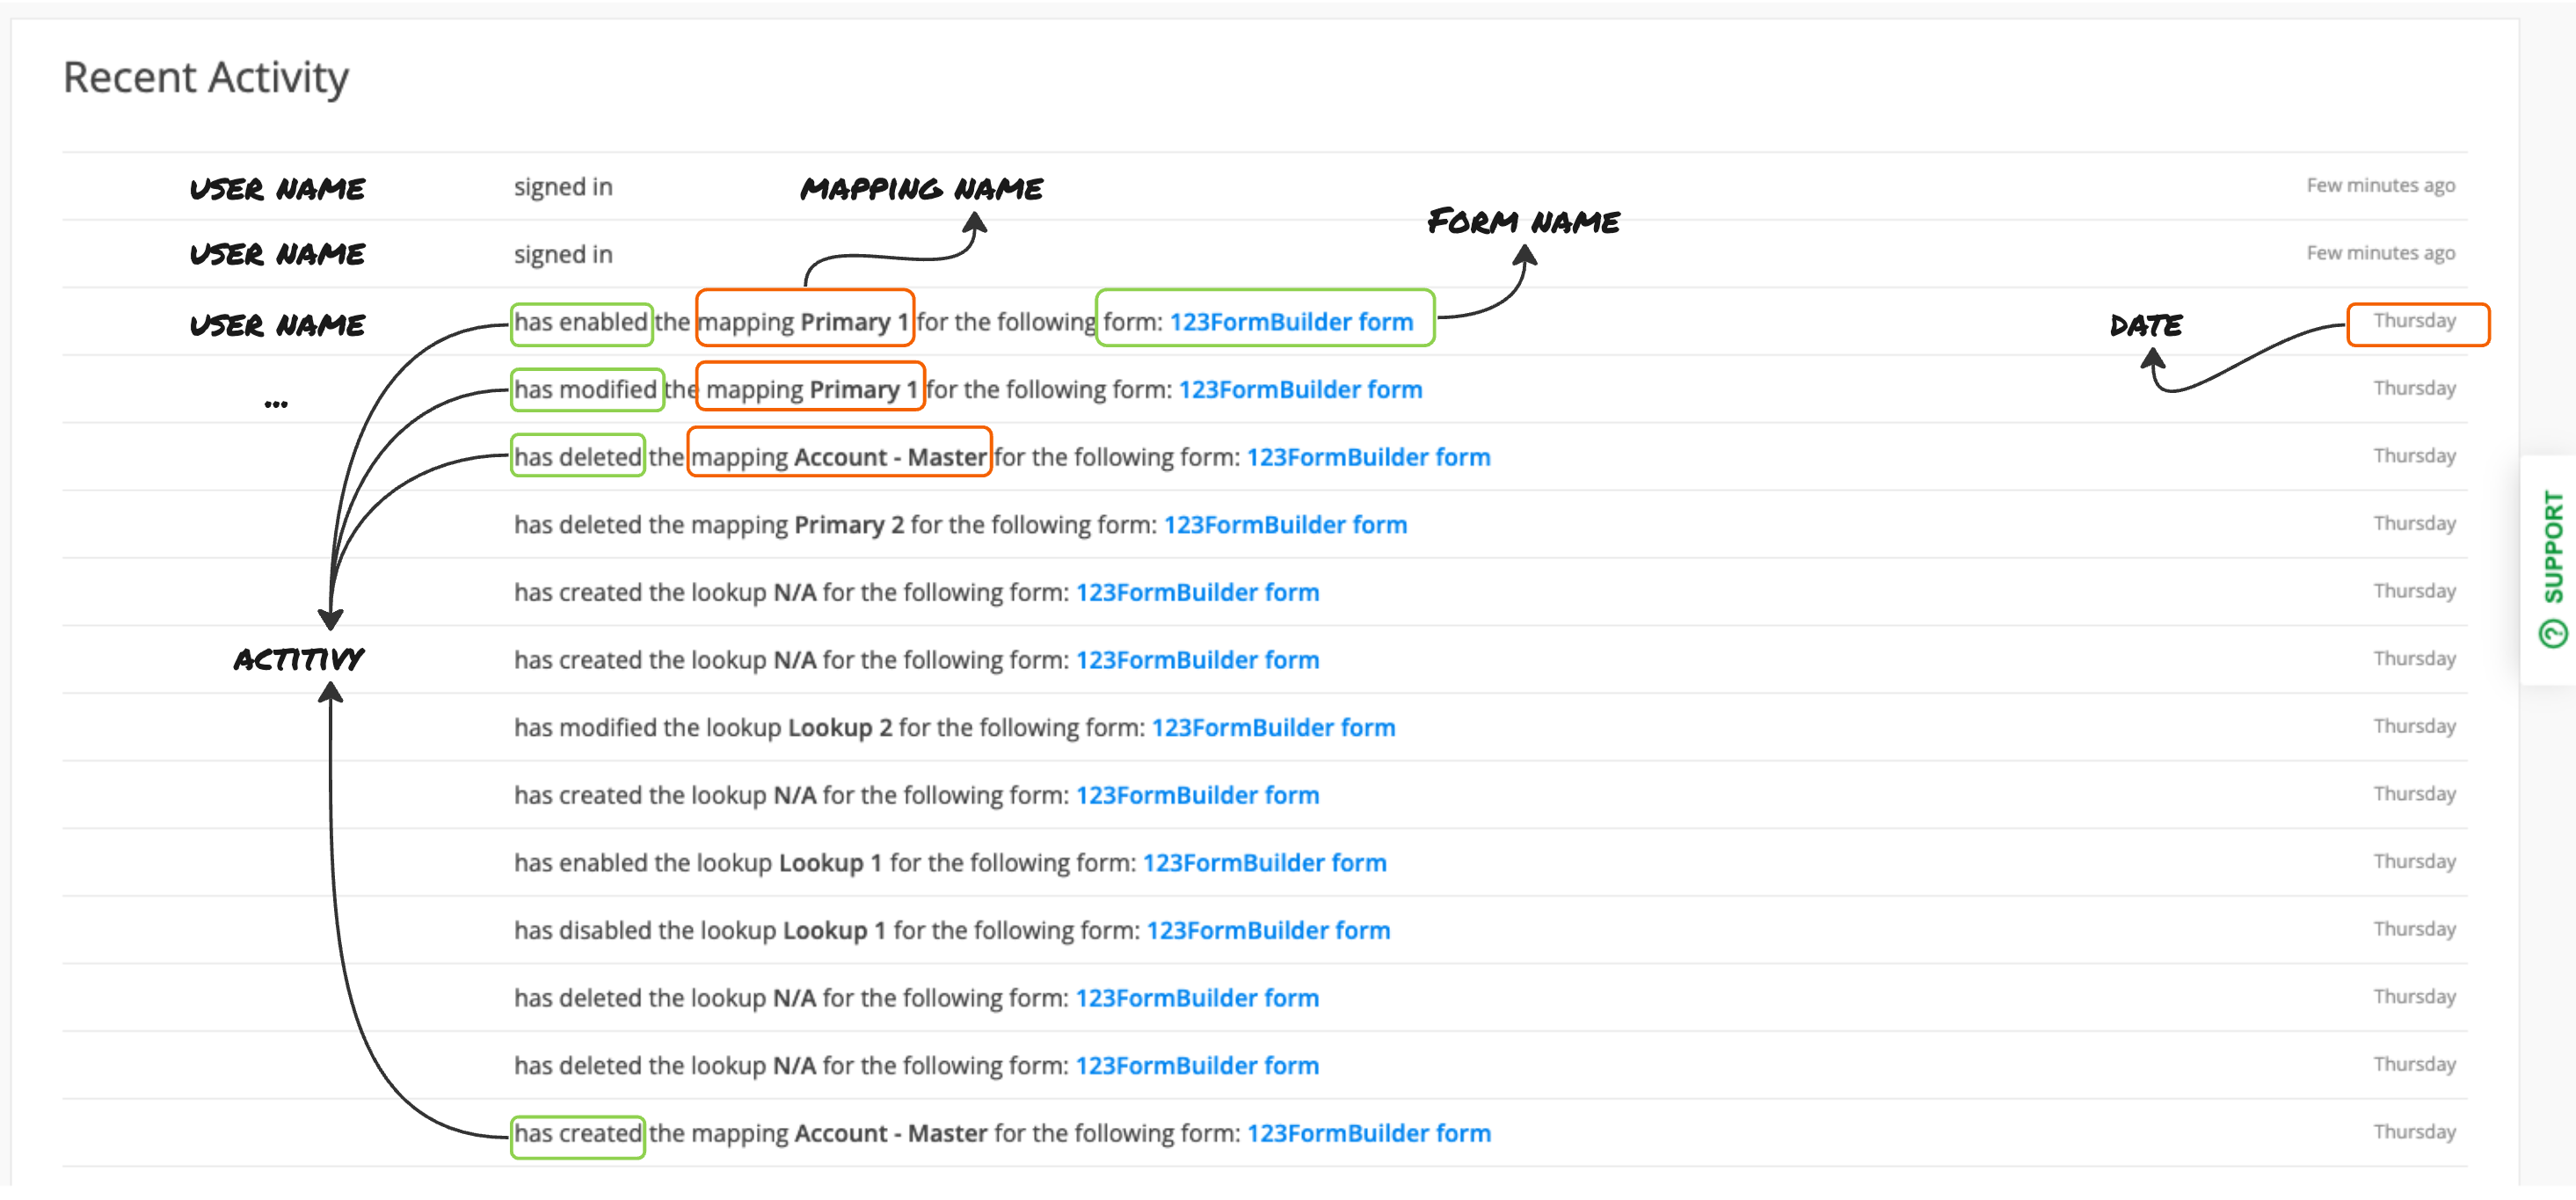
Tracking activity for Mappings
Whenever an object mapping is created/enabled/modified/disabled, we are displaying the info under Recent activity.
Let’s take an example. We’ve redacted the user name, but right where we’ve written User name, it will appear the user that performed that action.
For mappings, we can determine multiple actions: create mapping, enable mapping, modified mapping, deleted mapping and also disabled mapping. Each action is linked to a form name and the date when the action was performed.
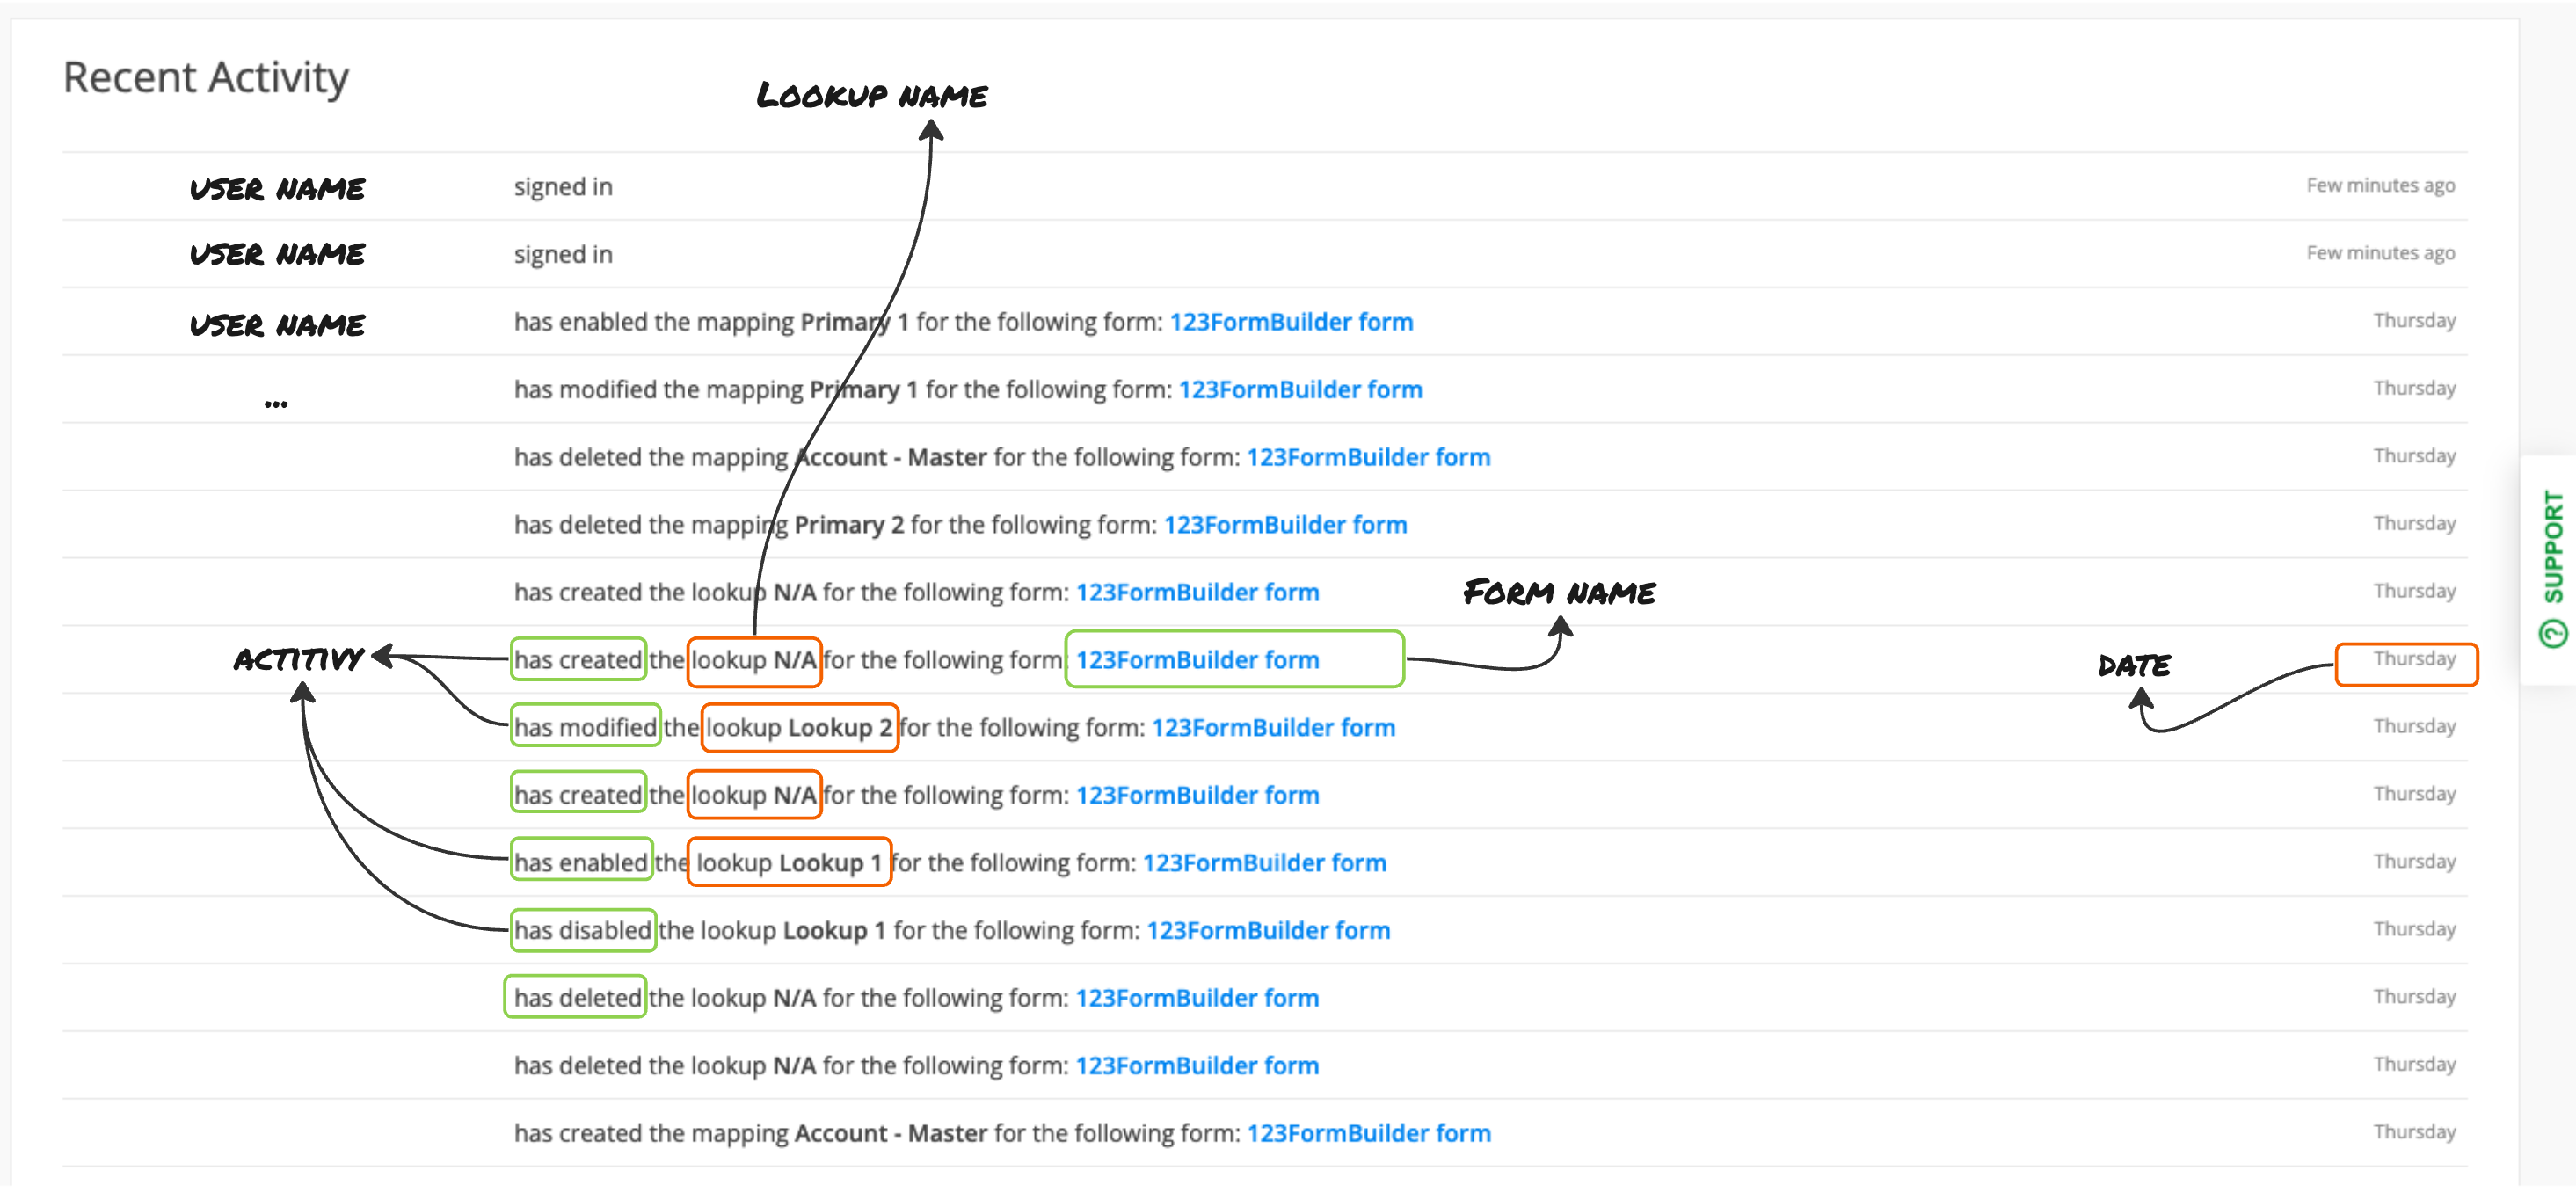
Tracking activity for Lookup relationships
Following the same pattern that we’ve described above, we log in the activity for lookup relationships as well.
We are displaying the user that took the action, the specific action (create/modified/enable/disable/deleted), the lookup relationship name, the form on which the action was performed and the date.
Note: when creating a lookup relationship, it doesn’t have a name from the start – this is why when creating a lookup, it has the default value name of N/A. When naming your lookup, the action is logged as modified the lookup [introduce lookup name].
What’s next
We are preparing to log in the actions related to Prefill settings and duplicate mappings.
Related articles
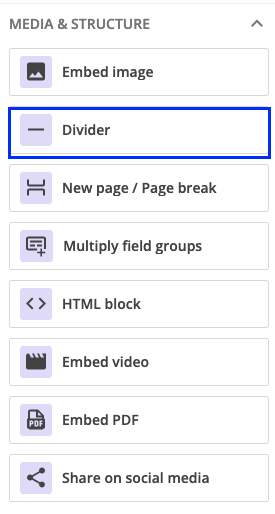
The Divider field can be found under the Media & Structure section. Its role is to provide a structure to your form. You can use it to separate different sections of the form to make it easier to scan by your respondents.
Note: the Divider field does not count against the total number of fields you can use according to your pricing plan.
Settings
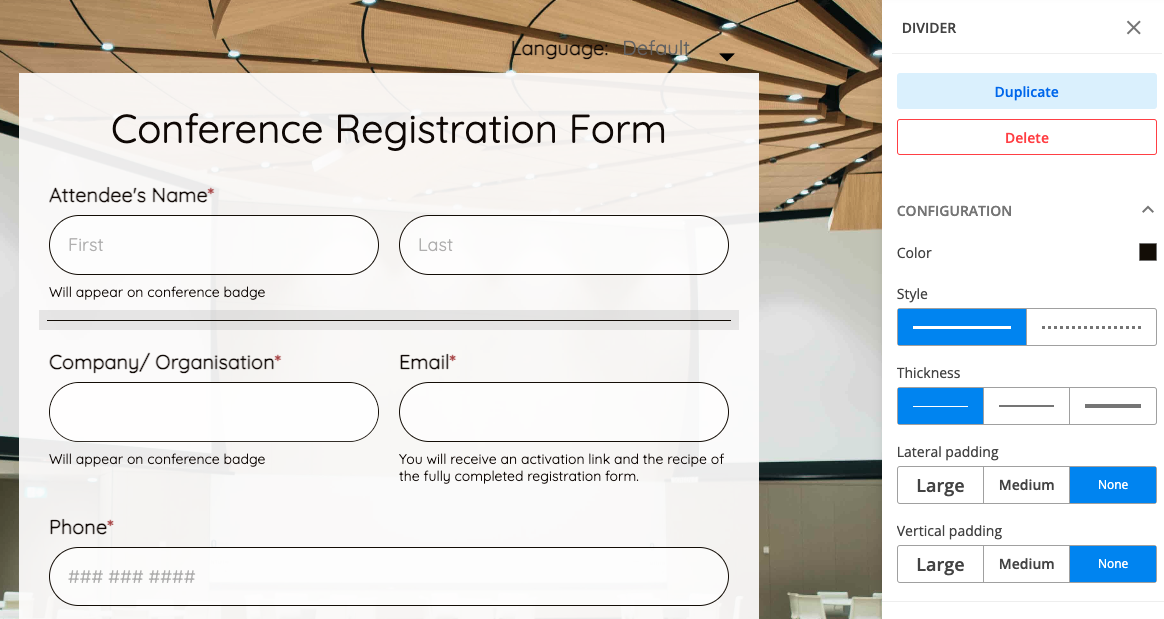
Once you add your Divider field on your form, on the right side panel you will find different customization settings.
The first option is Color, where you can use the color picker to choose your preferred color or type in the code of your preferred shade.
You can also change the Style: either make it a straight line or a dotted line. Another setting would be to change its Thickness.
If you want to make the divider shorter, you can choose between a medium or large Lateral padding.
If you want to bring more space between the divider and the above and below fields, you simply have to apply a medium or large Vertical padding.
Related articles
We are glad to announce that Fields Insights section is now available. As you got used to Form Insights section, you might wonder what exactly does Fields Insights.
How to get to Fields Insights?
Firstly, let’s see how we can navigate to Fields Insights. From My Forms, you can click on the dotted menu and navigate to Results. From the Editor, you can simply click on Results in the header menu. Results section is split into three: Insights, Submissions and Reports.
Insights section is split into two subsections:
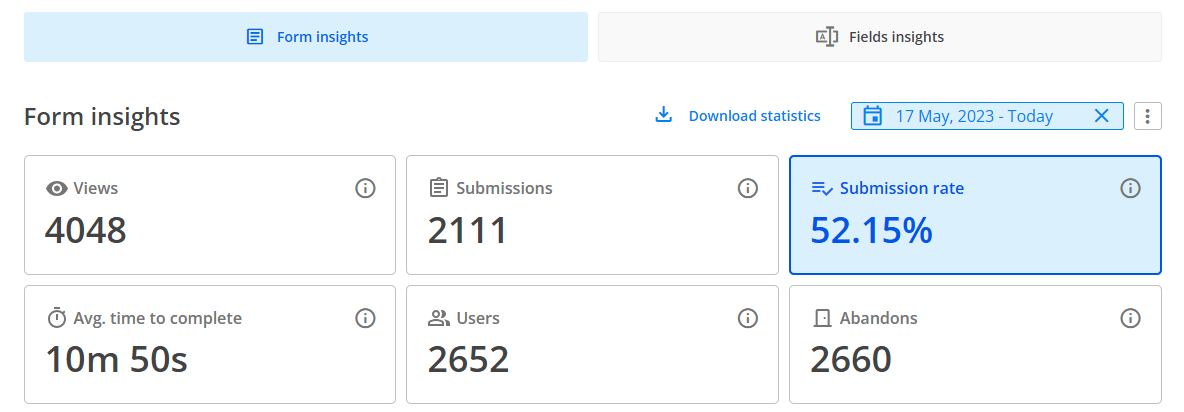
a. Form Insights – here you can find stats related to your form: Views, Submissions, Submission rate, Avg time to complete, Users & Abandons, together with a more detailed analysis that takes into consideration the devices, locations and referrers of your respondents.
b. Fields Insights
What is Fields Insights?
Fields Insights is our newest section of the product. Here you have access to the performance of each question that is currently on your form.
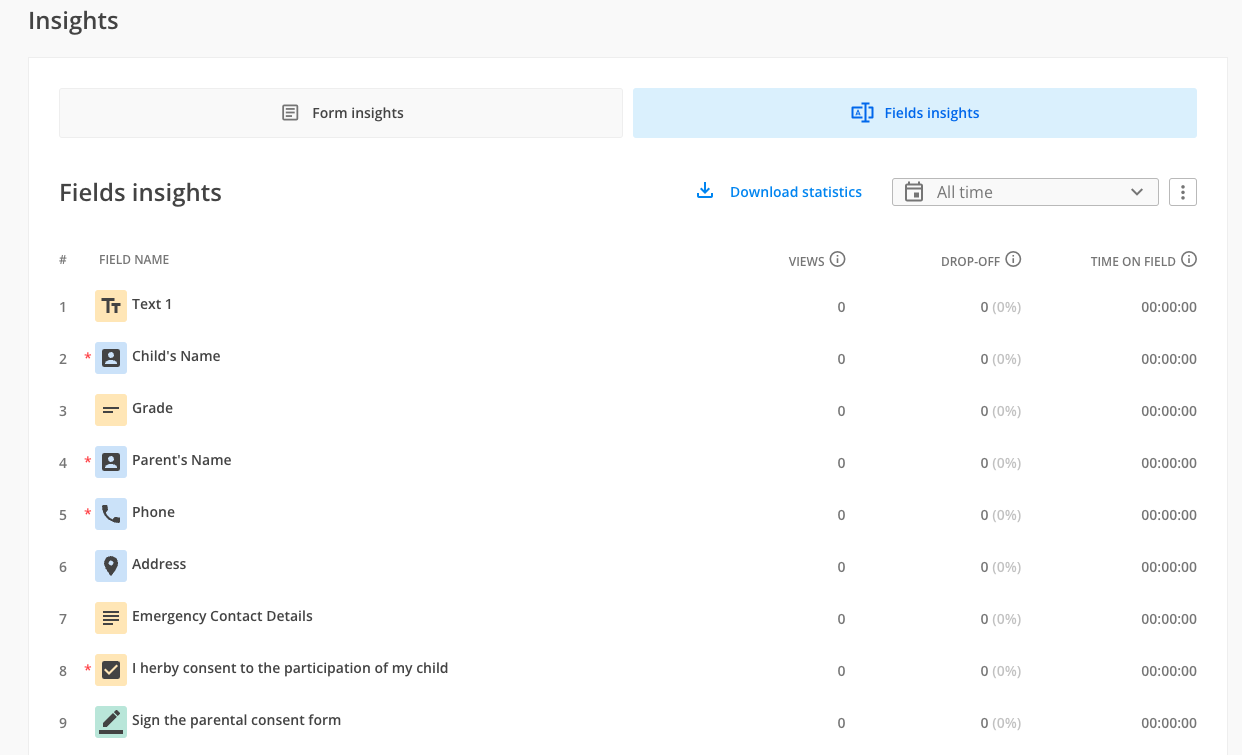
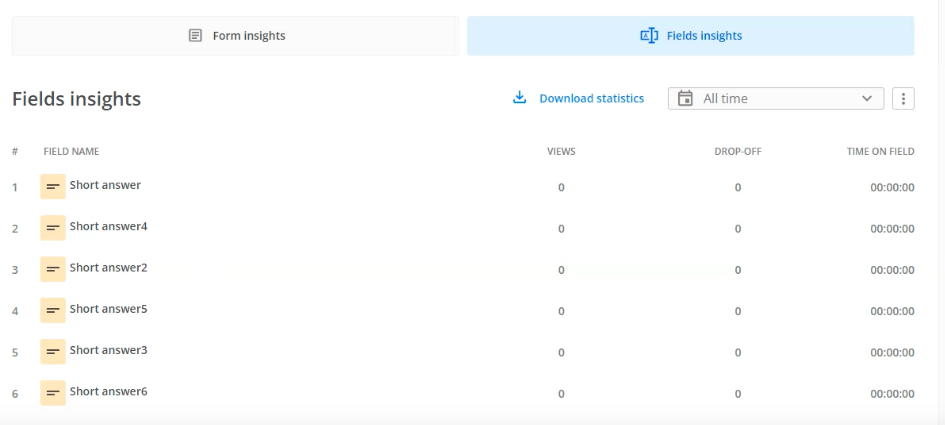
Let’s take each row one by one to explain it better.
All questions appear in the order they are added on the form – thus the numbering on the left side of the tabel. Under Field name, we have the suggestive icon for each type of field. For example, the first question is Text content field, so we are displaying the suggestive icon for Text content field.
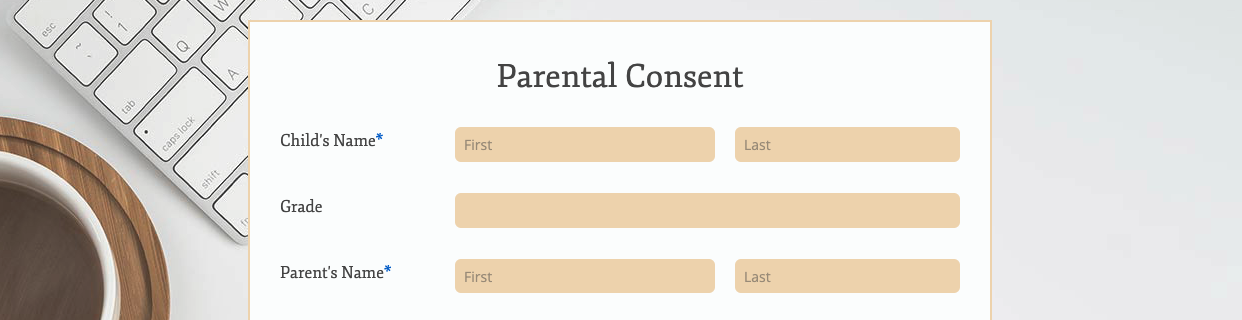
You might notice that some fields have the red asterisk attached. This is because those fields are marked as required on the form. For example, Child’s Name and Parent’s name are fields marked as required on our form:
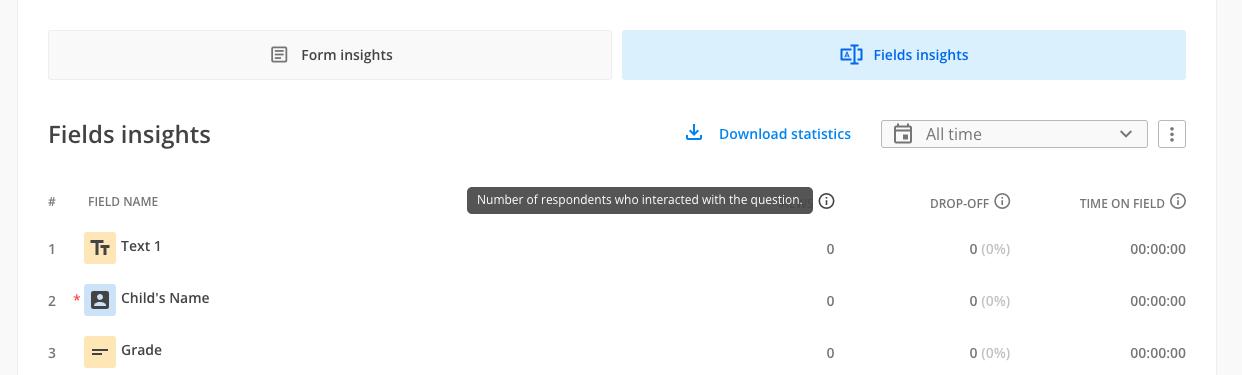
The third column is called Views. When hovering over the info bubble, you will notice that Views shows the number of respondents who interacted with the question. Each time a respondent interacts with a field (clicks within in, types something, selects a choice, etc), we are counting 1 view towards that question.
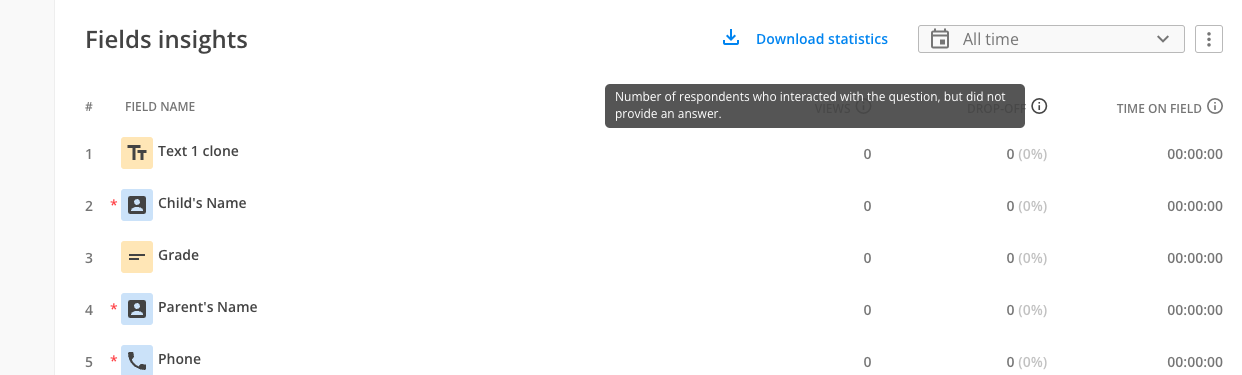
The fourth column is called Drop-off. When hovering over the info bubble, you will notice that Drop-off shows the number of respondents who interacted with a question, but did not provide an answer to that question. For example, a respondent types something, but deletes the entire answer. Or selects a choice from a single choice question, but then clears the choice.
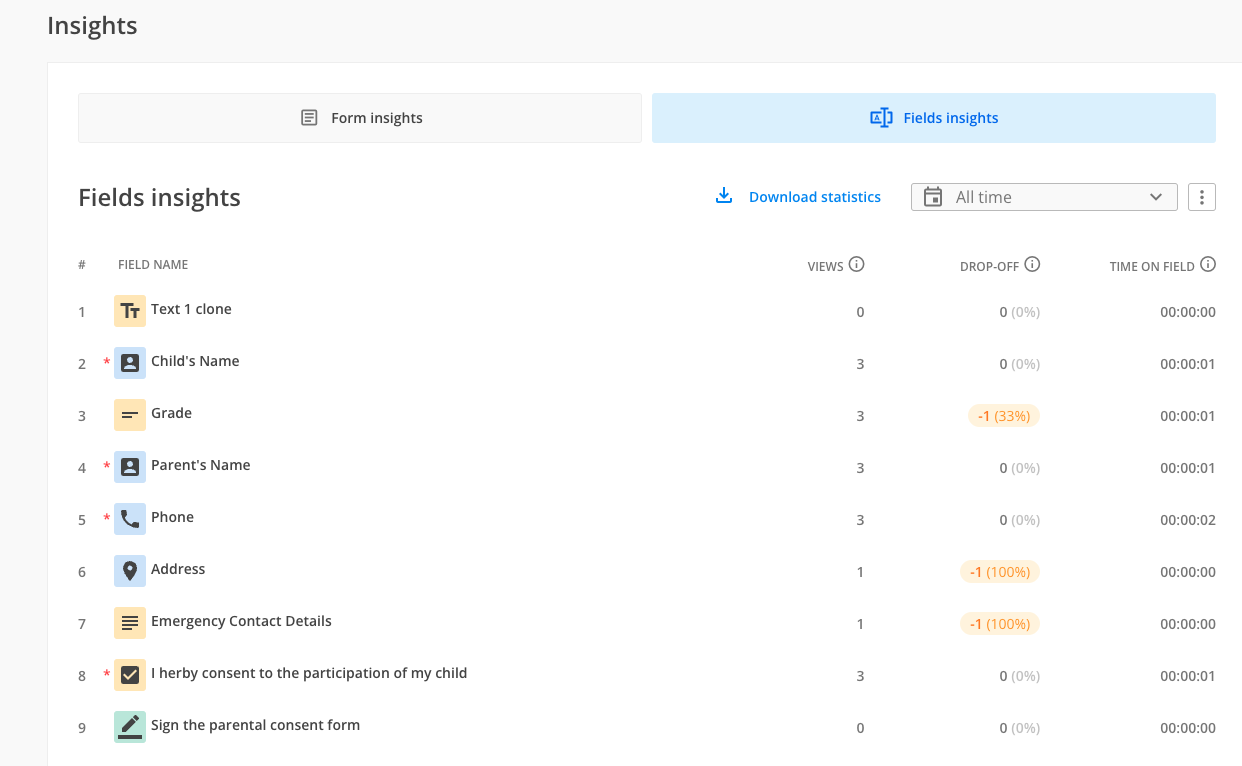
Note: the top three questions that have the highest drop-off rate are marked distinctively in the Fields Insights table. This is meant to help you determine which questions are abandoned by your respondents. As such, you can go back and make the necessary adjustments to your form in order to collect more data & submissions.
As an example, for the Grade question, we have 3 interactions with the question and 1 drop-off, so a 33% drop-off rate per that question.
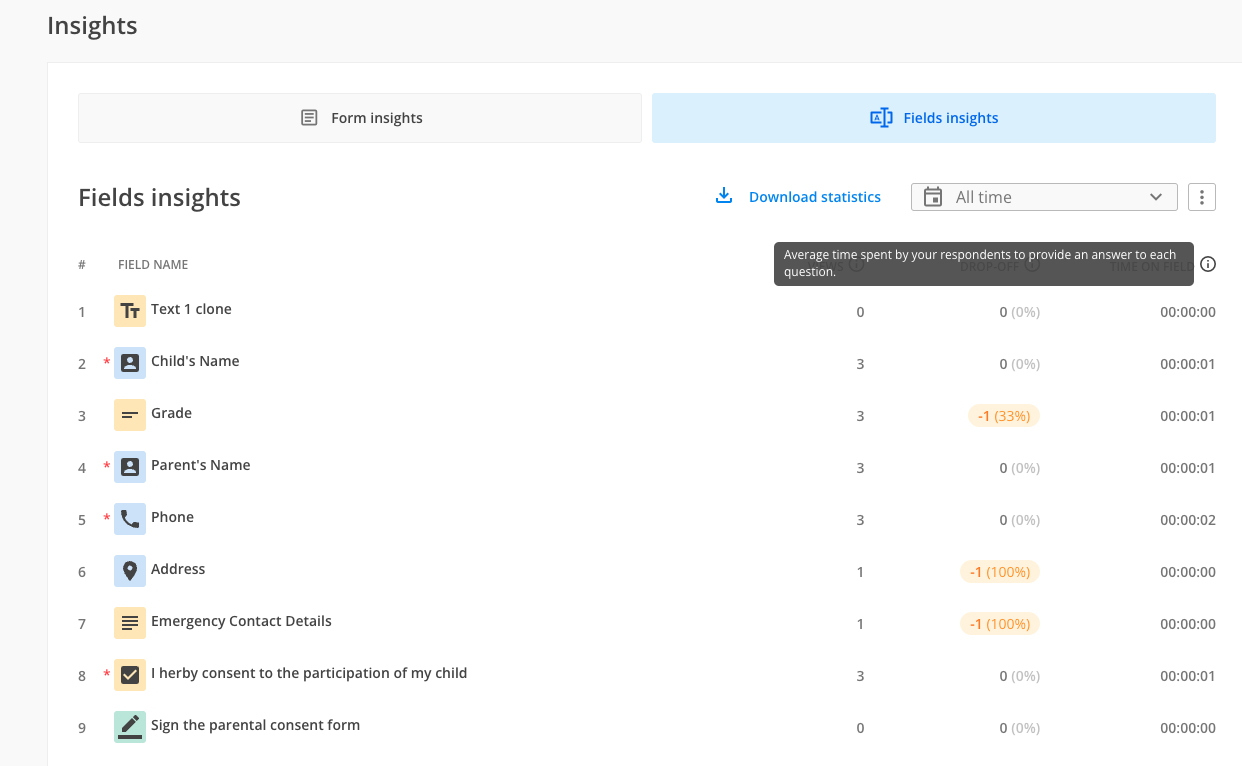
The fifth column is called Time on field. When hovering over the info bubble, you will notice that time on field shows the average time spent by your respondents to provide an answer to each question. This can help you determine where your respondents can get stuck and where they spent the most time thinking of an answer.
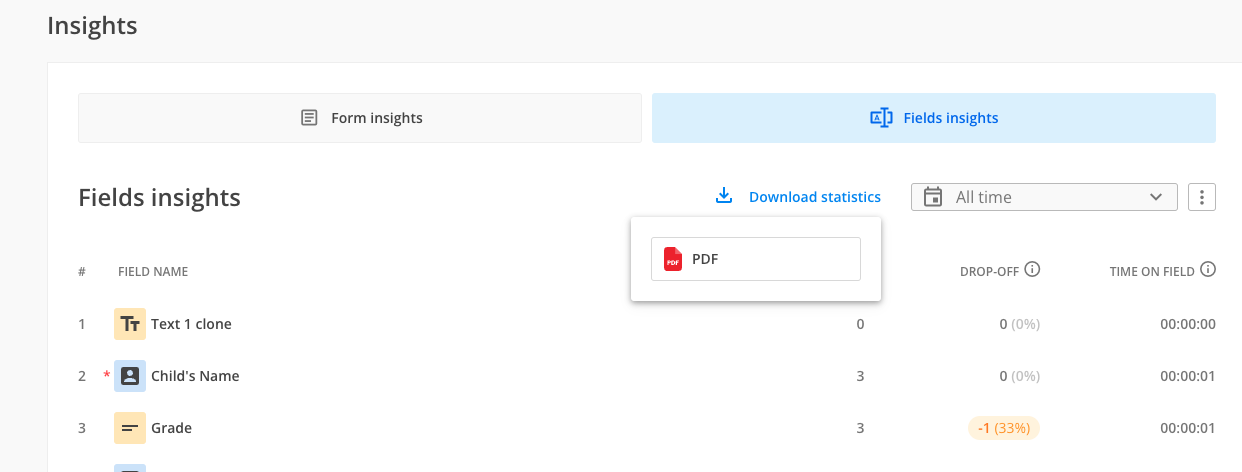
Download statistics
Another feature that Fields Insights has is Download statistics. Once you click on Download statistics, you will notice the option to download the Fields Insights data under a PDF format.
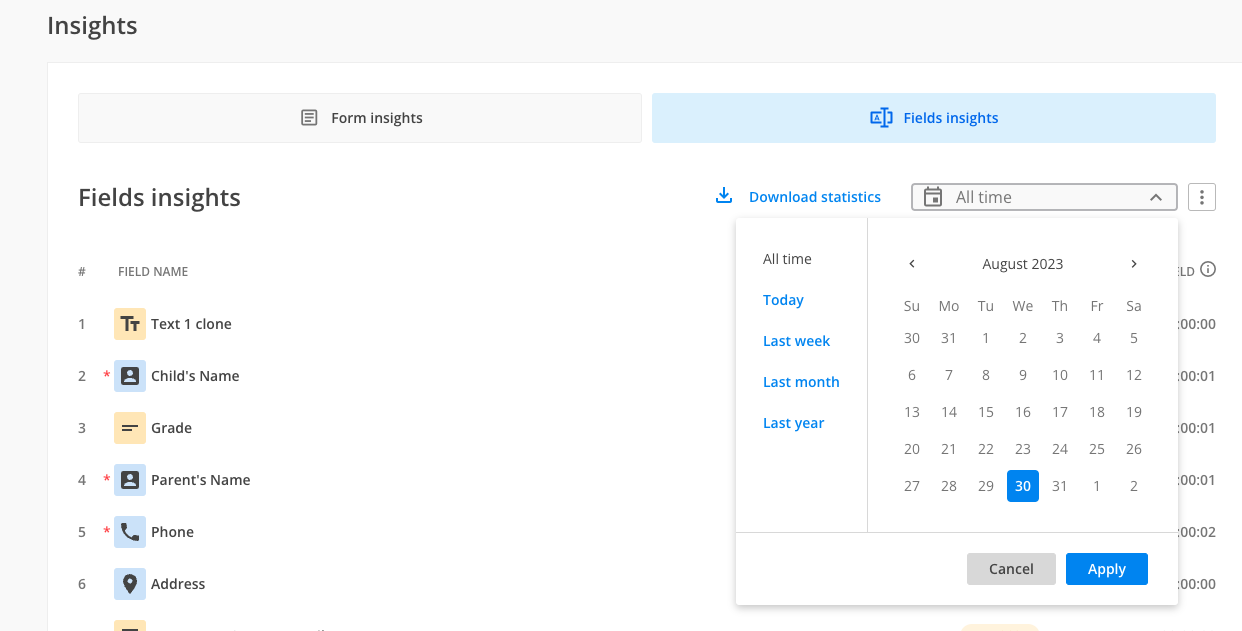
Date picker
Exactly as in Form Insights, you can see the performance of your questions in a specific time frame that you wish.
Delete data
If you are reusing the same form for different purposes or you simply want to start from scratch, you have the option of deleting the data from Insights.
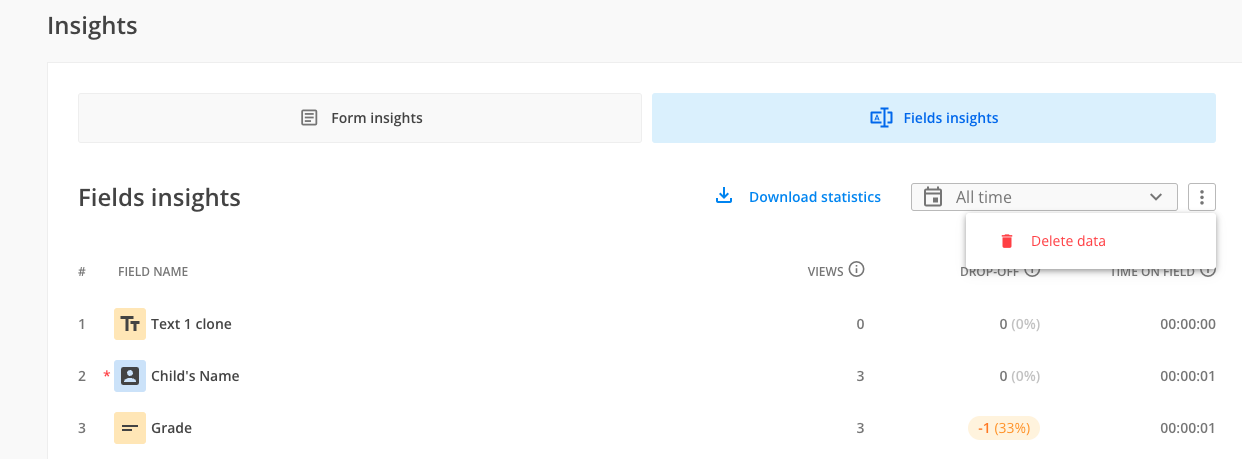
Important Note
Deleting data from Form Insights has an effect on Fields Insights data as well. Deleting data from Fields Insights deletes the data from Form Insights.This action can not be undone.
Important notes
Exceptions
There are some fields that are excepted from showing in Fields Insights, such as Embed video & Embed PDF. The main reason for this is that the respondents’ actions onto these types of fields are hard to track.
Time to register events
It takes up to 60 seconds to register the events your respondents perform on each type of field in order to get accurate data in Fields Insights
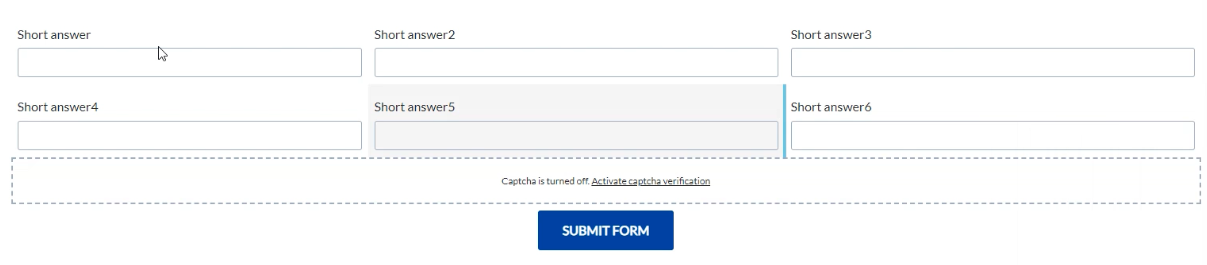
Order of fields
There might be cases in which the order of the fields in Fields Insights is not the same as visual order of the fields from the form. For example, when you have 3 fields on the same row and 3 fields underneath them, the order in Fields Insights might be skewed. Below you can find an example:
Important Note
We are collecting data for Fields Insights for Platinum and superior plans from 30th of August 2023. For pricing plans under Platinum, data for Fields Insights is being collected starting with the 6th of September 2023.If you want to have consistency between Form Insights and Fields Insights, you can either use the date picker to filter your data or you can start from a clean slate by deleting the data from Insights.
Work in progress
There is still some work in progress with Fields Insights section. We are going to handle the below aspects one by one:
-Likert scale field & Multiply field groups – these fields are currently not shown in Fields Insights.
-when your respondents are using autocomplete from browser, we are currently not counting the interactions your respondents had with the autocompleted fields
-when fields are prefilled from the URL, we are currently not counting the interactions your respondents had with the autocompleted fields
-right-to-left alignment is currently not handled in Fields Insights.
-hidden fields on the form are not marked distinctively in Fields Insights.
Related articles
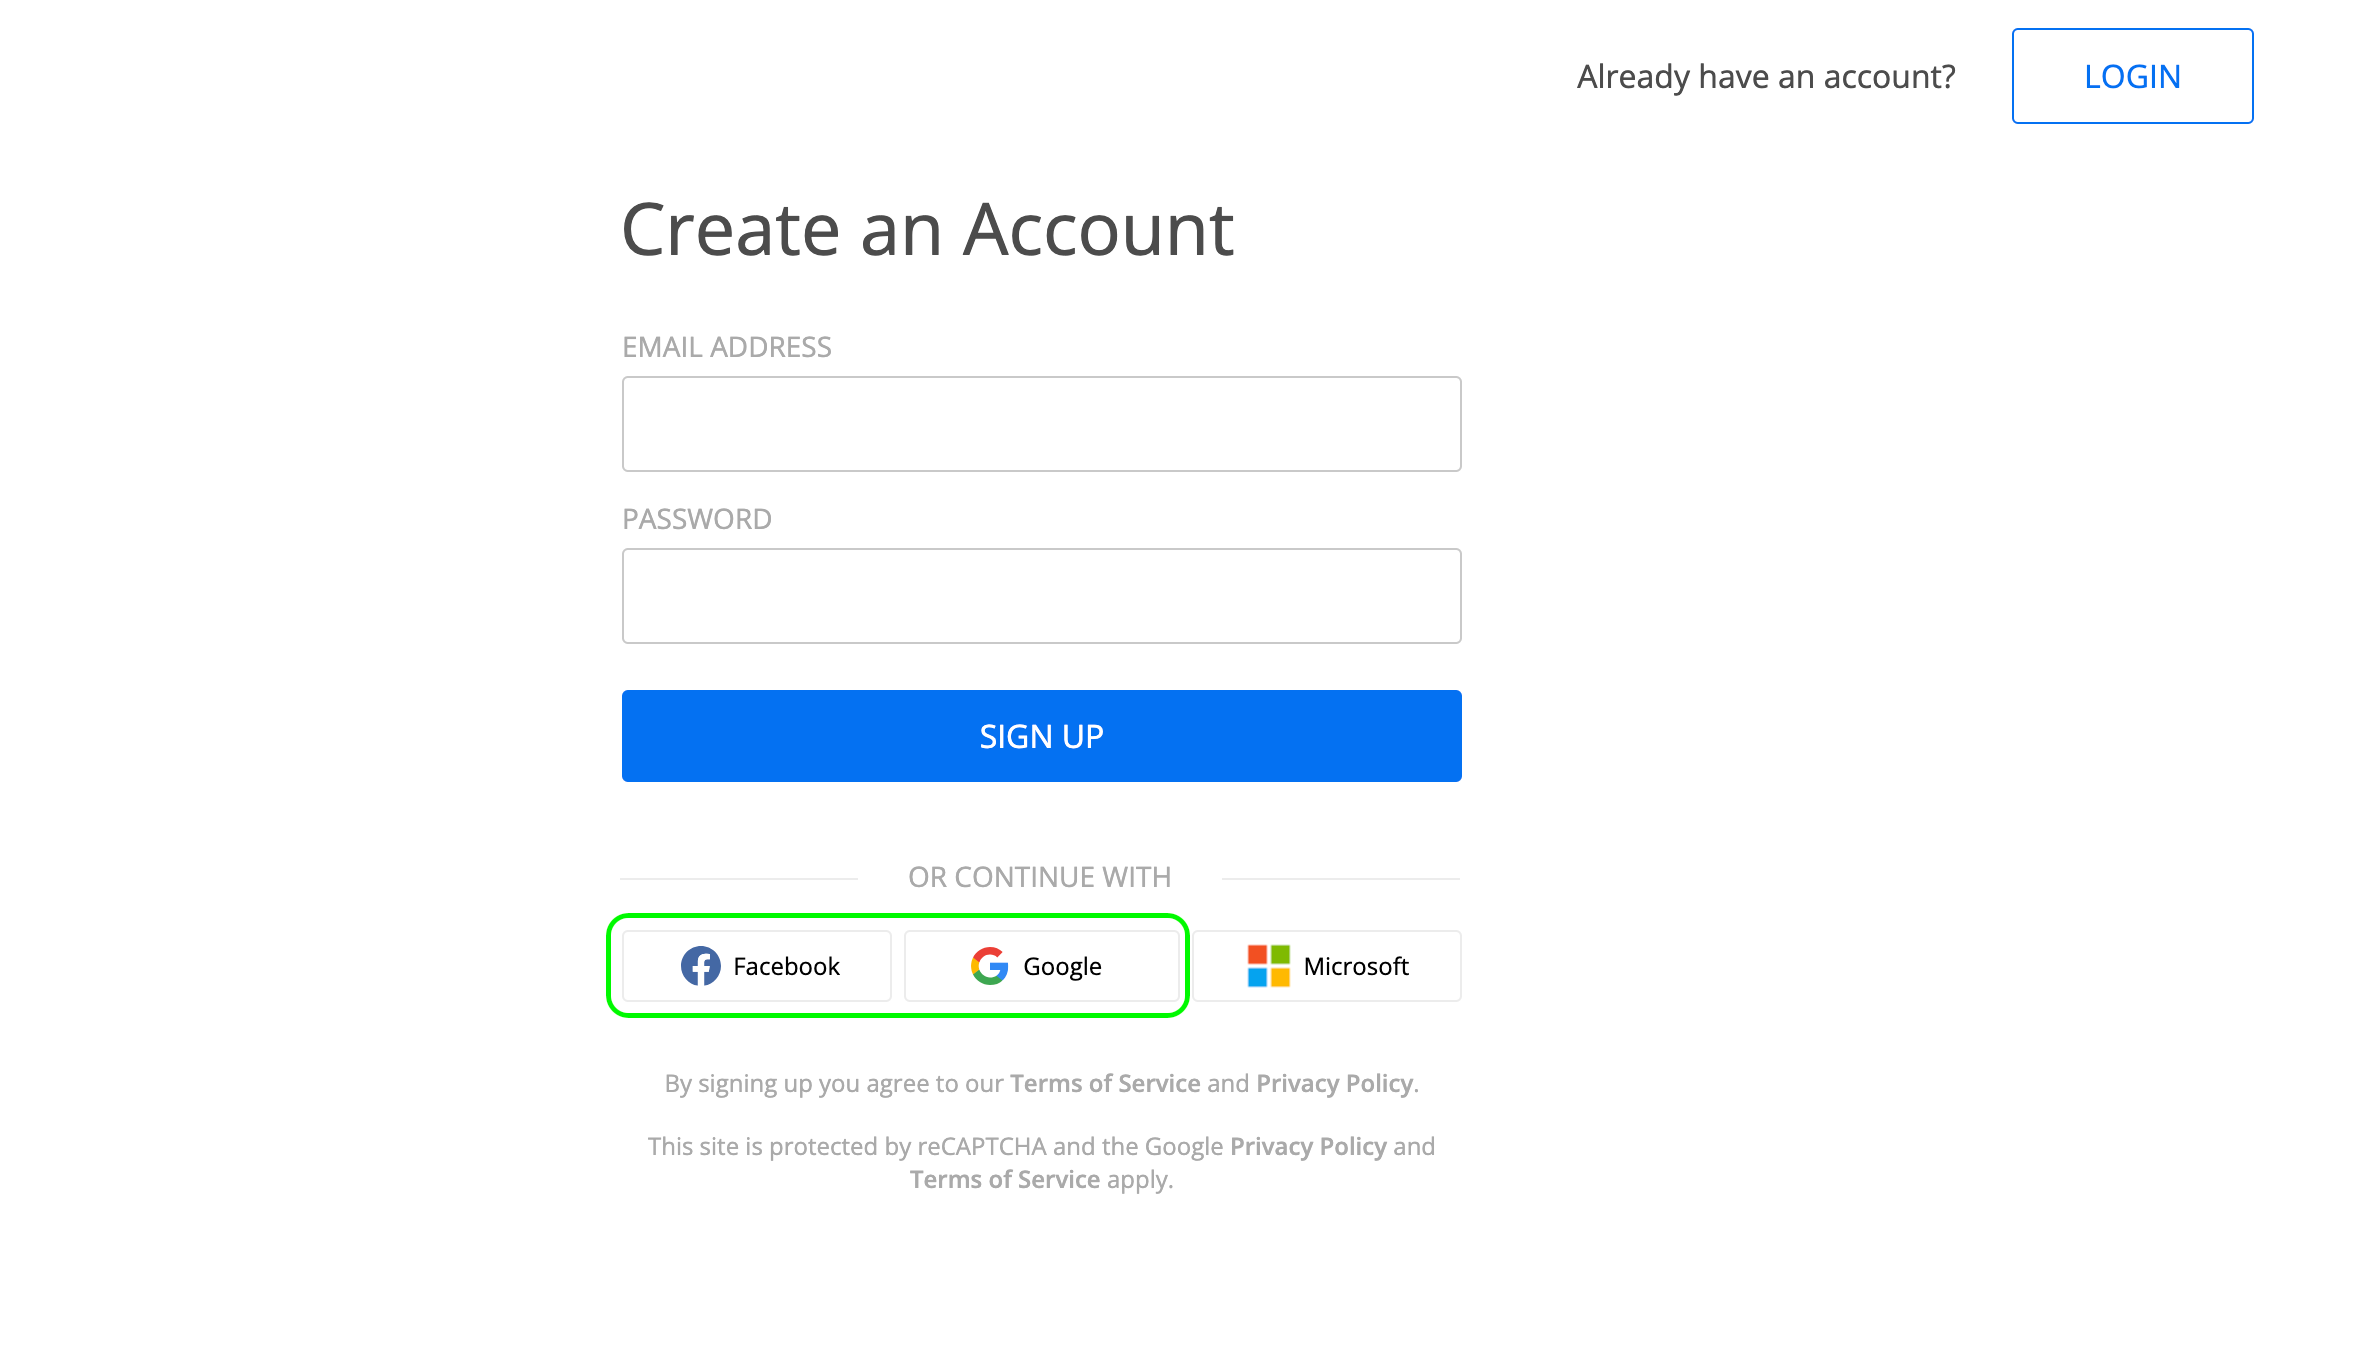
When creating an account with 123FormBuilder, besides the commonly used method to enter an e-mail address and set a password, you can also quickly create accounts by using an IdP provider such as Google or Facebook.
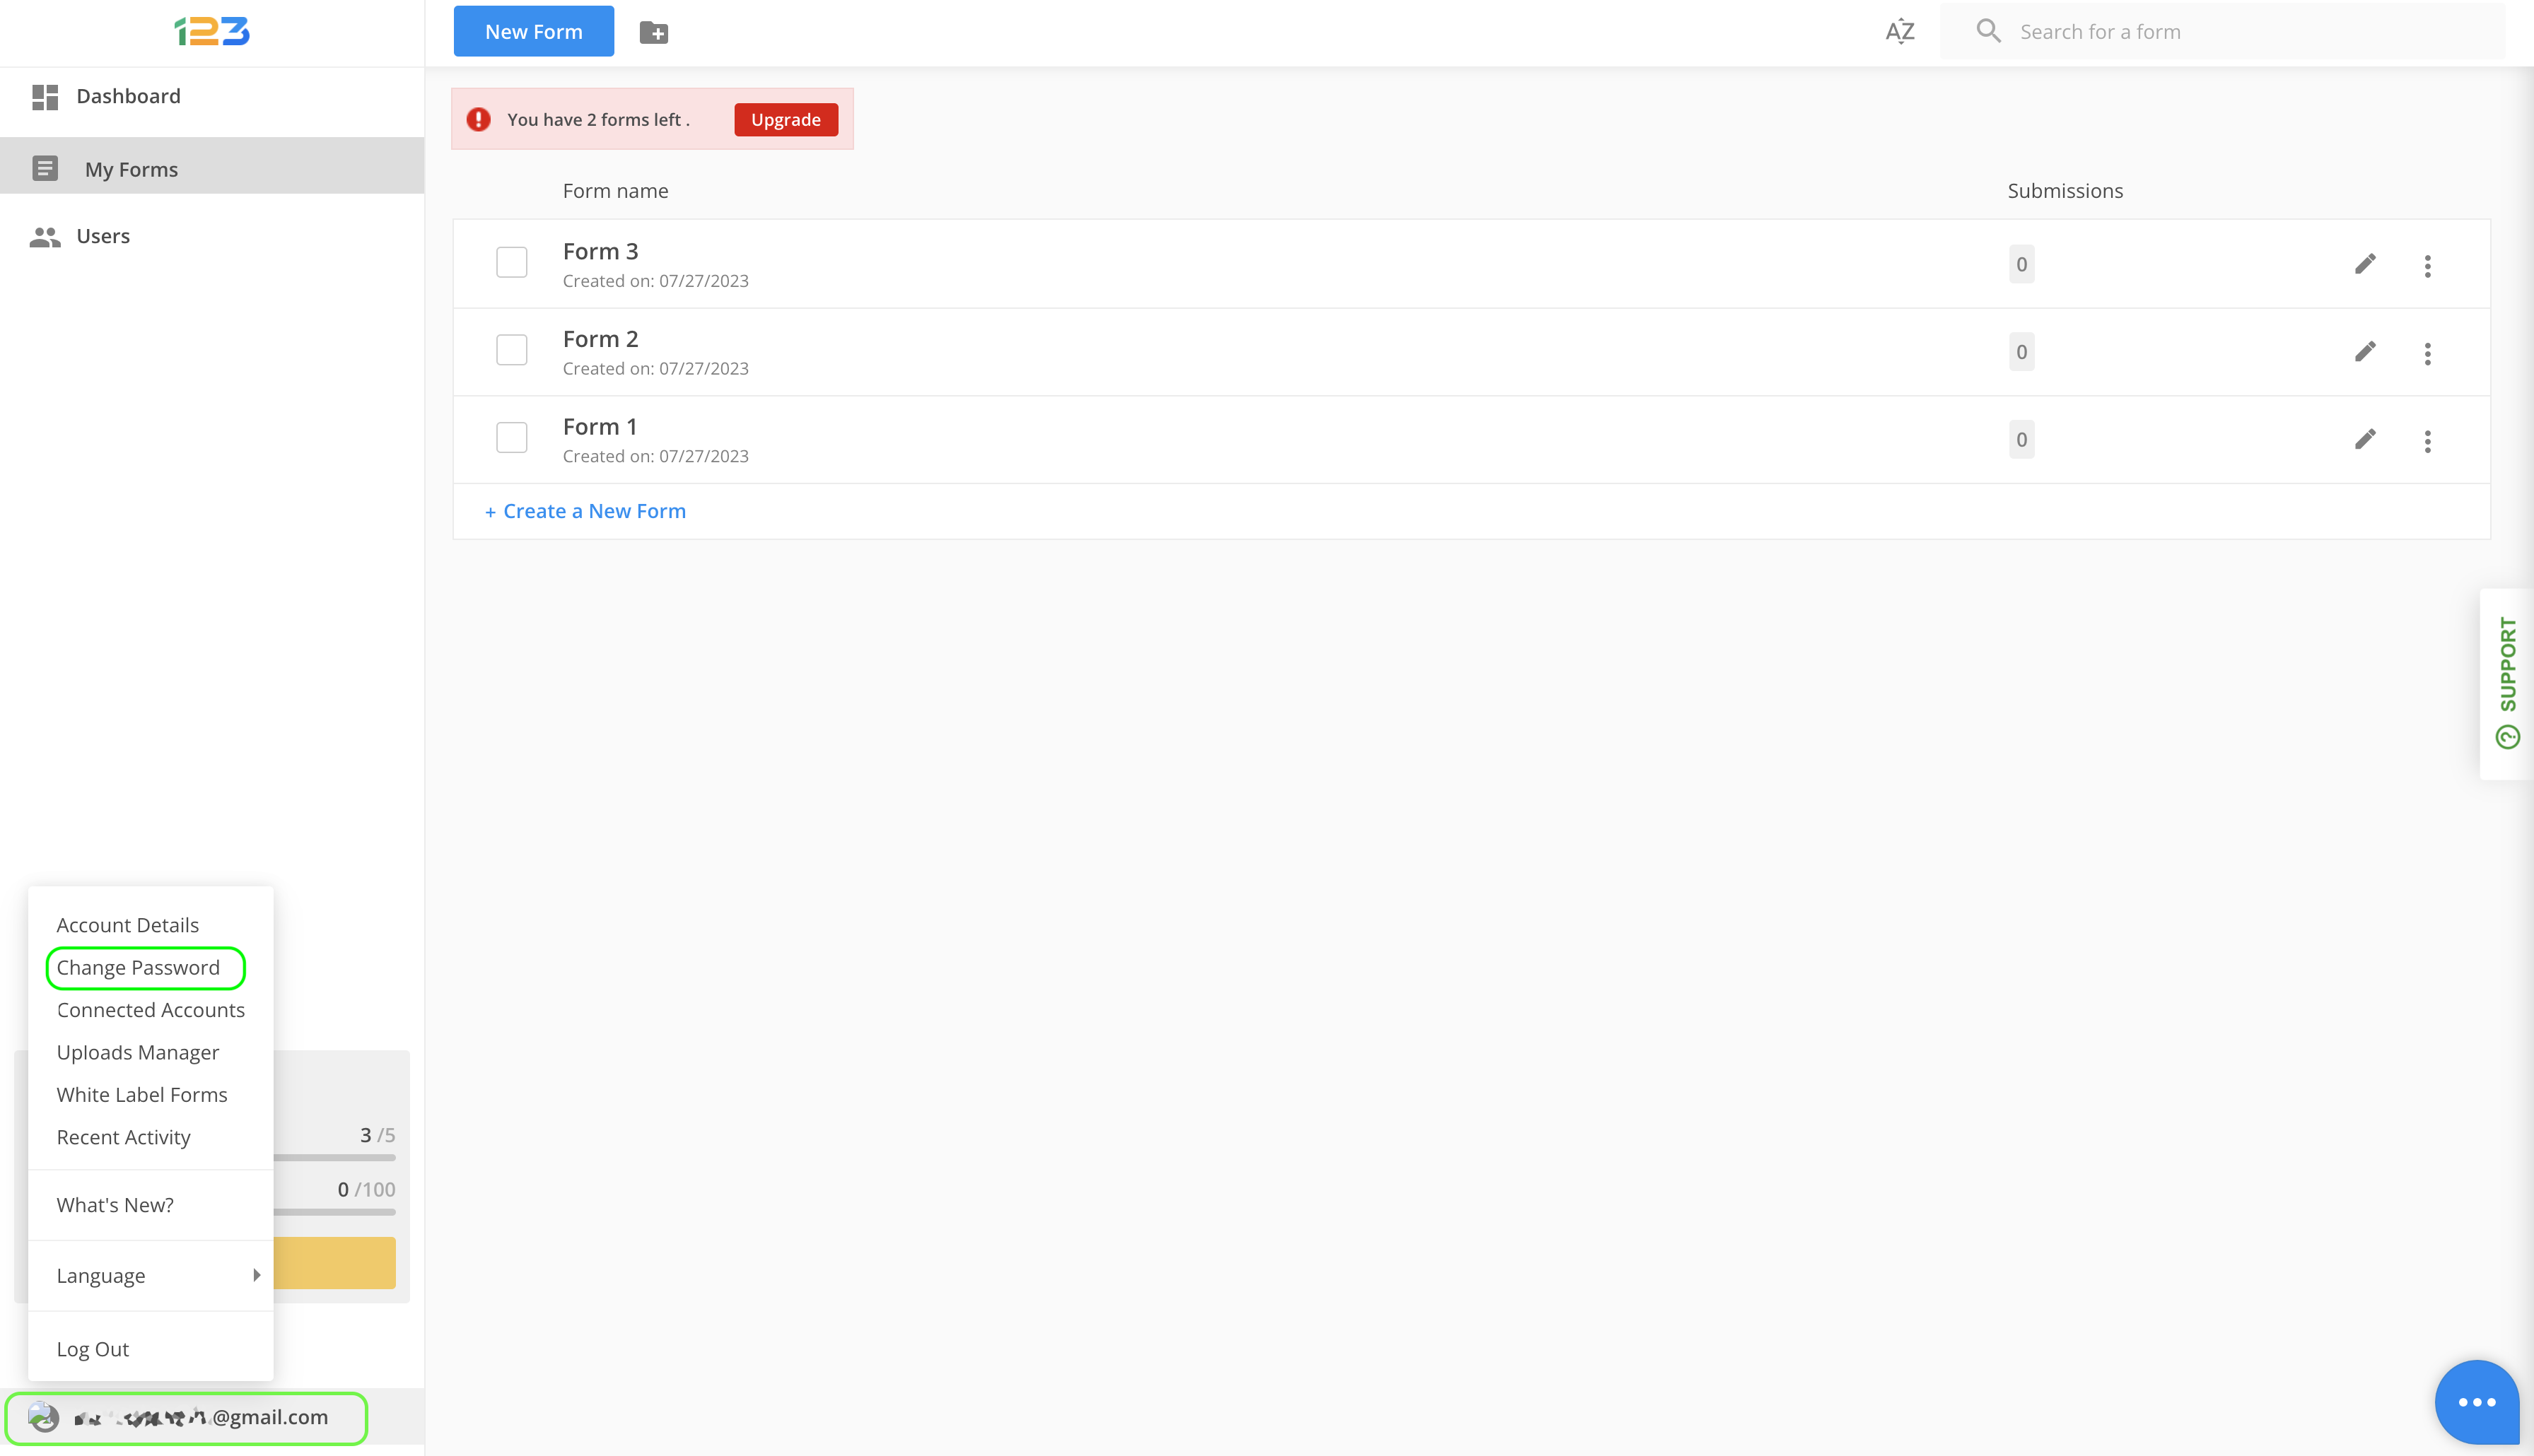
When using this method, you will need to generate a password in case you want to use the 123FormBuilder credentials to log into other platforms (such as Zapier, for example). This can be done easily by navigating to the bottom left side of your workspace and clicking on the e-mail address you are logged in with.
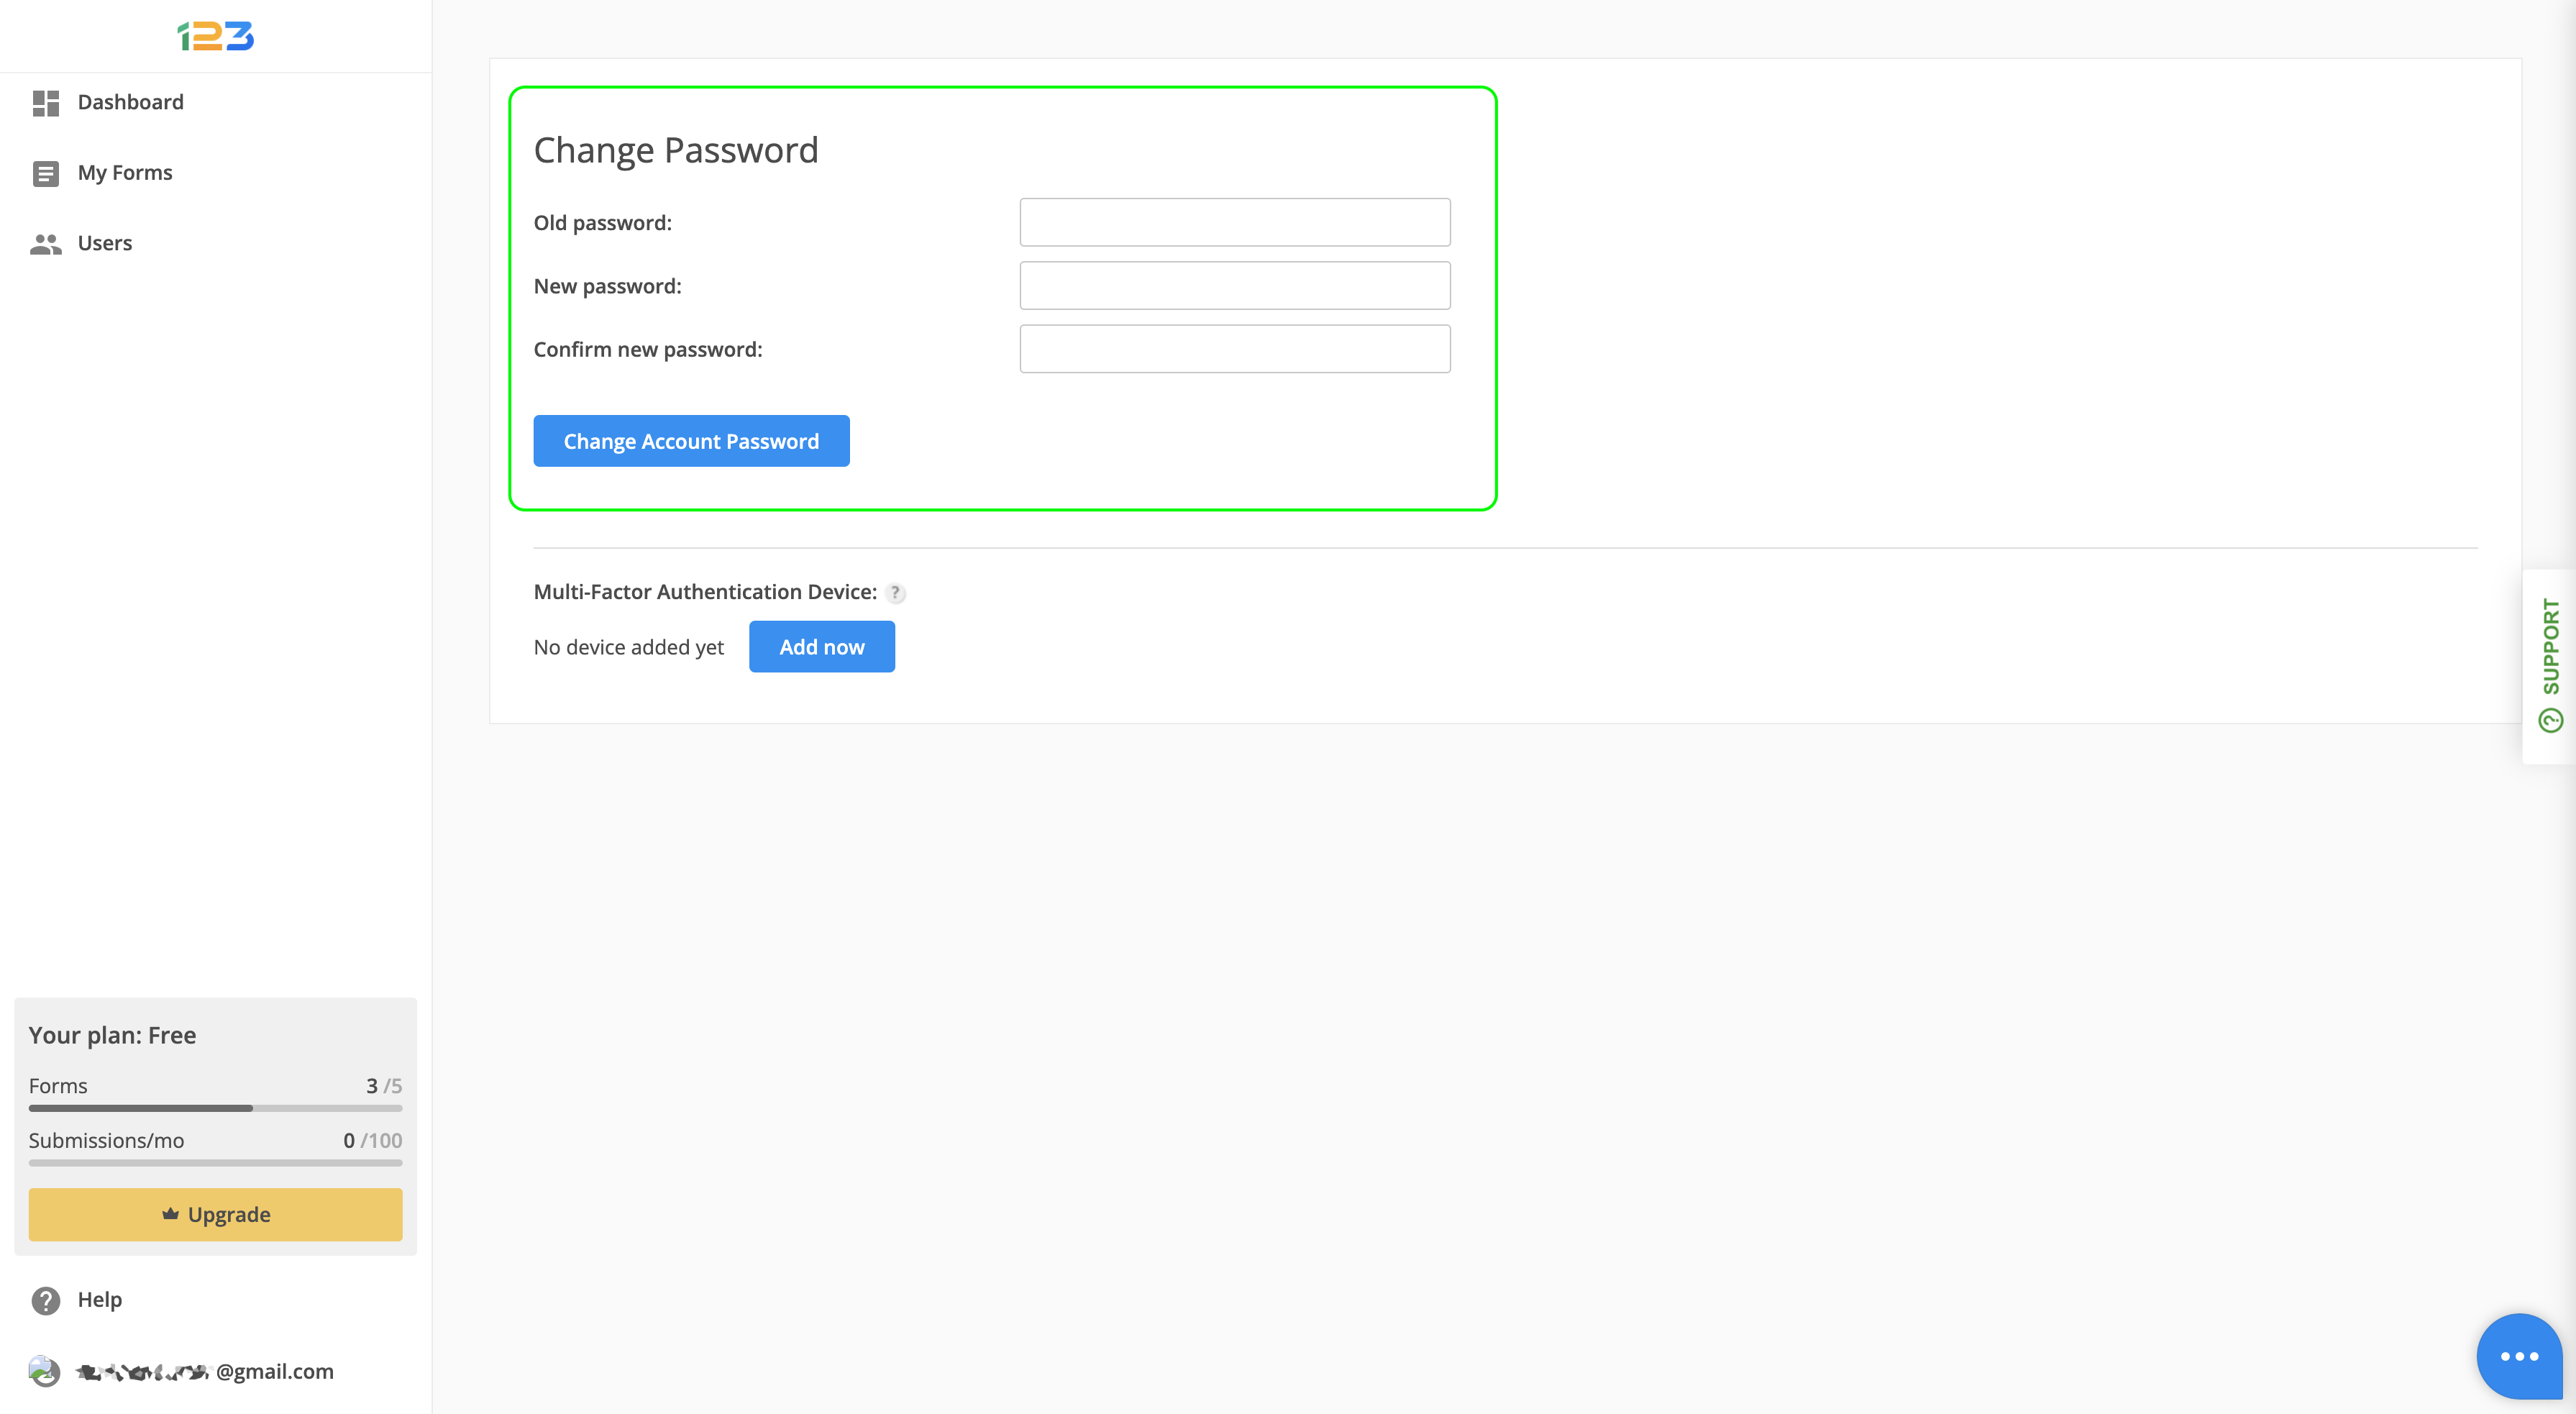
Doing this will open the account management menu, in which you can find the option to Change Password, second from the top down.
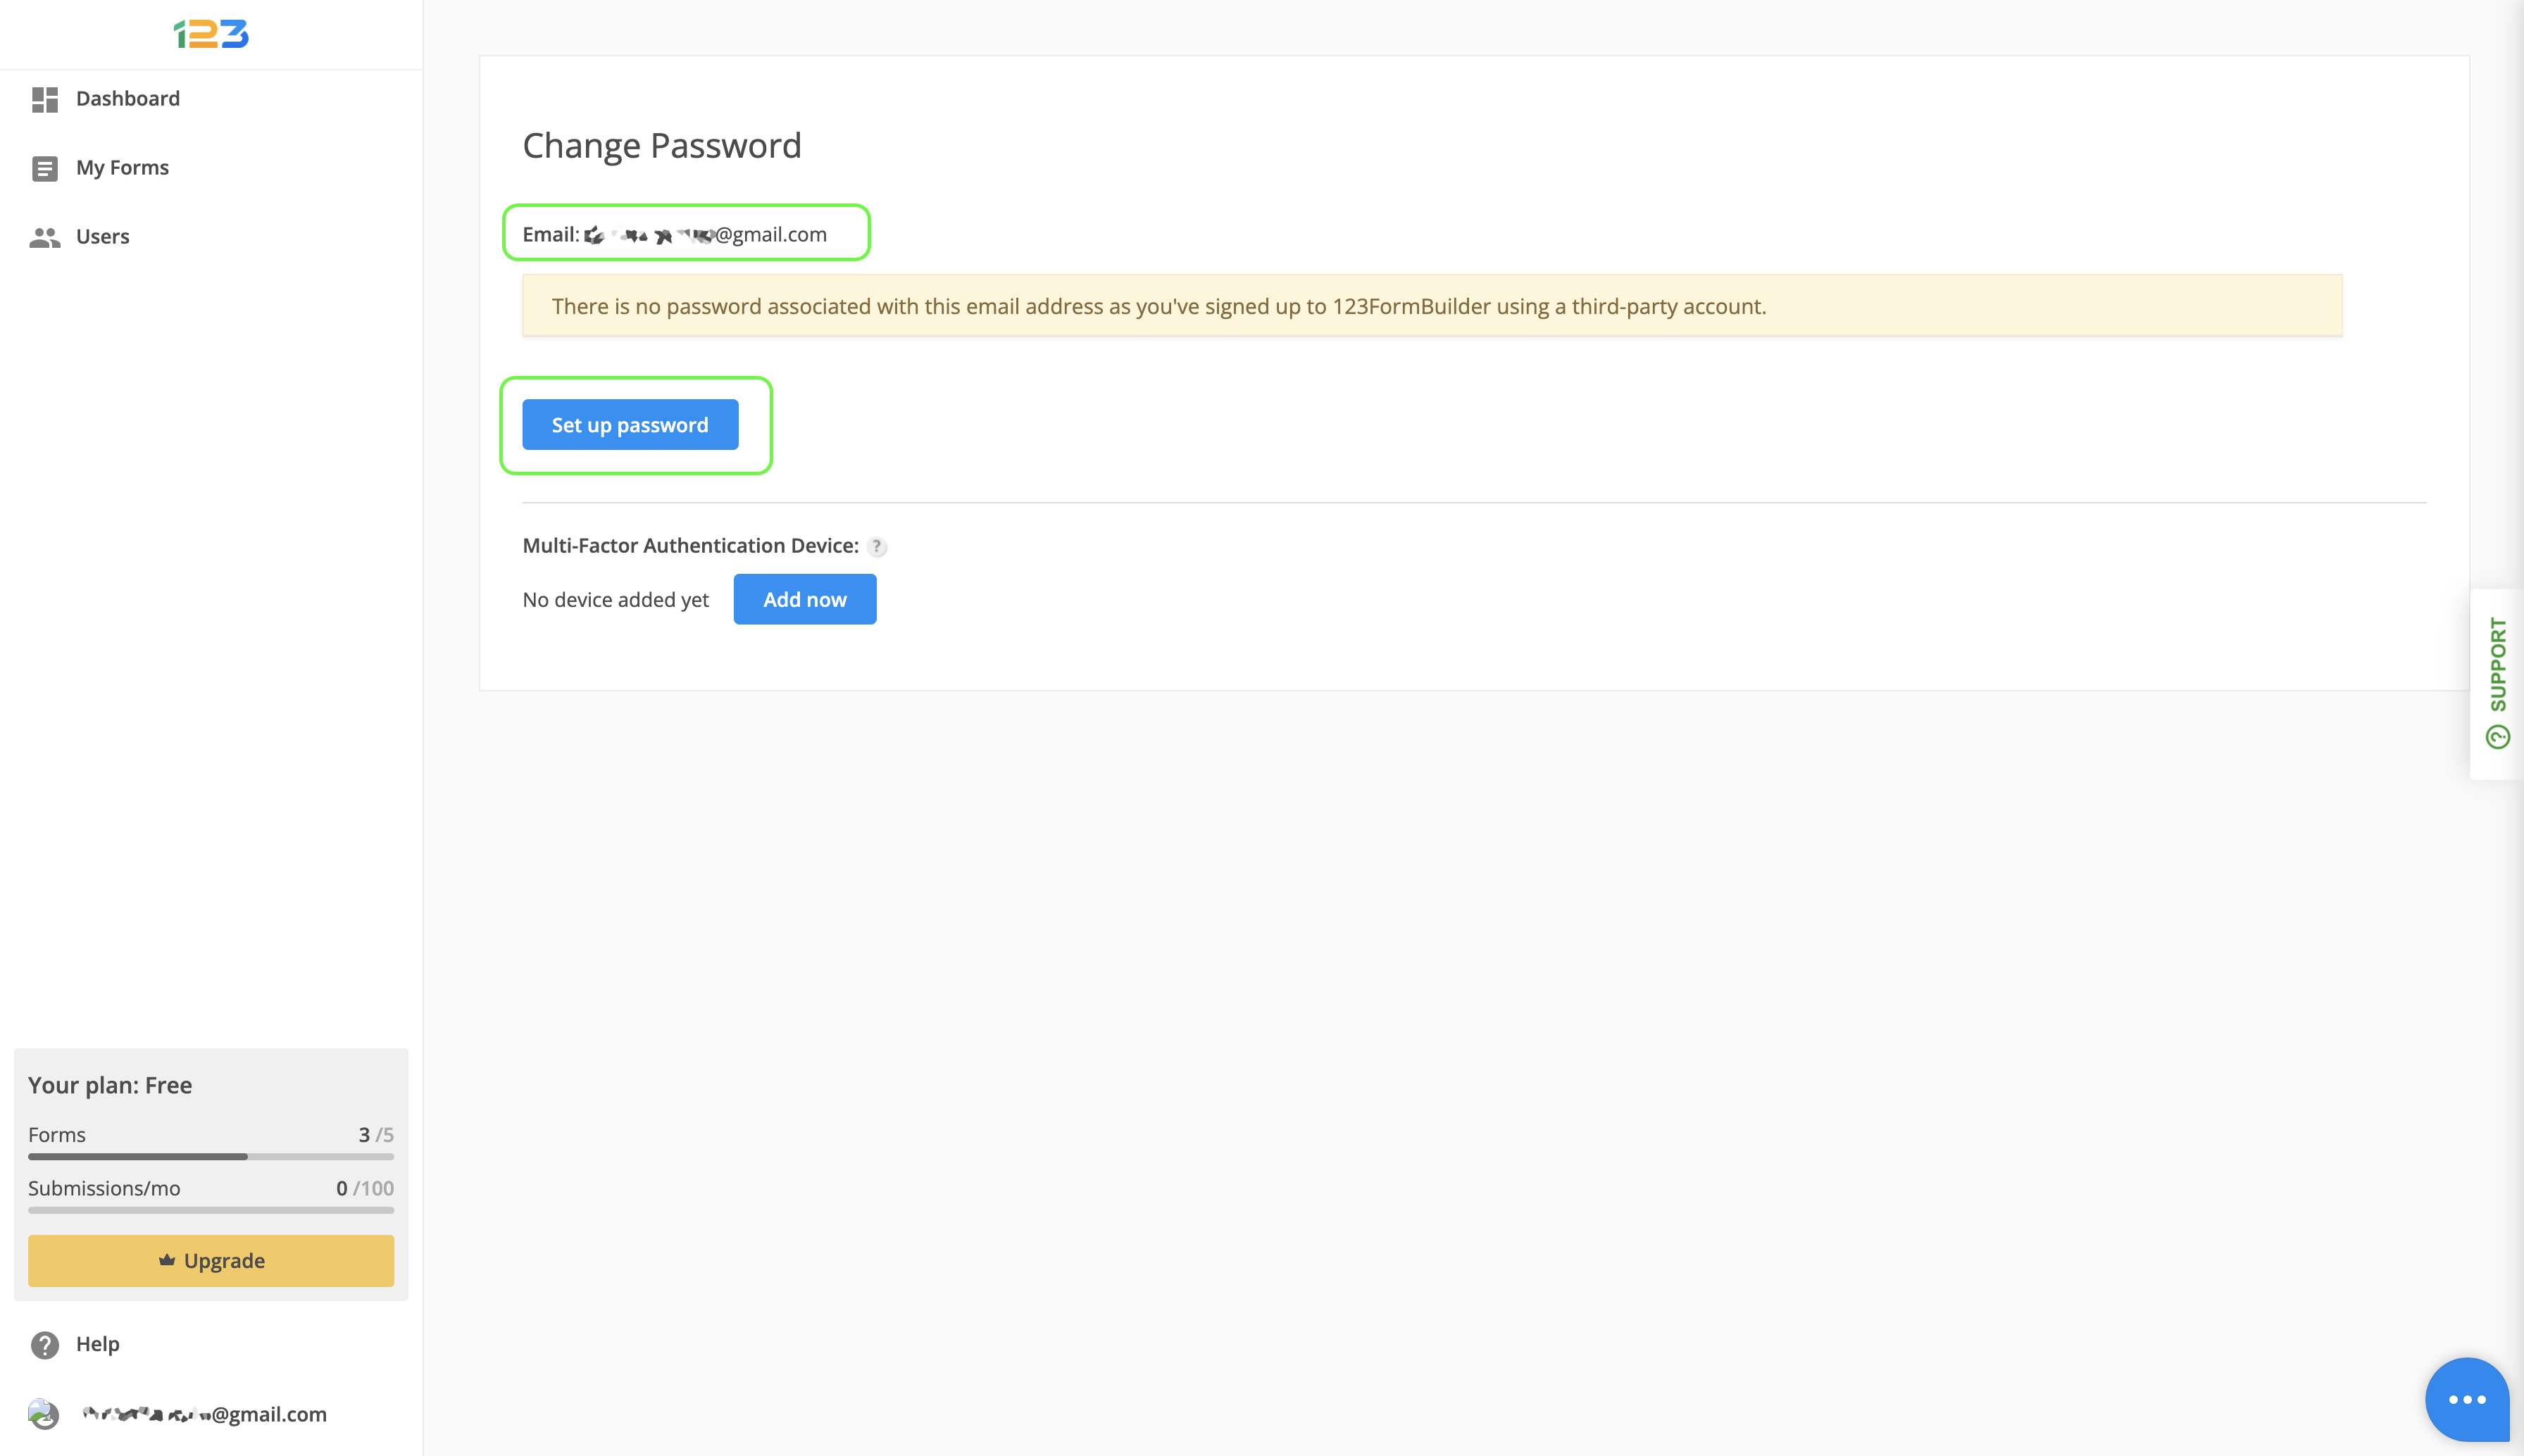
Clicking on this option open the Change Password interface. Here, you will find information regarding the account you are generating a password for (it is the same one you are logged in with and that you can see in the bottom left side of your workspace). Also, you’ll see a warning that there is no current password associated to your account and a button which will trigger the password generation flow.
Clicking on the button will send an e-mail with a link to the address indicated above. This link will enable you to set up a password for your account.
Please note that you will only see this screen if you are logged in with an IdP provider and you have never generated a password for this account.
If you have generated a password for your account previously and follow the flow described above, when clicking on the Change password tab, you will see the screen shown next. In this flow, in order to change your password, you need to enter both your current and your new password, and the update will take place right away.
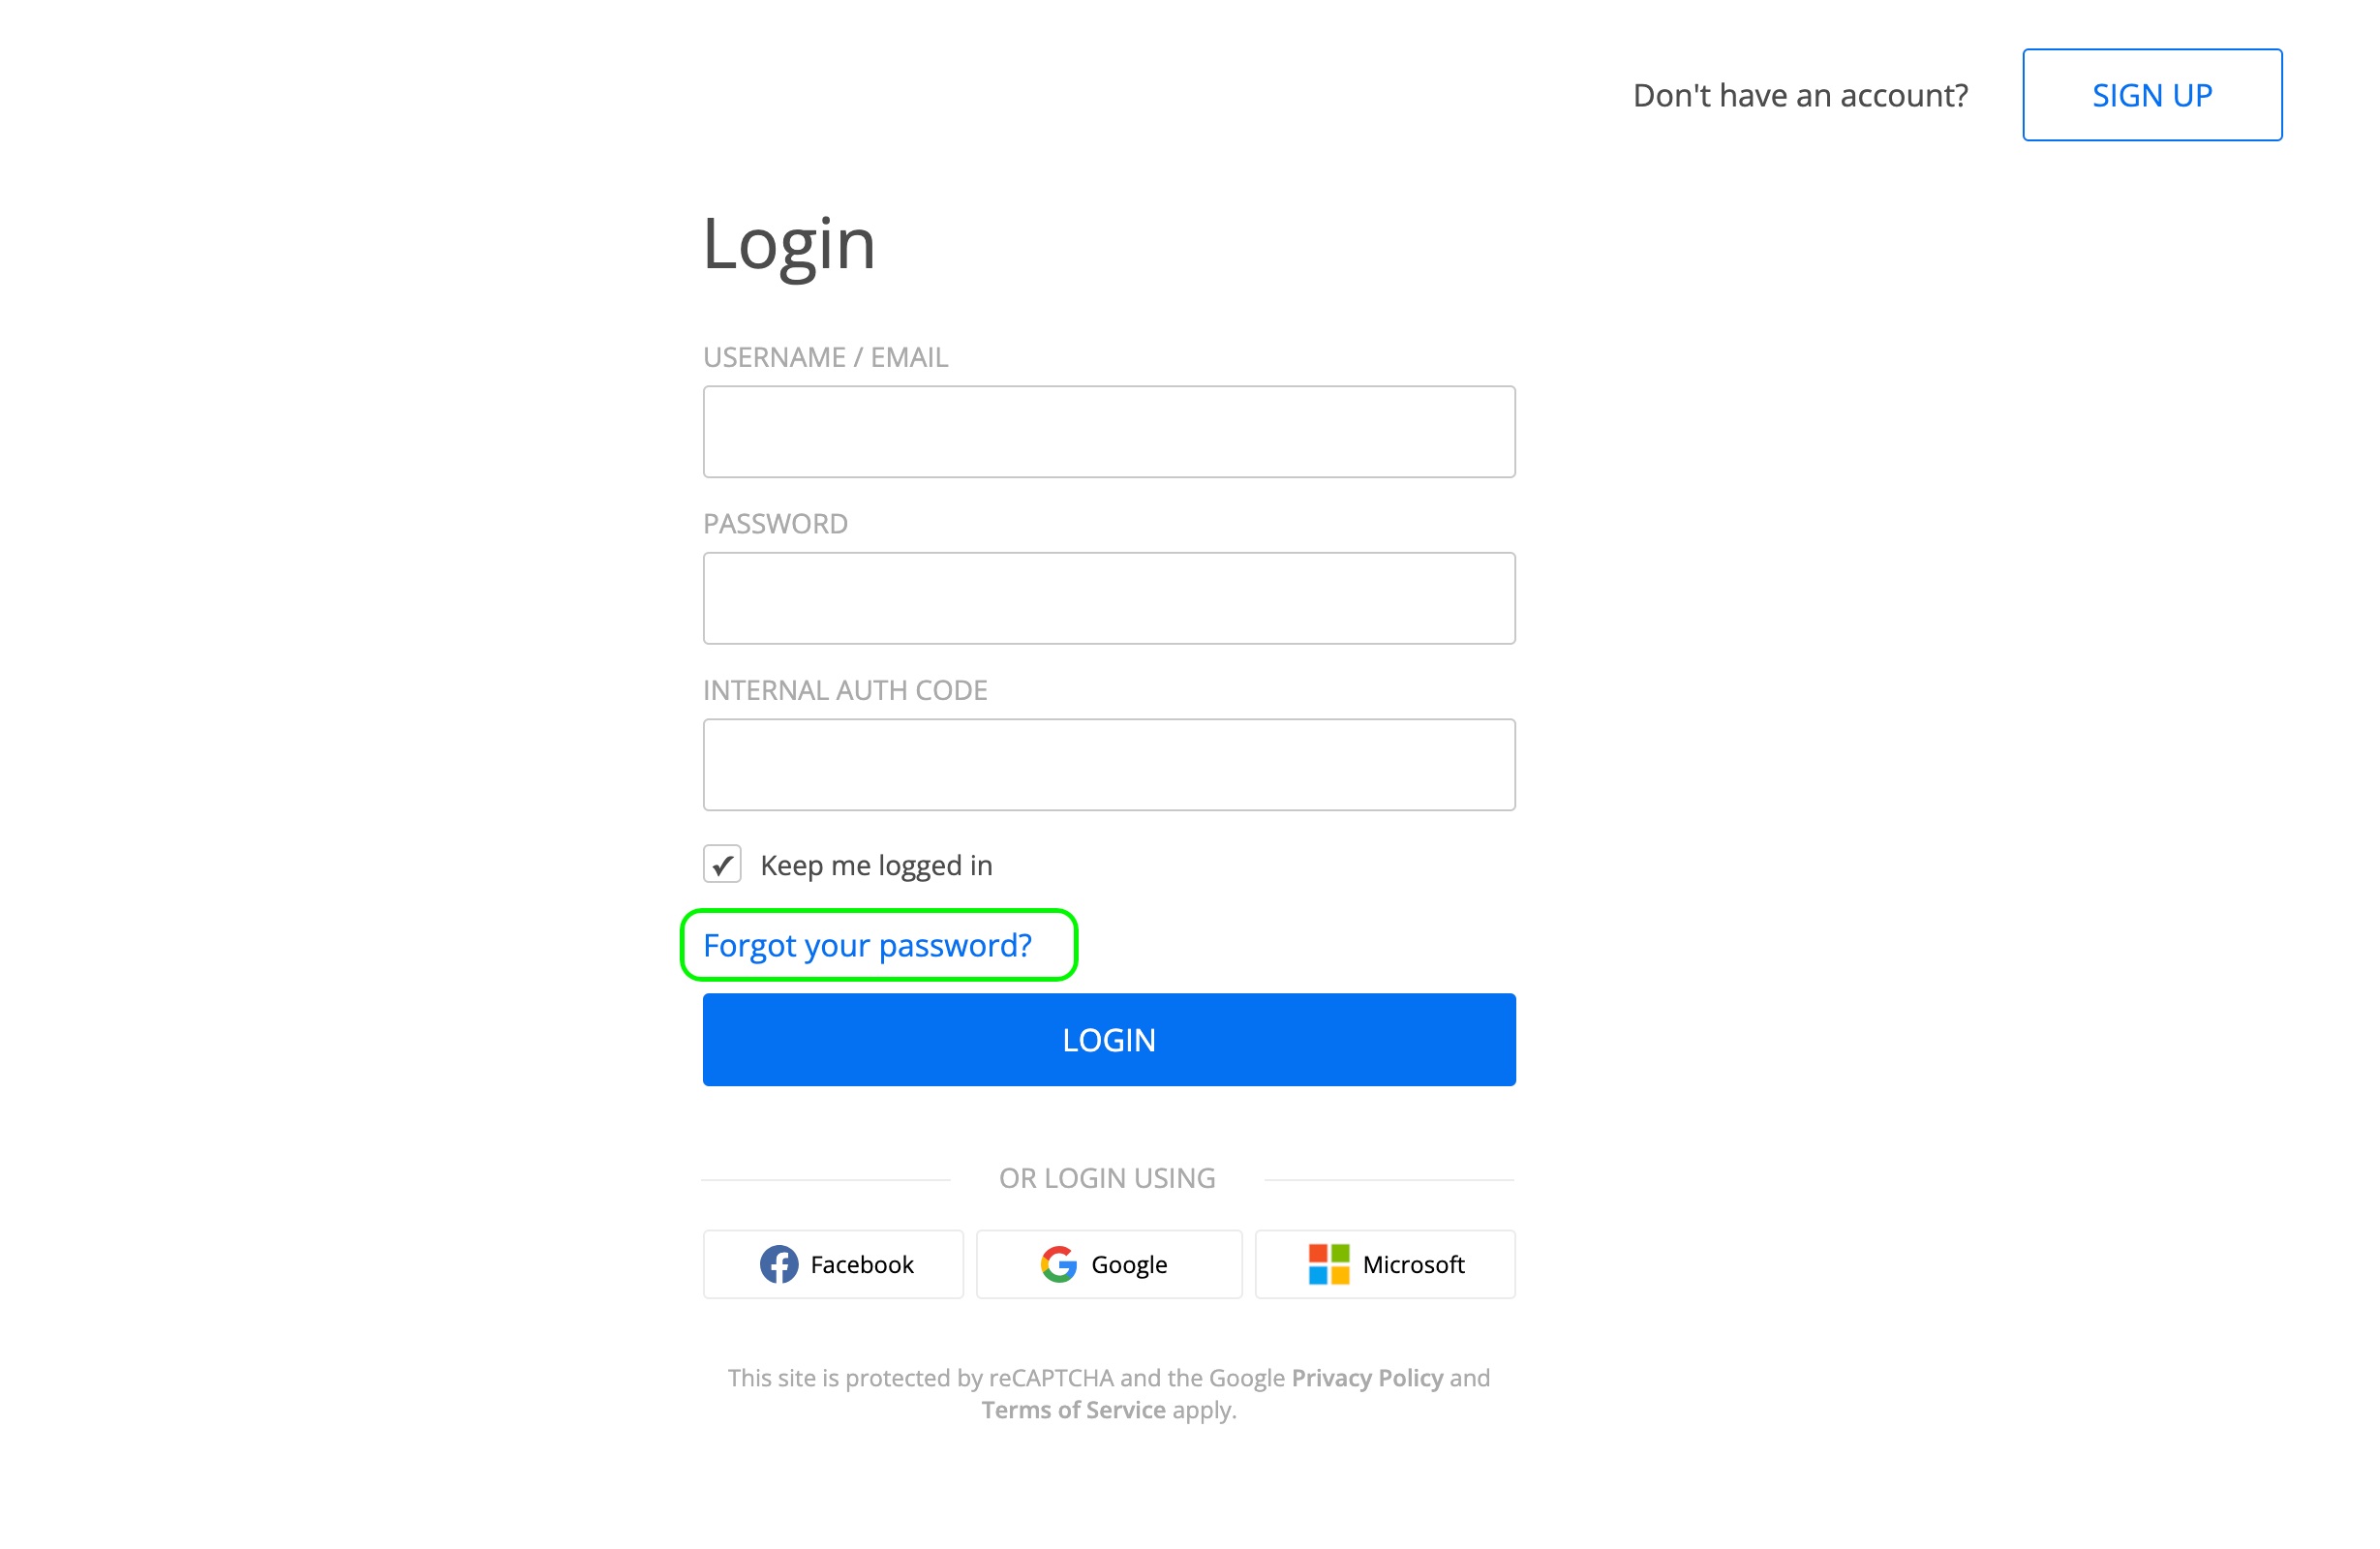
In case you don’t remember your old password, go to the login page and trigger the password reset flow from there, by clicking on the Forgot password button.
Related articles:
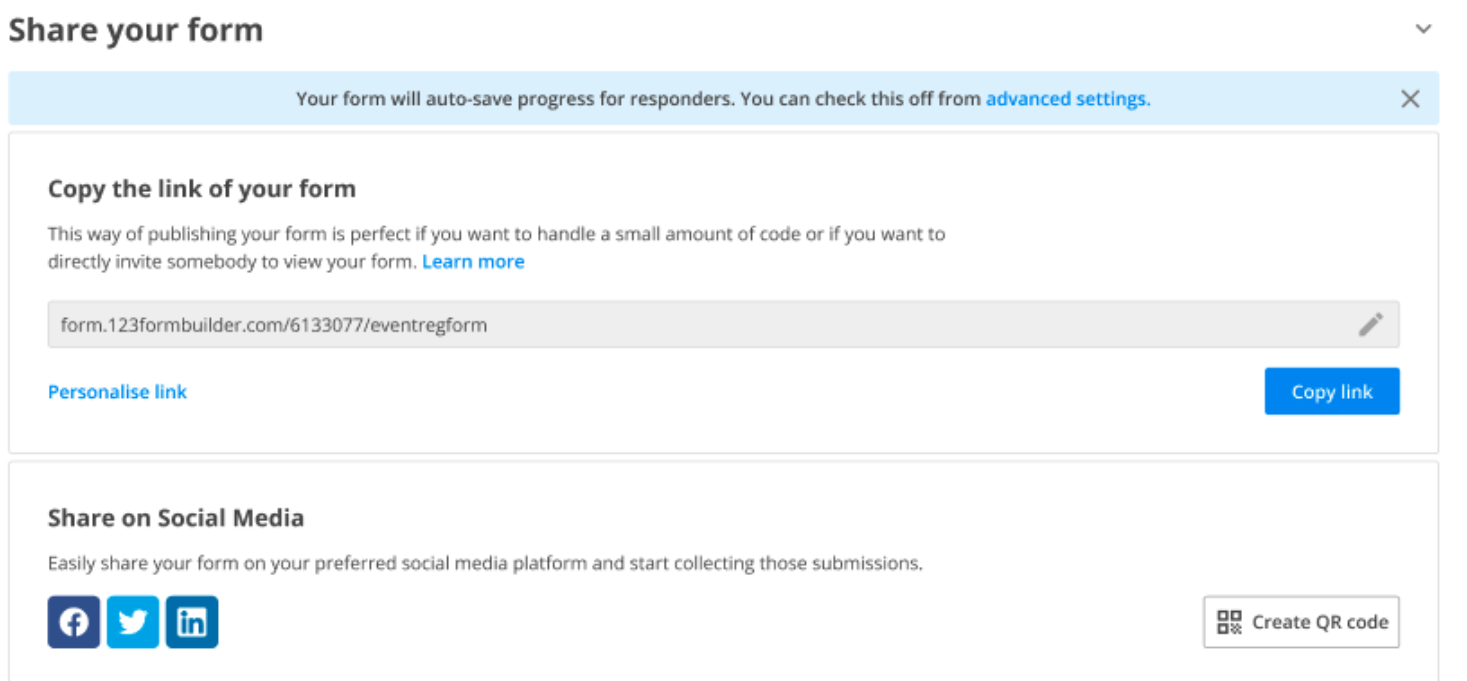
You can personalise the link of your form in various ways, depending on your needs and use case. We will take them one by one and show you exactly how they work.
Personalise link
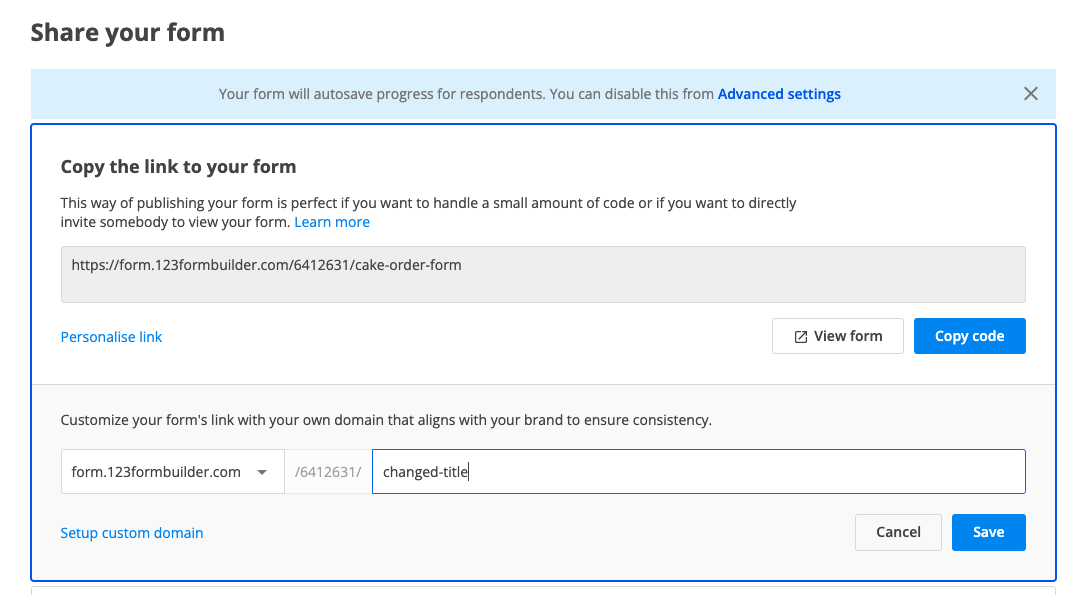
The first option would be to change how your link looks like. You can do that by clicking on Personalise link right below the quick link of your form.
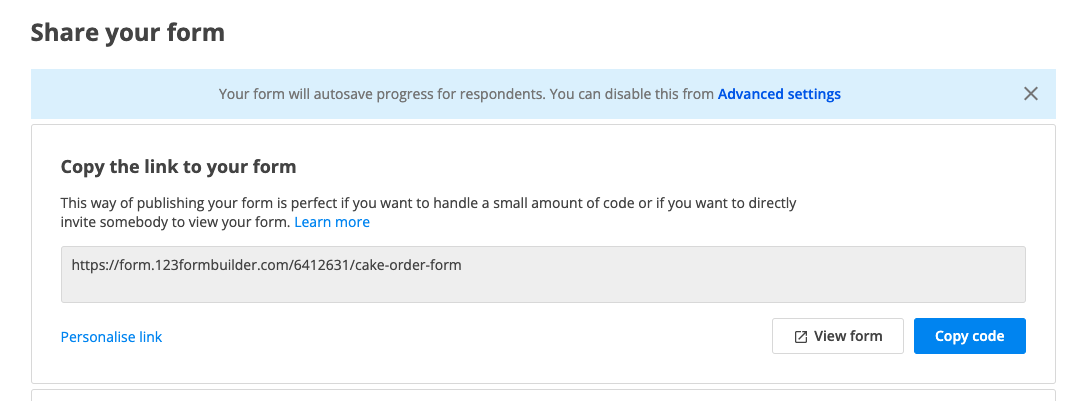
Once you expand the Personalise link section, you have 2 options to change the format of your link:
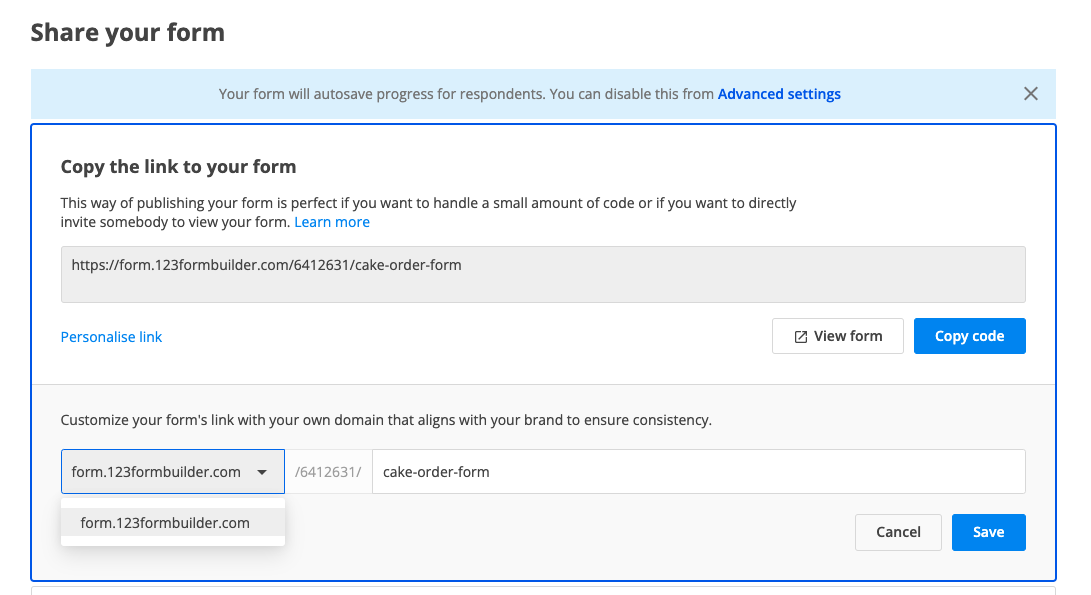
a. you can change the first part of the link by clicking on the dropdown -> if you have a custom domain applied on your form, by clicking on the dropdown you can switch between the root link that 123FormBuilder is offering and your custom domain one. In our video example below, our form did not have a custom domain applied to it. If we want to start the process of adding one, we can click on Setup custom domain option and we will be redirected to the Custom domain setup.
b. you can change the final part of the link by editing the text within the input text box -> by default, your link will contain the name of the form. If you want to change that, you can simply edit the text and click Save.
Setup metadata
When sharing your link with anyone via social media platforms, your link has behind it some metadata information. This includes an image associated with the link, a title or a description. You can customise all of that in order to collect submissions easier.
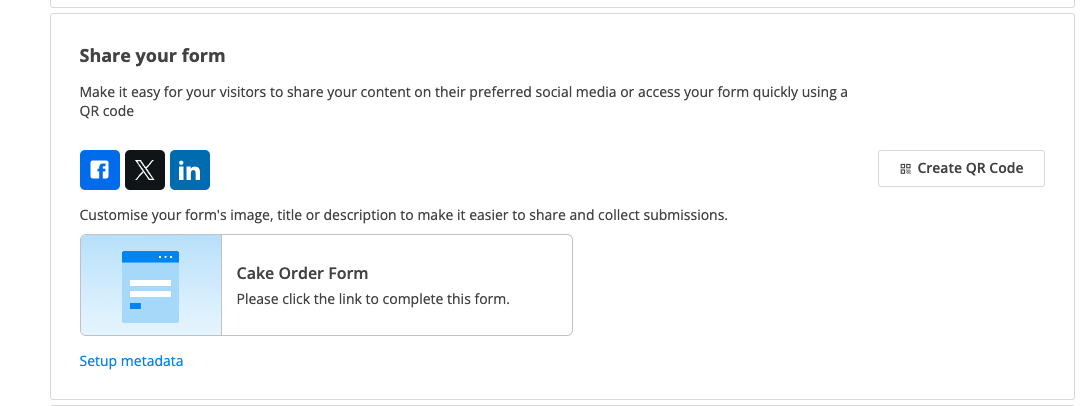
By default, the metadata of your form has a generic photo, the title of the form and a default description. You can customise all that by clicking on Setup metadata.
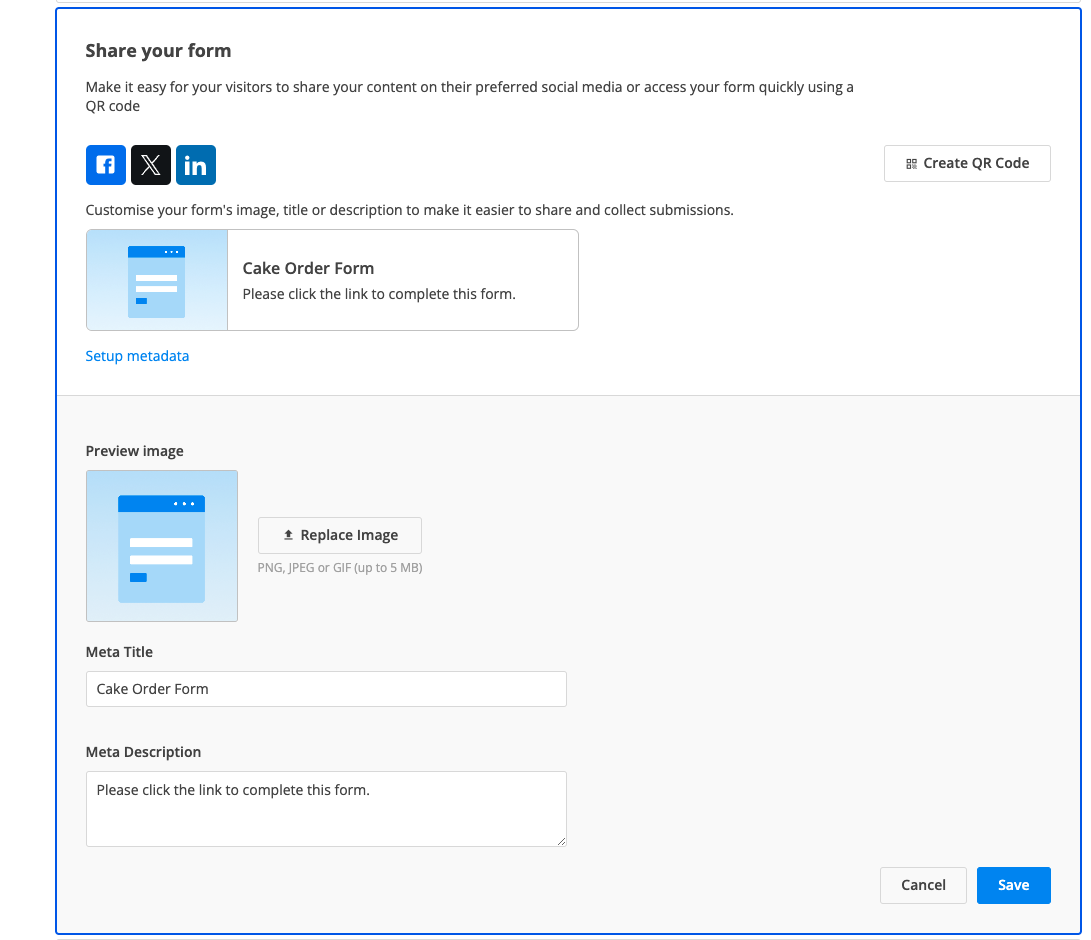
You can replace the image with anything you’d like. The file has to bePNG, JPEG or GIF and up to 5 MB. The Meta Title is by default your form name, but you can change it according to your needs. Last but not least, the Meta Description can also be customised.
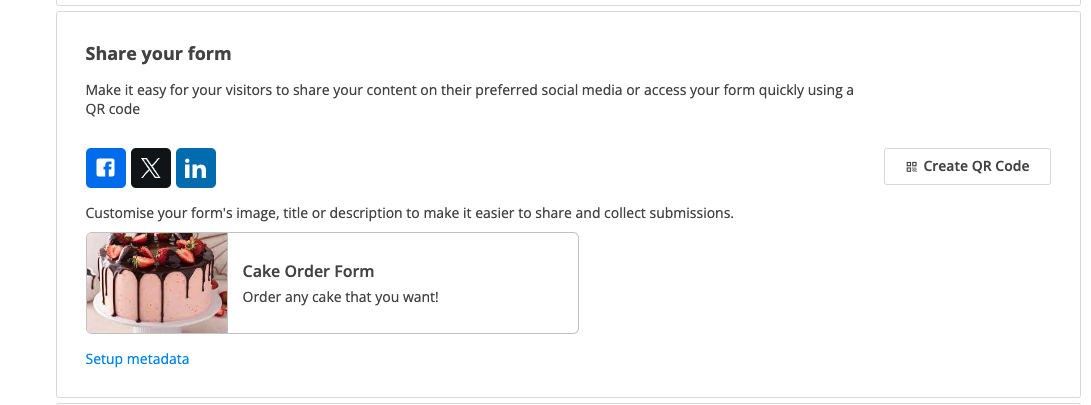
Once you’ve made all the necessary changes, click Save. All your changes will be updated directly in Publish section so you could see what your respondents see when you share the link with them.
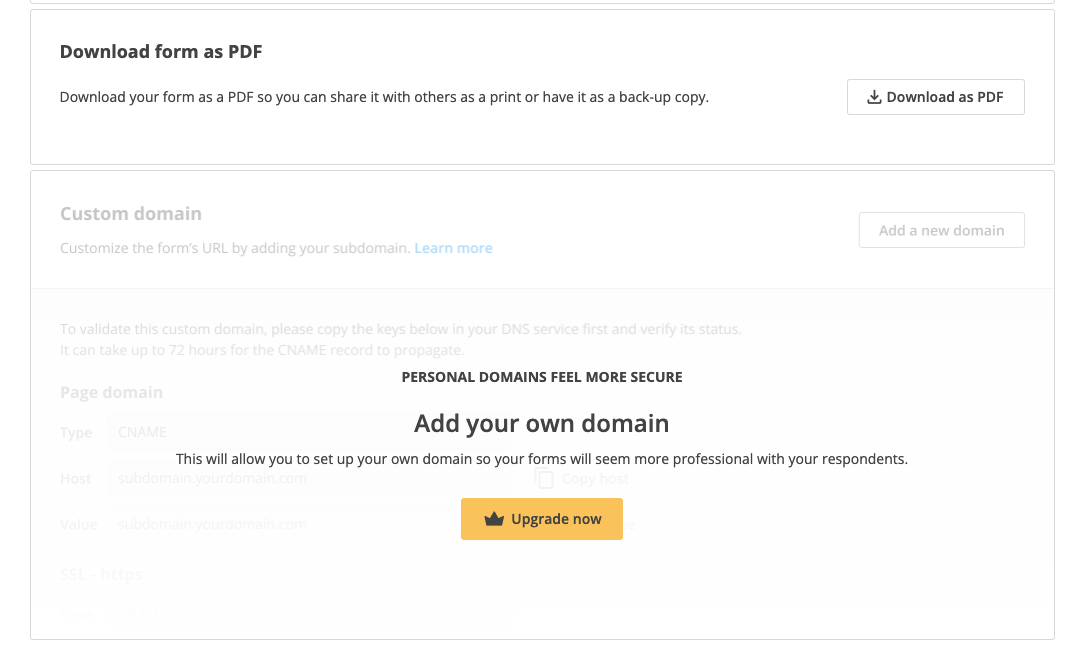
Custom domain
Another option of personalising your form is by applying a custom domain to it. All the necessary steps to set up a custom domain can be found in this article.
In order to request your respondents’ consent on storing their data, we’ve created a brand new field, the GDPR Agreement field.
It can be found under the Uploads & Consent category.
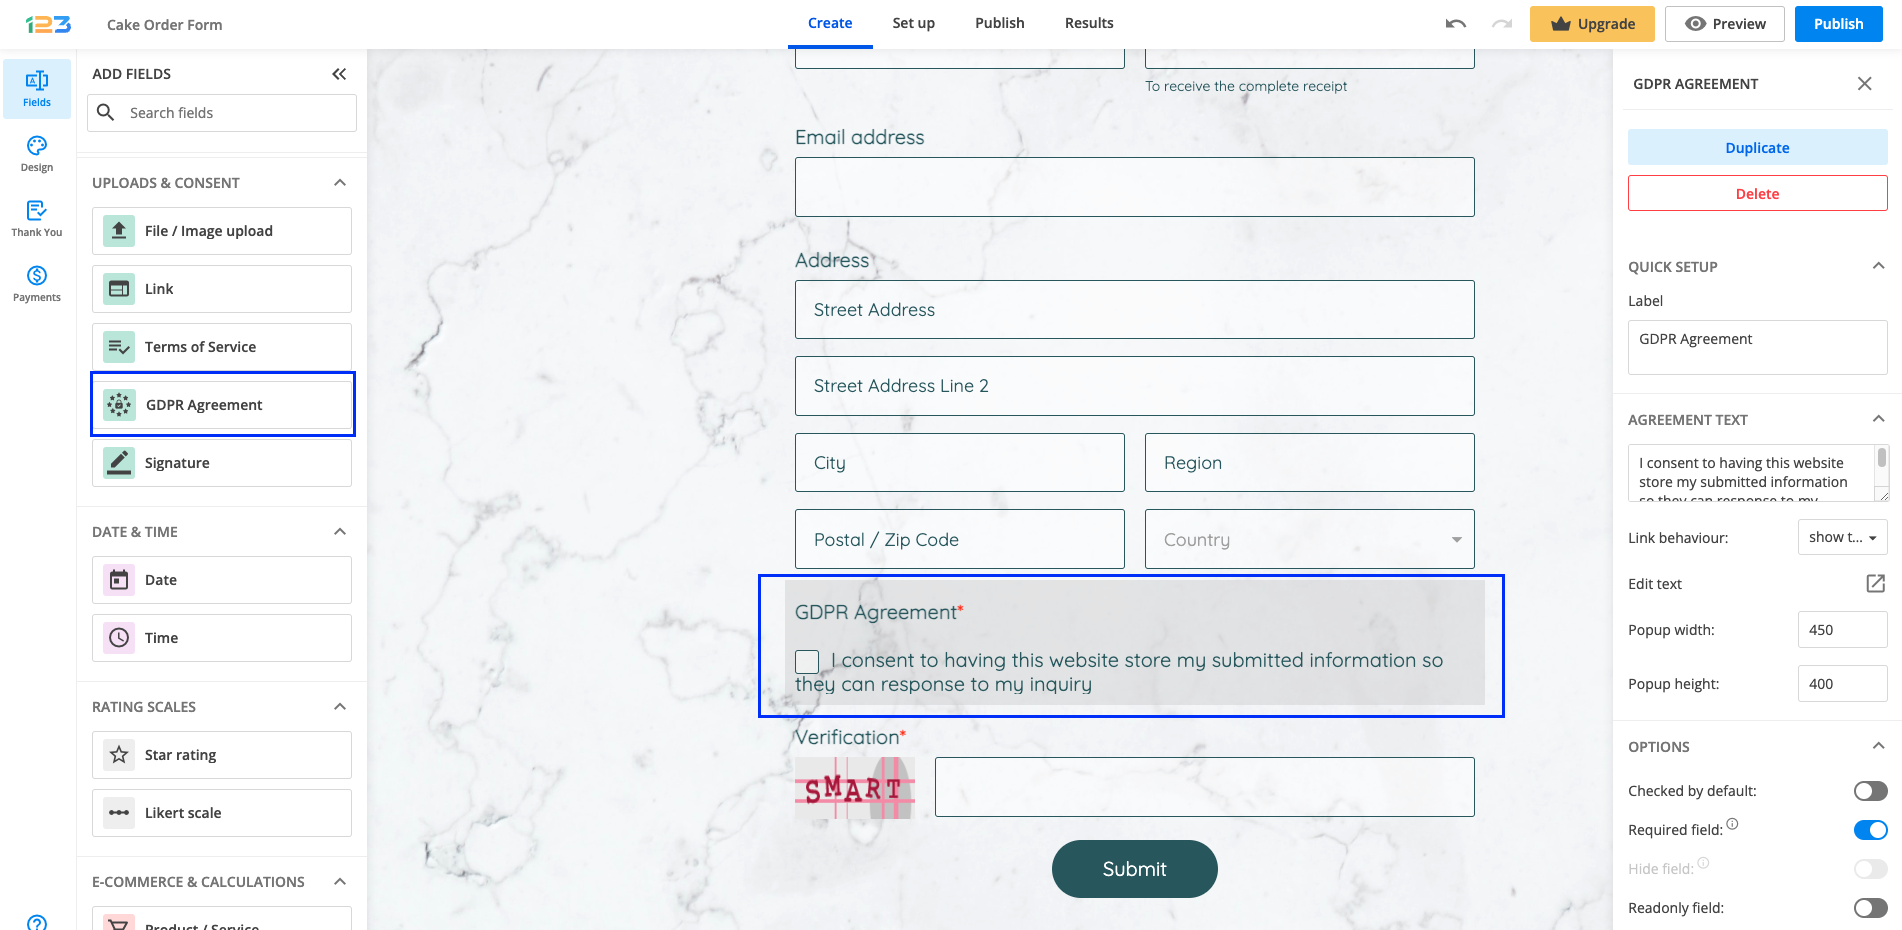
Agreement text
We have offered a default agreement text that can be easily customized according to your needs. If you want to open up the text editor, you simply have to click on Edit text.
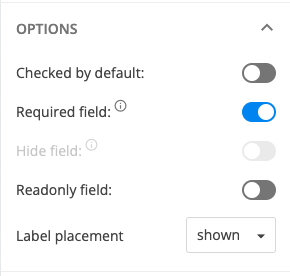
Options
By default, the GDPR Agreement field is marked as required, but you can change this from the Options section. Also, you can choose to have this checked by default for your respondents.
Another option is to have the field as Readonly, if this fits your use case.
Related articles
You’ve published your form and you have started to gather Insights data. But you’ve noticed that you have a high number of Users and Abandons on your form and the numbers do not add up. Let’s see what you should keep in mind when interpreting Insights data.
Browser cookies
As a general rule, Users logs in unique respondents, but under certain scenarios. Firstly, we track a “unique respondent” via their browser. If they change their browser or device, they will count as a “new user”.
Further, if the respondent uses the same browser each time they interact with the form AND their browser has cookies allowed, then we can easily track that the same respondent accesses the form three times. So we log in only one user.
If the browser does not have cookies allowed, then we can not track down the identity of that respondent. Therefore we will count the user as a unique one each time he accesses the form, even from the same browser.
Another stat that is dependent on browser cookies is Abandons. Normally, when a visitor opens the form and starts interacting with it, we automatically apply 1 Abandon, which we later delete once they submit. But with cookies disabled, we’re not able to track that correctly anymore so the abandon number remains.
This is one of the main reasons why you might register a high number of users and abandons.
All cookies enabled/ Third-party cookies blocked
When your respondents have no cookies blocked, or only the third-party cookies blocked, your Insights data will behave the same. This means that if your respondent accesses the form three times from the same device and browser, we are counting only one user.
Let’s detail what happens on each step when the same respondent accesses the form numerous times:
Step 1: respondent A accesses the form the first time, interacts with the form but does not submit it. This results in 1 view, 1 user, 0 submission, 1 abandon.
Step 2: same respondent A accesses the form the second time, interacts with the form, but does not submit it. This results in 1 view, 0 user, 0 submission, 1 abandon.
Step 3: same respondent A accesses the form the third time, interacts with the form and now submits it. This results in 1 view, 0 user, 1 submission, 0 abandon.
After all the actions from above, if we draw the line, our Insights data would show: 3 views, 1 user, 1 submission, 2 abandons.
Above we talked about the situation when your form respondents do not finish filling out the form in one sitting. Now let’s explain what happens when your form respondents are different each time (or they are the same but access the form from different devices or browsers each time).
Using the steps structure from above, this is what happens in this scenario:
Step 1: respondent A accesses the form, interacts with the form but does not submit it. This results in 1 view, 1 user, 0 submission, 1 abandon.
Step 2: respondent B accesses the form, interacts with the form, but does not submit it. This results in 1 view, 1 user, 0 submission, 1 abandon.
Step 3: respondent C accesses the form, interacts with the form and submits it. This results in 1 view, 1 user, 1 submission, 0 abandon.
After all the actions from above, if we draw the line, our Insights data would show: 3 views, 3 users, 1 submission, 2 abandons.
All cookies blocked
There might be cases in which your respondents have both browser cookies and third-party cookies blocked.
In this case, Users will increase with each time a respondent accesses the form. We cannot track down if it is the same respondent, even if he is using the same browser/device. Each time your respondents access the form, interact with it and do not submit it, we are counting 1 view, 1 user & 1 abandon.
Furthermore, even if your respondent submits the form, because of the blocked cookies, we are still keeping the abandon value that allocated. This results in an Insights section that will have very similar numbers for Submissions, Users and Abandons.
Views & Submissions
While Users & Abandons are dependent on browser cookies & third-party cookies, the number of Views & Submissions will always be accurate.
Views & Submissions are not impacted by cookies being disabled or enabled. Submission rate is based on these two metrics, thus these three Insights stats are accurate even if your respondents do not allow cookies.
Related articles
What is autosave progress?
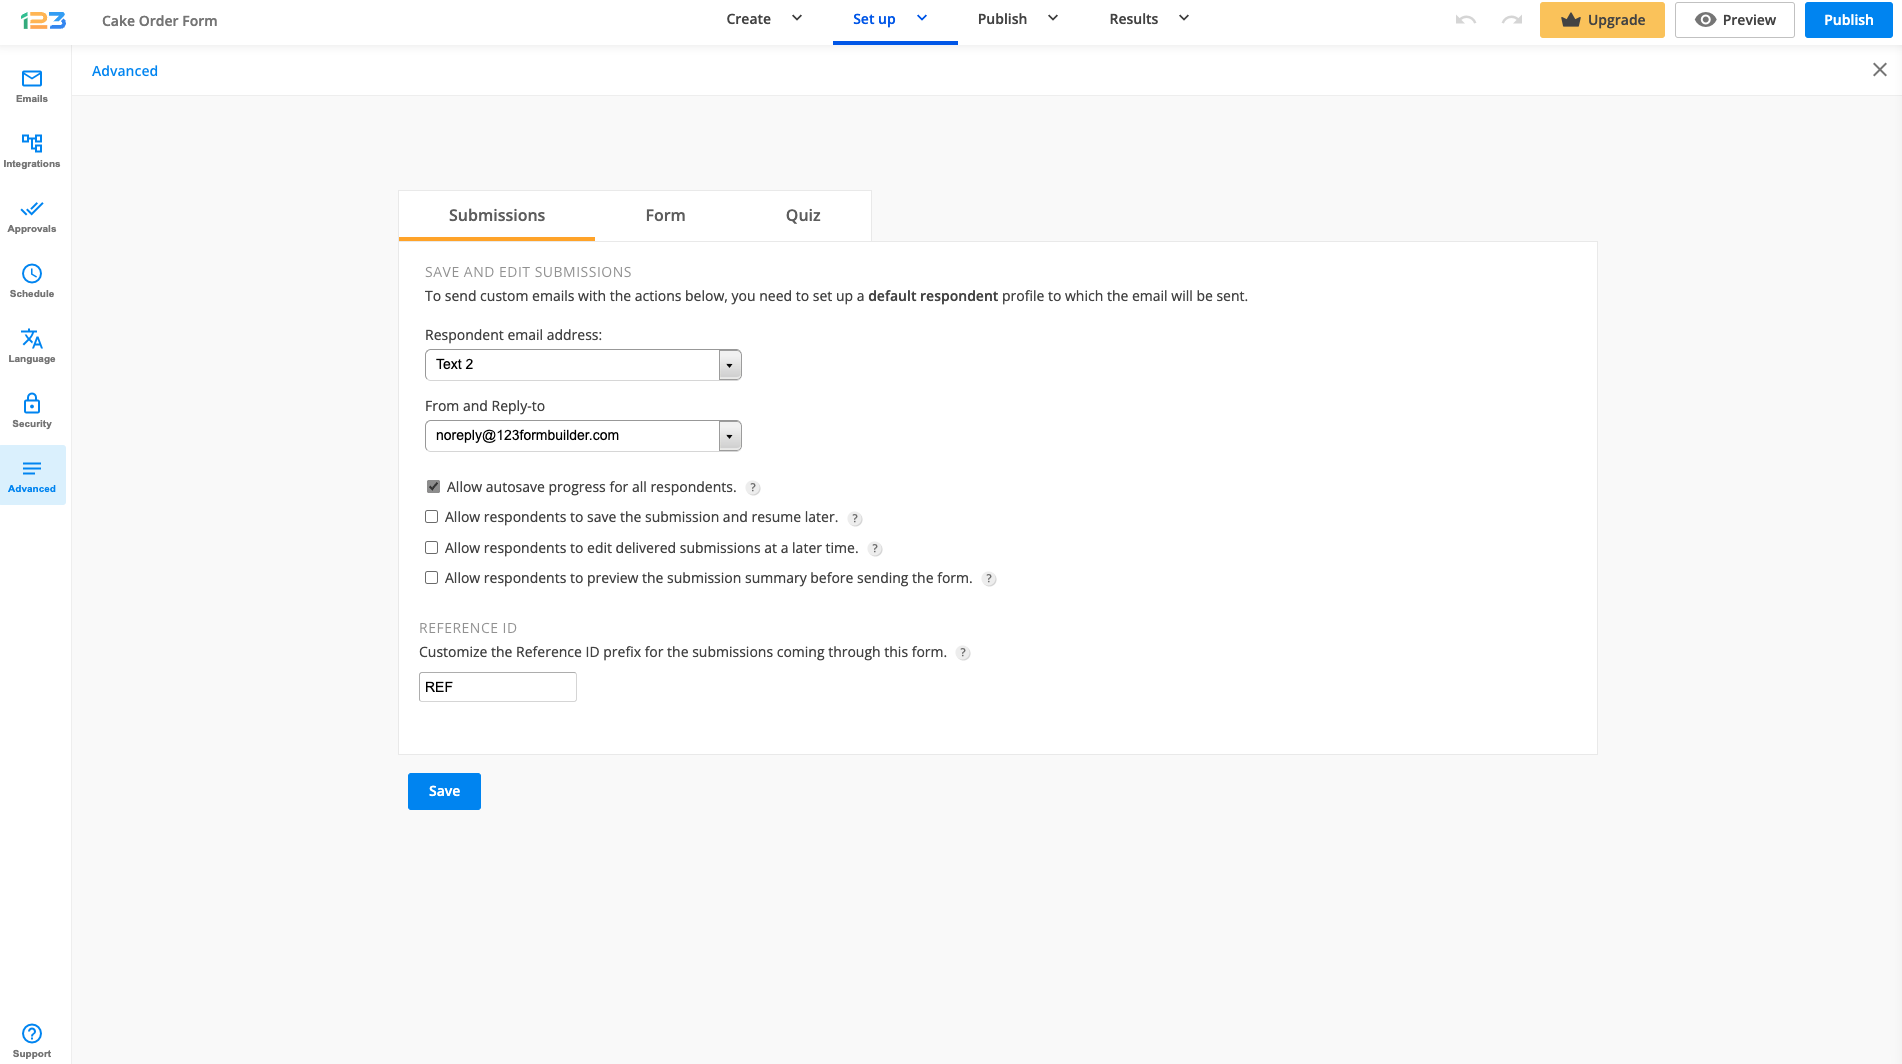
In Advanced section, under Submissions tab, you have available a new feature called Allow autosave progress for all respondents.
When your respondents start filling in your form, but for some reason they do not submit the form, we are storying in their web browser the answers they have provided up to that point for 15 days. If your respondents come back to the form using the same browser, then we are automatically retrieving the info they have provided so far so they wouldn’t have to start from scratch.
How does it work?
Let’s begin with a scenario. You have a quite lengthy form, multiple pages and it requires a lot of information from your respondents, that they do not have it all at hand. They begin completing the form and realise that they need to find out some additional info in order to submit the form. They simply abandon it and decide to come back to it when they have all the necessary info.
If you have Allow autosave progress for all respondents enabled, this will definitely help your respondents. If your respondents come back to your form, using the same browser, within 15 days, we are automatically retrieving the information they have provided so far.
Behind the scenes, every time your respondents start filling out a form, we are storing in their web browser the information they provide for 15 days. One important thing to keep in mind is that this option impacts only the respondents. You, as a form creator, won’t be able to access their partial responses at all, as the data is stored in the respondents’ browser.
If there are any privacy concerns, you can always disable this option from Advanced section.
When Allow autosave progress is enabled, we are displaying a banner in Publish section so that you could double check all the necessary settings.
Limitations
If you have any of these 3 features enabled, then Autosave progress will be automatically turned off.
If you are on Enterprise pricing plan, Autosave progress is automatically turned off. On any other pricing plan, Autosave progress is by default On.
Benefits & Usecases
Operational forms
If you are using 123FormBuilder forms to your day to day work, this feature can save you a lot of time. Sometimes, due to unstable internet connection, you might be cut off right in the middle of completing the form.
By having Allow autosave progress for all respondents enabled, you can continue completing the form even if you do not have access to the internet. All the info you have provided on the form will be stored to your web browser for 15 days. Once you get connection to internet, you can simply access the form again from the same browser and submit the form.
Registration forms
Some registration forms can be quite lengthy and they require a good amount of information from respondents. If they don’t have all the information at hand, no worries, they can always come back to the form using the same browser and they don’t have to start completing the form from scratch.
Of course, only if you have Allow autosave progress for all respondents enabled.
The use cases can go on and on, but it depends entirely on your form and how you want to use it and help your respondents. These are just some examples so you could understand its benefits and also its limitations.
Related articles
Autosave progress FAQs
Most Popular
Frequently Asked Questions
Here is a list of the most frequently asked questions. For more FAQs, please browse through the FAQs page.