123FormBuilder Knowledge Base
Search our documentation platform for answers, service specifications and 3rd-party integrations.
Knowledge Base
Make your emails stand out by adding images to them. Follow the steps below to successfully add an image to the email notification of your online form.
In your form builder account, go to the Emails section of your form and select your template from the left-side panel. Click on the plus (+) sign in the Body area and choose the Image option.
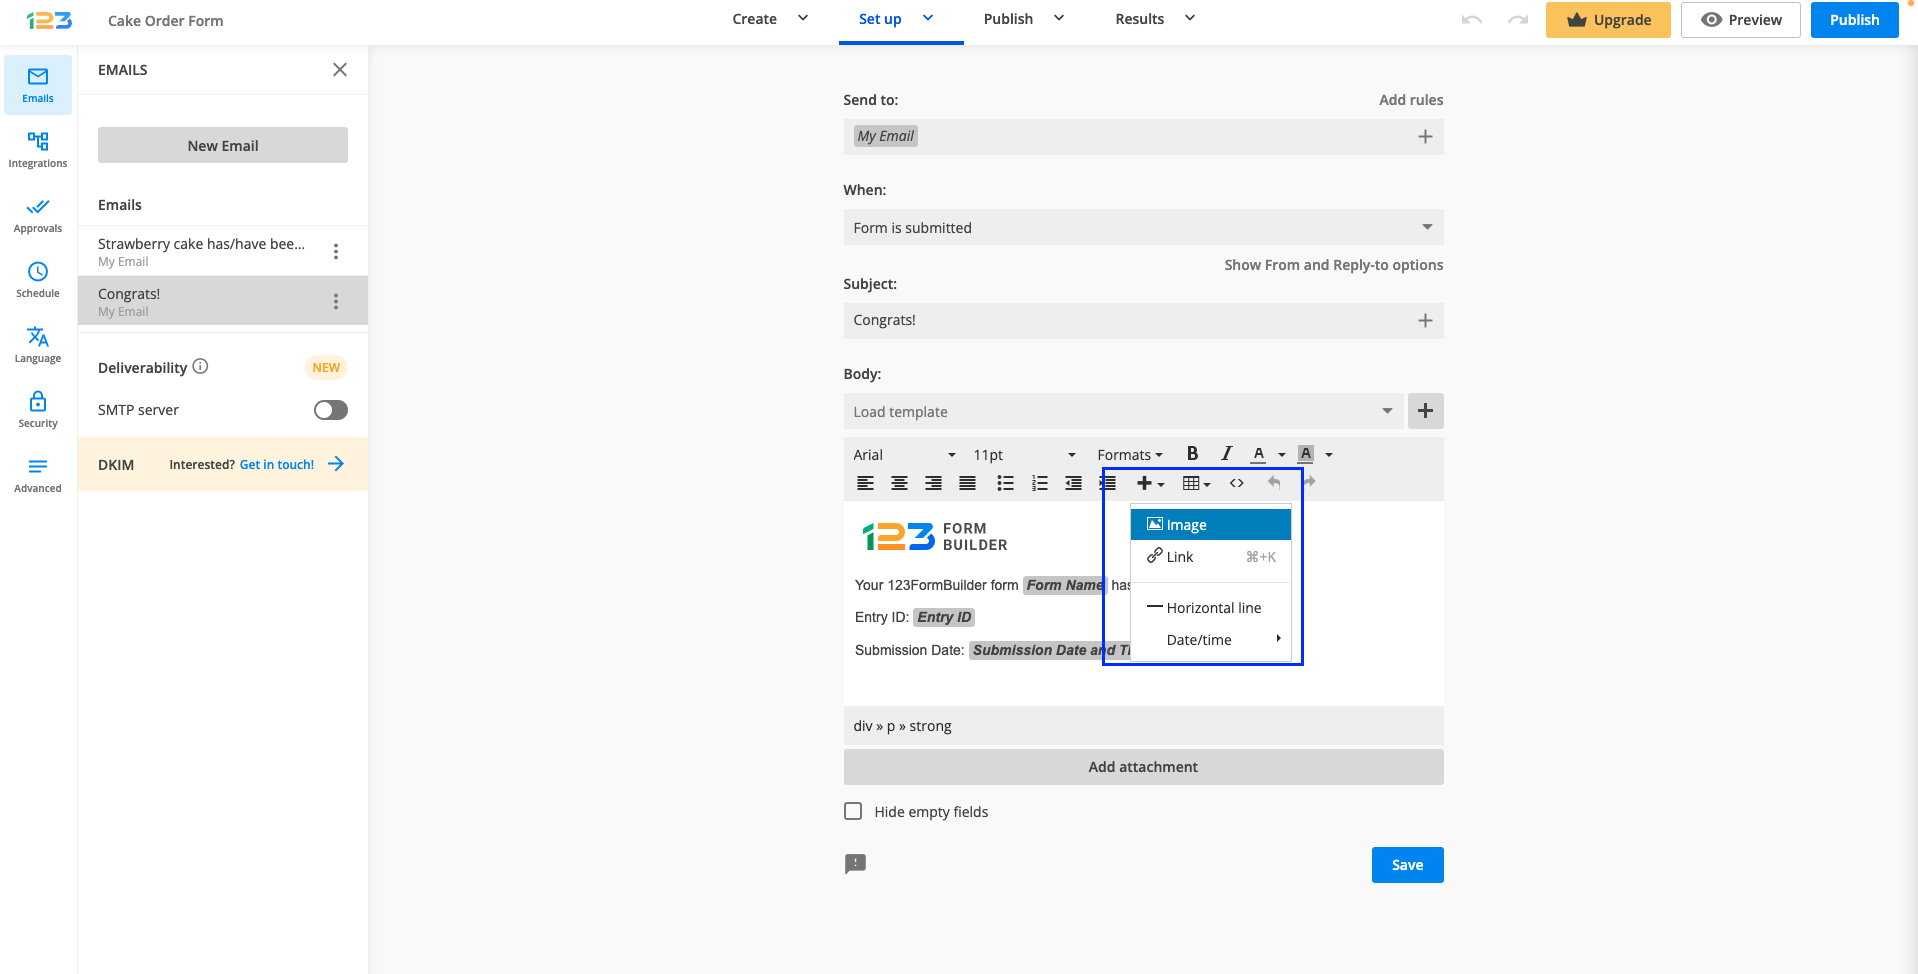
In the popup window, click the Source icon and pick the image from your local device. Change its size in Dimensions according to your needs. You can even maintain its proportions when changing its size by ticking the Constrain proportions option. You can also add an image description.
Click Ok and you will see the image displayed in your email. Save your template and that’s about it. From now on, the image will appear in the email content. You can add more than one image to the same email template. Just repeat the steps above and include as many images as you desire.
Related articles:
Setting Up Notifications in 123FormBuilder
How to set up the Body of your email notifications?
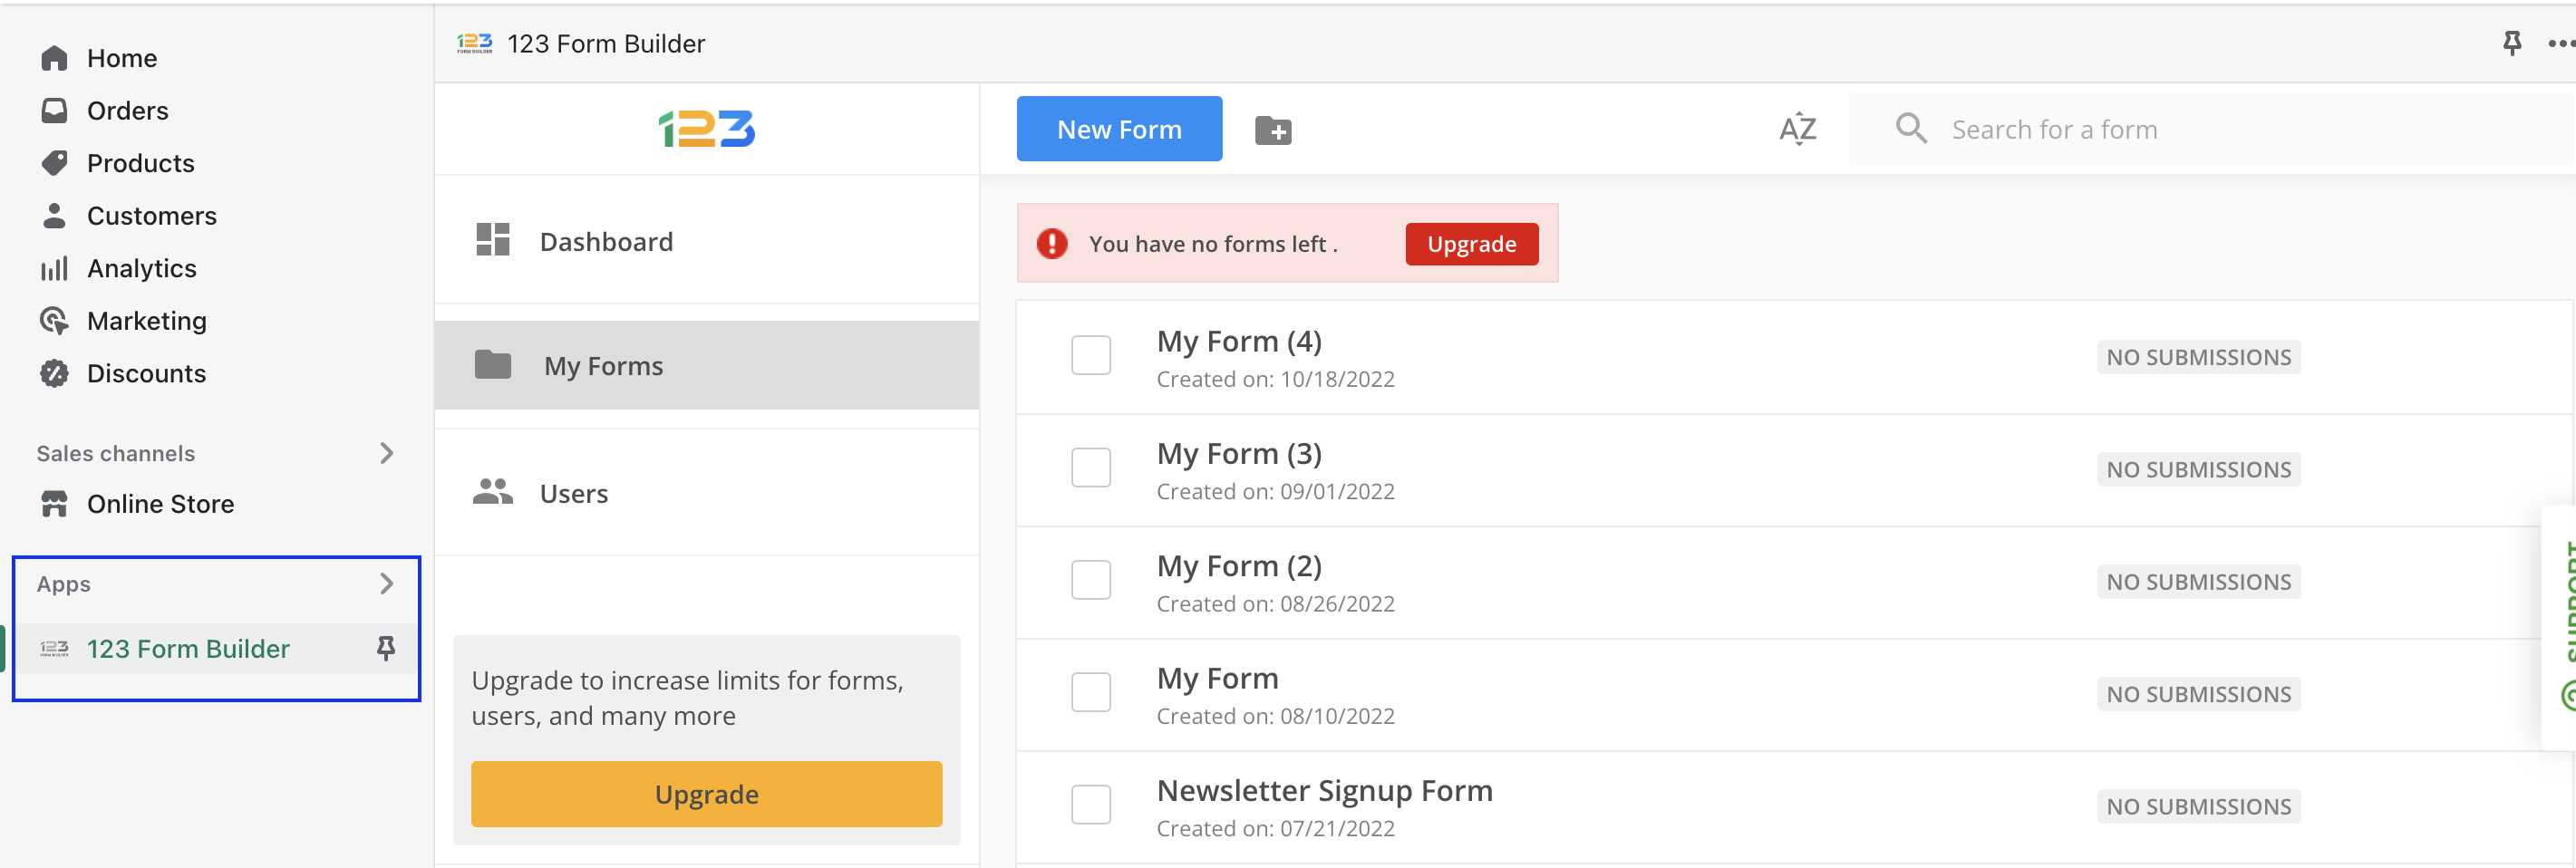
123FormBuilder is a free online form builder that allows you to build any type of form: surveys, event registrations, job applications, online bookings, appointments, lead captures, donations, orders, and more. 123FormBuilder has built a dedicated app for Shopify. Pretty much everything you can do on the main platform, you will be able to do on Shopify as well.
To install our application, visit the Shopify App Store and search for 123FormBuilder.
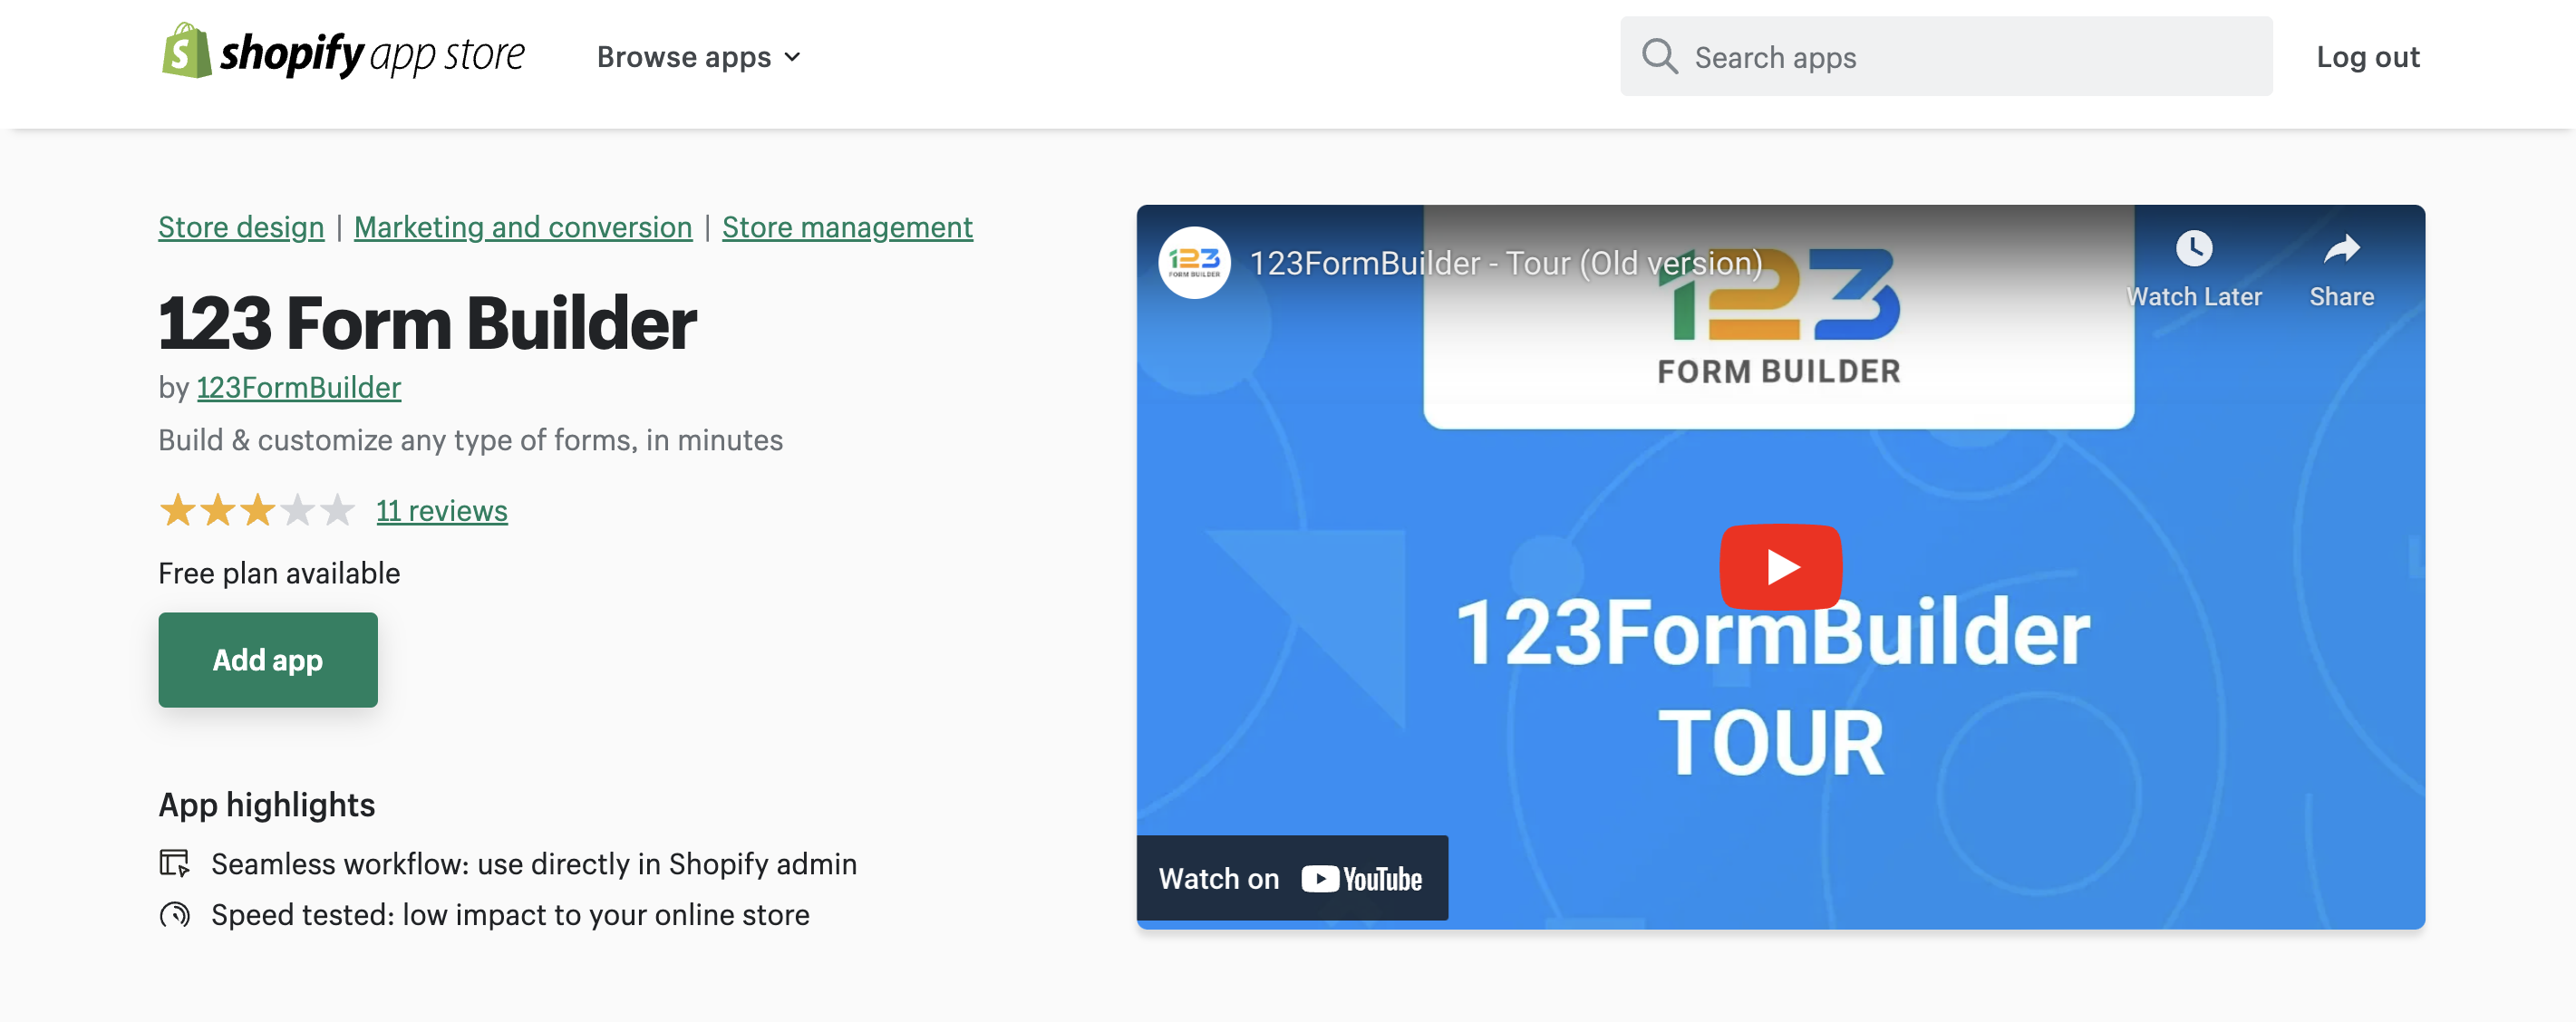
Next, click on Add app and Install app.
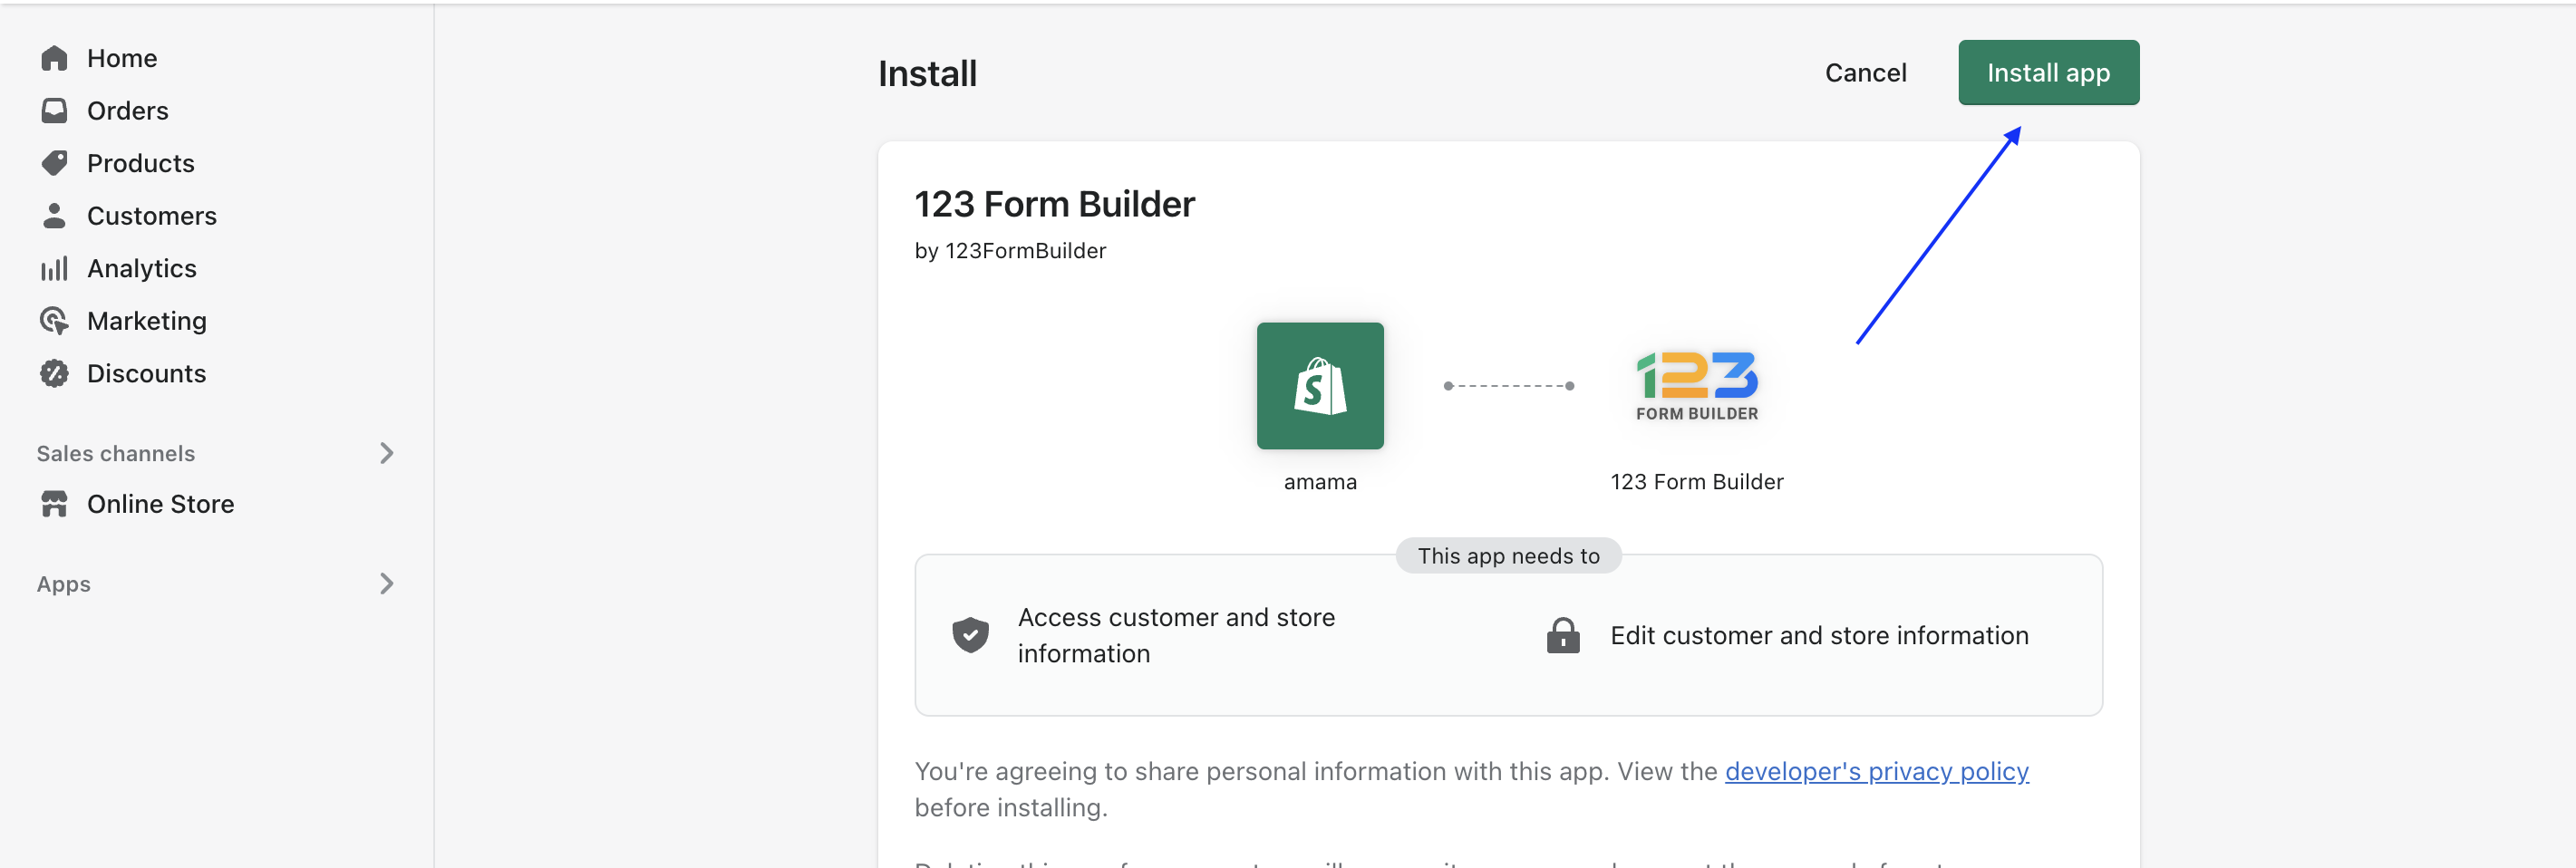
Once the app is installed, a new 123FormBuilder account is created with the email address associated with your Shopify account.
Related articles
As you all know, the GDPR laws apply to all organizations that process the personal data of EU citizens, even when not operating in the EU territory. This includes all form data you collect with the forms and surveys you build using our form builder. Since most web forms are designed to collect personal information, you need to make the forms compliant. This is a mandatory requirement for any company that has access to personal data.
The GDPR laws protect personal information such as names, phone numbers, addresses, and locations.
Best practices
- Allow users to correct and/or update their own data. Enable the edit submission feature.
- Send a copy of the completed form to the sender.
- Upon request, form users should be able to contact you whenever they want. Include your contact details on the form. Read more about the “right to be forgotten” law.
- Use multiple-choice fields to state your conditions and receive your users consent.
- Explain why you need their personal data.
- Add terms of service fields where you list your Privacy Policy and other details. Do not use the “Checked by default” option. The user must select the checkbox.
- Enable the Reference ID to better track your user’s submissions.
Important Note
After you publish/share your form, any new changes to your GDPR form fields will cancel the consent.Examples
Explain why you need their personal data:
- This form collects your name and email address to keep track of [your activity].
- This form collects your email address so that we can add you to our newsletter list.
- The collected information is used for advertising purposes.
- The collected data will be used for research/ to plan an event /to communicate with you.
Create a Privacy Policy:
- I consent to allow my data to be used for [… ]
- I consent to receive newsletters about [… ]
- [Company] has my permission to store and process my personal data.
Our platform is GDPR-compliant. However, if you prefer all your data to be hosted in the EU, please signup and use our EU site.
Read more about the 123FormBuilder GDPR Compliance here.
Tips & tricks
We have launched a new field to help you make sure that the form is GDPR compliant and you get the agreement from your respondents – GDPR agreement field.
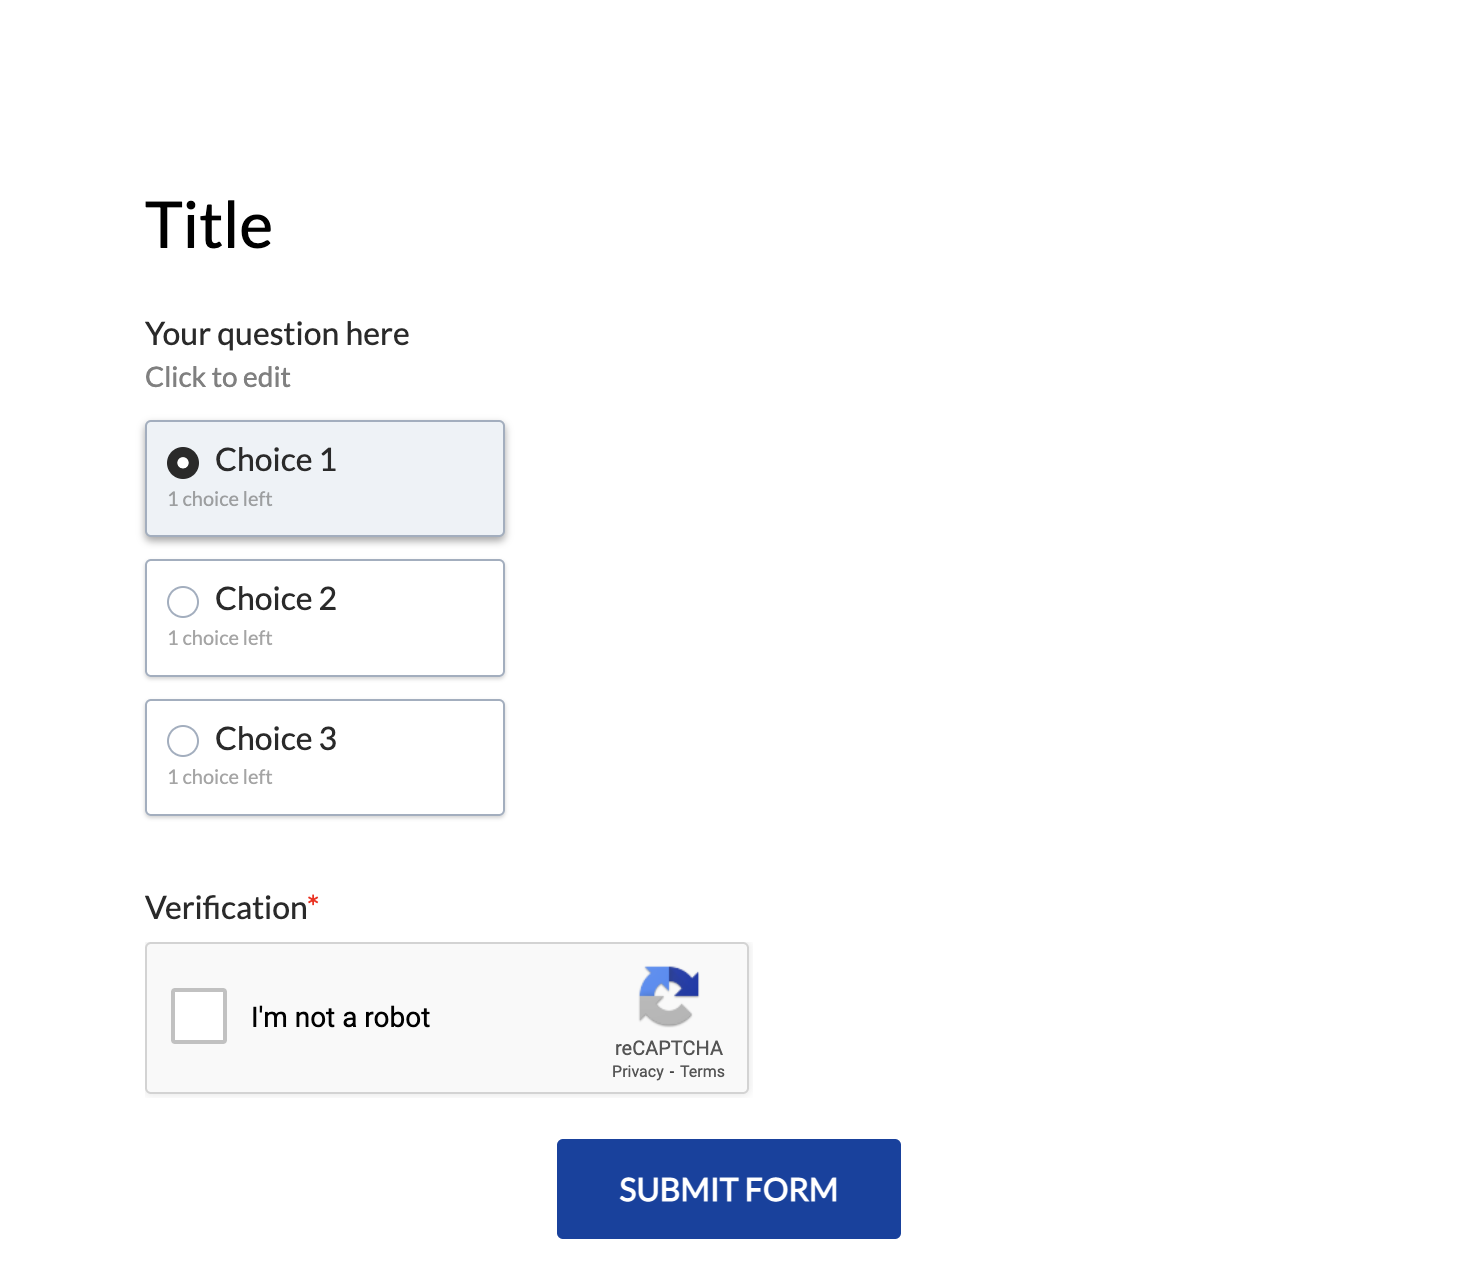
For fields that are based on a choice selection (Single choice, Multiple choice, Dropdown) you can set a limited number of selections accepted.
This feature is useful in a variety of cases. Consider the scenario in which you need to create a workshop registration form and participants have multiple sessions to choose from. However, each session has limited availability. By using the Restrict choices feature in 123FormBuilder, you can easily set limits on the number of times each session can be selected. As a result, you can avoid overcrowded sessions and ensure that the workshop runs smoothly. Let’s explore how this feature works.
In the Create section of your form, click on your choice field, go to Validation in the right-side panel, and enable Restrict choices.
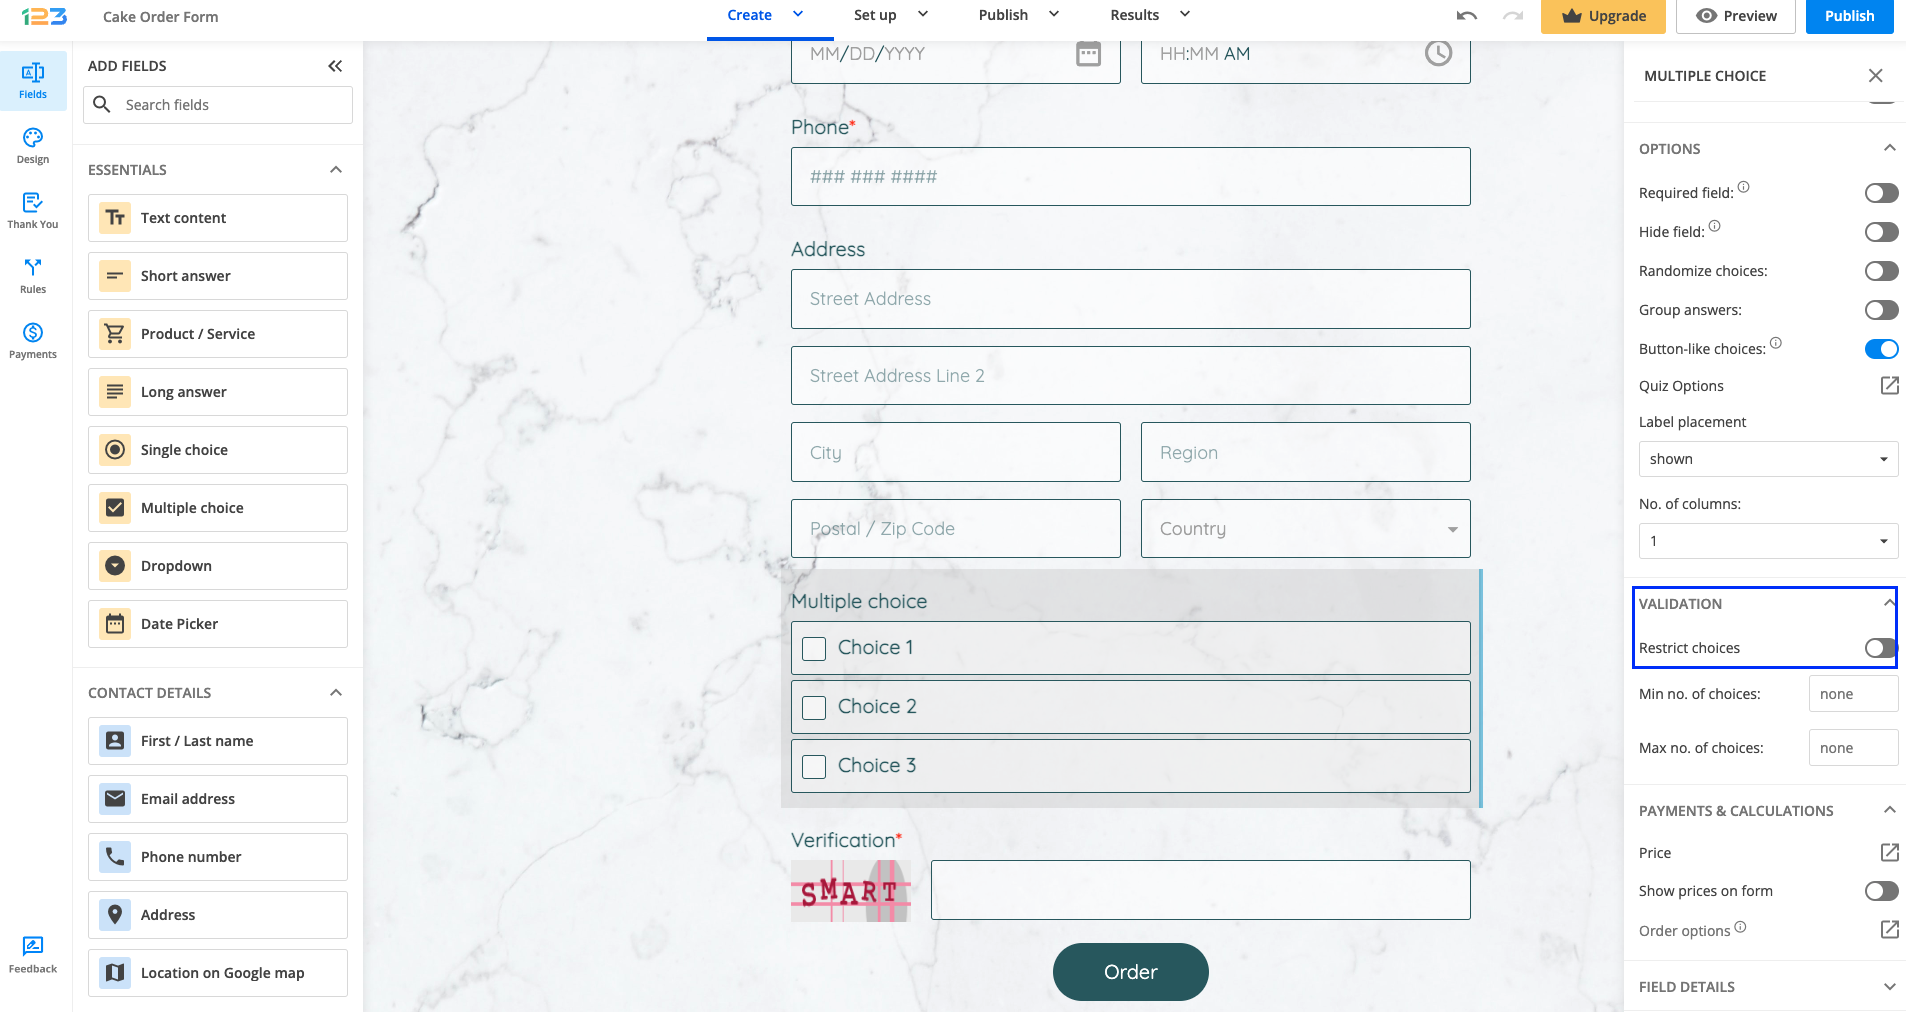
You will notice that additional options showed up. We will explain each of them below:
Configure values – from here you can configure the total accepted value for each choice.
You can set an individual limit or a default total (the limit will be the same for each choice). Once your respondents reach the limit for your choice, the system will automatically gray out that choice. When a choice is greyed out, it can not be selected anymore. To make a choice unavailable from the start, write “-1” to that specific option in the table below.
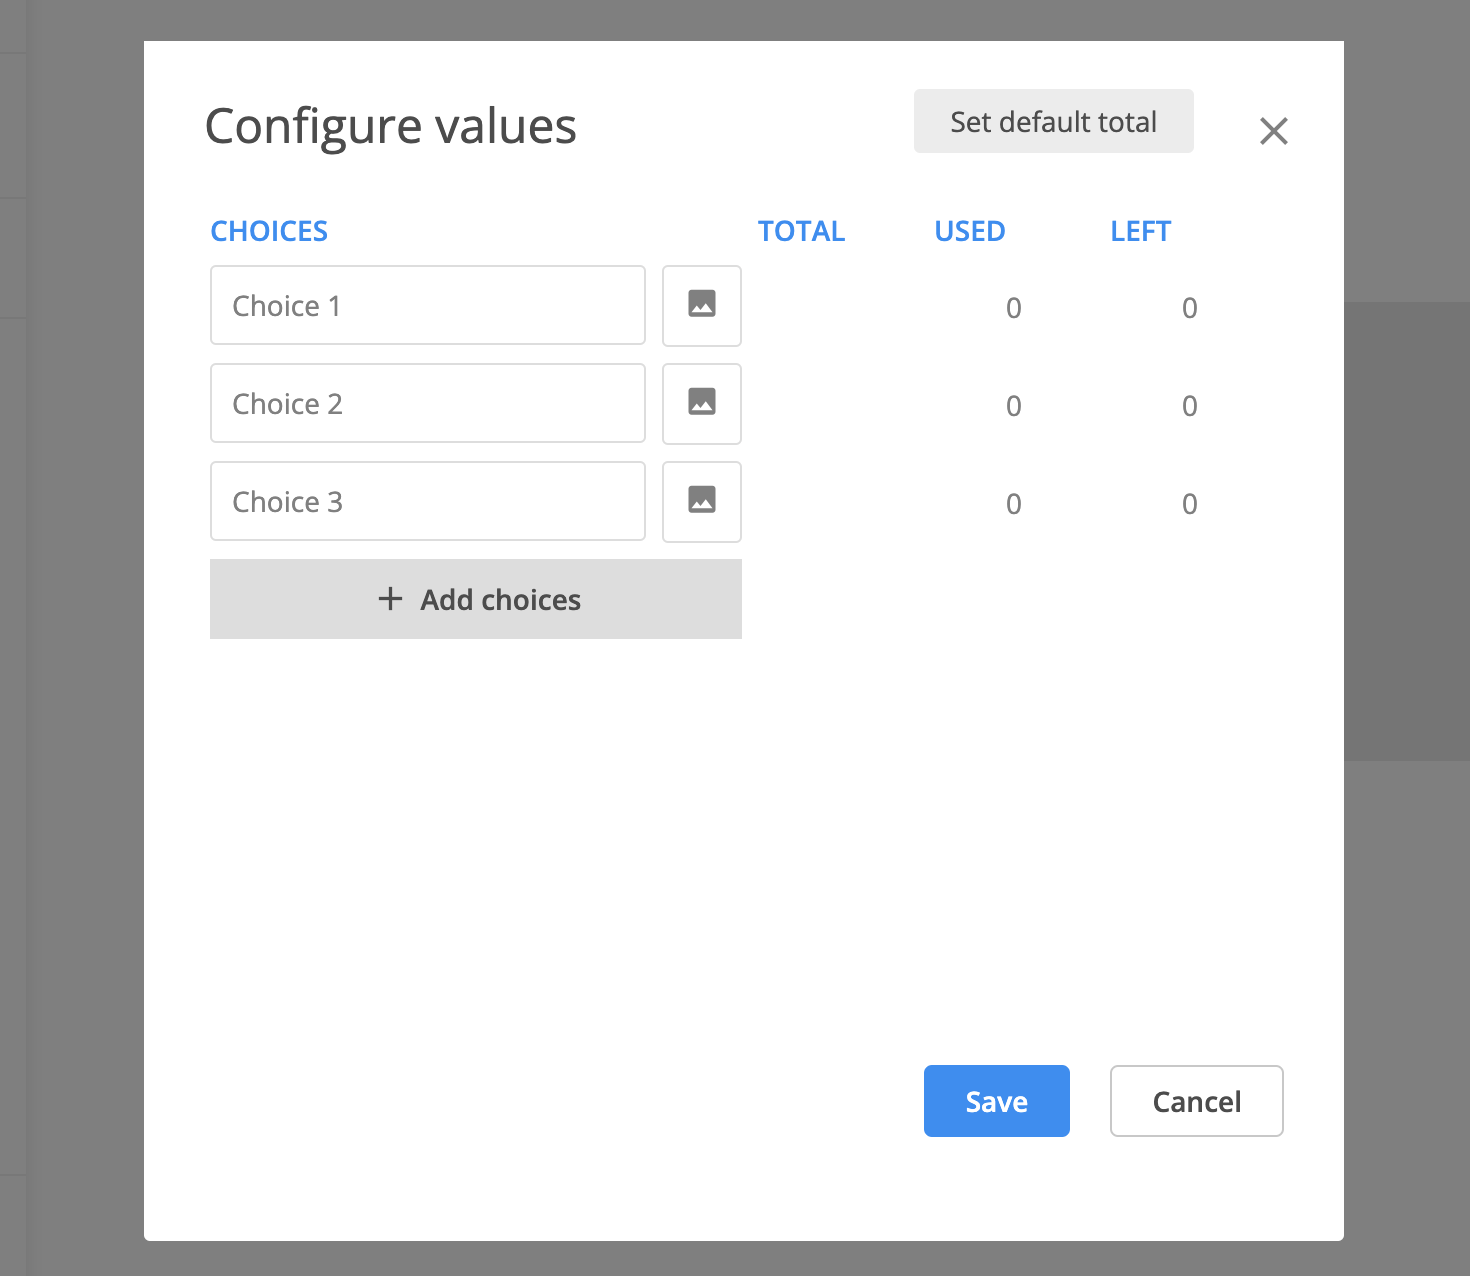
Show no. of choices left – allows your respondents to see the remaining available options for each choice.
To learn how to restrict the number of times an option is selected on your forms, you can also check out our step-by-step tutorial:
Related articles
If you want to request your respondents’ agreement in a form, you can use 2 fields: the Terms of Service field or the GDPR Agreement field. All you have to do is drag and drop the desired field on your form and customize it according to your needs.
Terms of service field
Agreement text
The default text is I agree to the < link > terms of service < /link >. You can change the text but do not forget to include the link HTML tags.

Link behaviour
There are three options to choose from: none, open URL, and show text (this is set by default).
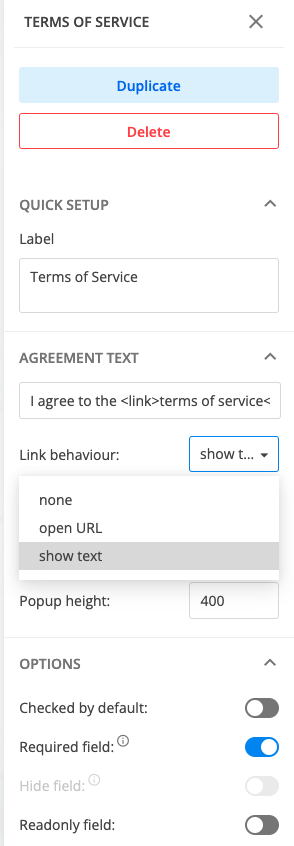
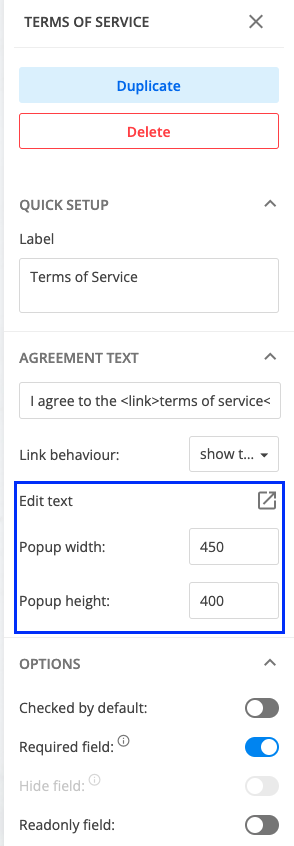
When show text is selected, a few options become available. First, you can add your text by clicking on Edit text. A rich text editor will open where you can input your terms of service. When your respondents click the link, a popup with the text will open on the form. You can also modify the popup width and height.
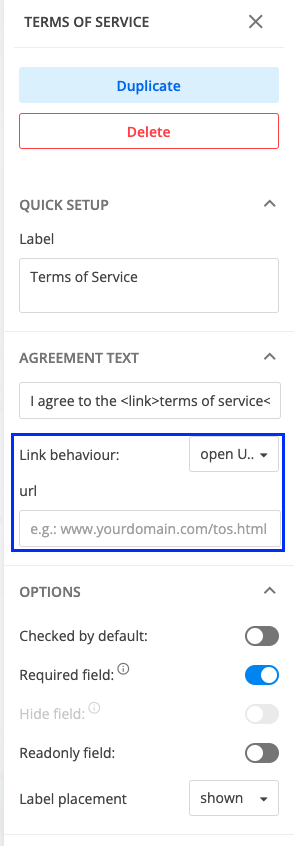
If you choose open URL, all you have to do is input the URL where your respondents can check the terms of service. The URL you provide will open in a new tab.
GDPR agreement field
The GDPR Agreement field is located under the Uploads & consent category of fields.
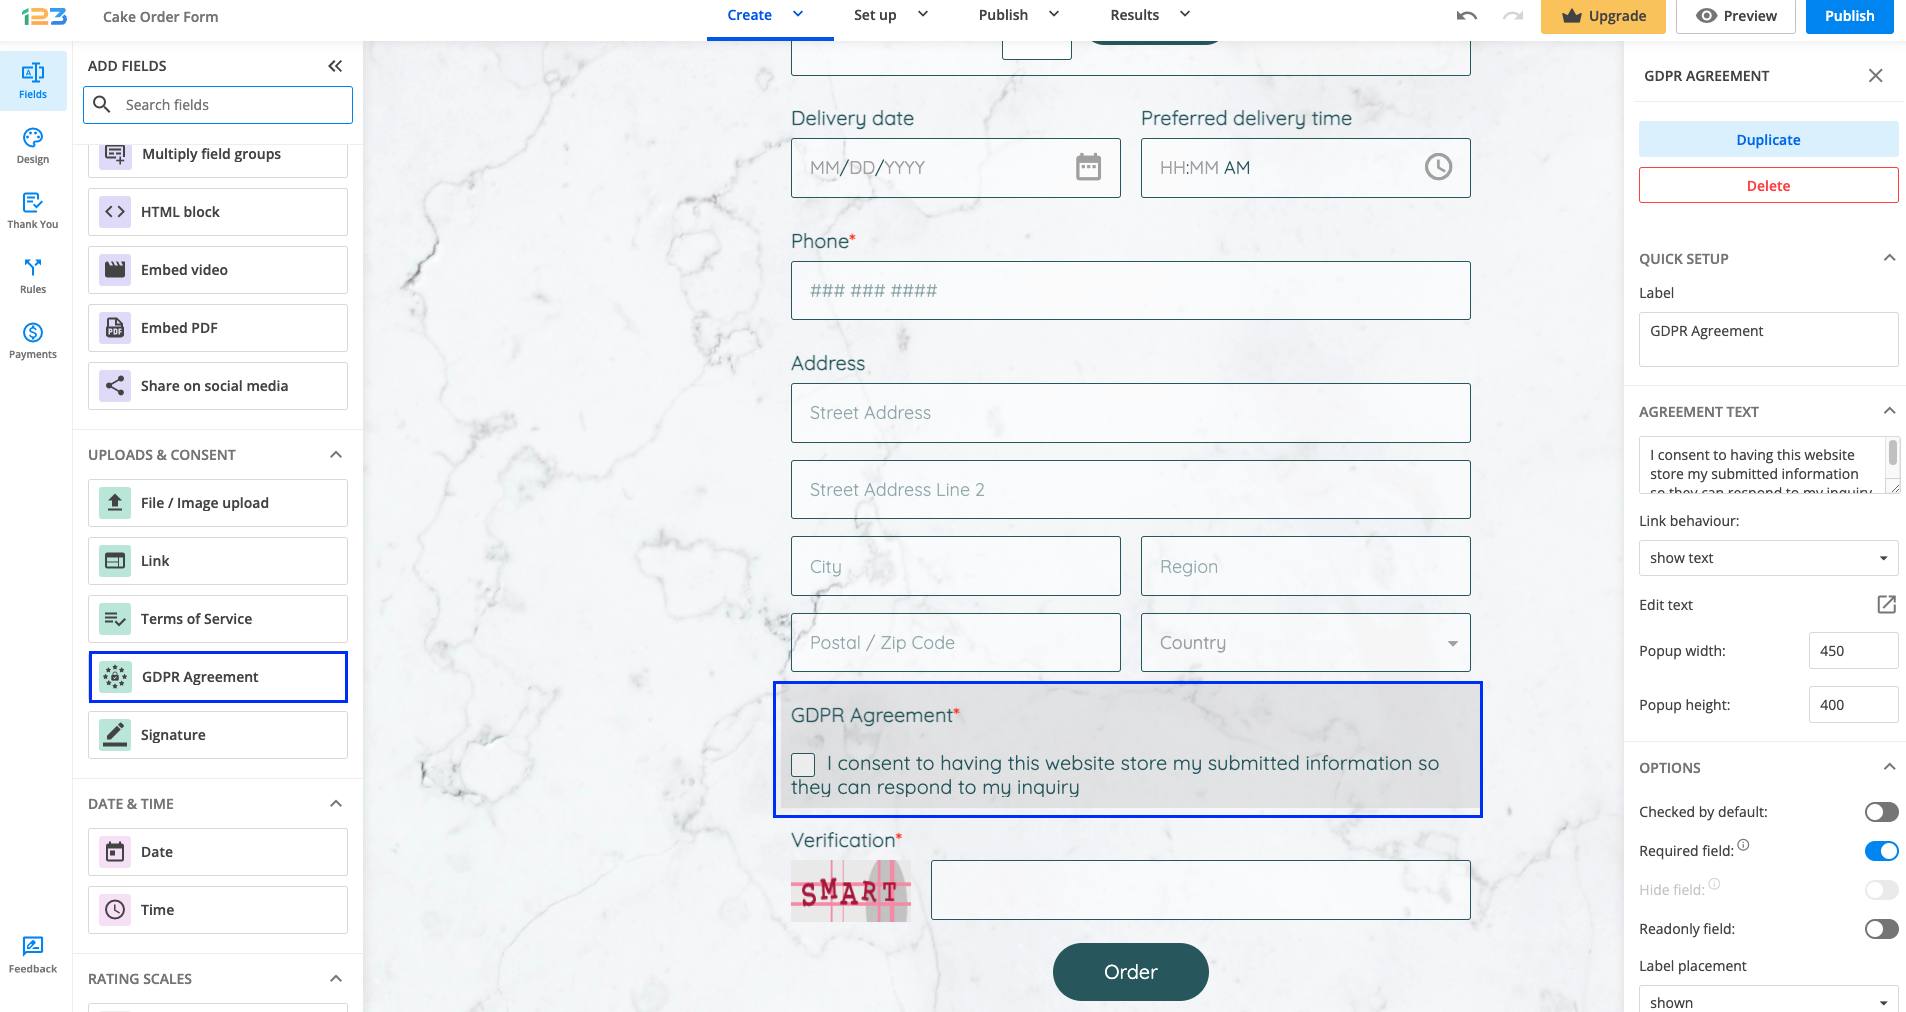
The agreement text is already provided, but you can easily modify/edit it according to your needs. If you provide any link within the agreement text, you can also set the link behavior, exactly described above for the Terms of Service field.
You can opt to have the field Checked by default and/or mark it as Required. If needed, you can set the field as Readonly as well.
123FormBuilder makes it easier for you to manage your event and keep track of your attendees.
When you want to limit the number of submissions your event registration form can receive not by form entries, but by the number of registered participants (which can be greater than the number of submissions), drag a Number field in the main view of your Form Editor within the form builder.
In the right side panel, the field options will open up. Switch on the toggle Limit submissions total value.
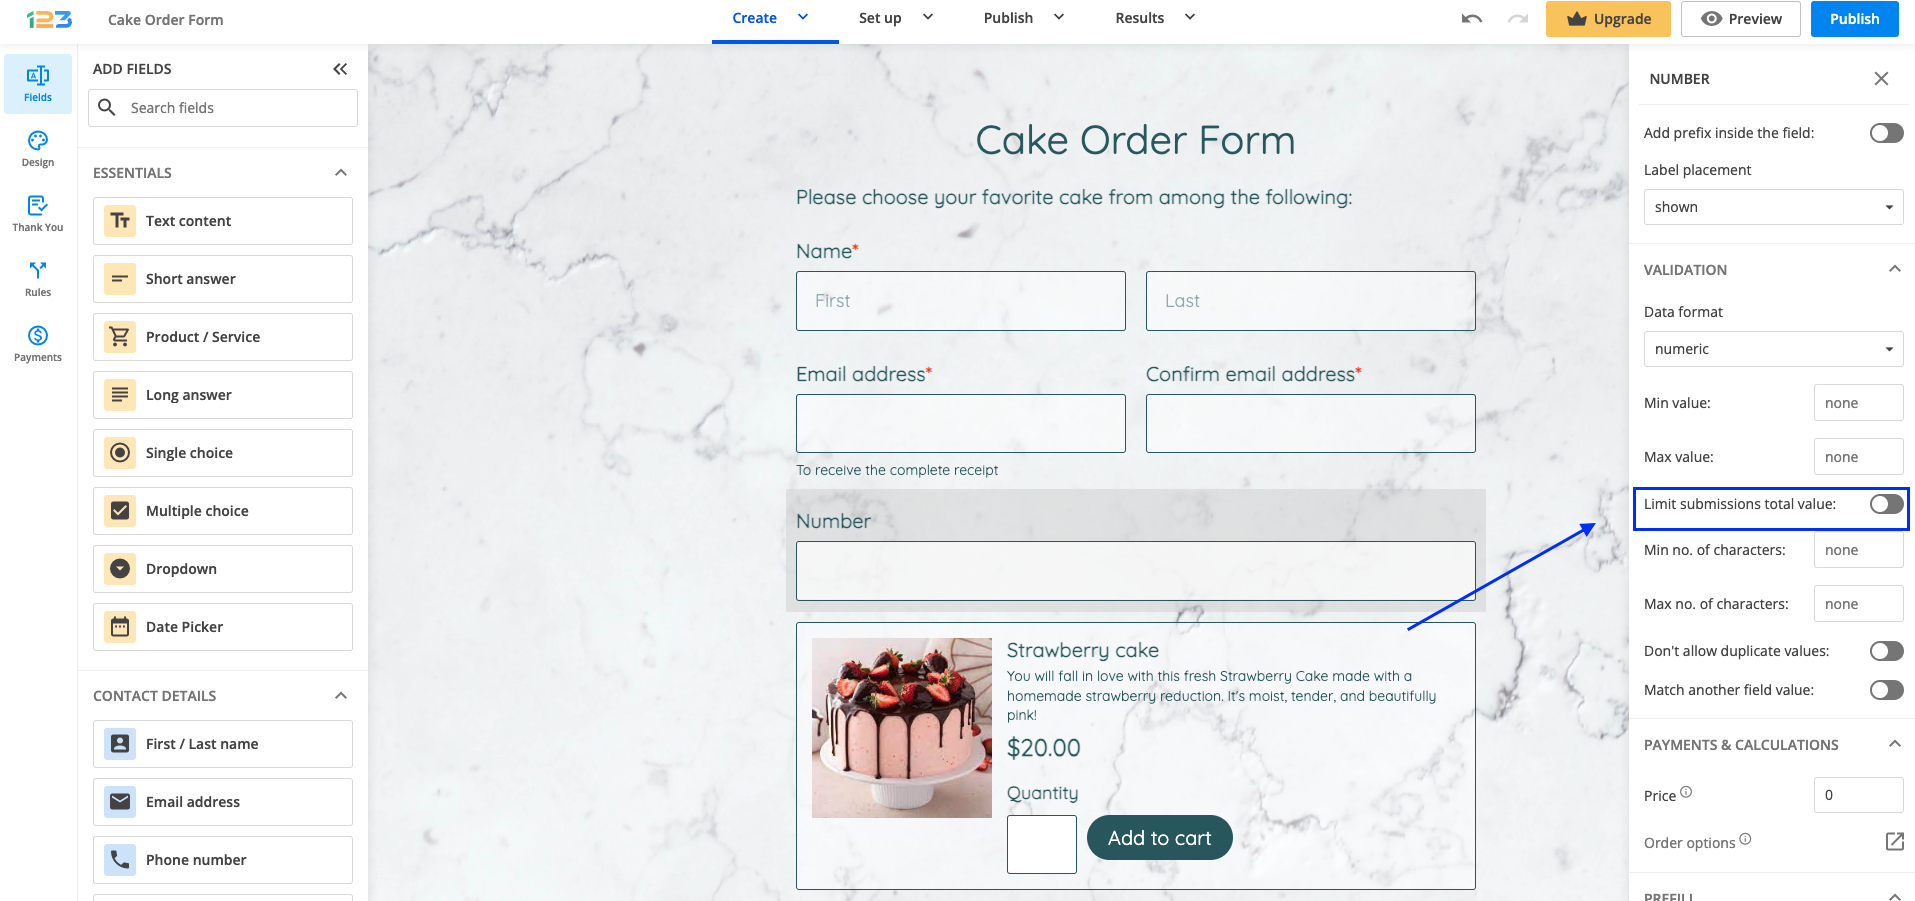
Two new boxes will show up: Current total value and Limit submissions total value. Each form submission will update the current total value.
You don’t need to change anything about it, not now, not ever. In the Limit submissions total value box, type the maximum number of seats available at the event.
You have now set up the participants’ limit. In addition, make sure that form users will type in this field the total number of people they are registering through the form. To do this, use the Required option and Instructions, which can be adjusted in the right side field settings as well.
With this feature enabled, a line of instructions will show up anyway. This will indicate the maximum accepted value; in other words, the number of seats left. You can change the message in the Translations section.
When the maximum number of participants is reached, form users won’t be able to add new attendees to the event.
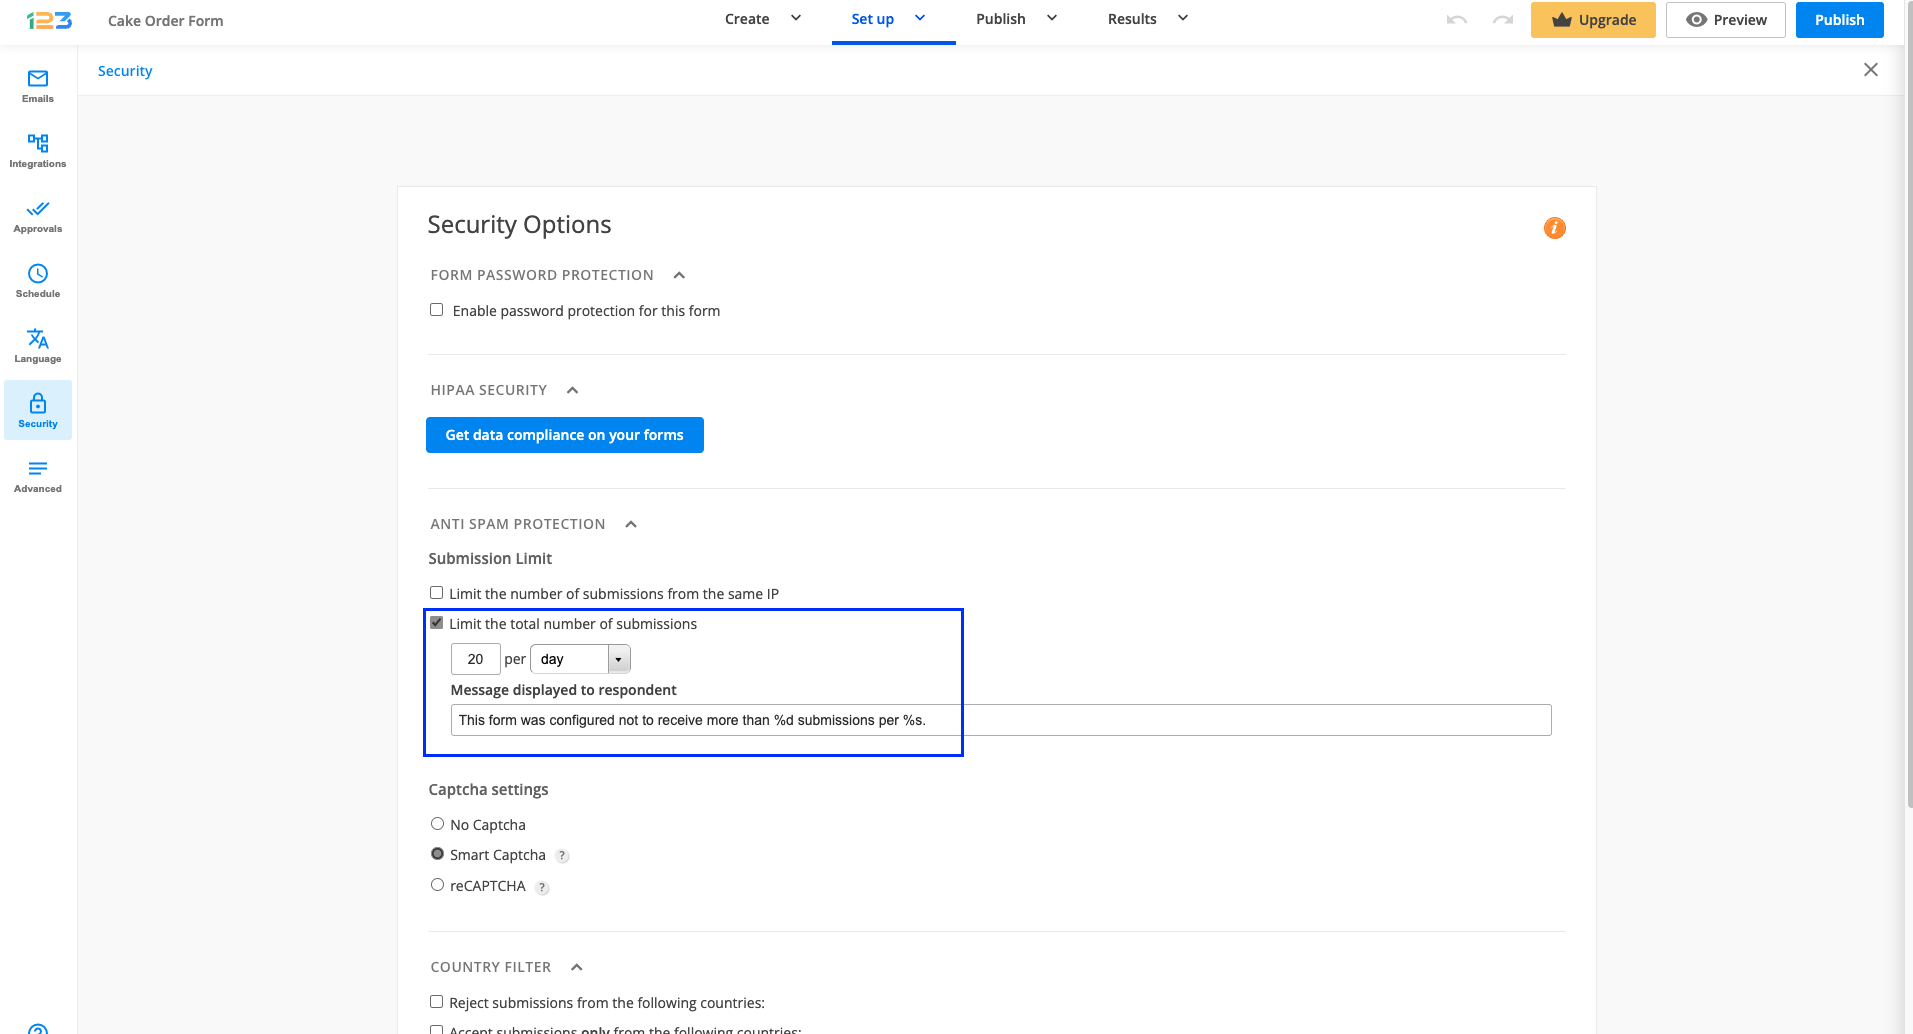
You can limit the number of submissions a form can receive in your form’s Security section within the form builder. Tick the option Limit the total number of submissions. Afterward, specify the maximum number of submissions that you want to accept for that form. You can choose to accept a certain number of submissions per hour, day, week, month, year, or eternity.
If you have an event with limited seats, you can limit the maximum number of guests permitted to your event, through your online form.
Related articles
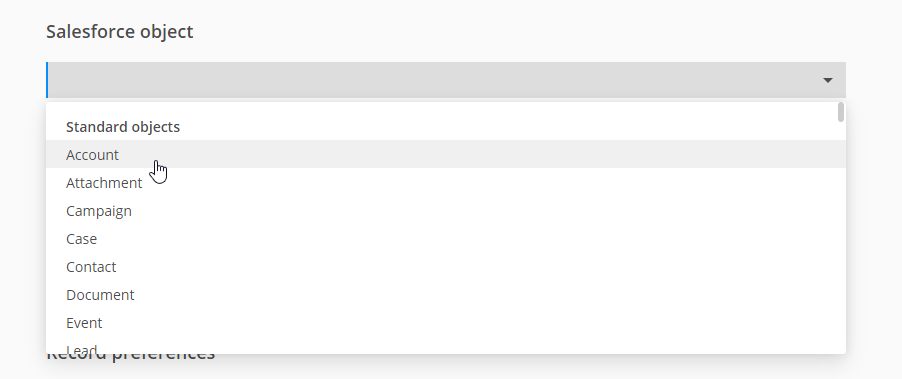
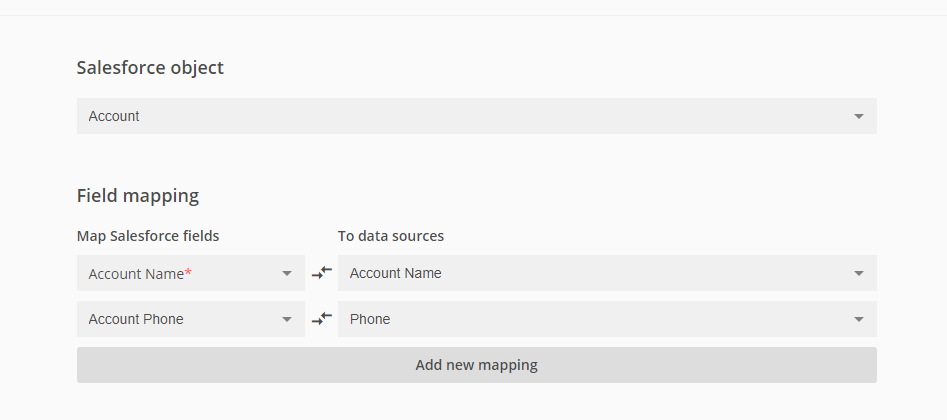
To map form fields with Salesforce fields, make sure you are on the Object mapping section of your Salesforce integration. Then choose a Standard Object or a Custom Object from the searchable dropdown menu (this is where the records will be sent in Salesforce).
For each Salesforce field, you will have on the right side only the form fields that have a validation matching the Salesforce data type.
Important Note
You will also see that some of the Salesforce fields within specific objects are required. This doesn’t mean that the form fields have to also be required, however it is highly recommended to be mandatory to make sure the users will complete them. Otherwise, the data submitted won’t be sent to Salesforce.Usually, the required fields are those that appear automatically when you choose an object. If you want to associate more fields, just click the Add new mapping button.

If you want to send form data to different objects just apply the same configuration accordingly. Map the Salesforce fields with their corresponding form fields and you’re all set!
Now you will receive the form data directly into your Salesforce account.
Related Articles
Once you have purchased a subscription on our platform, you can start using all the available features included in your plan. You will be charged automatically every month/year by 2Checkout, depending on the subscription type you have selected.
You can opt to upgrade or downgrade your account subscription whenever you want to. In order to do this, log in to your 123FormBuilder account and click on any Upgrade button.
Next, you can check the plan you are on and see what the other plans have to offer. On this page, you can choose to upgrade to a different plan.
You’ll find the option to downgrade/ cancel your subscription from the My Account section.
Important Note
The action of upgrading or downgrading your account will not bring changes to your forms. The form’s settings and data will remain the same.You can add File upload fields to your web forms and start collecting files through form submissions. This option is available starting from the Gold Plan. Check this article to find out how much storage space each plan provides.
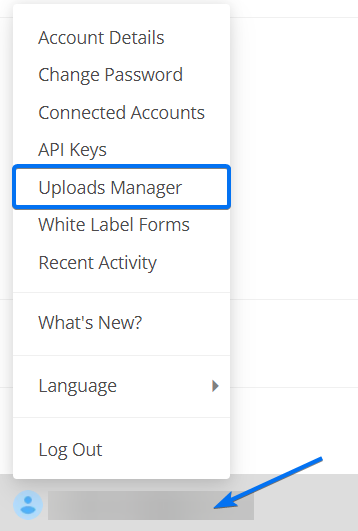
After you have logged in to your form builder account, click on your username. Each uploaded file is located in the Uploads Manager section.
Here you can see and manage the files uploaded through all your web forms.
Following a new update to our file managing system, each form now includes a dedicated Form files section which can be accessed from the forms Results tab. Here you will find only the files uploaded to that specific form.
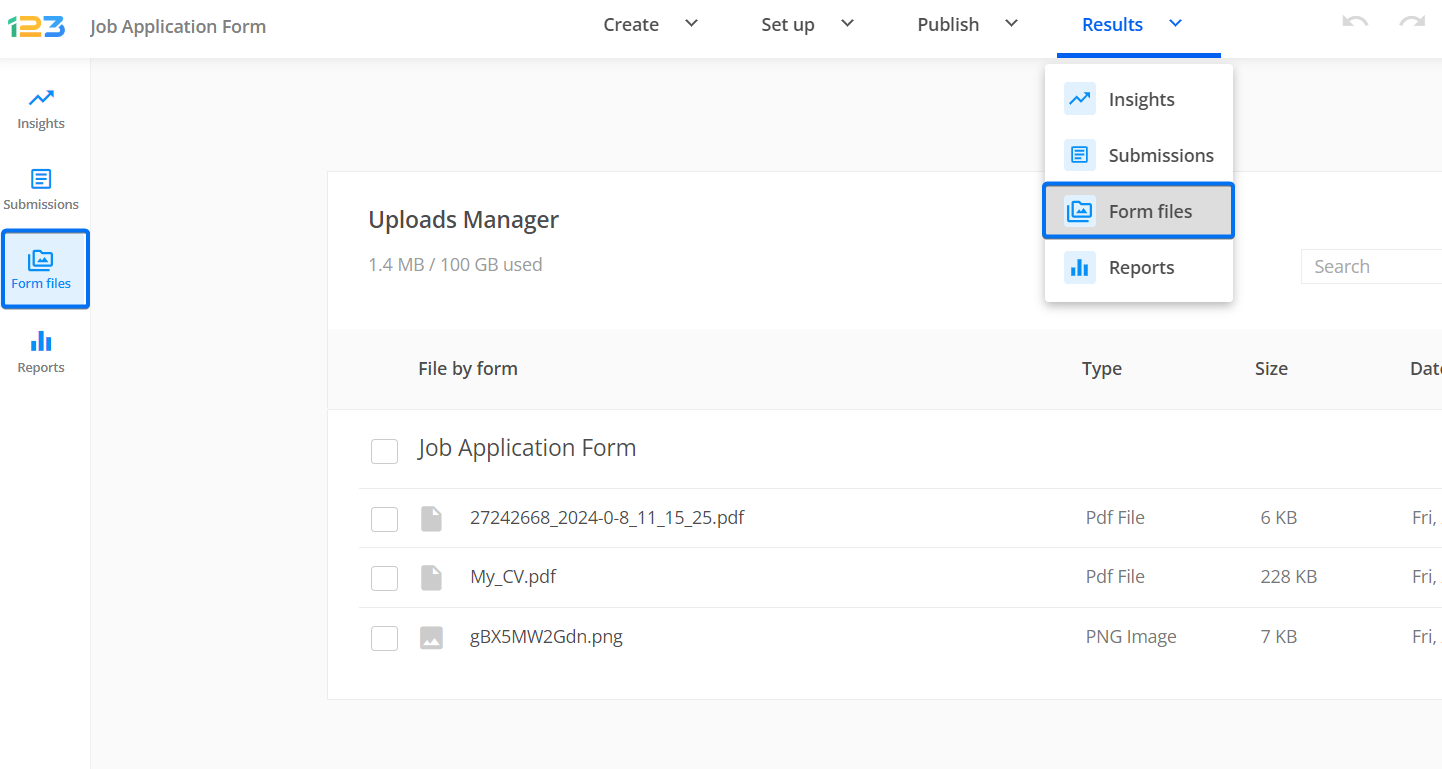
Delete the unnecessary files to free some of the upload storage space, or download them to your device.
Select the checkbox of each file you want to delete and press the Delete button. The same goes for when you want to Download files.
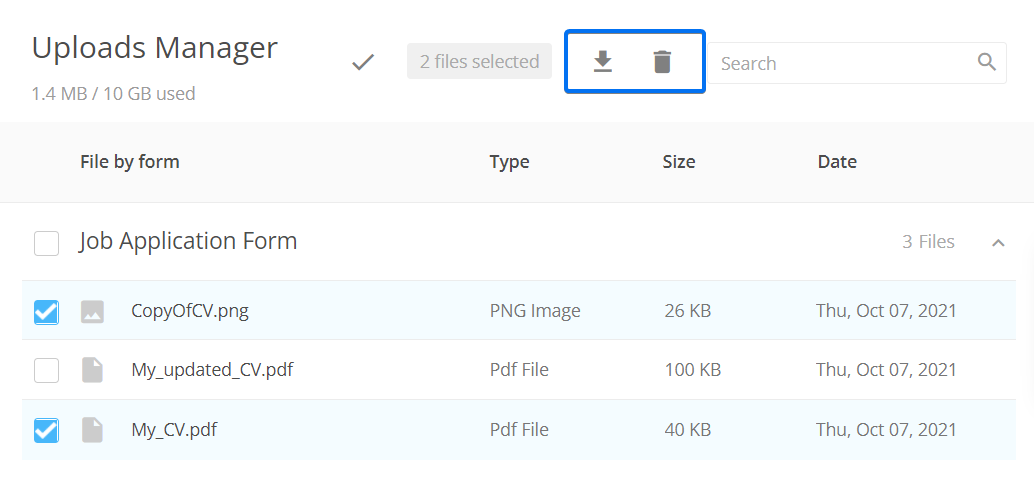
If you accessed Uploads Manager by clicking on your username and need to delete only the files received from a specific form, check the box next to the form’s name. You can also select all the files uploaded through all your forms by selecting the top check sign.
Important Notes
- The deleted files can’t be recovered in any way possible. This action is permanent.
- Before deleting a form, make sure to delete the files collected through it.
- Be careful not to exceed the upload storage space available for your subscription, as this will limit the access to your account. Delete the uploaded files on a regular basis.
You can also use our Dropbox integration to have a copy of the uploaded files from submissions in your Dropbox account. From there, it’s all up to you what you want to do next.
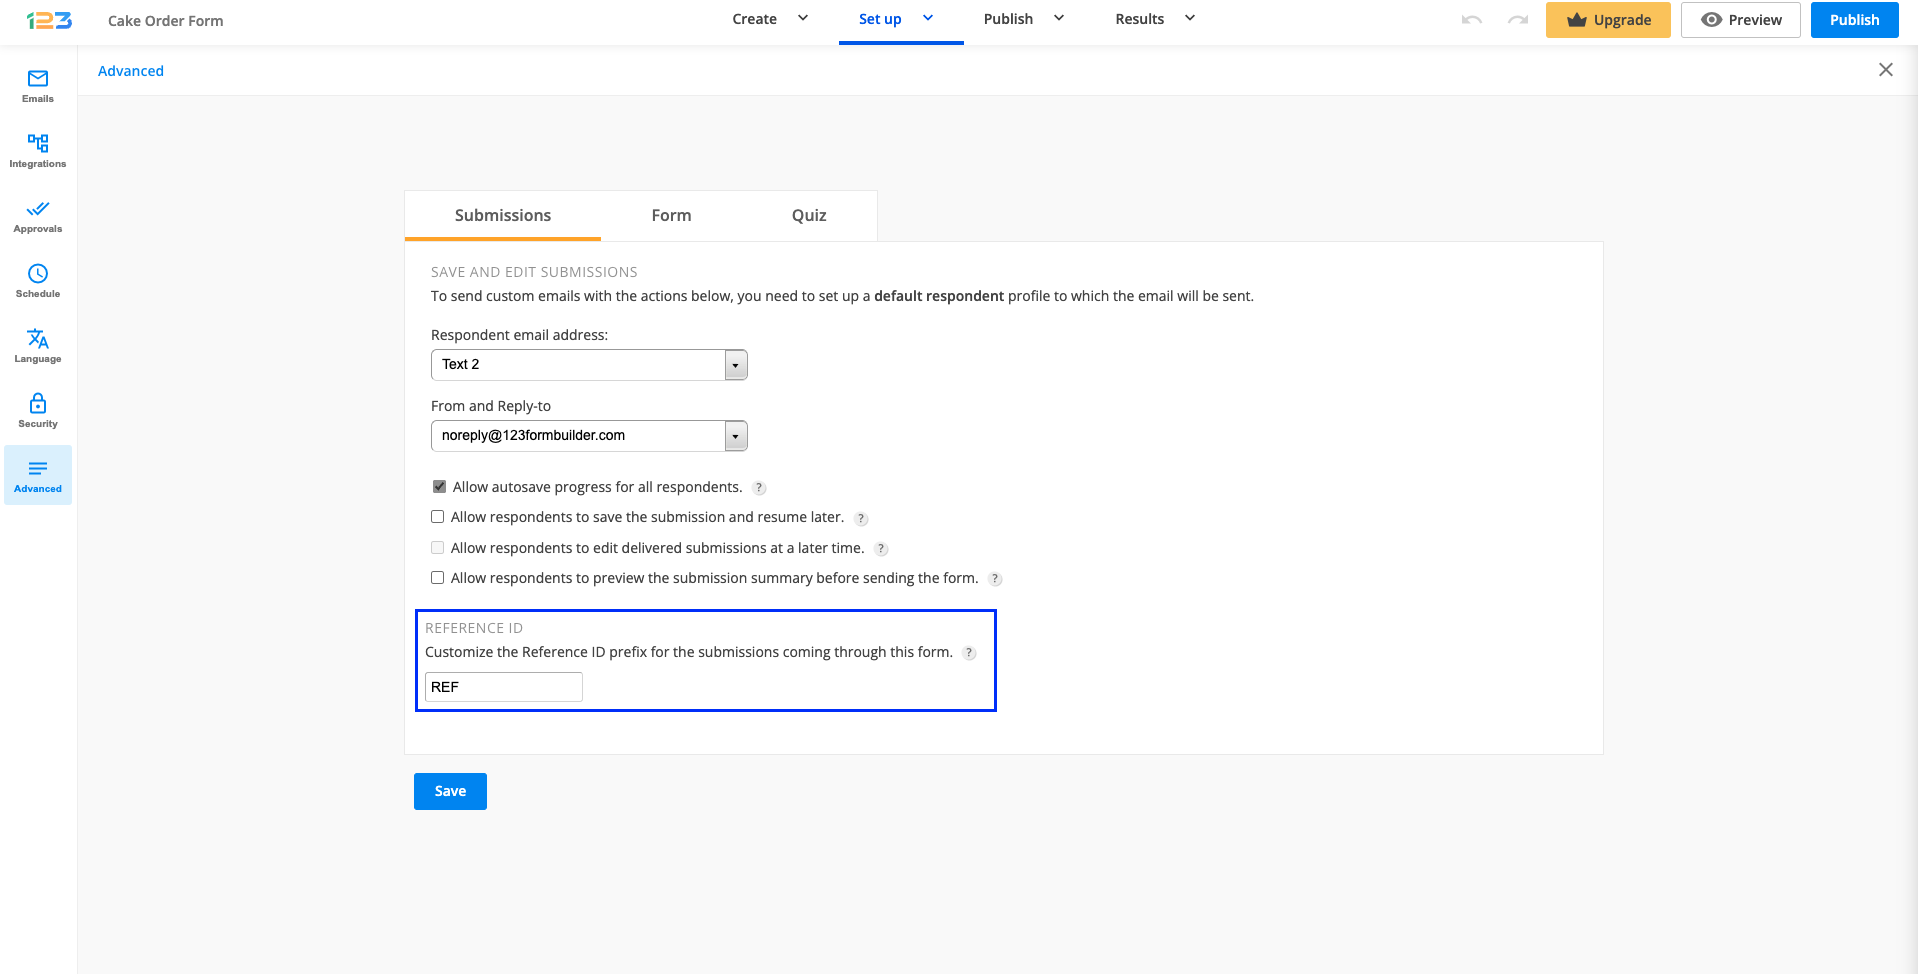
Each submission has a unique Reference ID that can be customized in the Advanced → Submissions section of your form within the form builder platform.
After submission, you can redirect users to a URL that contains this ID. Paste the URL below in the Thank You page section → Redirect to URL box and make the indicated adjustments.
https://www.yoursite.com/file.php?yourrefid=requestRefID

a) https://www.yoursite.com/file.php – Replace this with your custom page.
b) yourrefid – Here you can use any variable you want (ABC, Order Number, anything). The variable can be different from the one you have put in the Reference ID box, in Advanced → Submissions.
c) =requestRefID – Do not make changes to this part of the URL.
Below you have a URL example with our domain.
https://www.123formbuilder.com/file.php?OrderNumber=requestRefID
In your browser, after submitting the PHP form, the Redirect URL will look like this: https://www.123formbuilder.com/file.php?OrderNumber=1563453426
Important Note
The Reference ID prefix can contain up to 9 characters.Important Note
The Reference ID can only be passed like this via a link added in the Thank you page redirect box. It cannot be passed with these steps via Form Rules.There are cases in which you want to redirect users from one form to another. The two forms may contain common fields and you don’t want users to fill out the same information twice. This is where custom redirect URLs come in. The custom links are created by using our own domain (123FormBuilder.com) and this procedure can’t be used on the forms embedded on your website.
Watch our video tutorial below
The redirect URL can be specified in the Thank You Page section of your form within your form builder account. Select the Redirect with custom variables option and provide the custom URL.
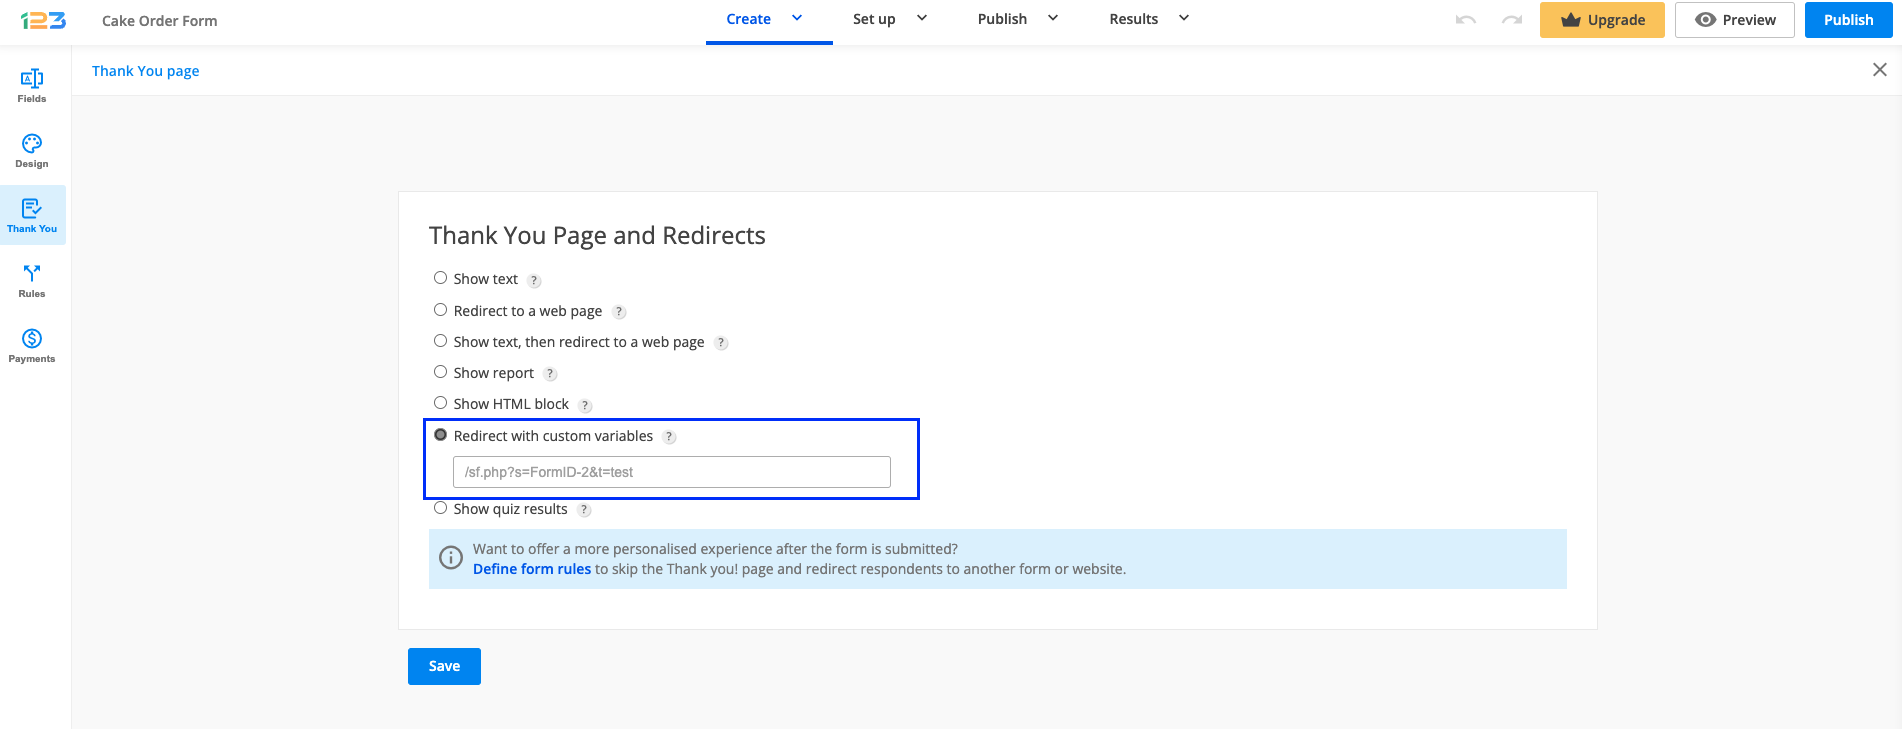
If you are using the new Thank You Page, then all you need to do is enable the Redirect to URL option from the right-side panel and copy the URL in the box below.

Important Note
Files uploaded through File Upload fields, Single/Multiple choice fields, Dropdowns, Likert Scales, and Phone fields cannot be passed to another form.Creating the custom link
Build your custom URL using the following structure:
https://www.123formbuilder.com/sf.php?s=form-222222&customVars123=yes&control2323232=request1212121Copy it into a text editor. The bolded variables from the URL remain unchanged and they are required for the custom URL to work.
Now, you will need to add your own information from your forms. Let’s take an example. We have Form A and Form B. We want to have some fields from Form B prefilled based on the answers to a field from Form A.
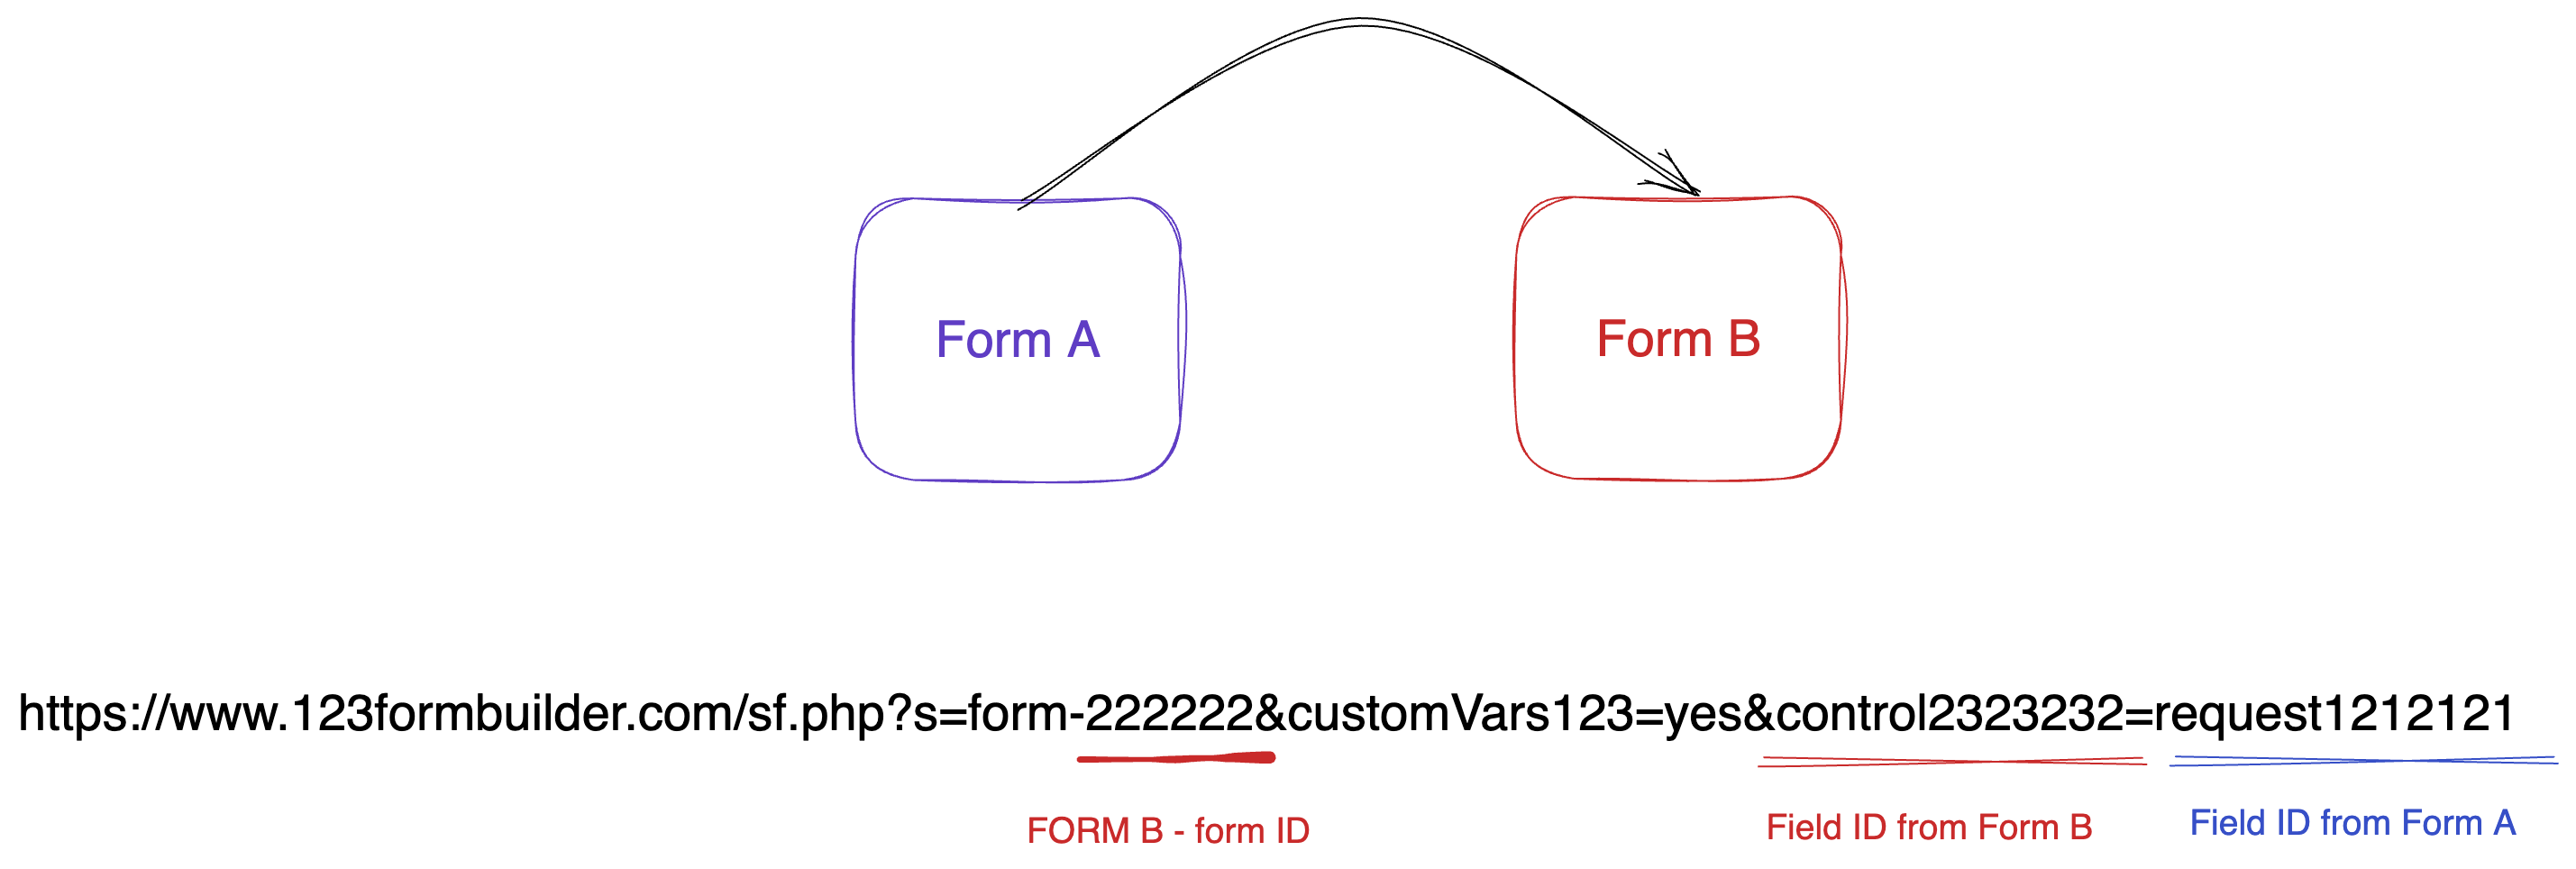
Find out the form ID of the form you want to have prefilled
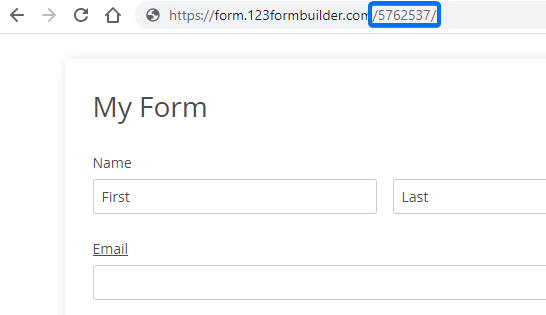
1. Replace 222222 (where it says form-222222) with the ID of the form where you want to redirect the user’s input (the second form, where you want the data prefilled. In our example, it is the form ID of Form B). You can retrieve the ID from the URL or from the Publish → Link section of your form.
Find out the fields IDs & create URL
2. Now the next step would be to find out the fields IDs. You need to know the field A from form A from where you want to have the prefilled data taken from and the field ID from form B, where you want to prefill the data taken from form A.
Following our Form A and Form B example, let’s say that in Form B I want to have the First/Last name field already prefilled with the answer provided by respondents in Form A at the same First/Last name field.
In this case, in the below URL example, we need to change the control variable to have the Field ID of our First/Last name field from Form B. The request variable needs to have the Field ID of our First/Last name field from Form A.
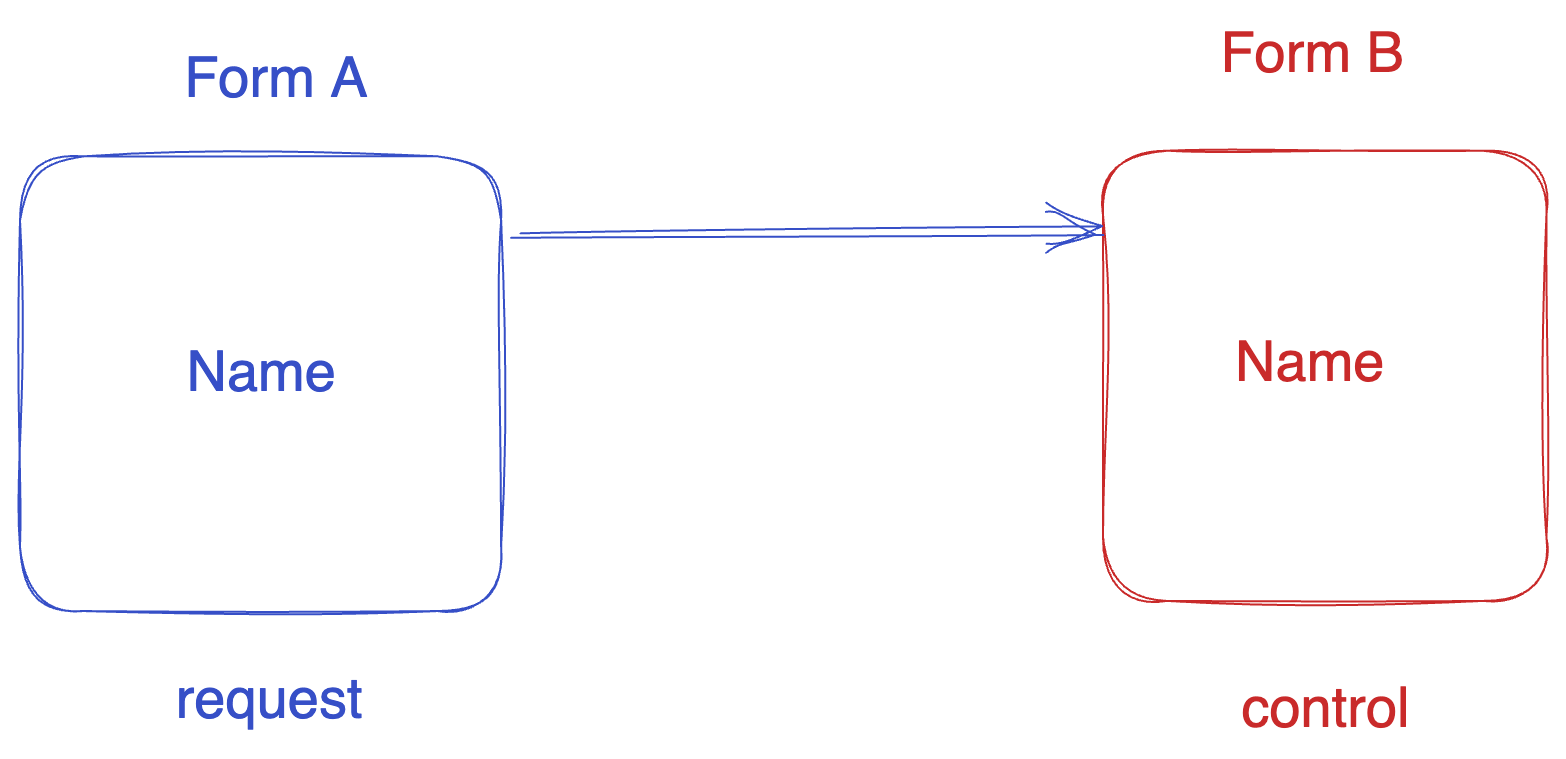
https://www.123formbuilder.com/sf.php?s=form-222222&customVars123=yes&control2323232=request1212121In the above URL, replace 2323232 (value for control) with the ID of the field where the value will be passed (from the second form, where the data will be prefilled, in our example, Form B).
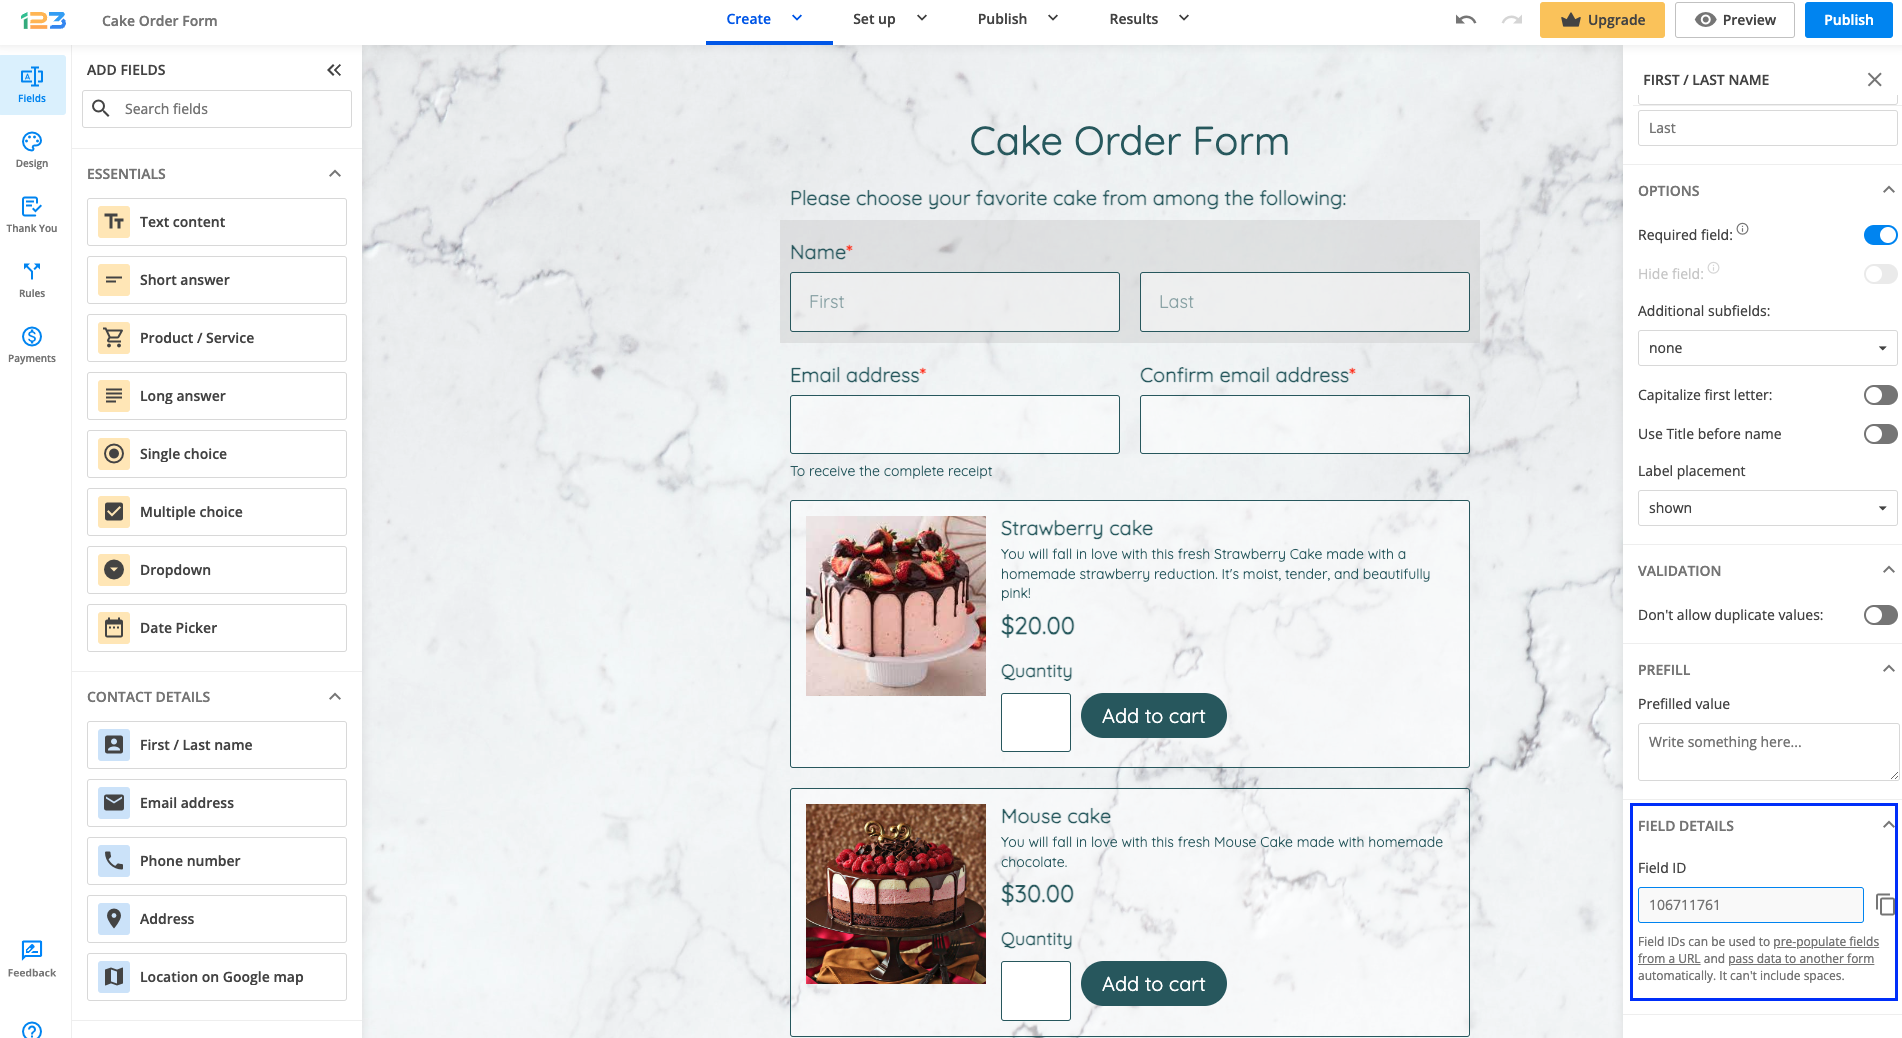
You can find the field ID using two options:
a. select the field on your form and go to Field details – there you will have available the field ID and all you have to do is copy it and paste it in your custom URL.
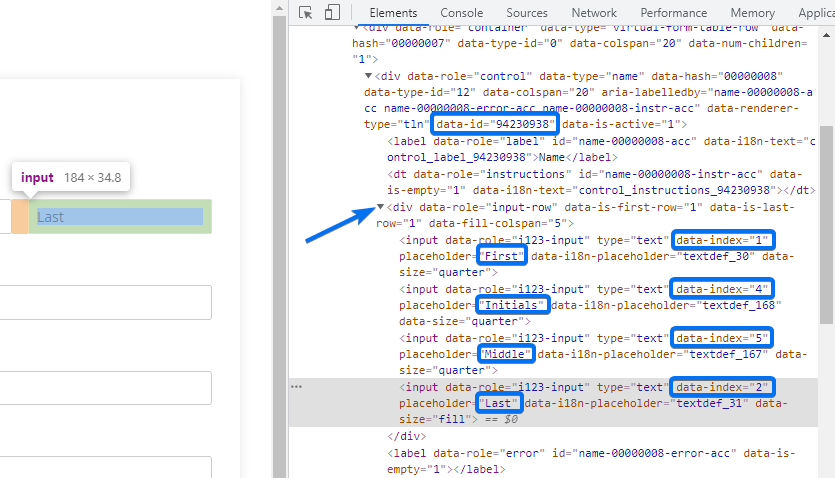
b. a more complex option to take the field ID would be to go In Preview mode of your form, right-click on the input box and select Inspect. The ID is a set of numbers located next to “data id=”.

https://www.123formbuilder.com/sf.php?s=form-222222&customVars123=yes&control2323232=request12121213. Replace 1212121 with the ID of the field from where the value will be retrieved (from the first form, where your respondents have already provided their input, in our example it would be Form A). Retrieve it the same way as described above, only this time you’ll need to view the form from where you retrieve the input (the initial form filled in by the user, in our example it would be Form A).
More complex scenarios
If you have a Name field or Address field that contains multiple subfields, you will have separate IDs. In this case, you need to look at the data-index. For example, in the Name field, you will have First Name – 1234567-1, Last Name – 1234567-2. Therefore, the right syntax will be &control1234567-1=request2222222-1&control1234567-2=request3333333-2. To add the initials continue by adding &control1234567-4=request2222222-4.
Add as many parameters as you need to.
e.g. control222222=request333333&control444444=request555555
Related articles
Most Popular
Frequently Asked Questions
Here is a list of the most frequently asked questions. For more FAQs, please browse through the FAQs page.