DKIM (Domain Keys Identified Mail) is a standard email authentication method that adds a digital signature to outgoing messages. Receiving mail servers that get messages signed with DKIM can verify the sender’s identity, and ensure that messages actually came from the sender, not someone impersonating the sender.
In other words, it detects forgery and prevents the delivery of potentially harmful emails. So, it helps protect email senders and recipients from spam, spoofing, and phishing. Plus, it improves email deliverability, by reducing the chances of being blocked by the recipient’s servers or entering spam.
How does it work?
A DKIM signature is a header added to email messages, which contains specific values that allow receiving email servers to validate the source of the message.
For this, a pair of unique encrypted keys are used:
a public key – included in the digital signature, and is accessible by internet service providers;
a private key – kept on the outgoing server, and is used for verifying the signature once the email is delivered.
When these keys match, it means that the identity of the sender is valid.
Who is it for?
Suppose you are using 123FormBuilder to collect data from your customers and use email notifications to communicate with your customers. In that case, DKIM can help you rest assured that your messages are delivered and trustworthy. Especially if you are choosing to personalize the email notifications and send them on behalf of your own custom domain (using a custom email address as sender or from email).
Not sure if this feature is right for you? Drop us a line, we are happy to help!
How to add a DKIM signature to email notifications, sent through 123FormBuilder?
First things first, for DKIM (Domain Keys Identified Mail) to work:
you need to have an Enterprise account and purchase the DKIM add-on, if you are interested in this get in touch with our sales team;
a new TXT record needs to be created in your organization’s DNS;
the setup needs to be validated on our side after the DNS is updated;
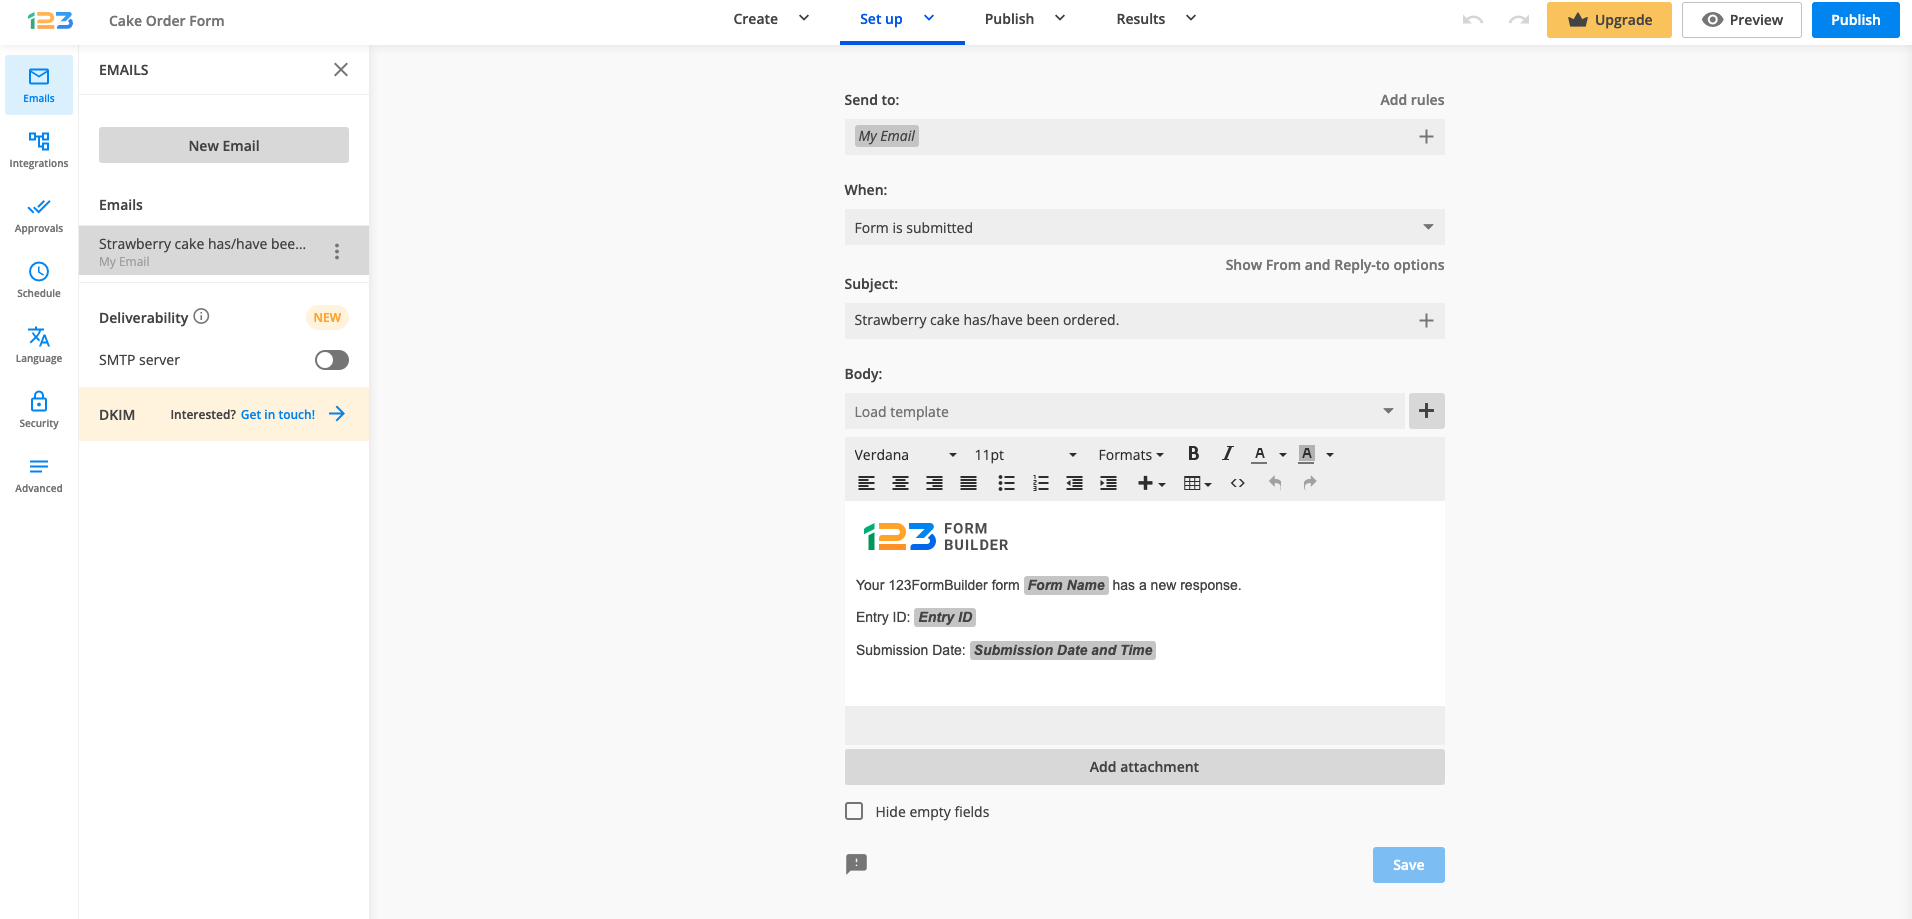
When editing your forms, you need to navigate to the “Emails” section. In the left side panel, you directly have the orange banner with “DKIM. Interested? Get in touch ->”.
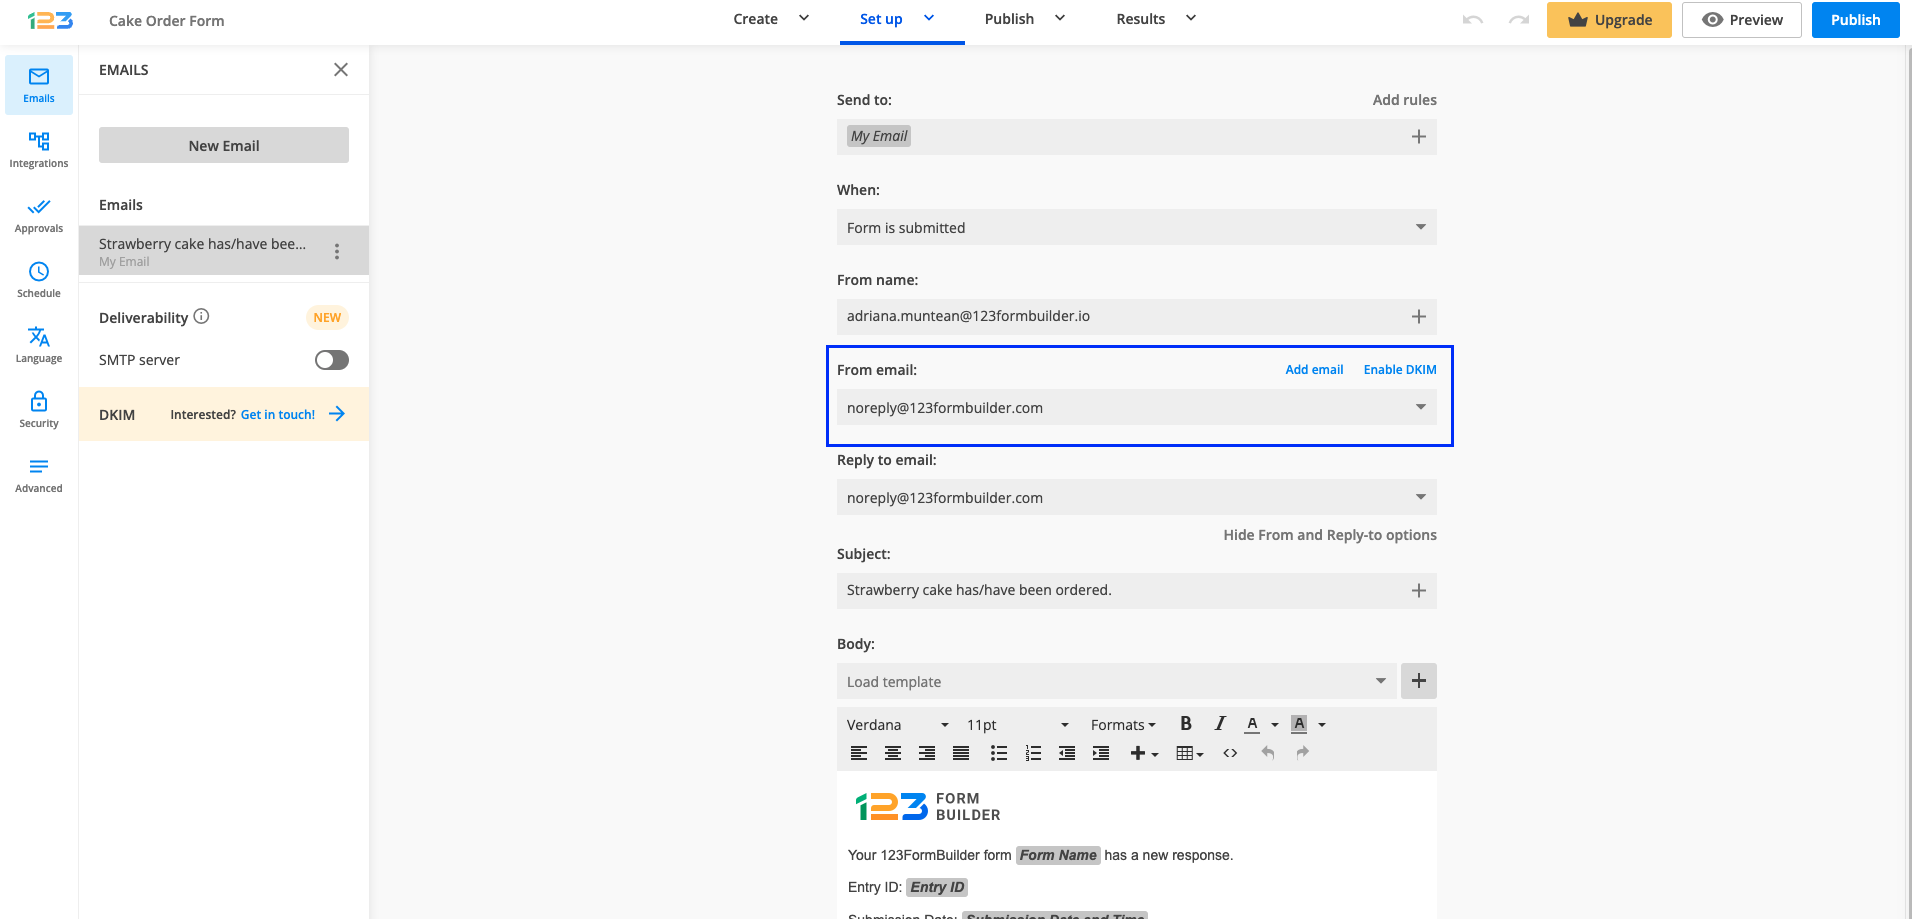
Another option would be to click on and click on “Show From and Reply-to options”. Then you will see:
a dropdown that allows you to select a “From email” – which will appear as the sender of the email notification;
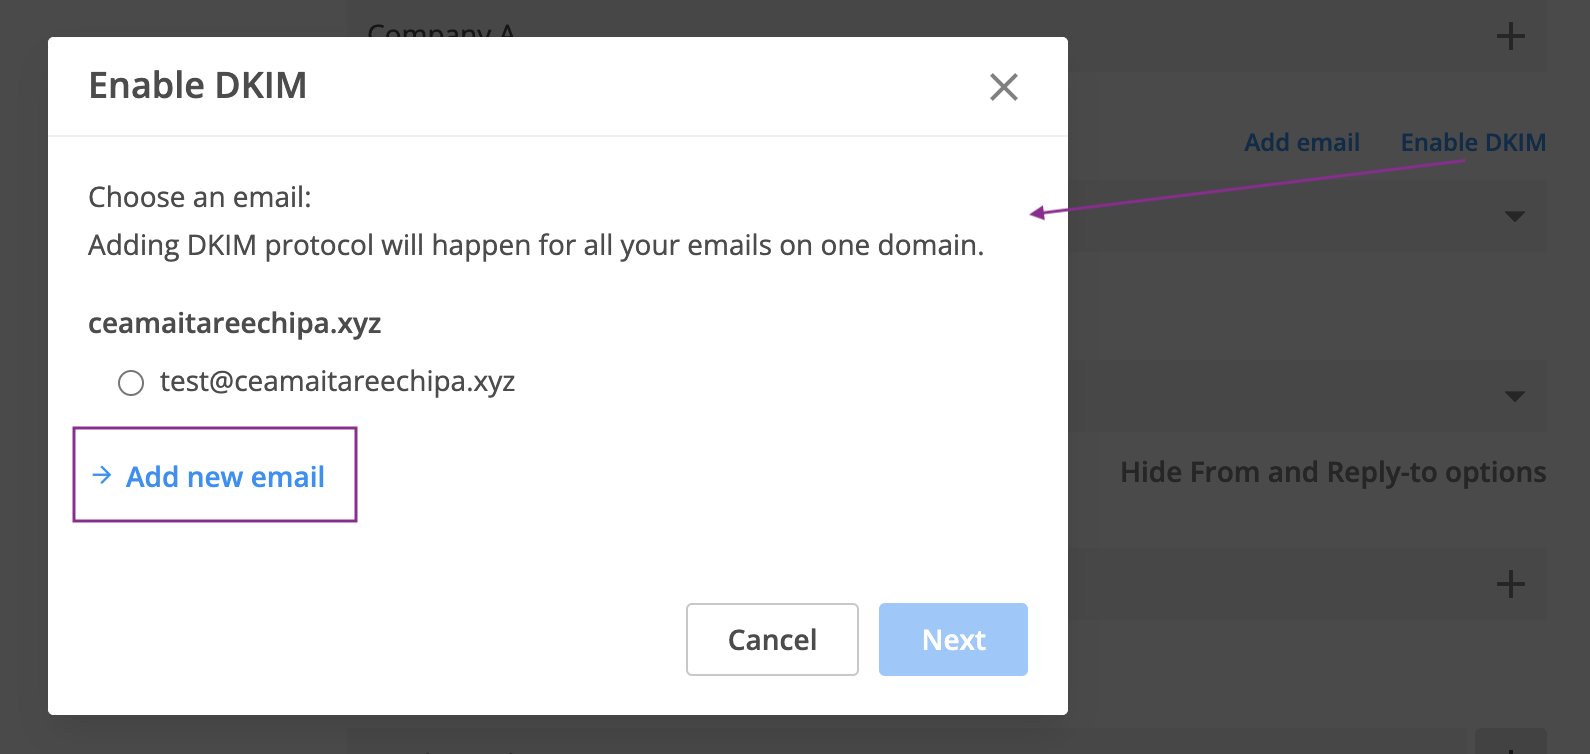
and two options displayed above this dropdown – Add email & Enable DKIM.
If you don’t want the sender of your email notifications to be noreply@123formbuilder.com or noreply@myfor.ms, but want to use an email from your own domain instead, based on the desired level of security you can either:
Click on Add email and configure SPF records for your organization’s domain;
Or click on Enable DKIM and include a DKIM signature to your email notifications, as an addition to the SPF records (which are mandatory for all custom senders).
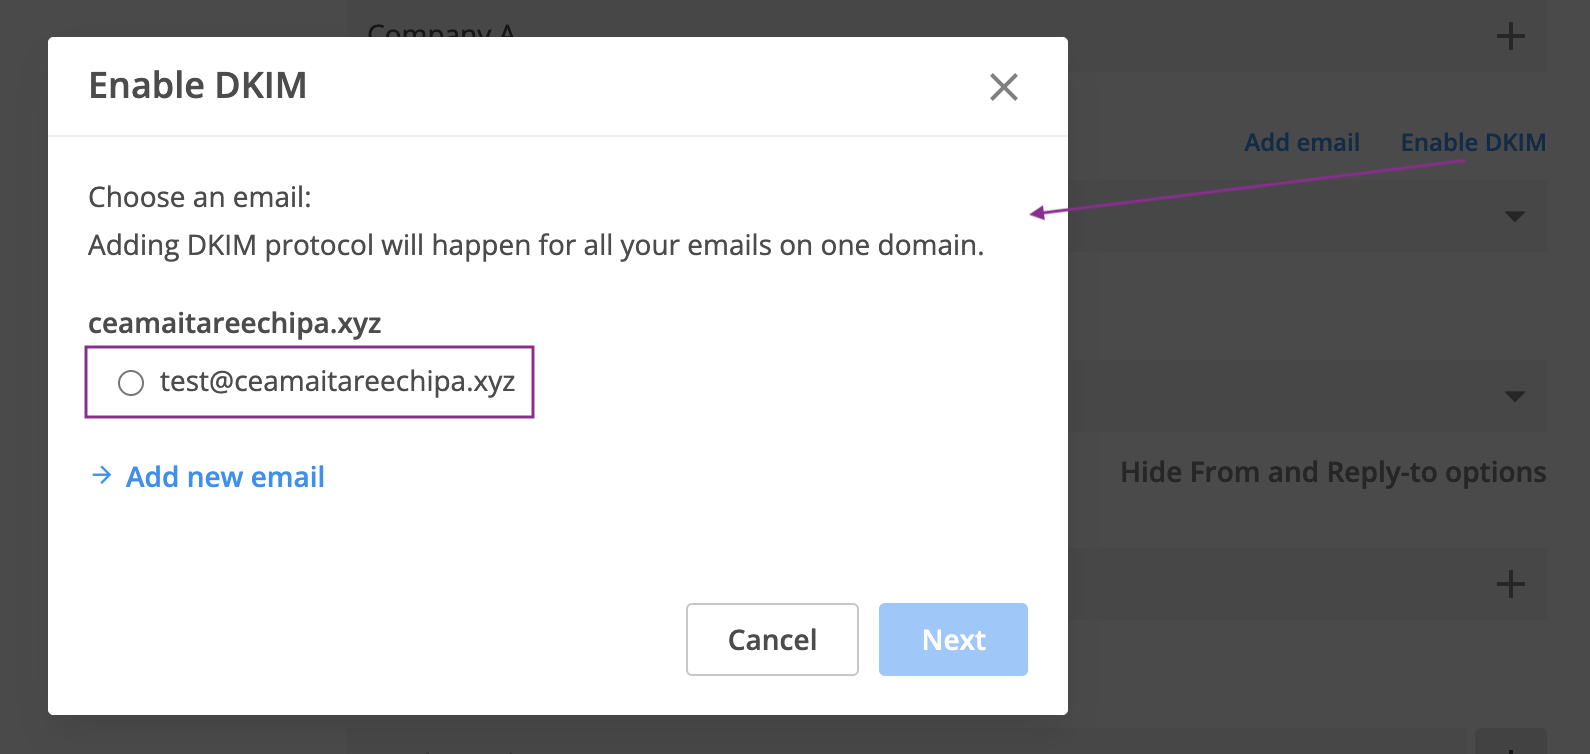
If you already paid for the DKIM add-on, clicking on Enable DKIM will allow you to choose from two options:
Add the DKIM signature to a custom domain for which you already configured the SPF records;
Or, add a new email and configure SPF & DKIM in the same step.
DKIM (Domain Keys Identified Mail) is a type of digital signature that can be added to emails in order to ensure that they are not forged. It works as an anti-spam protection mechanism both for senders and recipients. You can find out more about it here.
How to add a DKIM signature to email notifications, sent through 123FormBuilder?
First things first, for DKIM (Domain Keys Identified Mail) to work:
you need to have an Enterprise account and purchase the DKIM add-on, if you are interested in this get in touch with our sales team;
a new TXT record needs to be created in your organization’s DNS;
the setup needs to be validated on our side after the DNS is updated;
When editing your forms, you need to navigate to the “Emails” section. In the left side panel, you directly have the orange banner with “DKIM. Interested? Get in touch ->”.
Another option would be to click on “Show From and Reply-to options”. Then you will see: and click on “Show From and Reply-to options”. Then you will see:
a dropdown that allows you to select a “From email” – which will appear as the sender of the email notification;
and two options displayed above this dropdown – Add email & Enable DKIM.
If you don’t want the sender of your email notifications to be noreply@123formbuilder.com or noreply@myfor.ms, but want to use an email from your own domain instead, based on the desired level of security you can either:
Click on Add email and configure SPF records for your organization’s domain;
Or click on Enable DKIM and include a DKIM signature to your email notifications, as an addition to the SPF records (which are mandatory for all custom senders).
If you already paid for the DKIM add-on, clicking on Enable DKIM will allow you to choose from two options:
Add the DKIM signature to a custom domain for which you already configured the SPF records;
Or, add a new email and configure SPF & DKIM in the same step.
DKIM setup
If you want to add a DKIM signature to an email domain that already has SPF records configured, you just need to select the desired email & click on next.
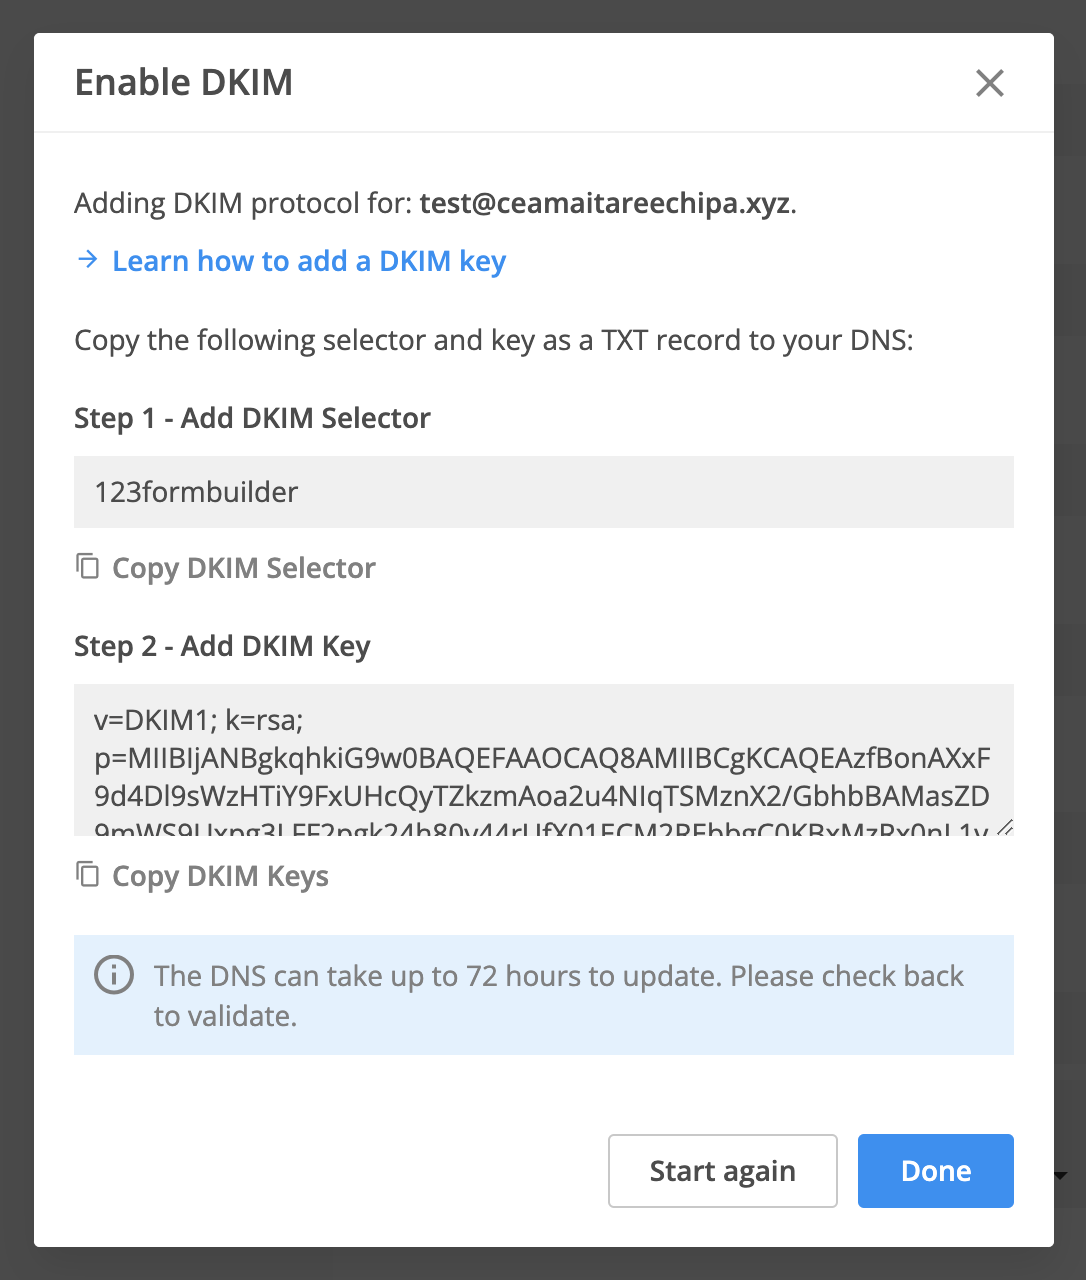
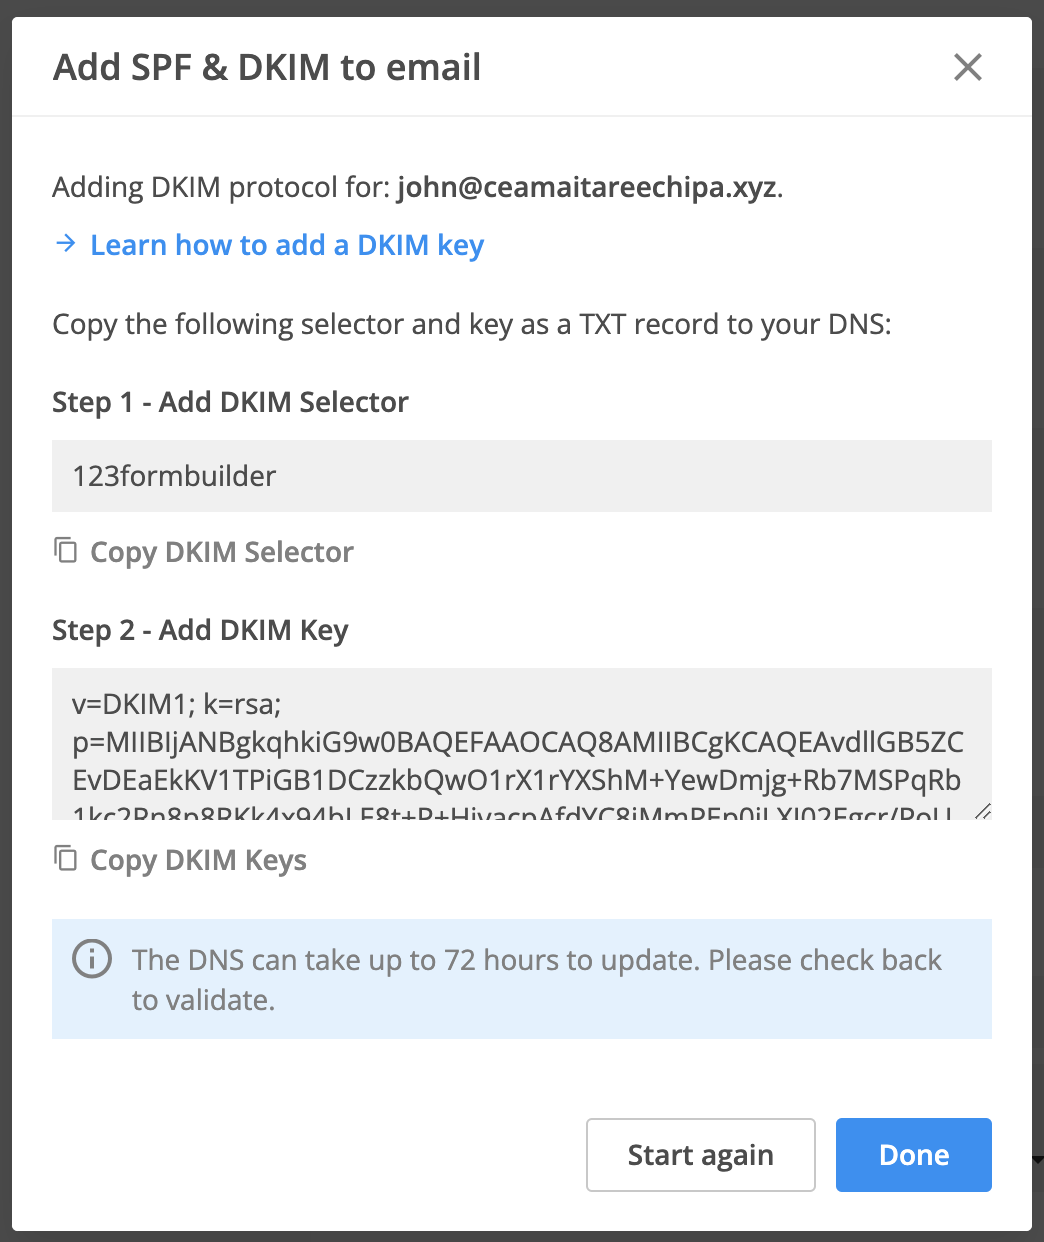
Then you will see a pop-up with DKIM setup details:
copy the DKIM selector & key, and create a new TXT record with these details in your DNS;
close the pop-up and wait for the DNS to update;
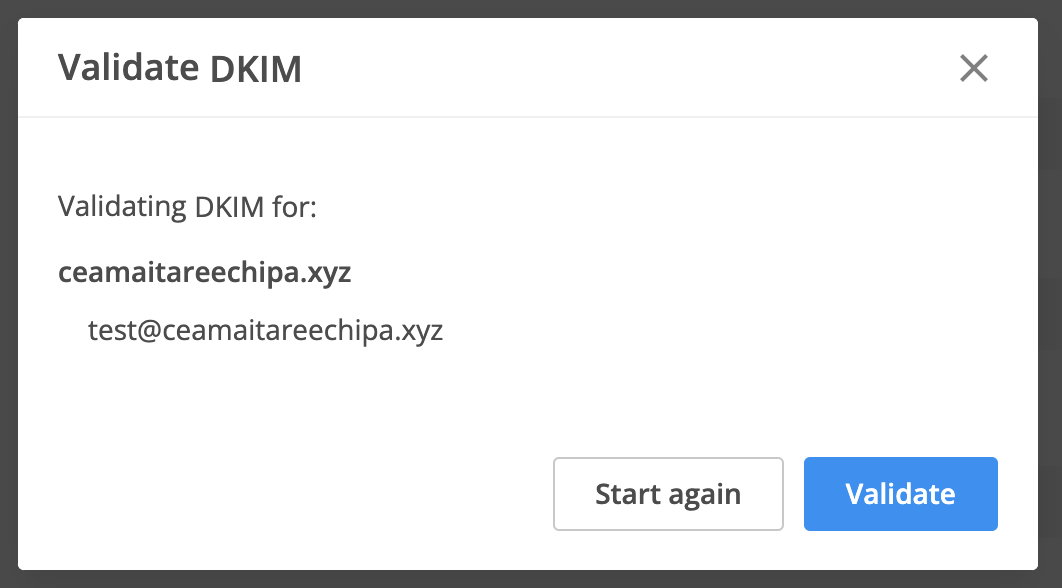
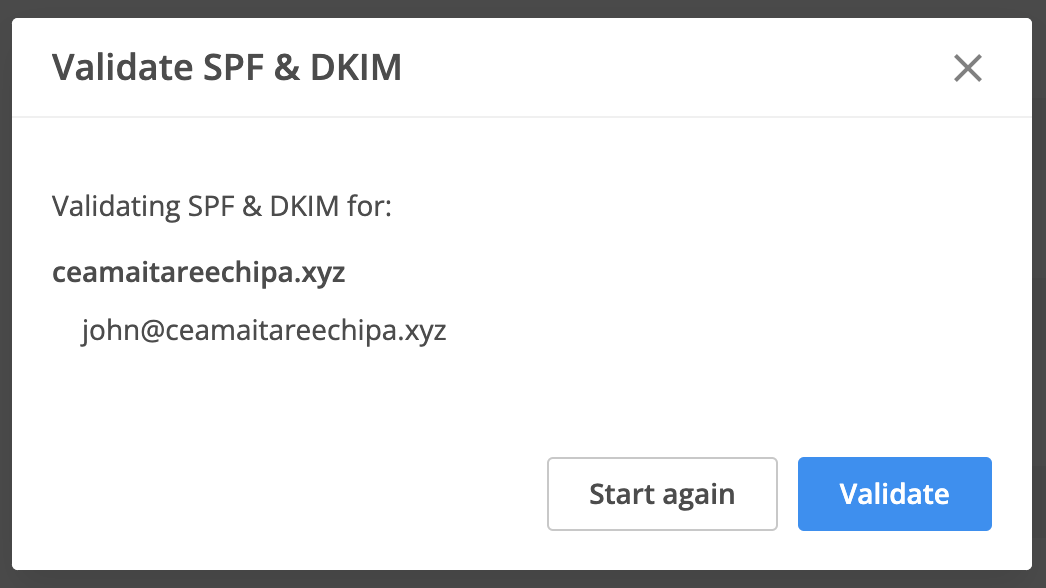
After the DNS is updated, come back to the form, click on Enable DKIM button again and validate the setup. If the setup is valid you will see a success message and will be able to use this email address as the sender for upcoming email notifications. Don’t forget to save the setup once you are done customizing the email.
SPF & DKIM setup
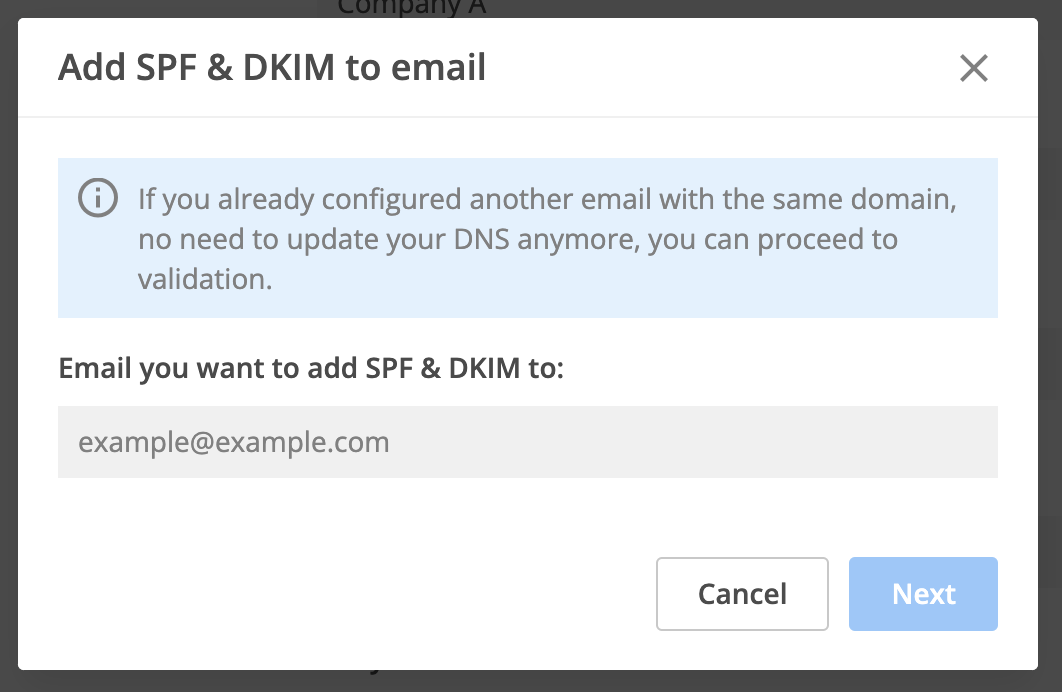
If you want to add a DKIM signature to an email domain that doesn’t have SPF records configured yet, click on Enable DKIM, and instead of selecting an email from the list, click on add new email.
Then you will see a pop-up where you can type the desired email.
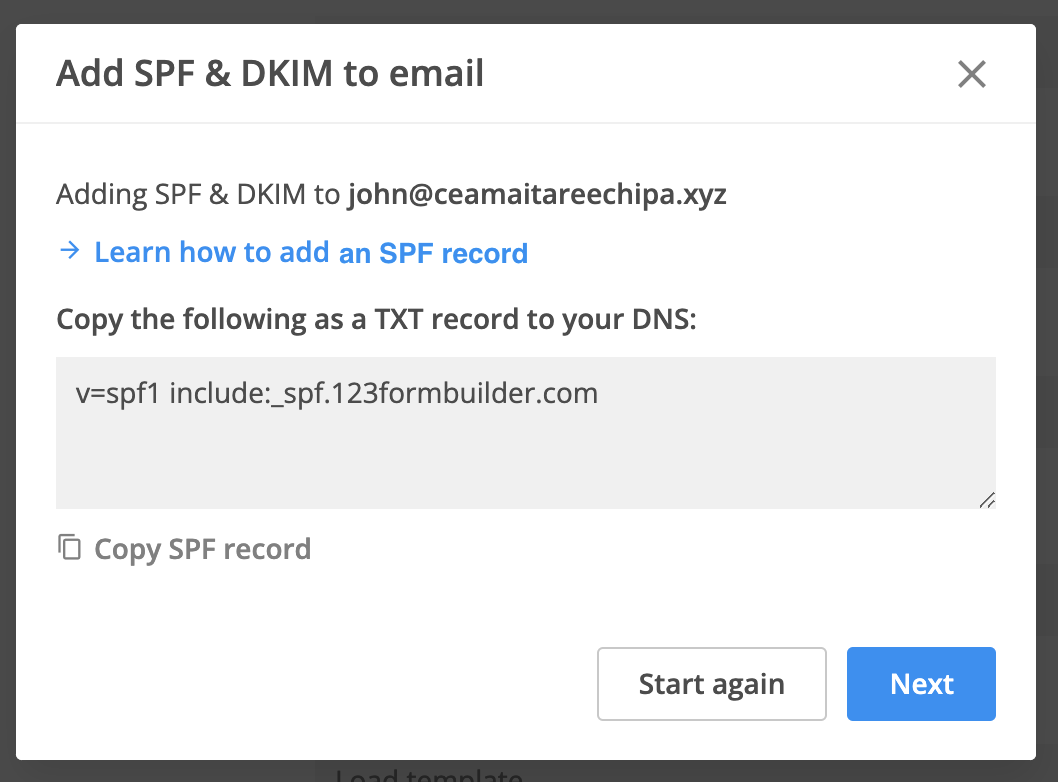
After that, you will be redirected to a pop-up with the setup details for the SPF record. You need to create a new TXT record with these details in your DNS, and click on next.
Then click on next, to see the setup details for DKIM, and:
copy the DKIM selector & key, and create a new TXT record with these details in your DNS;
close the pop-up and wait for the DNS to update;
After the DNS is updated, come back to the form, click on Enable DKIM button again and validate the setup. If the setup is valid you will see a success message and will be able to use this email address as the sender for upcoming email notifications. Don’t forget to save the setup once you are done customizing the email.
Tips
If the validation fails and you receive an error message it means that either:
the DNS wasn’t updated yet → please wait & validate again after the DNS is updated. In some cases, it can take up to 72h.
the setup isn’t correct → copy the SPF records, the DKIM selector & DKIM key again and check if they match with the TXT records added to your DNS. If they don’t, edit the TXT records, and validate the setup once more after the DNS was updated.
If at any point you want to enable DKIM (Domain Keys Identified Mail) for another email from the same domain or form a completely different domain, just click on “Start again” and restart the setup from scratch.
If you already configured SPF & DKIM records for a domain, you can use any email address from this domain without needing to update the DNS. You just need to add the new email & validate it, before you can use it as sender.
You do not need to set this up if you are using the default 123FormBuilder addresses (noreply@123formbuilder.com or noreply@myfor.ms), or if you have connected your SMTP server to your forms.
How to make sure the setup works?
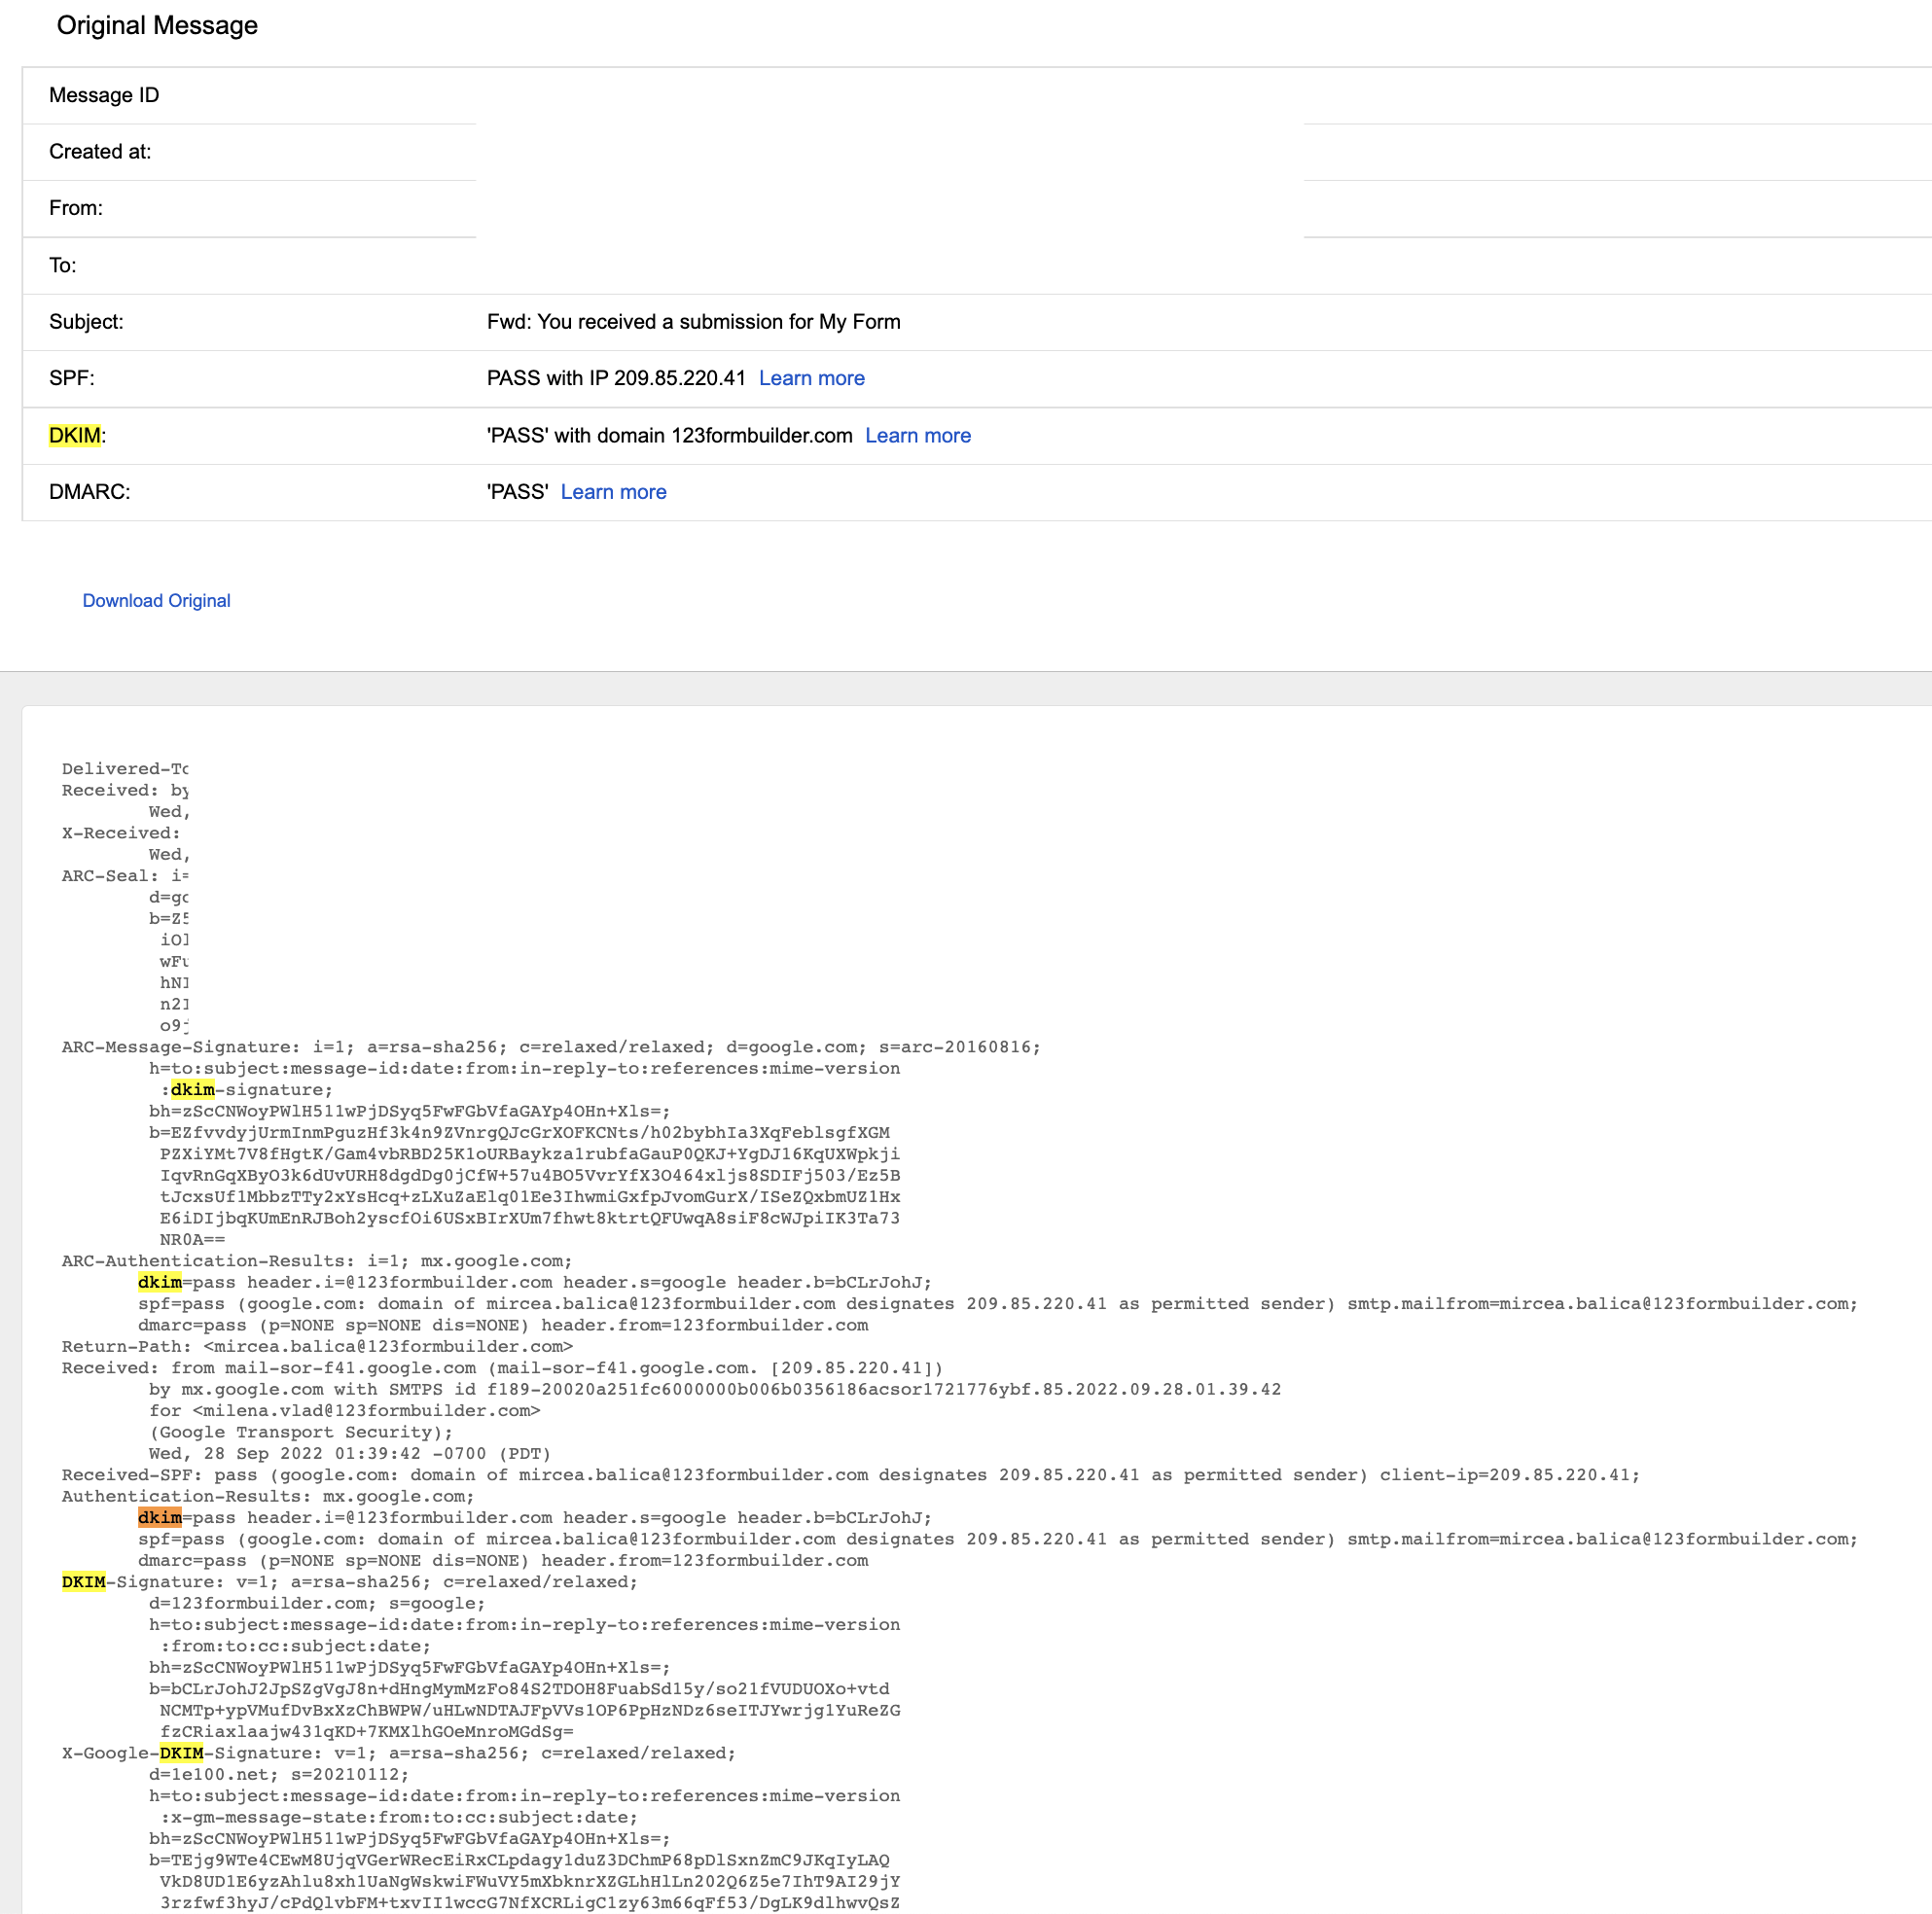
After saving the email notification setup, preview the form and make a test submission. Go to your inbox, open the email notification and click on settings – show original message.
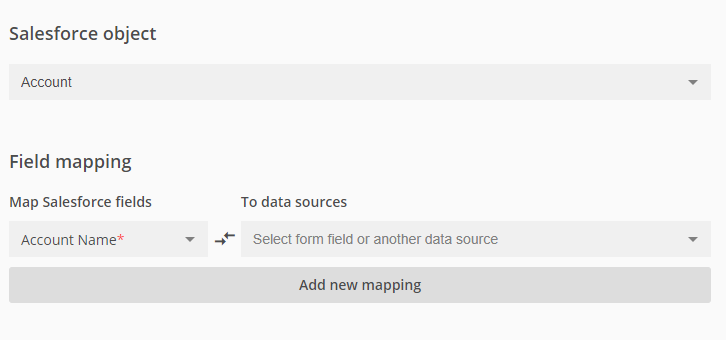
The Object Mapping section allows you to automatically send data to Salesforce when a form is submitted, based on a previously defined setup.
When an object is added, all of your Salesforce fields are available to be used in the mapping. For each Salesforce field from the left, you can choose, on the right side, the form fields that have a validation matching the Salesforce data type, as well as a few other sources for the data.
In this article we will explain which other data sources can be used in a mapping:
Custom values (with/without form fields as variables);
Alternative values (for picklist fields);
Salesforce values (for picklist fields);
Lookup & Query result (Salesforce values which can be looked up/queried in advance);
Lookup Relationship (record IDs of other mapped objects).
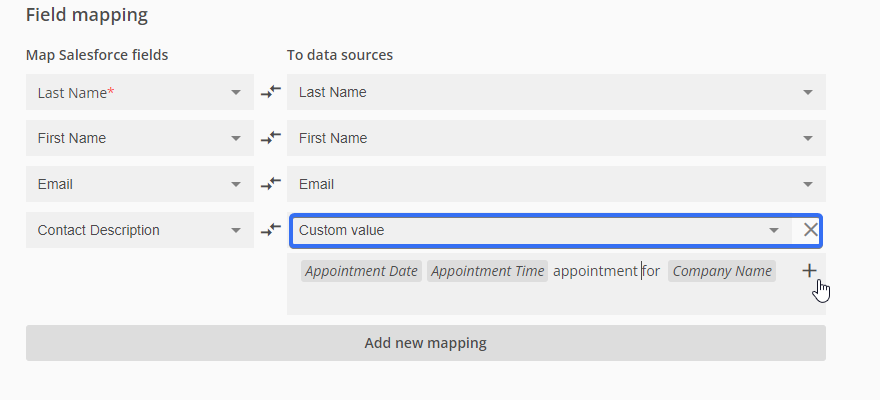
Custom values
Custom values are a great way to send to SF fields a predefined text, a description or user input from multiple form fields. By clicking the plus sign you can add multiple field variables.
An example would be sending the date and time field into a single SF field.
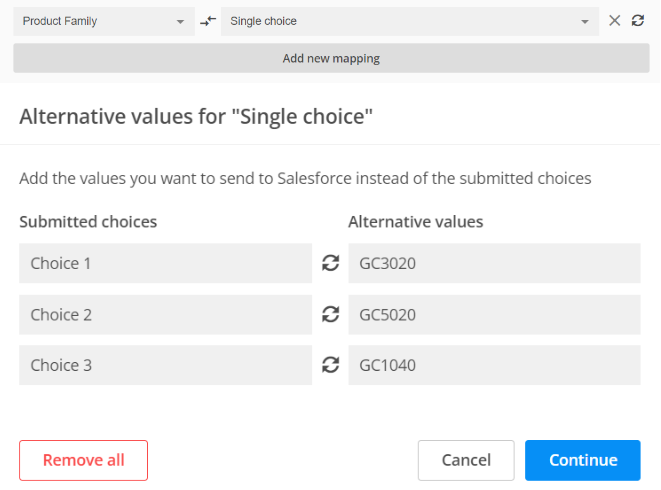
Alternative values
This option is available only for choice fields and allows sending a specific value that is different from what’s selected on the form.
E.g.: The choices on the form will list the Products as “GenWatt 100kW, GenWatt 300kW, GenWatt 200kW”, but in Salesforce the Products are listed as “GC3020, GC5020, GC1040”.
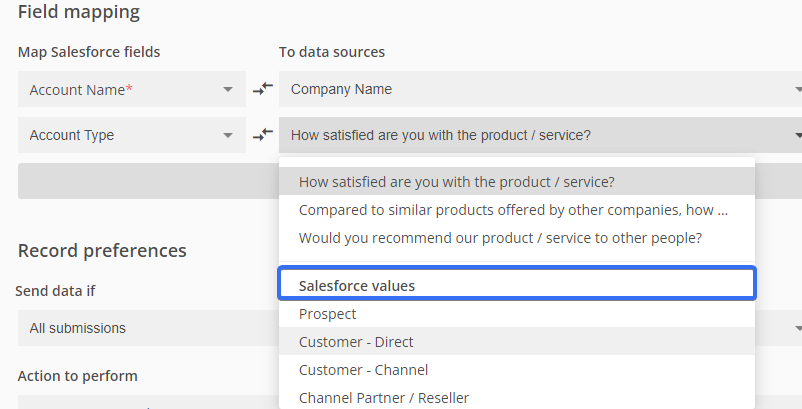
Salesforce values
This option is available for picklists and will list the values which exist in Salesforce.
Use this data source when the same value needs to be sent for all submissions and the value doesn’t depend on what the form visitors choose on the form.
Examples:
Status = “New” for any Ticket created via the form or
Account Type = “Prospect” for all accounts created via the form, etc.
Lookup or Query results
The returned values from lookups and queries can be used in the object mappings.
This requires setting up a Lookup or Query prior to the mapping.
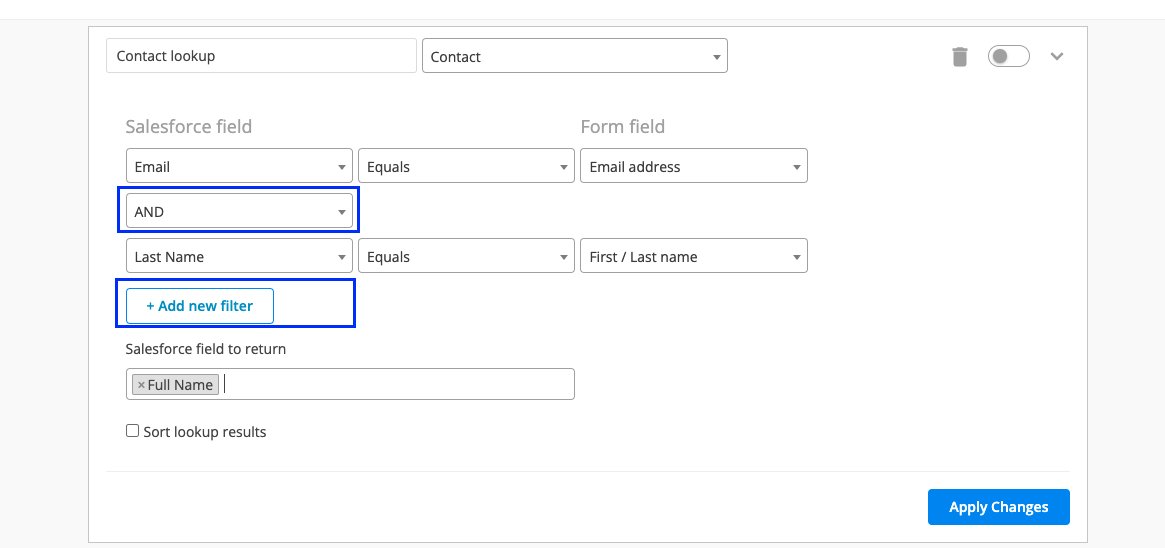
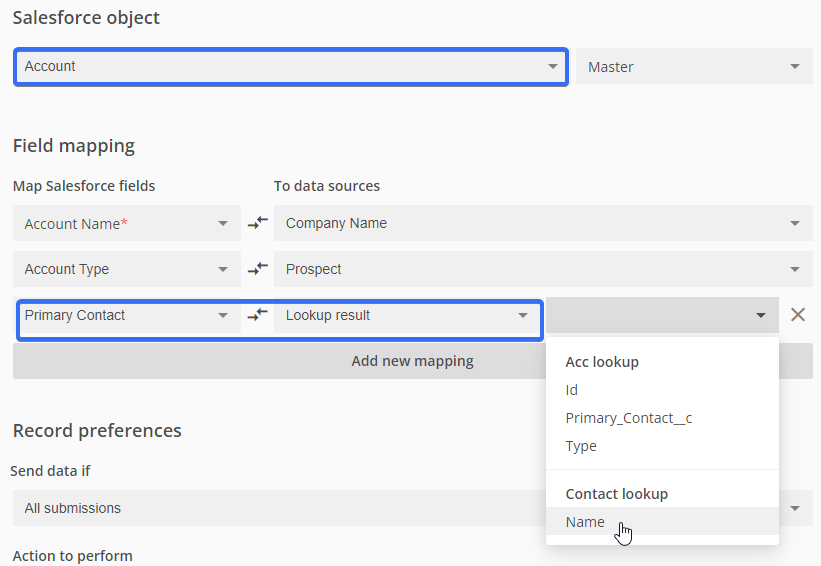
E.g.: Imagine sending to Account a value from the Contact object. Let’s say we want to send contact Name to the Primary contact field of an Account (as text, not as lookup, in this example).
First step is setting up the Contact lookup to get the contact name based on a filter. You can add multiple filters by clicking on Add new filter button.
Note: currently the AND/OR logic operators are exclusive -> if AND operator is chosen, all the logic operators between the filters are set to AND. If you change one logic operator to OR, all of them will be changed to OR automatically. We are currently working on bringing improvements to this area by allowing you to set up multiple filters with AND and OR logic operators combined.
Then, the last step is to create the Account mapping and use the lookup result for the Primary contact:
Lookup relationship
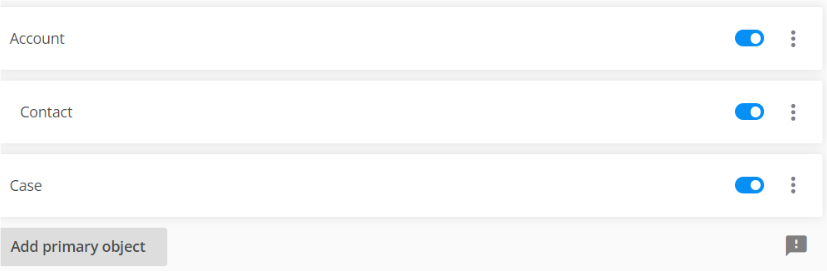
This option makes it possible to easily relate records from different objects that are created via the same submission.
E.g.: Let’s take this scenario – when the form is submitted, based on the setup, it will create an Account, a Contact and a Case. We want the Case to be related to the Contact and the Account.
To achieve this, we go to the Case mapping → search for the Contact ID/Account ID SF field → map it to Lookup Relationship → choose the Contact/Account:
In Lookup relationship, you can identify the object mapping you want to use by the object mapping name that you’ve given to that object mapping.
123FormBuilder is hosted on Amazon servers with two data centres: US and EU.
When you install our application in Salesforce you are prompted to select the server on which you need the account.
If you accidentally select the wrong one and you want to change this you need to follow the following steps:
Reset your connection with our application In order to reset the connection you need to refresh your token. To do that, follow the steps explained in this article.
Switch servers After refreshing the token when you access 123Formbuilder you’ll be prompted once more to select the server. Click now to continue on the correct server.
If your account doesn’t show up and you are still seeing the same screen, click on the Switch server text.
Important Note
Forms created on one server will not be accessible on the other server because they connect to different databases.
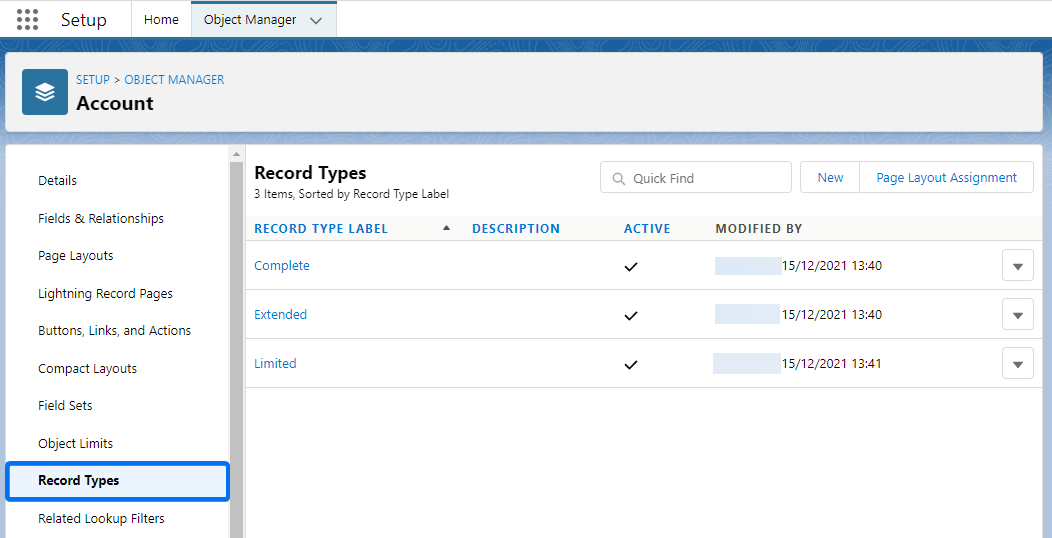
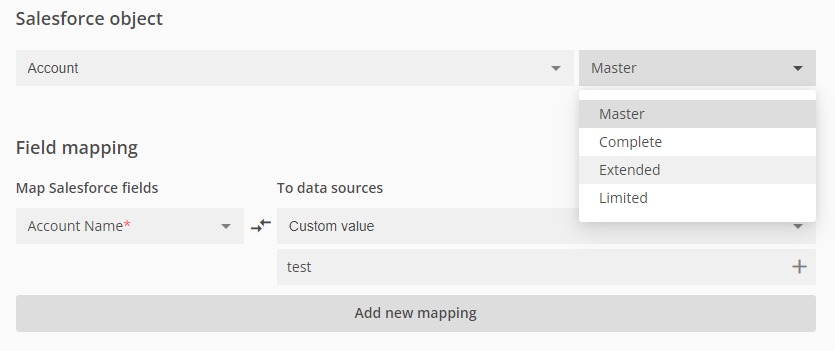
There are different layouts that can be set for each object in Salesforce. The integration within our form builder allows you to select a layout that exists in Salesforce. Then, the fields present in that layout will be displayed in the integration for you to associate them.
When you set up the object in the integration, you’ll see the Record types section on the right that allows you to choose your custom record types and will load its fields.
Important Note!
We only show the dropdown menu when your Salesforce account has at least 1 custom page layout created. The dropdown menu will not be available if you only have the default layout (Master).
Finally, associate the Salesforce fields with the form fields and save the changes.
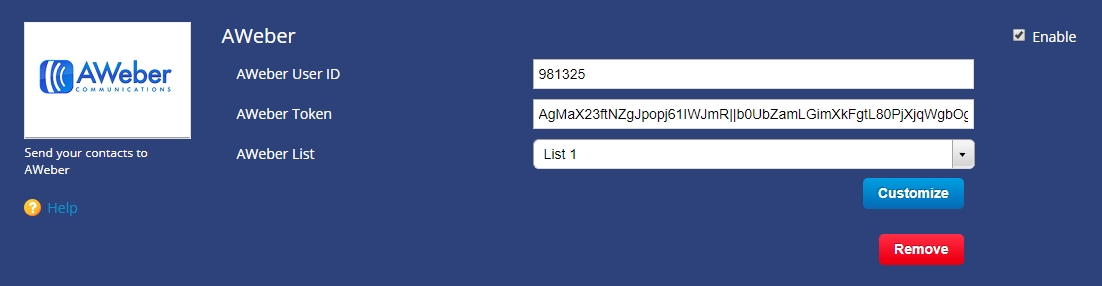
To enable the integration with AWeber and send contact information straight to your AWeber lists, go to the Integrations section in your 123FormBuilder account and select AWeber.
Click on Connect to enter your AWeber login data and to allow the integration to access your AWeber account. After you grant this access, you’ll be redirected back to the application box.
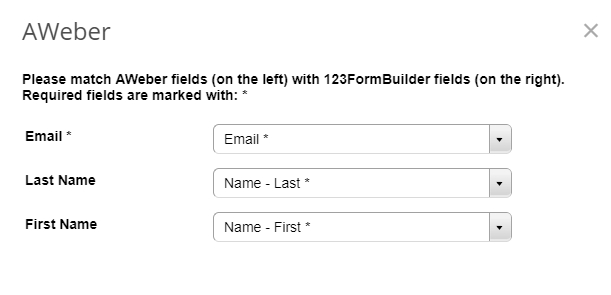
The AWeber User ID and Token fields in the application box are populated automatically. In the dropdown list, you can find all of your AWeber mailing lists. Choose the one you want to send contact information to. Then click on Customize to create the field associations. Match the AWeber fields on the left side of the customization lightbox with 123FormBuilder fields. Choose the latter in the dropdown lists. Press Save.
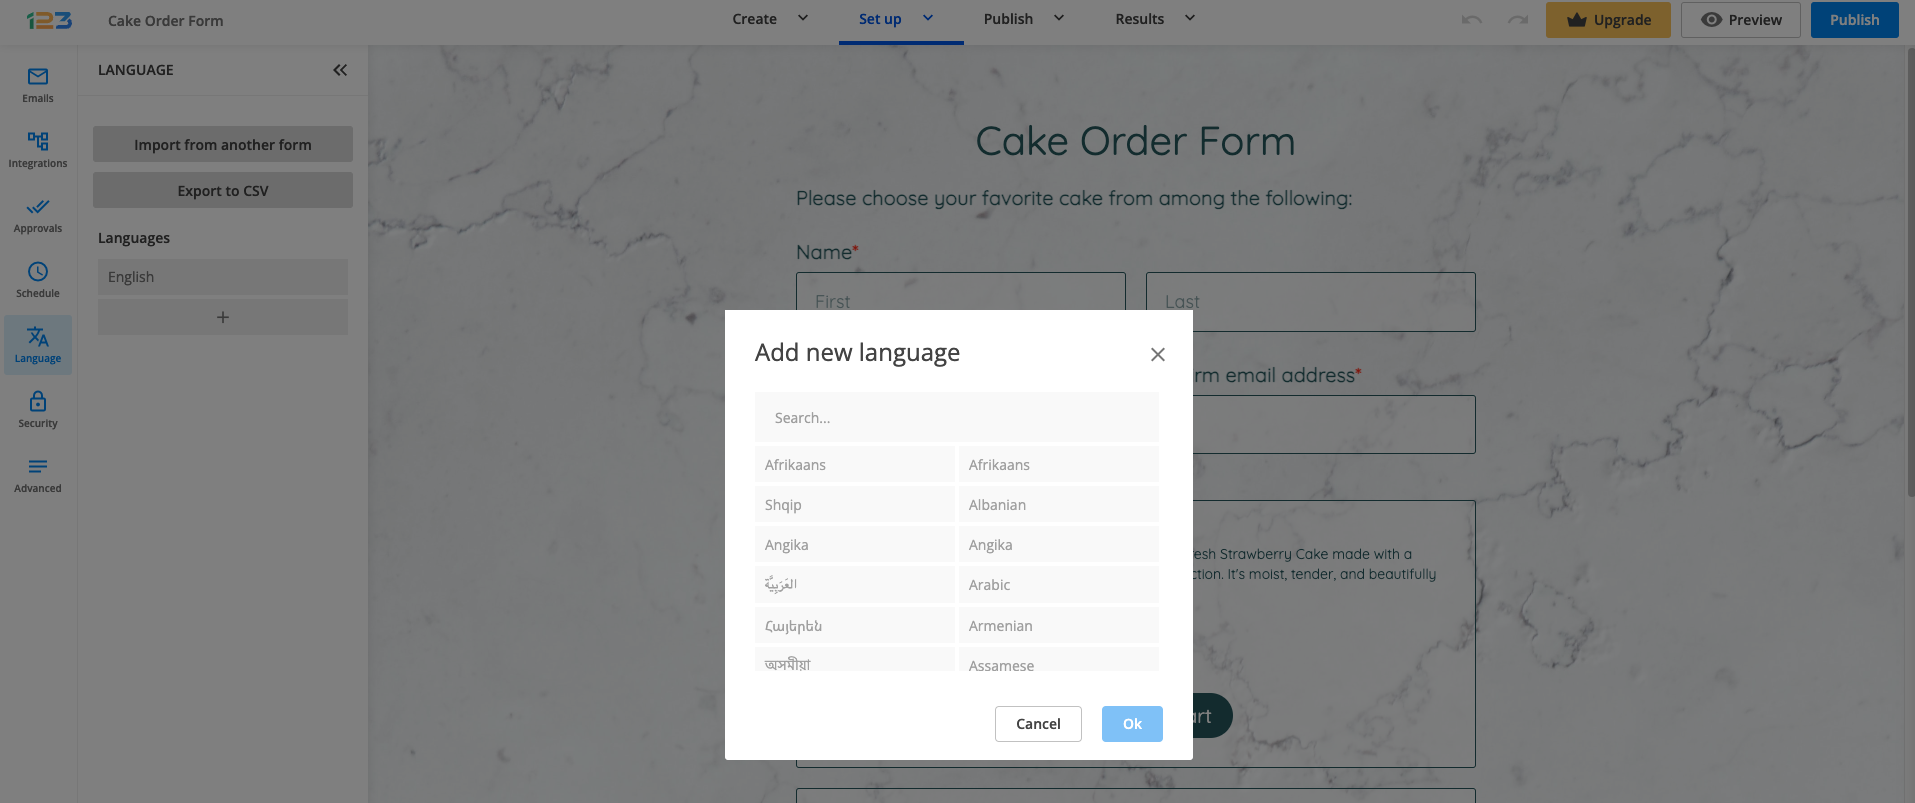
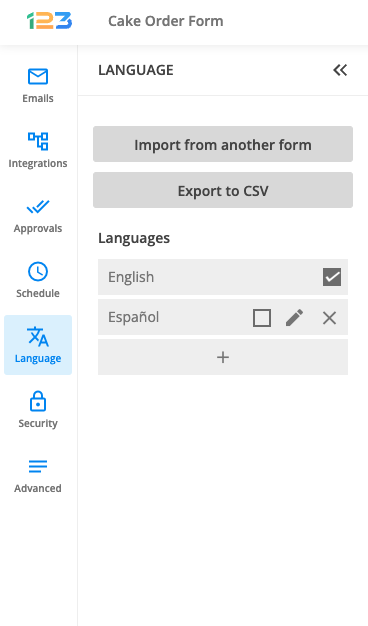
When you access the Language section of your form for the first time in our form builder, you’ll first notice the default language. This is the first language you can choose to edit. The words that you used as field labels when building your form are the starting point for all future translations for a particular form.
Below the default language there is a plus sign.
Click on it and a lightbox will pop up where you can select what other languages you want to add to your form. Let’s say we are choosing Spanish as a second language.
Once the second language has been added to the form, it will be displayed in the left side panel. By hovering over them, you can choose which language to be the default one and you can also edit or delete it.
Note: Please keep in mind that adding the language to the form does not automatically translate it. You will have to click on the pen icon and manually input the translation for each field/error message/system message.
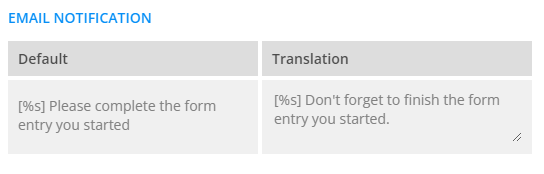
Clicking the pen icon will open a different lightbox where you will find all the form fields that you’ve created and all the system/error messages on the left column. On the right side, you will need to type in the translation for each text/message.
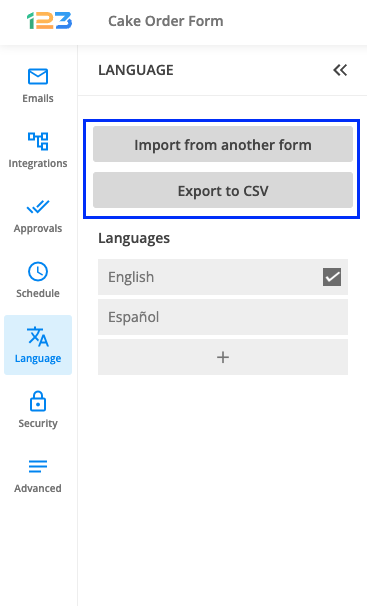
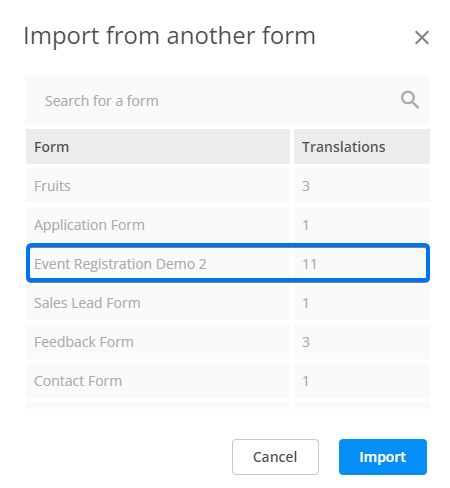
In the same Language section, you have two buttons: Export to CSV and Import from another form.
Export to CSV will automatically start downloading a CSV file containing all the translations from your form. The latter is useful if you’ve already set up a multi-language form from where you can import translations.
Important Note
Copy the tags of the messages that appear on the left in case you want to keep the same structure (e.g. %s is used for links and variables).
123FormBuilder is constantly developed to support the latest and stable web browser versions. We highly recommend updating your browser to the latest version to have the best and most secure user experience across our platform. Old browser versions might disable some of the 123FormBuilder features and cause navigation problems.
If you are not using a recent browser version, 123FormBuilder can not guarantee the stability and functionality of the platform’s features.
In this article, we will illustrate the browsers fully supported by 123FormBuilder based on:
Usage of the 123FormBuilder features (Builder).
Display of forms as the end result (Viewer).
Builder
Viewer
Google Chrome (major versions released in the last year)
Google Chrome (major versions released in the last year)
Safari (major versions released in the last year)
Safari (major versions released in the last year)
Firefox (major versions released in the last year)
Firefox (major versions released in the last year)
Internet Explorer 11 (functional only) *we have dropped support for Internet Explorer 11
Internet Explorer 11 (functional only) *we have dropped support for Internet Explorer 11
Microsoft Edge (major versions released in the last year)
Microsoft Edge (major versions released in the last year)
Android smartphone and tablet (Chrome, Firefox, Opera)
Android smartphone and tablet (Chrome, Firefox, Opera)
iOS, iPad, and iPhone (Safari, Chrome, Firefox, Opera)
iOS, iPad, and iPhone (Safari, Chrome, Firefox, Opera)
Payment forms are not compatible with the edit submissions option from the Advanced section of your form inside the form builder.
The payment process will trigger again when the form user returns to make changes to their submission. Although the submission is updated after sending the form and the user can refuse to move forward with the payment, this is not recommended.
For example, let’s say you have a bakery order form and a user orders two cupcakes. They might change their mind at the last minute and order something else. Even if they make a new payment, this can perturb your workflow and create unpleasant situations between you and your customers.
Therefore, we strongly advise against allowing users to edit their submissions if you use your form to collect payments.
You can easily add a middle name subfield for the Name field.
Click on the Name field and access the settings on the right-side panel. Go to Options and turn on the toggle Use a middle name. This will include an additional subfield between First and Last. You can also include an initial and a title if you require more information.
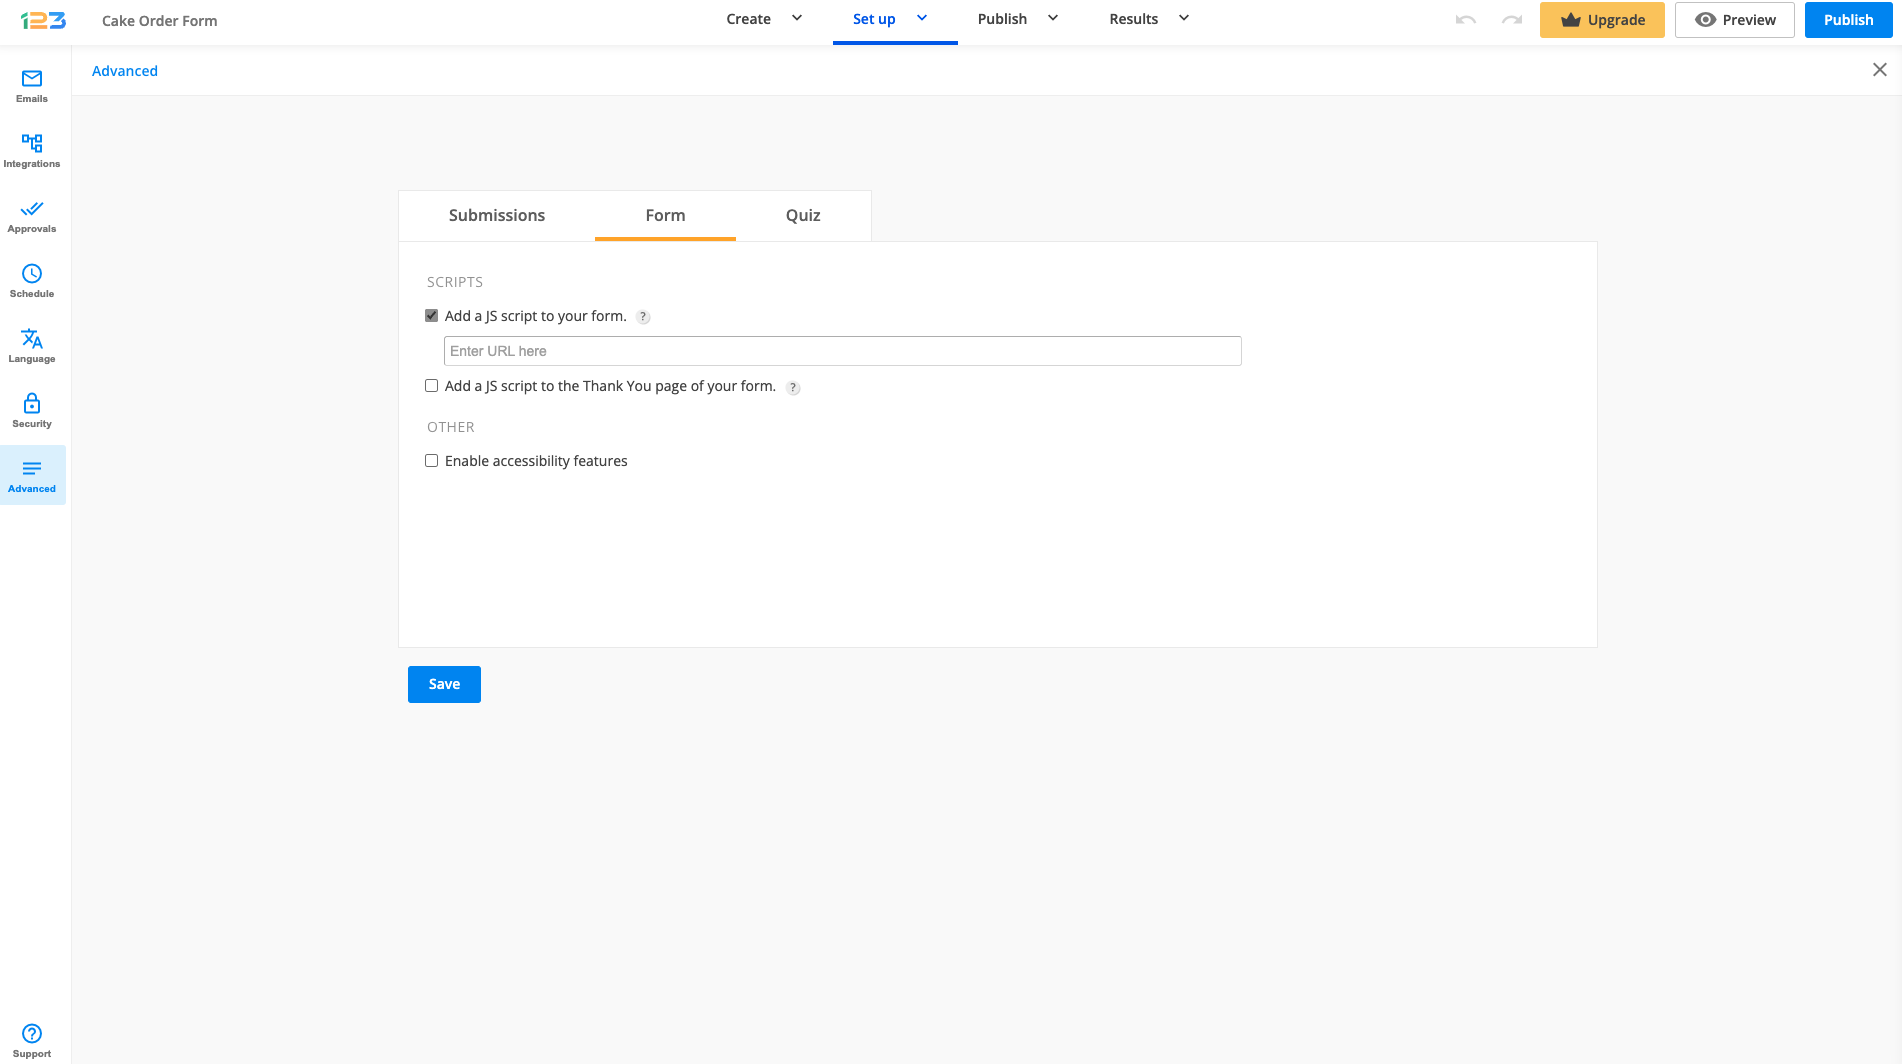
Yes, you can. From the Form Editor, go to the Advanced → Form tab.
Afterwards, tick the option Add a JS script to your form. Paste the script URL in the text box that shows up and Save. Make sure to use a reliable service to host your script files.
You can use, for instance, Dropbox to host your script.
Here is a step by step guide on how to successfully apply a script to your form with Dropbox:
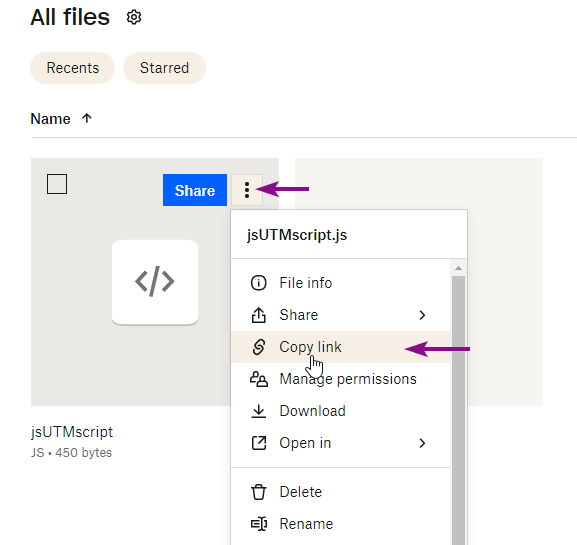
First, if you are using a script provided to you by someone else, make sure to copy and paste the script in a text editor and then save it with the extension .js (you can use Notepad, Word, etc).
Then you will upload this file in Dropbox. From there, you can share/copy your link, as seen here:
Paste the link in the Advanced section of your form, under the option Add a JS script to your form. Before you save, you will need to tweak the link that Dropbox generates. Your link has this format: https://www.dropbox.com/s/b4xxxxxxxxxx/myscript.js?rlkey=ya19ii9xxxxxxxxxxxxxx&dl=0. Instead of “www” write “dl” and after “dropbox” write “usercontent” and your link will now look like this: https://dl.dropboxusercontent.com/s/b4xxxxxxxxx/myscript.js?rlkey=ya19ii9xxxxxxxxxxxxx&dl=0.
You can now click on Save and access your form to see if the script is triggering.
If you need to apply a script that should perform an action on the Thank you page, or that tracks the number of users who submitted your form, use the option below – Add a JS script to the Thank You page of your form.
With 123FormBuilder, you can create a contact form for Blogger and many other types of forms. Here’s how you can embed these online forms on Blogger.
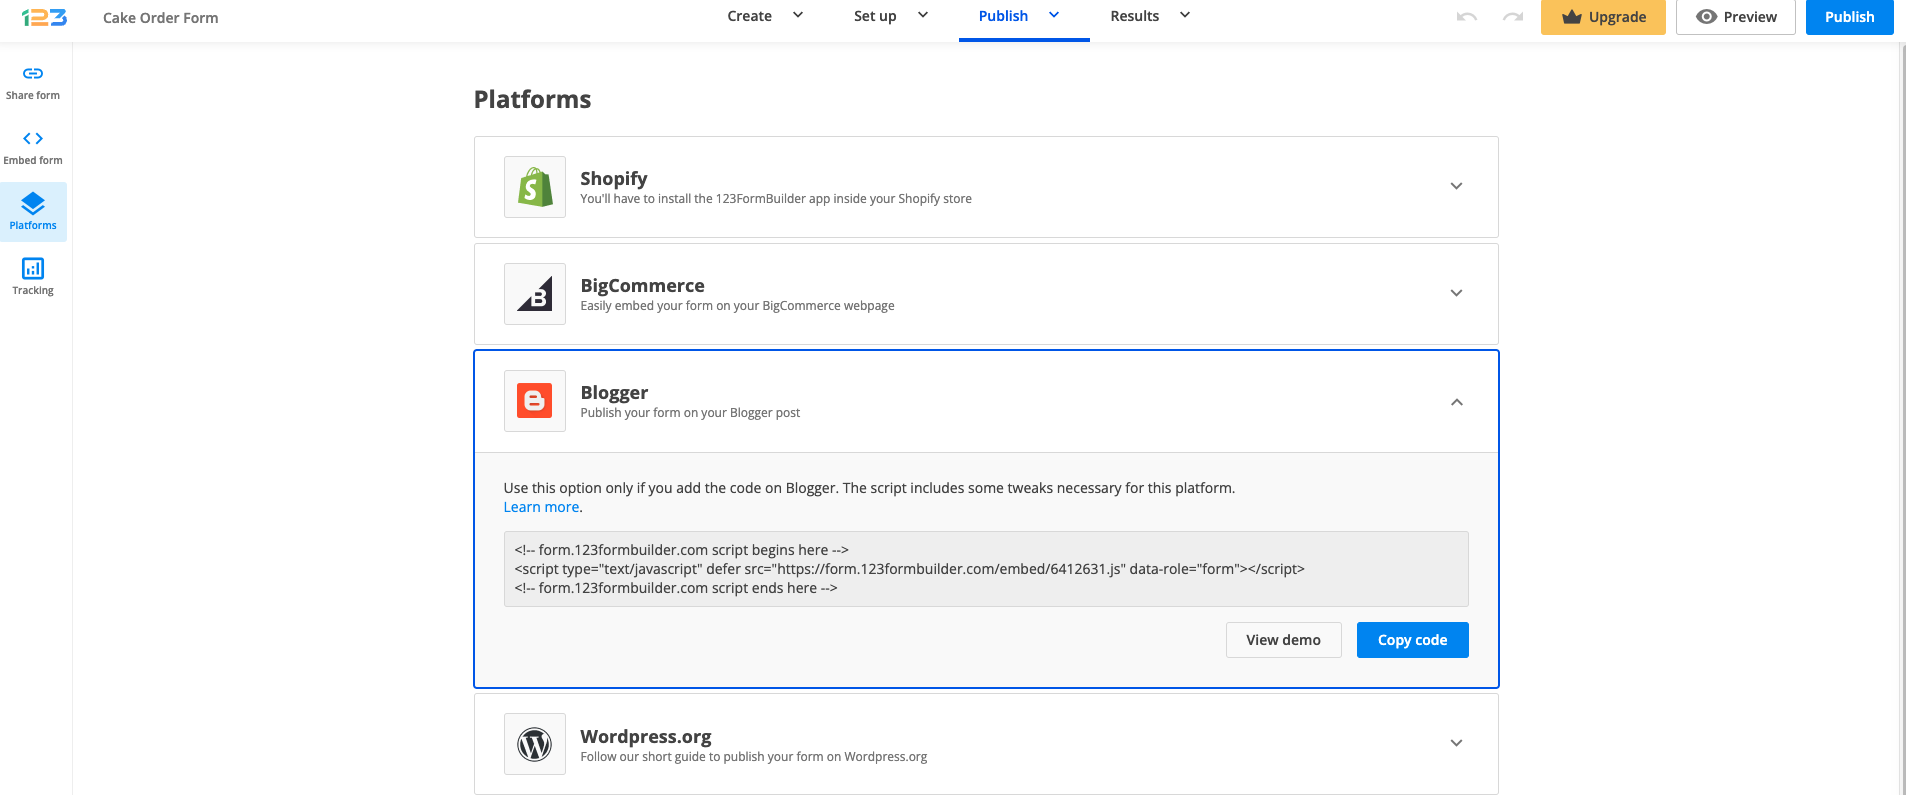
After you’ve created the form in your Form Editor and tweaked your form settings, go to the Publish → Platforms section. Here click on the tab named Blogger and copy the code generated for your form.
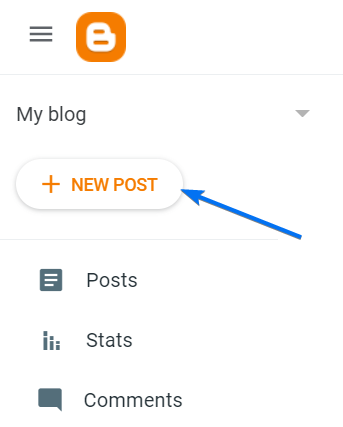
Then, log in to your Blogger account and click the New Post button.
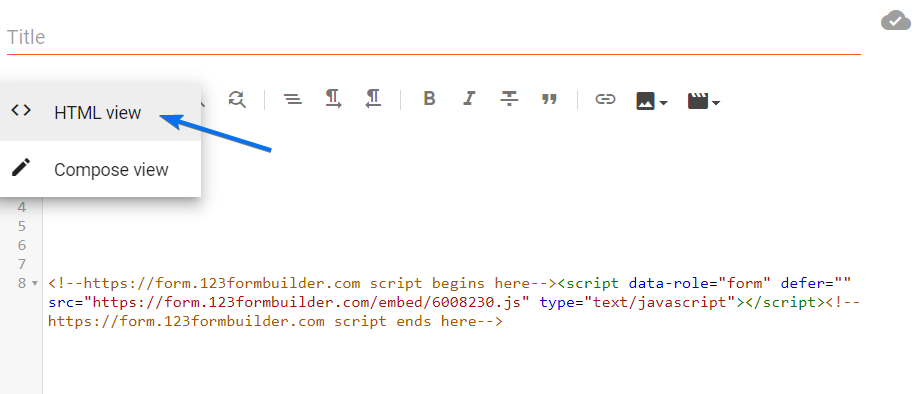
Afterward, select the pencil icon to switch to HTML view and paste the code that you’ve copied from your 123FormBuilder account.
Preview, Publish and you’re good to go.
Use a contact form for Blogger to expand your reach. Have your visitors contact you via a contact form or more.
If you want to use a lightbox form, you cannot see how it interacts on the page in preview mode. You’ll need to publish the page first.
Note:There’s a slight difference between Blogger and Blogspot. You use Blogger to create your blogs and blog posts, while Blogspot is the service that hosts them. Each blog is a subdomain on Blogspot (e.g. http://www.123blog.blogspot.com). So whether you refer to your blog as being from Blogger or Blogspot, use this publishing option to add your online forms.
Here is a list of the most frequently asked questions. For more FAQs, please browse through the
FAQs page.
Is this service free?
Yes, we offer a free form builder service. Just sign up to the Basic plan and you are all set. This plan is forever free, but you are limited with a few features only, such as 5 forms per account, 100 submissions per month and you have to keep the backlink to 123FormBuilder on your forms. Check out our features matrix for more information.
How many forms can I create?
It depends on the service plan you are on. Higher service plans enable more features, including more web forms for your account. If you need more forms, go to the My Account section of your account and click the upgrade button. To create an unlimited number of forms, either upgrade to the Platinum service plan or higher. Consult our features matrix for more information.
How can I publish my forms?
You can publish your forms in many ways, by using their direct URL or HTML link, embedding them with a JavaScript code, Inline HTML or iFrame, using the Facebook app or the WordPress plugin, using popups, the Blogger code snippet and many more. Once you have created and customized your form, go to the Publish section to complete your work. Read more in our documentation.
How do I change my form design?
You can change the design of your form for more information. in the Themes section, which is located in your form settings. We offer a set of more than 30 predefined form themes for your forms, but you can also create your own from scratch. You can customize the submit button, the logo and more. To apply your own stylesheets, all forms come with a custom CSS editor.