123FormBuilder Knowledge Base
Search our documentation platform for answers, service specifications and 3rd-party integrations.
Knowledge Base
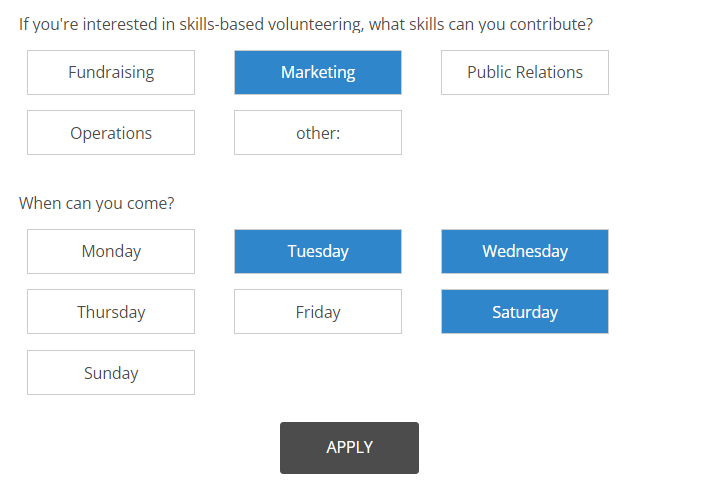
In this article, you will learn how to make choices as clickable buttons using our CSS form generator. We developed a CSS code that will change the design of your Single and Multiple choice fields.
Use the below CSS code to give your form a modern layout. Copy-paste the code in Design → Add custom CSS.

If you want to change the choice alignment (horizontal or vertical), make sure to go to each field in the Layout section. Here you can choose to display your choices in multiple columns (from 1 to 4).

body #form div[data-role="choice"] > label > input[type="radio"], body #form div[data-role="choice"]
{
   padding: 0.5em;
   margin: 0;
}

body #form div[data-role="choice"]  > label > input[type="radio"]{
   position: absolute !important;
   opacity: 0 !important;
   left: -100% !important;
}
body #form div[data-role="choice"]:first-child {

}
body #form div[data-role="choice"],body #form div[data-role=control]:not([data-force-mobile-rendering]) [data-role=input-row] {
    overflow: unset !important;
}
body #form div[data-role="choice"]  > label > label {
   display: none !important;
}
body #form div[data-role="choice"]  > label  {
   overflow: unset !important;
   padding: 0 !important;
}
body #form div[data-role="choice"]  > label  > span {
   width: 150px;
   height: 40px;
display: flex !important;
   justify-content: center;
   align-items: center;
   border: 1px solid #cccccc;
}
body #form div[data-role="choice"]  > label > input:checked + label +  span  {
   background-color: #2F86CA;
color:#ffffff;

}
body #form div[data-role="choice"] > label > input:checked + label + span:after {
   display: block;
   width: calc(100% + 4px);
   height: calc(100% + 4px);
   left: -7px;
   top: -7px;
   background-color: transparent;
   position: absolute;
}
We made bold the parts where you can add your own preferences.
- width: 150px – increase the number of pixels to make the buttons wider.
- height: 40px – change the row height to any size.
- background-color: #2F86CA – add the hex code of your desired color (currently it is a shade of blue when someone clicks on a choice).
- color: #ffffff – this will change the font’s color when the choice is selected (currently white).
When modifying the code make sure not to delete any semicolons or curly brackets. If something is not working properly you can always copy the code again.
This is a general code that works for all forms and applies to all choice fields. We created this code to showcase our platform’s flexibility.
Important Note
Keep in mind that it is not our responsibility to fix the code once you have changed it.We do not recommend using the custom CSS code with choices that have uploaded images or a button-like layout as the design of the form will be off.
That being said, here is how the CSS will change the design of your form:

When the selector is removed, the choices will inherit the properties from the Design → Fields → Field hover & Field focus sections.

Related articles
With 123FormBuilder, you can create coupon codes and assign them to your order forms. Whether you’re planning a seasonal sale or simply want to thank your loyal customers with a special discount, you can certainly achieve this with our web form builder.
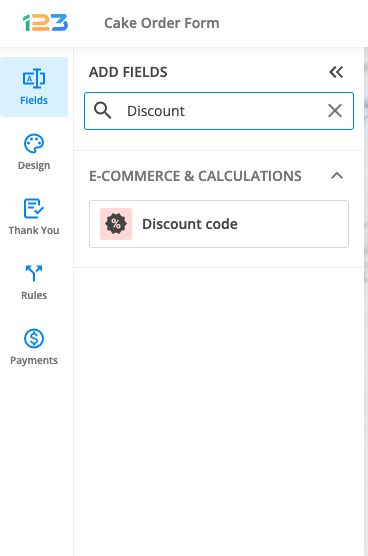
To add discounts, you’ll need the Discount code field. Go to the Form Editor and scroll down to the Calculations section to add the field to your form or simply search by Discount.
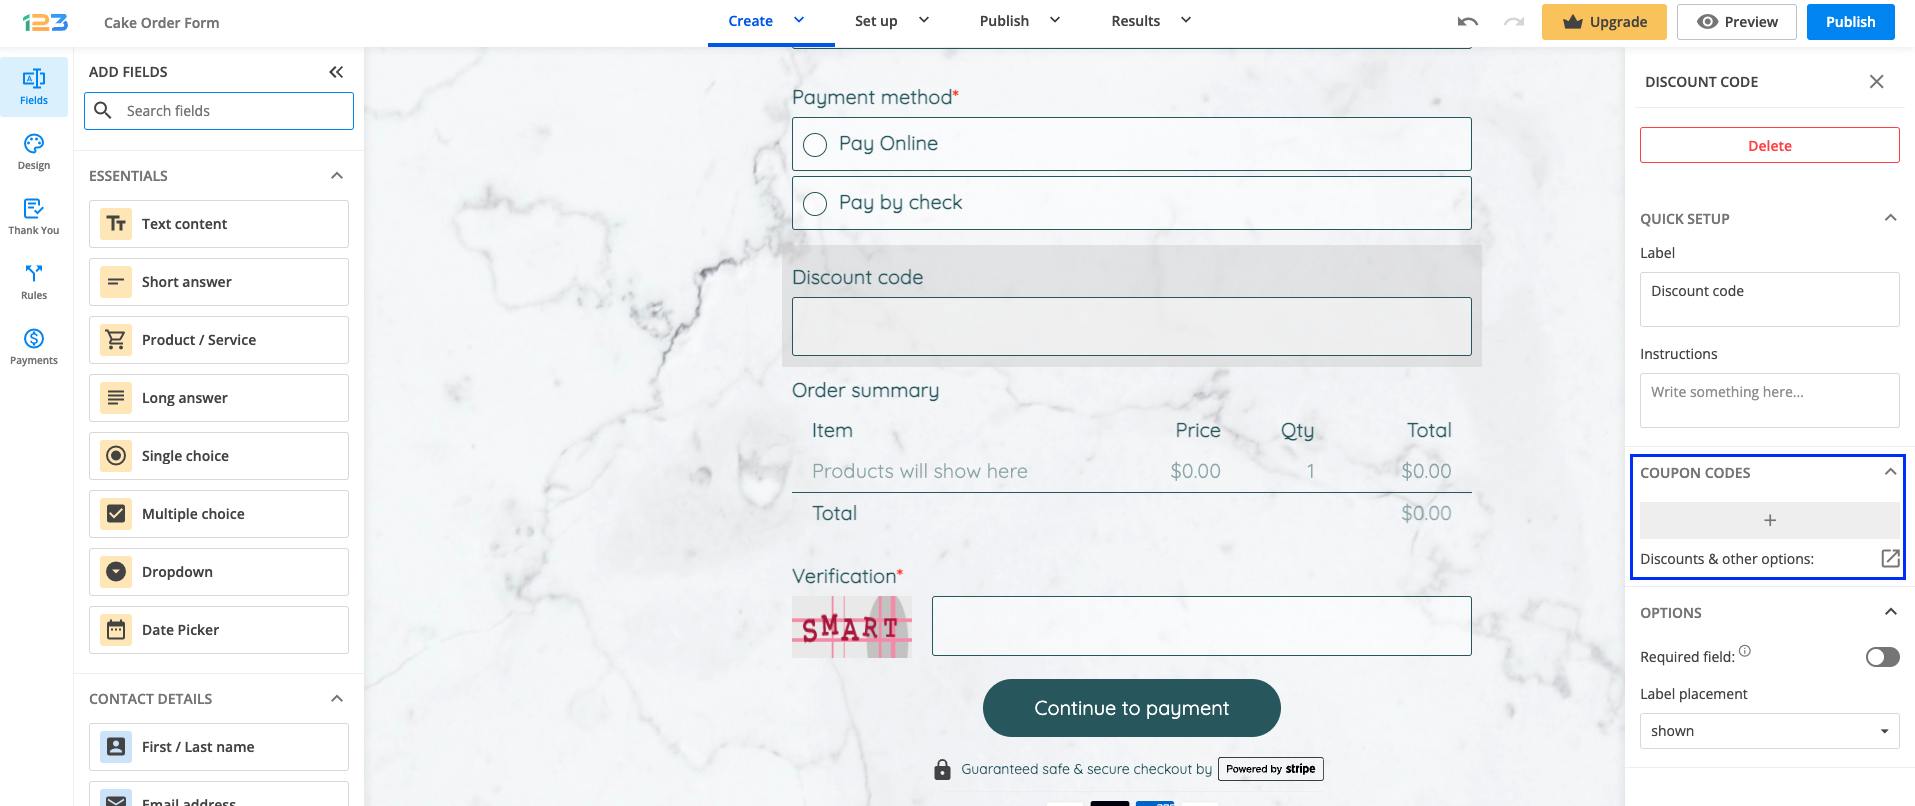
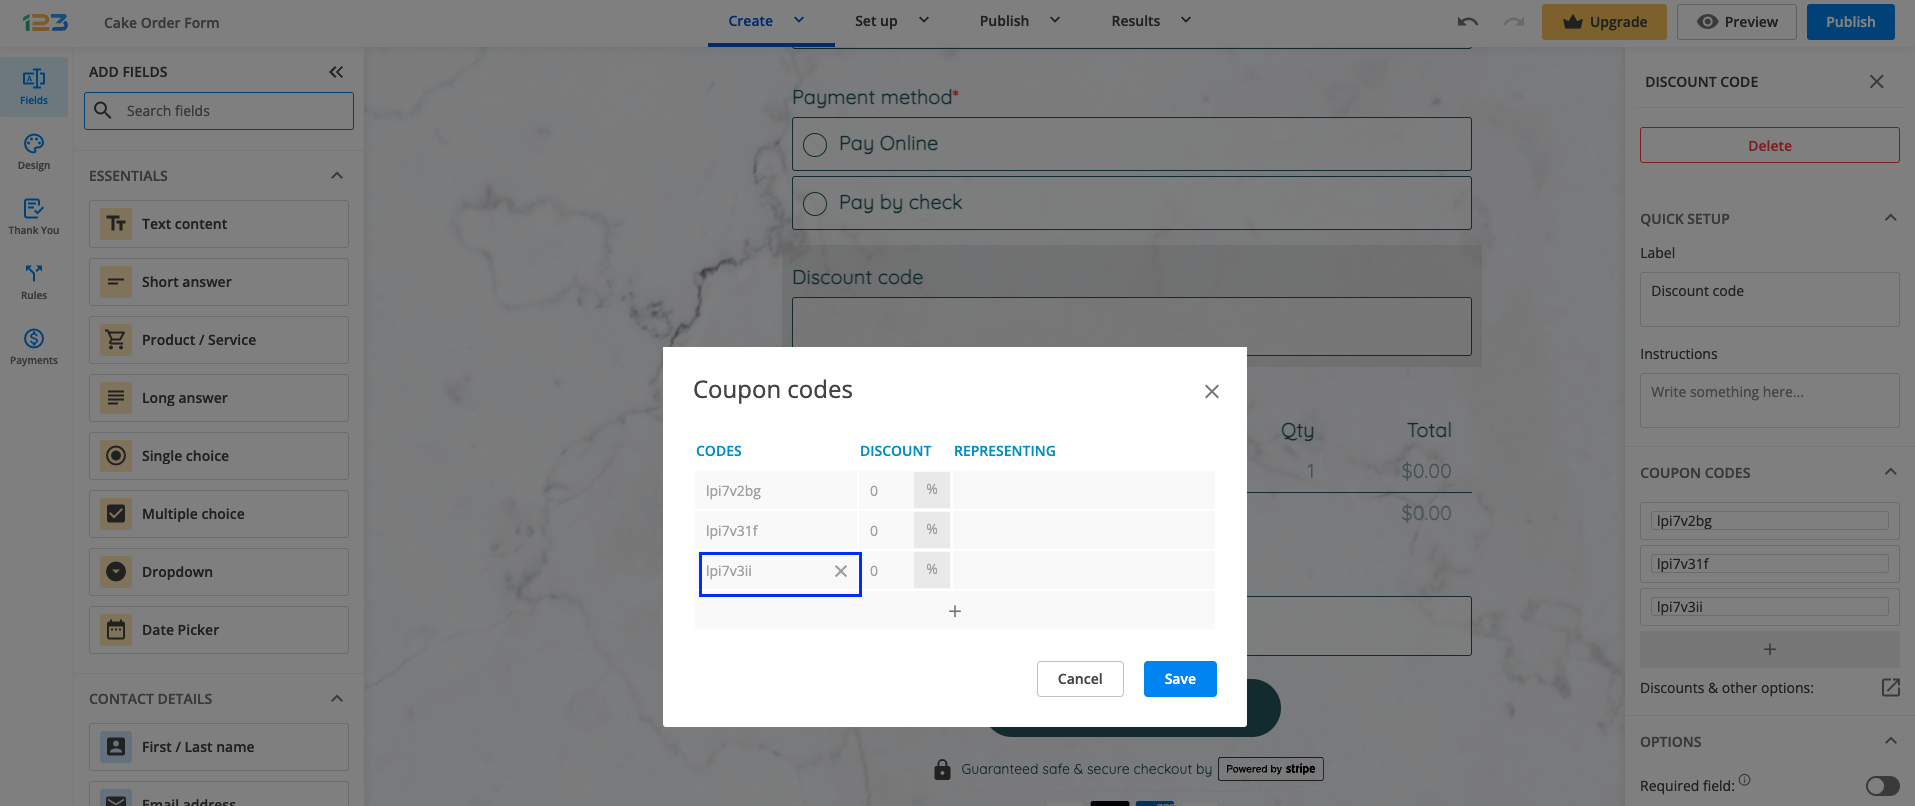
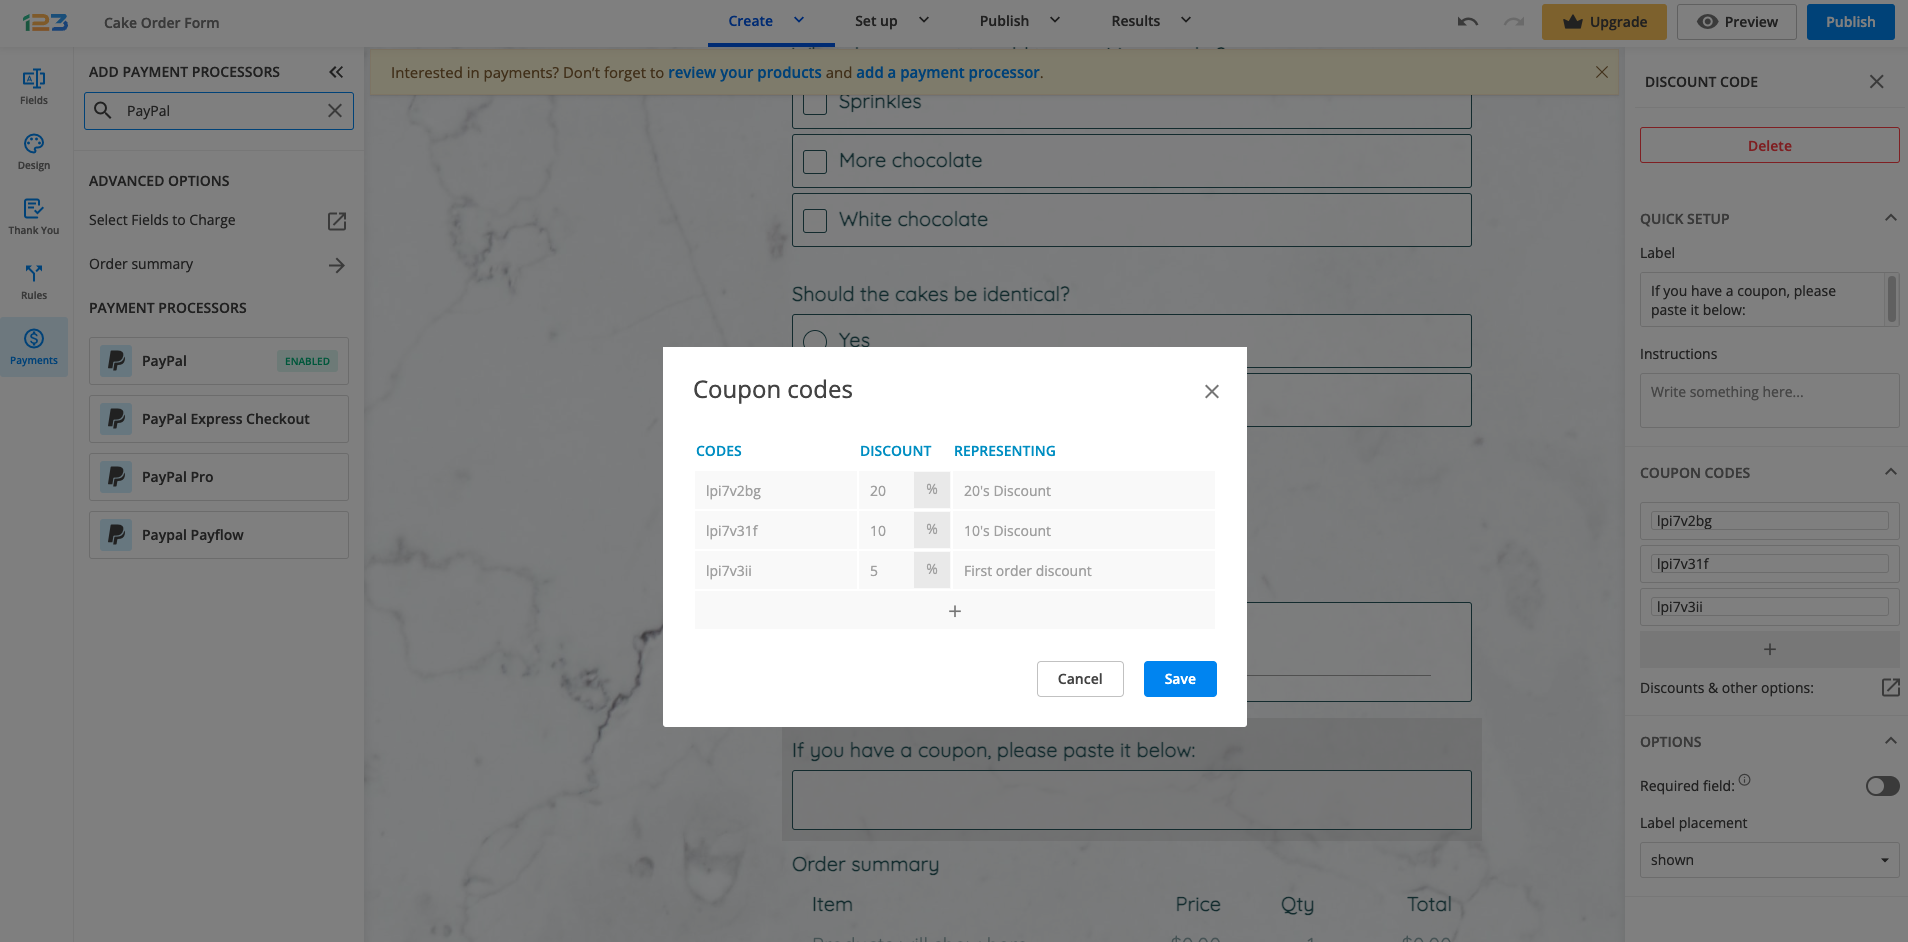
Under the Coupon codes section, click on Discounts & other options to create a new discount code.
You can create as many coupons as you want and you can use multiple codes for the same discount. Let’s see how to do this.
Click the plus sign to add a new coupon. Afterward, type in the code that you’ll share with buyers, specify the discount associated with it and mention what this discount represents.
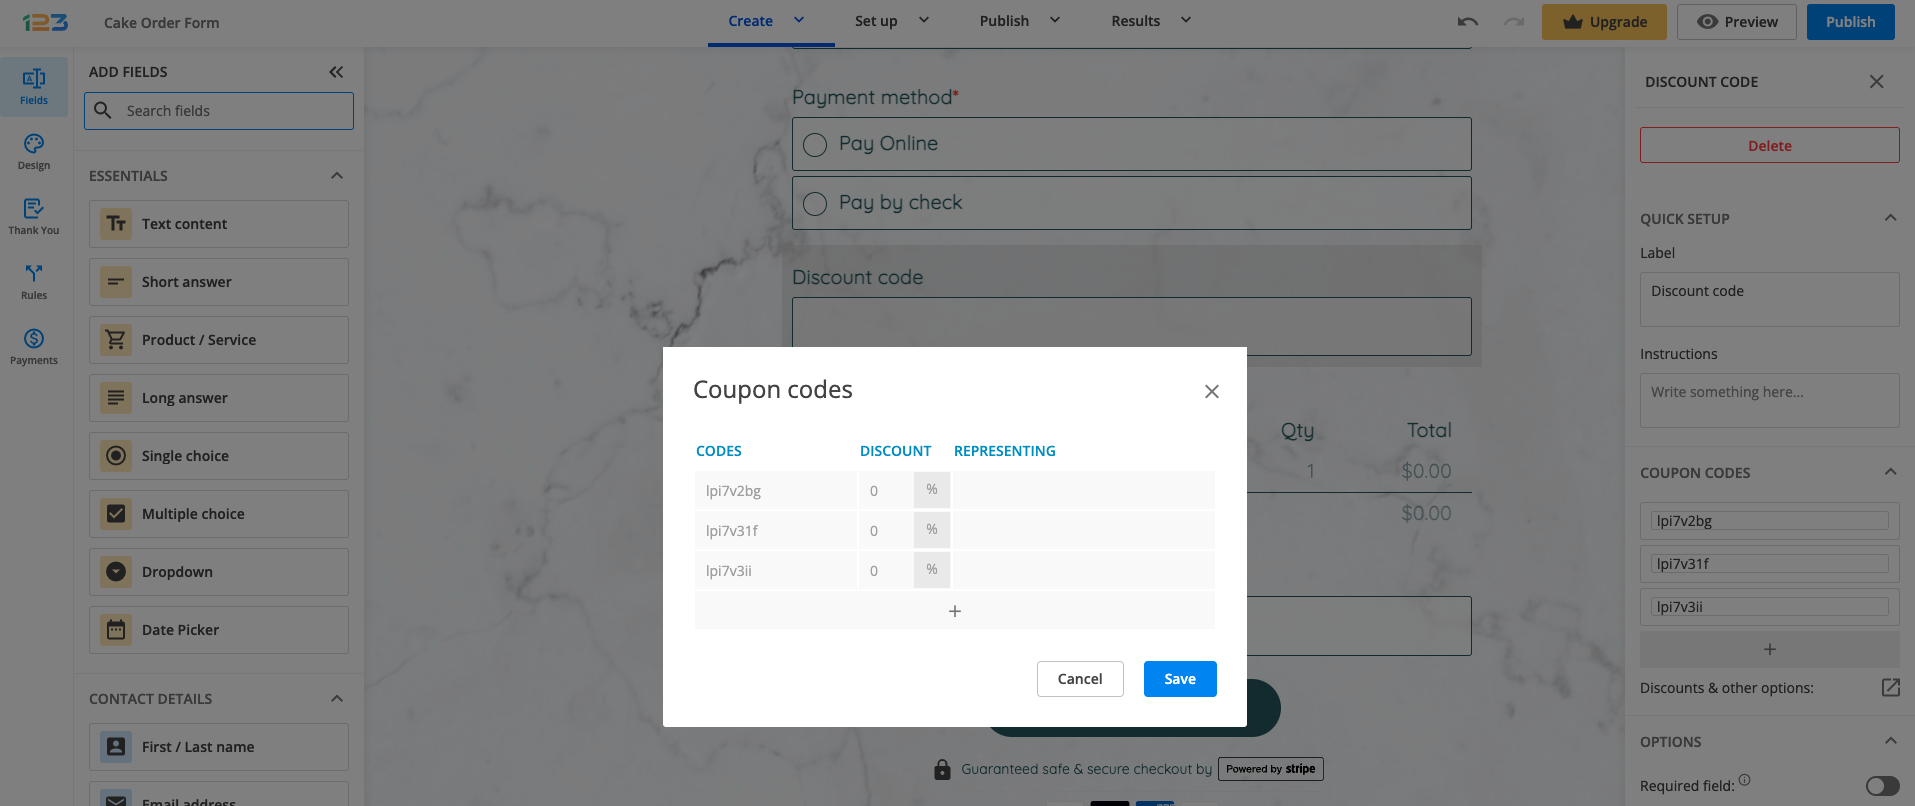
The discount can be percentual or can consist of a fixed amount. In the latter case, the currency will be the one set in the Products section.
You can remove discounts from the Coupon codes list when you don’t need them on your form anymore.
Related articles
Once you connect a payment processor and assign your prices, you can specify how should the total price be calculated by setting up the Products section.
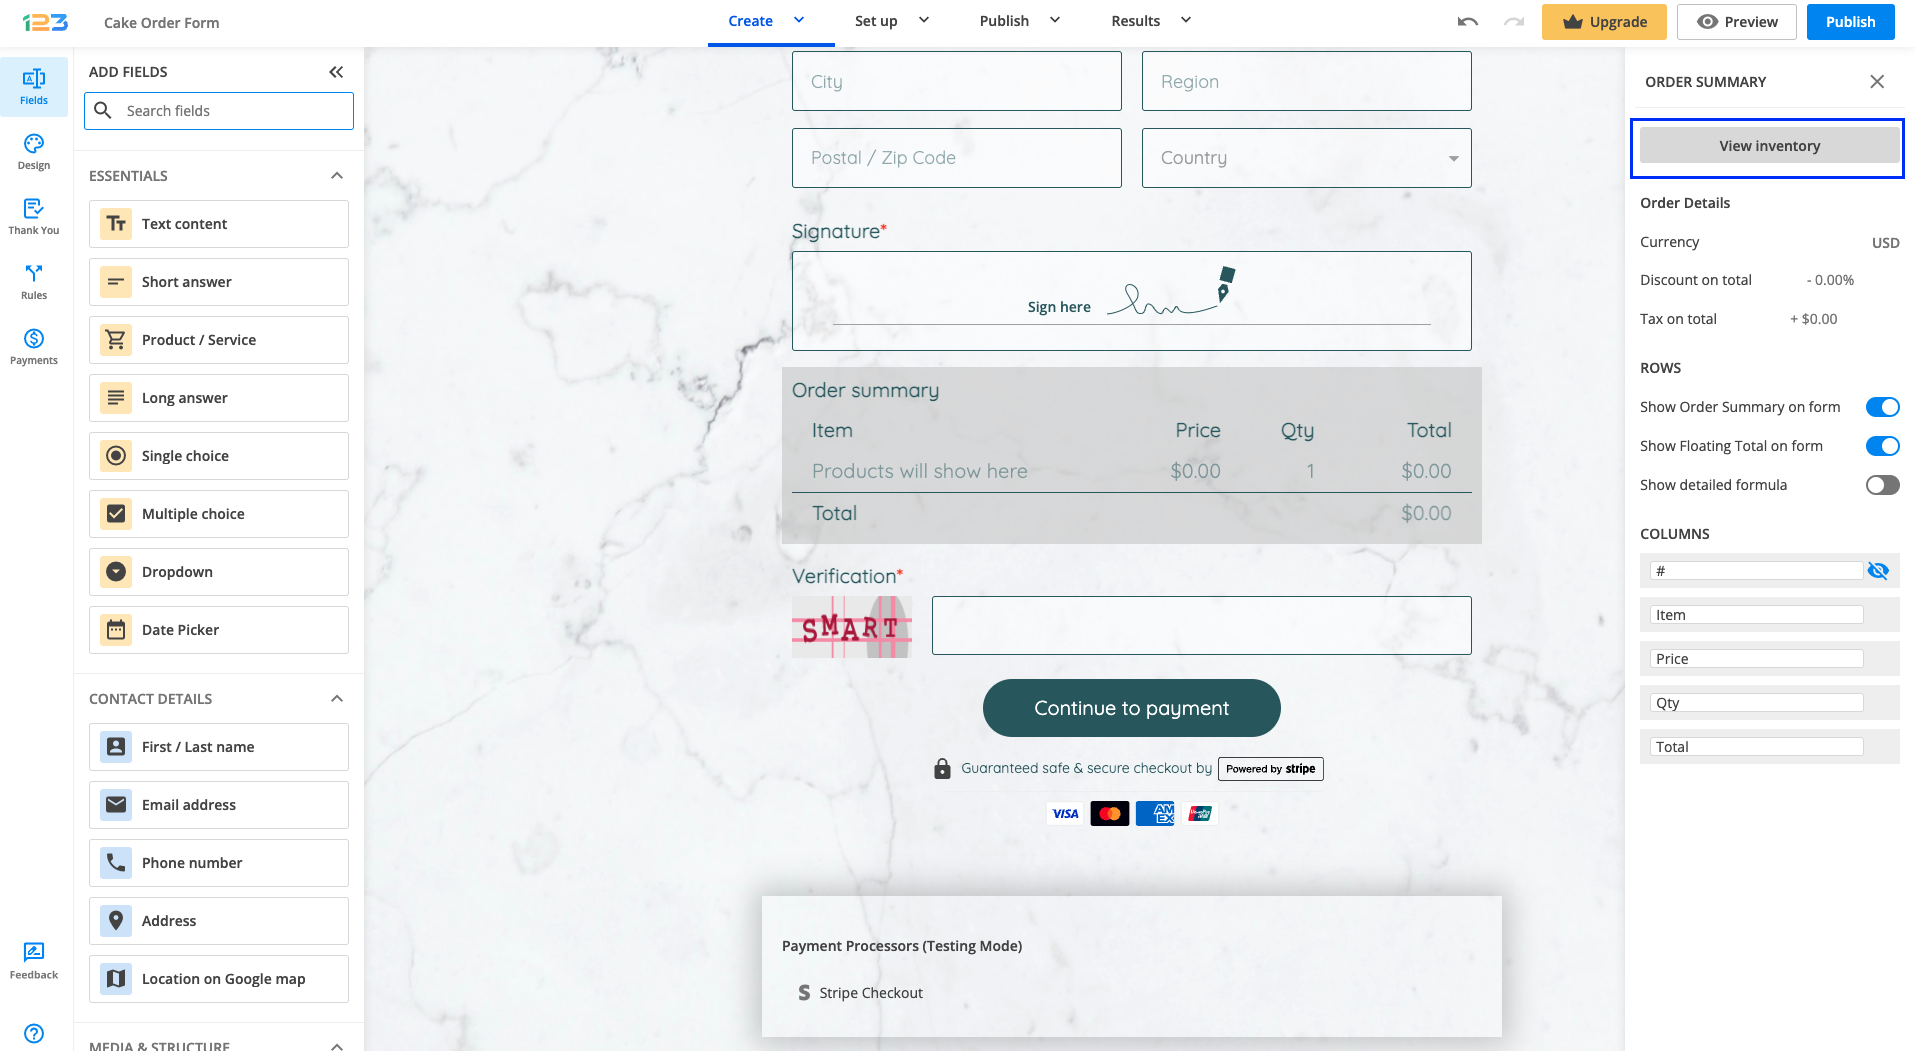
To do so, in your Form Editor, scroll to the bottom of the form and click on the Order Summary.
Afterward, click on the View Inventory button.
The pop-up window has 5 columns: Product, Price, Multiply with, Discount, and Tax.
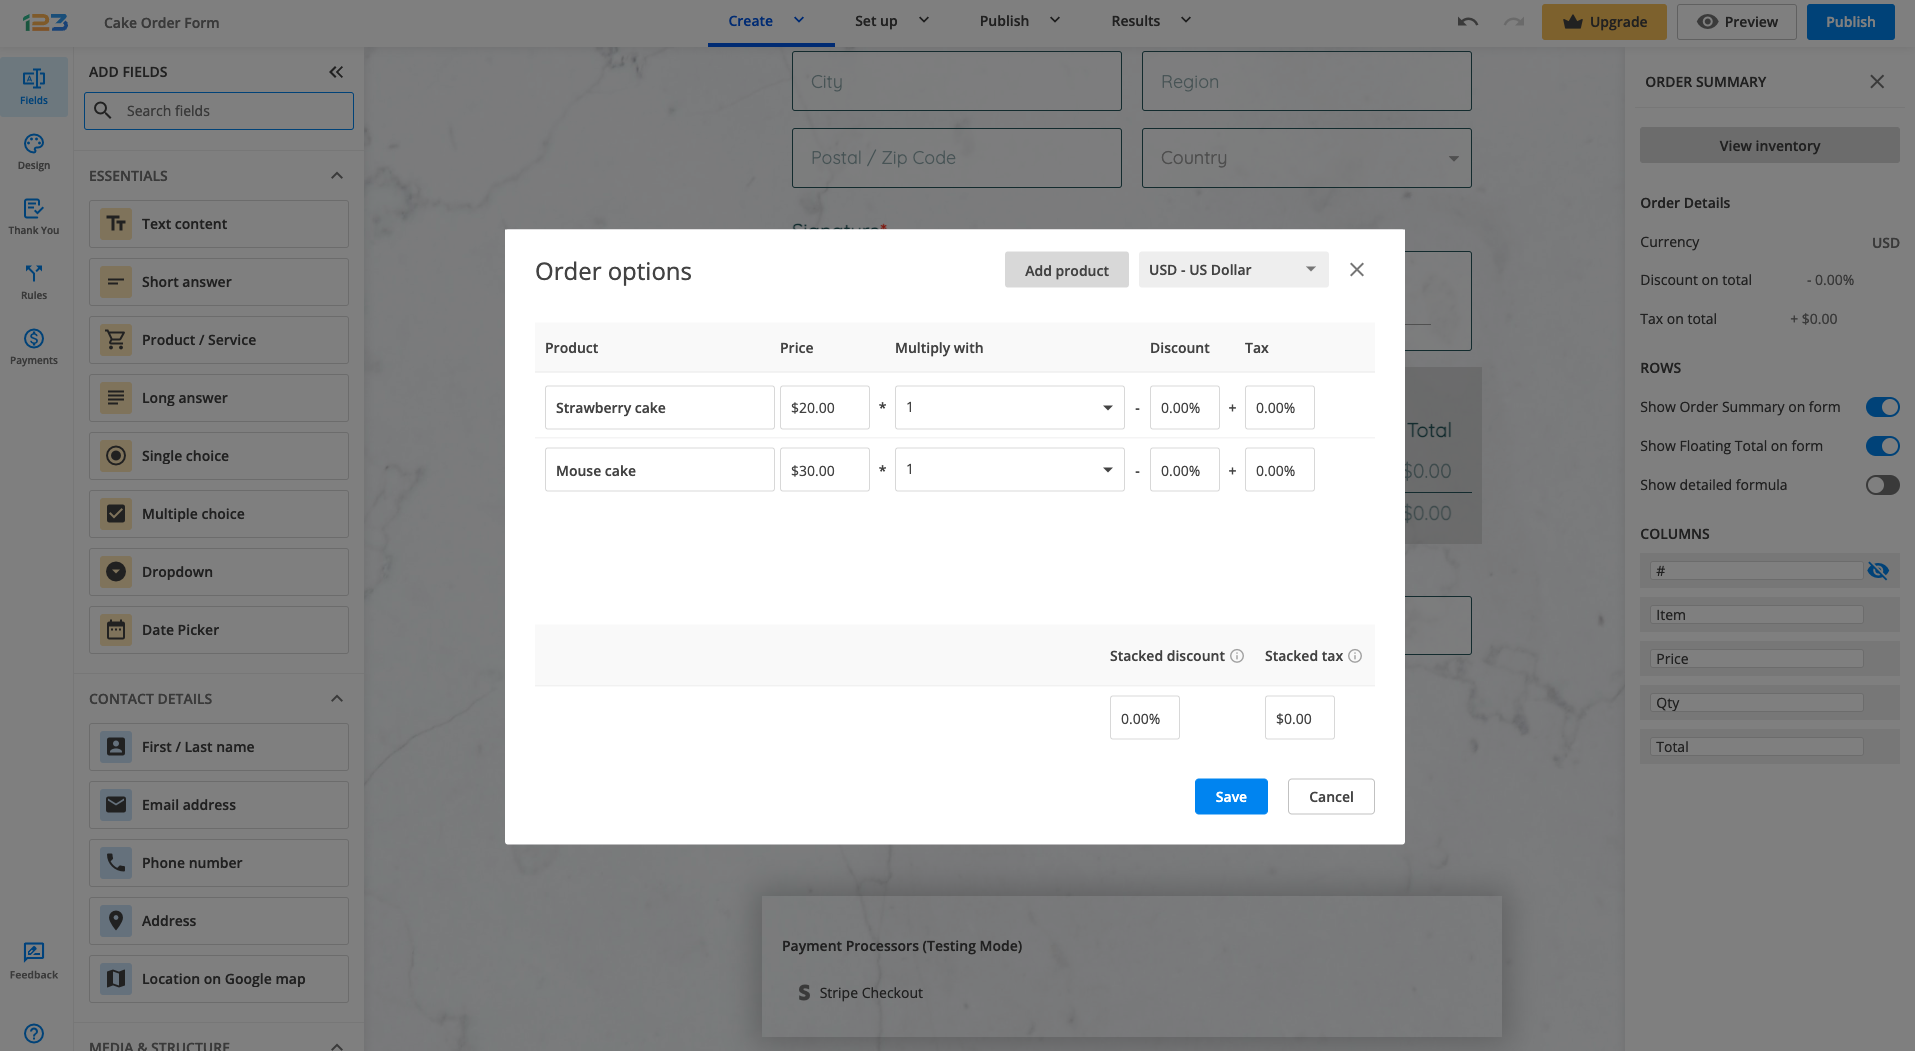
Product
Under this column, you will find the labels of all the fields that you have values assigned.
You can also rename your fields if you want to present your products in the Order Summary differently than in the form itself. Just click on your item and start typing the new description.
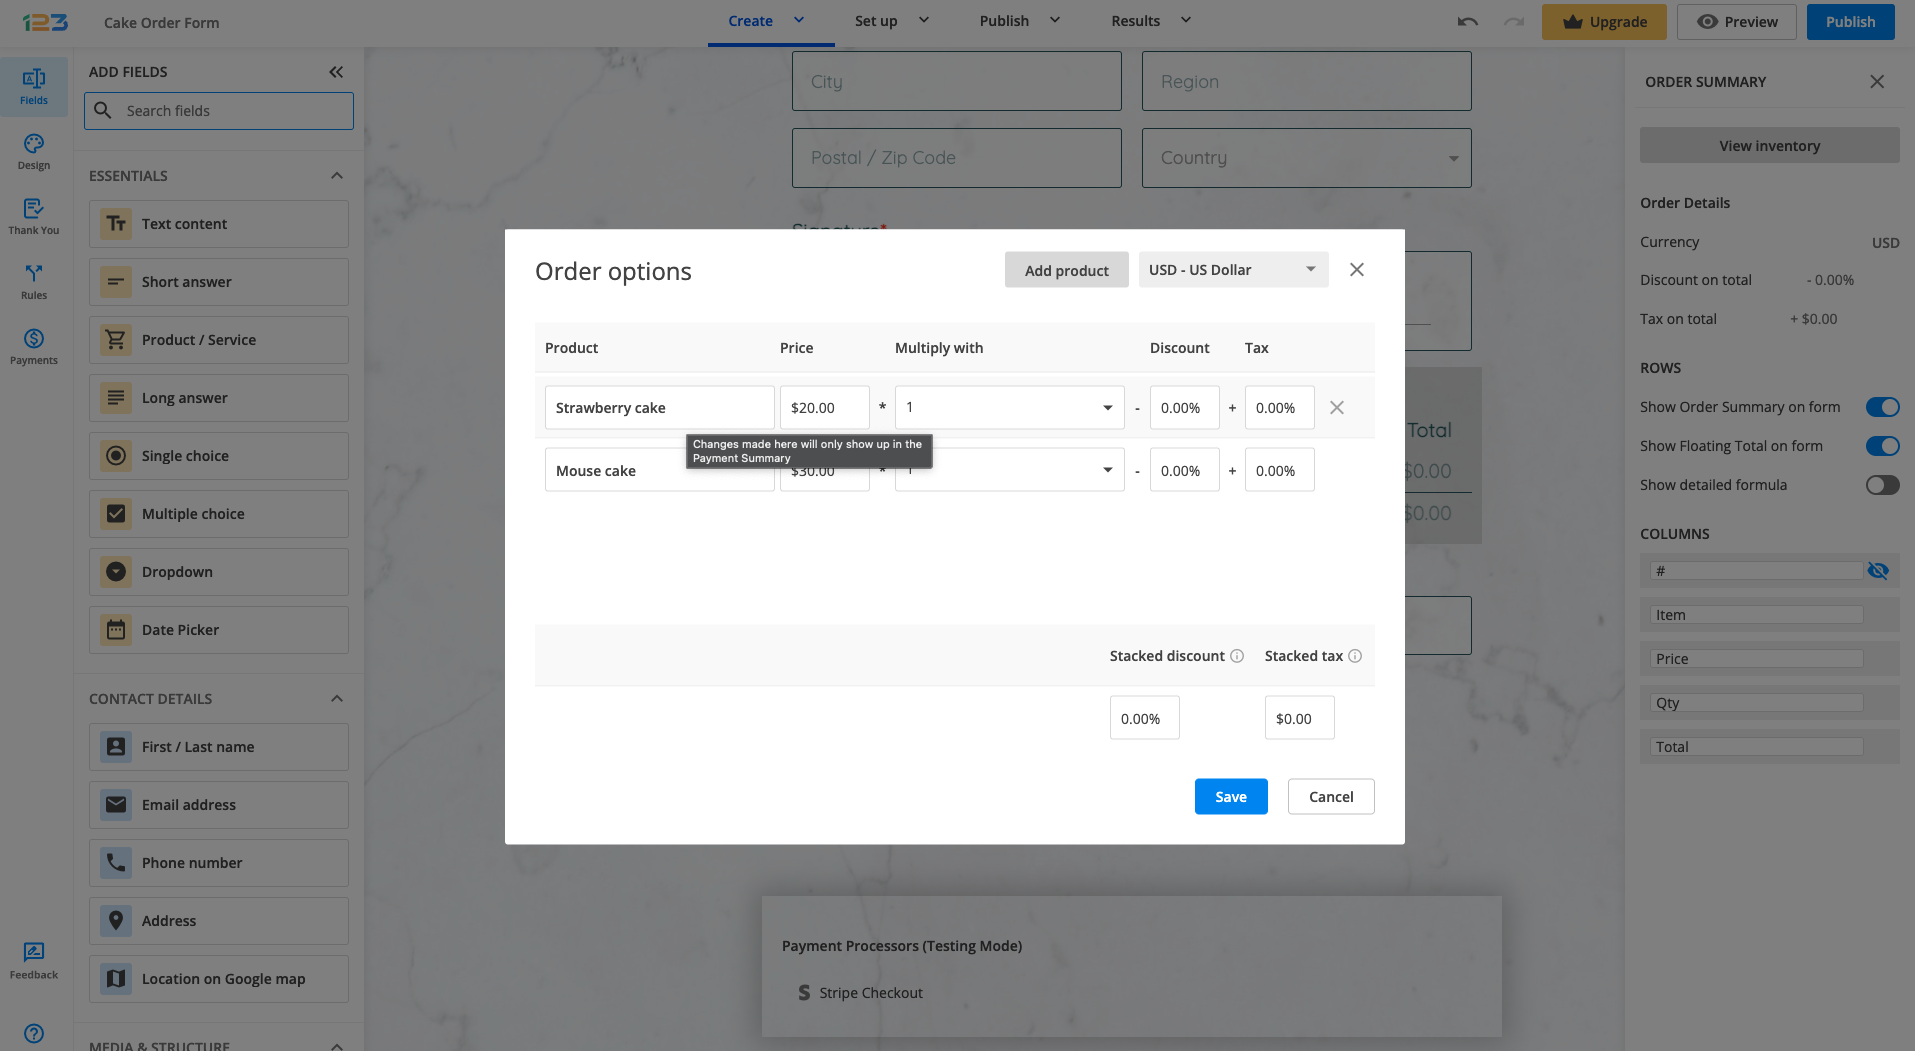
Price
The Price column will auto-detect its type based on the field’s functionality. There are three types of values:
- Multiple is for choice fields (Single/Multiple choice and Dropdowns) because there is more than one option to choose from, and each choice can have a different price.
- Variable is for Formula fields. The final value depends on the user’s choices.
- The fixed price is displayed for input fields.
Click the price type. This will allow you to change the prices or assign values to your choices.
Note that formulas can not be modified from here. You will need to return to your formula field to bring changes.
Multiply with
By default, each product is multiplied by 1. However, you can choose to multiply your product with any number.
Discount and Tax
In each field, you can apply a discount and a tax. You can choose a percentage or a fixed value. If you want to apply a discount or a tax on the total value, add it to the bottom of the Products page in the On Total section.

Add items to the total price of your order form, multiple your items with quantity, add discounts, and also markups. The total that will be displayed in the Order Summary table represents the amount that your users will have to pay after submission.
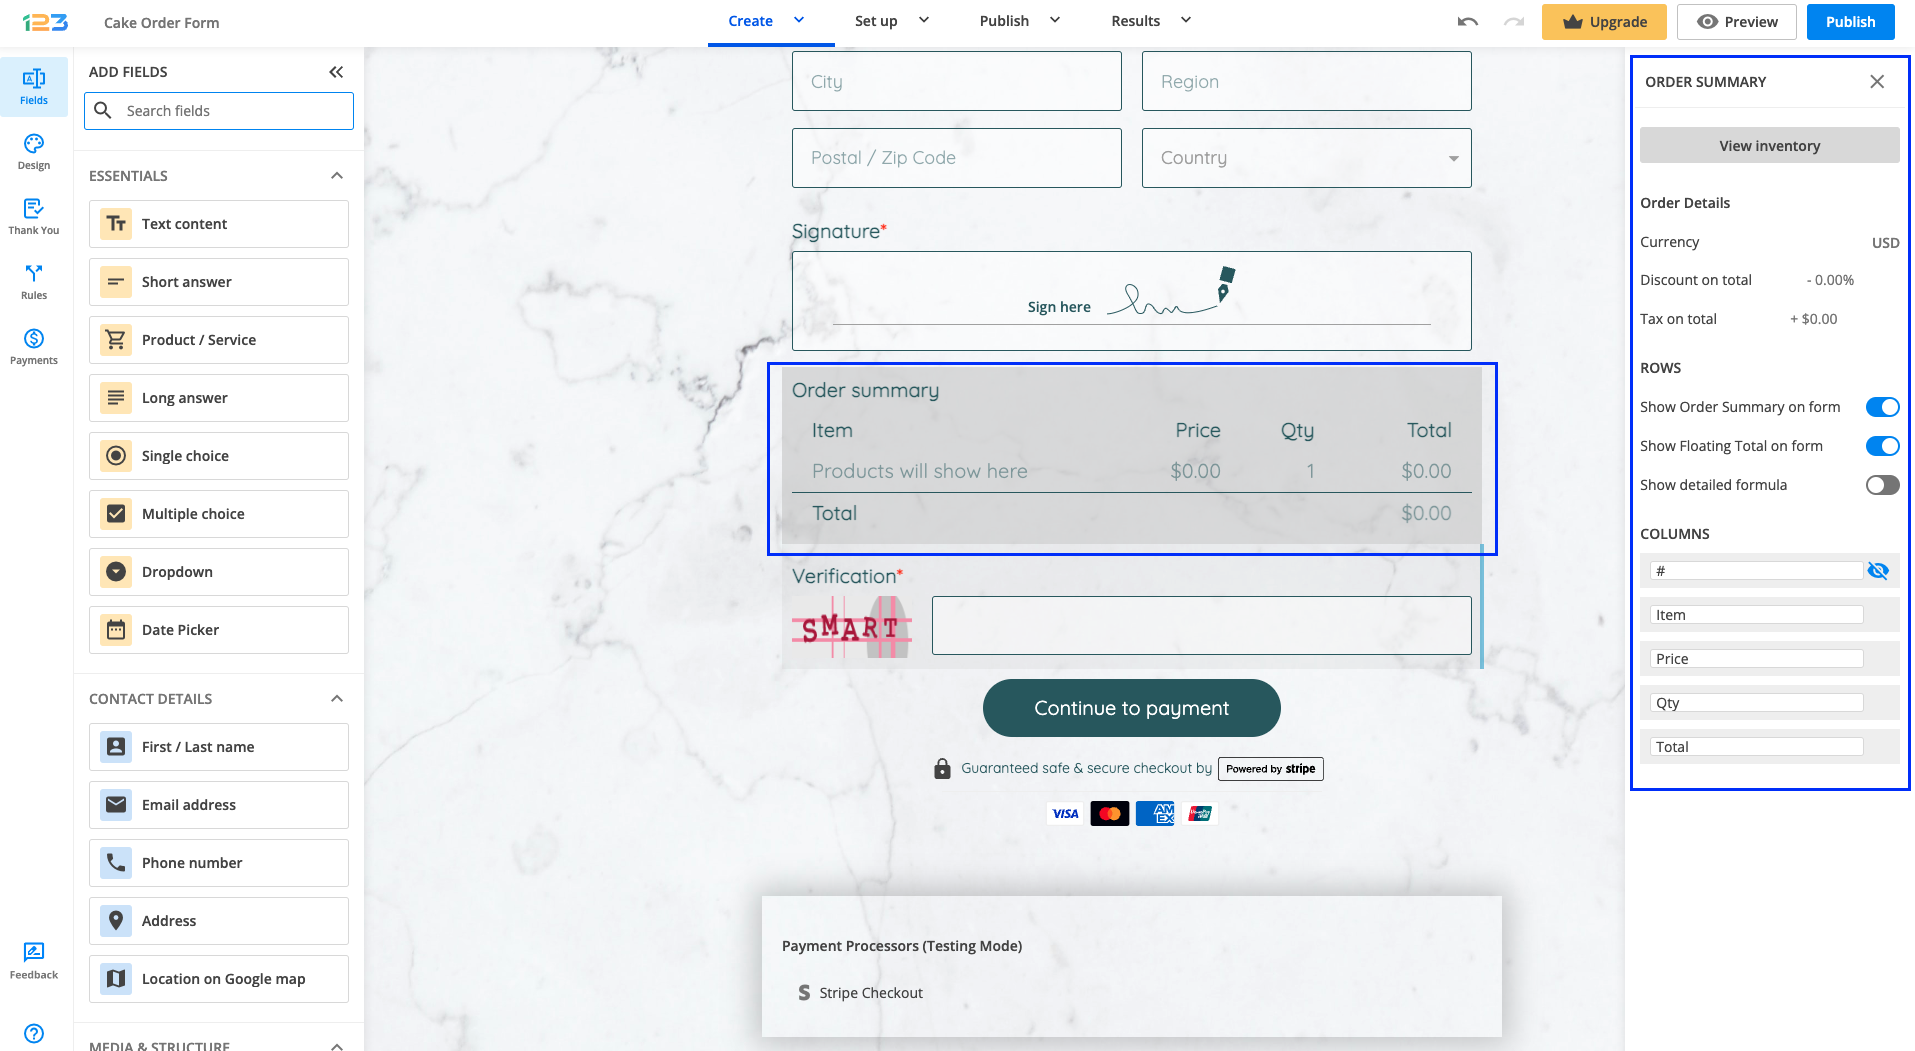
To open the Order Summary, enable at least one payment processor in your form builder account and the Order Summary preview will appear on the form. Click on the Order Summary and its options will open in the righ-side panel.
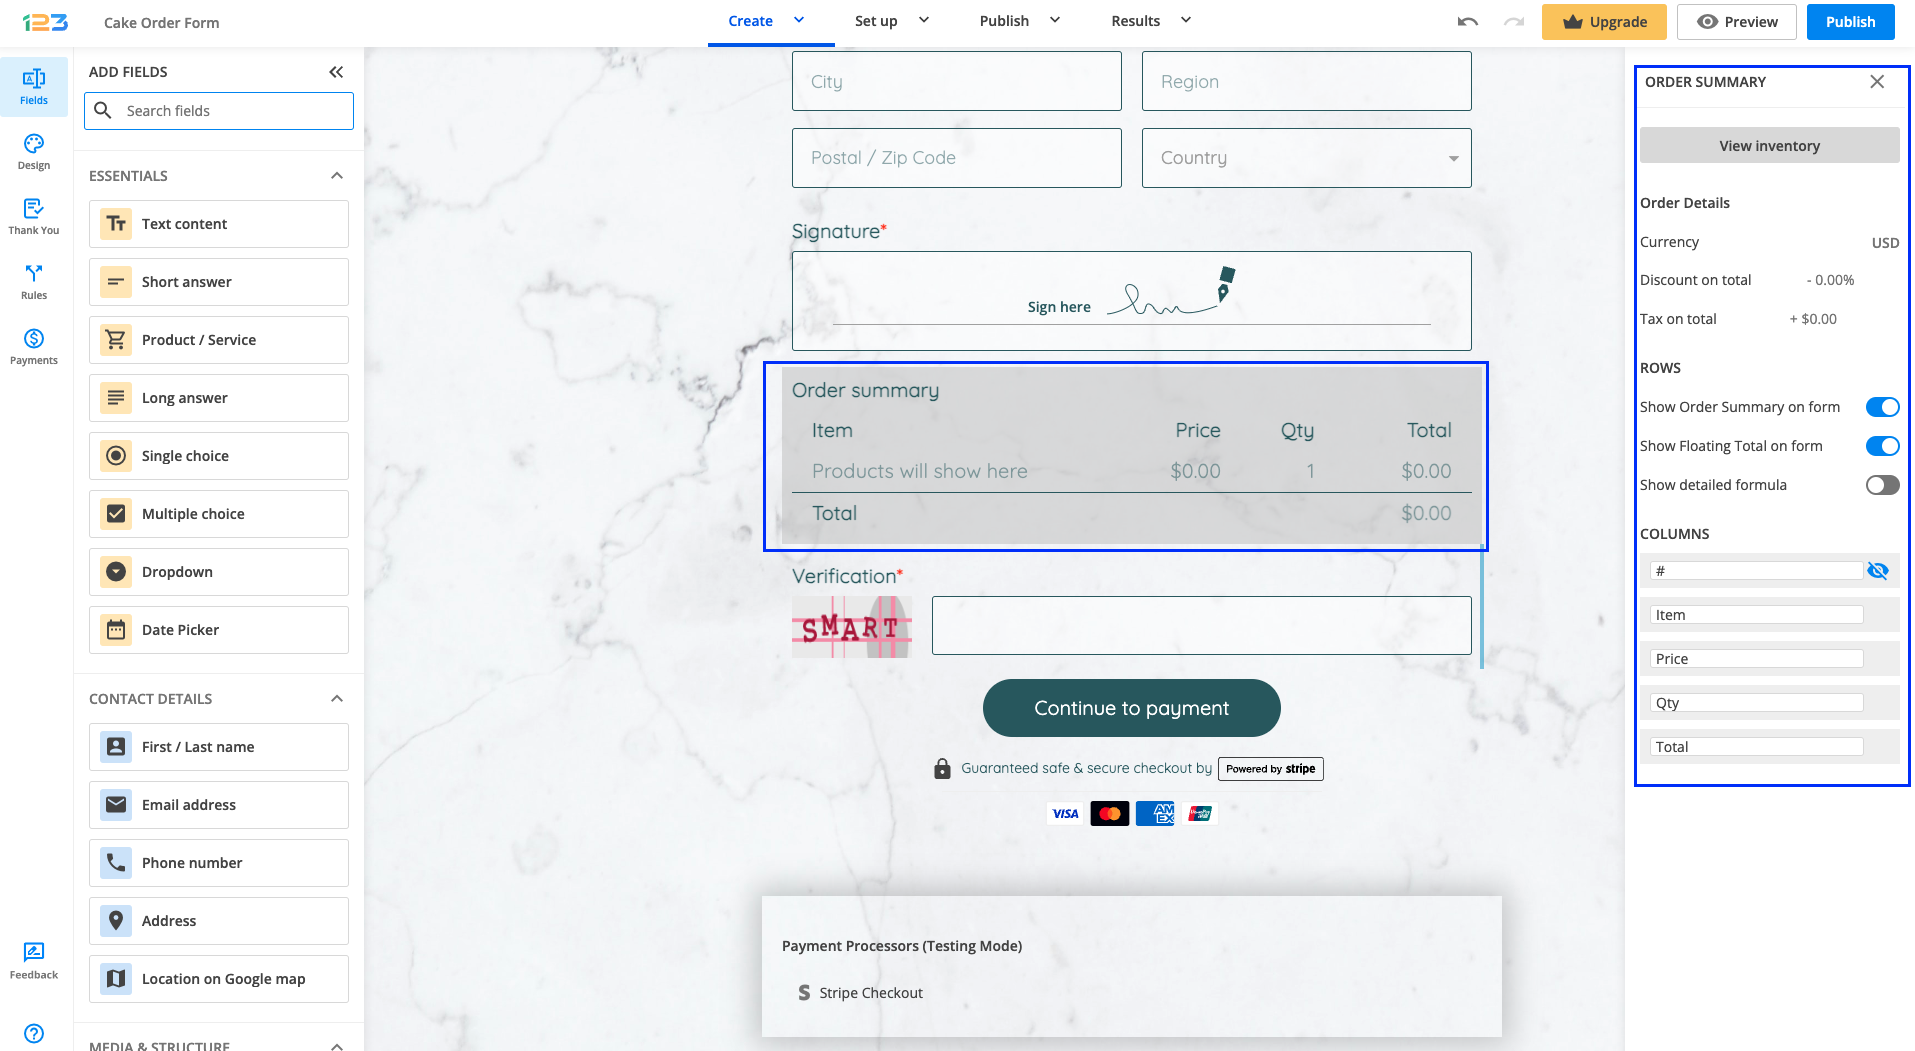
Click on View inventory to see all the fields. Here you can specify how to calculate the total price and assign the values.
In the pop-up window, there are 5 columns: Name, Price, Quantity, Discount, Tax. Check out our Products article for more details.
Finally, under Summary we have two options:
- Show summary
- on form. Form users will see the summary above the submit button.
- after submit. Form users will be redirected to a separate page where the payment summary is displayed with the available payment options.
- Show live order summary. Form users can view the amount they have to pay while completing the form.
For more details you can check out our short step-by-step tutorial on how to add payments to your forms:
Creating a complex order form with payment integration using our order form generator may initially seem a bit tricky. This article will guide you through every step, from adding the first field to having happy customers and money in your account.
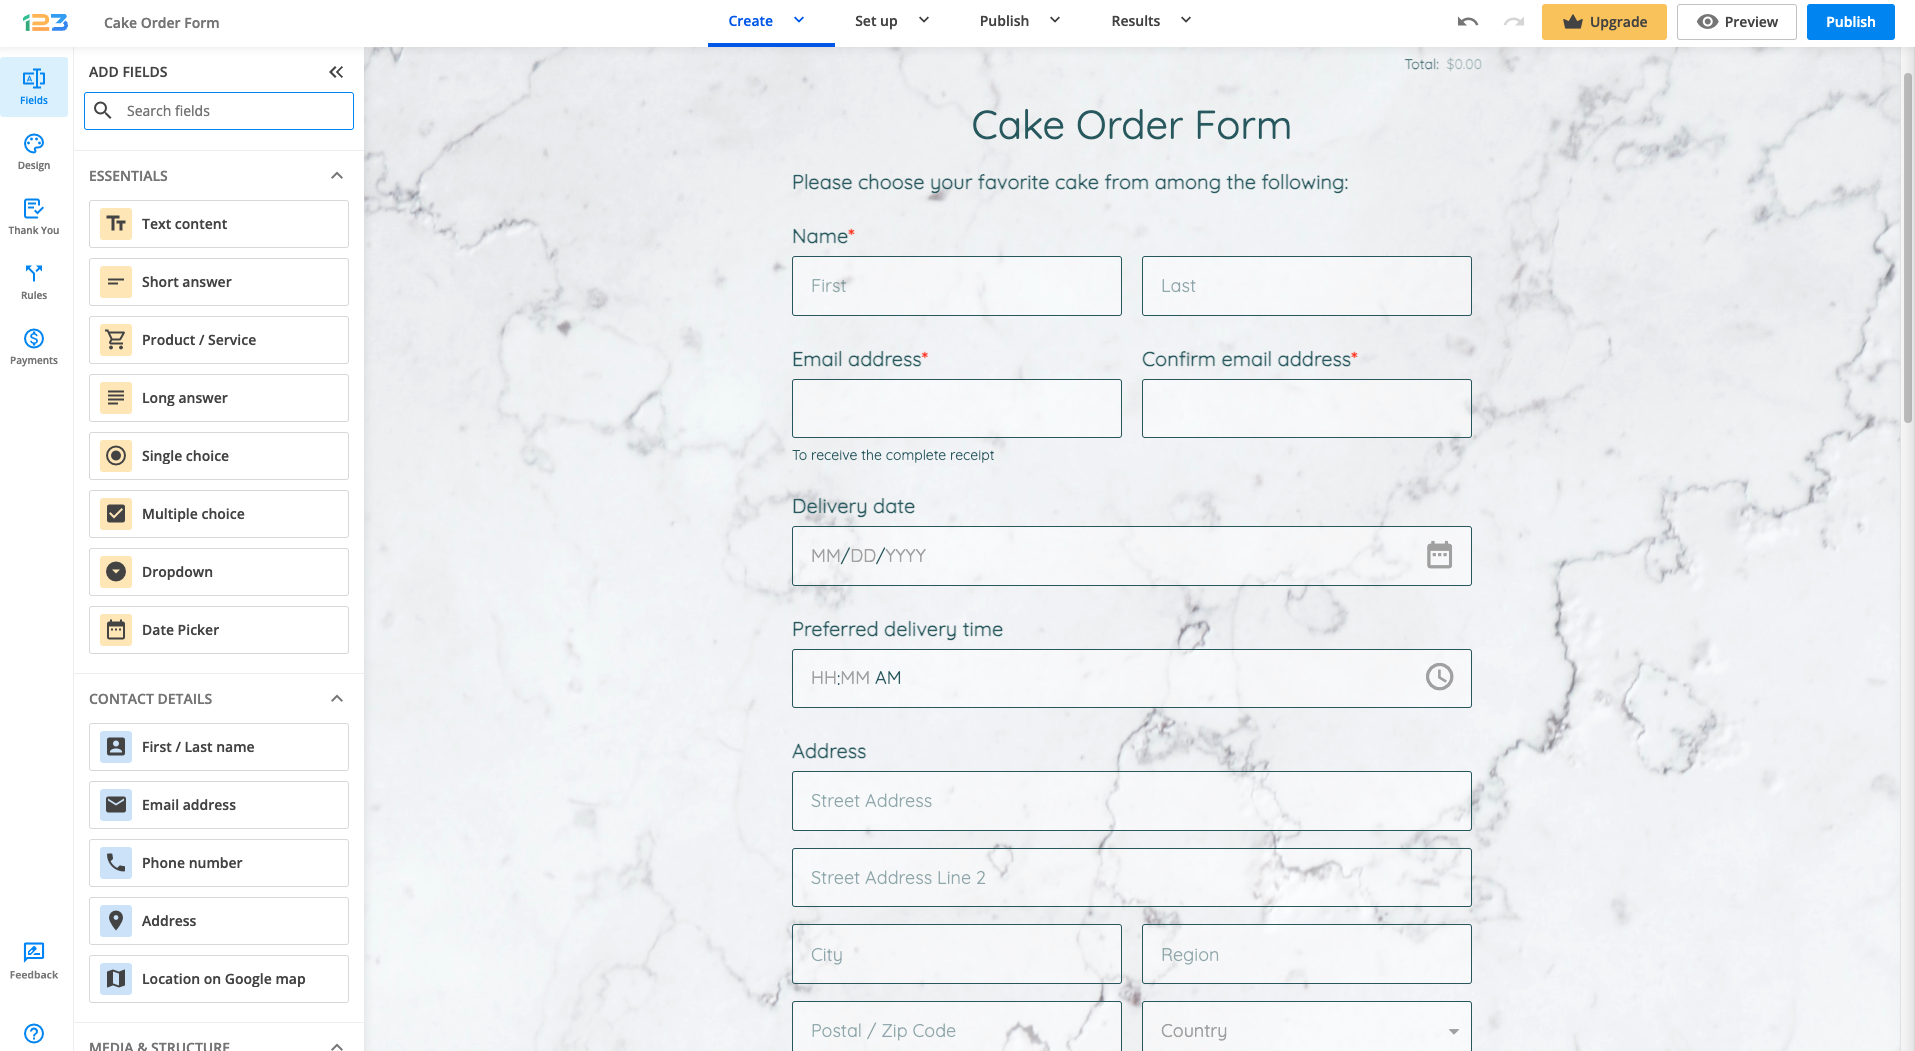
Here is a complex order form that we’ve created for demonstration purposes. Even though it looks complex, it’s not that hard to build.
We will divide this tutorial into three parts: Form Editor, Field Rules, and Payments.
Form Editor
1. In the Form Editor of the form builder we will divide the form into three parts: contact and delivery details, menu and order confirmation, and terms of agreement. You can use divider fields in order to separate the section within your form.
2. The contact and delivery details section will contain fields with no special functions, whatsoever.
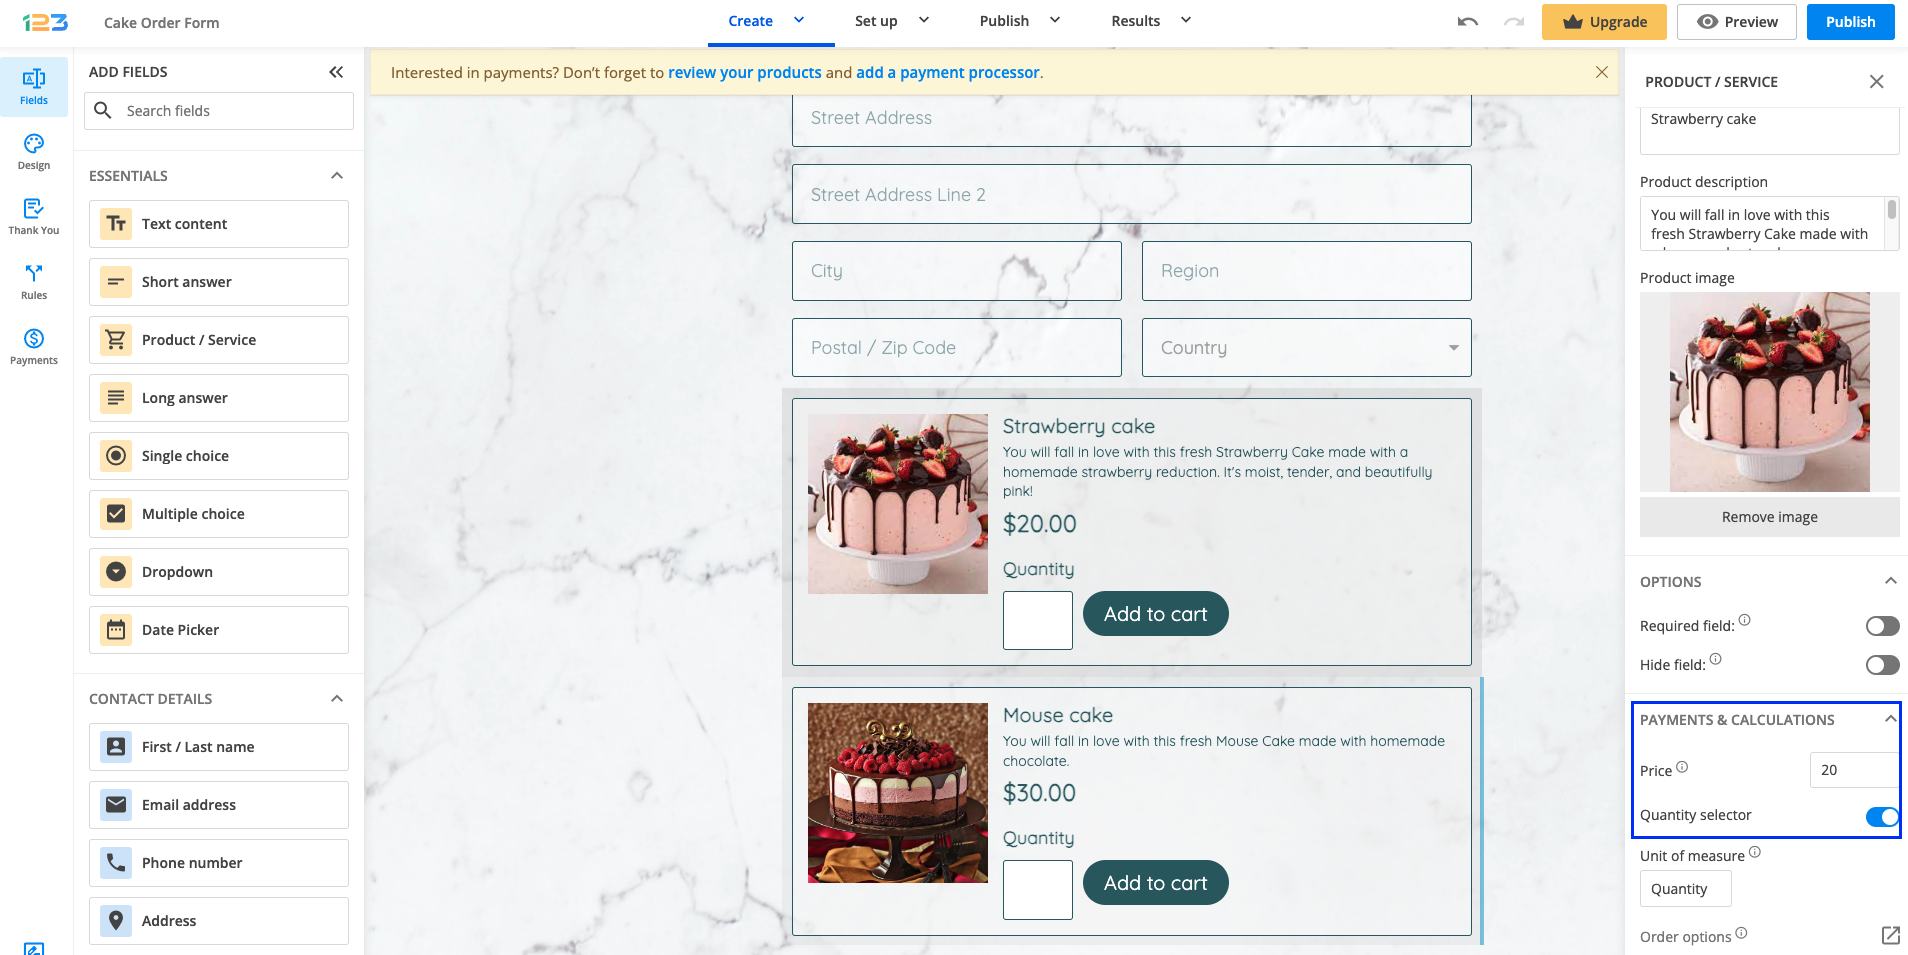
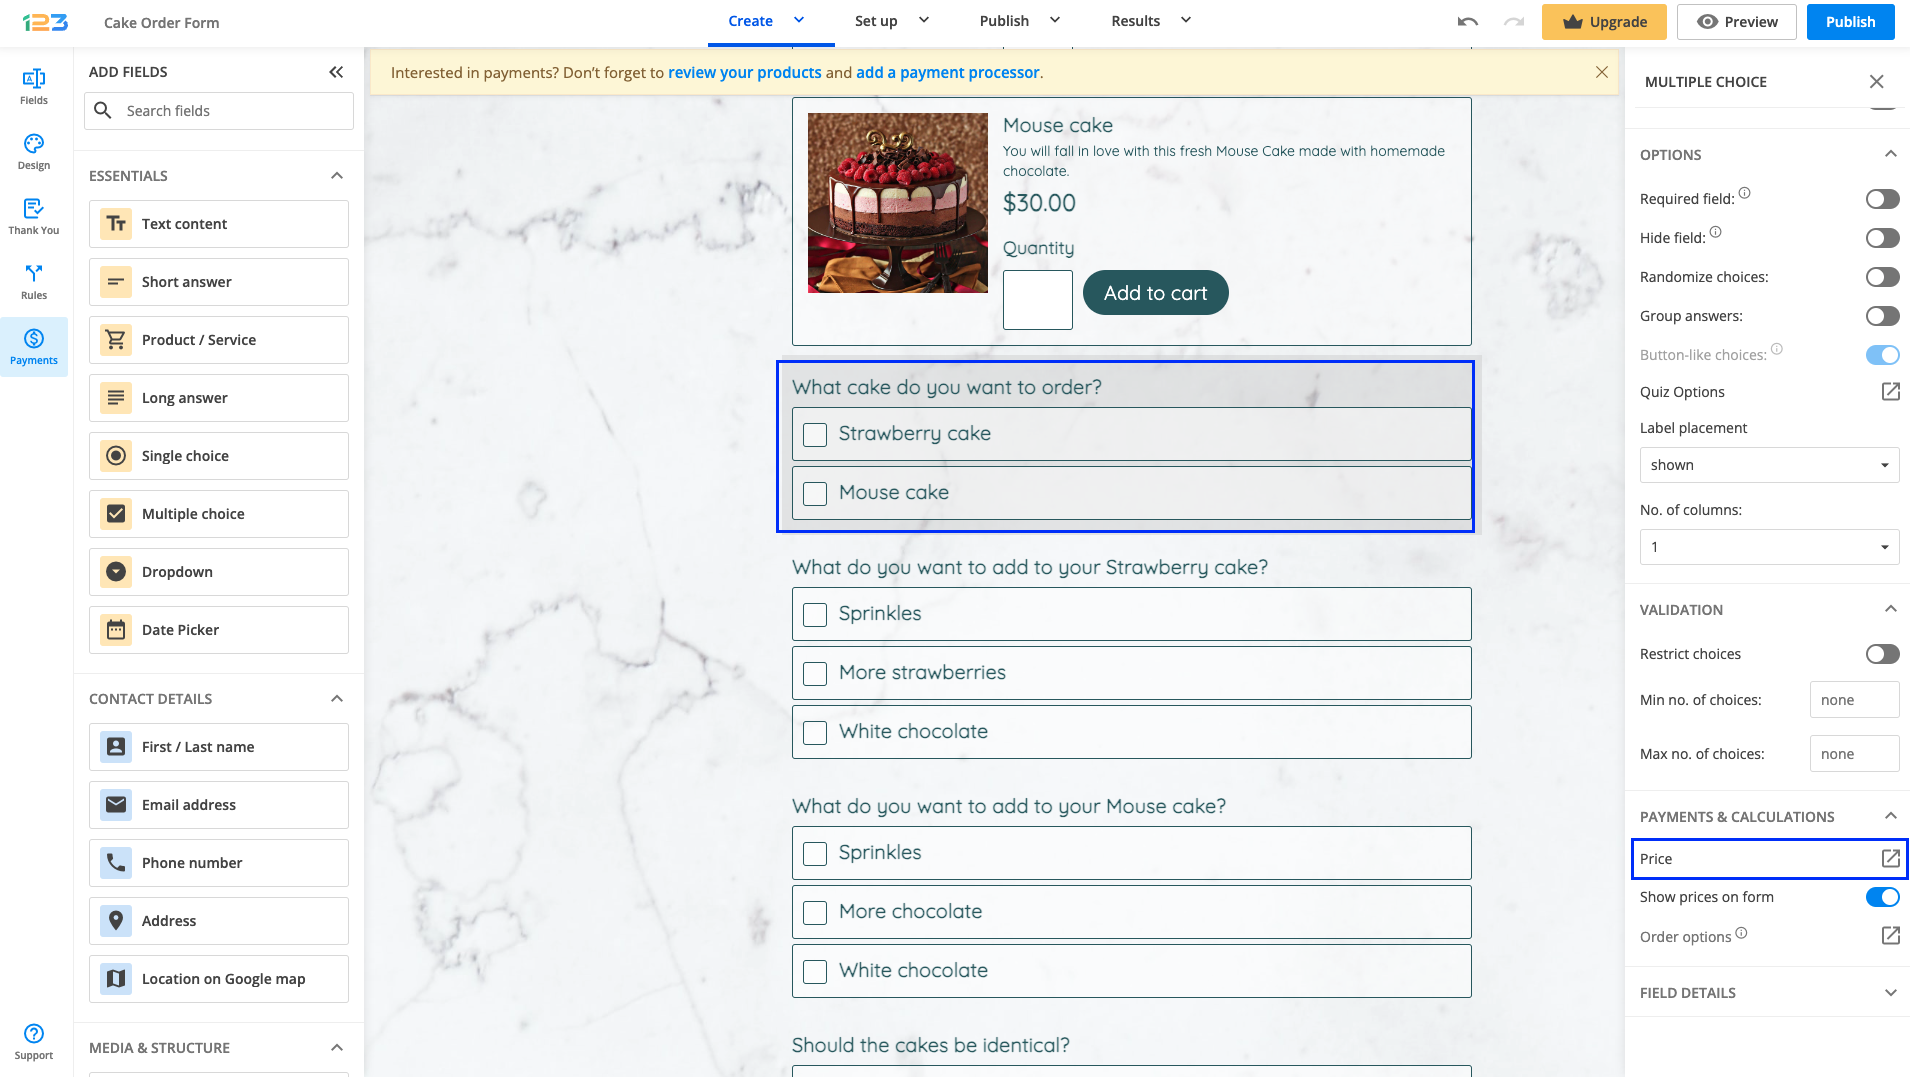
3. The menu is where we will add all fields that will sum the order. It might take a bit of time, but rest assured, it’s really not that hard. We are going to use Product field to display the menu. In our example, we have added 2 products – Strawberry cake & Mouse cake.
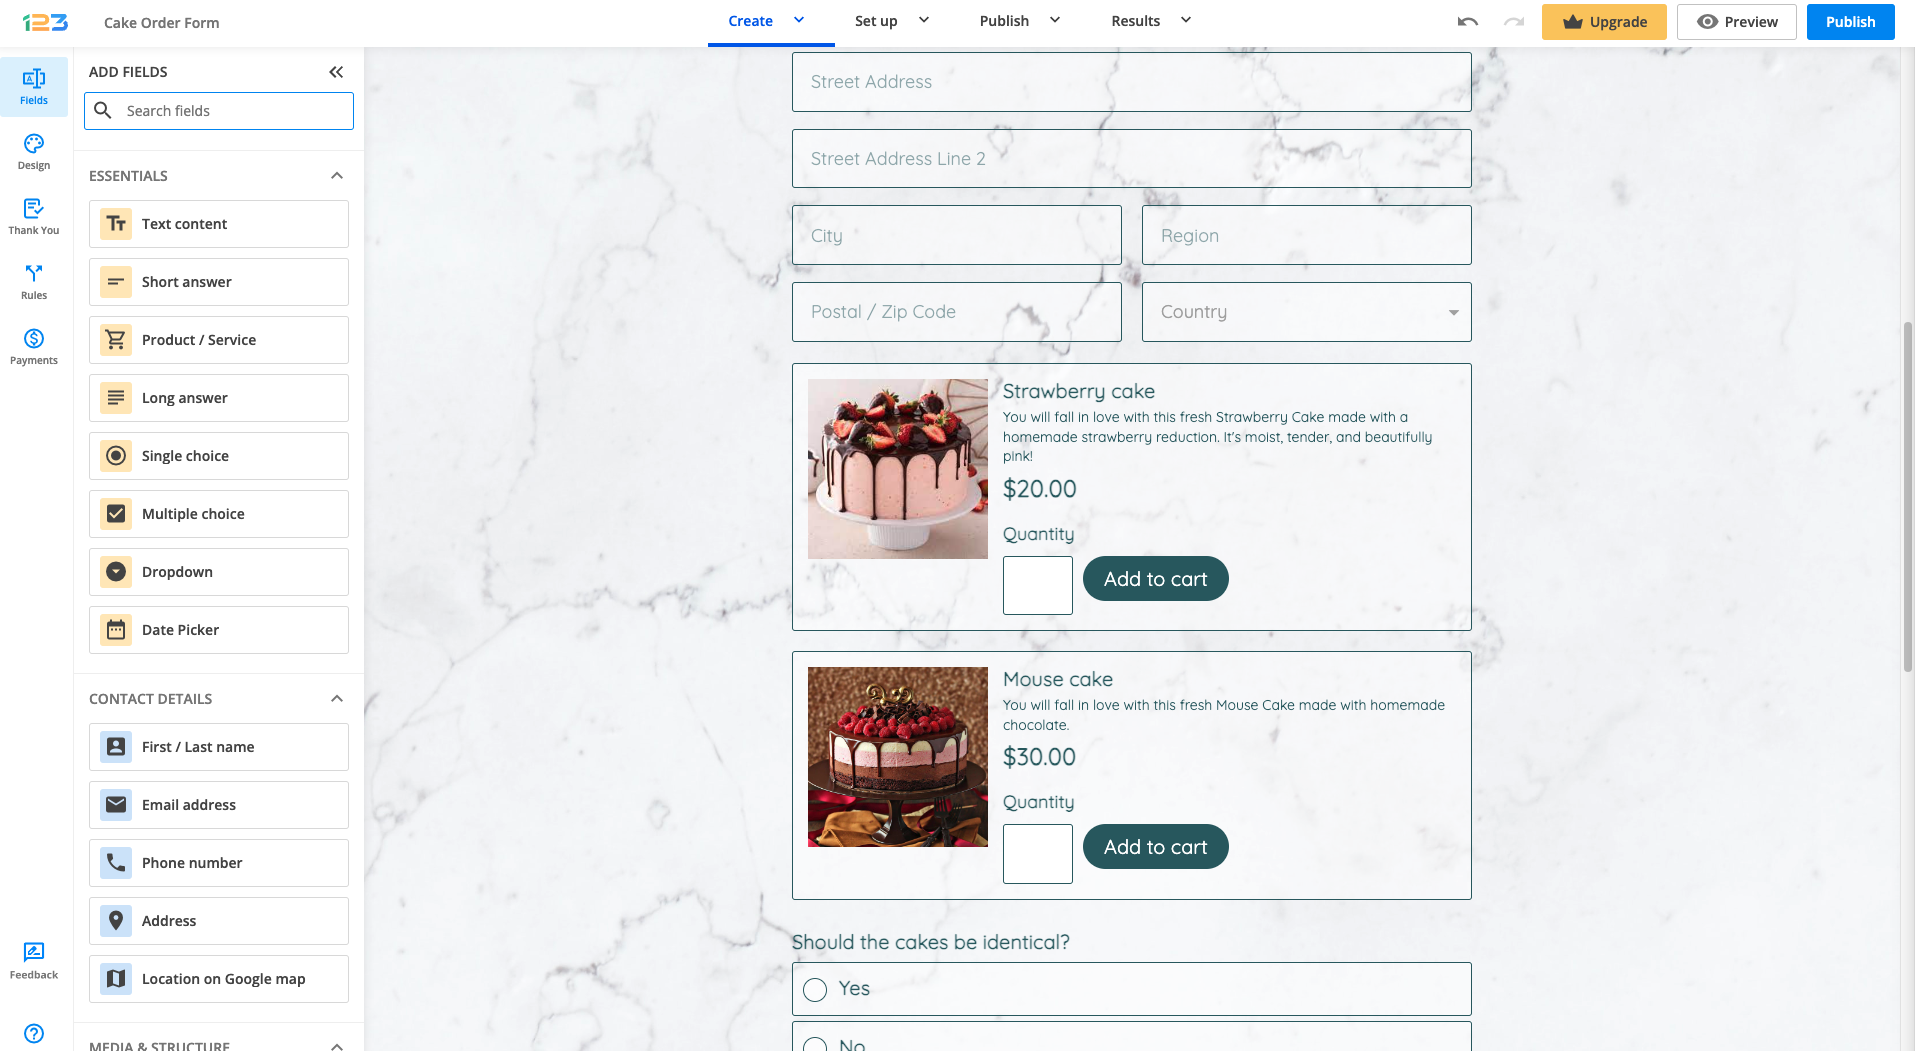
We’ve also added two questions that are related to the product that has been chosen by the respondents. Everything will make sense once you read the Field rules section.
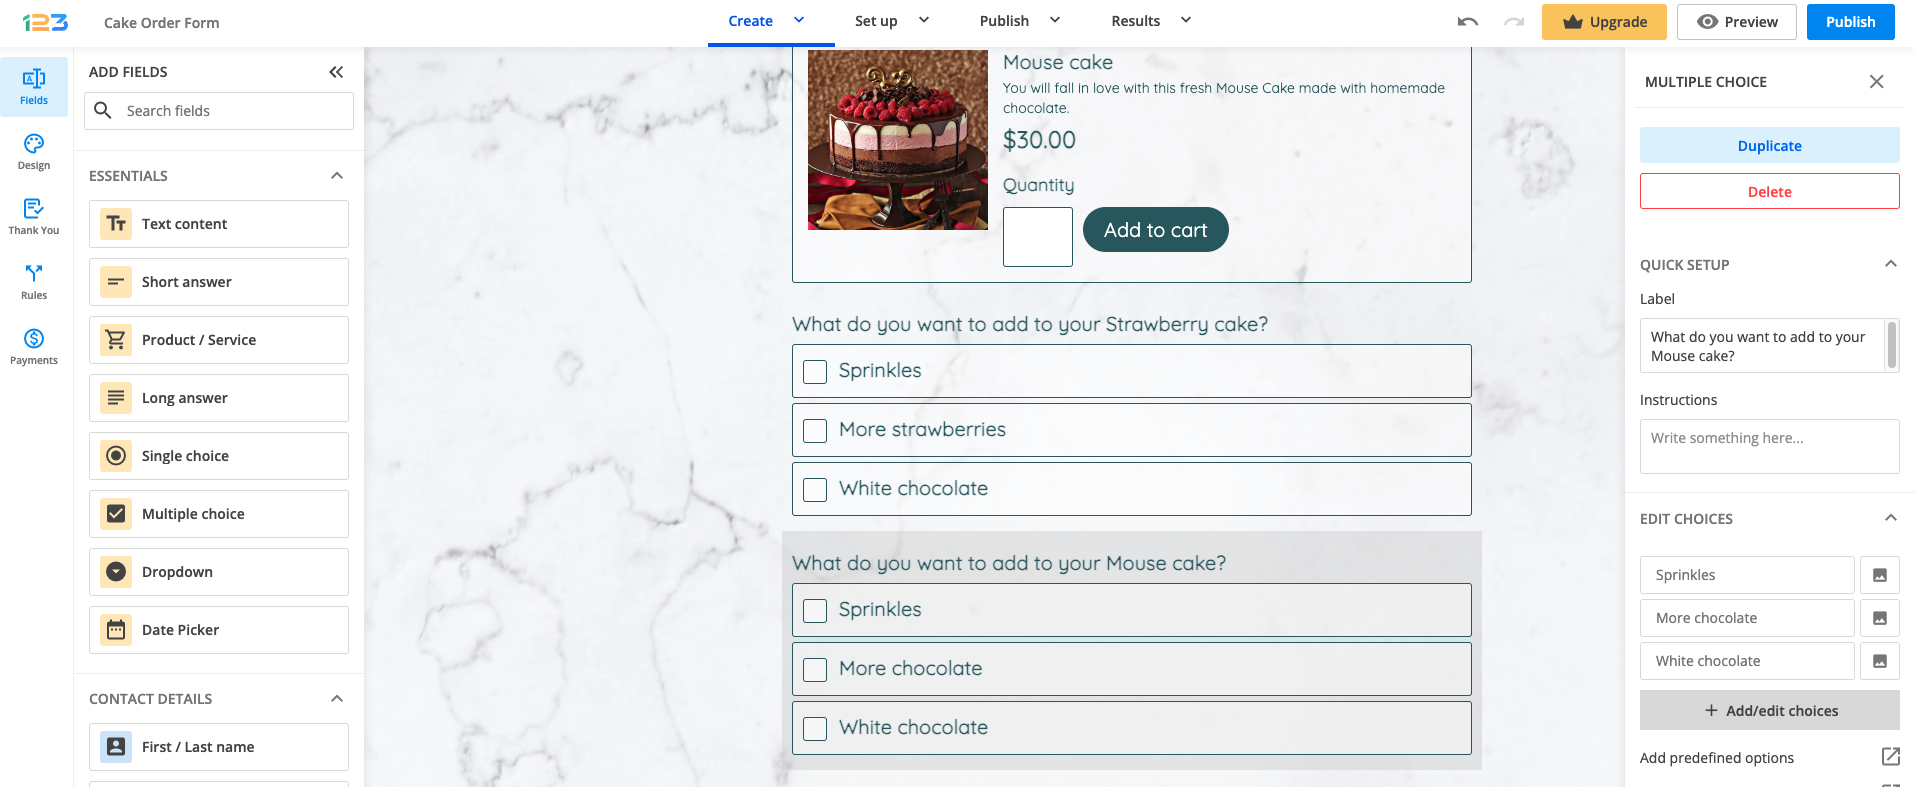
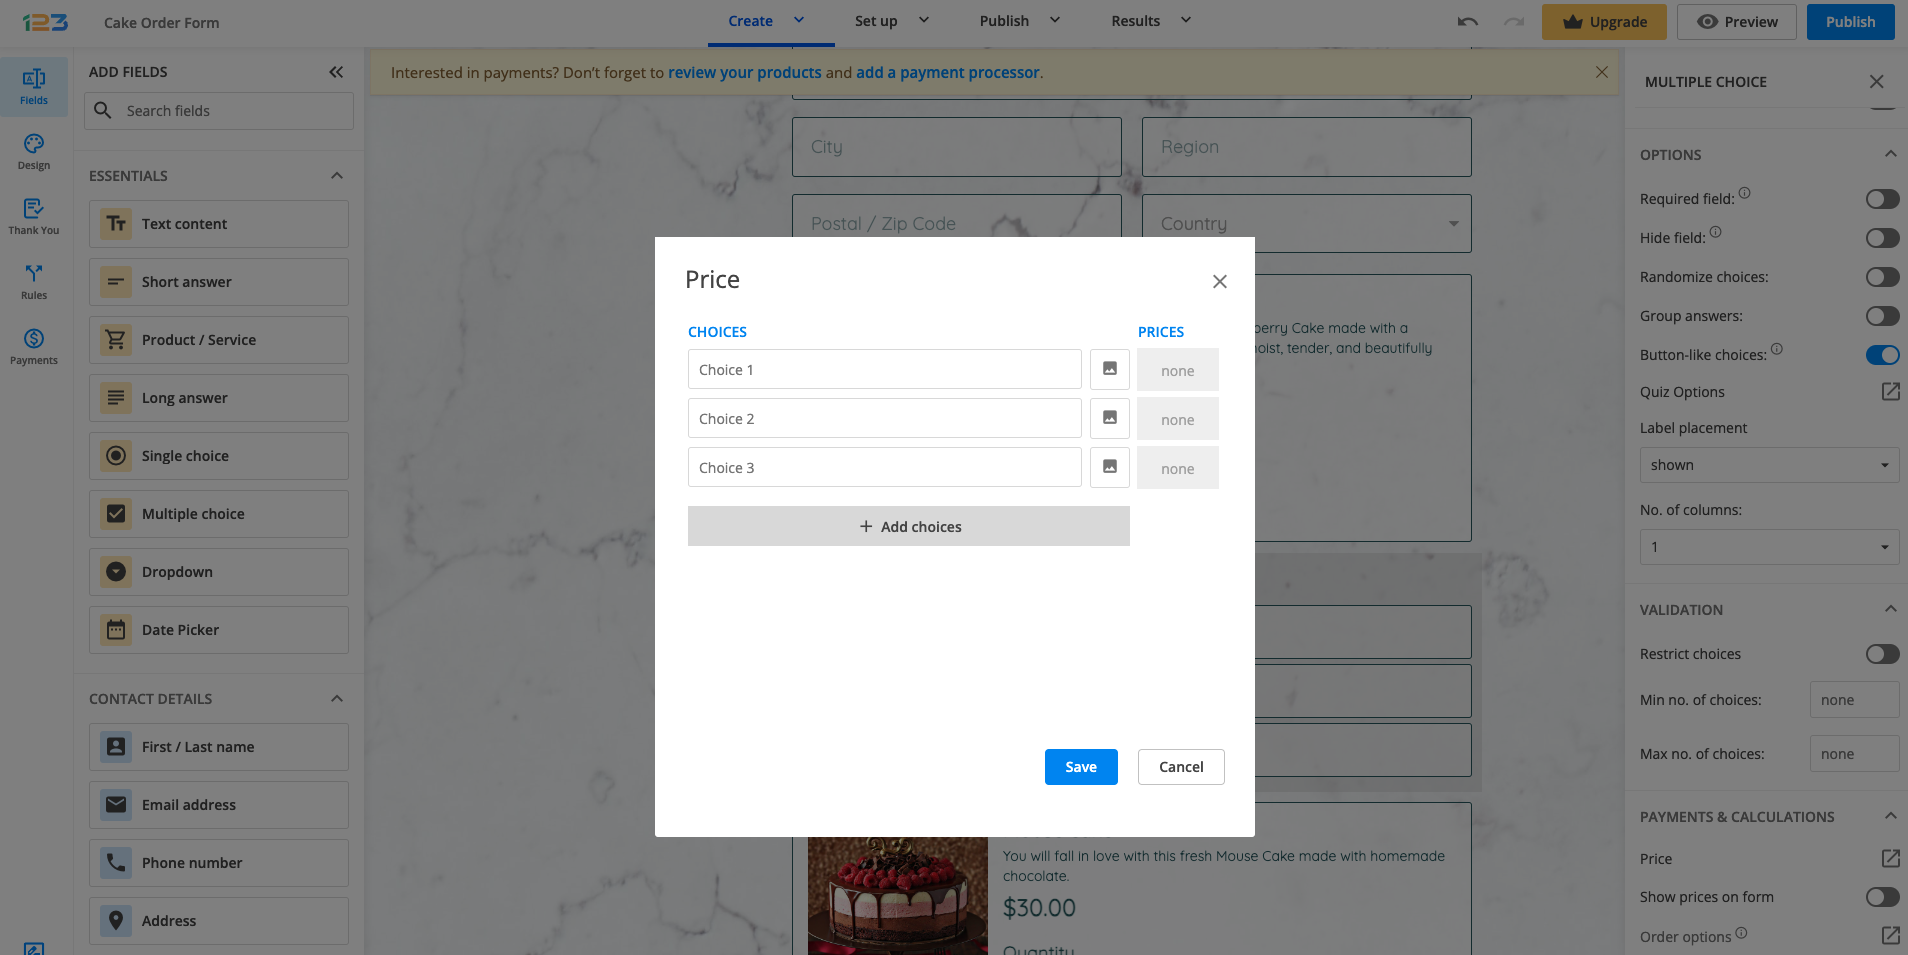
Note: if according to your pricing plan, you do not have access to Product field, you can achieve something similar by using Multiple choice fields. Also, you can add image to both choices.
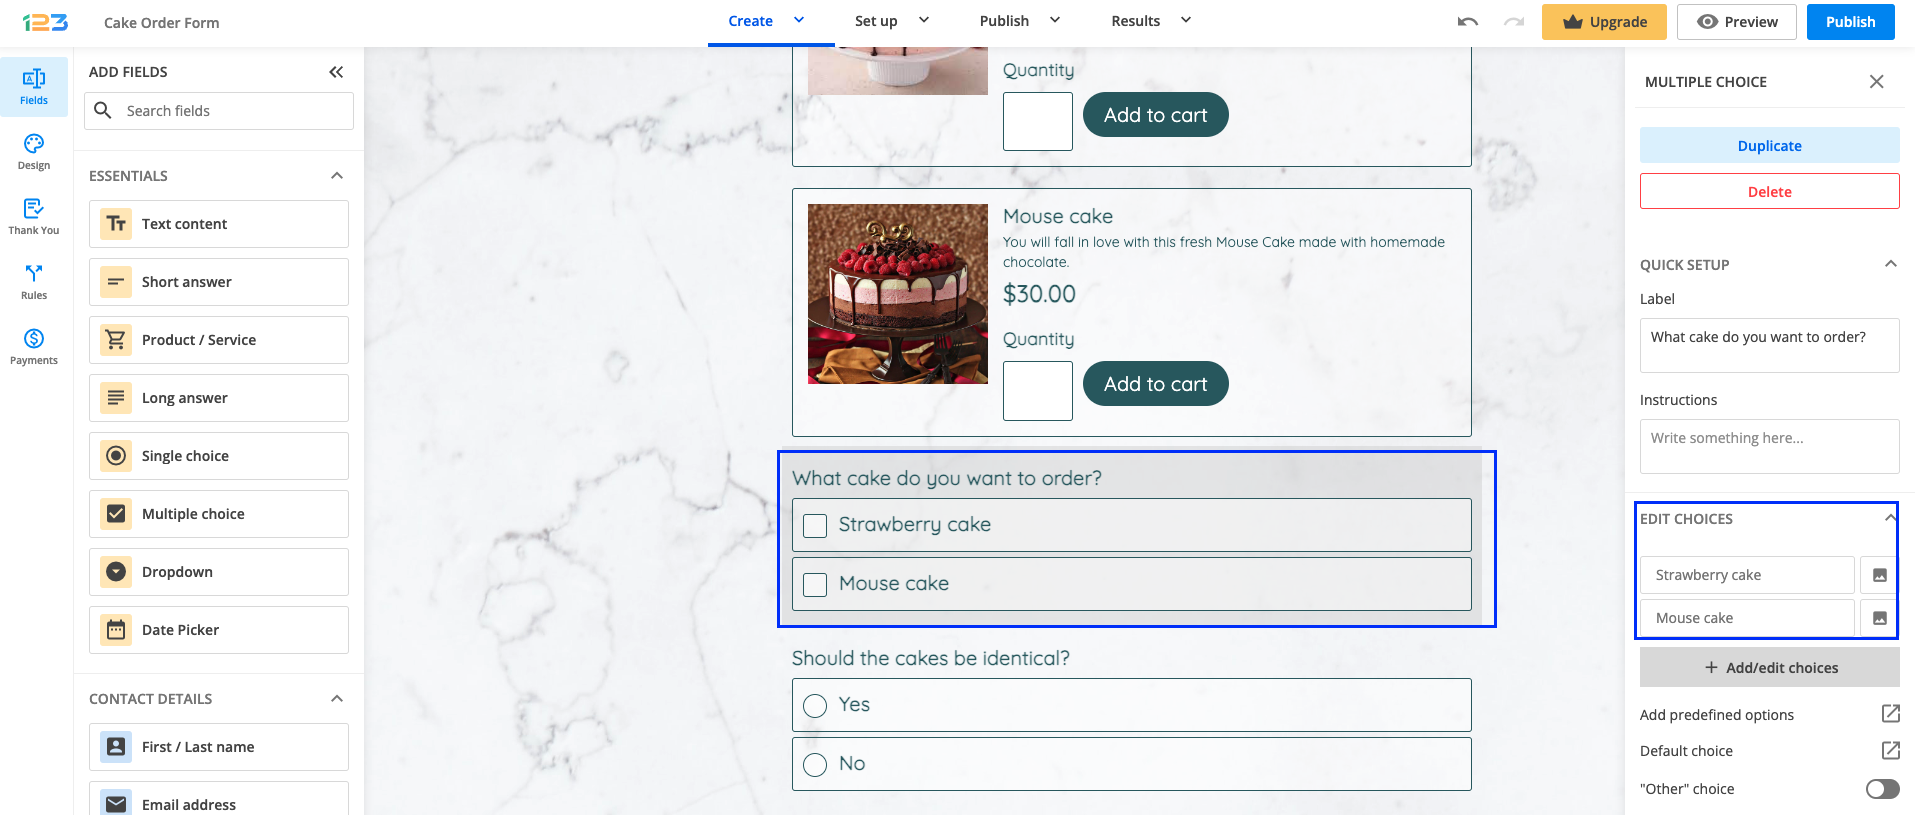
You just have to click on the image near the choice and upload the photos in the modal that has opened up.
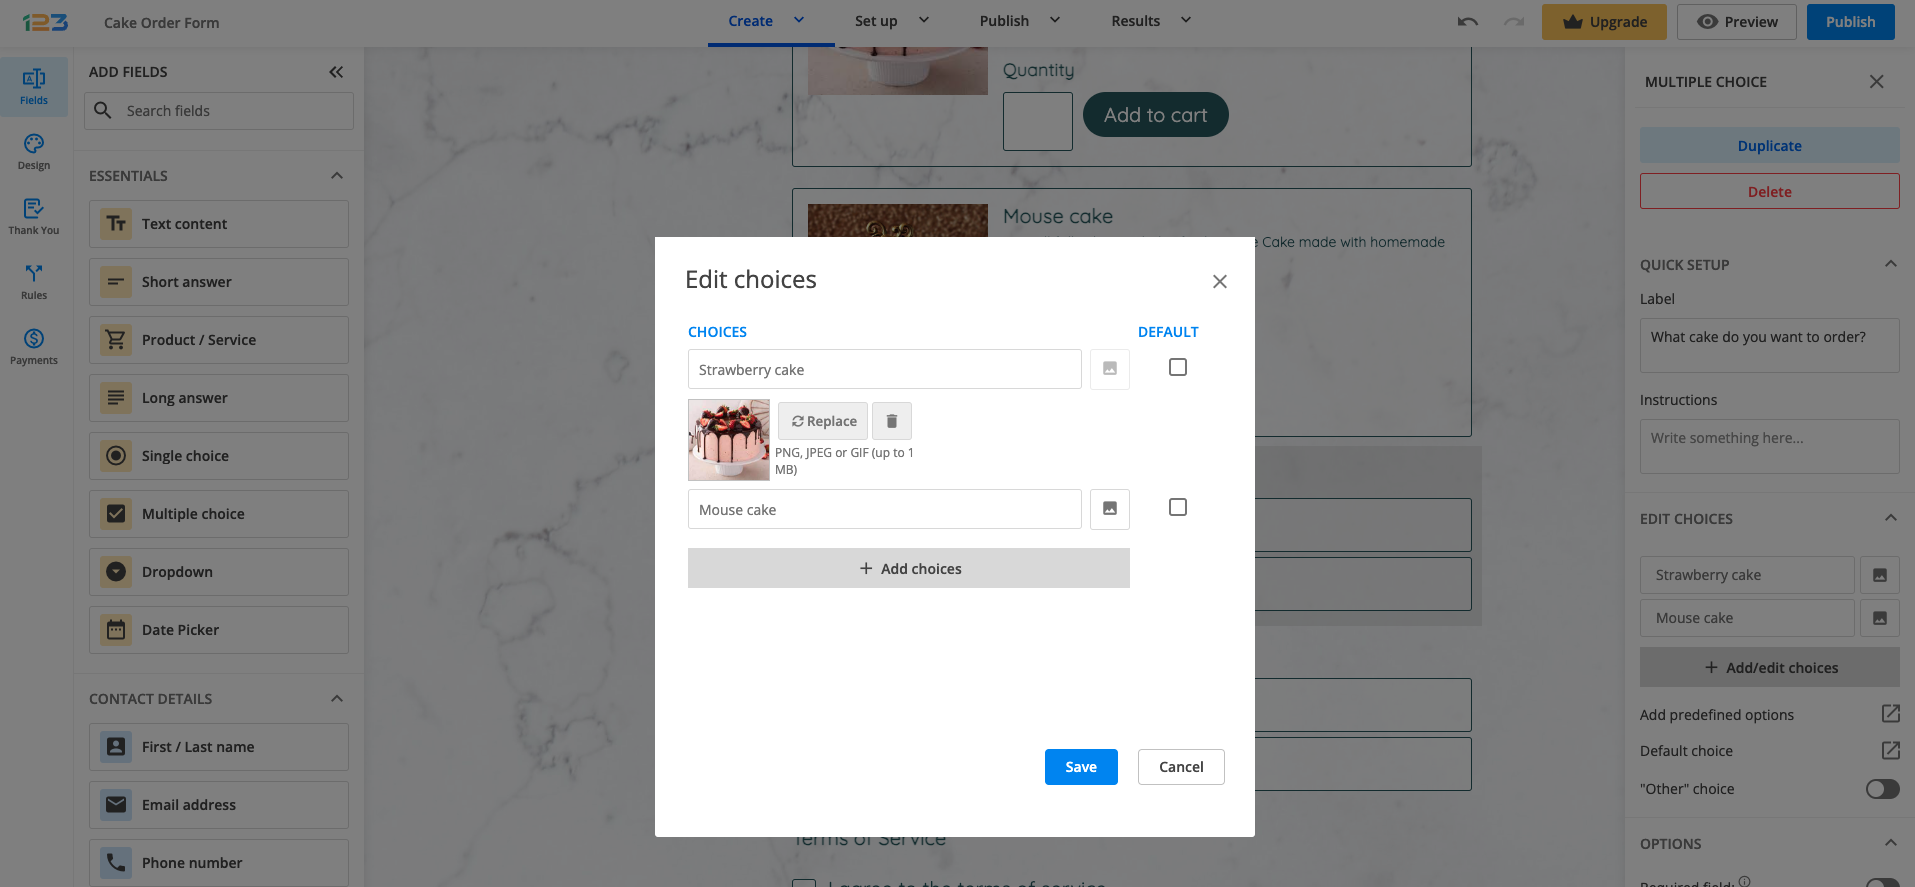
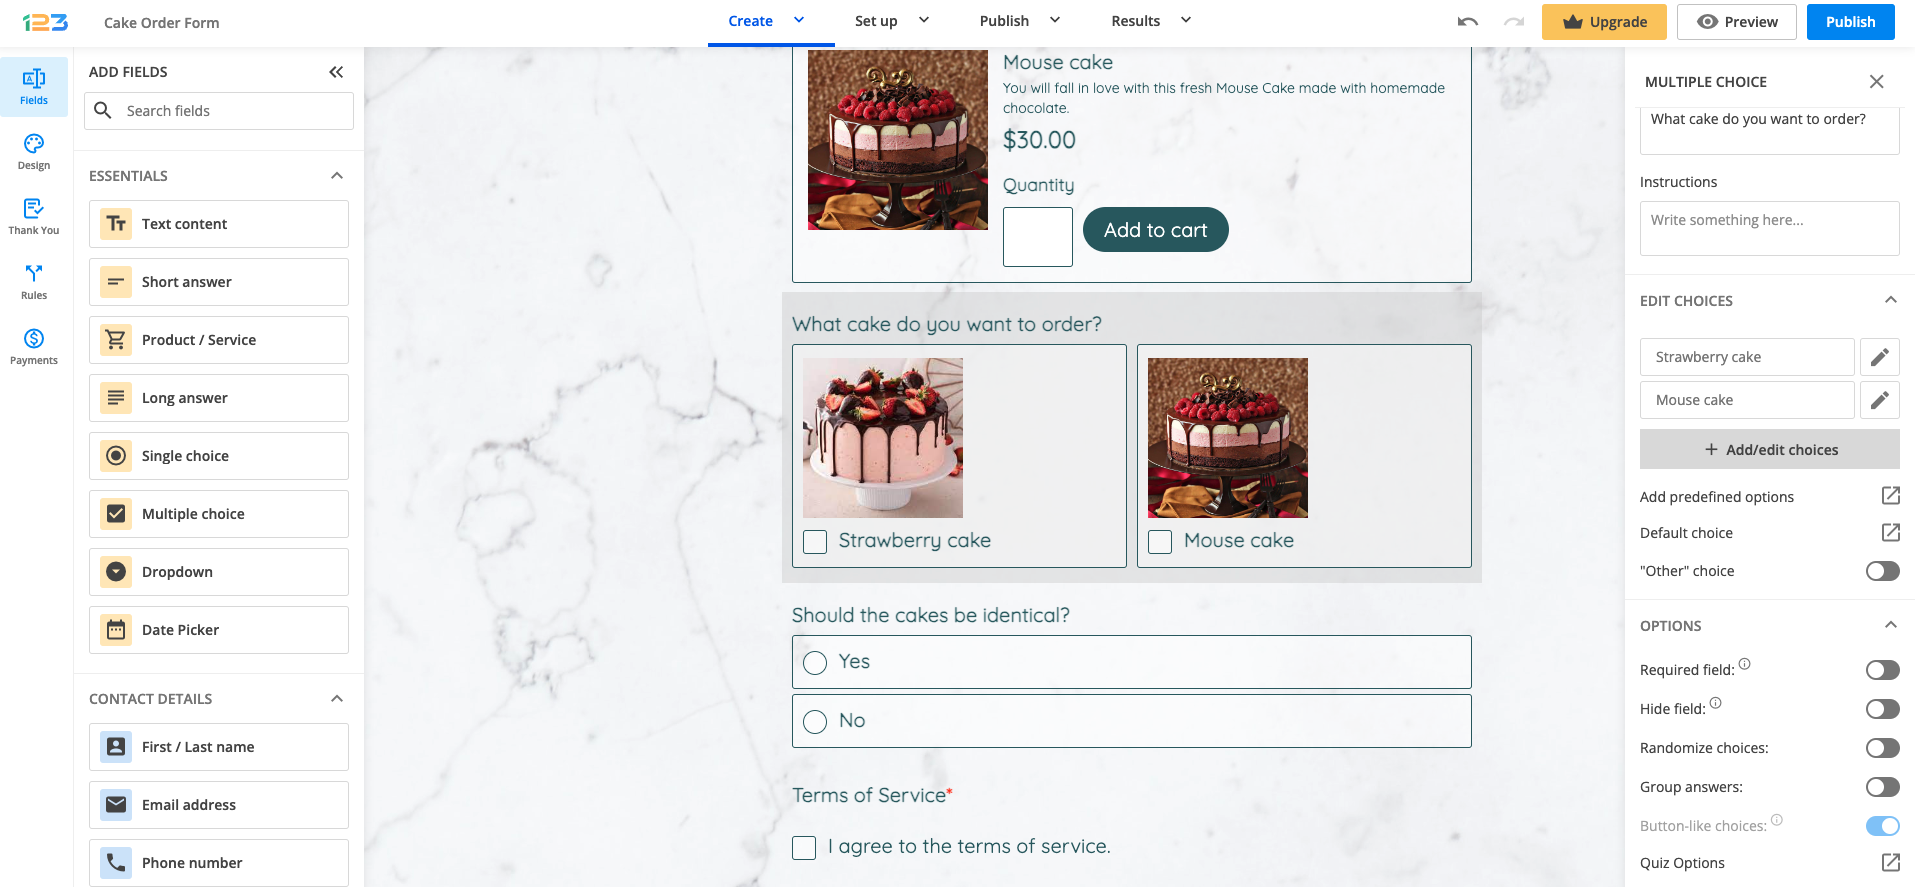
This is how it would look in the end when you have uploaded the images:
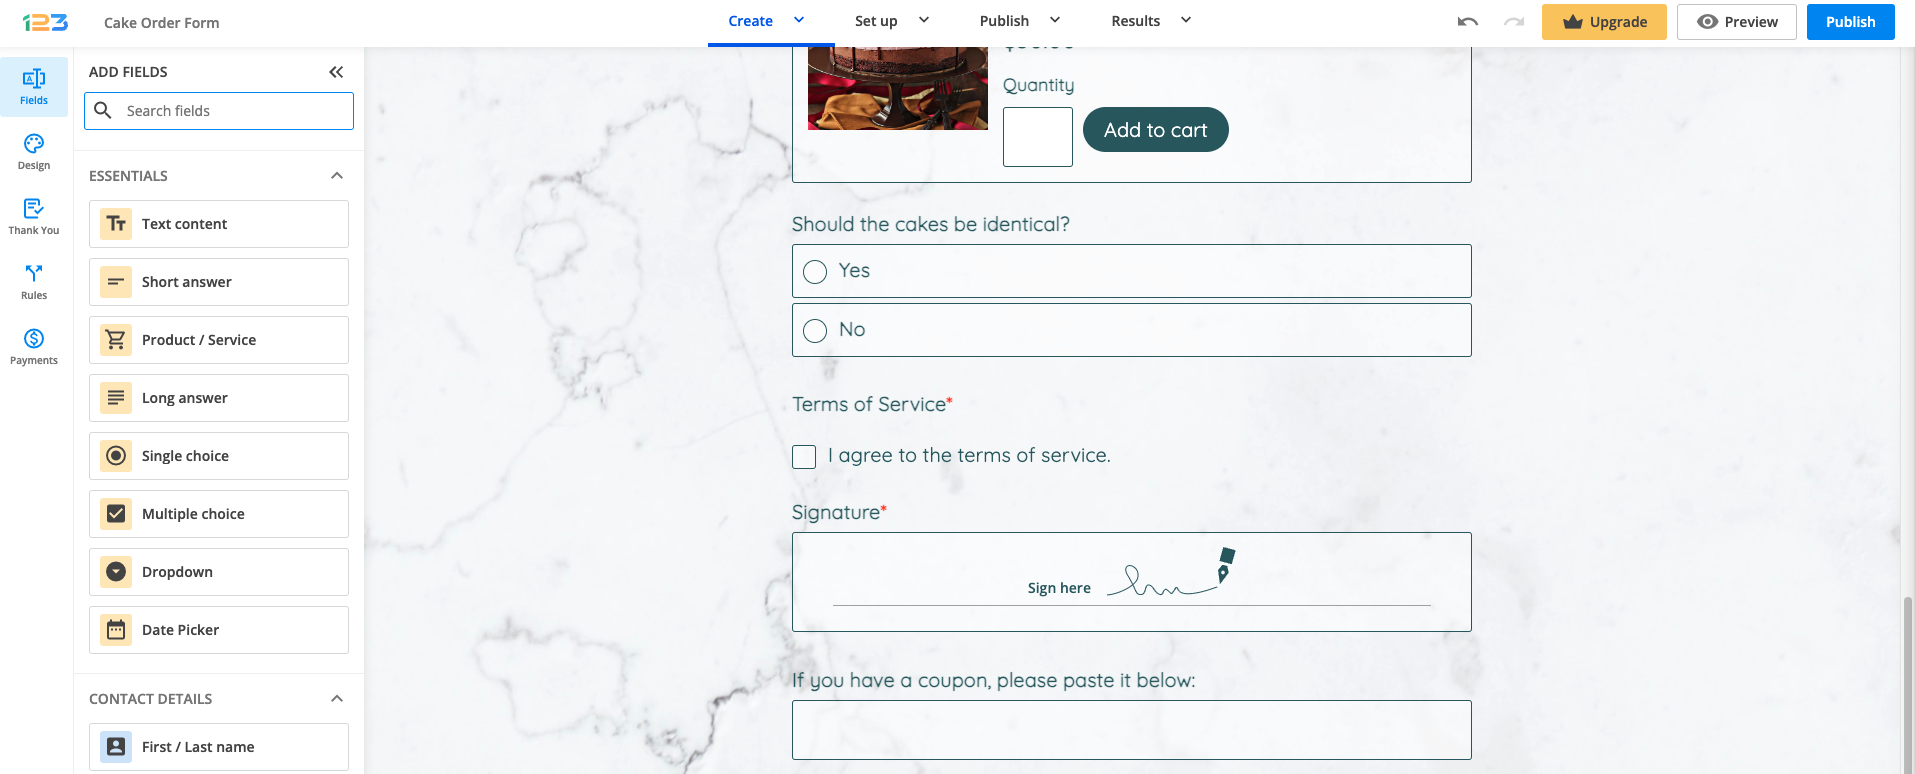
In the last section we will add a Signature field, a Terms of service field, and a Heading as an instruction to clients who have coupon codes to use for discounts.
Field Rules
Now that’s about it with the Form Editor, but we need to do something with those fields to appear only when the client selects one product or the other. The sample form provided earlier works something like this: when the respondent selects Strawberry cake, the field related to add-ons to the Strawberry cake appears. The same applies when they select Mouse cake.
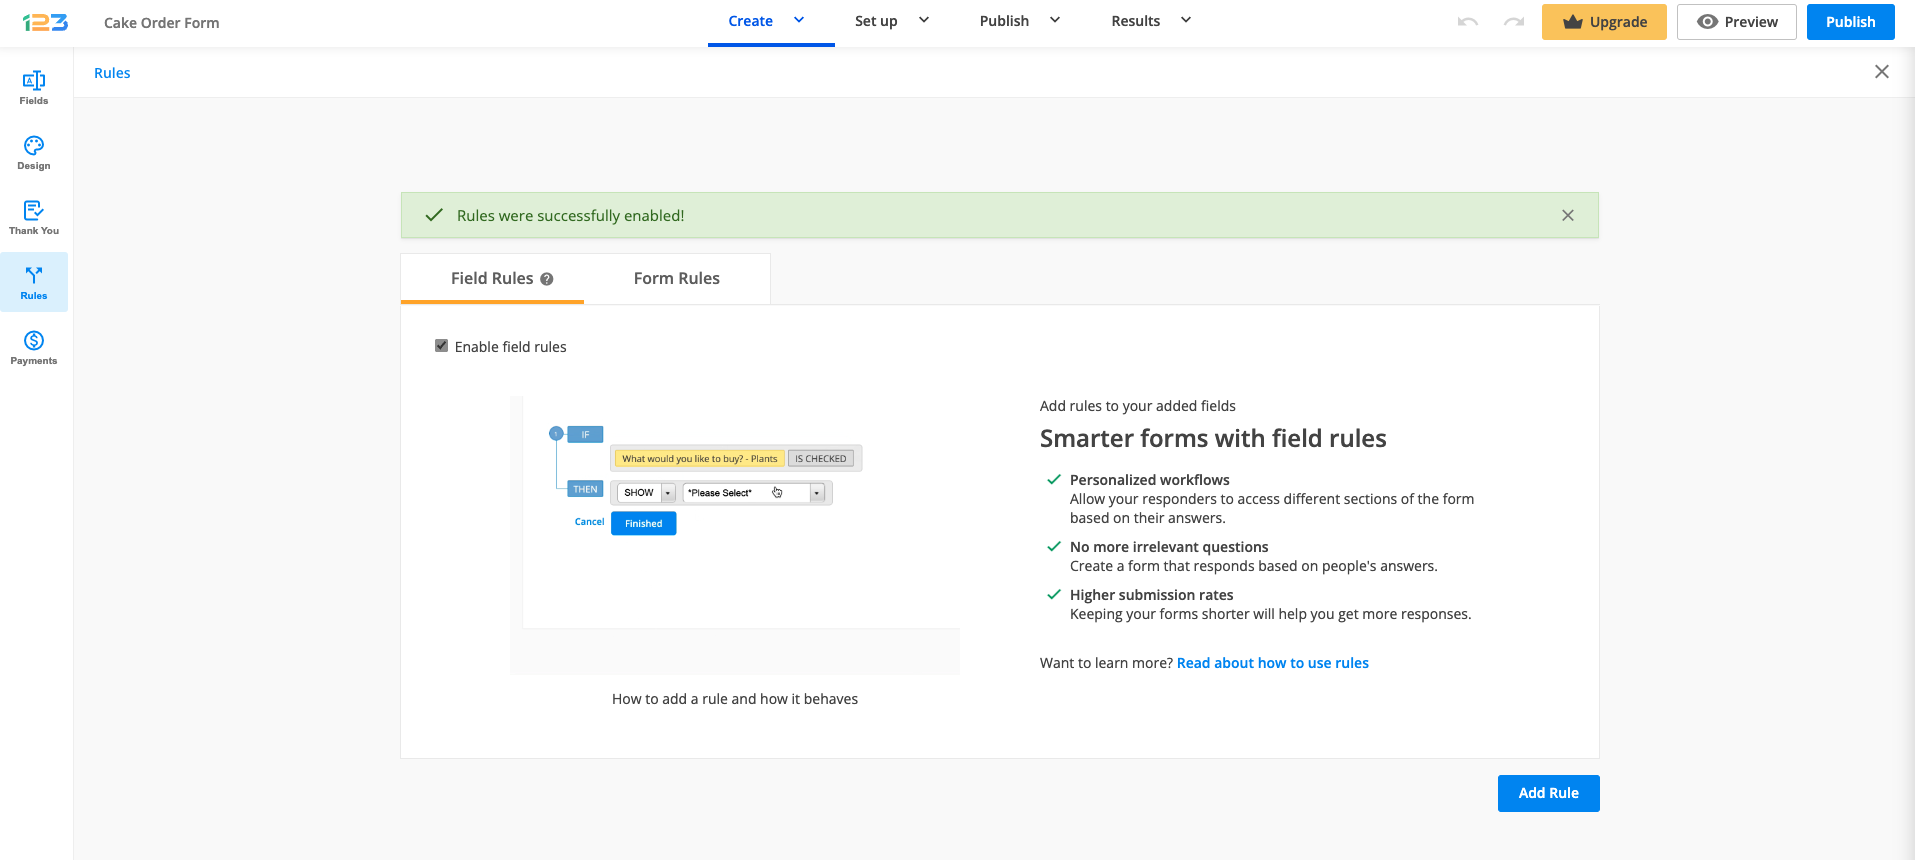
1. Go to Rules → Field Rules and check Enable field rules.
2. Next, add one rule at a time. It’s best that you know precisely how you want to set your rules.
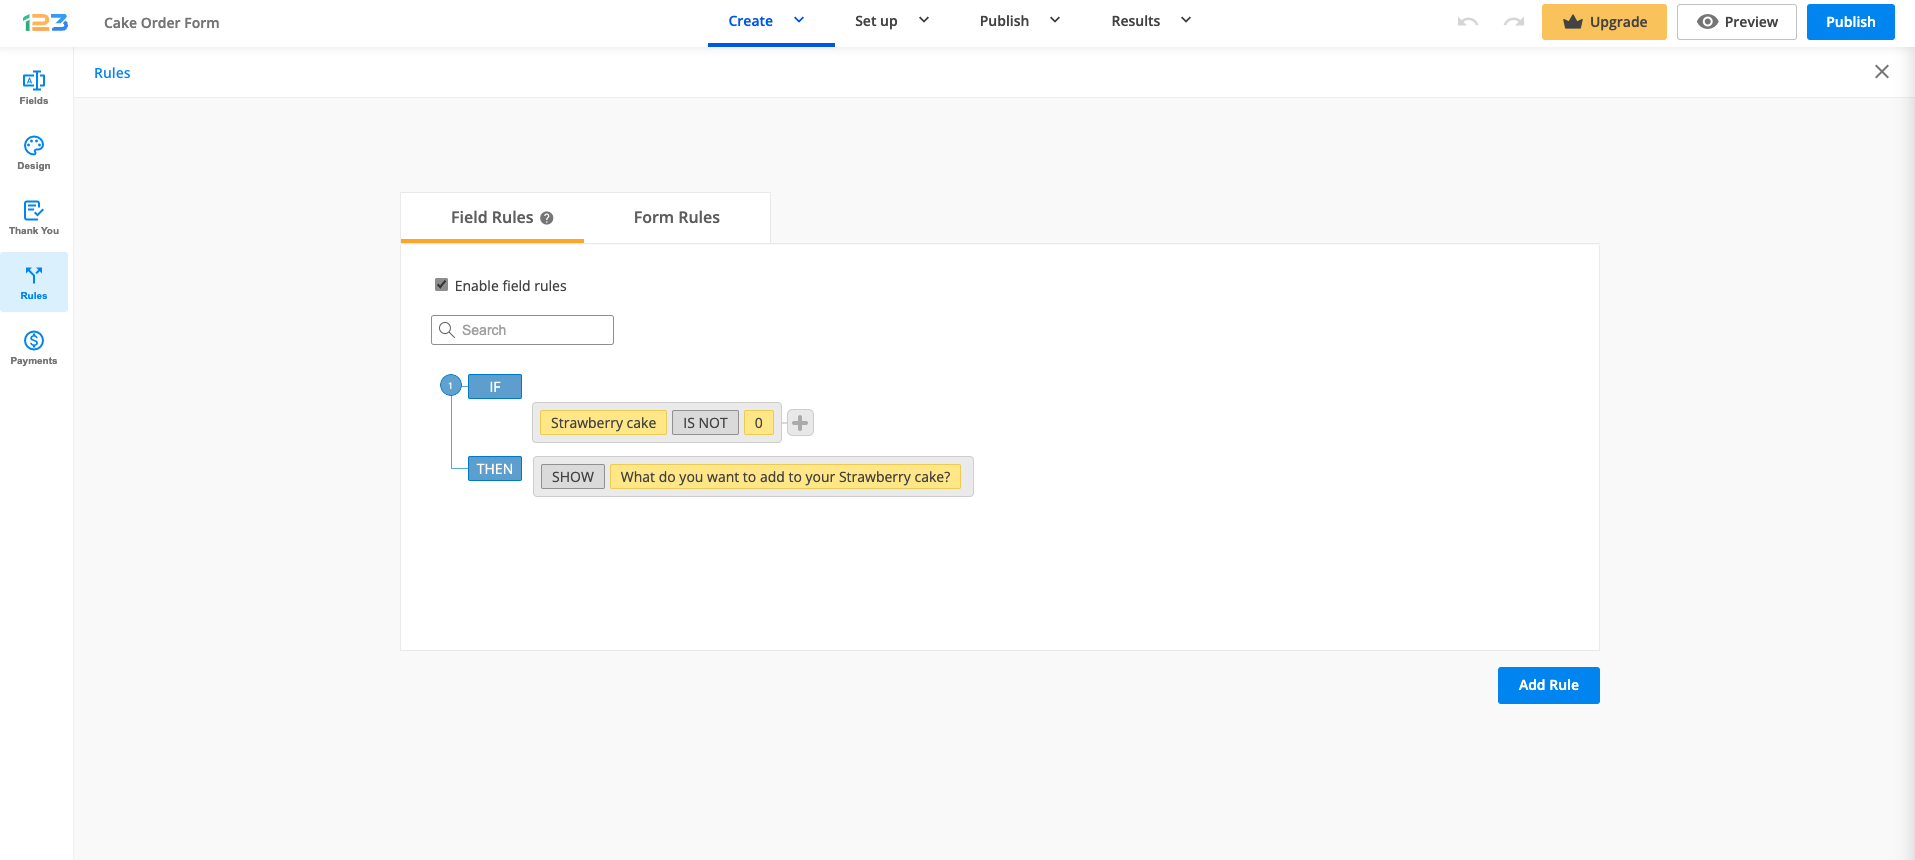
3. We will need to add the first rule that is related to the Strawberry cake. If the strawberry cake is added in the cart by respondents (meaning its value is not 0), then we want to show the question related to the add-ons for the Strawberry cake.
The rule will look like below:
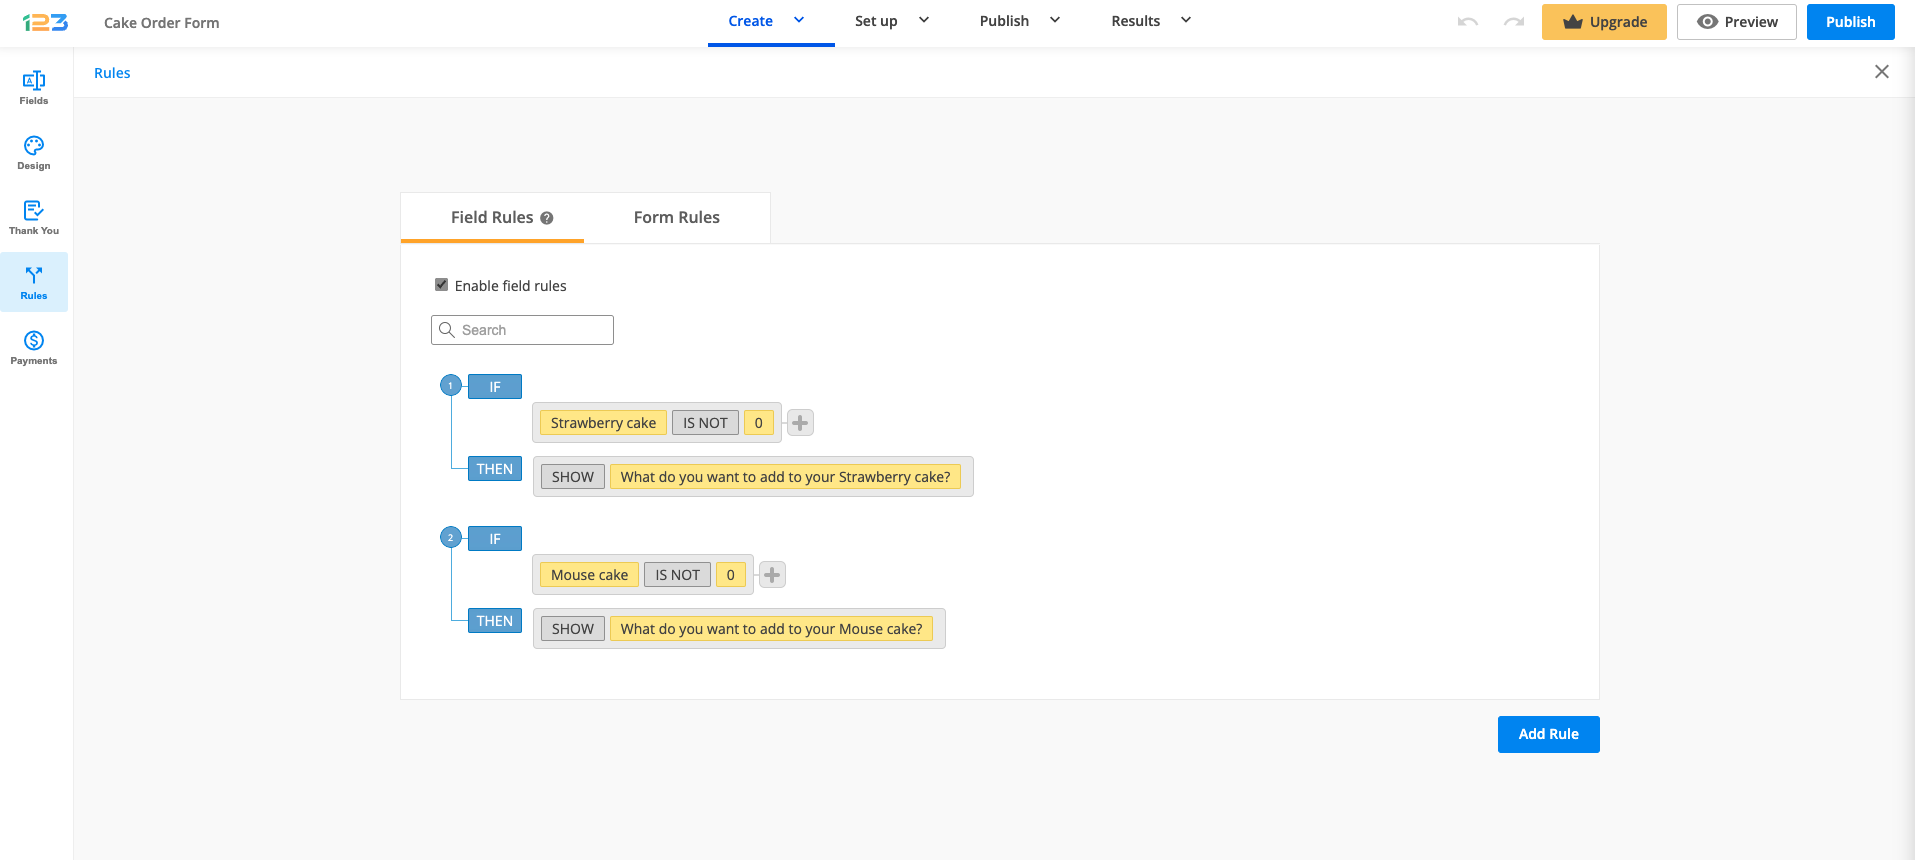
Add a new rule and repeat the same condition, but this time replace strawberry cake with mouse cake in the first dropdown list.
You can assign more conditions to the same rule. To add an extra condition, click on the gray plus sign and a new line will appear. Set up the new condition and press Add when done.
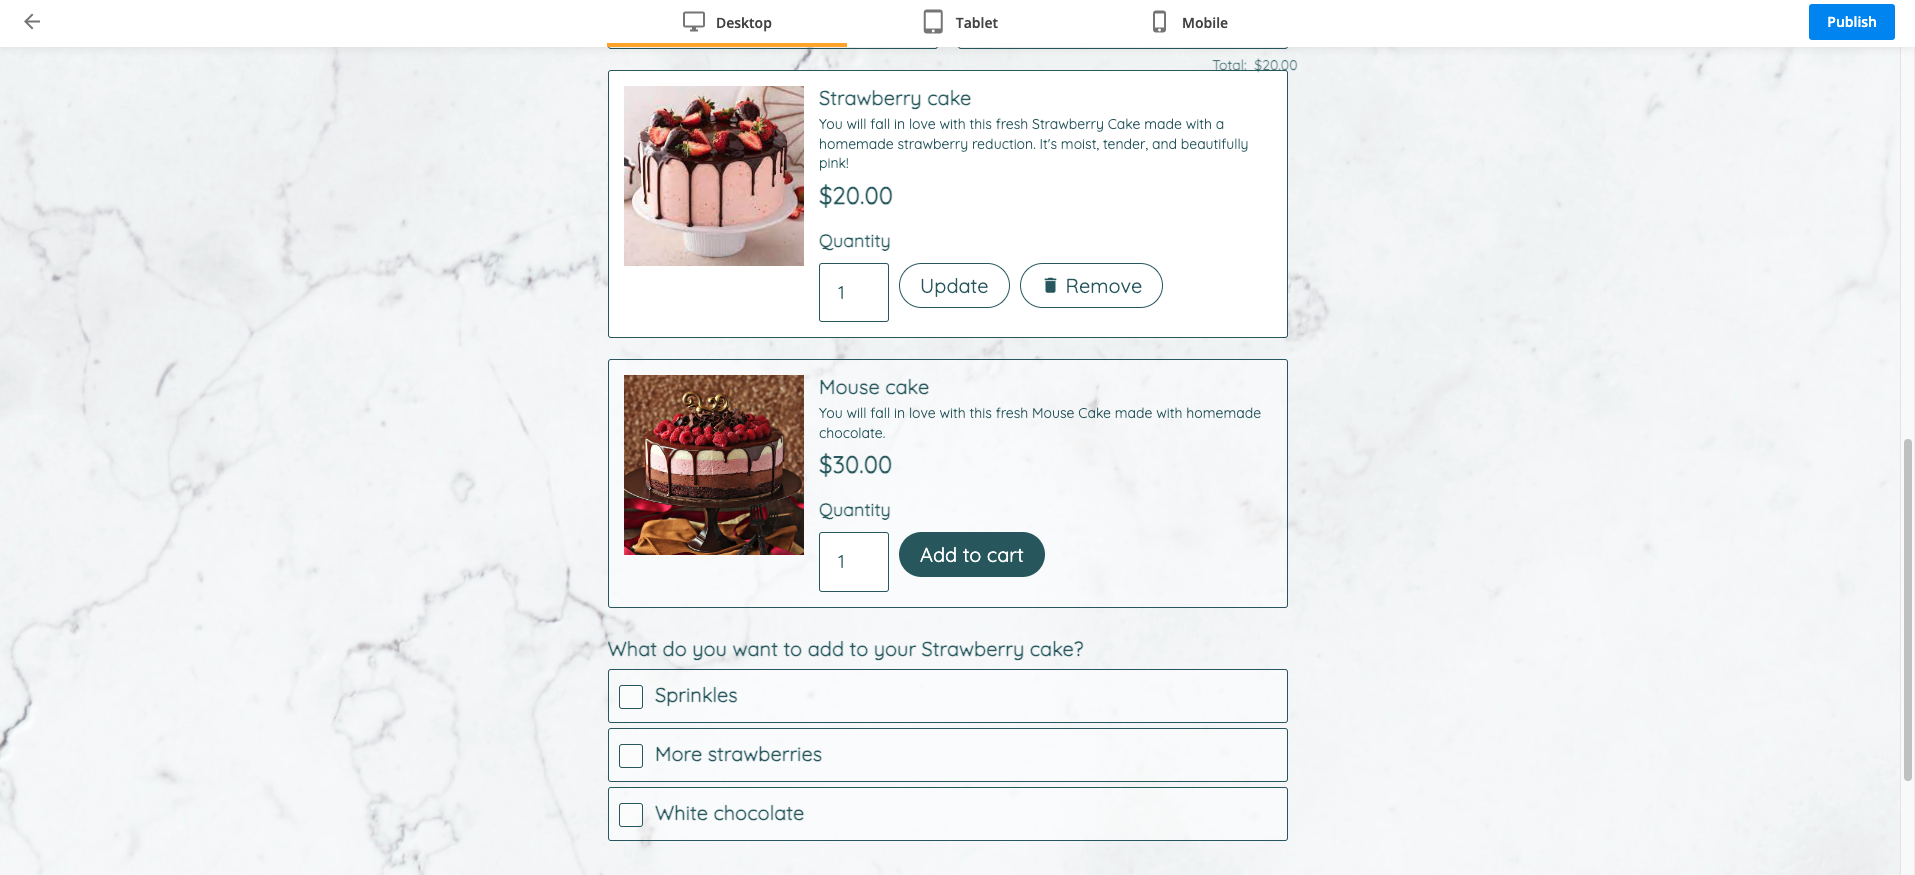
This is how it would look like in Preview mode.
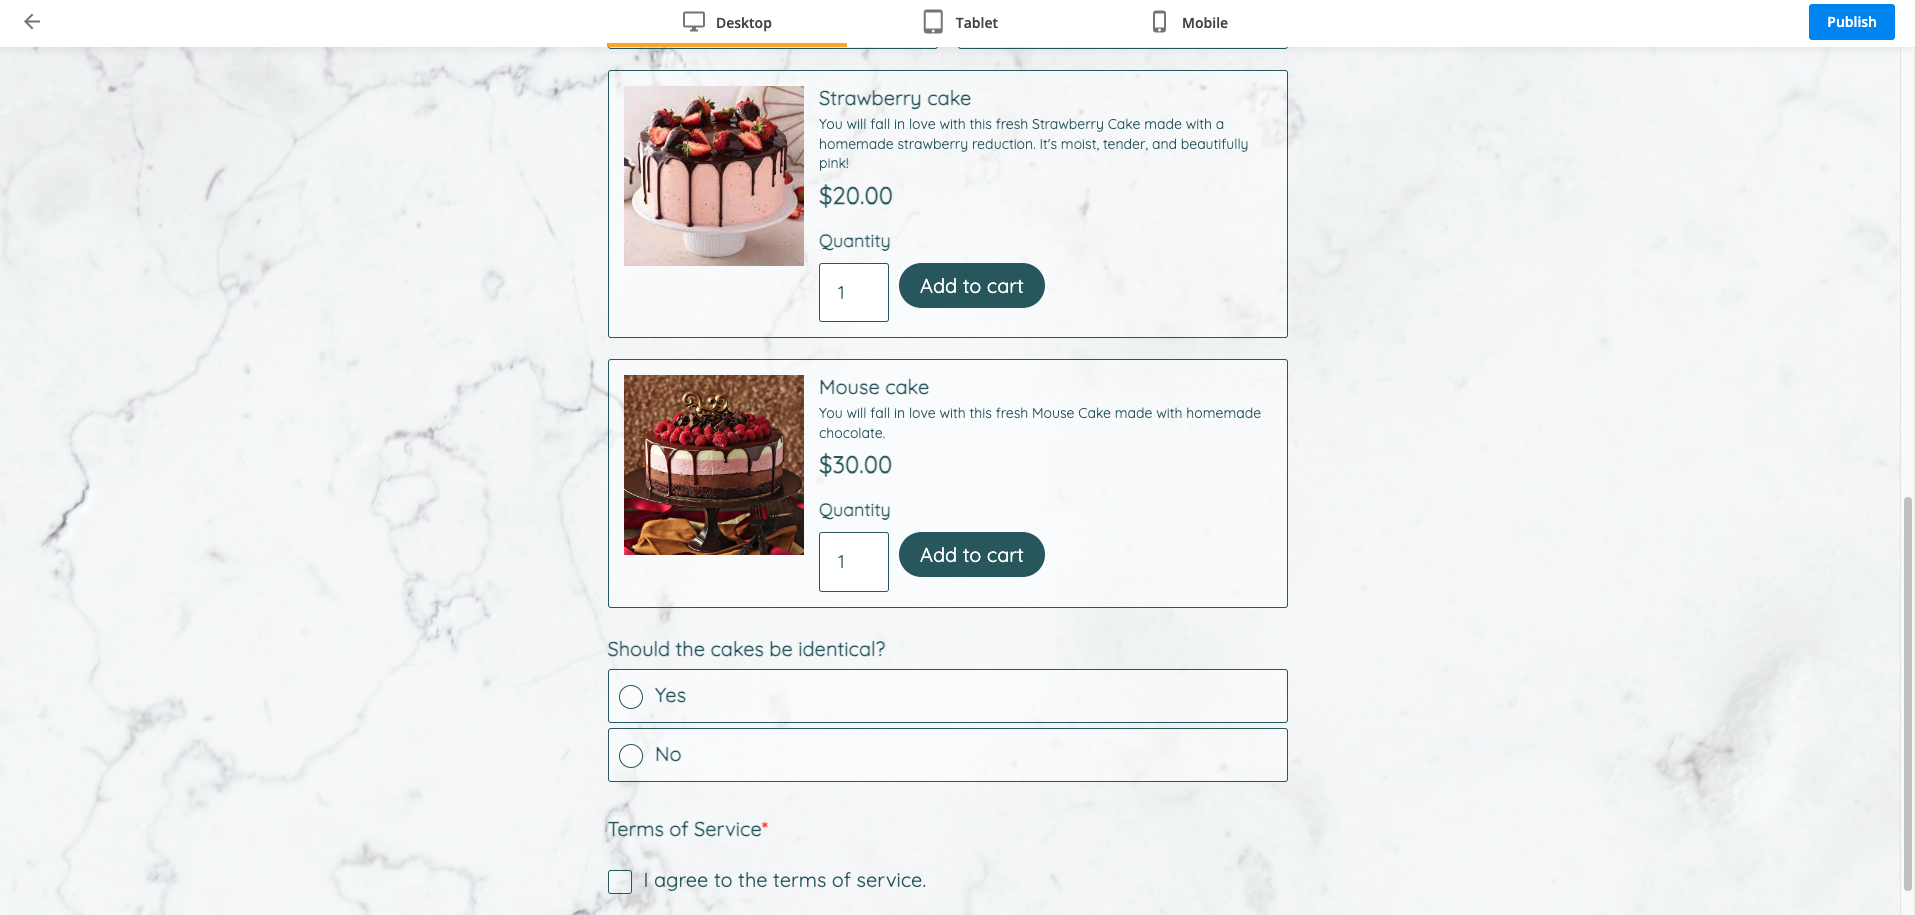
Once the Strawberry cake has been added to the cart, the additional question is displayed according the field rules that we have set up:
Payments
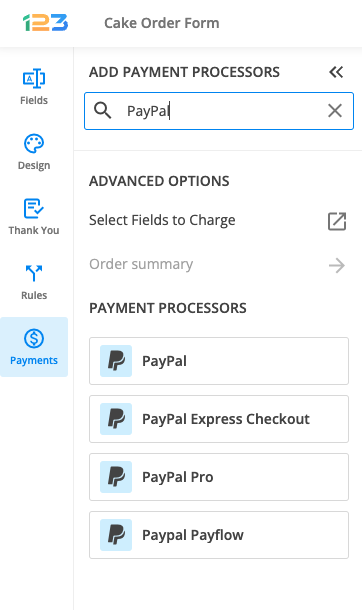
In this section, we have assigned the prices of the form’s products, a coupon box for discounts, and the payment processor. To start with, go to the Form Editor → Payments section and select the payment gateway you want to use.
1. In this demo, we have selected the PayPal payment gateway. You can select and use as many payment gateways as you desire. Learn more about our PayPal order form creator and how it can fit your business model.
2. On each choice field/product field, we have assigned the necessary prices. You can check this after enabling the payment processor and going to View inventory. All products that have a price assigned will be displayed in this Order options modal.
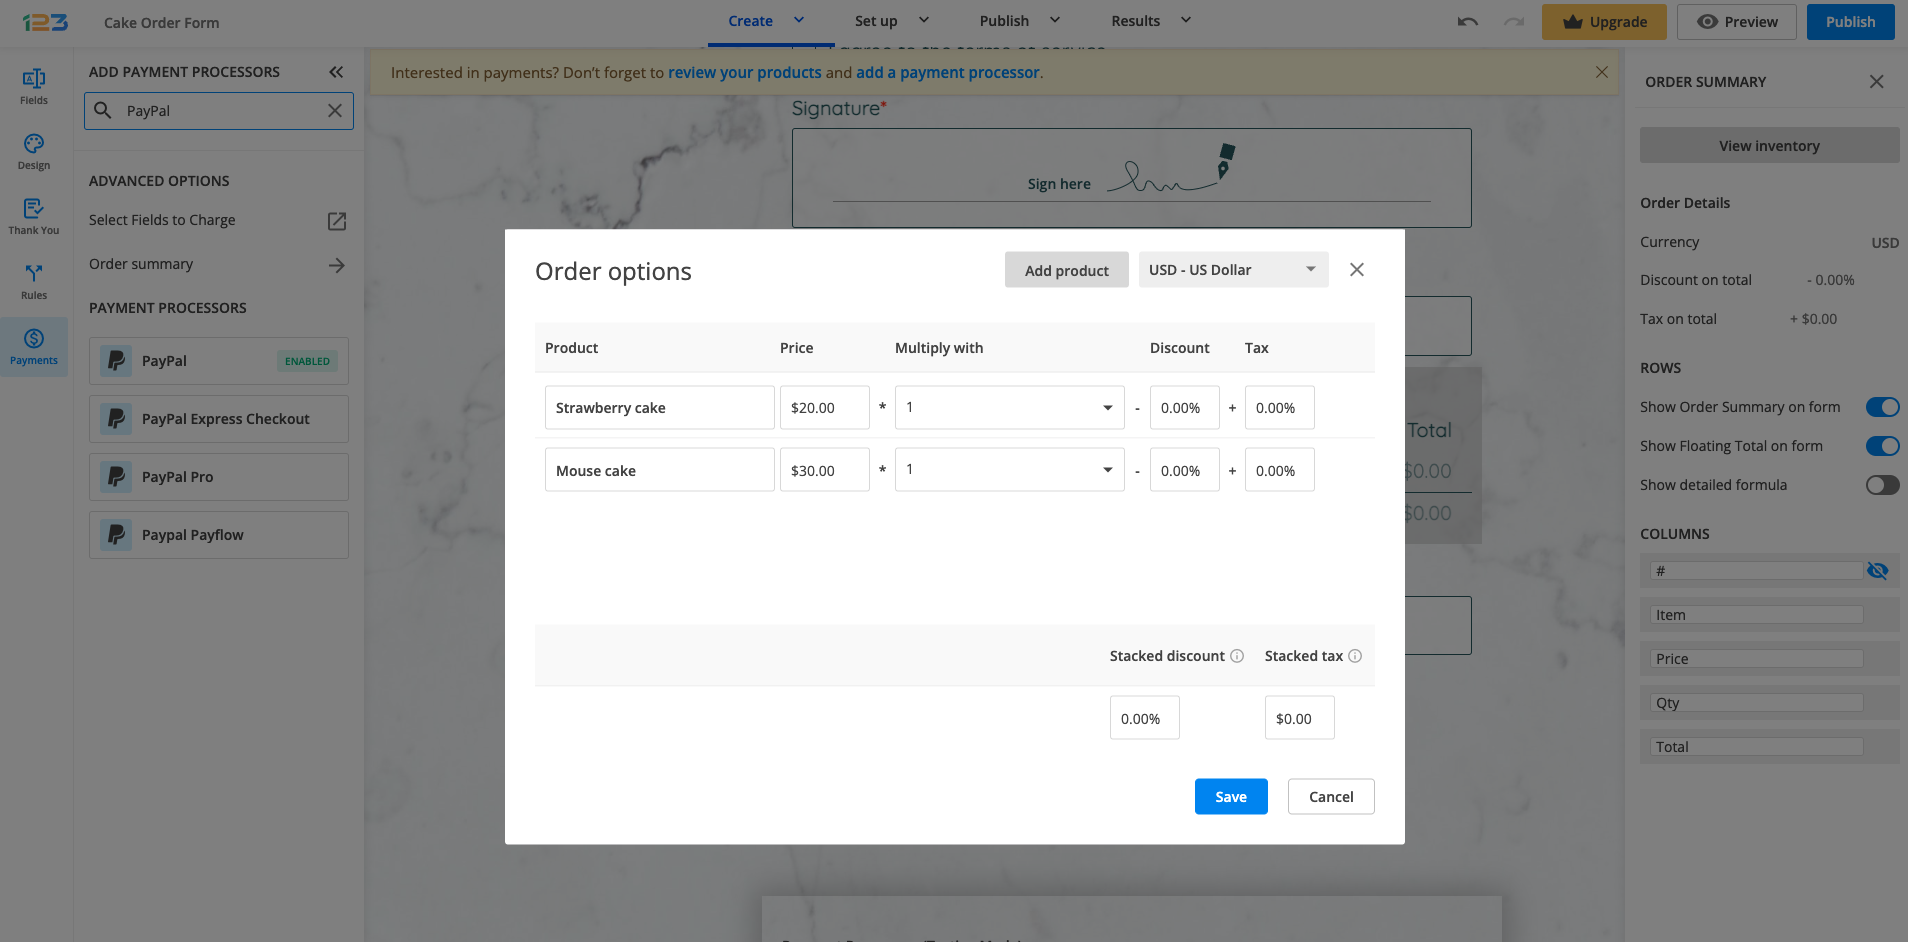
4. You can also add a Discount code field and assign coupon codes to your order form, depending on your needs. We have added three coupon codes to this form. Users can assign one of the codes and receive a discount.
5. In Emails section you can establish an email template that can be sent only after the payment is completed.
And this concludes our guide to creating a complex order form. Pretty easy right? Even though it might seem that a lot of settings are required, with 123FormBuilder, creating complex forms is a piece of cake (that goes pretty well with some tea or coffee).
If you’re running your business on Wix, WordPress, Shopify, or Weebly, this article will guide you on how to create an order form for each one of them using 123FormBuilder.
Related articles
You can set up payment integrations for your online order forms and start collecting money from your customers, as easy as 1-2-3! Assign prices to your items and set up discounts and fees. In this article, you will learn how to set up payment integrations.
First, you need to assign the values to your products/services. To do so, add a choice field (Single/Multiple choice or Dropdown) or a Product field and list the available options in the form builder.
Click the field to open its options in the right-side panel and you can set the Price from Payment & Calculation section.
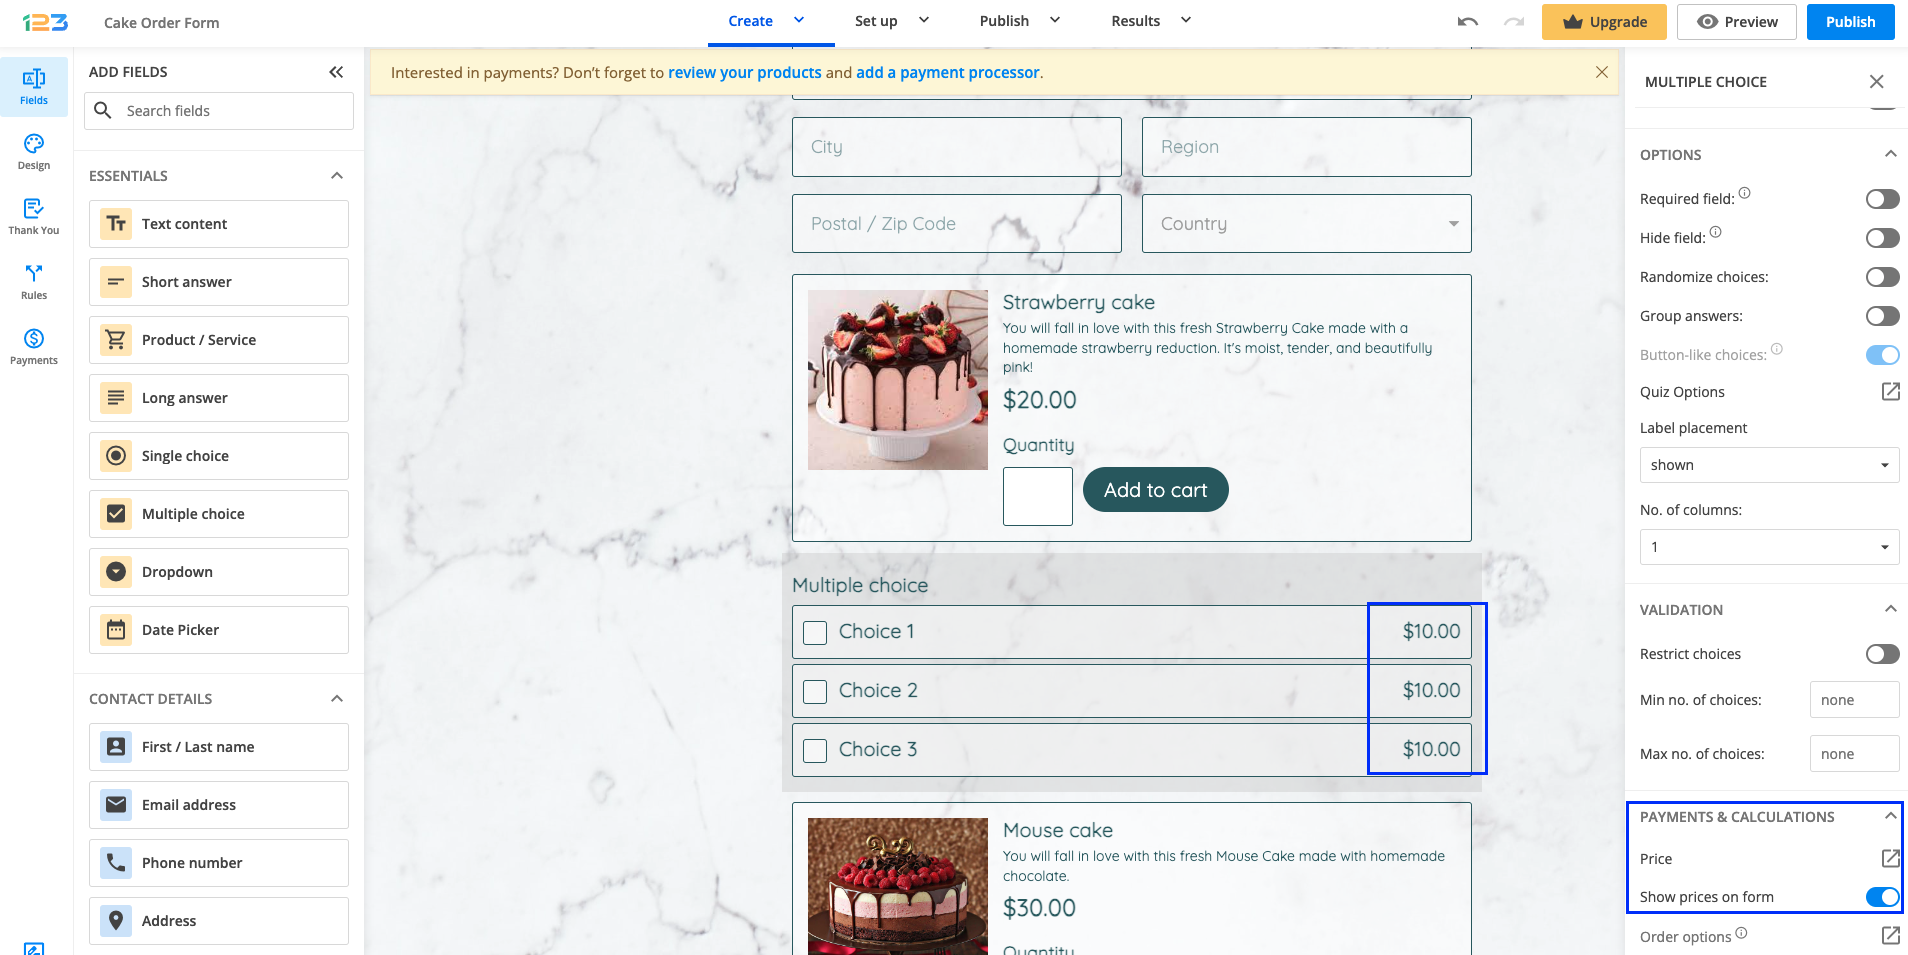
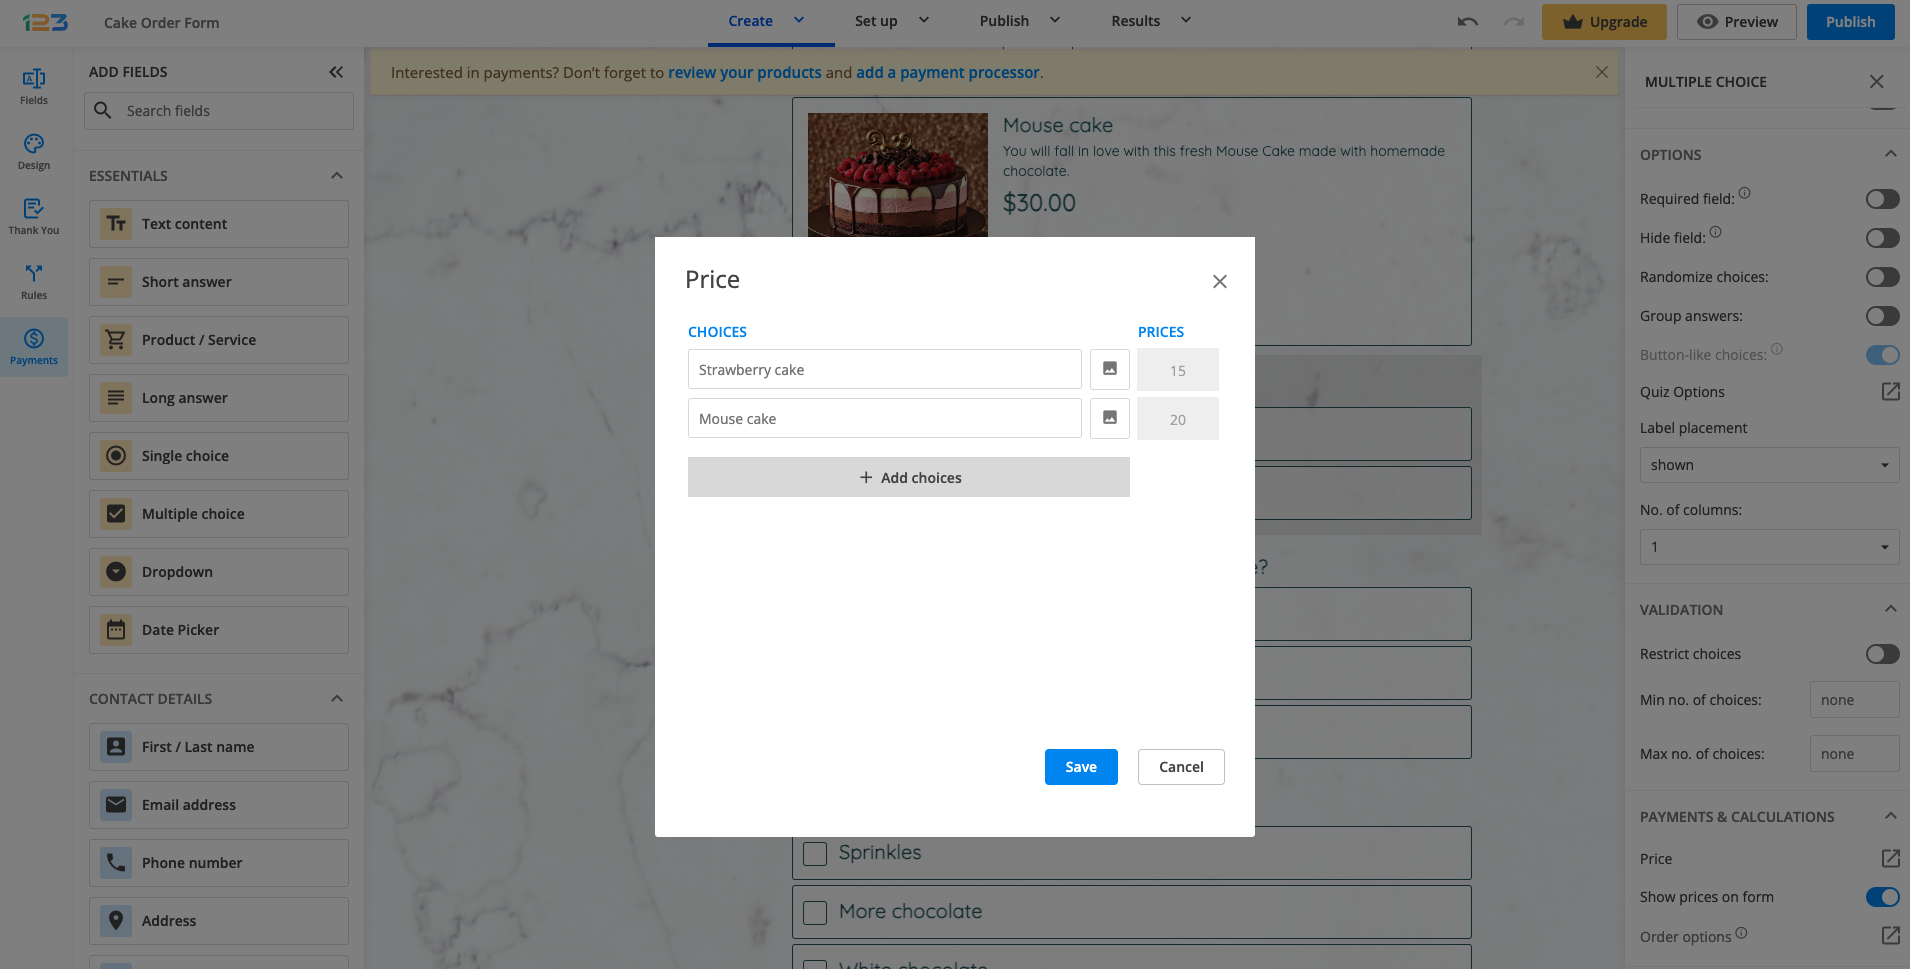
If you are using a multiple choice/single choice field, all you have to do is click on the Price under Payments & Calculation and assign prices for each choice.
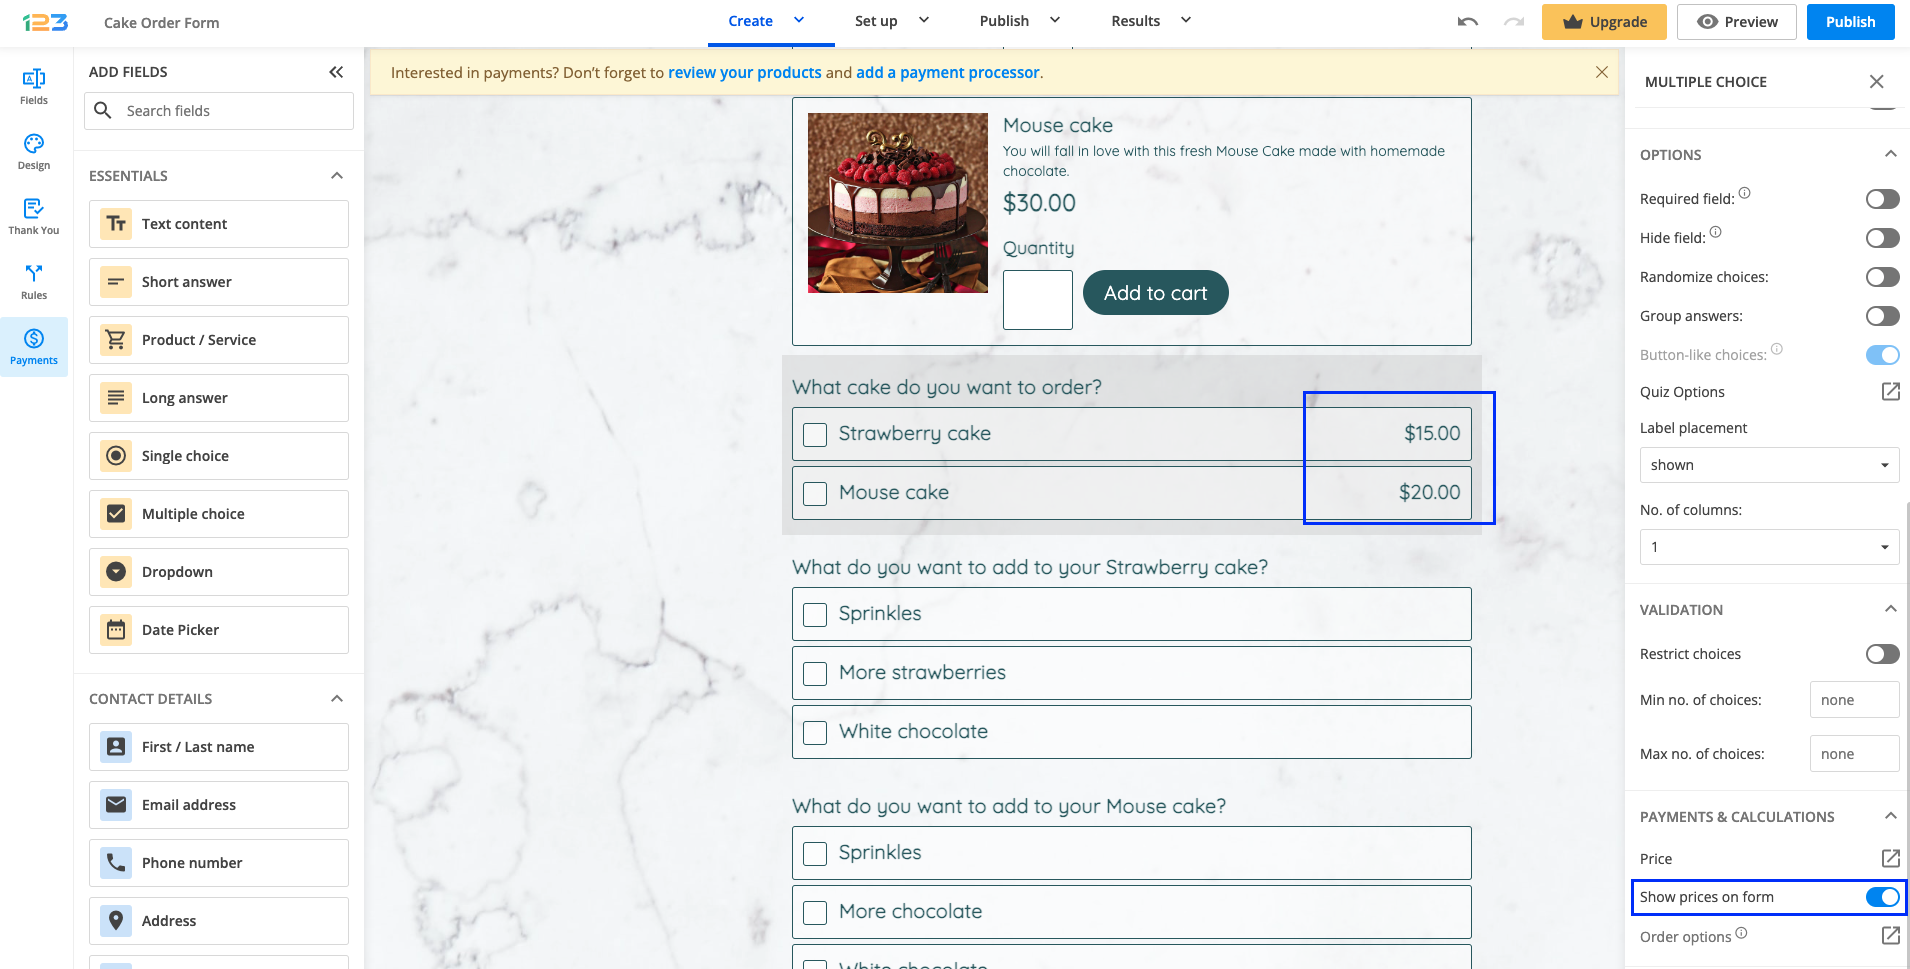
For the multiple/single choice fields, once you have saved the prices, they will be displayed near each choice, as Show prices on form is enabled. You can disable it if this does not fit your needs.
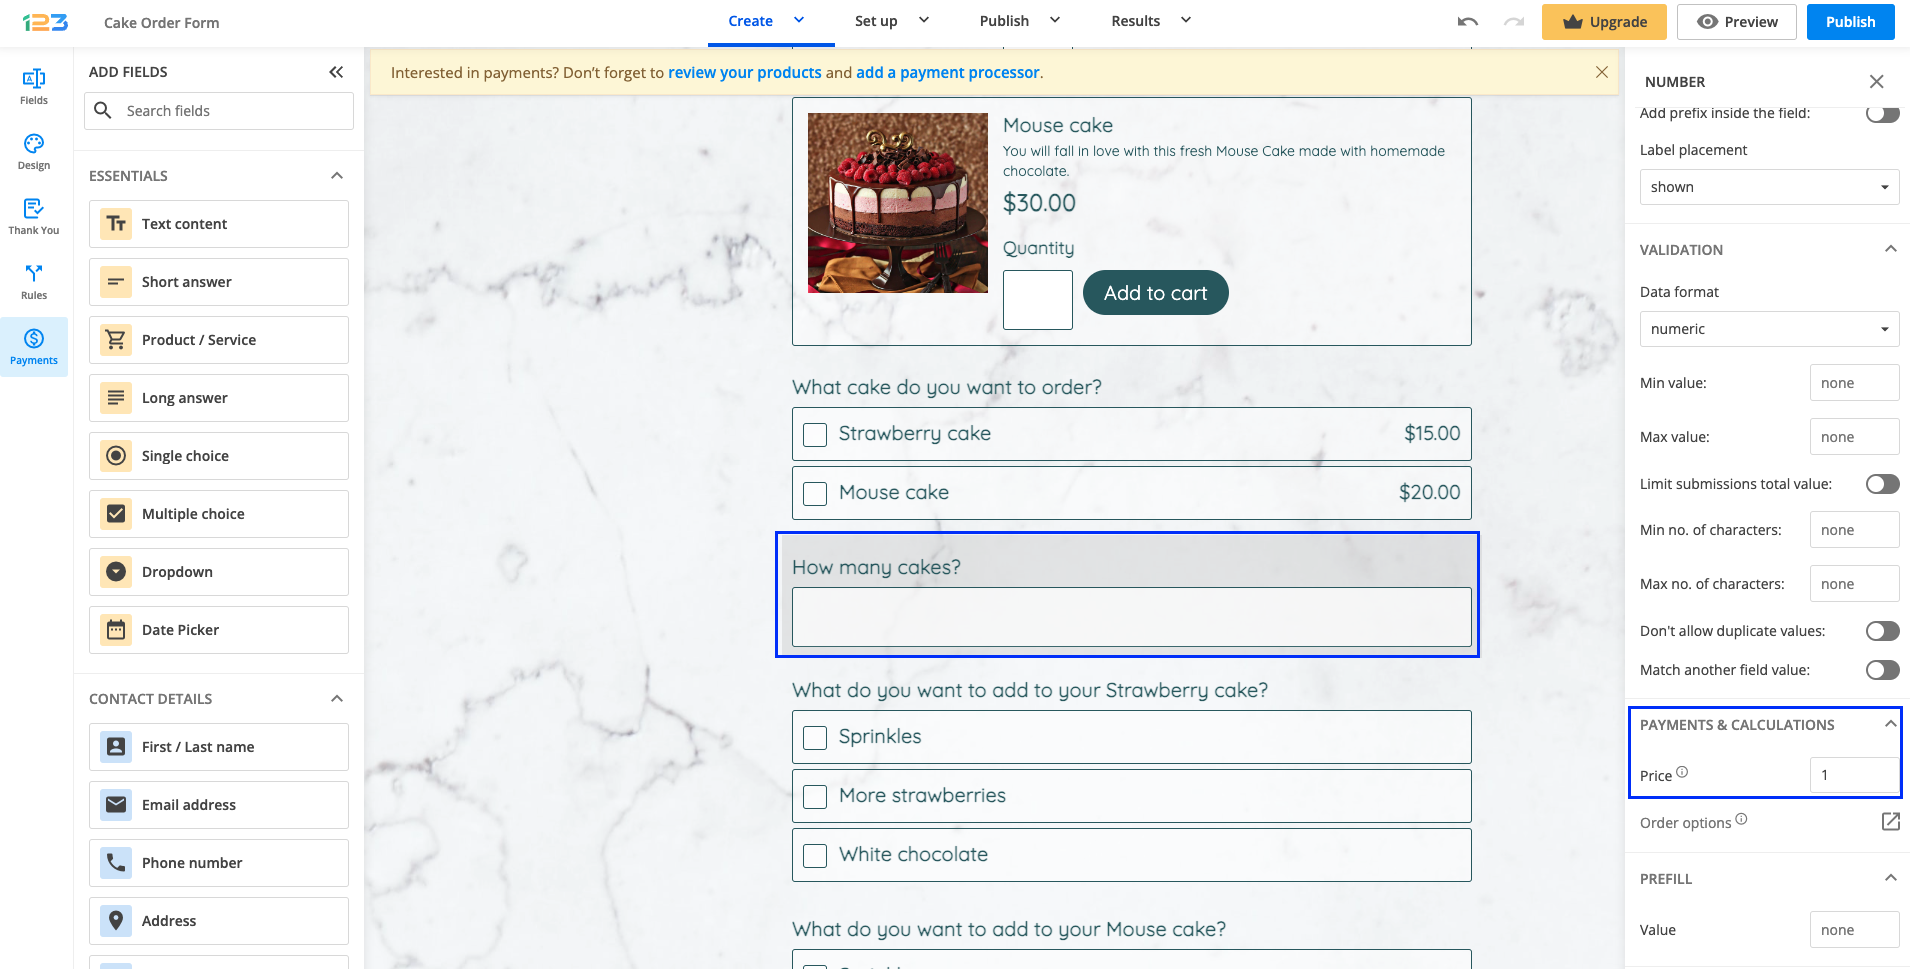
If you need the user to type in a custom amount, add a Number field and assign the value “1”.
The Number field also works as a quantity field. You can assign the price of the product to the field and the user can input the quantity.
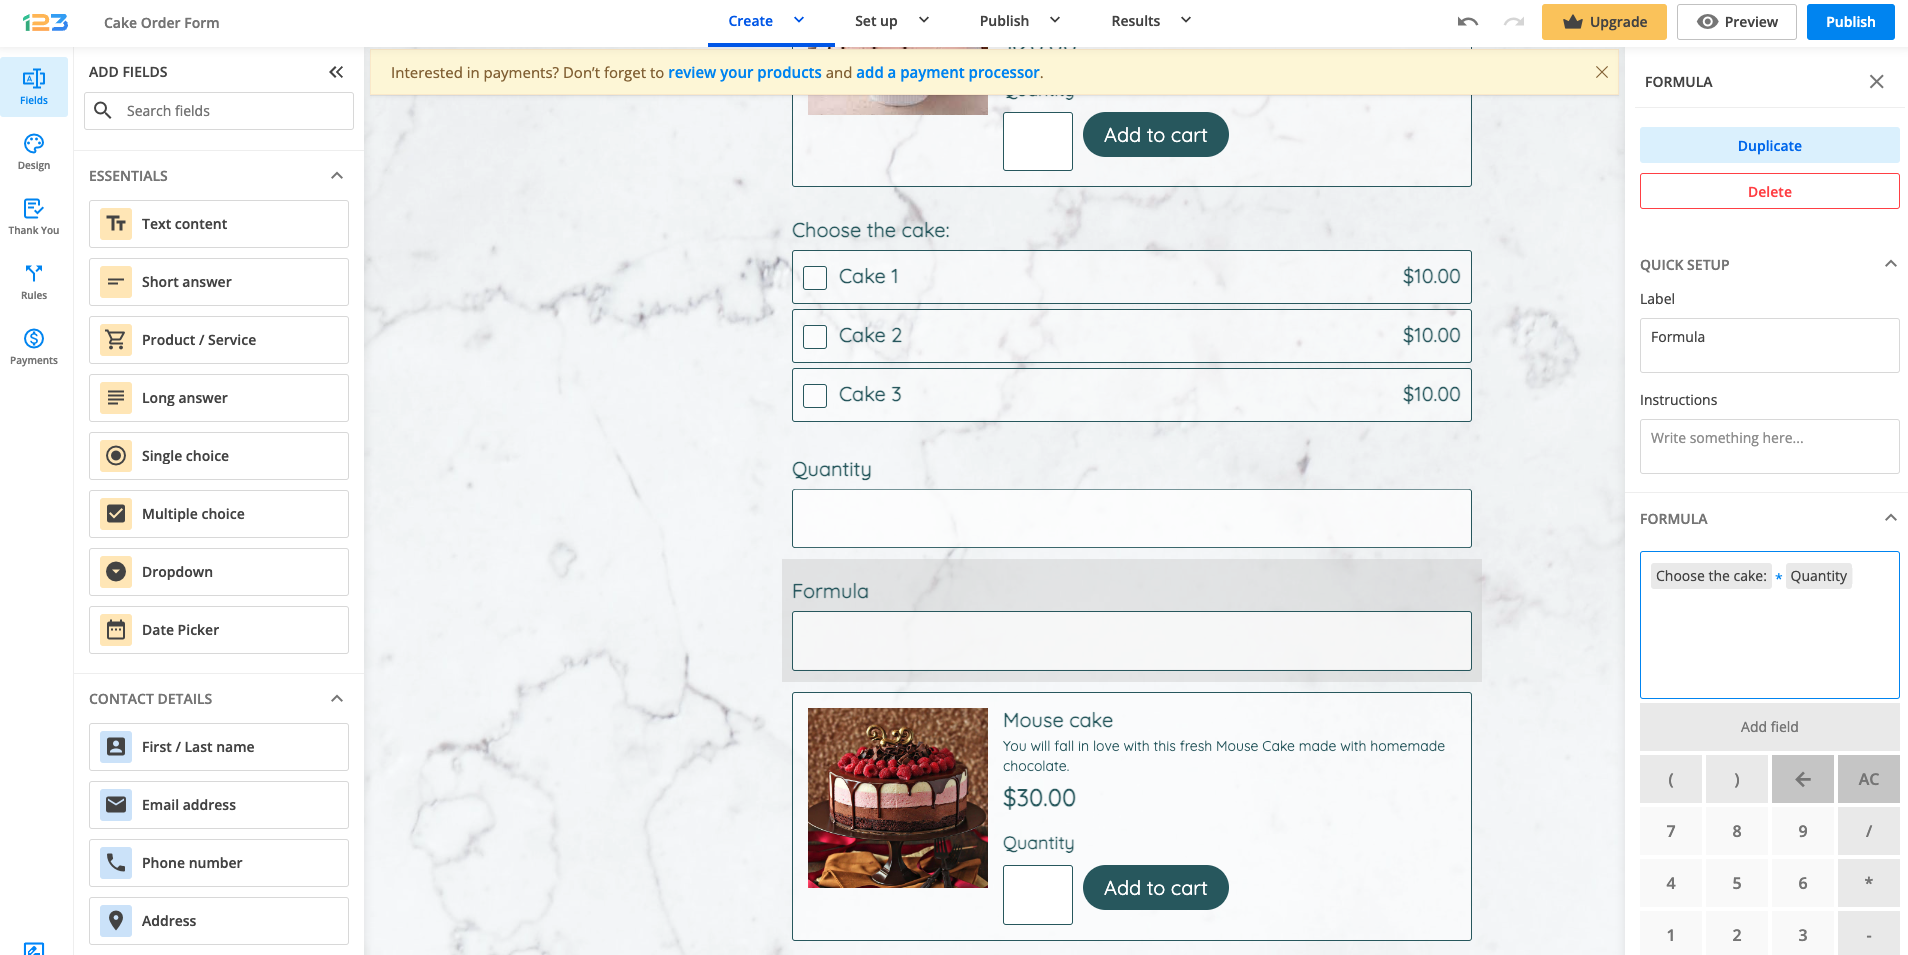
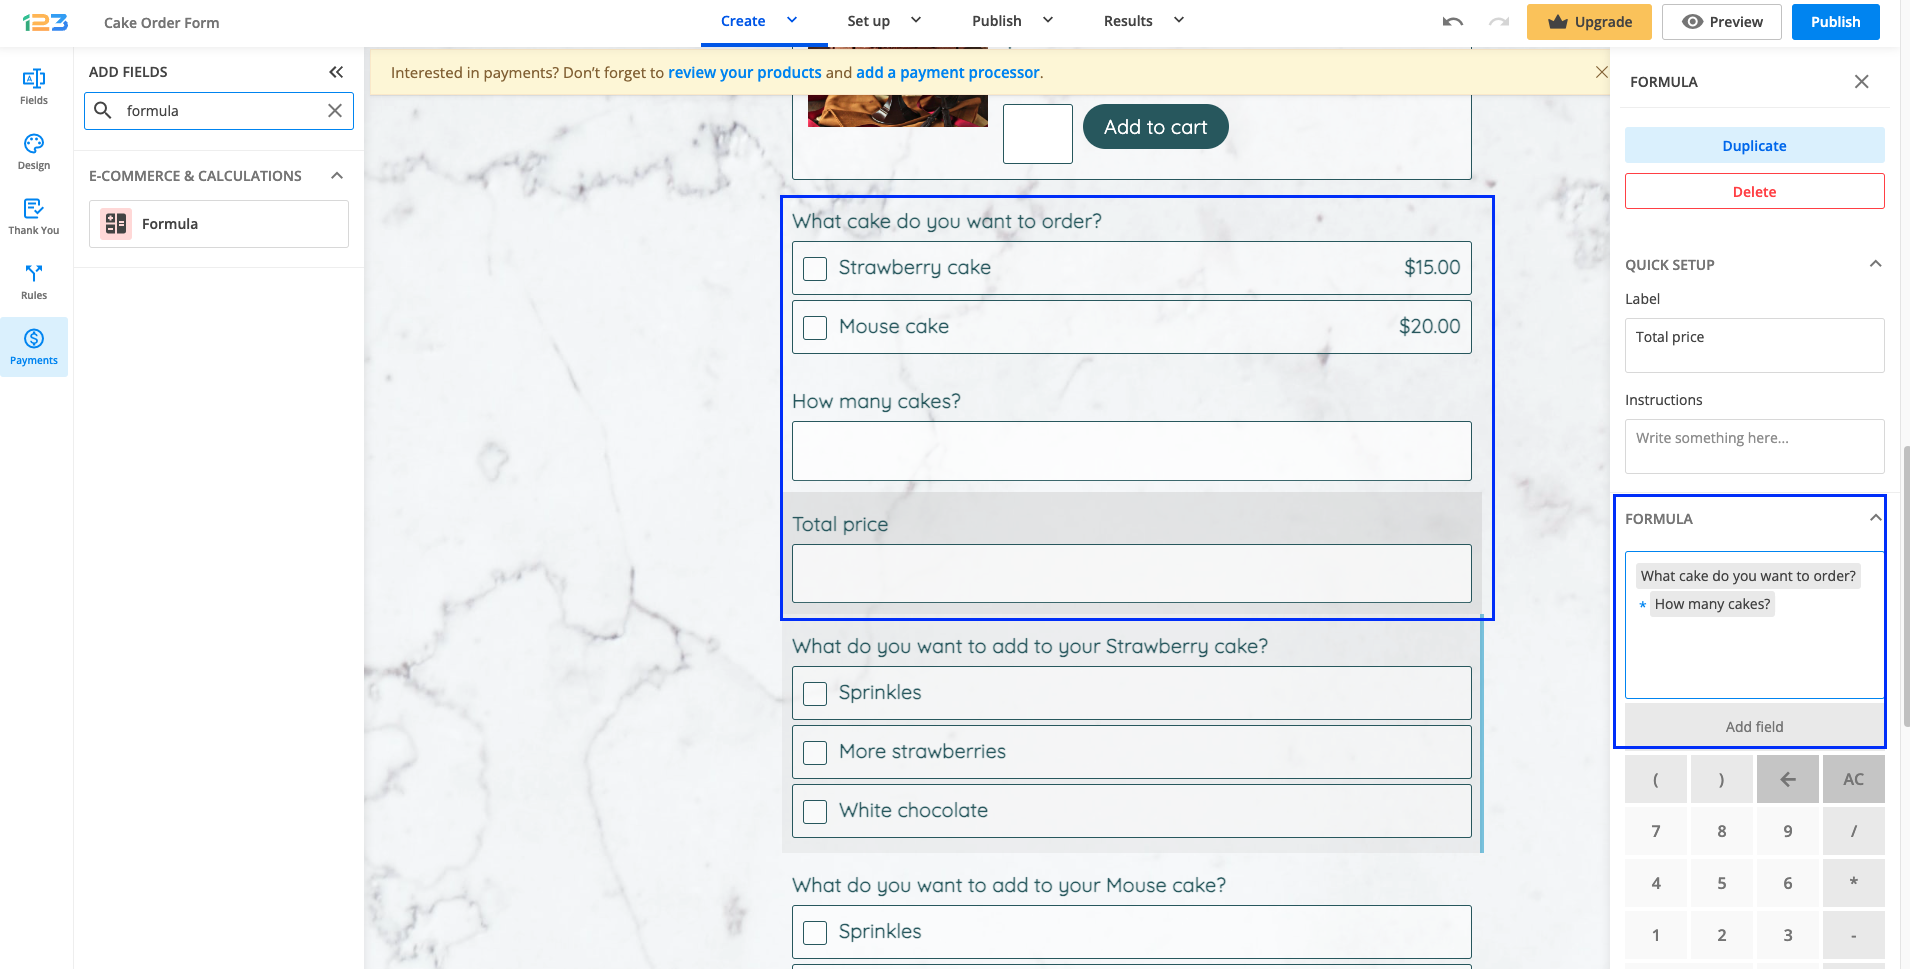
To create mathematical operations on your form, add a Formula field. Use the Add field button within the calculator to add your form fields.
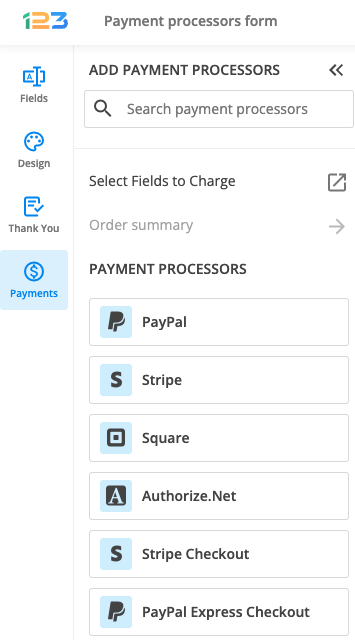
After the calculation process is done, scroll to the last section of the Form Editor called Payments. Here you’ll find all the available payment gateways that you can add to your form.
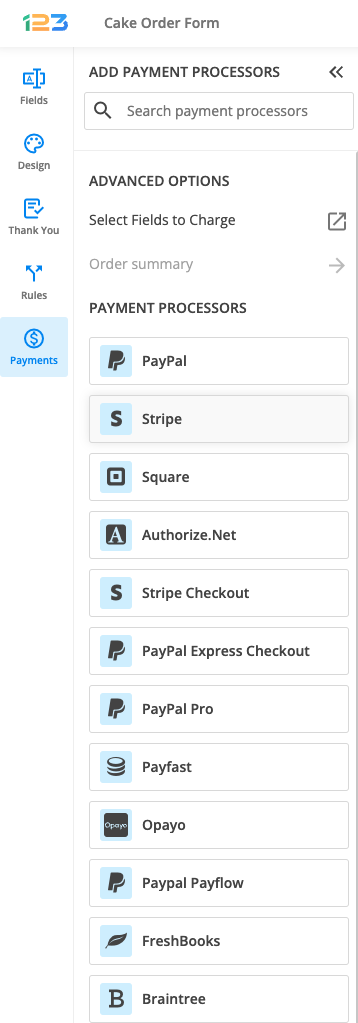
Next, select your payment processor and provide the necessary credentials.
Once connected, at the bottom, a new section will appear – Order Summary. By clicking on it, you’ll notice some settings to the right-side panel.
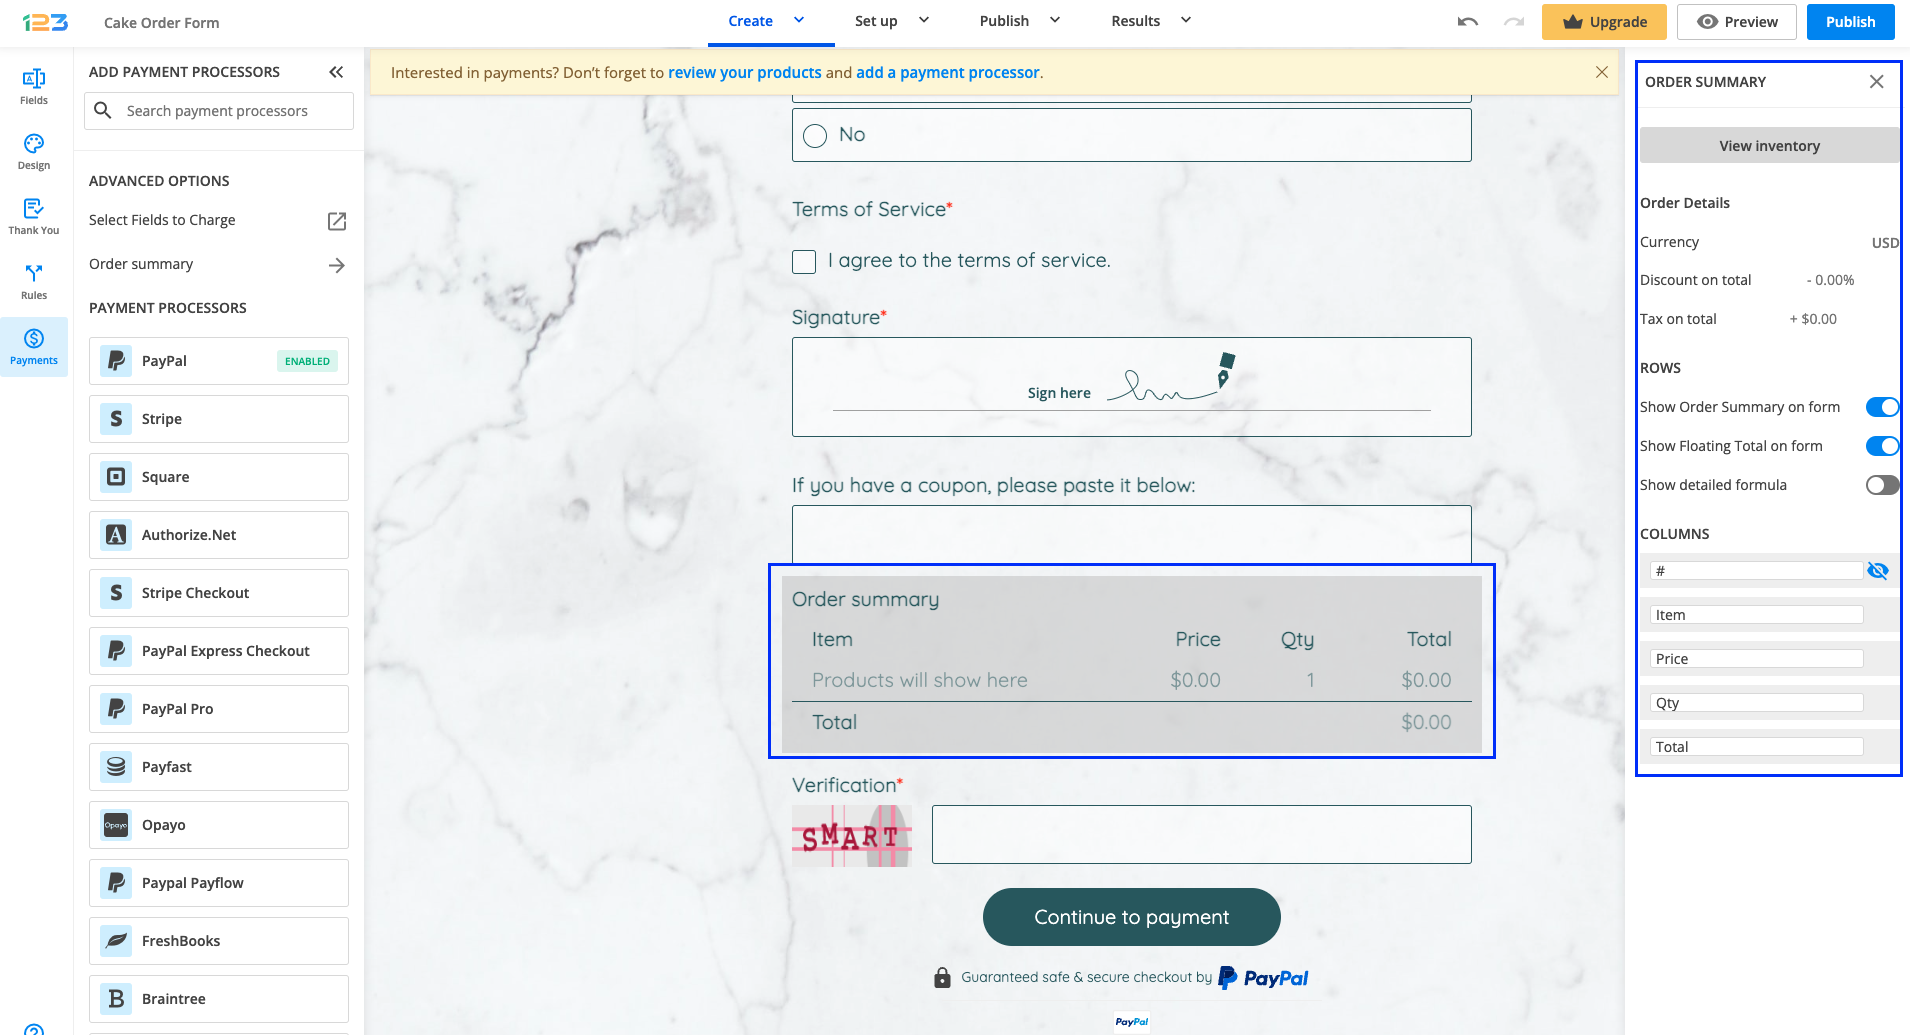
- Order details (set up the currency, discount on total, tax on total).
- Show detailed formula and Show discount & tax.
- Show order summary on form 0 Choose if you want your form users to review their payment options or not, before sending their entry.
- Columns. Here you have the freedom to rename the Payment summary table columns’ names.
After that, click on the View inventory button. A pop-up window will appear where you can see all the fields that have prices assigned. Determine how you want to calculate the total price.

- Name. Here are all the fields that calculate the total price. Click the plus sign to add a new product.
- Price. This column will show you the actual price of the field or Multiple, Variable. Multiple means that you have multiple prices in that field. Variable is displayed when you have a formula.
- Quantity. By default, it is “1” (e.g the value assigned to the field: $154 x 1). However, you can also add a Number field in this column. This way, the price will be multiplied with the number inputted on the form. This works great when the form user needs to specify the quantity for a specific product.
- Discount. Here you can establish a discount for each field in percentage or a fixed amount.
- Tax. Similarly to the Discount option, you can add a tax for each field, either in percentage or fixed amount.
You can also change the currency you wish to accept payments in, by clicking on the Currency button.
Below is a list of all the payment processors that we have an integration with:
- PayPal Express Checkout
- Square
- Stripe
- Authorize.net
- PayPal
- PayPal Pro
- SagePay
- PayPal Payflow
- Braintree
- PayU
- FreshBooks
- Stripe Checkout
- Payfast
- Sisow
- Worldpay
- Civica
Related articles
With 123FormBuilder, you can perform calculations on your web forms & surveys. Use form calculations to add mathematical operations between your fields on your online forms.
Form calculations offer a world of possibilities beyond simple data collection. Take an insurance company for example. By creating online insurance calculation forms, insurance agents can provide clients with immediate and accurate quotes tailored to their needs. This not only enhances the efficiency of the quoting process but also ensures transparency and client satisfaction. Let’s see how you can set up calculations on your online form.
Assign Values
First, you need to assign the values to your products/services. To do so, add a choice field (Single/Multiple choice or Dropdown field) and list the available choices.

Click the field to open its options in the right-side panel and select Price from the Payment & Calculations section.
Next to each option type in their correspondent price.
After saving the prices, this is what it would look like. By default, the prices are shown on the form, but you can disable that by toggling off Show prices on form.
If you need the user to type in a custom amount, add a Number field and assign the price “1”. By default, a field has no value assigned to it, meaning the input will be multiplied by zero.
By assigning a value, the form will calculate input value X 1. (e.g. user types 123, the number field will calculate 123 X 1= 123 instead of 123 X 0= 0).
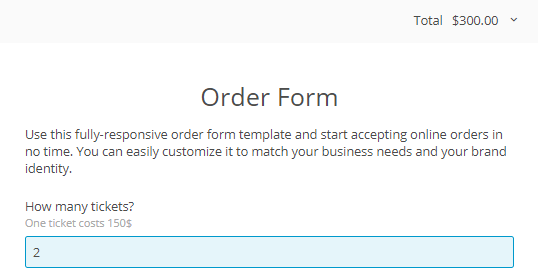
When you are using a Number (input) field, it also works as a quantity field. Assign the full price to the field (e.g. $150). If the user types 2, the calculation will be 2 X 150 = 300$.
Create formulas
To create mathematical operations on your form, add a Formula field. This field will show the total value in real-time.
Add a Formula field from the E-commerce & Calculations section. A calculator will appear where you can add operations between your form fields. Use the Add field button within the calculator to add your form fields. Once the field is selected, it will be automatically added to the formula. You can use your keyboard to add operators and values.
Important Notes
- You don’t need to enable payments on your form in order to use form calculations.
- Formula fields are read-only.
You can easily publish web forms in the content of your Wix webpages. With 123FormBuilder, you can build any type of web form and start collecting data from your website visitors.
How you can add web forms to your Wix webpages
1. To add our form builder app, make sure that you are on the webpage where the form will be embedded.
2. Next, in your Wix Editor, select Add Apps and search for 123FormBuilder. In the right panel, click on Add to Site.
3. Double-click on the default template to open our app menu and connect your existing 123FormBuilder account. If you’re new to our platform, an account is automatically created for you using the email address of your Wix account.
4. Once connected, select Manage Forms to open the 123FormBuilder widget.

5. After that, click on New Form to start creating your online form. Here you have the option to choose from our form template gallery or to create a form from scratch. For a quick guide on building your contact form, check out our contact form tutorial.
Publishing your form on Wix
After you have finished designing your form, it is time to publish it on your webpage. To do that, open your form in edit mode and simply click on the Publish button. Click on Preview within your Wix Editor to see how the online form will look on your Wix webpage. Once satisfied with the result, click on Publish and the form will be live.
Important Note
If you need to publish a second form, all you need to do is to search again for our app in the Wix Market. Make sure to click on Add Again and not Open App. The publish method is the same as explained above.Collecting money via forms is an easy and fast way to grow your business. Whether you are selling a product or offering paid services, here is your solution: 123FormBuilder + Square.
No code is needed. You just need to build your form, set the prices, and connect it to your Square account.
Setting up your Square integration
1. Click New Form from your account dashboard and start creating your payment form.
You can use choice fields (single/multiple choice and dropdown lists) to display the products on sale or, even better, Product field.
2. In your Form Editor, in the left side panel, you will notice the Payments section. By using the search bar, you can quickly find Square.
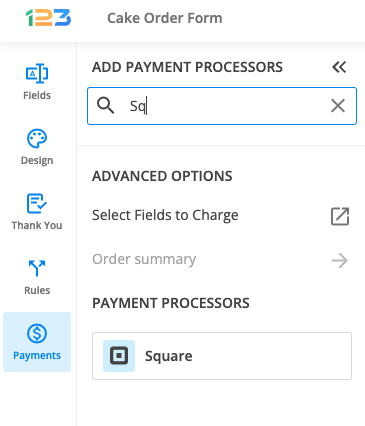
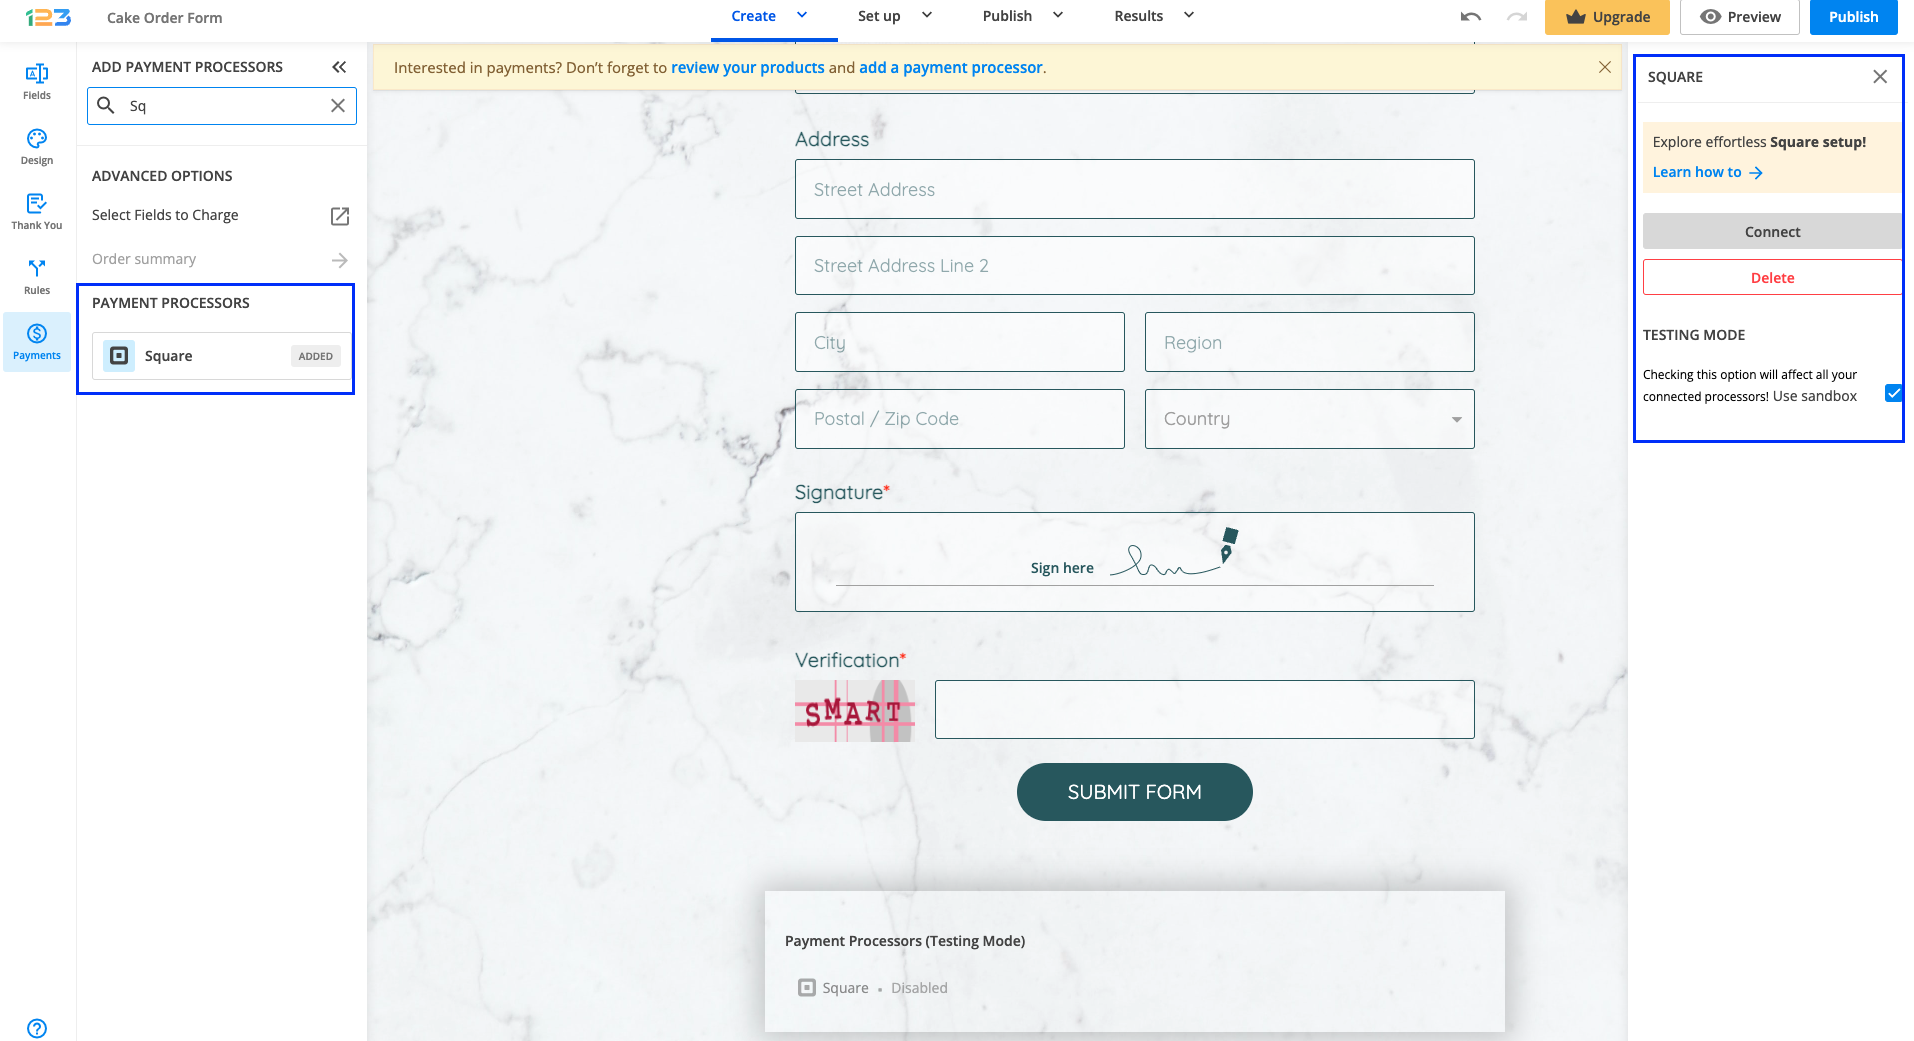
3. After adding Square on your form, you will notice a couple of changes: the Square payment processor has a tag near its name & the settings panel opens up to the right side of the page.
4. In order to set up the Square integration, you have to click Connect. A new tab will open where you can provide your Square credentials or choose to create a new Square account. Once connected, you will be able to choose and manage locations. If you want to test transactions, simply tick the Use sandbox option.
5. Once enabled, Square will have the tag updated to Enabled so you could easily scan which payment processor is enabled.
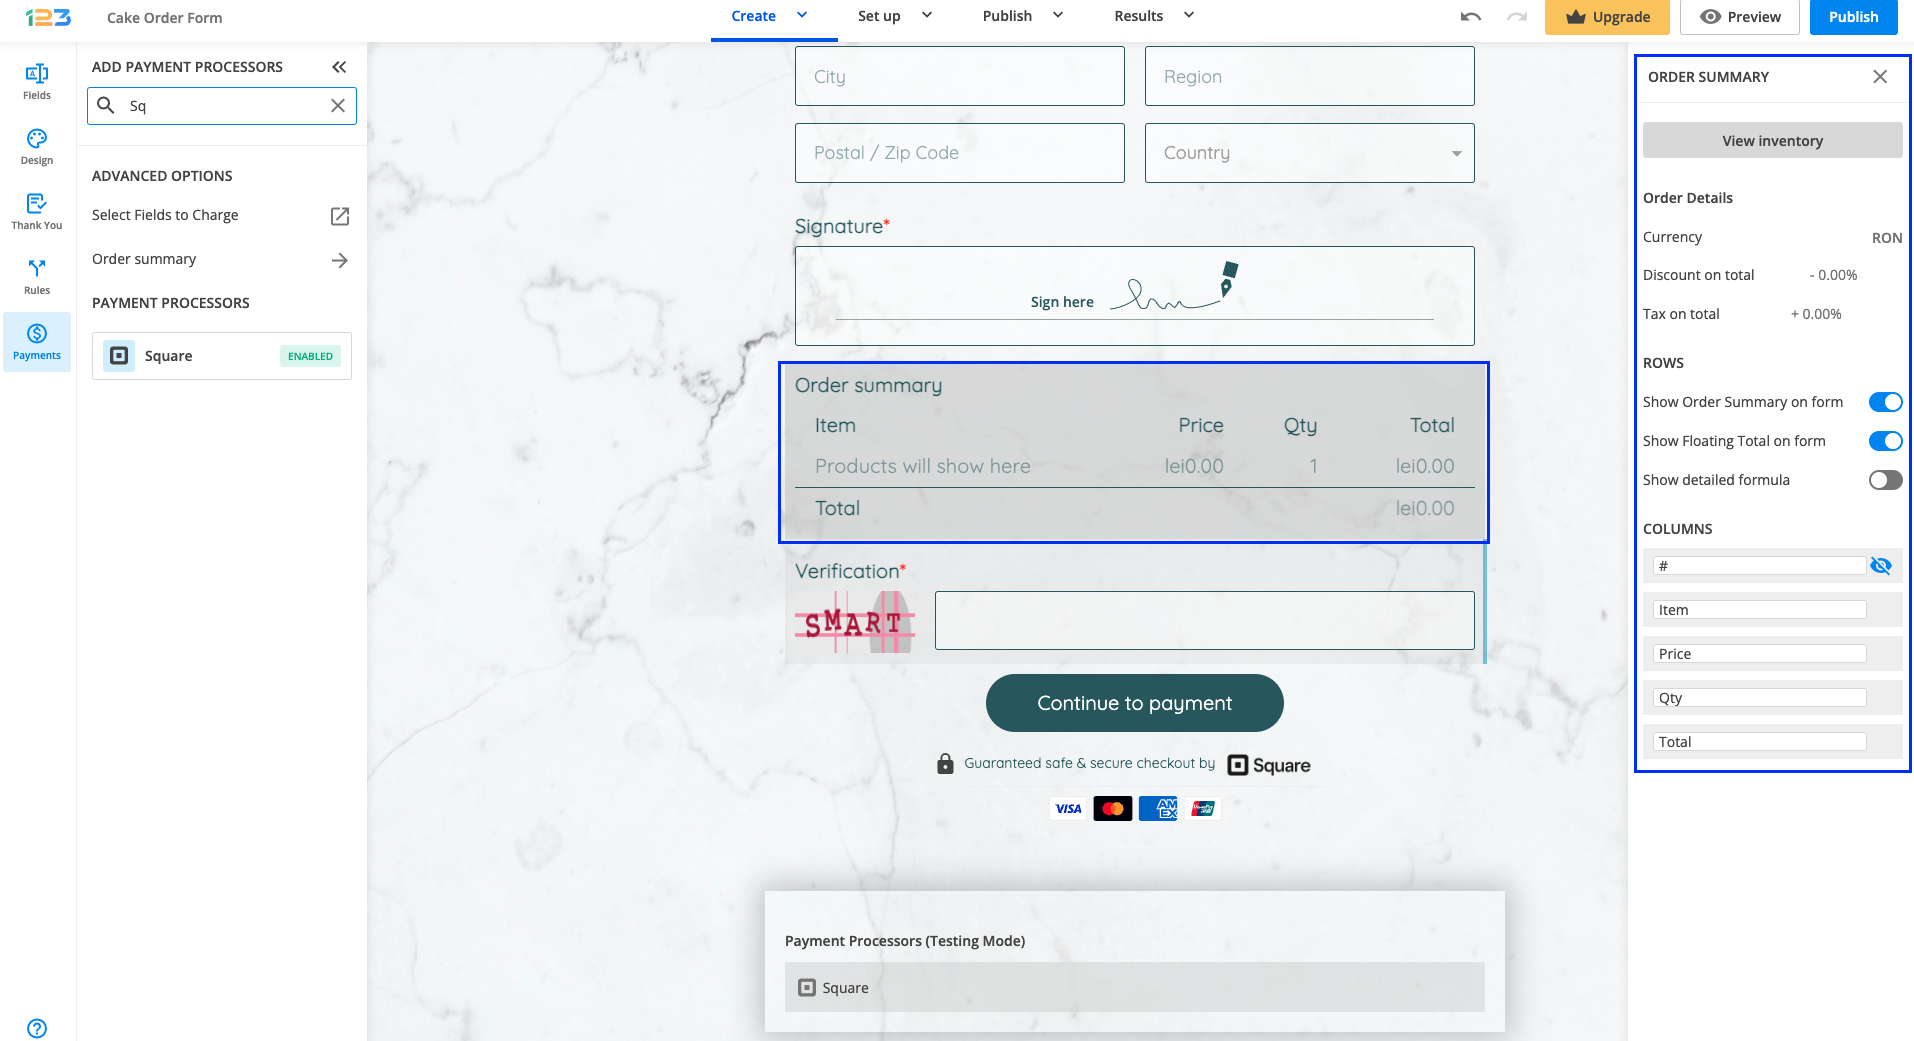
Another change is that on your form it will be displayed an Order summary. Here will appear all the products your respondents select on the form, together with the price per option, quantity and the total price. If you want to customize the order summary, all you have to do is click on it and the available settings appear on the right side panel.
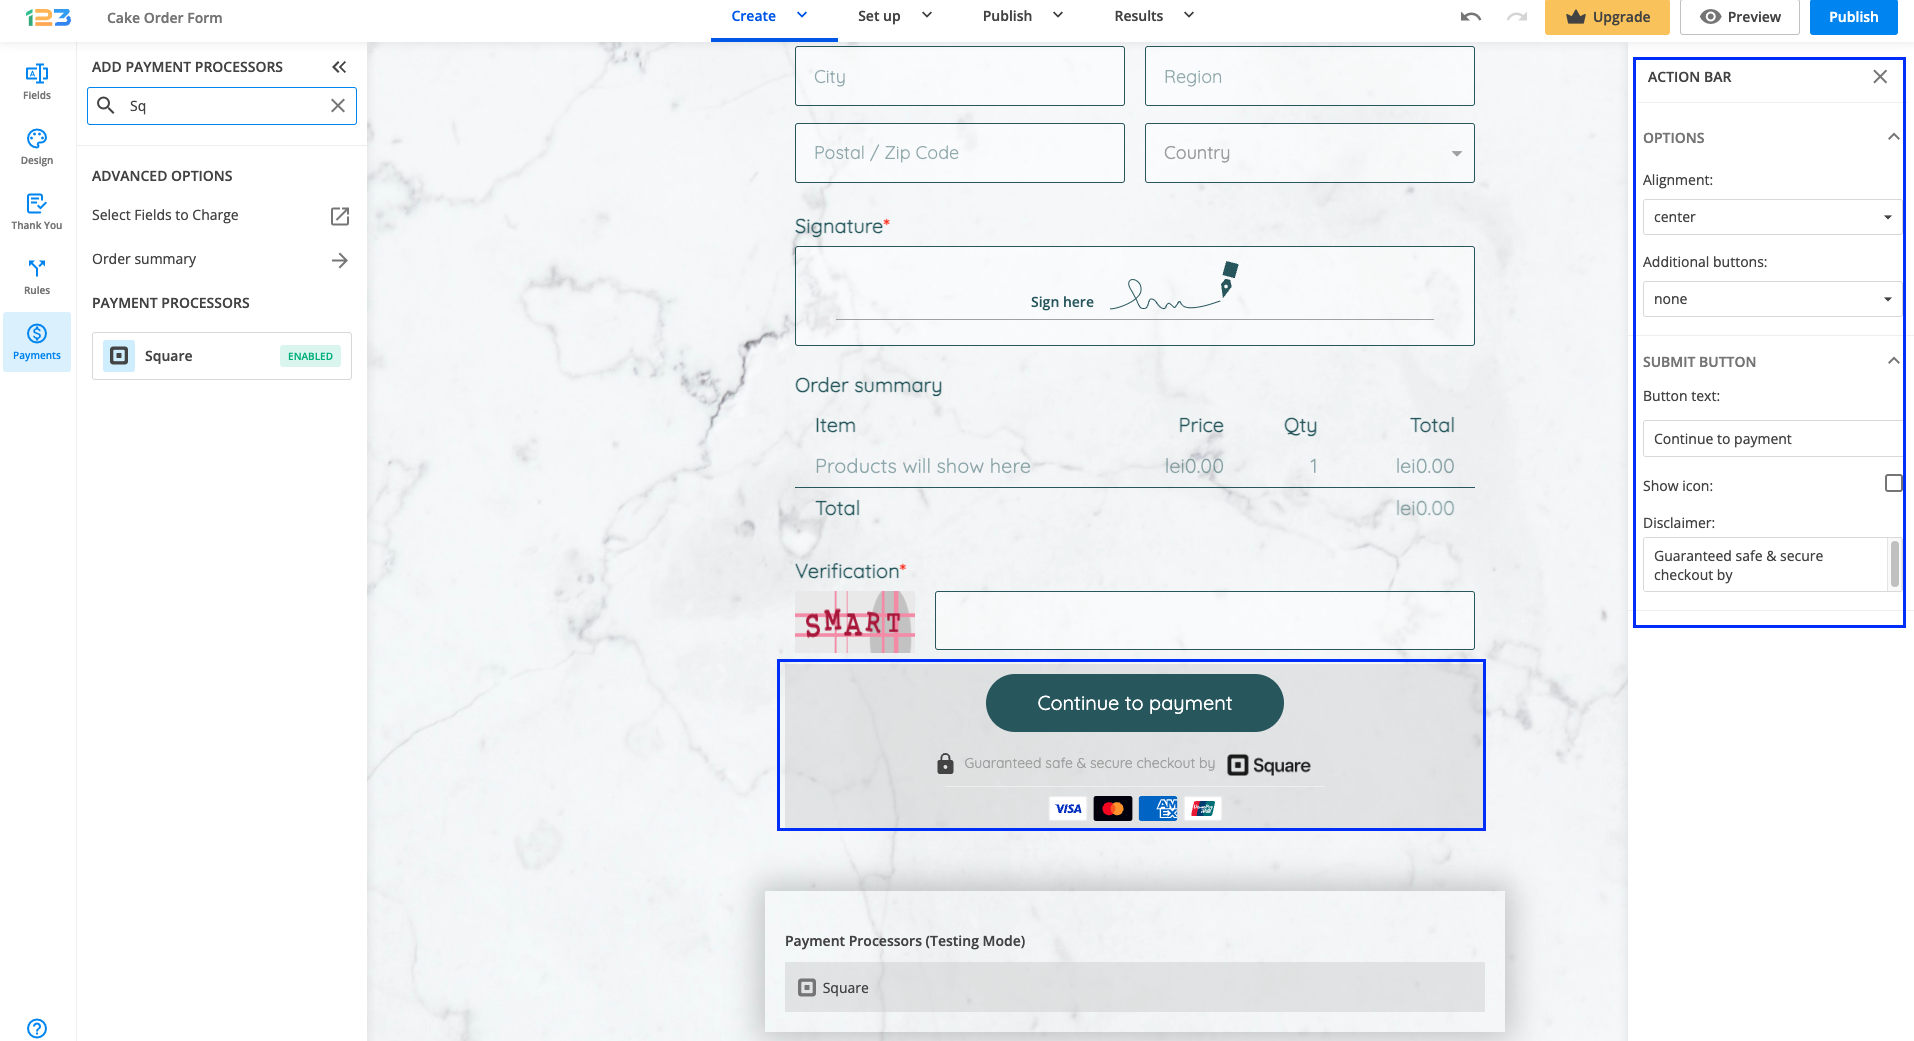
When a payment processor is enabled on the form, the Submit button is changed to Continue to payment. You can modify this by clicking on the button area. A right side panel with settings is opened and you can modify the button text & the disclaimer shown under the Continue to payment button.
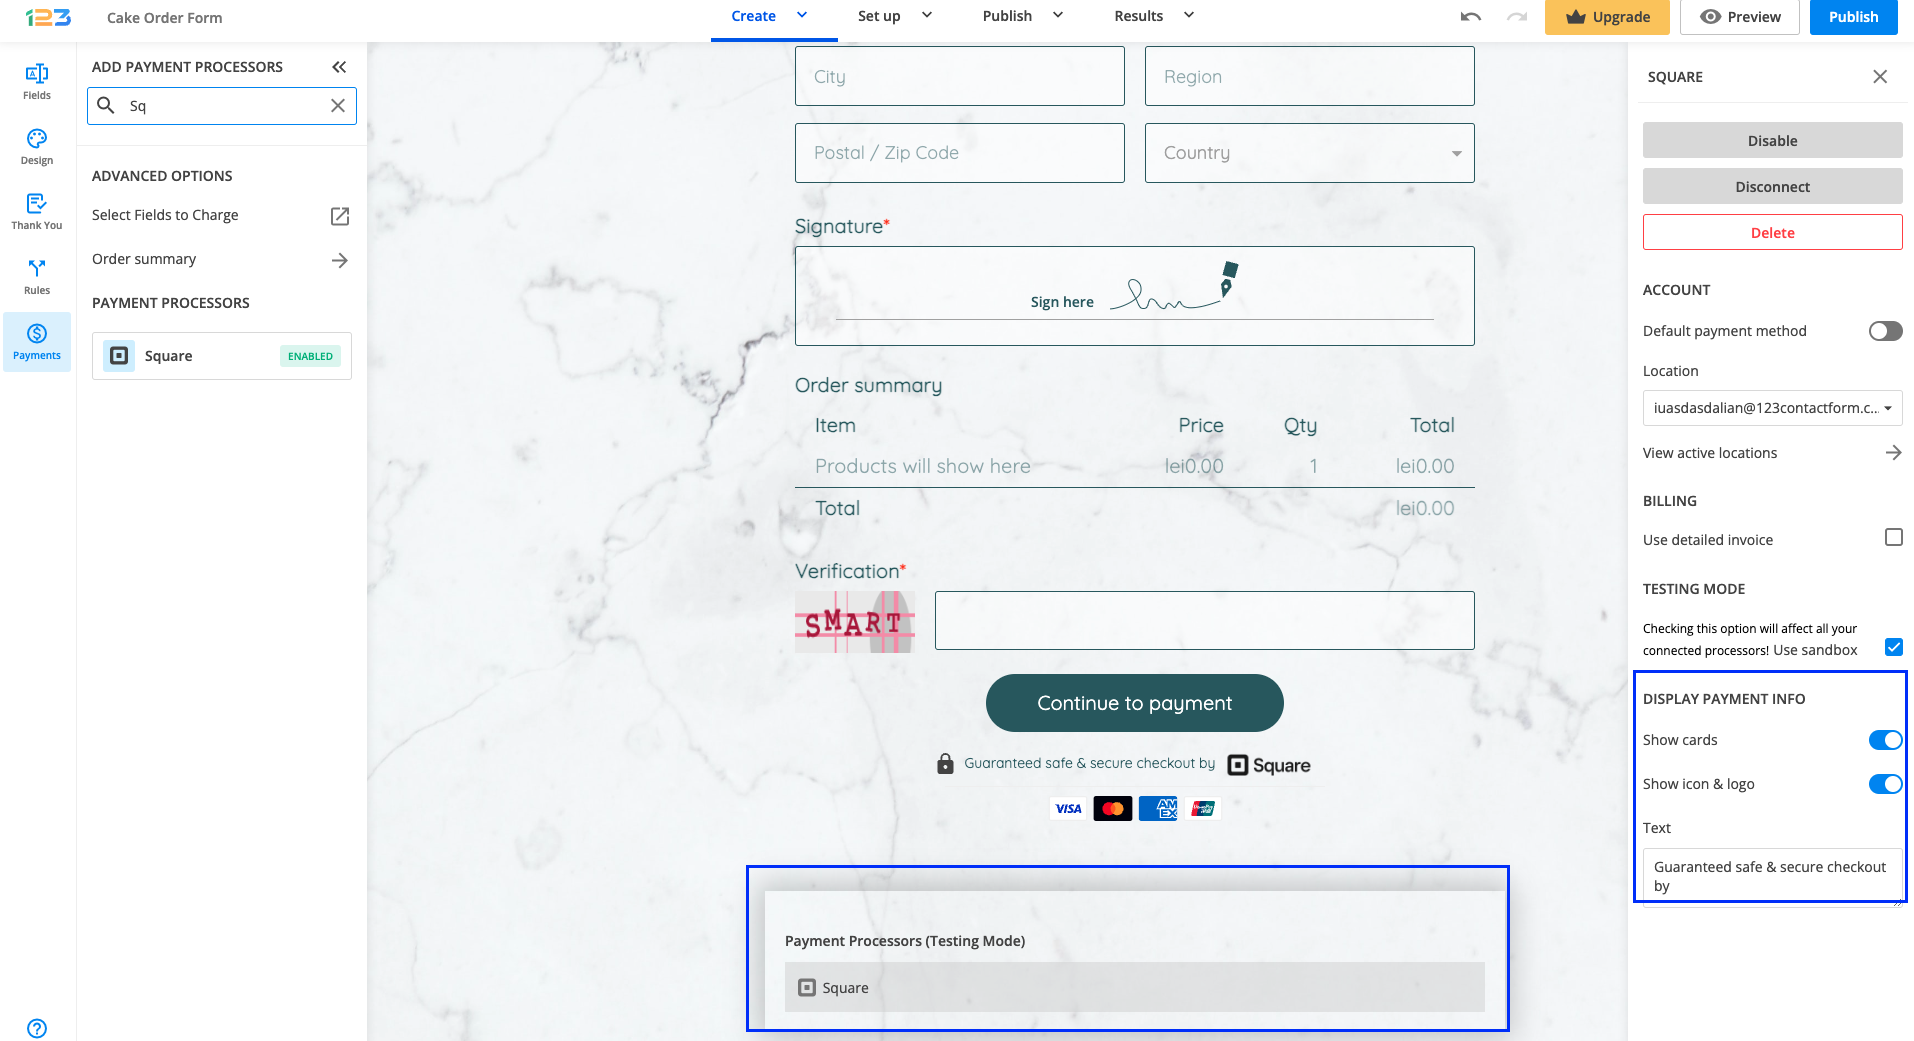
Another change that you might have noticed is that we are displaying the accepted cards and the icon & logo of the payment processor enabled on the form. By default, these settings are enabled, but you can disable them by clicking on the payment processor and going to Default payment info.
And that’s how easy it is to build a payment form with Square! Now you can just sit back, relax, and let your orders roll in.
Different business scenarios may require you a form migration between Salesforce orgs. For example, after you are done setting everything up in your Sandbox org, you need to turn to your Production environment. Or if you are a consultant and are preparing the Salesforce implementation for a customer, you need to publish the setup live at the end. Irrespective of the situation, 123FormBuilder provides an easy-to-use migration mechanism that allows you to quickly transfer forms between different Salesforce orgs.
When you migrate a form between Salesforce orgs, the two orgs should have a similar structure. The object and fields mapped in the 123FormBuilder – Salesforce integration should be identical.
After migration, you will need to check the integration settings and re-enable your connectors. This is in order to minimize the chances of something not working correctly.
How can I migrate my forms from one Salesforce org to another?
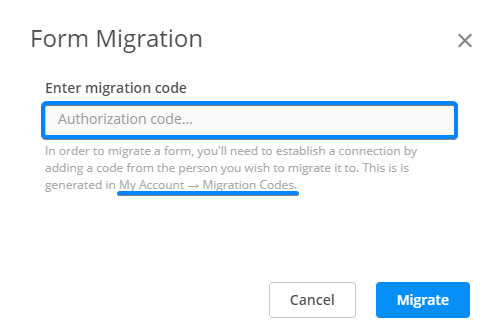
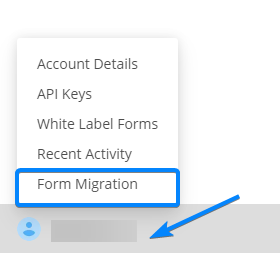
First, it’s important for you to know that the feature is available in the My Forms section of your 123FormBuilder account for each form you are creating. The Show More menu contains a Form Migration option that allows you to move the form to the new org. In order to establish the form connection with the new org, you need a migration code that has to be generated inside it.

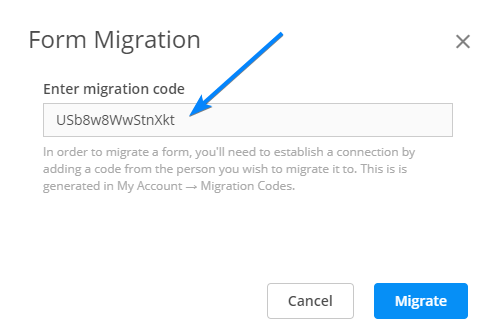
You’ll be asked to paste your migration code to continue.
How do I generate a migration code?
In order to generate your migration code, navigate to the org in which you want to migrate the form. In the section My Account, you will find a brand new section named Form Migration.
Here you can do the following:
-
generate multiple migration codes
-
establish code availability
-
leave useful notes for yourself
Attention! The code generated will only be available for the time frame you have specified. You can also delete migration codes at any point.
Form Migration Between Salesforce Orgs
The final step required for the form migration is to copy the code generated in the source org and insert it in the Form Migration section of the target org. Once you will press the Migrate button, the form will be transferred to the new org.
Important Note
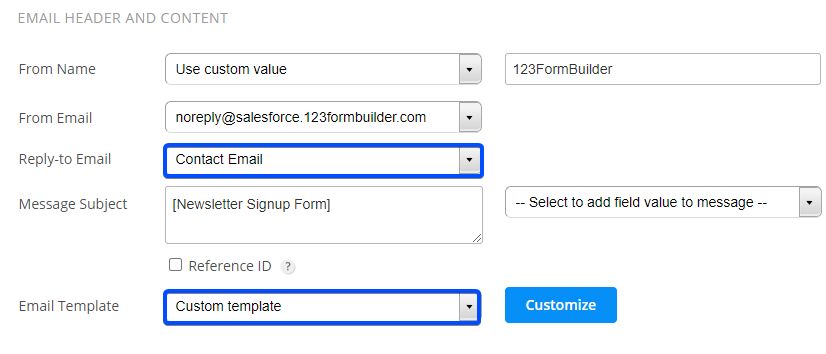
When migrating a form, there are a few options in different areas of the form that are not transferred, so please make sure you check and set them up after the form is migrated.
The values from Notifications → Form Owner (You) → Email Header and Content – The “Reply-to Email” and “Email Template” don’t copy over.
And you are all set! To sum up, all that you need to do is generate a migration code in the target org and use it in the source org for the forms that you wish to migrate.
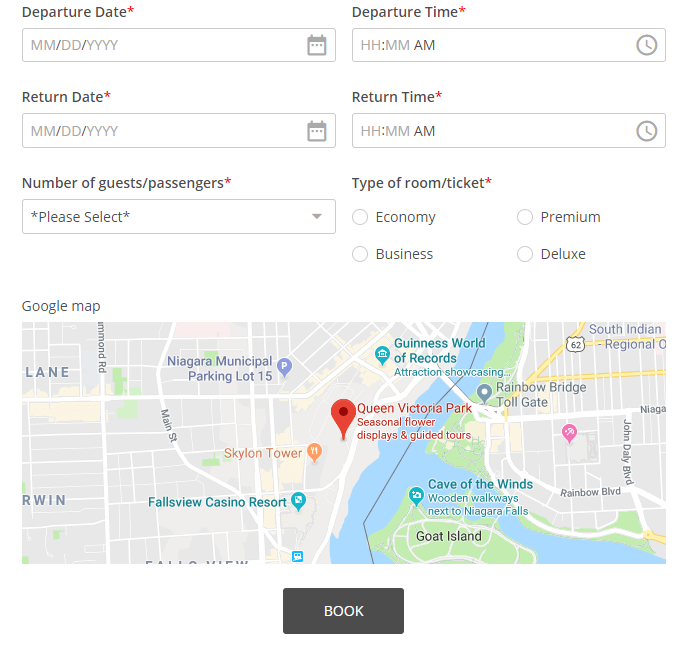
Showing is always easier than telling. If you need to communicate a specific address to your respondents, do it with the interactive Location on Google map field. People will appreciate that you’re making their experience smoother this way.
The Location on Google map field requires a 2 min setup before you can get it to work in our form builder.
Get a Google Maps API key
To use the Map field, you first need to connect it to Google’s API. You can get your own API key from this link by pressing Get Started. You will be guided through a short process to create your own project inside the Google Map Platform in order to get a personal API key.
Important Note
Google’s Map service will require you to set up a billing account for the API usage. You can check their pricing system here .If you don’t have a Billing account just yet, click on the Manage Billing Accounts button and then Create Account. Afterward, return to the setup from this link to set the billing account for your project.
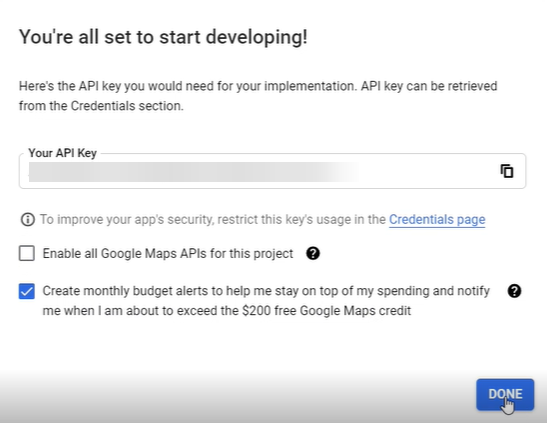
Your API Key will be generated right away. You have the option to enable all the Google Maps APIs for your project or you can enable them individually from Maps APIs and Services.
There are multiple versions of Google Maps API. To enjoy all the options provided by the Google Maps field, you need to enable the Places API, Maps JavaScript API, and Geocoding API.
Restrict your API key
You need to restrict the access to your API key and authorize its access only to trusted requests. Follow the steps below on how to authorize 123FormBuilder.
- Open the Google Cloud Platform Console.
- Select your project.
- Next, go to APIs & Services and choose Credentials.

- Click the icon next to your API Key to open the Restrict and rename API key section.
- Scroll down to the Applications restrictions and select HTTP referrers (web sites).
- Click on Add An Item and at Referrer type in: https://*.123formbuilder.com/*

Connecting the API key to your form
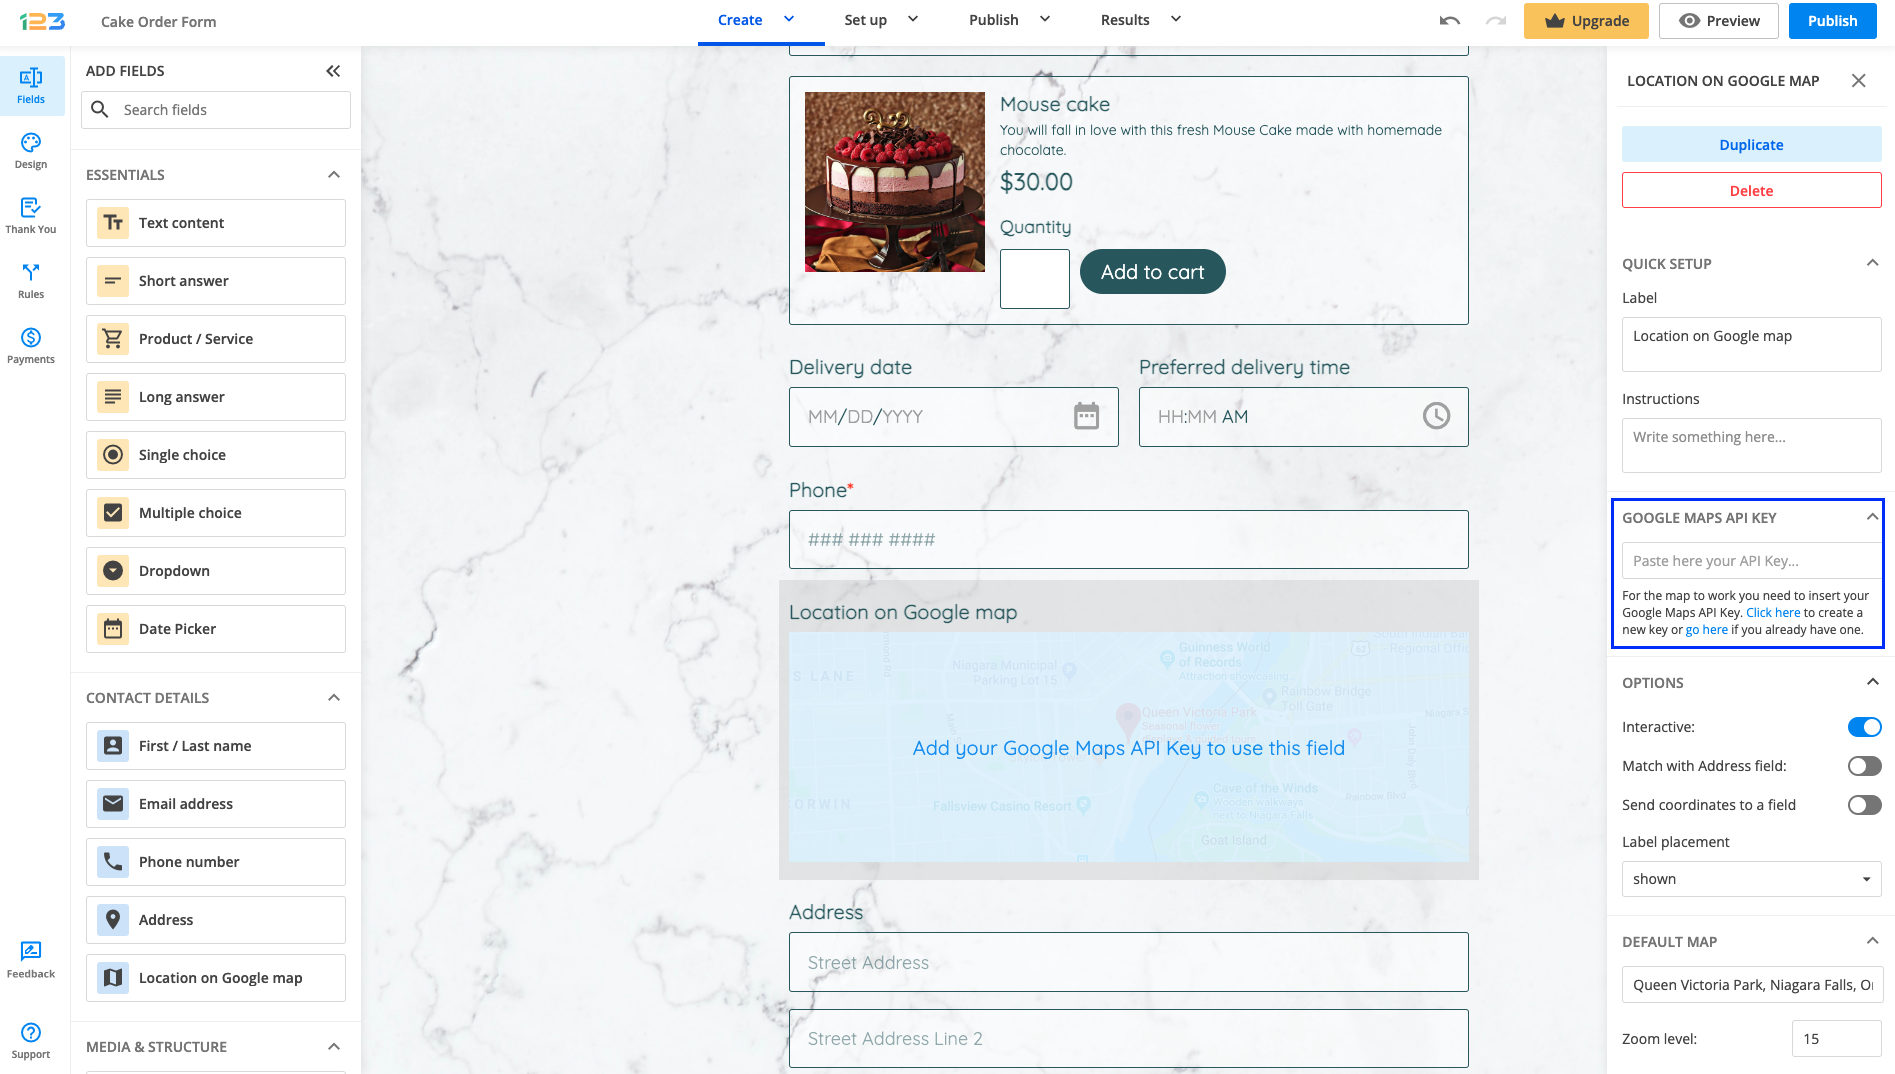
After you have received the API key, it’s time to put it to use.
Go to the form you wish to add Google Maps in and add the field. After, go to its Edit Field panel and insert the API key, as you see in the picture.
Related articles
Besides the Attachments object, the Files object can receive data sent through the form as well. To set it up, just follow the steps below:
1. In the Object Mapping section of your Salesforce integration, add the Content Version object as a related object to your primary object.
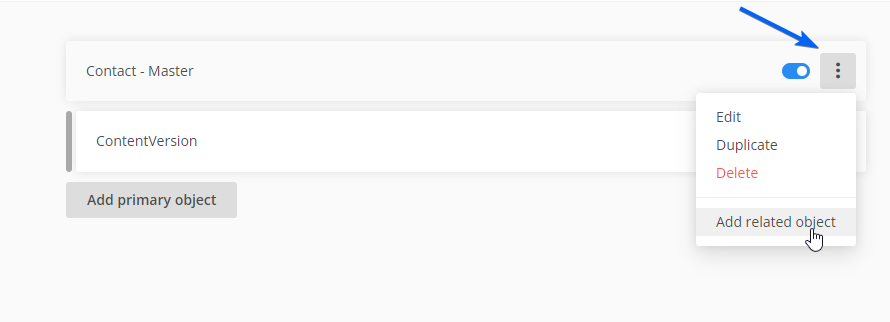
2. Afterward, associate the Salesforce fields with the fields indicated in this image:
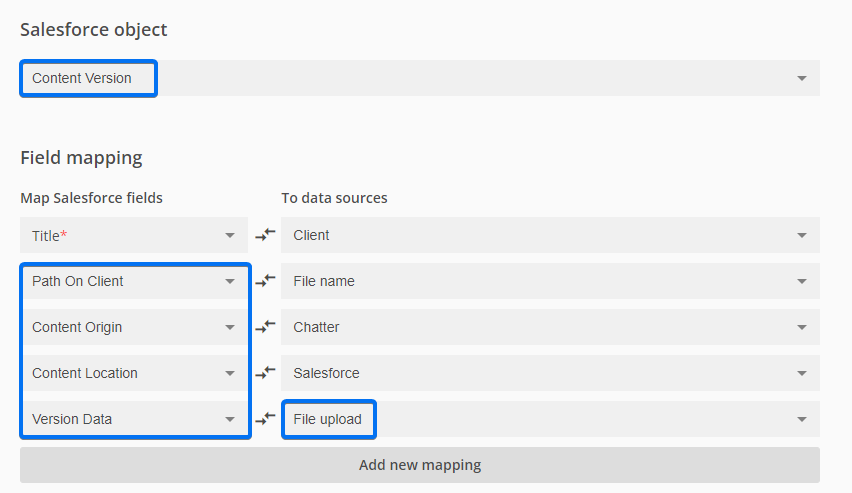
You can map the Path On Client field to any input field. However, you must associate the Content Origin and Content Location fields with Chatter and Salesforce, exactly like in the example above, while Version Data has to be mapped to a File upload field.
Related articles
Most Popular
Frequently Asked Questions
Here is a list of the most frequently asked questions. For more FAQs, please browse through the FAQs page.