123FormBuilder Knowledge Base
Search our documentation platform for answers, service specifications and 3rd-party integrations.
Knowledge Base
By default, the File upload field can upload a single file only. However, if you enable the multiple files feature, your form visitors can upload several files at the same time.
To enable this feature, log into your form builder account, go to the Form Editor, and add the File upload field to your form.
Afterward, go to the Edit Field panel on the right and check the option to Allow multiple files, under the Options section.
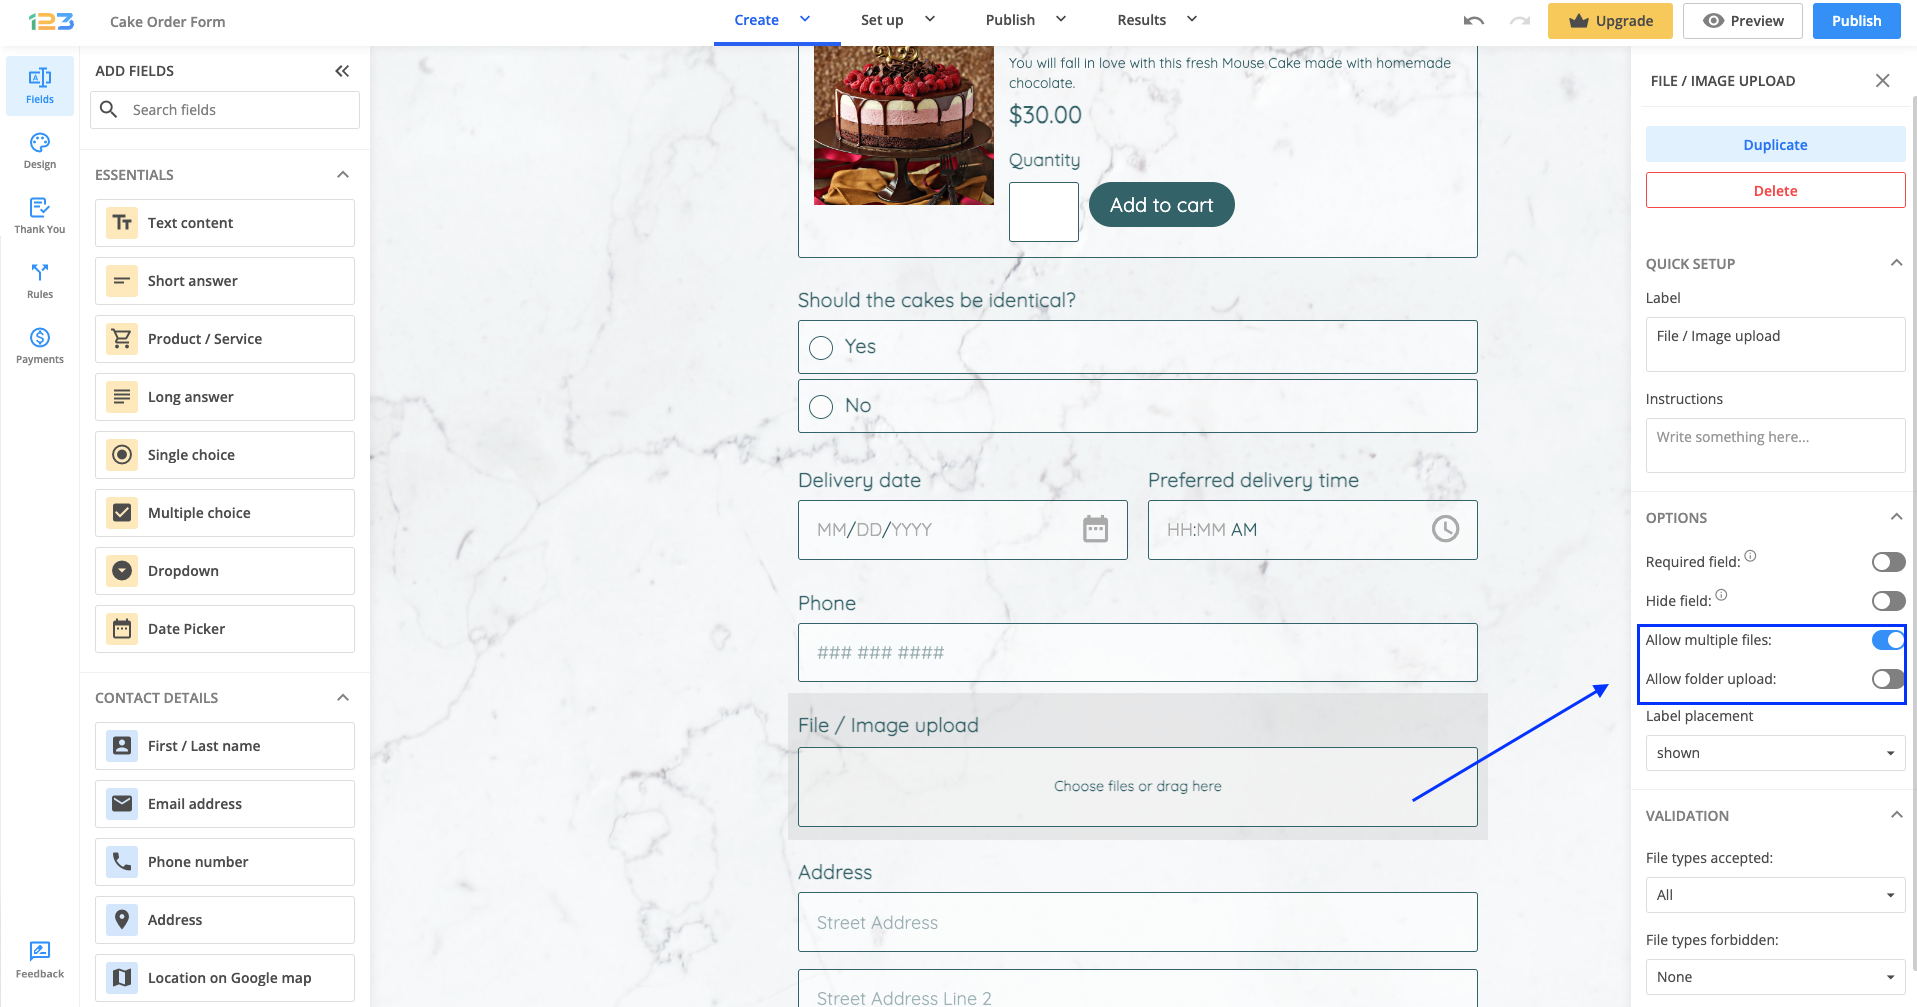
Your form users can select the Add Files (Choose files or drag here) button on the form each time they need to upload a new file. Once uploaded, all files will display on the form, one below the other. Form visitors may use the X symbol on the right side of each file to delete it.
Important Note
If you also enable the option to Allow folder upload, then your form visitors will no longer be able to upload individual files, only folders.Related articles
The 123FormBuilder – Google Calendar integration allows you to create forms from which your visitors can:
- Create events directly into one of the calendars from your Google Calendar account.
- Register as attendees at existing events from your Google Calendar account.
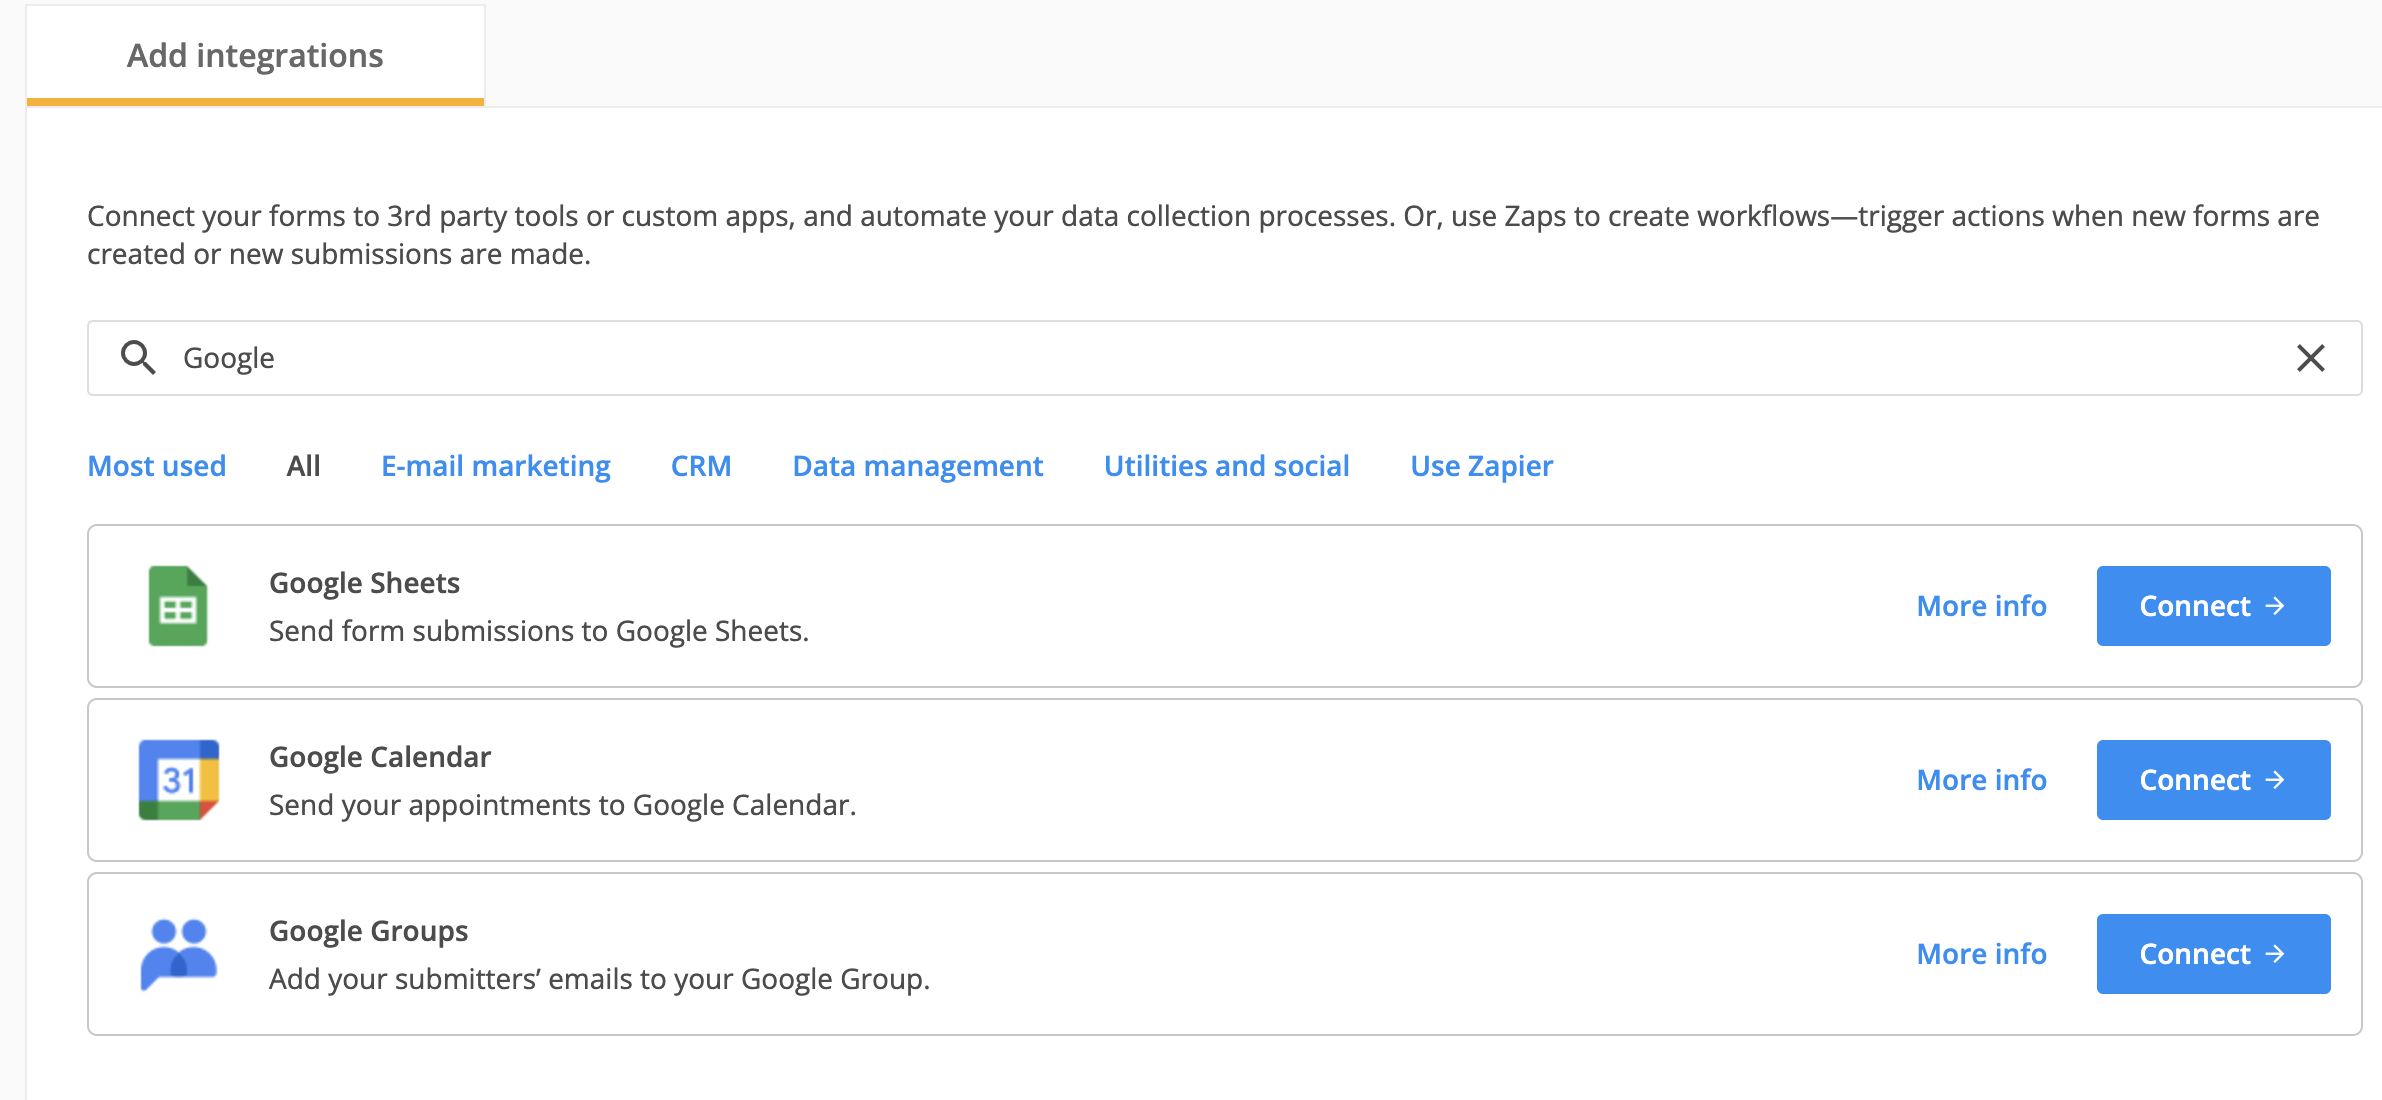
Enabling the Google Calendar integration
You can enable this integration from the Integrations section with your form builder account. Use the search functionality to search for Google Calendar.
Now follow these steps to enable the Google Calendar integration for your form:
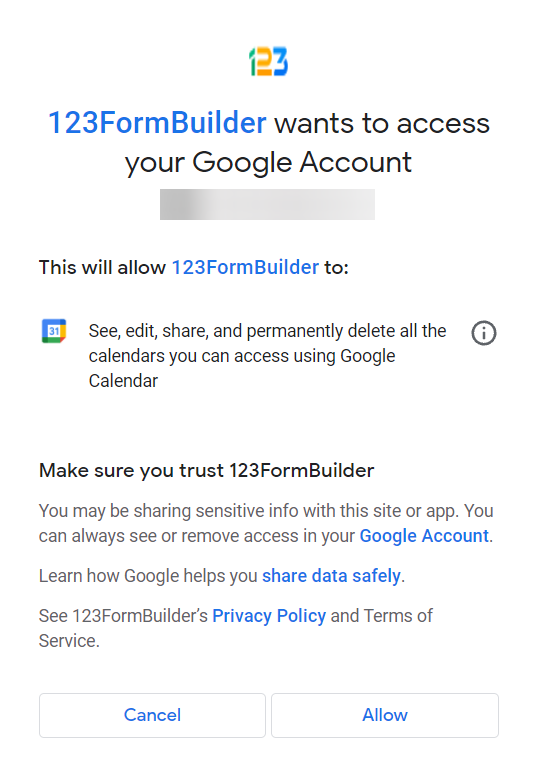
1. Click on Connect.

2. Click on Allow in order to let the application make any necessary changes to your Google Calendar account.
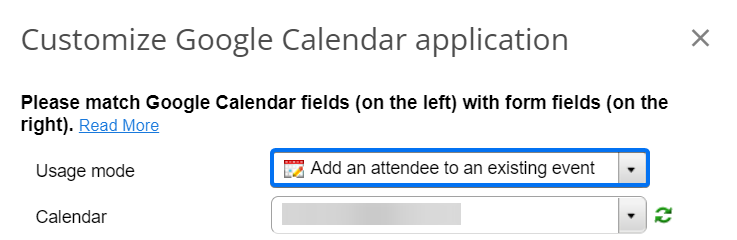
3. A popup will appear, the Customize panel, where you have to associate Google Calendar fields with 123FormBuilder fields and hit Save. These associations establish how the information is passed to your Google Calendar account.
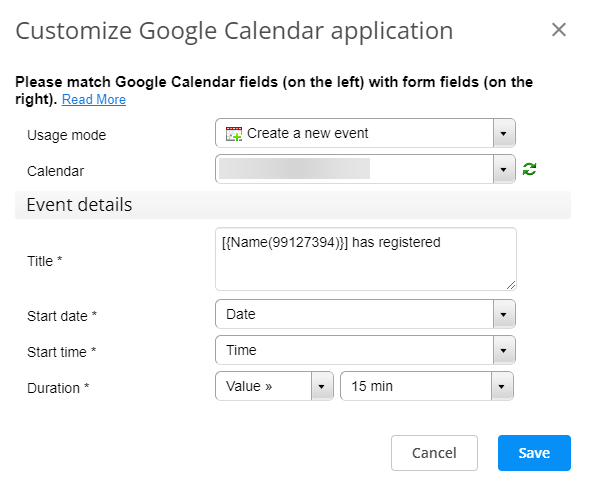
4. From Usage mode, select the type of action you want: Create a new event or Add an attendee to an existing event.
It’s really recommended that you set as required the fields you’ll need to associate in the Customize panel. This way, there won’t be any errors when creating or attending an event, users being unable to submit your form without completing all the fields. If you do not make the fields required, users may skip some of them and the information will not succeed in your Google Calendar account. In short, even though a submission will pass successfully, if not all fields have been completed, no event will be created or the attendee will not be added to your event.
5. In Error handling (bottom page) you can add your email address, in case your submissions encounter any problems. If you delete an event and later someone is trying to attend it or if you delete a calendar where someone is trying to create an event, you’ll receive an alert in your inbox with details of the submission.
These were the steps for using the Google Calendar application for your form. Below you can find the steps for setting up the two types of actions that this integration allows:
- Creating new events.
- Adding attendees to one of your events.
To create a new event
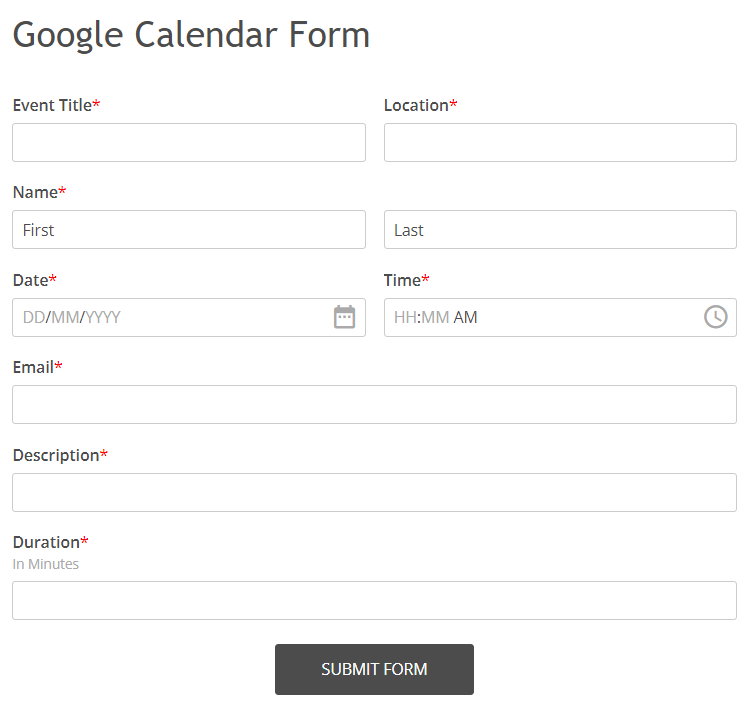
1. On your form, you’ll need to add the fields Name, Date, Time, Email, Number (for Duration), and three Short Text fields (for Location, Description, and Title). Make the fields required, as specified earlier.
2. Afterward, access the Google Calendar integration from the forms Integrations section. Select Create a new event from Usage mode, in the Customize panel.
3. In case you have more than one calendar in your Google Calendar account, choose the calendar where you want to create the event. If you have problems finding your desired calendar, press the Refresh button on the right.

4. You can choose to write a title in the assigned box or associate the appropriate field from your form in the dropdown list below. Don’t forget to click Add in order to set the field’s input in the Title box.

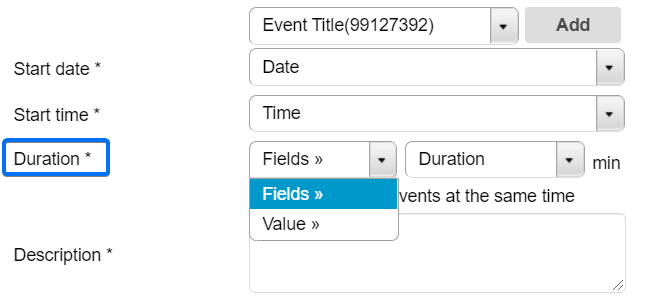
5. You can set the duration of the event in two ways:
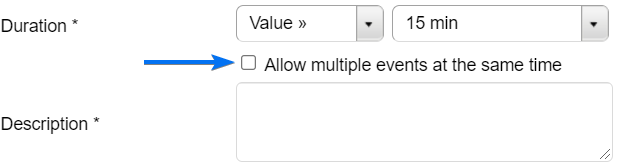
- Value – where you have five options available: 15 minutes, 30 minutes, 1 h, 1.5 h, 2 h.
- Fields – where you can assign a Number field from your form where users will specify the time in minutes.
6. The Description box can be set the same way as the Title.
7. Associate any field you want from the dropdown list for Location.
8. You can allow multiple events to happen at the same time in your Google Calendar account, by enabling this option in the Customize panel.
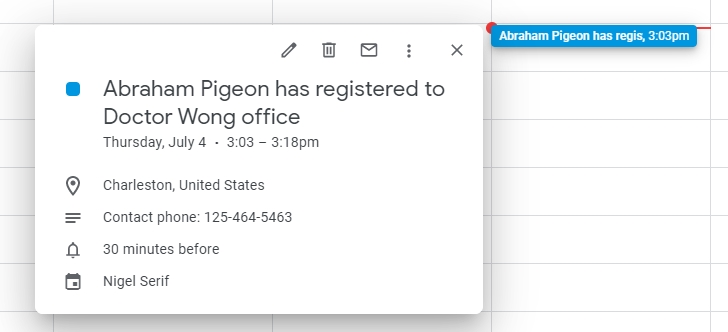
9. Lastly, click Save, and next time you receive a submission you’ll find the created event in your Google Calendar account like in the example below:
To add an attendee to an existing event
1. For this option, on your form you’ll need to add and set as required only the fields Name and Email.
2. Once you’re done, return to the Google Calendar integration from the Integrations section and select Add an attendee to an existing event from Usage mode, within the Customize panel.
3. Select a calendar and make sure that the associations for the Name and Email fields are made correctly in the Attendee details section.
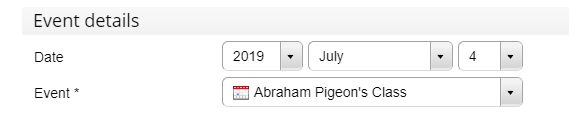
4. In Event details, choose the desired event. Search for it by Date and select its name from the dropdown list below.
5. Lastly, click on Save to finish setting up the integration.
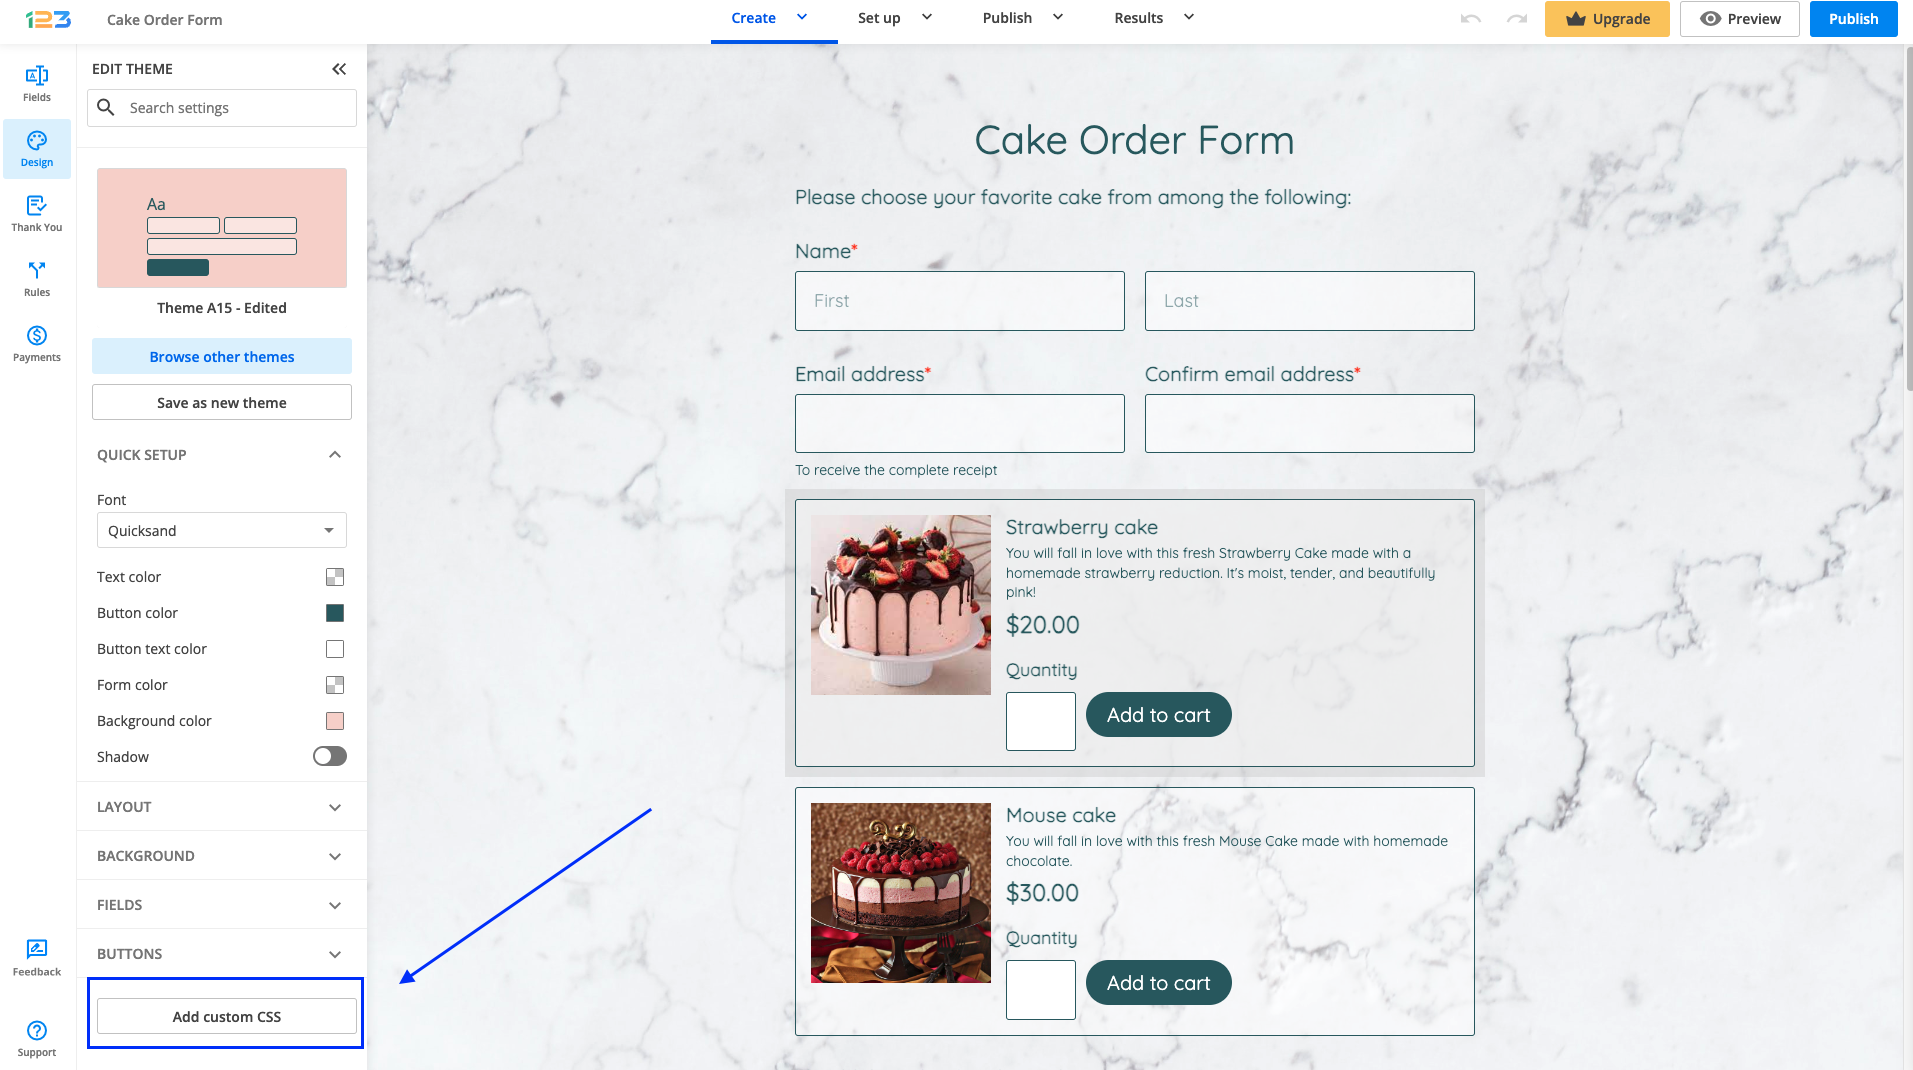
You can do this by using CSS. Read about our CSS form generator to learn more.
In short, you need to retrieve the field ID or class by inspecting the form code and then apply your preferred CSS style to it in the Design section of your form. After you have the CSS code, all you have to do is to click on Add CSS button and input your code.
Our form builder provides a substantial amount of design features that don’t require coding. Check out our Form Designer page for more info.
You can change the label placement for the entire form with the click of a button. Go to Design and expand the Fields section.
Under Label subsection, you will find an option called Placement.

You can opt for having the label in the left side of the field, on the top of the field or on the right side of the field.
Related articles
With the 123FormBuilder – NationBuilder integration, you can send form data and tags to your nation’s contact list.
Go to the Integrations section of your form and hit the Customize button of the NationBuilder app. In the Associate fields section, you can add tags to your form fields in three different ways:
- NationBuilder Tags. Type in the name of the tag which will be sent to your NationBuilder account only if the user has completed the field input.
- NationBuilder Field. Associate the form field input with the Tags field from NationBuilder, so when someone submits your form, the input of the respective form field will be sent as a tag to your NationBuilder account.
- Input as Tag. It’s equivalent to the Tags field from NationBuilder but comes in handy when you want to receive the data of the form input in your contact list, but also have it as a tag.
Please note: There are limitations associated with some fields. The sets of fields that are repeated in a Multiply Field Groups cannot be sent as tags to NationBuilder. Only the first set of fields can be sent.
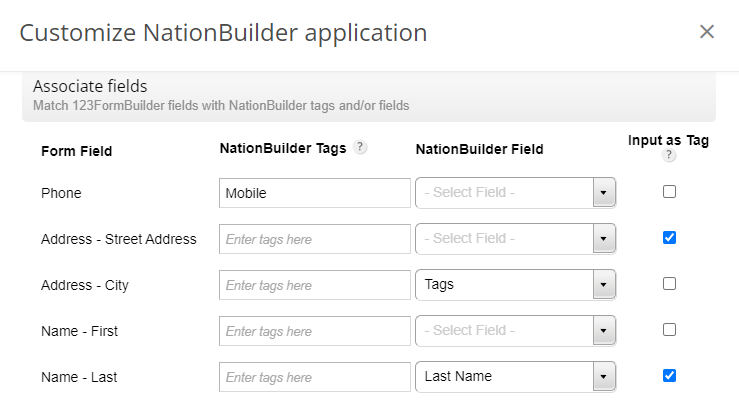
In the example above, here’s how the integration works:
1. If the Phone field is completed, the web form will send the tag Mobile to NationBuilder.
2. The input of the Street Address subfield will be sent as a tag to NationBuilder.
3. The input of the City subfield will be sent as a tag to NationBuilder.
4. The input of the Last Name subfield will be sent both as a tag and in the Last Name field from NationBuilder.
Whether you have created tags or associated form inputs as tags, you’ll find all of them in the Control Panel → Tags section of your NationBuilder account.
2Checkout is the payment processor we use to charge our paying subscribers. It’s best known to serve and deliver eCommerce services to individual customers and to resolve quick and secured transactions, not to mention the flexibility it offers for its clients to manage their subscriptions.
When you buy a plan on the 123FormBuilder form creator, a subscription is created there for you. 2Checkout will charge you every month or year, depending on the recurring payment you have selected. The subscription is charged automatically and not manually. You can either pay with your Credit Card or through PayPal.
Read our terms of service for more information.
If you want to change your payment details, simply log in to your 123FormBuilder account, go to the My Account section, and press Change Payment Details.
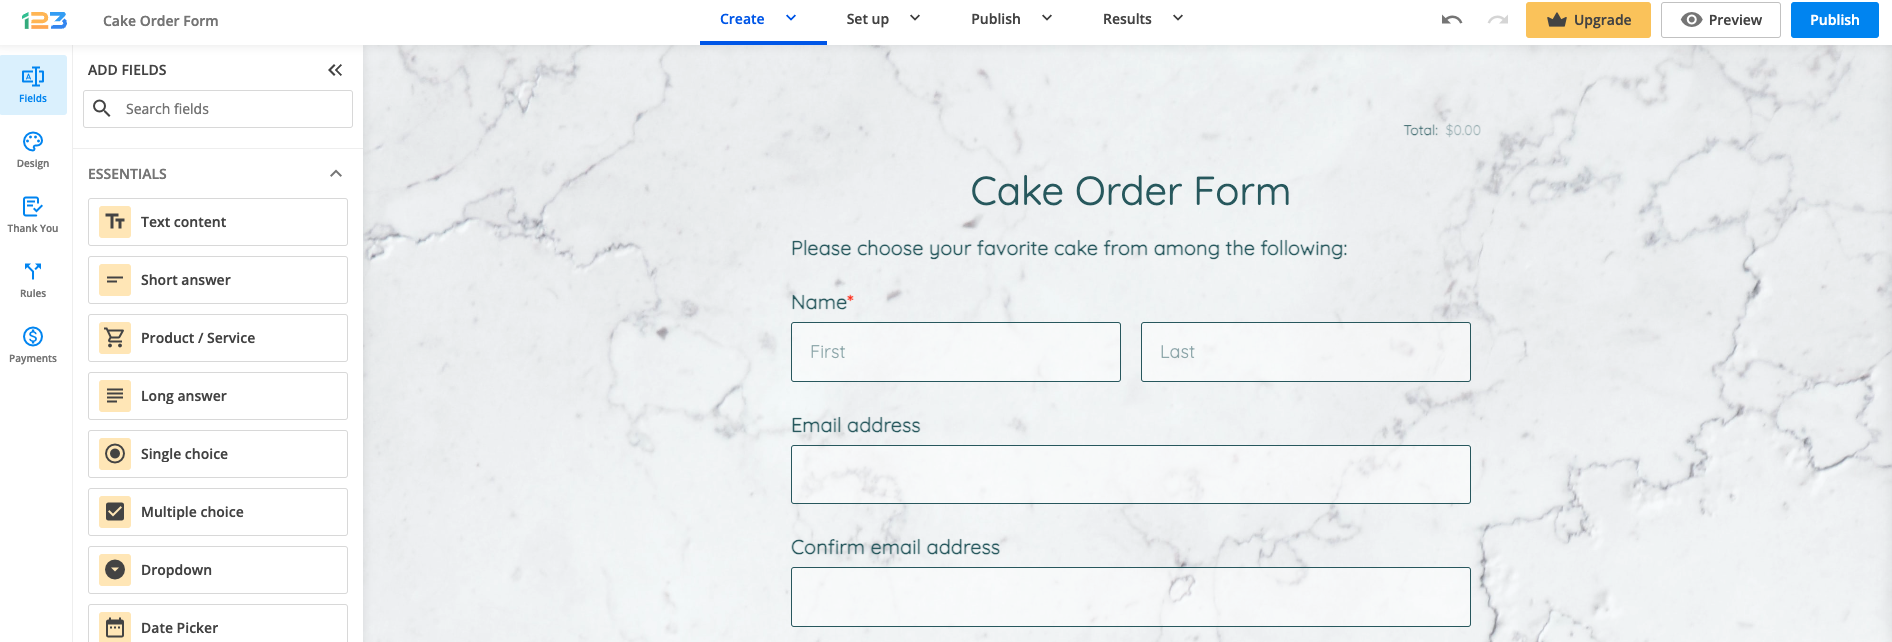
Sometimes, you may need to request matching input in two form fields; for example, when you ask users to provide and confirm their email addresses.
This type of validation can be easily enabled by following some steps.
Let’s go with the confirmation email address flow. Firstly, you need to add two fields in which the input should be identical.
For the second field, in our case, Confirm email address, go to Validation on the right-side panel and enable Match another field value. In the dropdown list that appears, select the matching form field, which, in this case, is the Email address field.
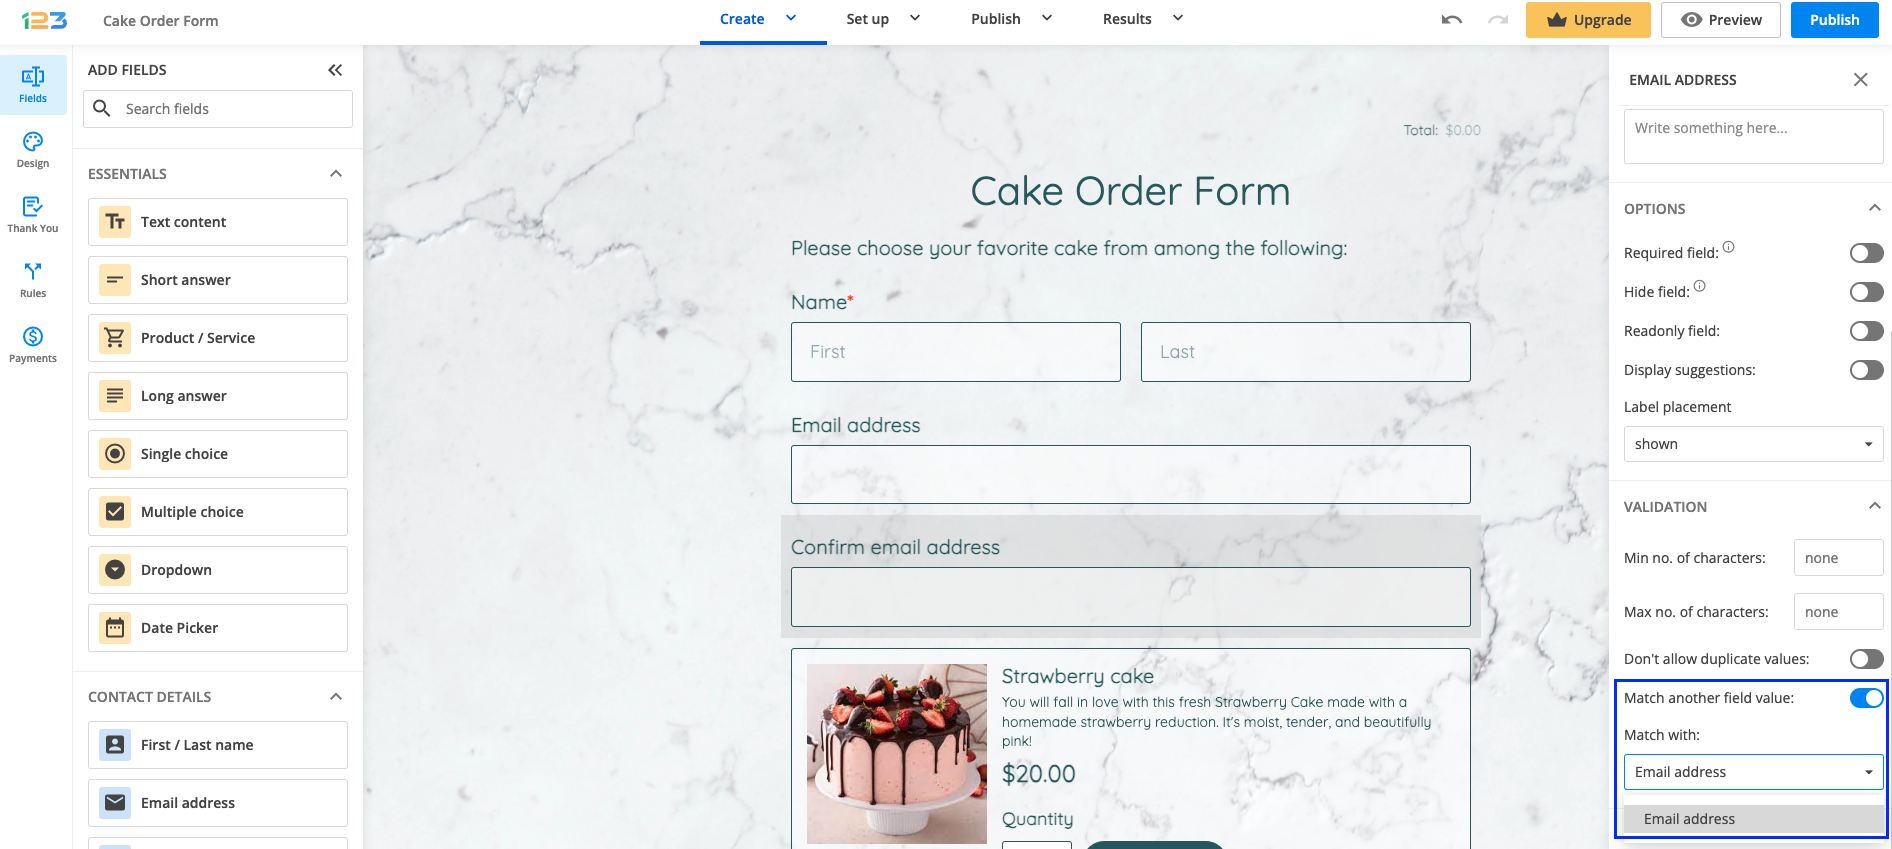
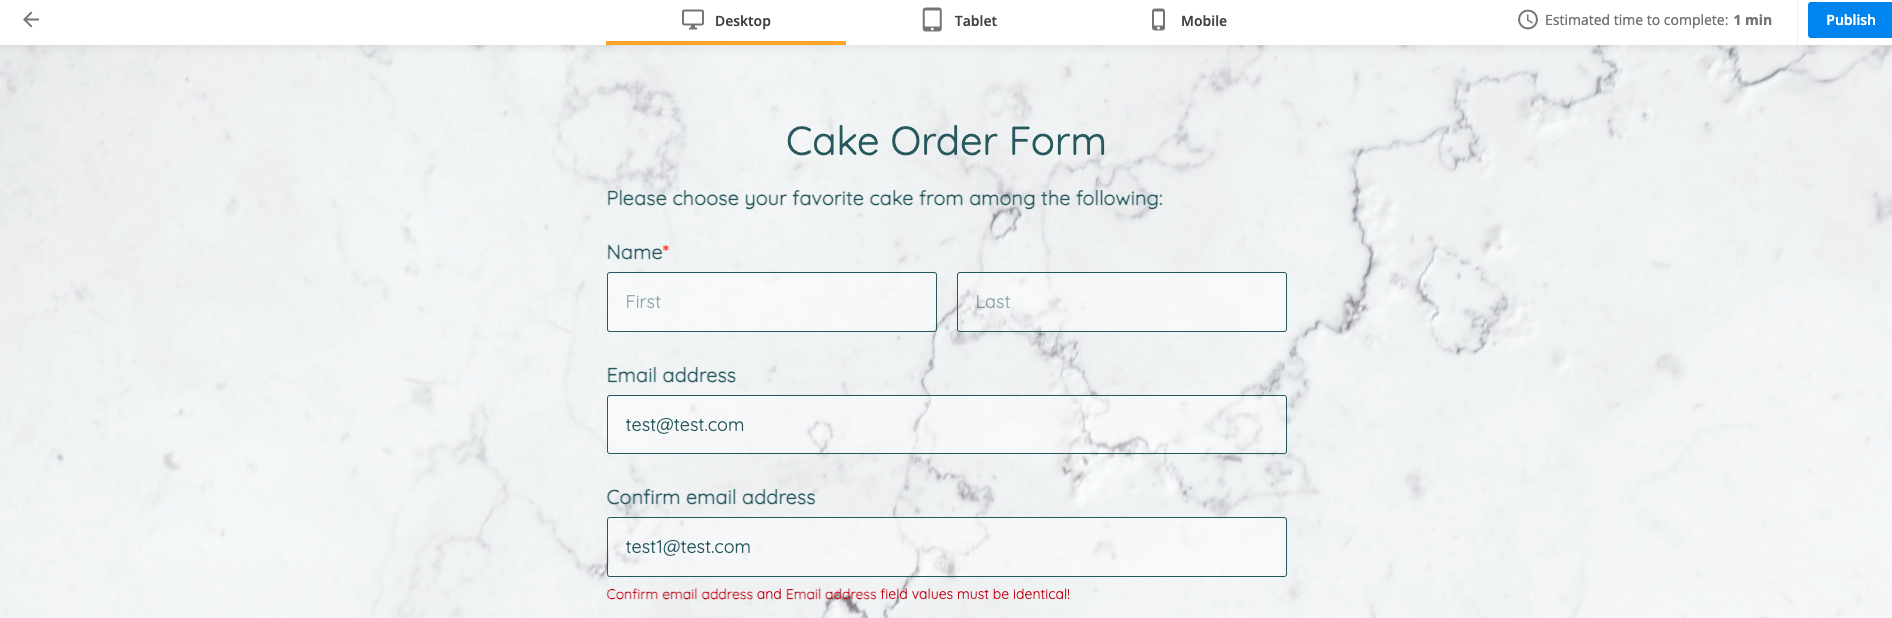
By doing this, the pairing is done on both fields. If respondents provide different inputs for the two fields they get an error indicating that the input must be identical. Therefore, they can not submit the form unless the two email addresses are identic.
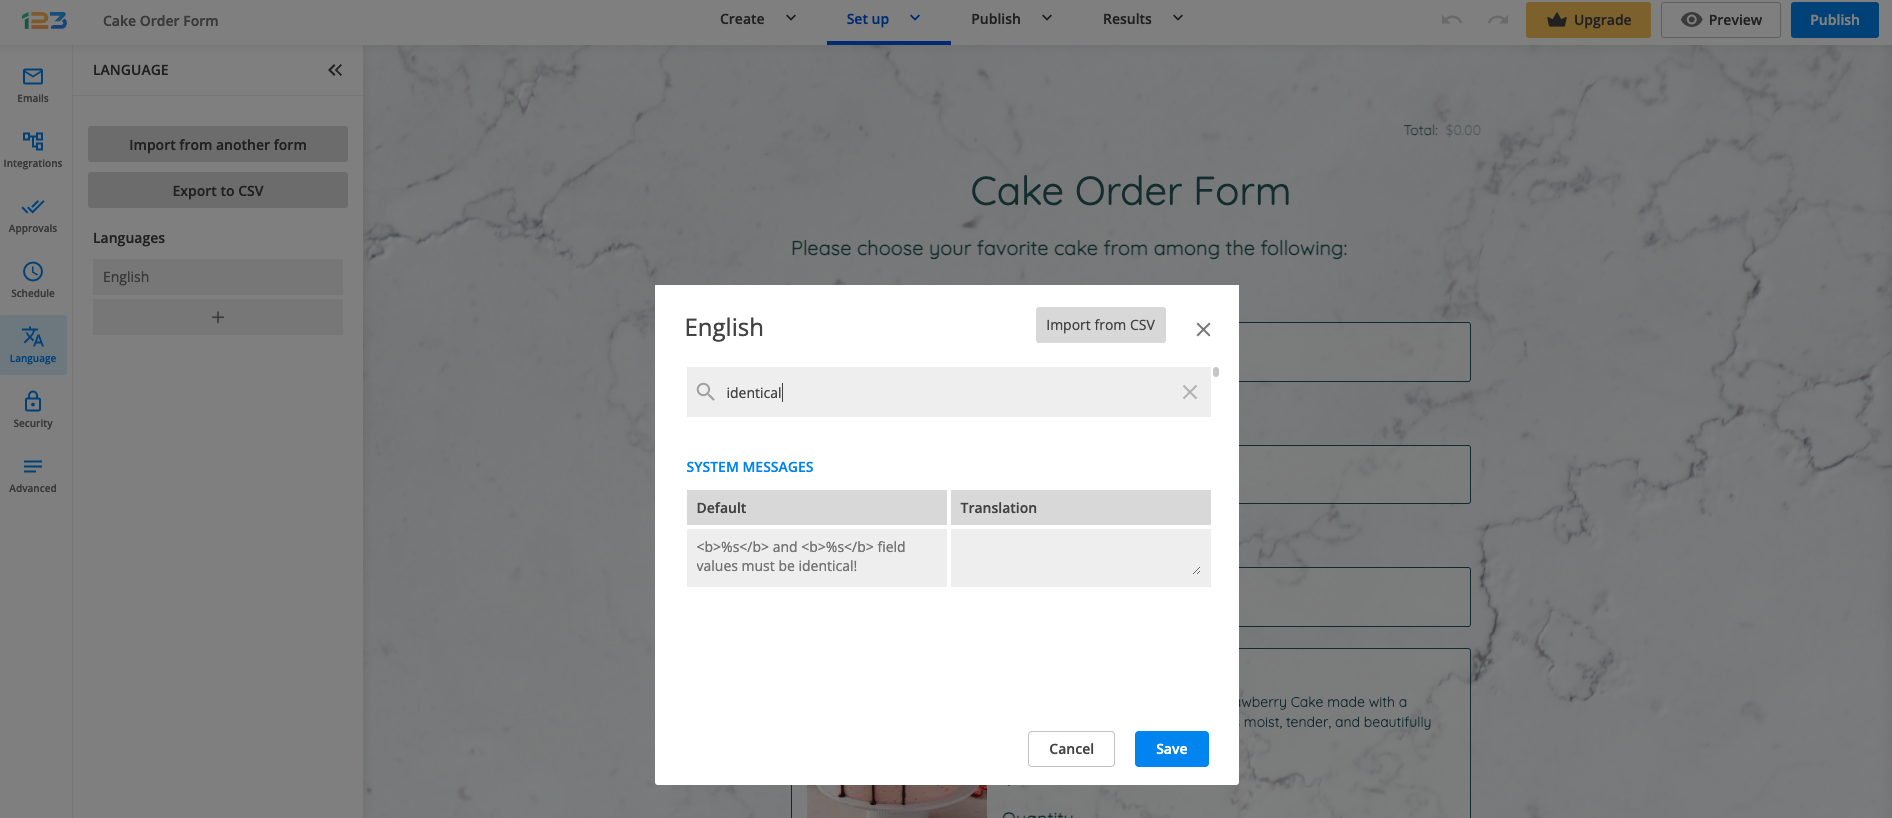
You can change the text of the message in the Language→ System Messages section (you can search by the word identical to quickly find the system message you want to edit).
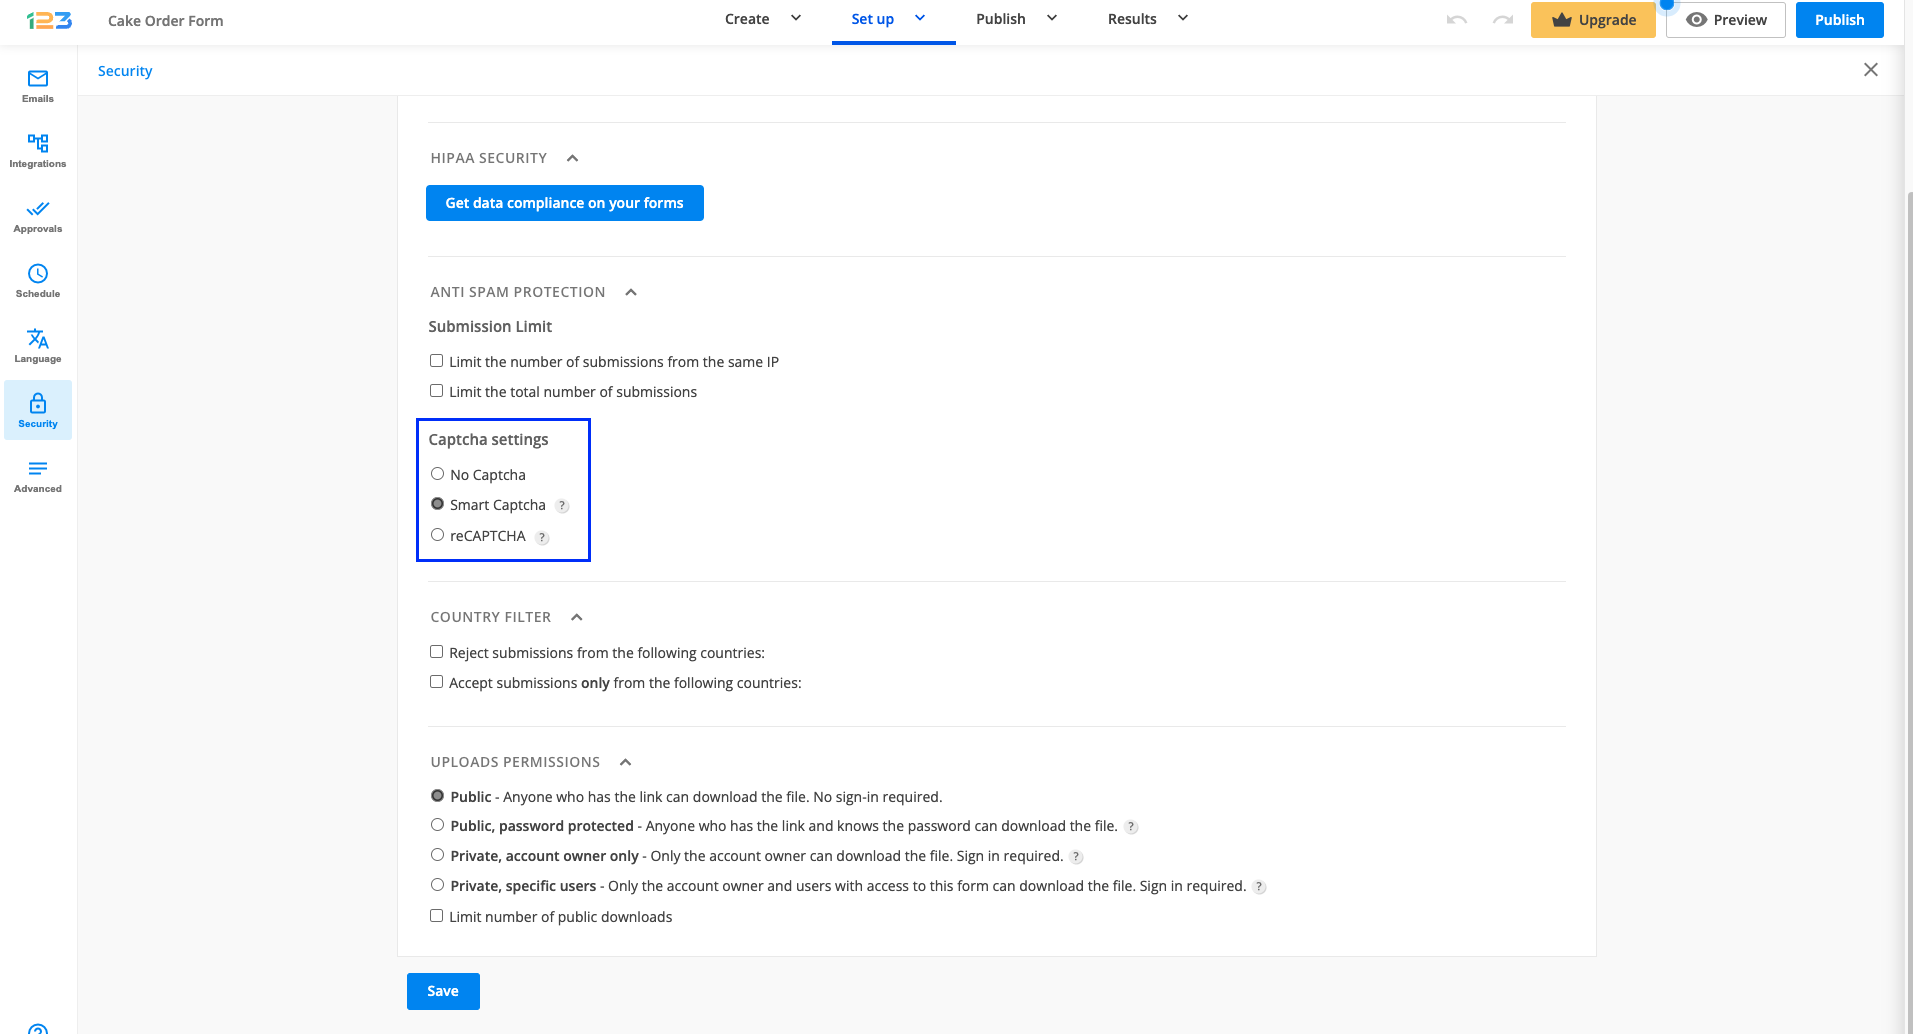
If you want the verification number/Captcha to never be displayed, all you have to do is to go to Security → Captcha settings and select the option No Captcha.
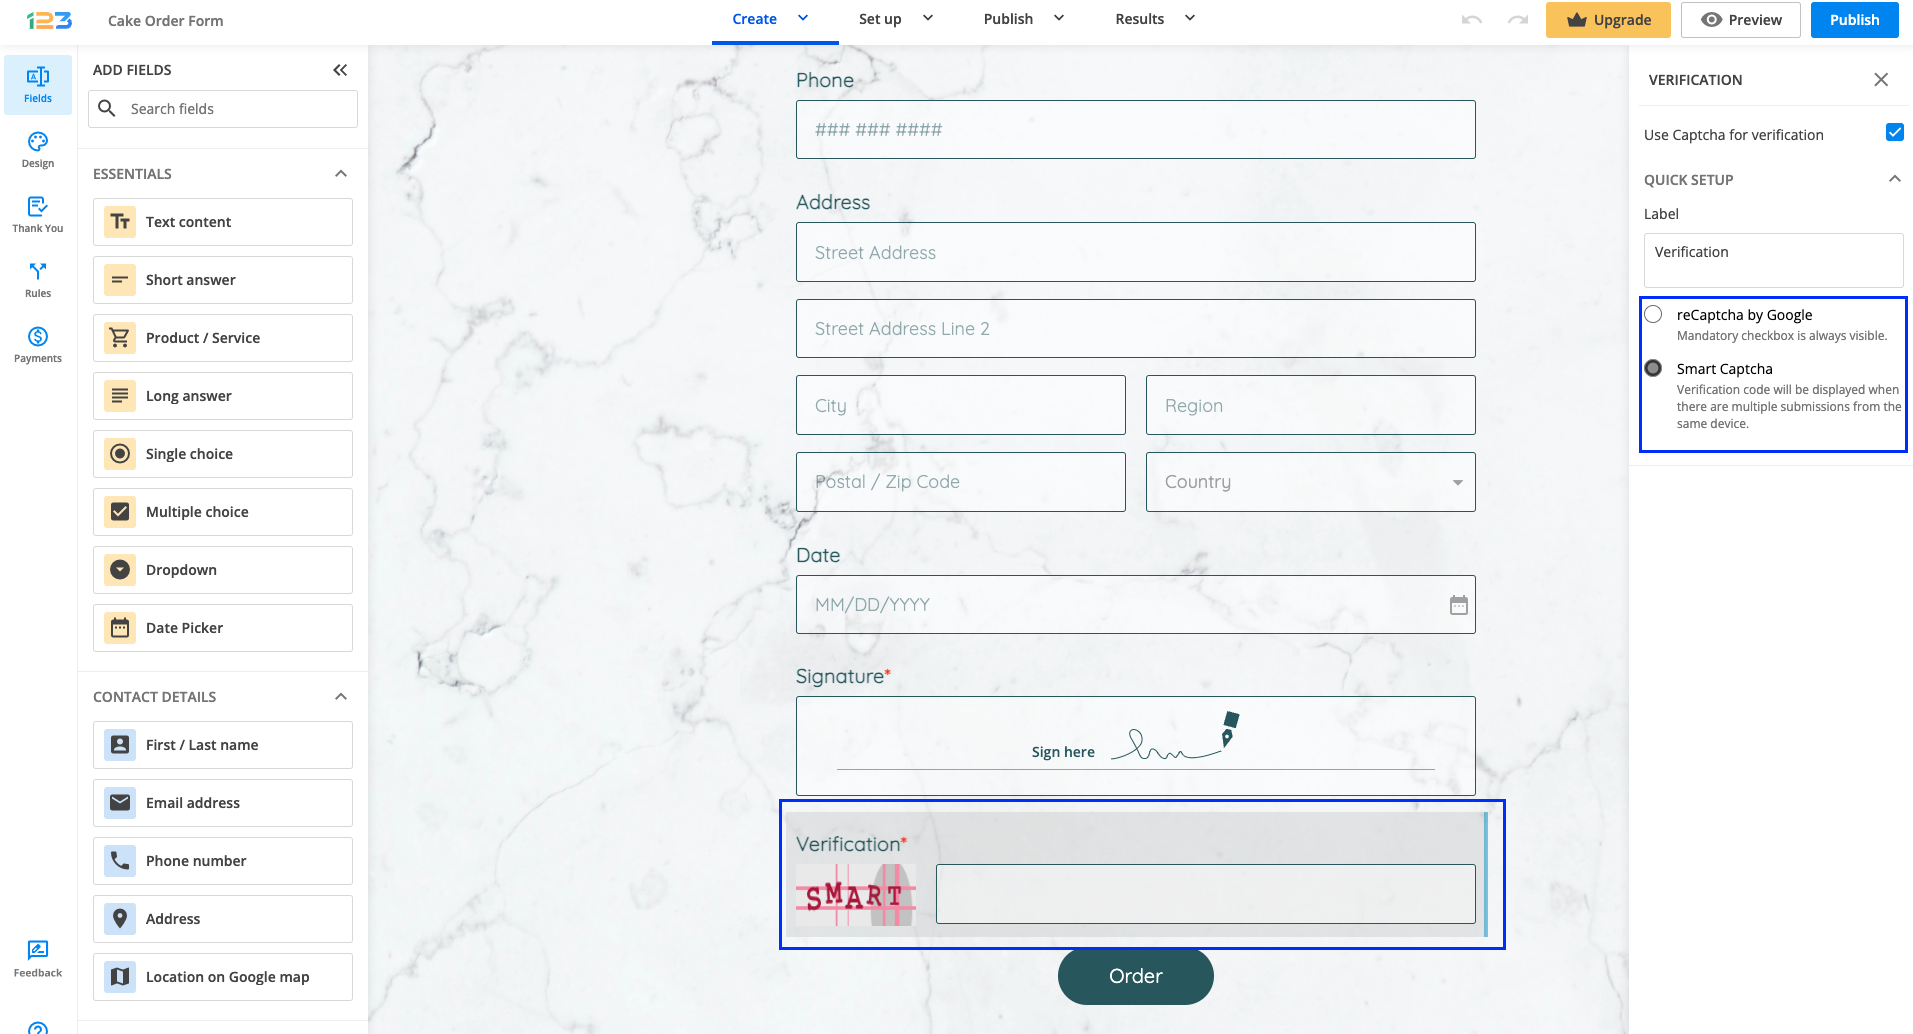
You can also remove the verification number directly from the Form Editor. Just select the Verification field from the bottom of the form, and from the right-side panel uncheck Use Captcha for verification.
Each online form you build with our form creator will send the email notifications of the first 1000 submissions made that day. This includes your standard or customized email templates, autoresponders, and copy-to-sender emails, regardless of the number of recipients. The limit is automatically reset each day.
This limitation is created to prevent email platforms from flagging us as spam because of the number of emails we send daily.
Note: All remaining email notifications will not be sent the next day. We send notifications only for the submissions that have been made on the current day. All your submissions are saved from harm, however. You’ll find all your submissions located in the Submissions section of your online form.
With our form builder, you can easily set up your email notifications and customize your messages.
By default, we send email notifications from noreply@123formbuilder.com. In this article, you will learn how to send emails using your own custom domain email.
First, go to the Emails section of your form. Then, expand the From and Reply-to options menu.
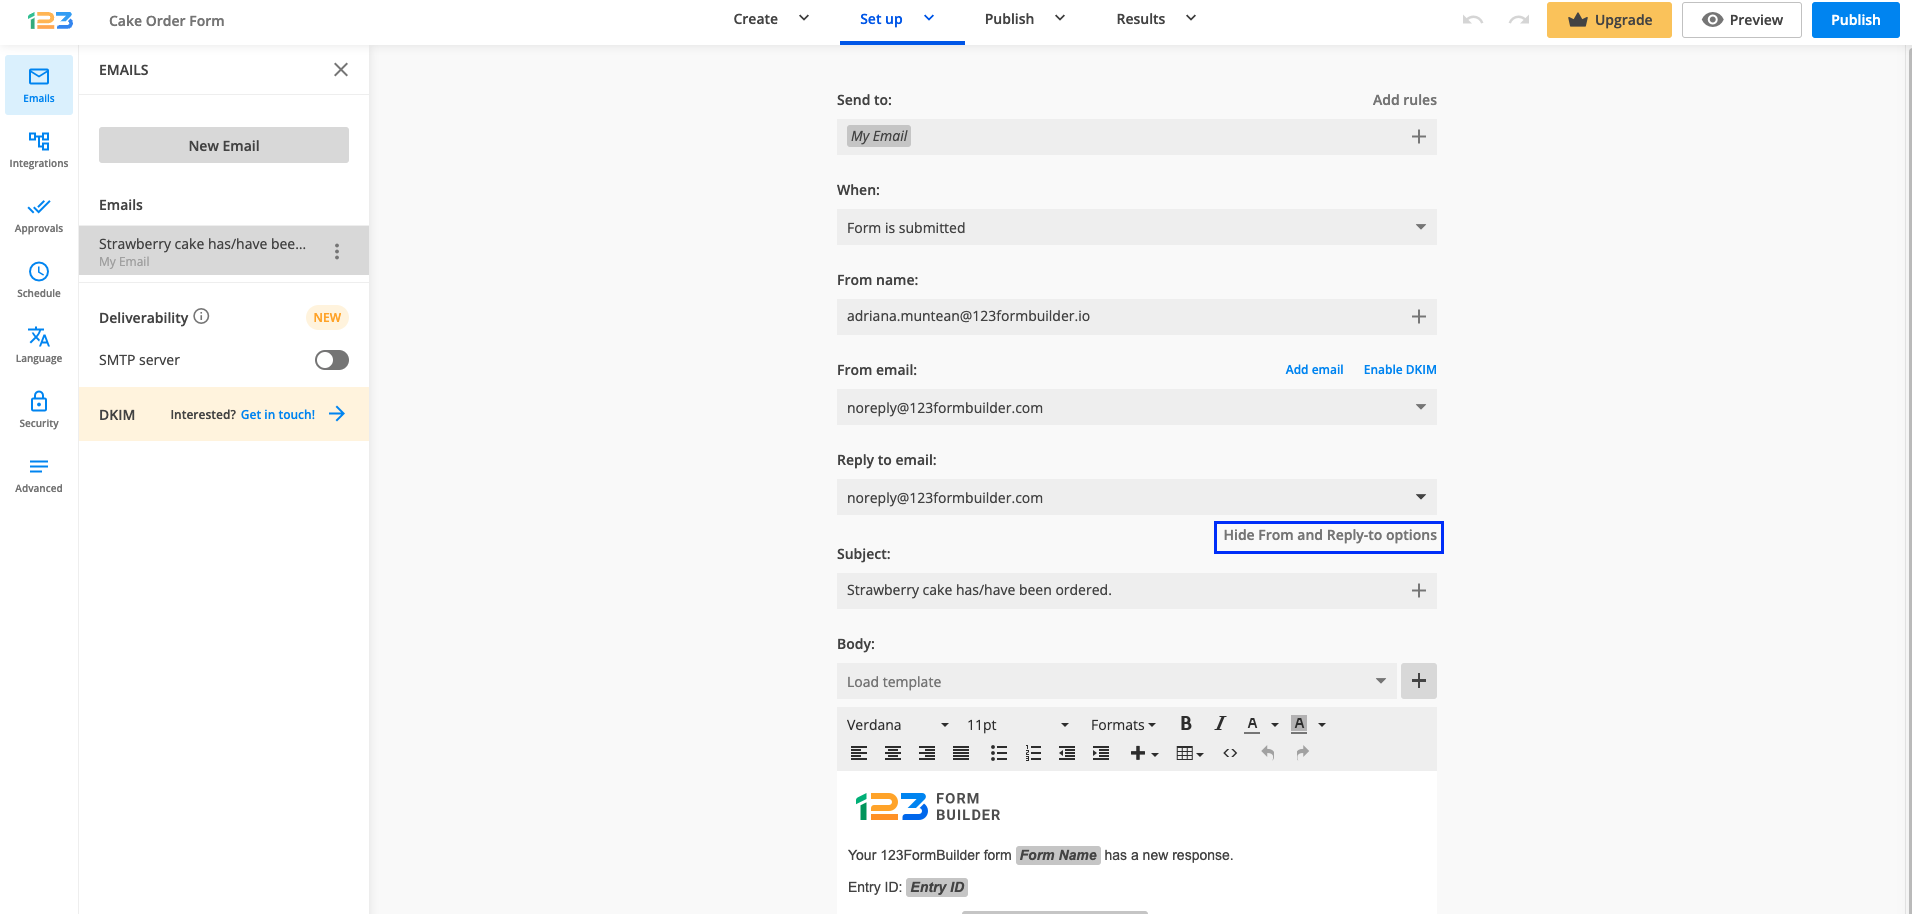
After that, open the From email dropdown. Here you have two options available:
- Add email
- noreply@123formbuilder.com (default option)
- noreply@myfor.ms
Add email
We incorporated an SPF email authentication tool for the custom email option. This is to ensure that only authentic domains/users send email notifications. We wanted to avoid spam emails, email bounce-backs and to prevent any phishing attempts that are pretending to be a legitimate business.
With this authentication process, you will grant 123FormBuilder permission to send email messages on your behalf.
To accomplish that, you will have to follow the steps outlined in the lightbox that opens when you click on Add email. Click on this guide to find out more details about this subject and obtain our SPF record. Once you are done configuring the SPF record, type in your email domain in Custom email box.
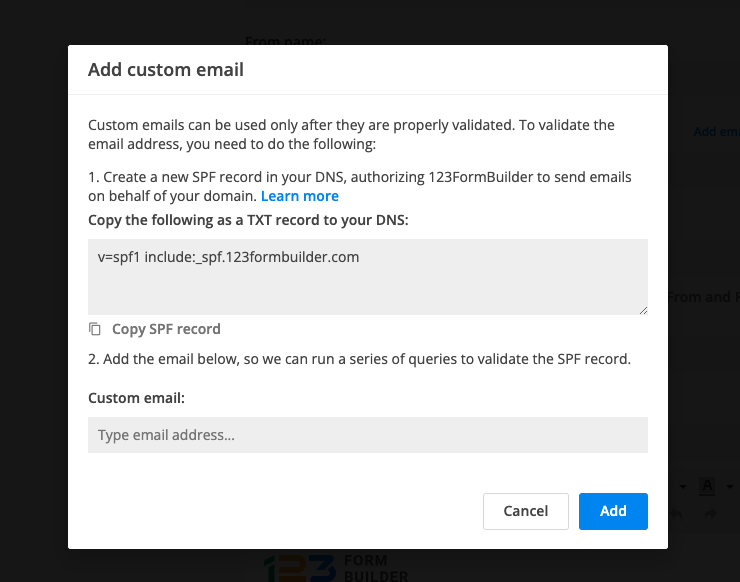
After you click Add, our system will check the email domain. If your email domain isn’t set up properly, an error message will display.
You can use the custom emails on the same form in all your email templates.
Important Note
The configuration must be done on each form. This setup isn’t made at the account level. For newly created forms you will have to add the custom email again.Removing references to our domain
With the noreply@myfor.ms option, you can remove any reference to our domain, 123FormBuilder. This option is available if you have purchased a paid subscription. Visit our Features Matrix for more details.
When you connect your SMTP server, you can’t make any changes to the From email settings. The form automatically prefills the SMTP email sender.
In order to send emails through your own SMTP server, simply follow this guide.
Important Notes
- Forms using our previous notifications version can define a custom sender only by enabling the SMTP feature.
- If you are a White Label user, at From email you have a fourth option available: noreply@whitelabeldomain.com.
Related articles
We allow four login attempts, to prevent accounts from being abused by other people. If you fail to type in the correct password on the fifth time, the account will be blocked for 30 minutes, followed by the message you see below. You will also be notified by us via email.
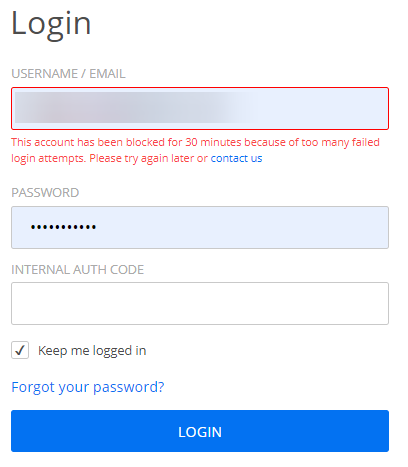
After the 30 minutes have passed, you can try again. If you need a password reset, please contact us.
After you’ve integrated your form with ActiveCampaign, AWeber, VerticalResponse, Top Producer, or iContact, you can add an opt-in checkbox to your form. This way, form users can tick the checkbox in order to be added to your mailing list and the bounce rate of your mailing list will drop.
Here’s how to achieve this:
1. In your form builder account, select your form, go to the Form Editor, and drag a Multiple choice field to the main view.
2. In the Edit field panel on the left side of the screen, delete Choice 2 and Choice 3 and replace Choice 1 with the message you want form user to see (e.g.: Add me to your mailing list).
3. Afterward, delete the field label or set its Visibility to removed and your checkbox is ready to find some functionality.
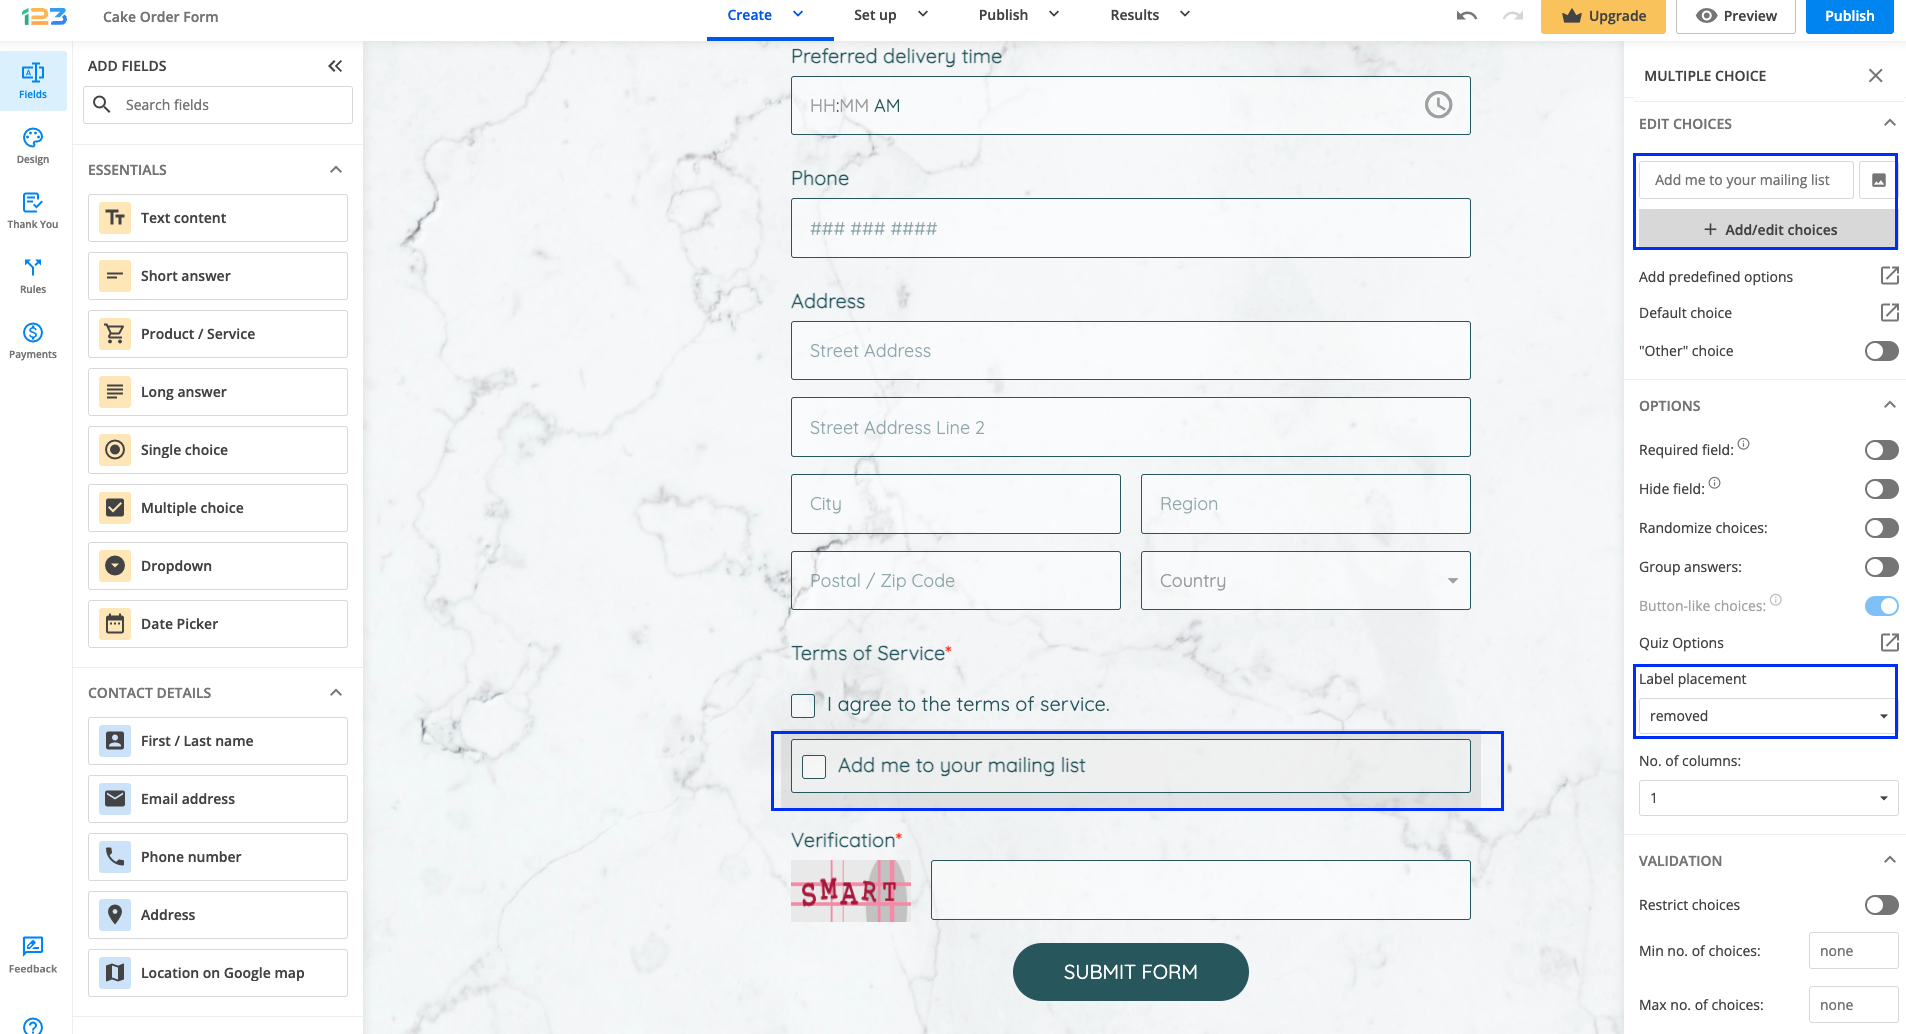
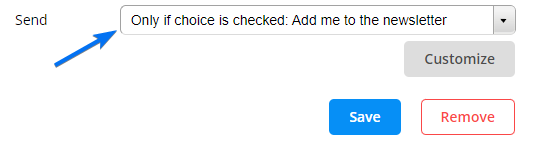
4. Next, go to your form’s Integrations section. In the application box, in the dropdown list labeled Send, select Only if choice is checked: (opt-in message).
5. Lastly, press Save and you’re done!
Most Popular
Frequently Asked Questions
Here is a list of the most frequently asked questions. For more FAQs, please browse through the FAQs page.