123FormBuilder Knowledge Base
Search our documentation platform for answers, service specifications and 3rd-party integrations.
Knowledge Base
1. Open Sitefinity Project Manager.
2. Create a new Website and configure it.
3. Right-click on the Edit in Visual Studio link.

4. Once Visual Studio opens, you will see some project files on the right side. Create a new directory and rename it to Widgets.

5. Upload in the Widget directory the 123FormBuilder files. You will import the files by right-clicking on the Widget directory → Add → Existing Item …
After the files have been uploaded, do not forget to Build your project (Press F6).
Your folder should look like this:

After this step, you can close the Visual Studio Environment.
6. Go to Sitefinity Project Manager, right-click on your project and choose Go to Administration. Your default Browser should open a website URL.
7. Use your User and Password to log in to website administration.
8. Once you are logged in, go to Administration → Settings.

9. On the Settings Page, click the Advanced button.
10. Next, go to Toolboxes → Toolboxes → Page Controls → Sections and create a new Section using the Create new button. Give a name and a title to your new Section. In this example, the section will be named 123CfWidget.
11. Go to your new Section (123CfWidget) → Tools and use the Create New button. This screen should appear:

Insert in the Control CLR Type or Virtual Path the path to the main file of the project.
Important note: The Control CLR Type must be identical to the one used in our example! Insert Widget name and Widget Title and click the Save changes button.

12. Now, you will go to Pages. Open your page, and in the right bottom corner, you should see the new Widget.

13. Drag your widget into the page.
14. After you have dragged the widget into the page, use the Widget Edit button. The following pop-up will appear:

After you insert the API Key, hit the Connect button, and instead of Please select a form you will see your 123FormBuilder forms. Select your form and use the Save button.
To get your API Key, log in to your 123FormBuilder account and go to My Account.
15. On the left side, you will be able to see the API Key. Just copy-paste it to Sitefinity 123FormBuilder Widget. With that, you are done and ready to use your 123FormBuilder forms in Sitefinity.
Yes, our forms work on mobile devices. They are mobile responsive and work on both Android and iOS.
When you set the form’s width to 550 pixels, it automatically becomes mobile responsive. If you want to see how your form would look like on a mobile device, you can always Preview your form and check out the Mobile view.
123FormBuilder offers various form templates you’re welcome to use! Customize any of the form examples that you find and start collecting entries.
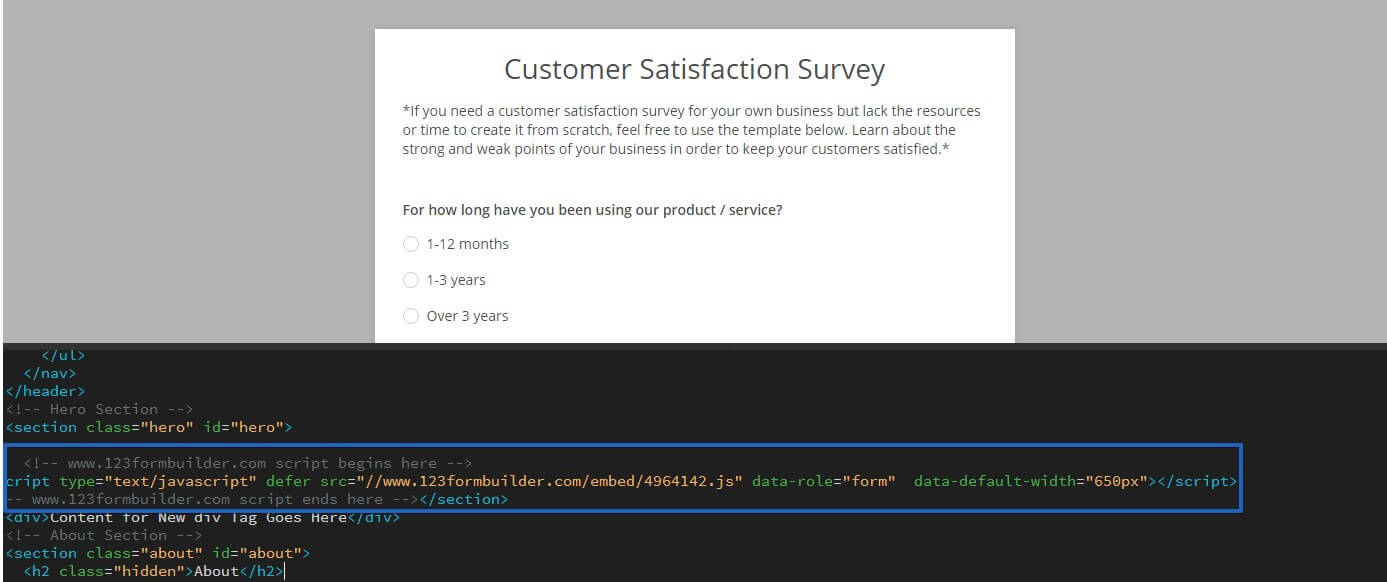
If you edit a website in Dreamweaver, you will need to publish the form using its Javascript option (Publish – Embed form) within your form builder account.
Copy the code from there and go to Dreamweaver. Access the section you need the form to be embedded. Paste the form script. Save your progress and start collecting submissions from your Dreamweaver website. In this example, we added the script in the hero section of the webpage.
In some cases, the JavaScript of your form that is generated by our form builder can’t resize the iFrame and your form is hence displayed incorrectly. This can be solved by adding the correct heading to your webpage. You should use the XHTML Strict Doctype:
< !DOCTYPE HTML>
Watch our video tutorial below
How to start
In order to prefill form fields with static values, you need a customized URL for your form, which you will share instead of the regular link. Normally, the link to your form looks like this: https://form.123formbuilder.com/201140/name-of-the-form, where 201140 is your form ID.
To introduce preset field values, you need a URL of this type:
https://form.123formbuilder.com/sf.php?s=123formbuilder-201140&control1111111=John&control2222222=Doe
where sf.php?s=123formbuilder is the key part that remains unchanged for all customized URLs, 201140 is your form ID and control1111111=John sets the preset value John for the form field with the ID 1111111.
Simply put, what you have to do is generate a URL that calls the form field for which you want to set a predefined value and assigns that value to it. You can prefill as many fields as you want within a form. URL parameter and value pairs are connected by ampersands (&). By pair of parameters and values, we understand control1111111=presetValue. In this structure, 1111111 is the form field ID.

Have at hand a text editor/notepad app and let’s go!
Retrieving the field IDs
First, let’s learn how to retrieve the field IDs we will need later. Note, there are multiple methods of retrieving a field’s ID.
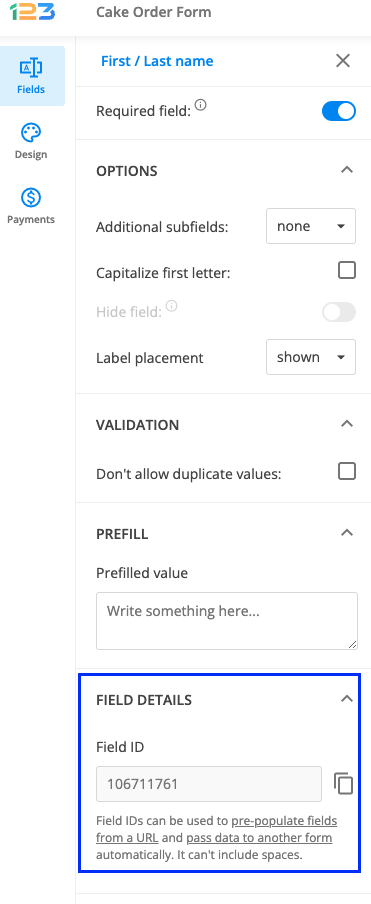
The easy way which we recommend is by using Field details. To find Field details, simply select a field on the form, and in the right side panel you will see the settings of the field. Under the Field details section, you will find the Field ID that can be used to create the URL you need.
If for any reason the method above does not suit you, you can also retrieve the fields’ IDs with the Inspect method. Go to the Preview button to see the form preview. Place your mouse’s cursor over the field that you want the ID for, then click the right mouse button and select Inspect. The ID of the entire field will be listed after data-id. Note that you don’t need to take this step if you already copied and used the field IDs from Field Details.

How to create the prefill URL
Next, we need to learn how to add the field IDs to a prefill link.
Follow these steps:
1. Copy this link in your note app or any other place where you can edit text: https://form.123formbuilder.com/sf.php?s=123formbuilder-201140&control1111111=John
2. In your notepad/text editor, replace the number 201140 with the ID of your Form. You can see your Form ID in the form link from the Publish > Share form section.
It will look like this: https://form.123formbuilder.com/6412631/name-of-the-form and the number here is the Form ID.
3. Instead of control1111111 insert the Field ID that you want to have prefilled. In our example, instead of control1111111 we are using control106711761, following the example of the below screenshot.

4. Replace our value John with the text that you need instead. If you want to prefill your field with the text “Maria” simply write Maria after =.

5. Optional: Now, if you need to add another prefilled field in the URL, simply add it at the end of the link: &control2222222=John and repeat steps 3-4.
6. Copy the link you edited in your text app and now you can start sharing it with others. When they access this link, the value that you inserted after = will be prefilled in the chosen field.
Complex scenarios
Here is some useful information for using prefilled form fields more efficiently in our form builder. Note that we will use 1234567 as the form field ID. You will need to replace this example ID with the actual IDs of your form fields.
a. Preset values for Short text, Long text, Number, Email, Website fields: You only need to include &control1234567=presetvalue in the webform URL. Replace presetvalue with the value of your choice and &control1234567 with your control (form field) ID.
b. Preset values for the fields Name, Time: In this case, the form field is split into several subfields. For example, the field Name contains a First Name and a Last Name. These two have separate IDs: First Name – 1234567-1, Last Name – 1234567-2. Therefore, the right syntax will be &control1234567-1=John&control1234567-2=Doe. If you’ve got more than two subfields, then go on using -3.
c. Preset values for Phone: If you want to prefill the input of the Phone field, use this code: &control1234567=123-342-345. However, make sure to use the format you’ve selected for the field.
d. Preset values for the Address field: An Address field functions the same way as the Name field, just that here you’ve got five subfields and, consequently, five IDs, from 1234567-1 to 1234567-5. In addition, there is the Country field, which is a dropdown list. To preset a value for the list of countries, you need the following code: &control1234567-6=CountryName.
e. Preset values for Dropdown and Single choice fields: These fields allow for a single choice. This means that there is only one ID for the entire field. The syntax is &control1234567=ChoiceName, where ChoiceName is the choice that you want to preset.
f. Preset values for Multiple choice fields: Since this field type allows for multiple choices to be selected, a single ID is not enough. Every option will have its own ID, in order to function as a separate subfield. To precheck an option, use this code: &control1234567-0=yes. As you can see, the first option is -0, next one -1, next one -2, and so on.
g. Preset values for Likert scales: Each Likert scale statement has an individual ID. To preset a value for a Likert statement, use the following code: &control1234567=Neutral, i.e. the value will be the name of the option that you want to have preset.
Advanced tips
To add a space in prefilled form fields, use the code %20. For example, to obtain the preset value Fifth Avenue for a field, you will need the following code: &control1234567=Fifth%20Avenue.
Certain symbols (%, &, +, #) cannot be used inside your preset value as they will be interpreted by the browser as HTML URL encoding. Similarly, with the %20 used for spacing, see here what code you need to use to have these symbols interpreted correctly. Most symbols however can be written as they are (!, ?, -, ., @, (), comma, etc.), so no need for extra work!
To open the form in a particular language, use the following URL: https://form.123formbuilder.com/sf.php?&s=form-201140&language=es. In this example, language=es changes the language to Spanish. Make sure to use the abbreviation of the desired language (such as en for English and fr for French).
Related articles
- How to pass user input from one form to another?
- How to prefill UTM values in form fields
- How to create prefilled hidden form fields on 123FormBuilder?
- [Salesforce] Prefill form fields with a predefined link
- [Salesforce] Dynamic prefill
- [Salesforce] Prefill dropdown with picklist values
- [Salesforce] Prefill single choice and multiple choice fields
- [Salesforce] Prefill forms in Salesforce Communities
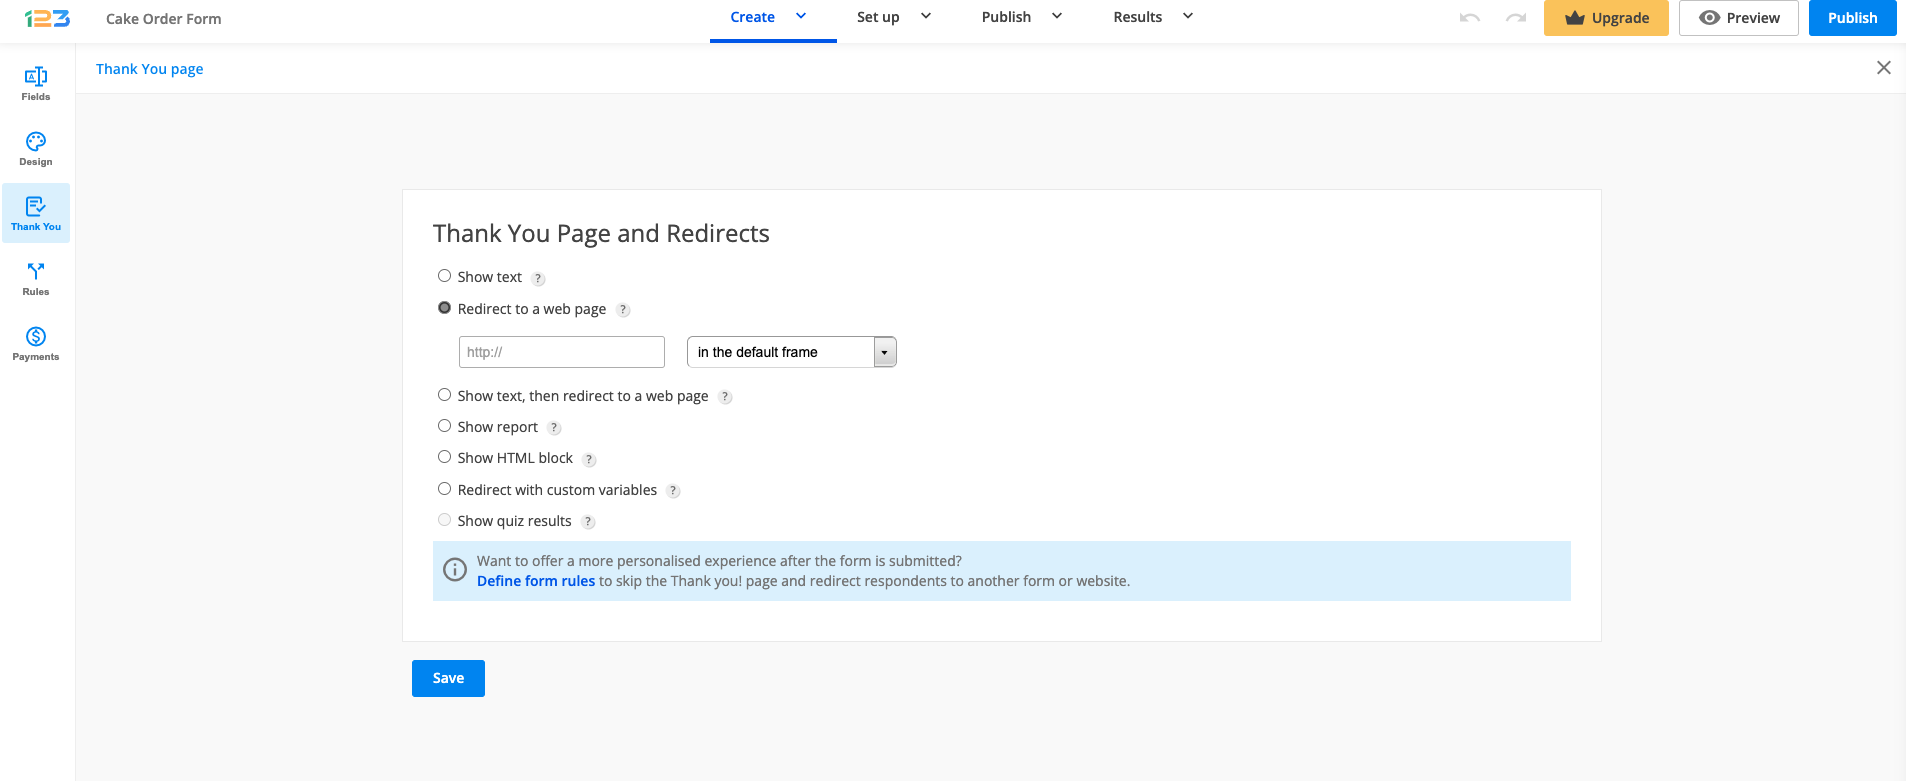
You can redirect users to your own page. In the form builder, go to the Thank You page section and choose Redirect to a webpage. There you will be able to insert your own webpage URL.
You can also paste the same webpage link where the form is embedded. This way your website visitors will not leave the webpage after submitting your form.
See more details on how to redirect form submitters to your website.
The choice of how you publish your form depends on your needs. However, the best way to publish your form is by using Javascript, as any change you perform on the form is automatically reflected on the embedded form and you won’t have to embed the code once more.
So you could make an informed decision when it comes to publishing your form, here are the available options.
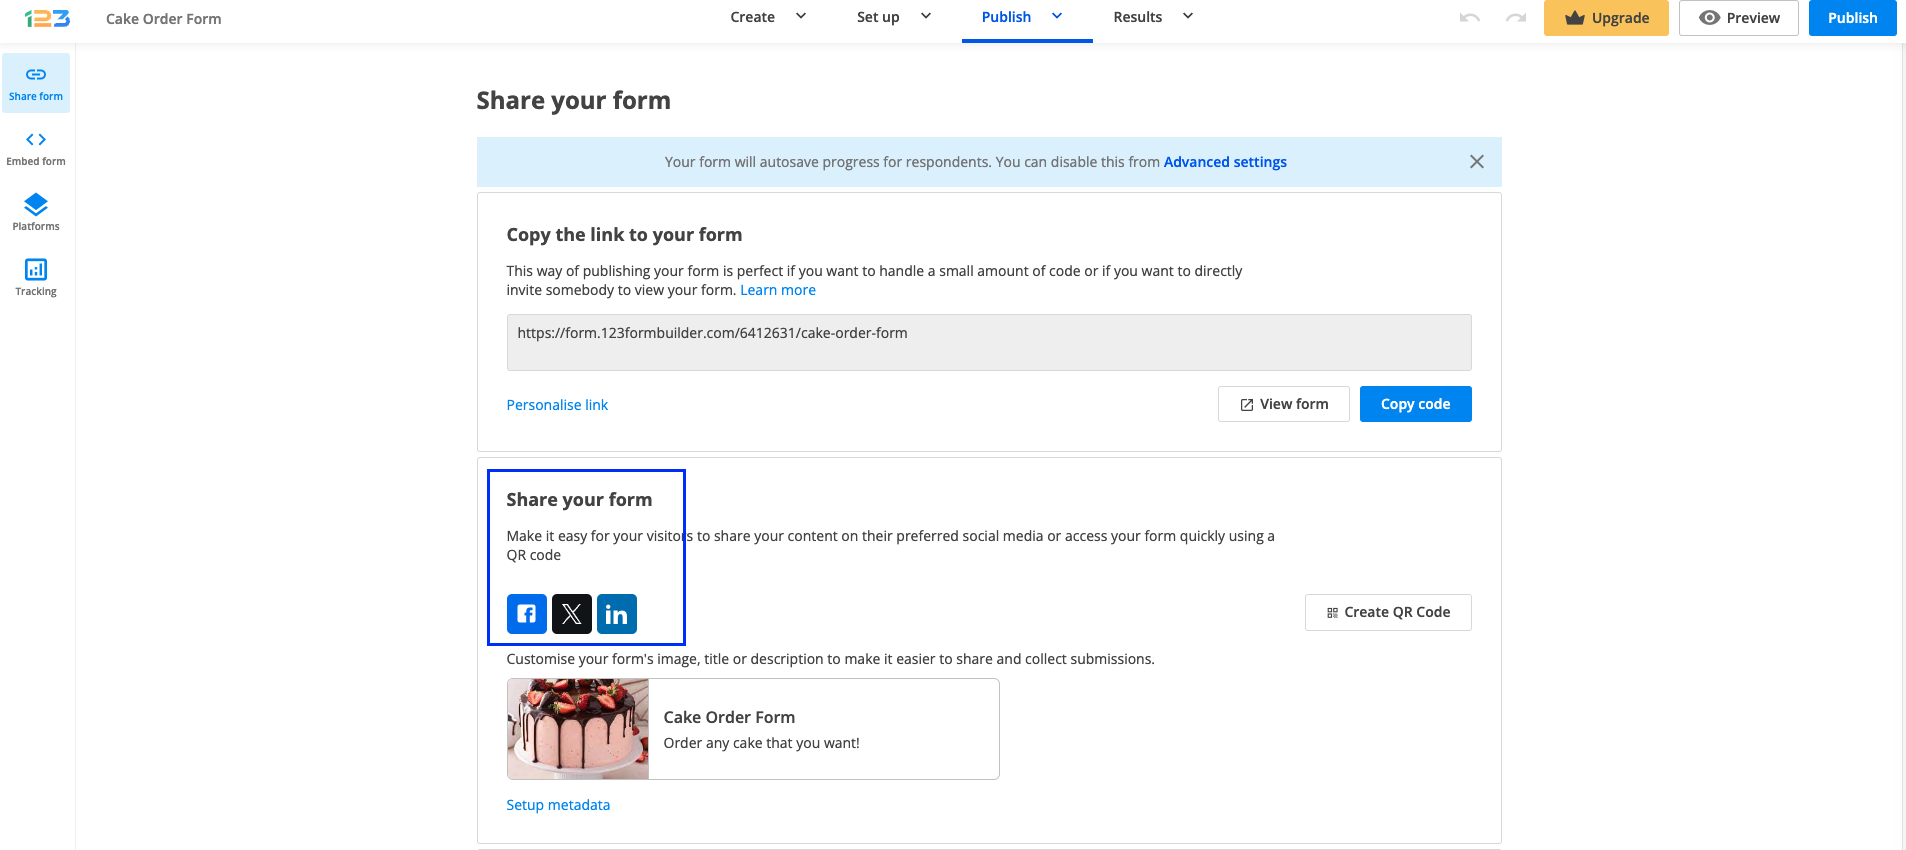
Link – this is the quickest and easiest method to share your form with your respondents. All you have to do is share the link by copying and pasting it where needed or you can use the Social Media icons to share the form on social media platforms.
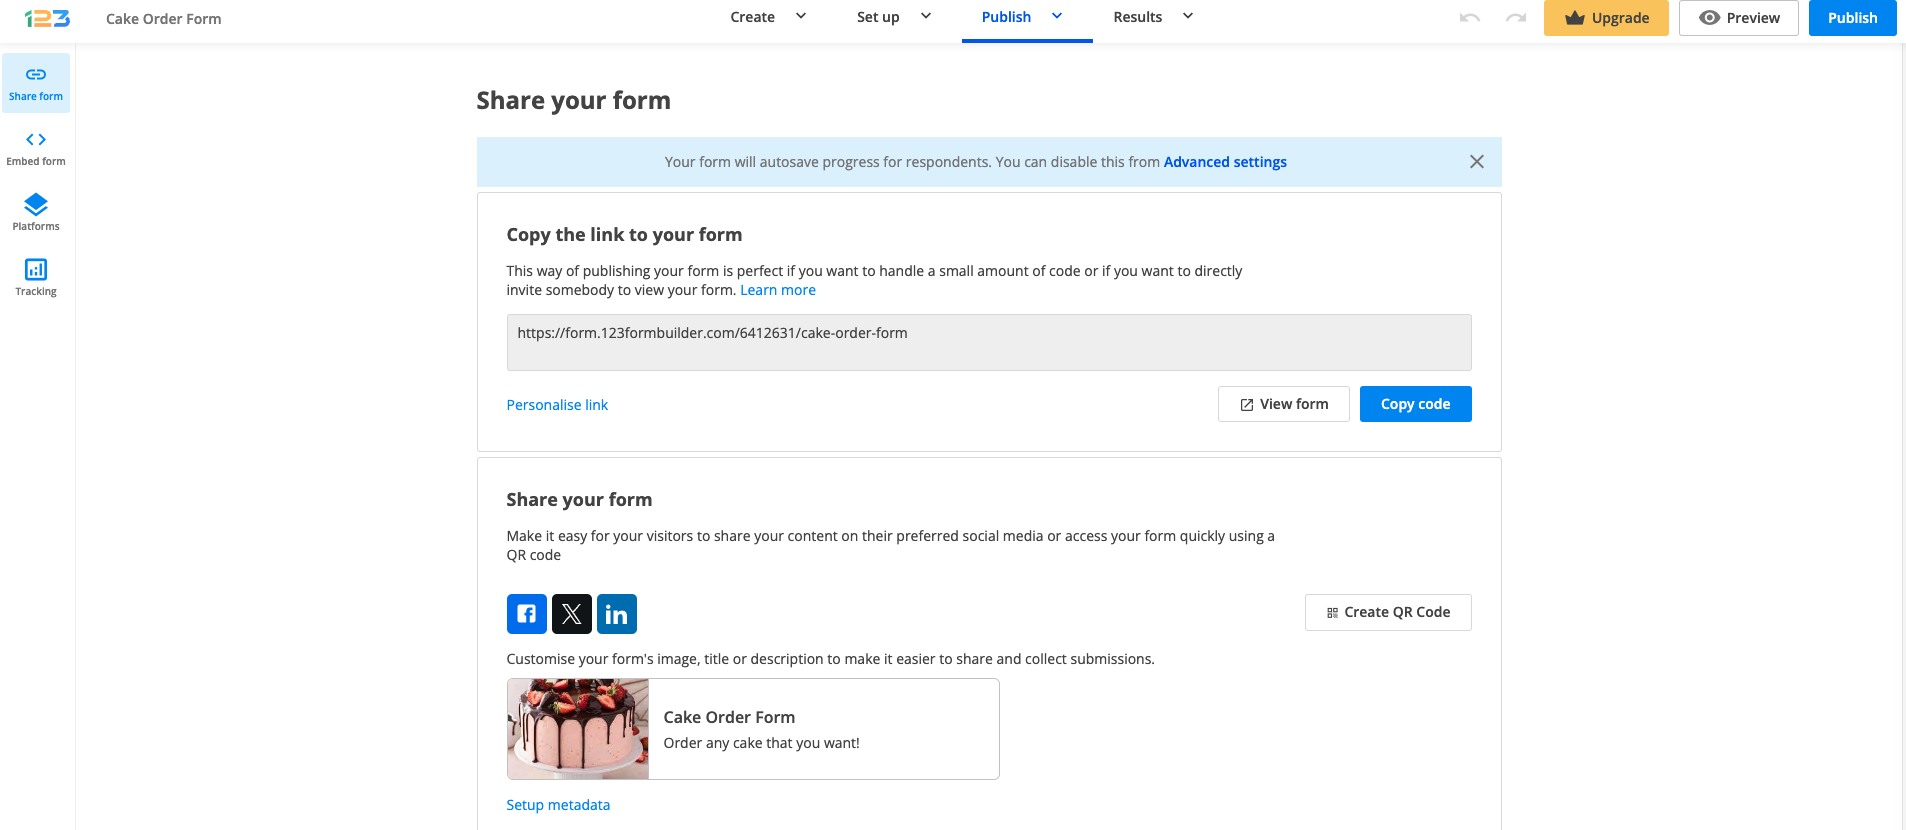
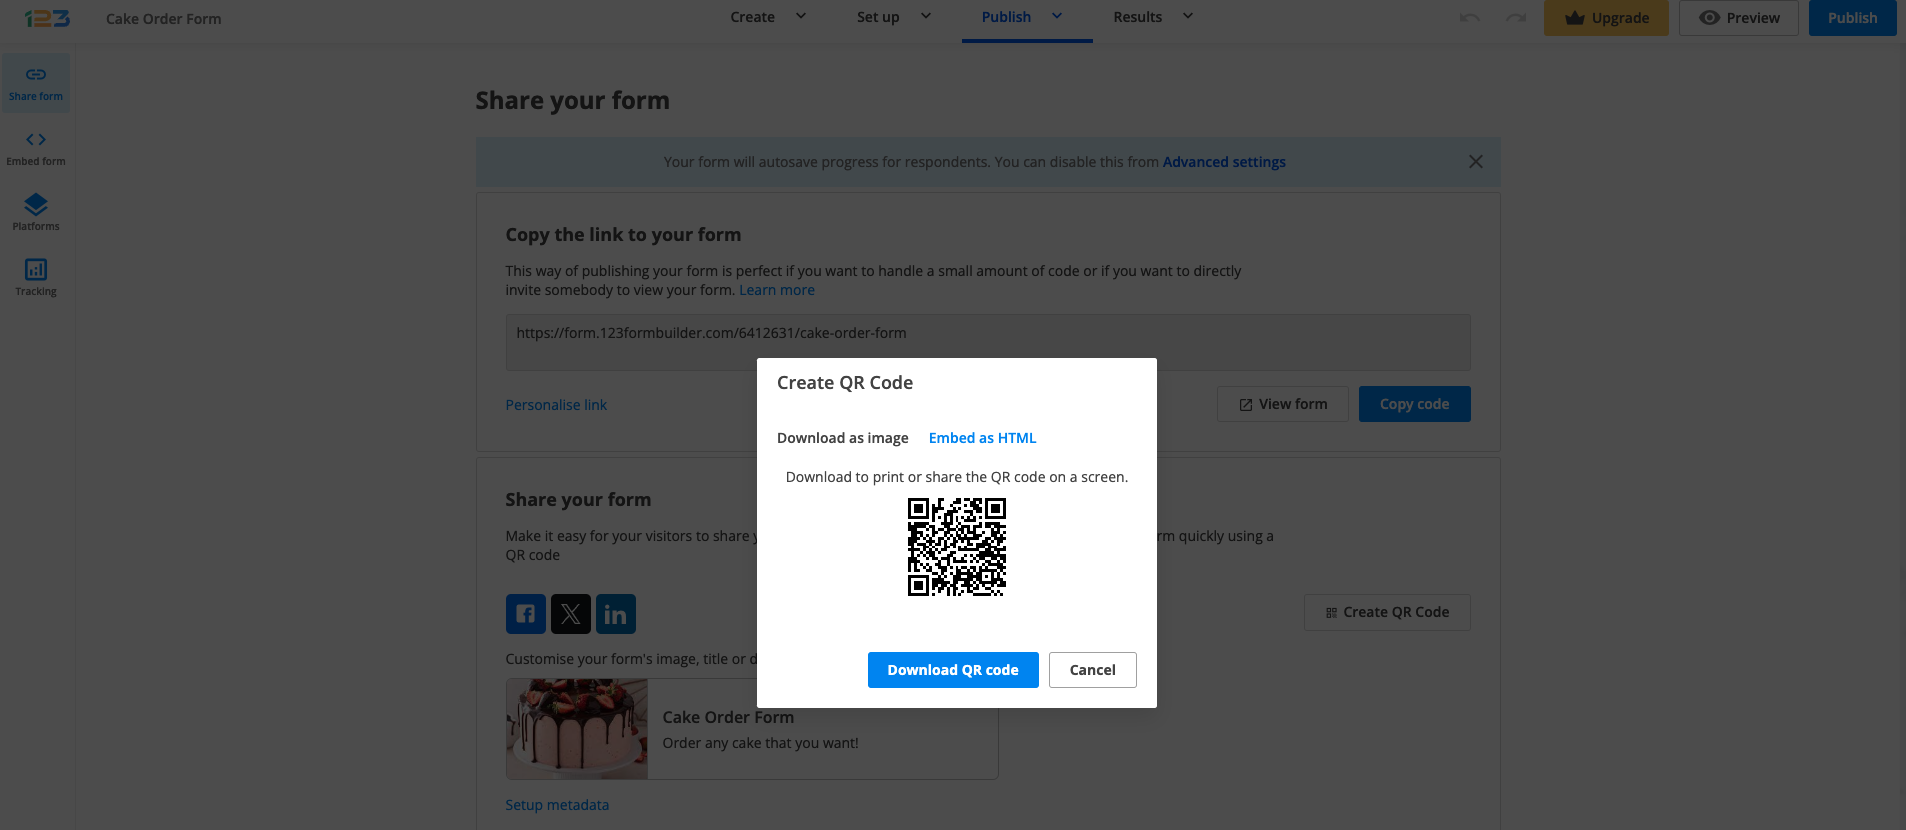
Create QR code – if you want to quickly share your link via a QR code, you can click on Create QR code and it will be generated for your form. You can either download the QR code under a png file format or you can choose to copy the HTML code in order to embed it in your website.
Download as PDF – whether you want to have a hard copy of your form or you have respondents that want to complete the form on a piece of paper, now you can download your form in a PDF format.

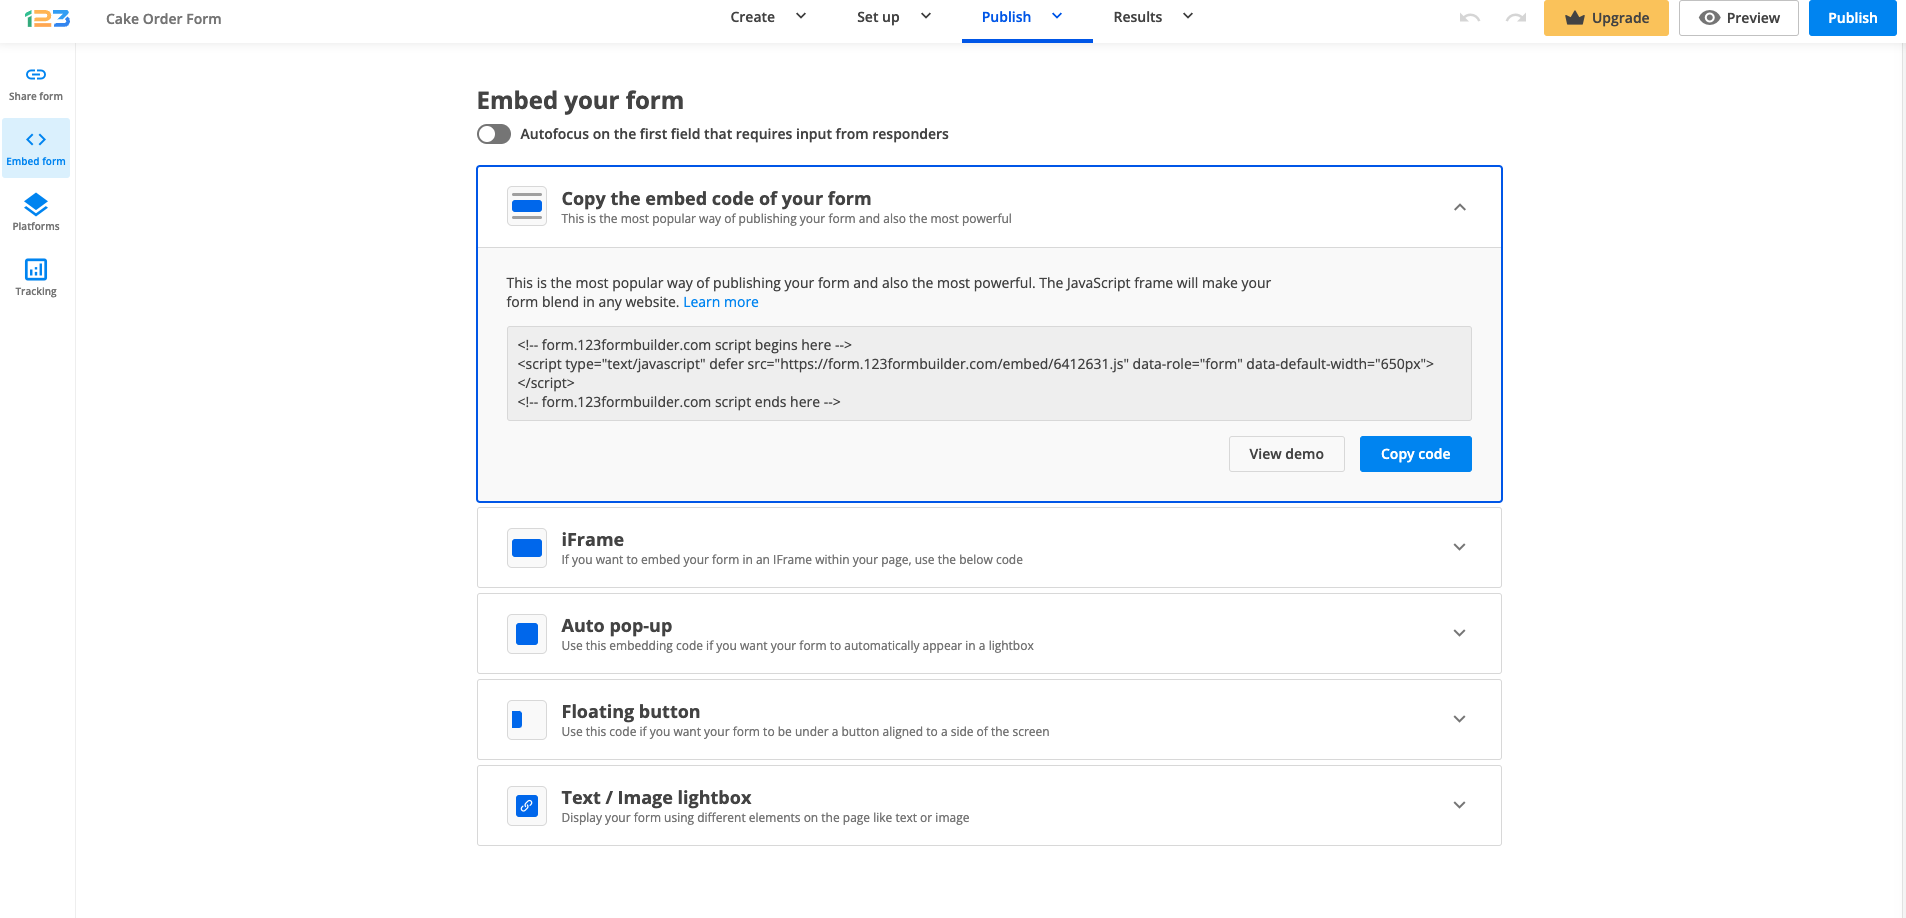
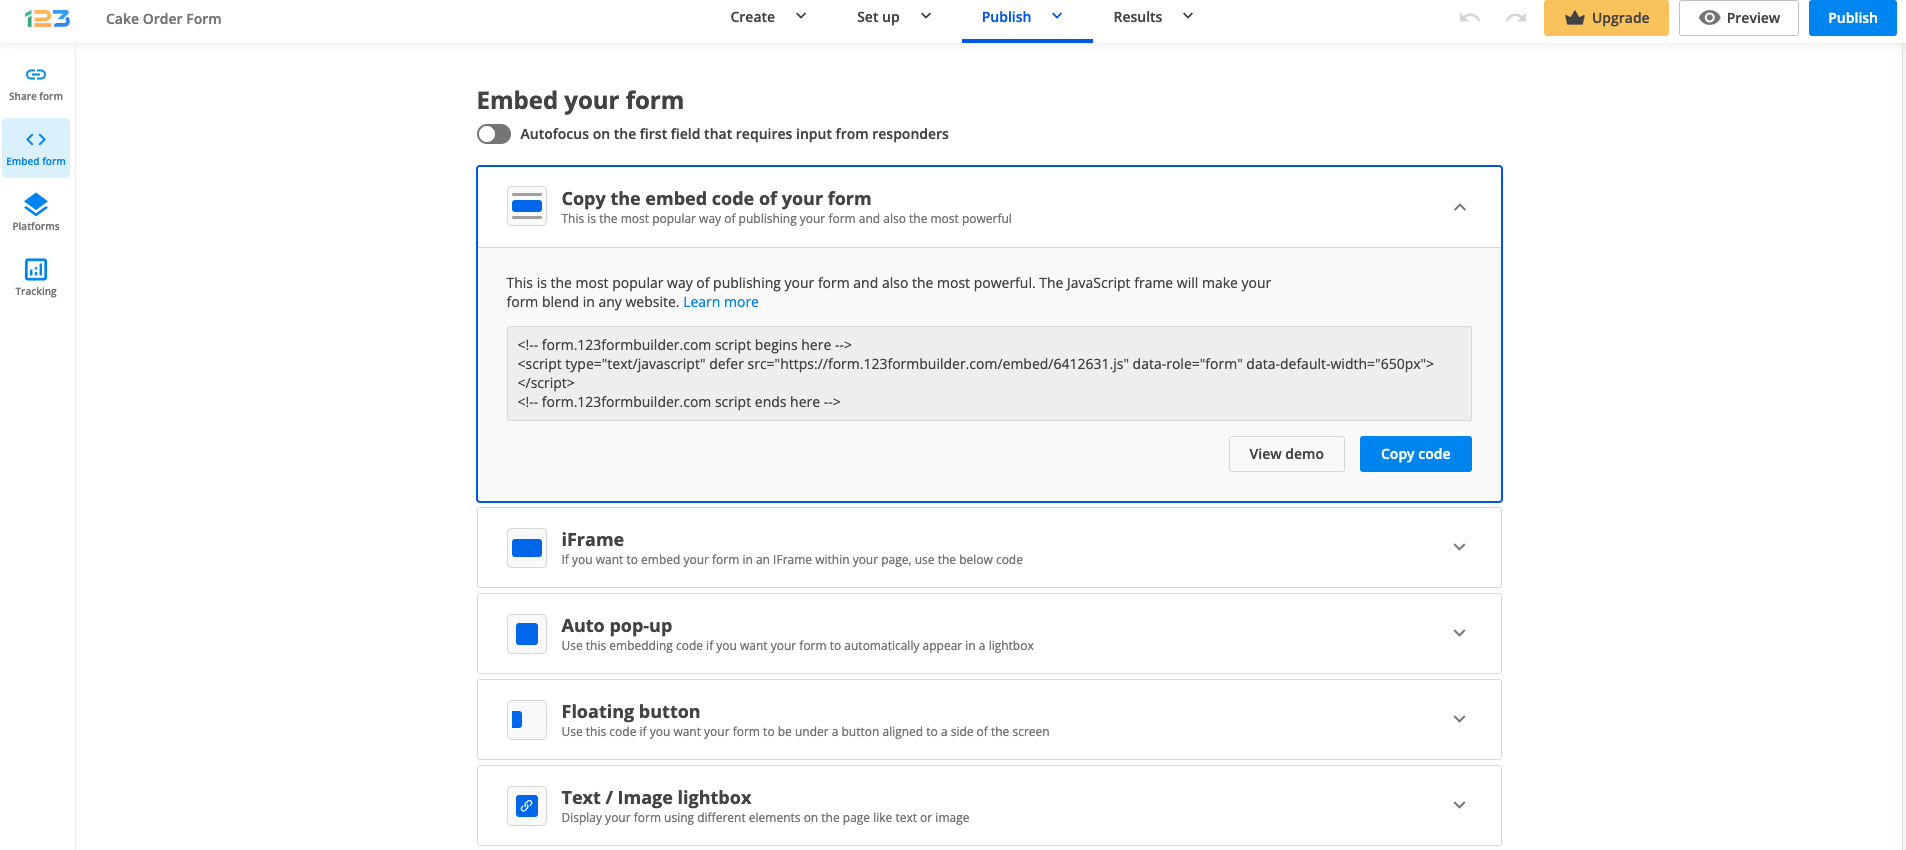
Embed options – here we have multiple options: Javascript, iFrame, Auto pop-up, Floating button & Text/Image lightbox.
Javascript option is the most popular one, while IFrame comes with a fixed form height. The floating button comes with customization options, such as customized text or image, button background color, button placement and font; for Auto pop-up, you can set up the number of seconds after the form is displayed.
Another option of publishing your form is by using the available platforms. Each of them has its own code that needs to be used.
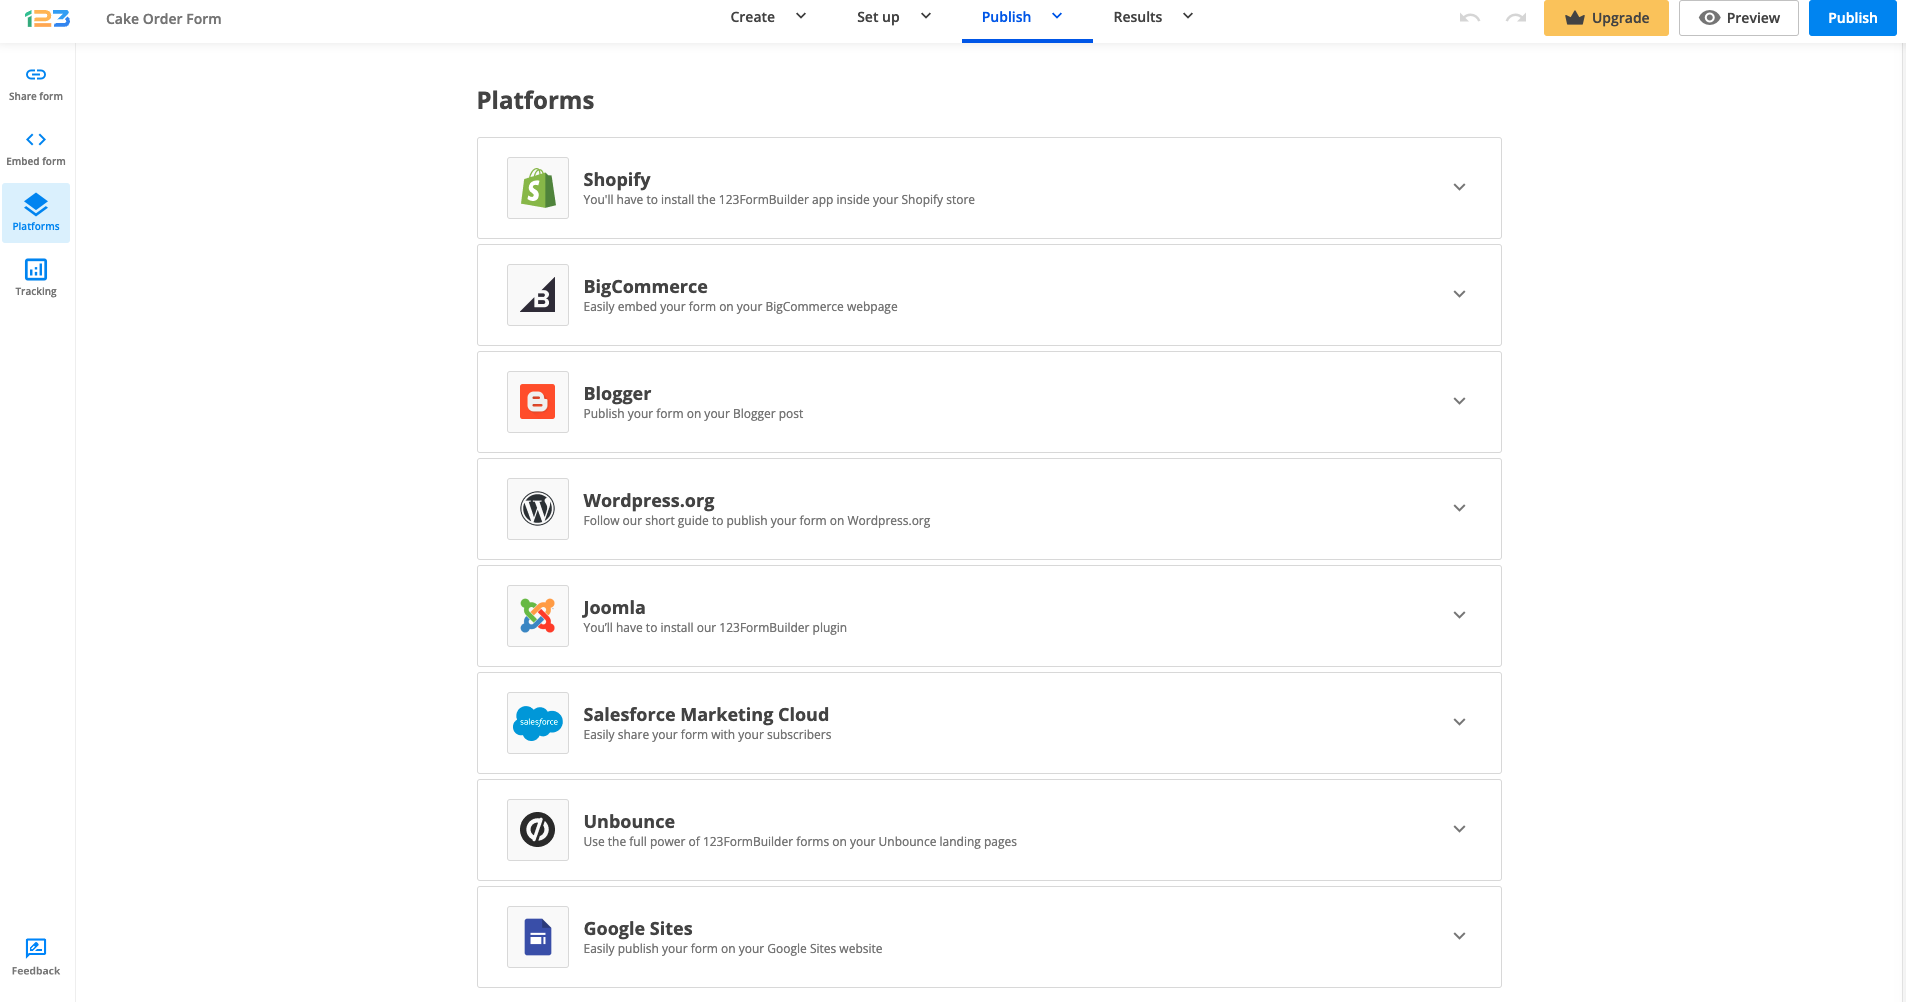
Note: If you want to add a form to your Wix web page, use our 123FormBuilder app for Wix to create, edit and easily publish forms on Wix. Read more in our documentation on how to add online forms to Wix.
You can share your web forms on Twitter. Visit the Publish → Share form and you can quickly share your form via Twitter by clicking on its icon.
Twitter can also be integrated as a 3rd party application with your web forms. Every form submission will trigger a new tweet. Learn how to integrate Twitter with your 123FormBuilder web forms.
To add a form to your Google Sites page, select the Publish button from the top right corner of your Form Editor within the form builder. From the options available on the left panel, select Embed form and choose one of the listed publishing methods. Let’s take Javascript for example.
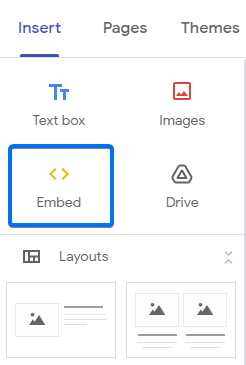
Access your Google Sites page and select Insert to add a new element to your website. From the available options choose Embed.
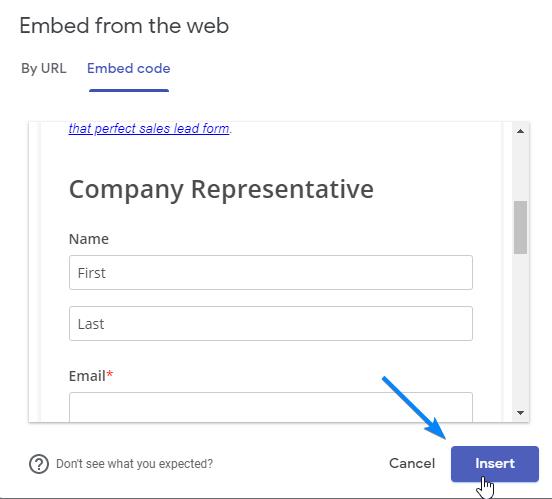
Switch to the Embed code tab. Paste your form’s Javascript code in the provided box and press Next.

A preview of the form is displayed. Finally, press Insert in your main view.
Place the form in the section you need on your webpage and drag the blue margins to adjust its height and width.
Finally, press Publish to save the changes to your website. You can now share your web page with others and collect the leads or contacts you need.
Important Note
If you are using the old version from Google Sites, use the iframe code of your form (Embed Code → Iframe).
You can publish forms on your Joomla website using the 123FormBuilder extension for Joomla. First, download the extension. Unzip the archive – you’ll find in it three folders: Joomla 1.5, Joomla 2.5, and Joomla 3.1. You need only the one corresponding to the Joomla version that you are using. The folder Joomla 1.5 contains two plugins, plg_123formbuilder and plg_123formbuilder_btn. Joomla 2.5 and Joomla 3.1 contain one package that has two plugins: Button – 123FormBuilder and Content – 123FormBuilder. The plugins are automatically installed with the package, but you’ll need to manually activate the plugins one by one, as explained further down.
Go to your Joomla Administration panel. Click on the tab Extensions in the horizontal menu on top of the page and choose the first option – Extensions Manager.


Note: To completely add the 123FormBuilder extension for Joomla 1.5, you’ll need to install each of the two packages separately in the Extension Manager (Button and Content).


The extension is now up and running. There are two ways of getting forms to Joomla:
1. While you’re editing a Joomla article, click on the icon Insert Form that shows up in your menu. Make sure you are logged in to your 123FormBuilder account. Select the form that you want to publish and click Embed. If you want to create a new form, press add new form and you’ll be redirected to your 123FormBuilder account.
2. Go to the Publish → Platforms section of the form in your 123FormBuilder account, click on the Joomla tab on the left side of the page, copy the code you find there and paste it in your Joomla article.

You may link to a lightbox form through text links, image links, or floating buttons. When published in lightboxes, forms will appear to be floating above the page and will definitely become the center of attention.
You have multiple options of embedding your form as a lightbox. Go to Publish and Embed form. There you can find Auto pop-up, Floating button & Text/Image lightbox.
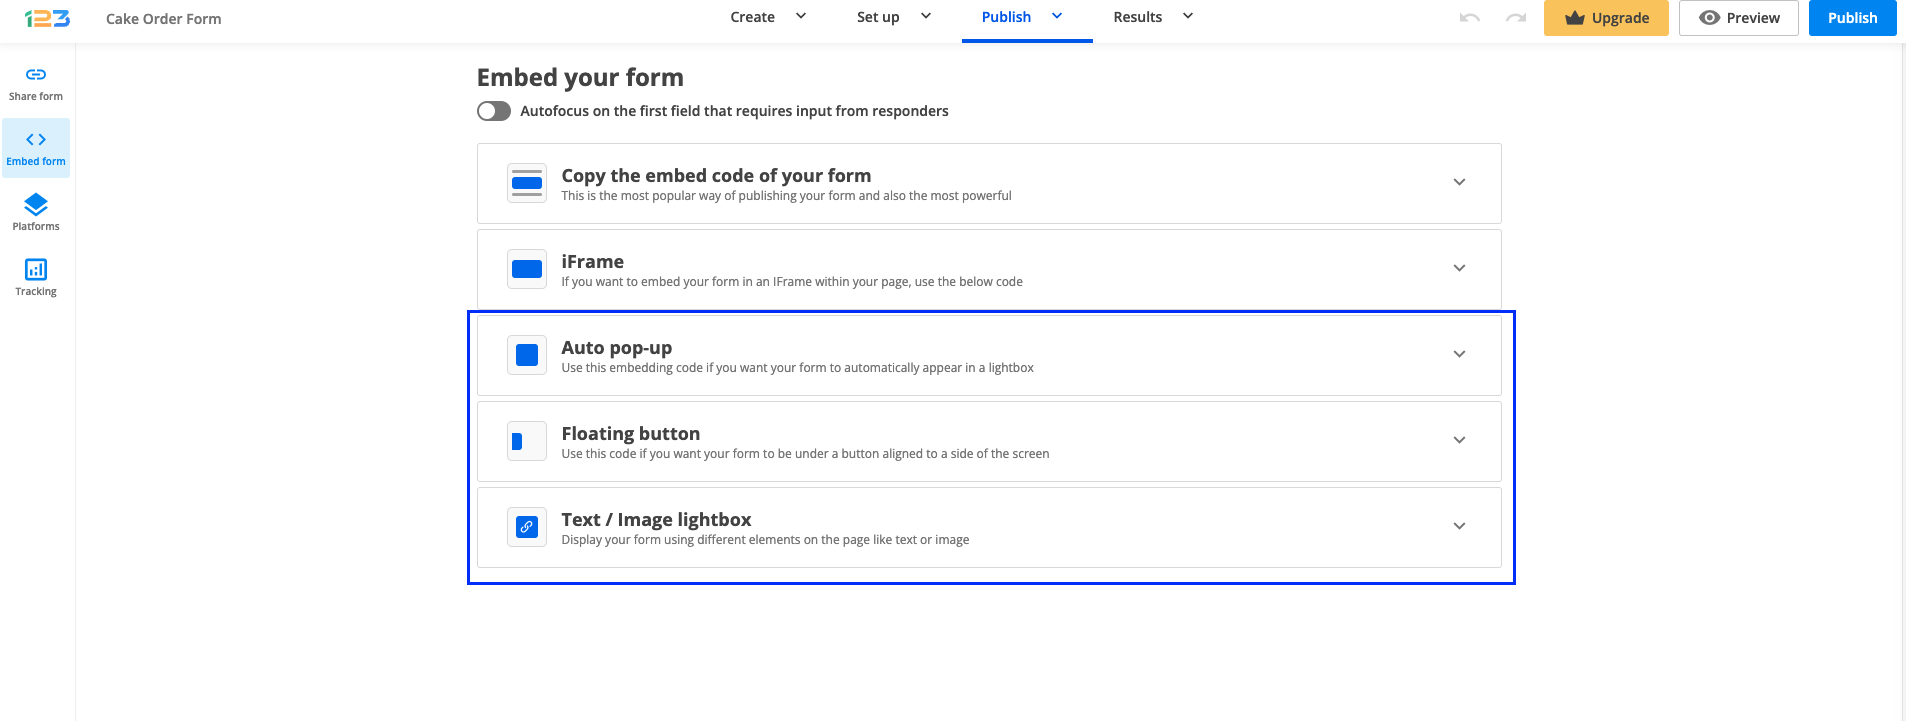
Here are some details about each option:
Auto pop-up – this allows your form to automatically appear on the top of the content of your webpage, without your respondents having to click on something (image/button/link). You can also set the number of seconds after which the form should pop-up.

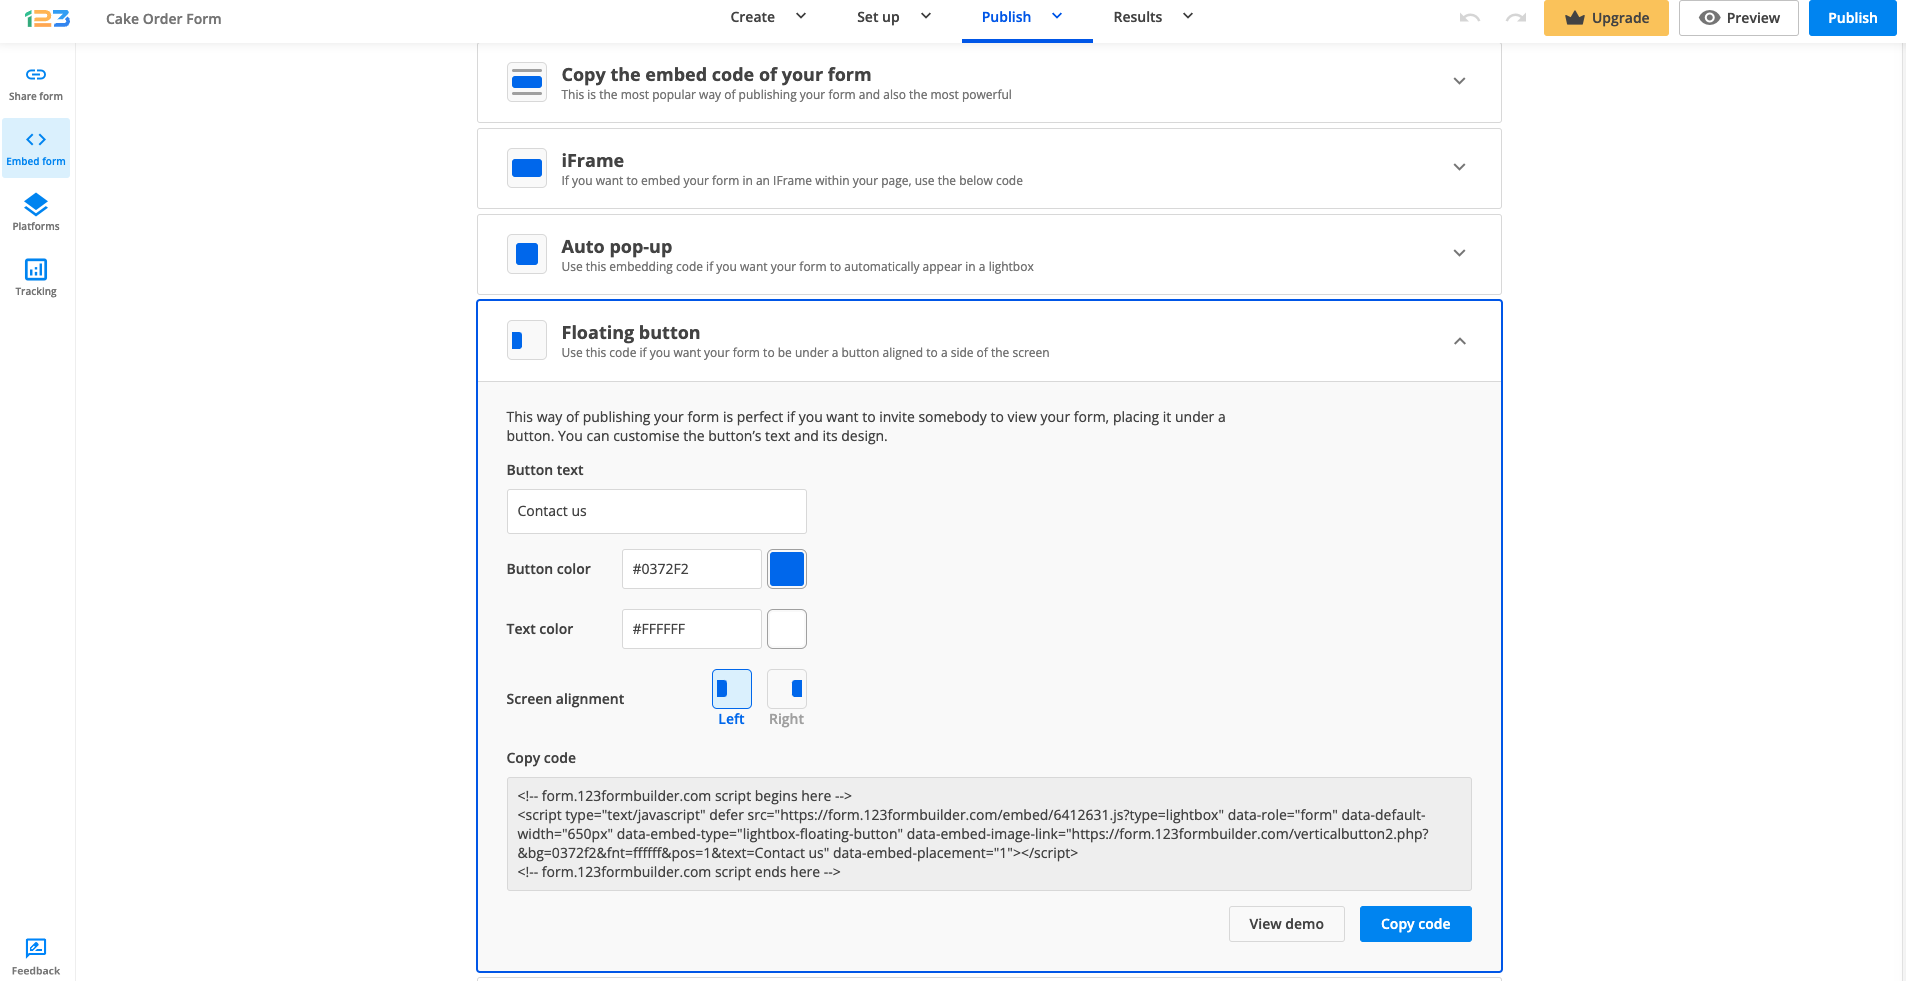
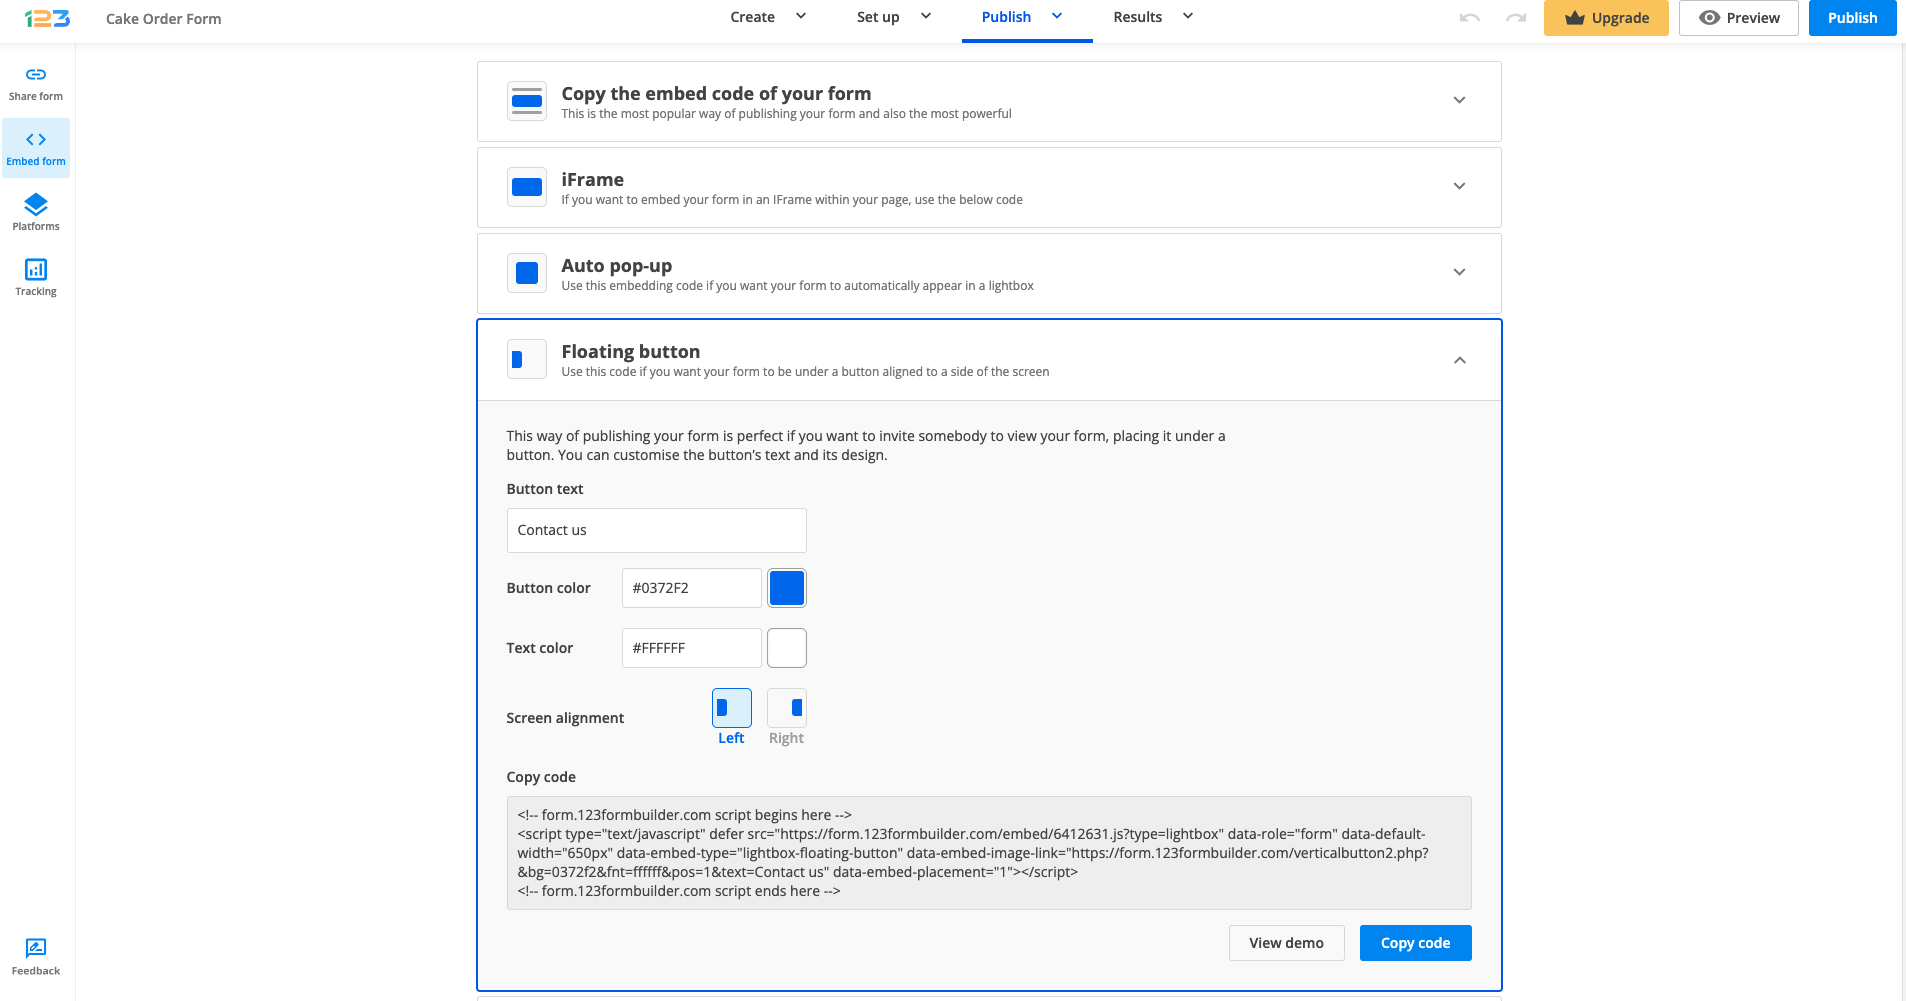
Floating button – you can use this option if you want to have your form under a button aligned to a side of a screen. You can customize the button text and the button color. Additionally, the text colour can be changed and the screen alignment – either left or right.
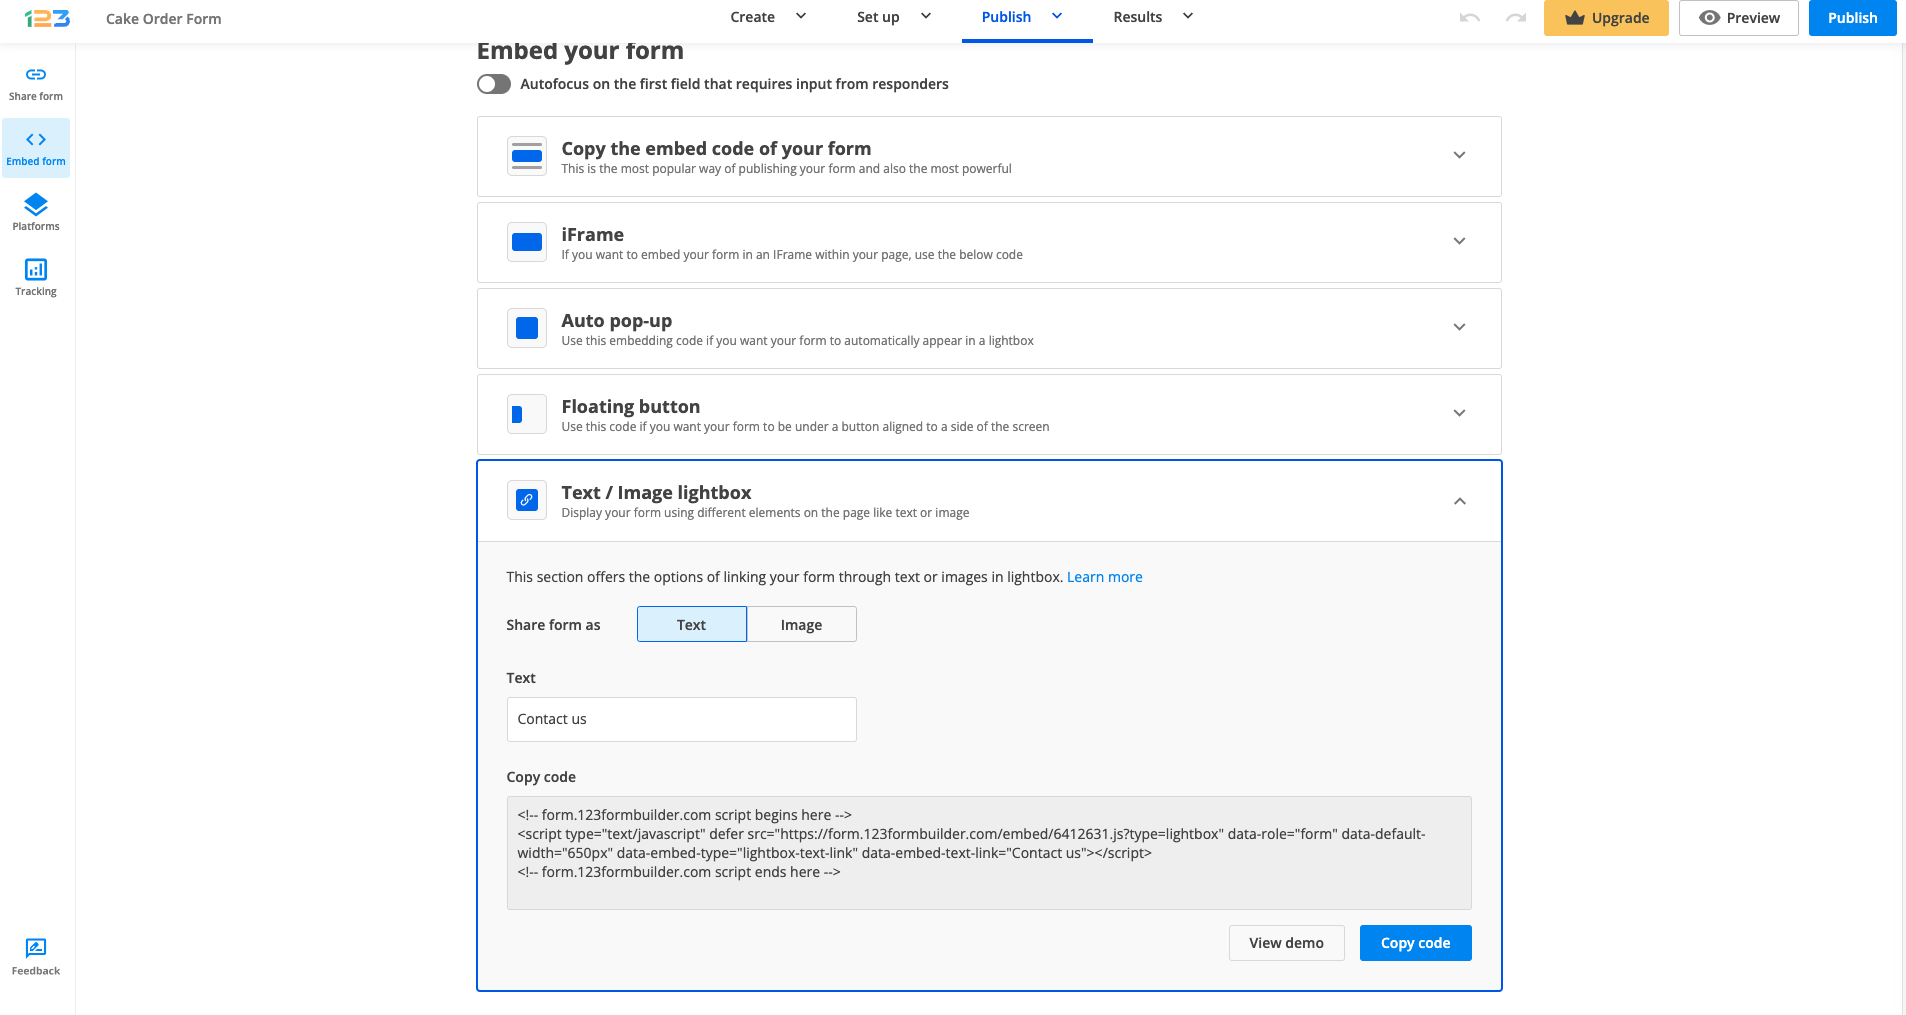
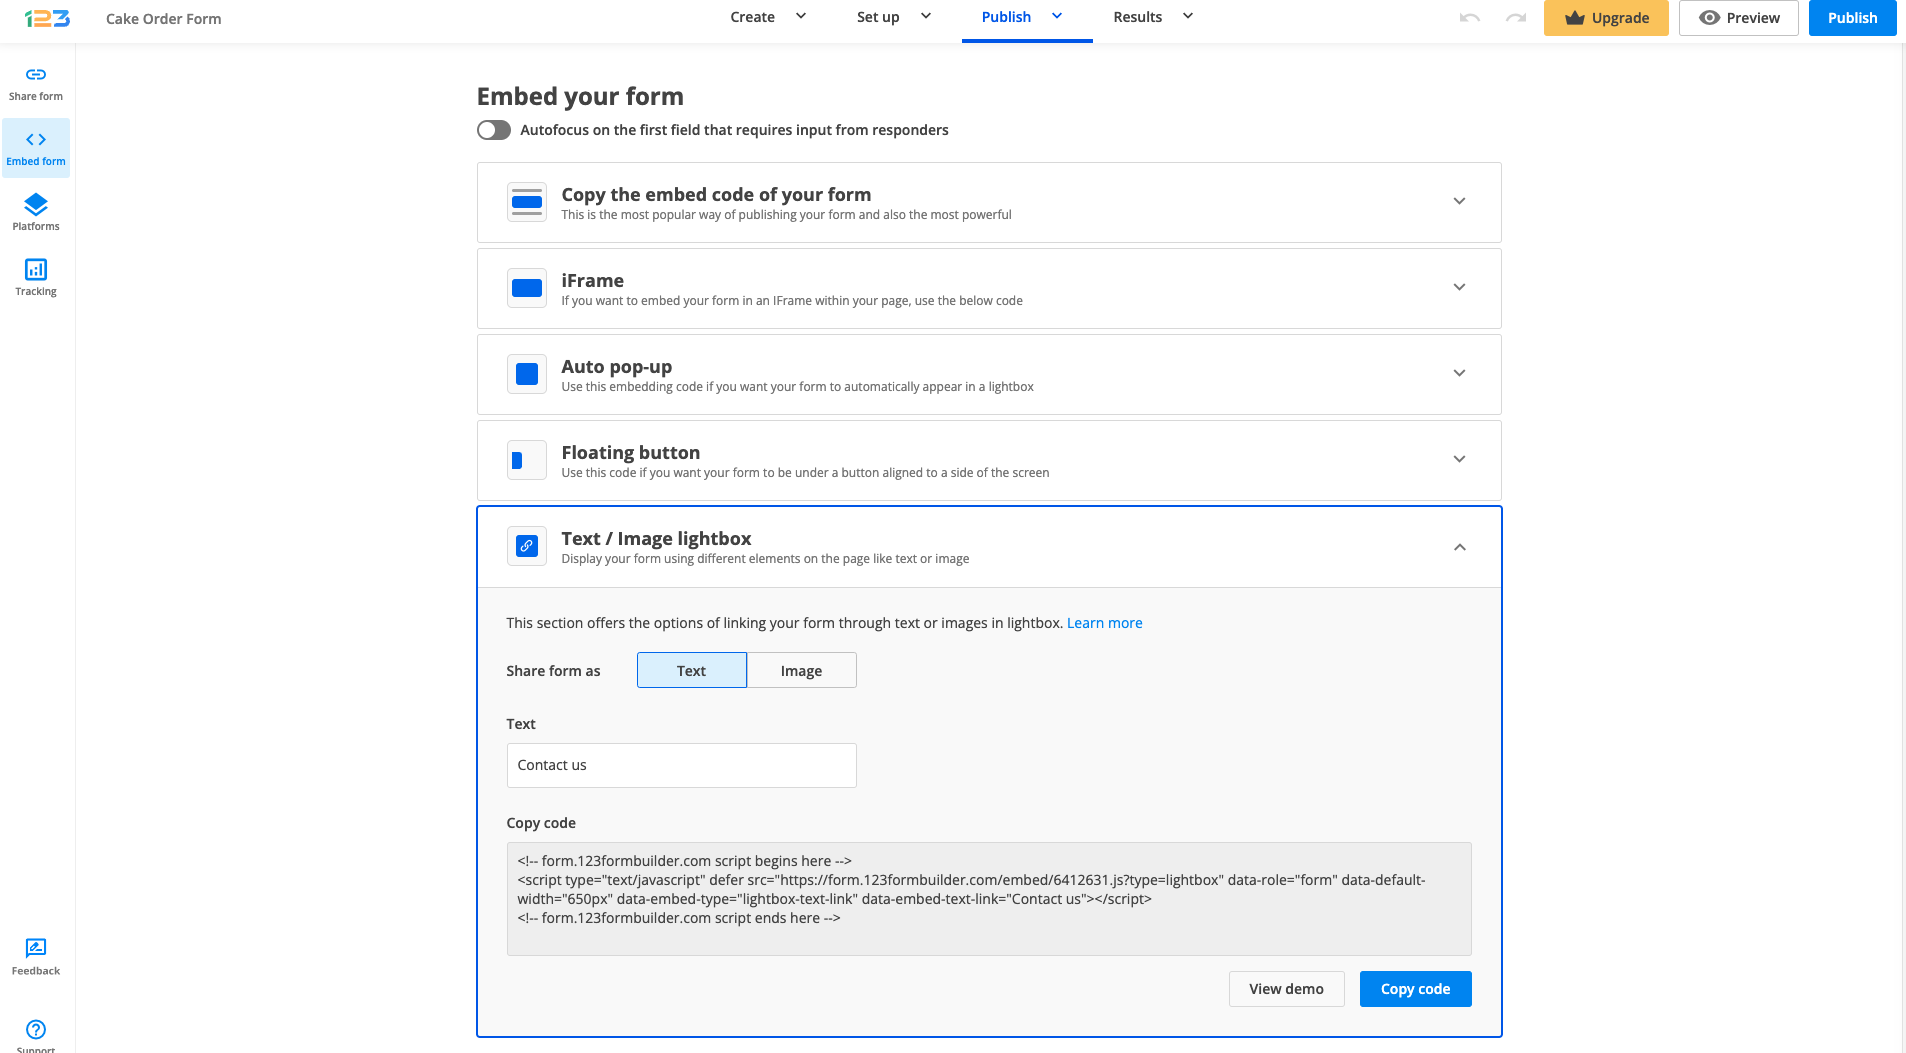
Text/Image lightbox – by using this option, you can display your form using different elements on the page like text or image. You can toggle between text and image and all you have to do is to provide the text or the image URL and copy the code.
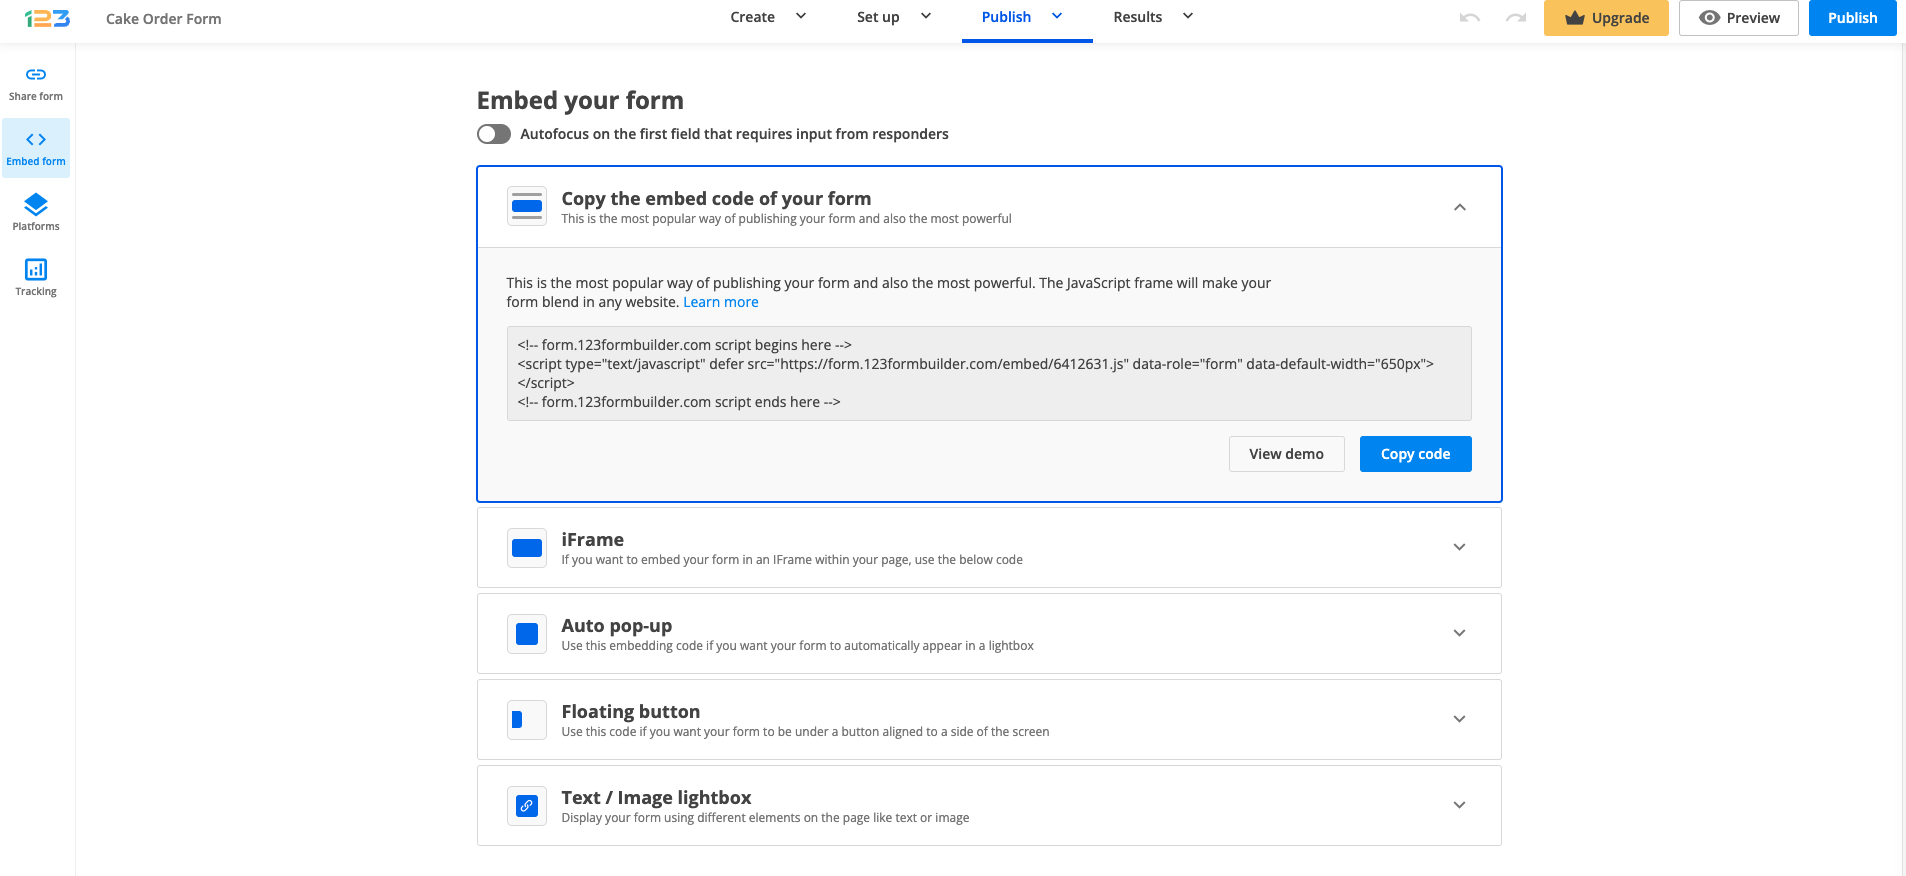
Our form builder provides various embed codes to publish your online forms. The form code can be embedded in your website in multiple ways such as JavaScript (recommended), as an iFrame, or as a Lightbox that also has its own options.
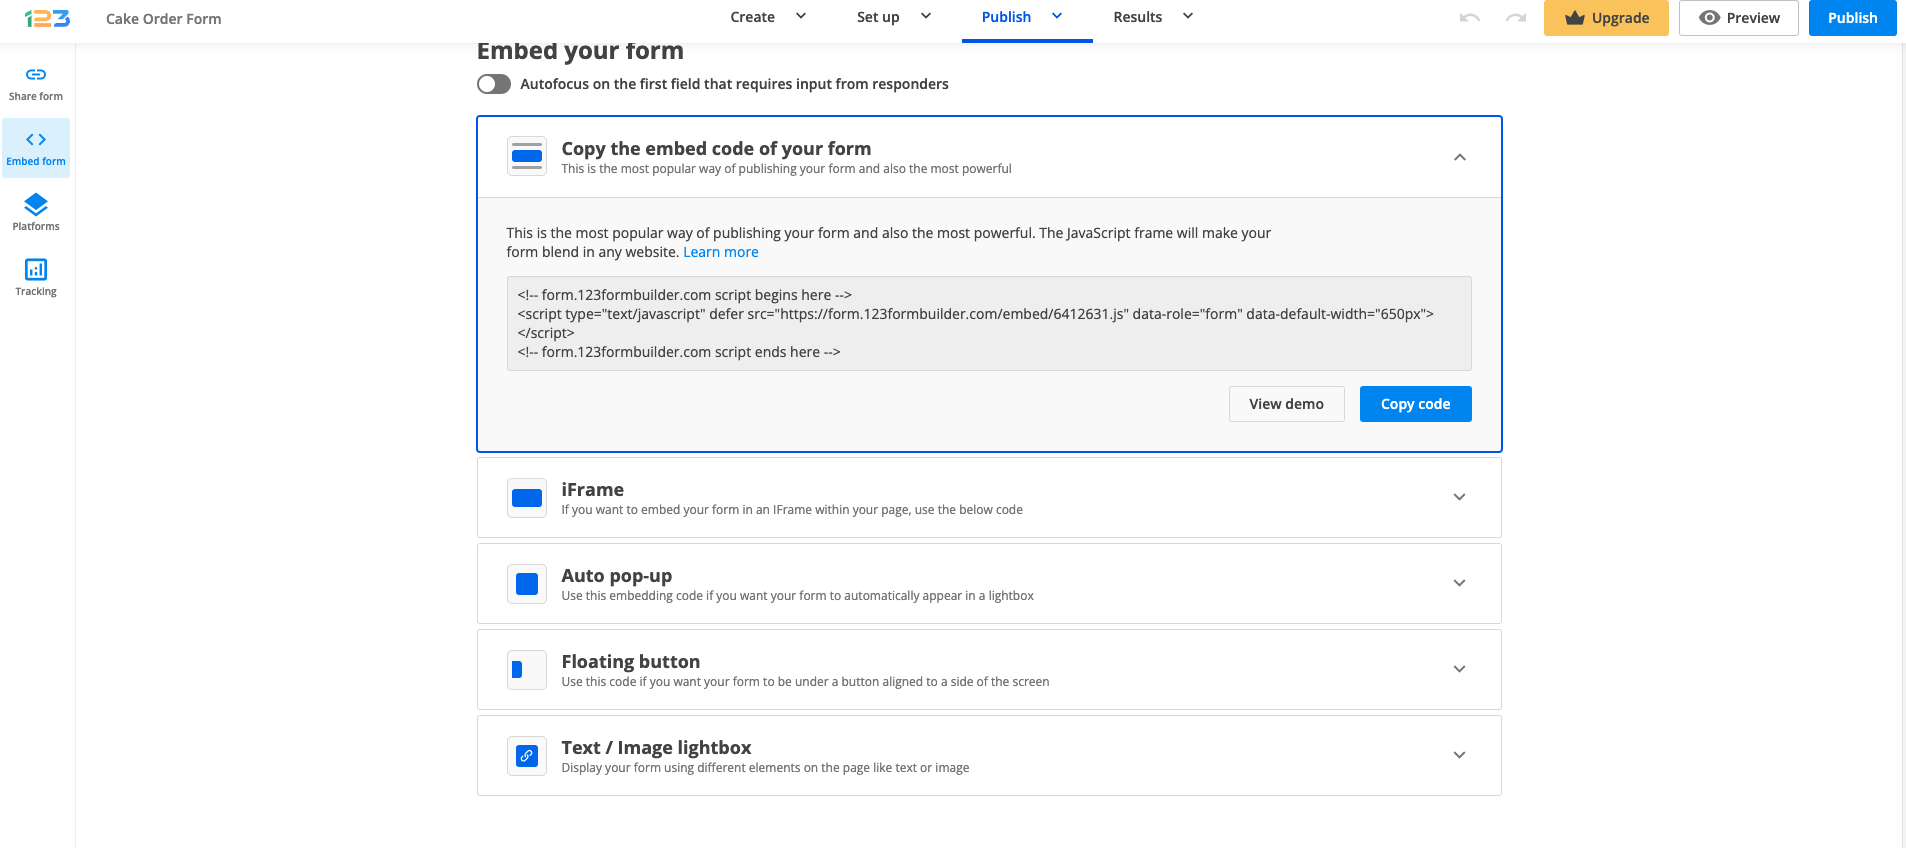
JavaScript
This is the easiest, safest, and most elegant way of embedding the generated code into your webpage. The JavaScript publishing will automatically adjust the height of your form, without showing any scrollbars. Each publishing method has a View demo button which illustrates how the form will display on your webpage.
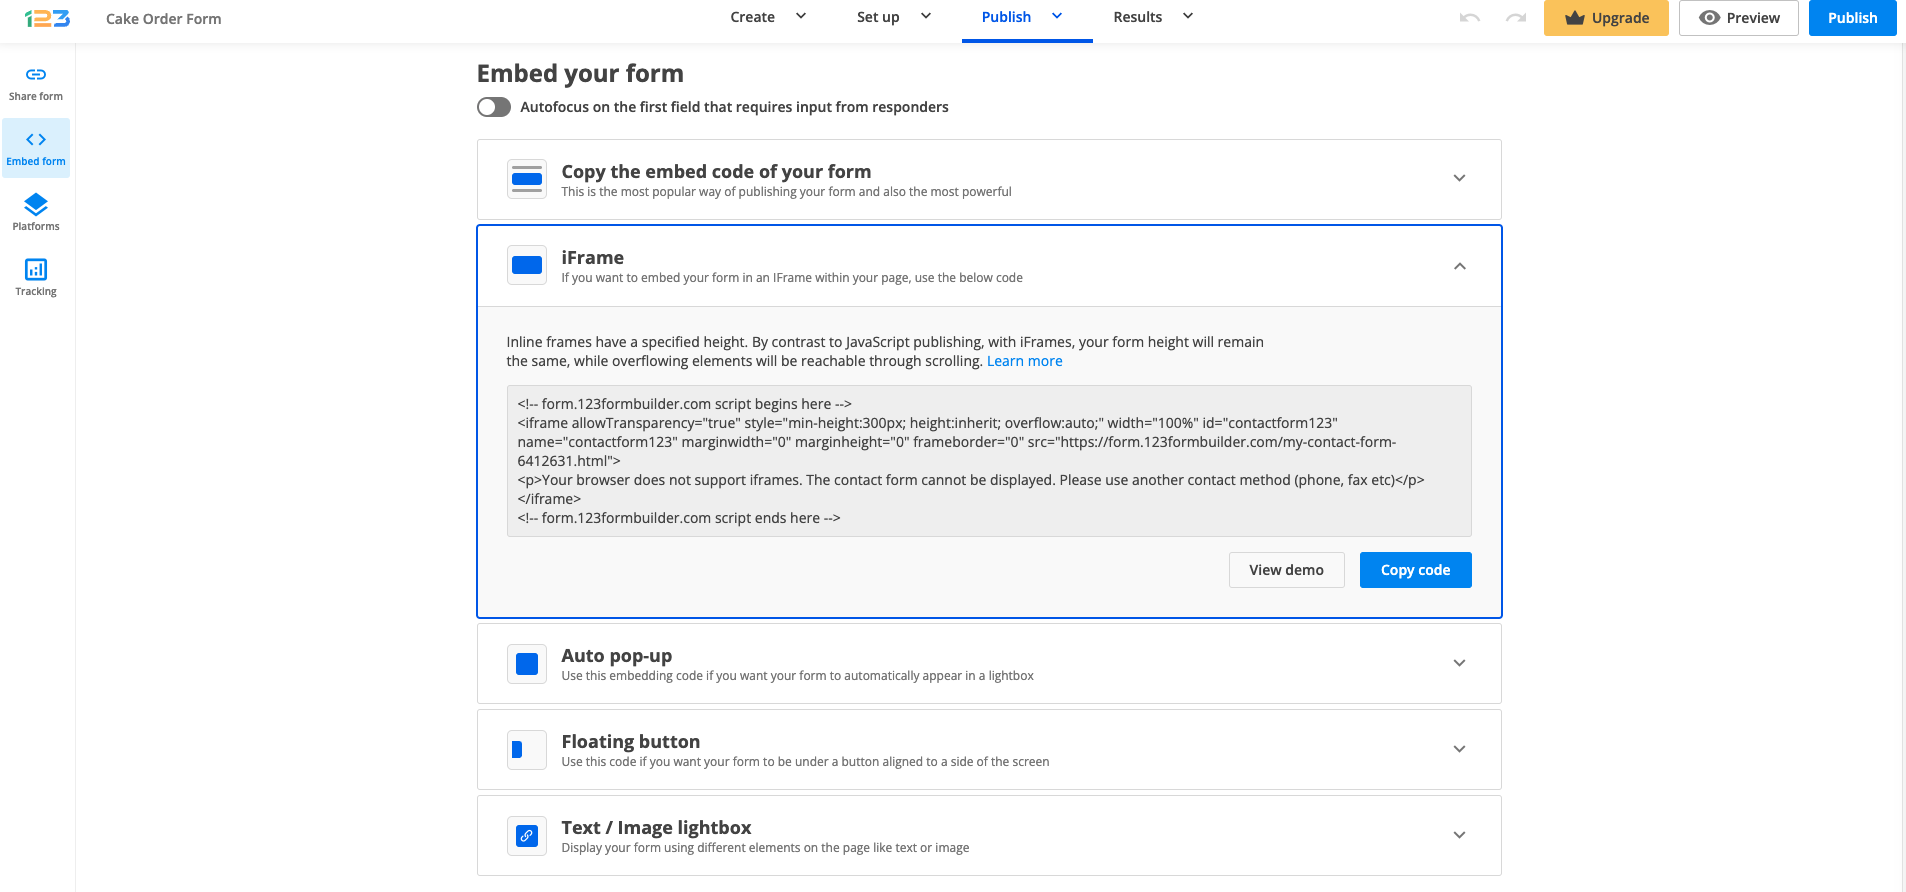
iFrame
Inline frames have a specified height. In contrast to JavaScript publishing, with iFrames, your form height will remain the same, while overflowing elements will be reachable through scrolling.
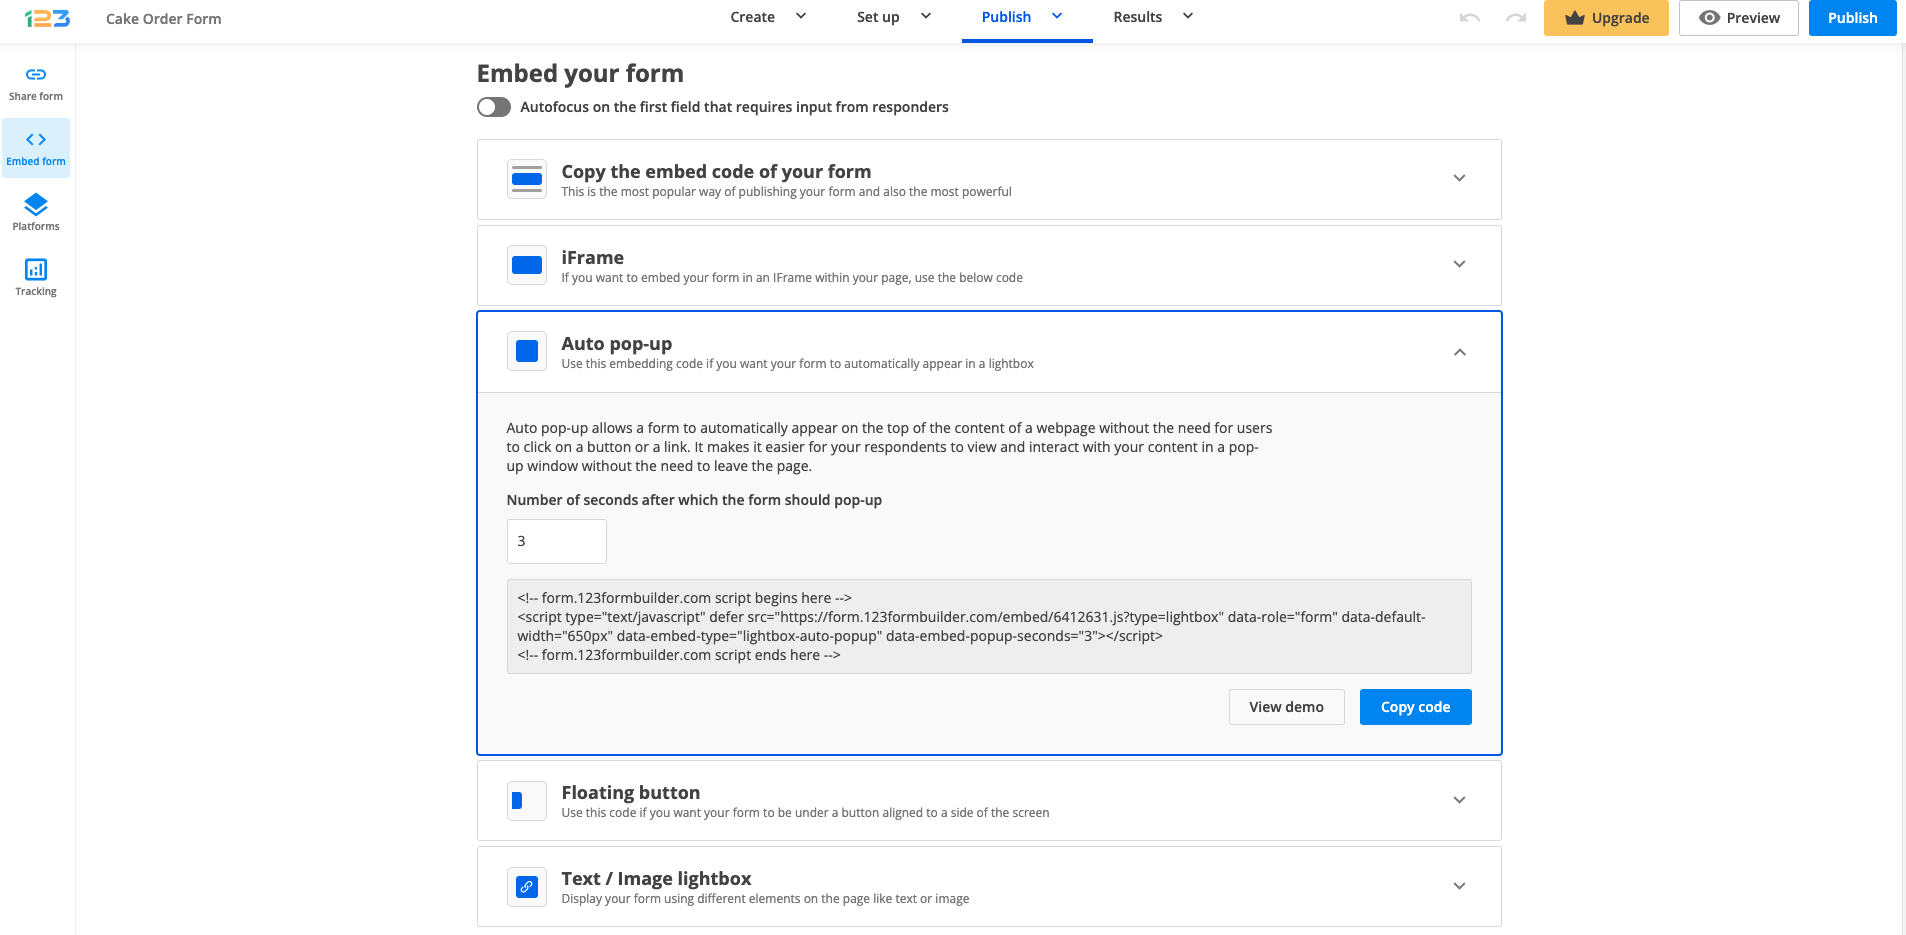
Auto pop-up
This option will auto popup the form on your webpage after a number of seconds you have set. By default, it pops up after 3 seconds.
Floating button
When published in lightboxes, forms will appear to be floating above the page and will definitely become the center of attention. Use this embed code to add a floating button with text on your webpage. Adjust the text, font style, color, and placement of the button.
Text/Image lightbox
By using this option, you can display your form using different elements on the page like text or image. All you have to do is to select which option your are interested in and provide the text or the image URL.
FAQs
1. What is the best way to publish my form?
Ultimately, it depends on your needs. However, the most recommended publishing method is the JavaScript embed code, as it allows for greater flexibility, interactivity, and customization.
2. How does JavaScript publishing differ from using iFrames to embed a form?
Publishing your form using JavaScript will automatically adjust the height of the form without showing scrollbars, while iFrames maintain a specified height where overflowing elements are reachable through scrolling.
3. What is the purpose of using Lightbox embedding for forms?
The Lightbox embedding method allows you to display your form in a modal window that overlays the content of your webpage. Users can easily open and close the form without navigating away from the page. With 123FormBuilder, you can use the Lightbox embedding method to publish your form as a floating button, a text, or an image.
Related articles
Most Popular
Frequently Asked Questions
Here is a list of the most frequently asked questions. For more FAQs, please browse through the FAQs page.