123FormBuilder Knowledge Base
Search our documentation platform for answers, service specifications and 3rd-party integrations.
Knowledge Base
Yes, users can preview a summary of their submission before sending the form. This is especially useful with order forms. Customers can review the order summary and go back to make changes if needed.
To enable the submission summary, access your form builder account, and go to the Advanced section of your form.
Under the Submissions tab, tick the option Allow respondents to preview the submission summary before sending the form.

The submit button will be replaced with a preview button, labeled Preview Submission. The actual submit button will be moved to the next page.
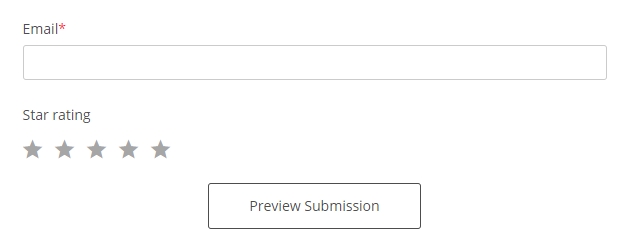
The preview page is read-only. Users can check whether the information they provided is correct and confirm by sending the form. If they want to change something, they simply need to click Go Back and return to edit mode.

In the case of multipage forms, a single preview page will contain all form fields, from all pages.
The preview page helps form users get a clear picture of the content they are sending, and decide whether everything is good or whether corrections should be made. This doesn’t leave room for subsequent doubts and contributes beautifully to the overall user experience.
To access the Advanced section, from your Form Editor select the More icon and click on the last icon in this group.
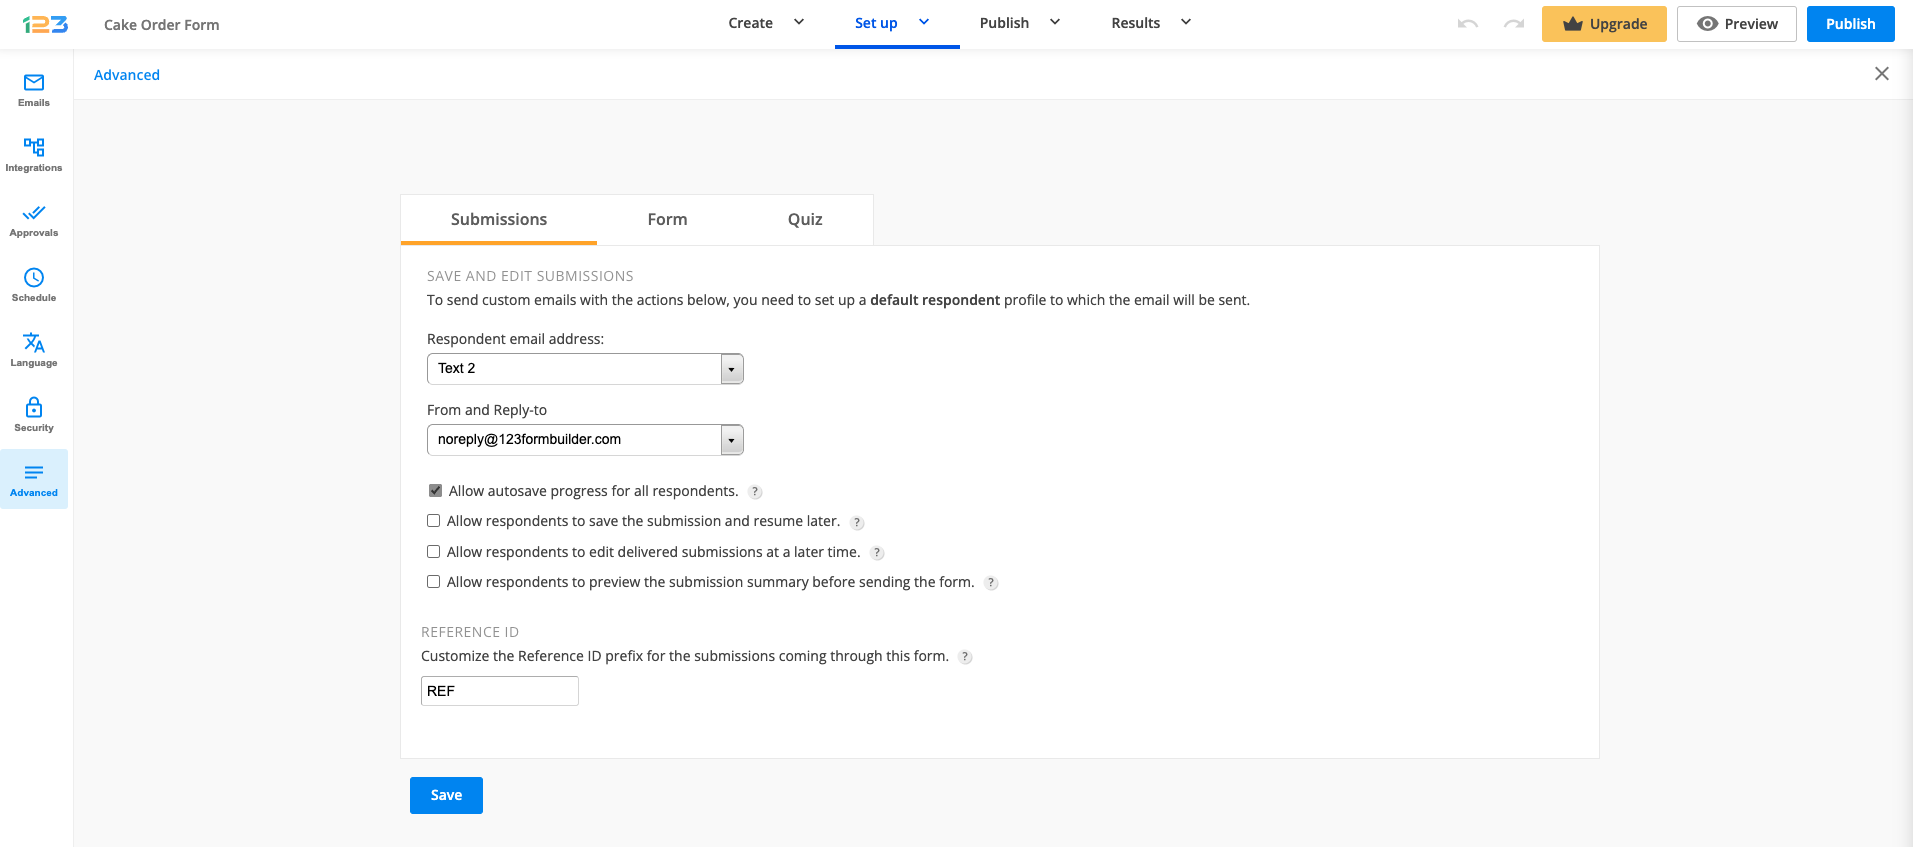
You’ll find the advanced features split into three tabs: Submissions, Form, and Quiz.
From the Submissions section you can do the following:
- Allow respondents to save the submission and resume later.
- Allow respondents to edit delivered submissions at a later time.
- Allow respondents to preview the submission summary before sending the form.
- Customize the Reference ID.
Next is the Form section where you can:
- Add a JS script to your form.
- Add a JS script to the Thank You page of your form.
- Insert Google Analytics code on the page.
- Conditional logic to show/hide form fields.
- Enable accessibility features.
Furthermore, if you have a quiz form, use the Quiz section to:
An order form with PayPal Payflow integration allows customers to provide their payment details directly on your online order form. They will not be redirected away from your website at any point. The PayPal Payflow integration requires having a PayPal Advanced account.
Set up your order forms with PayPal Payflow integration using the step by step guide below.
1. Click New Form from your account dashboard and start creating your payment form.
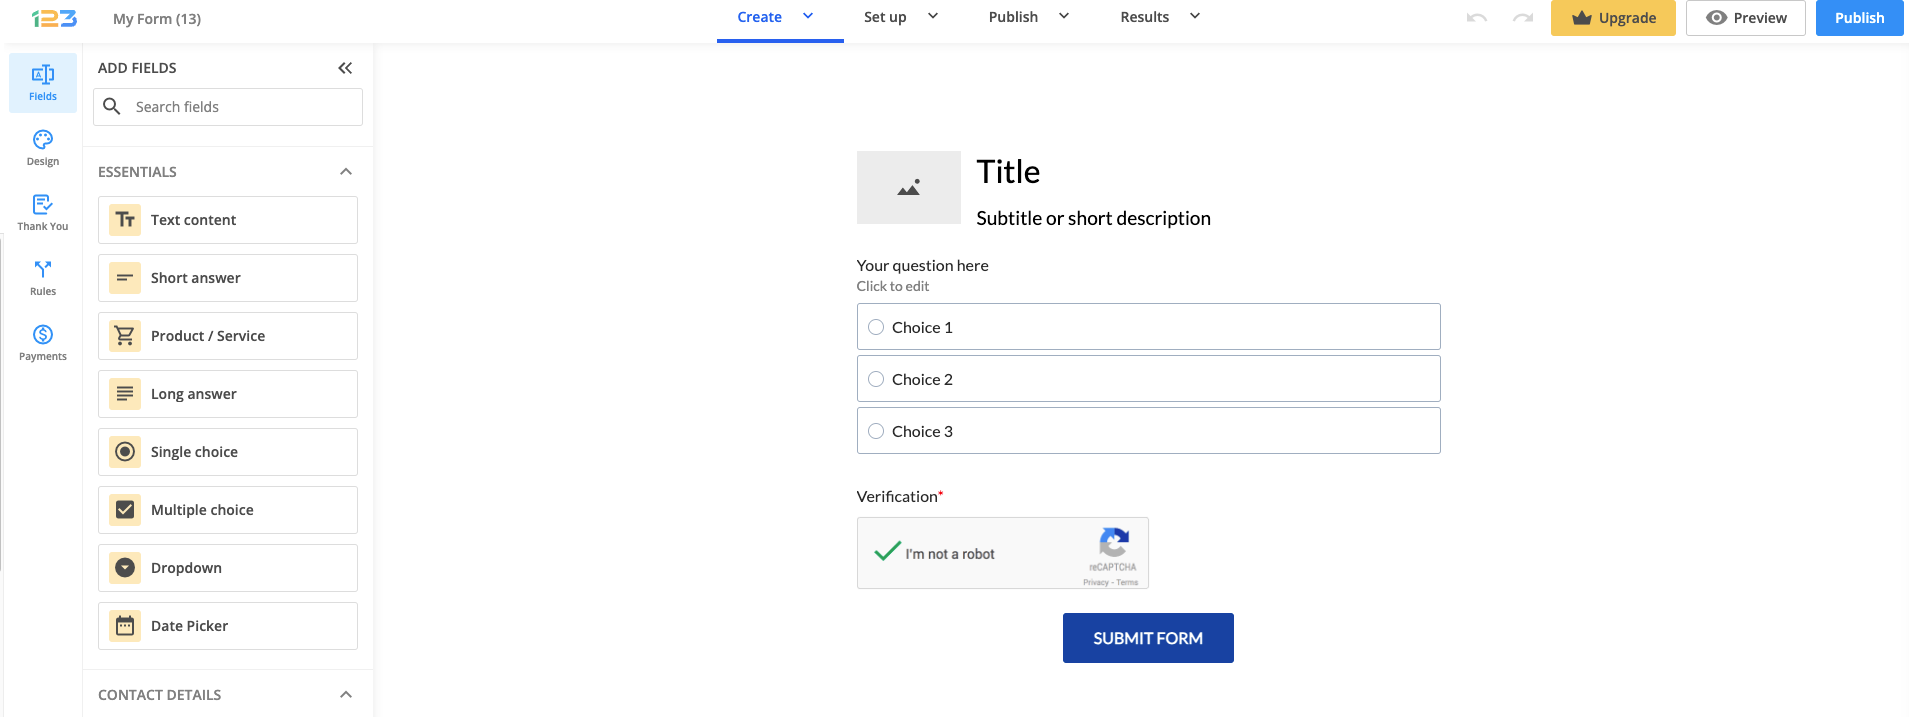
You can use choice fields (single/multiple choice and dropdown lists) to display the products on sale or, even better, Product field.
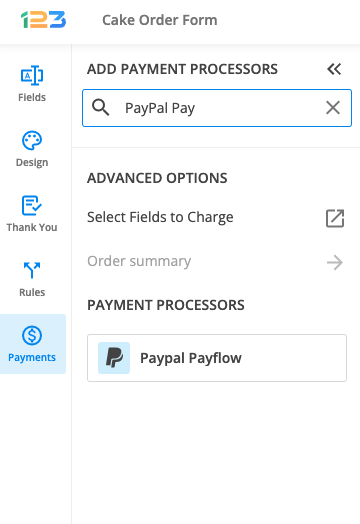
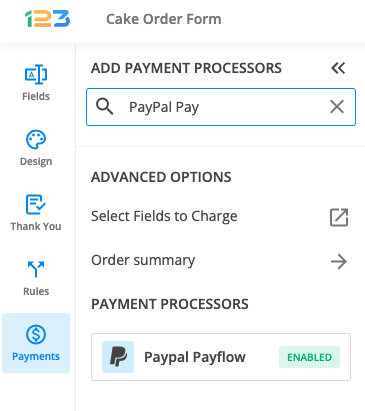
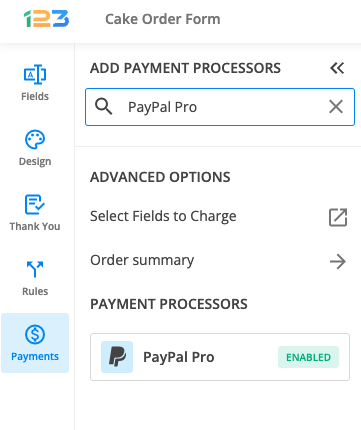
2. In your Form Editor, in the left side panel, you will notice the Payments section. By using the search bar, you can quickly find PayPal Payflow.
3. After adding PayPal Payflow on your form, you will notice a couple of changes: the PayPal Payflow payment processor has a tag near its name & the settings panel opens up to the right side of the page.
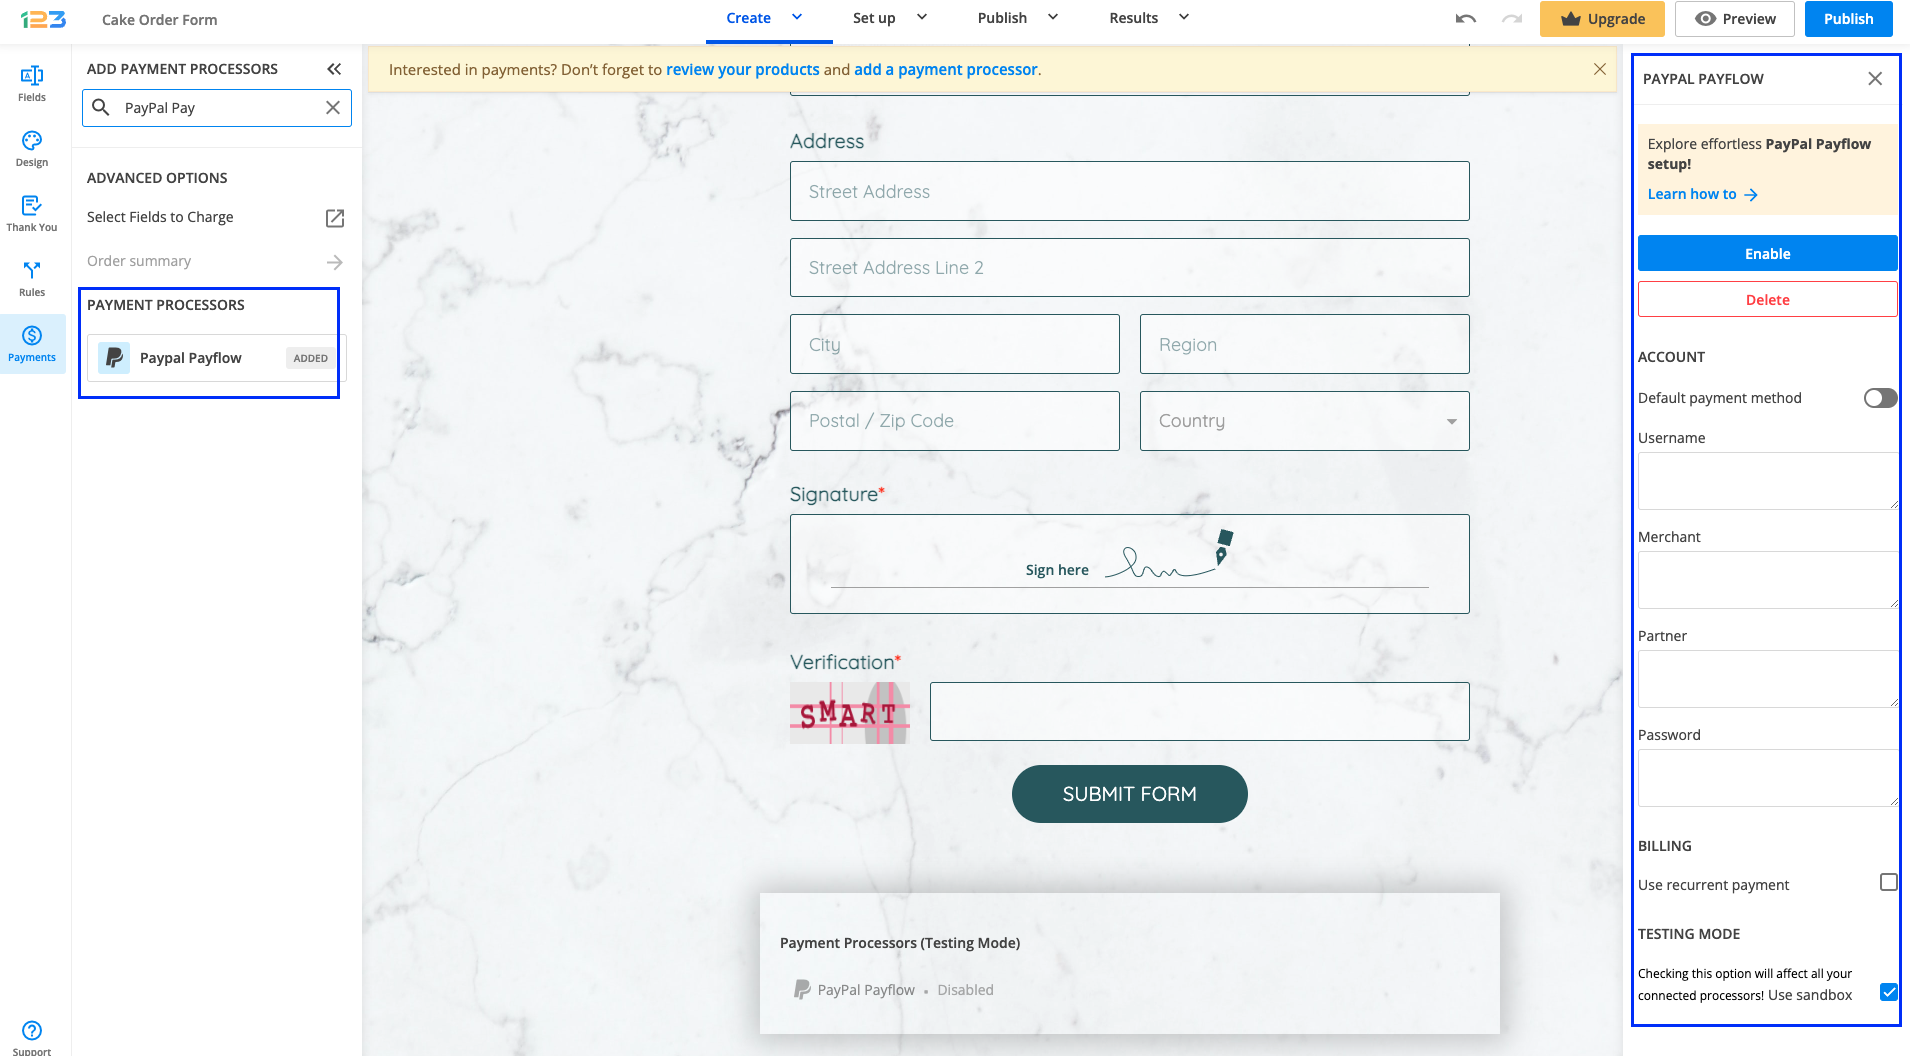
4. In order to set up PayPal Payflow, you have to provide your PayPal Payflow Username, Merchant, Partner, and Password.
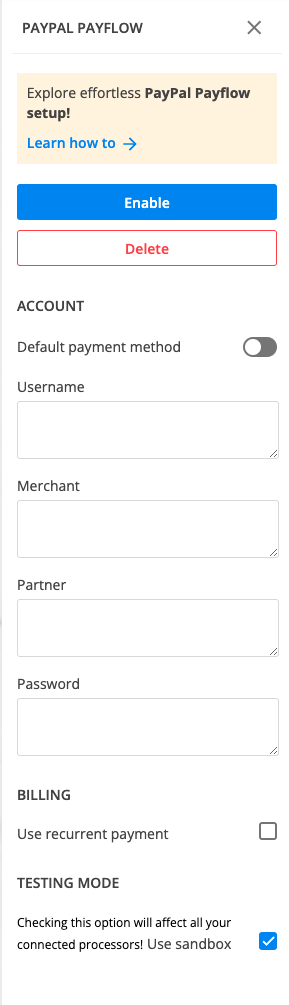
5. Enable the payment integration by clicking on Enable button. By enabling PayPal Payflow, you will notice a couple of changes on your form.
The PayPal Payflow payment processor on the left side panel has an Enabled tag on it so you could easily scan which payment processor is enabled.
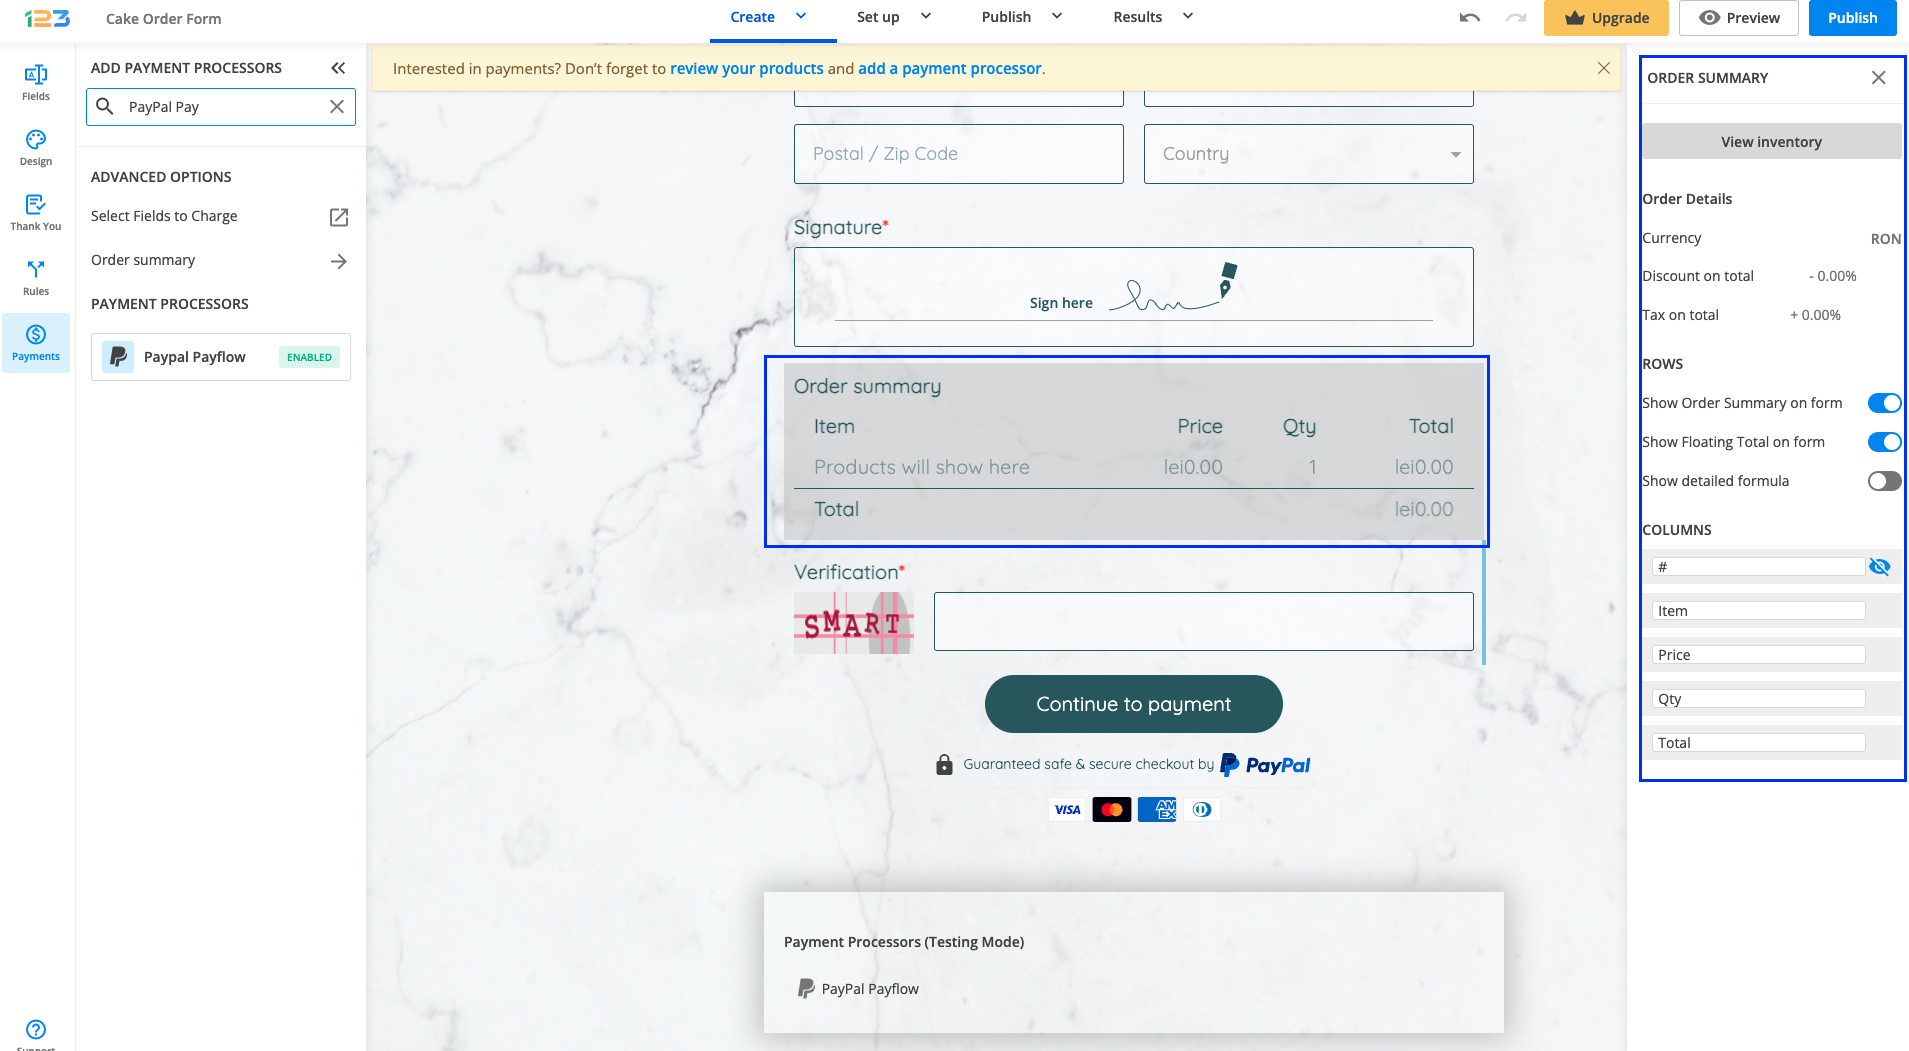
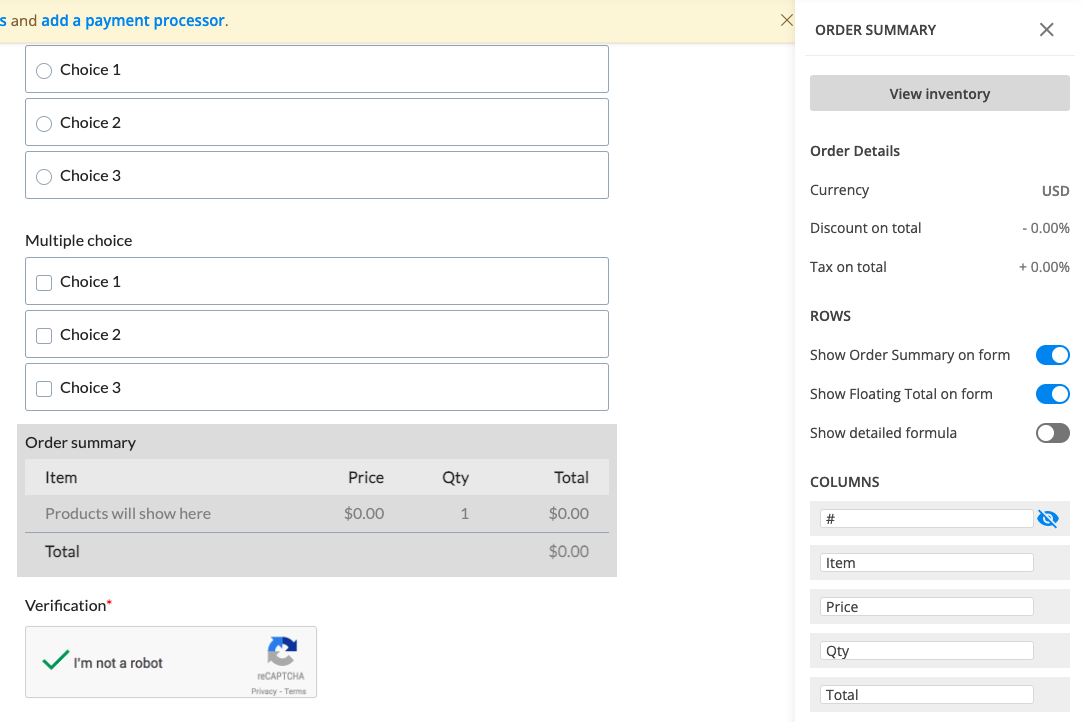
Another change is that on your form it will be displayed an Order summary. Here will appear all the products your respondents select on the form, together with the price per option, quantity and the total price. If you want to customize the order summary, all you have to do is click on it and the available settings appear on the right side panel.
Another change is related to the Submit button. Once your payment integration is enabled, the Submit button is changed to Continue to payment. Below it, we are displaying a disclaimer together with the PayPal logo so that respondents are aware they are proceeding to a payment.
Also, the accepted cards by the PayPal Payflow integration are visually displayed so that respondents know from the start what is the accepted payment method.
You can customize the action bar (everything that is related to the submit button, additional buttons, disclaimer, etc) by simply clicking on this area.
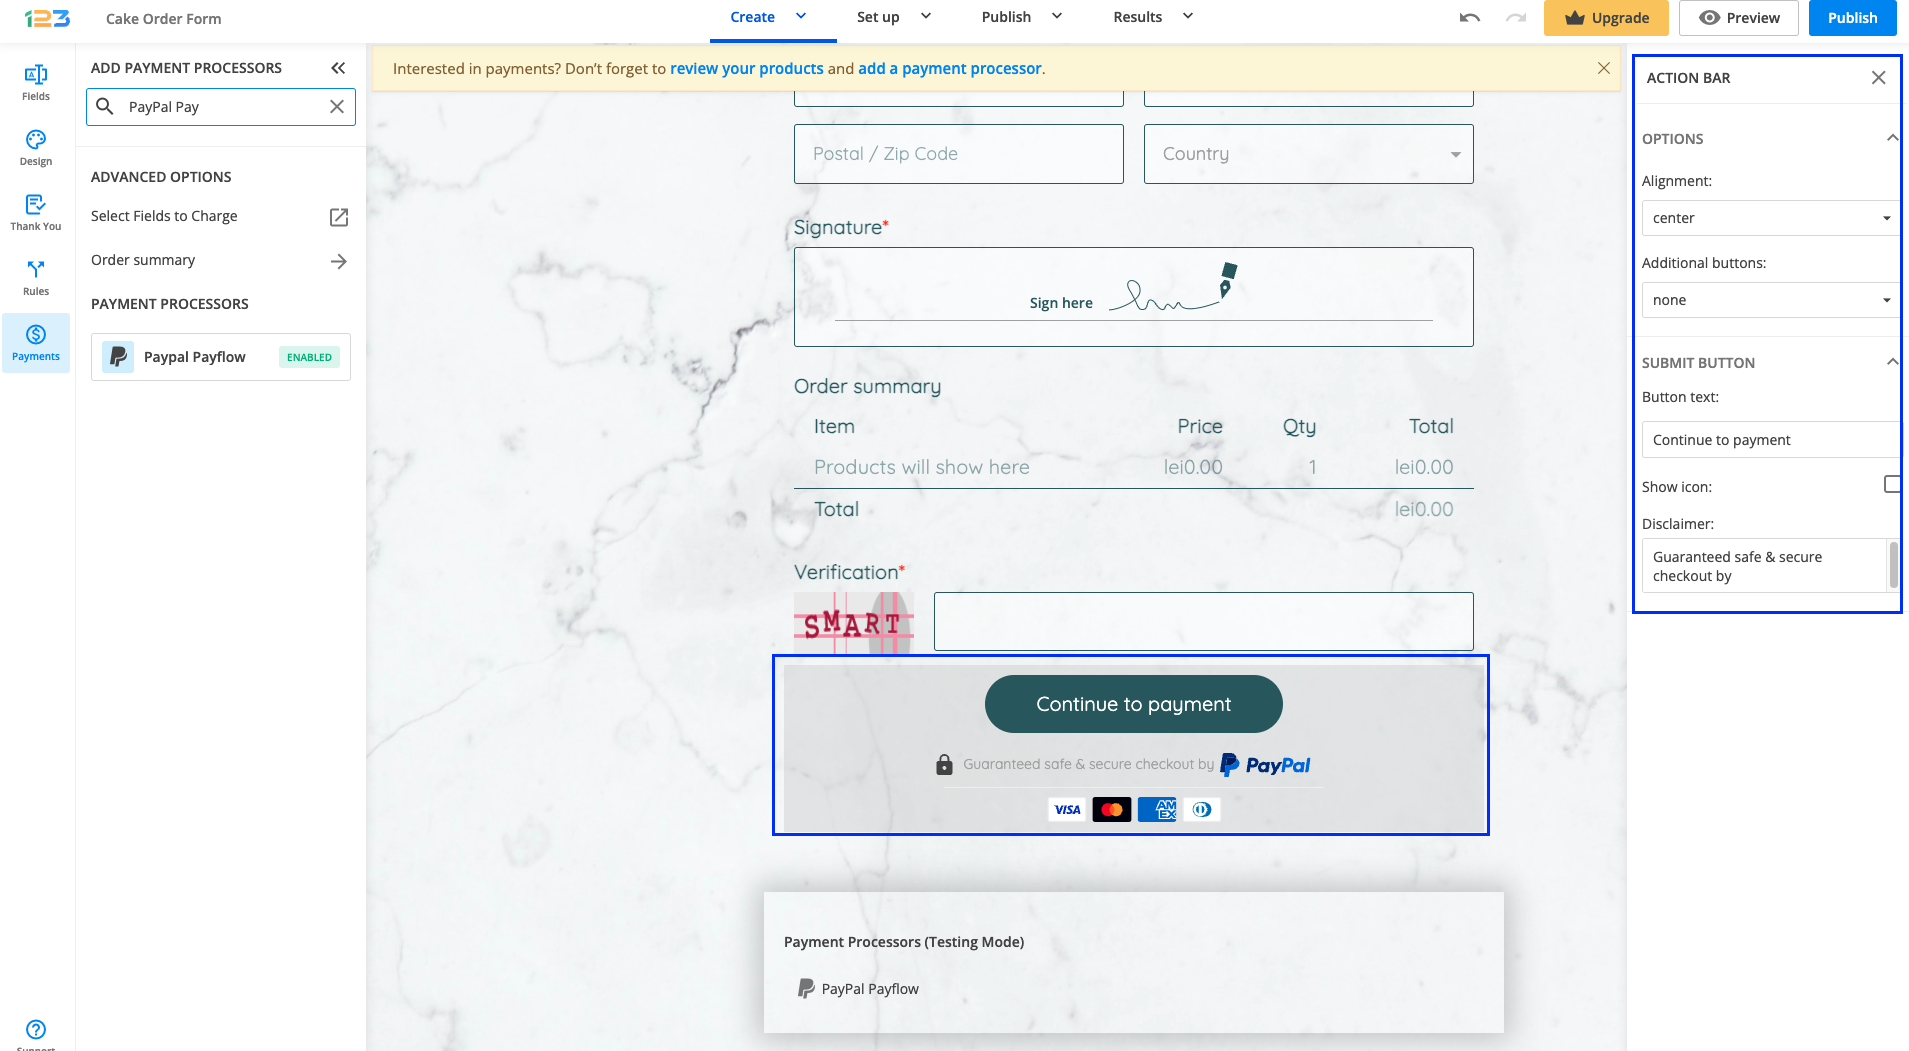
Another change that you might have noticed is that under the Continue to payment button, we are displaying a disclaimer, together with the icon & logo of the payment processor and the accepted cards.
By default, all these settings are enabled, but you can change them by simply clicking on the payment processor and going to Display payment info.
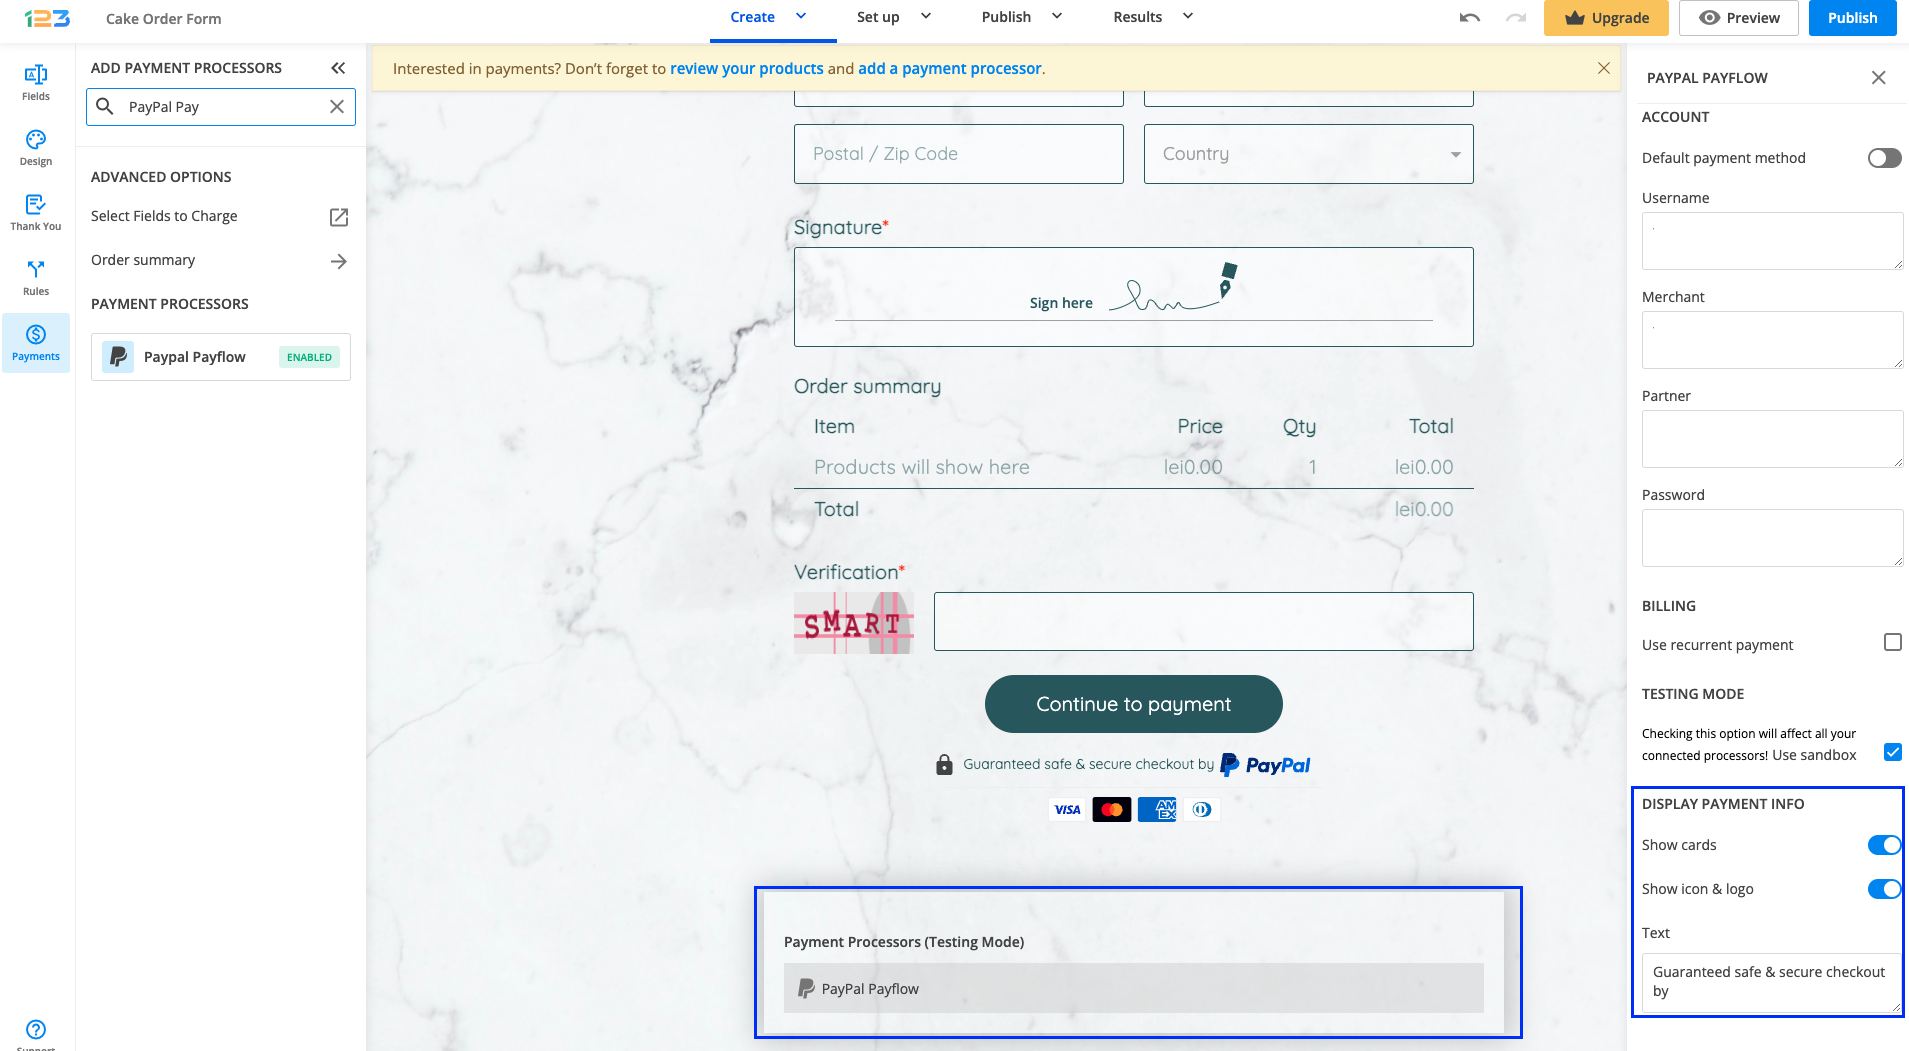
Important Note: To test your PayPal integration with 123FormBuilder, you’ll need a sandbox account on PayPal. If you do not have one, go to https://www.sandbox.paypal.com to create one. Type in the credentials of your sandbox account in the Payment Processors subsection and tick the Sandbox option on the bottom page.
If you don’t remember the setup information needed for PayPal Payflow, you can retrieve it from your PayPal Manager → Account Administration → Manage Users. Click on your username and find the information under User Login Information. Enable the integration on the top right corner of the box before leaving.

In your PayPal Manager, go to Service Settings → Set Up. In the section, PayPal Express Checkout, provide your PayPal email address.

Moving on to the section Payment Confirmation → Show confirmation page, select the option On my website. This way, customers will remain on your website after making the PayPal payment.

Using the 123FormBuilder – Dropbox integration you can have the files uploaded by visitors through your form sent directly to your Dropbox account at form submission. Dropbox is a good backup solution. Follow the steps below to enable the integration.
1. Build a form that contains at least one File upload field.
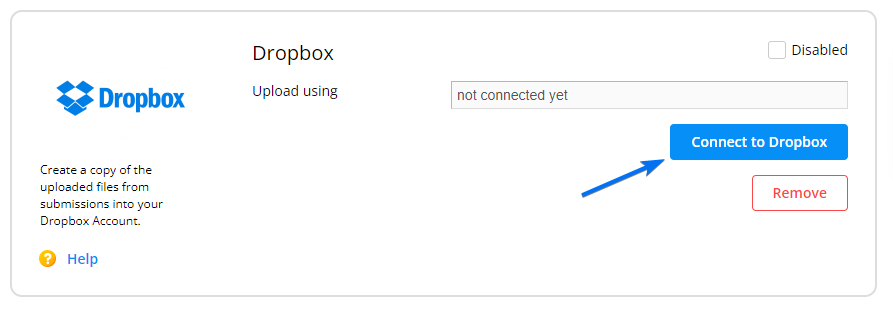
2. Afterwards, go to Integrations, select Dropbox in the applications list, and click Connect.
3. Click Connect to Dropbox in the application box.
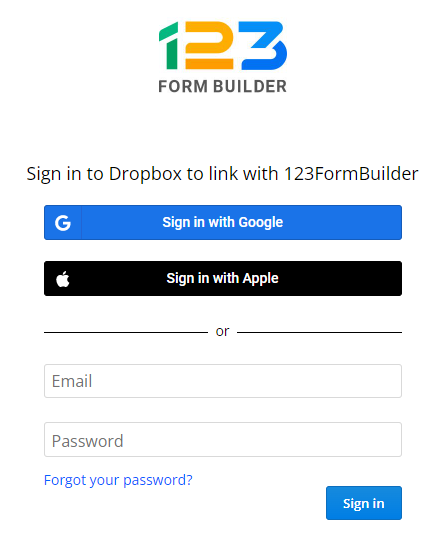
4. Next, provide your Dropbox login data and allow the application to access your account.
Now, when somebody uploads a file through your form and sends it, the file will arrive in your Dropbox account. Other than that, uploaded files will behave normally – they will be sent to you via email as download links and the links will also appear in the Results/Submissions section of your form.
To hide form fields using our form builder, go to the Form Editor and click on the field that you want to hide. Afterward, in its Edit Field panel, select the option Hide field. Although still visible in the Editor, hidden fields can’t be seen by users.

This feature is especially useful when combined with the prefilled form fields feature. They allow you to receive reference information in form submissions and to keep this information hidden from users.
Read more about how to set up prefilled hidden fields.
Tip: Use hidden fields with conditional logic. If hidden fields are shown by a rule, the form’s loading time will speed up. Furthermore, add a page break field on the form for better performance. For branching and conditional logic, set up field rules in the Rules → Field Rules section.
Related articles
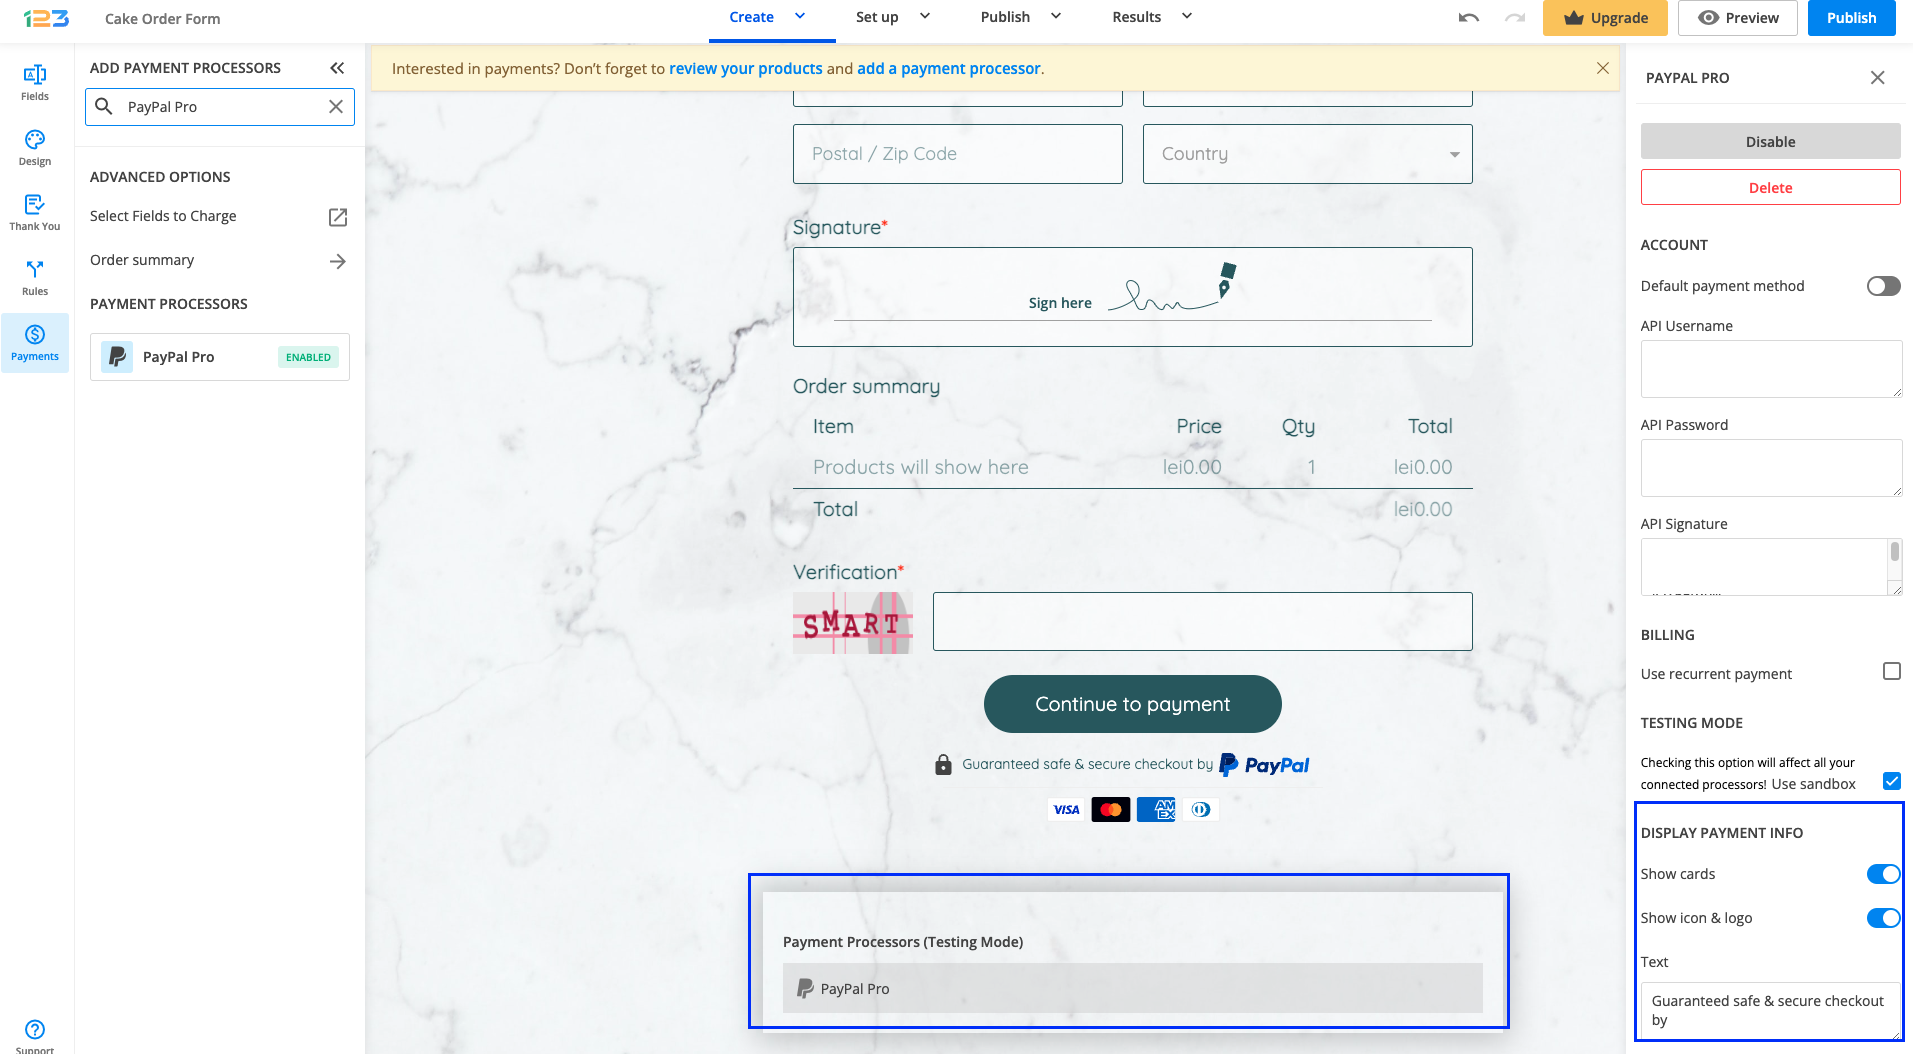
PayPal Payments Pro allows you to accept payments directly on your online order form, without redirecting away from the page. Users will enter their payment details in the form itself and credit card fields will be just regular fields in your form. To enable the PayPal Pro integration, follow the simple steps below:
1. Click New Form and start creating your payment form. You can use choice fields (single/multiple choice and dropdown lists) to display the products on sale or, even better, Product field.
To the left side panel, you will notice the Payments section. By using the search bar, you can quickly search for PayPal Pro.

2. After adding PayPal Pro on your form, you will notice a couple of changes: the PayPal Pro payment processor has a tag near its name & the settings panel opens up to the right side of the page.
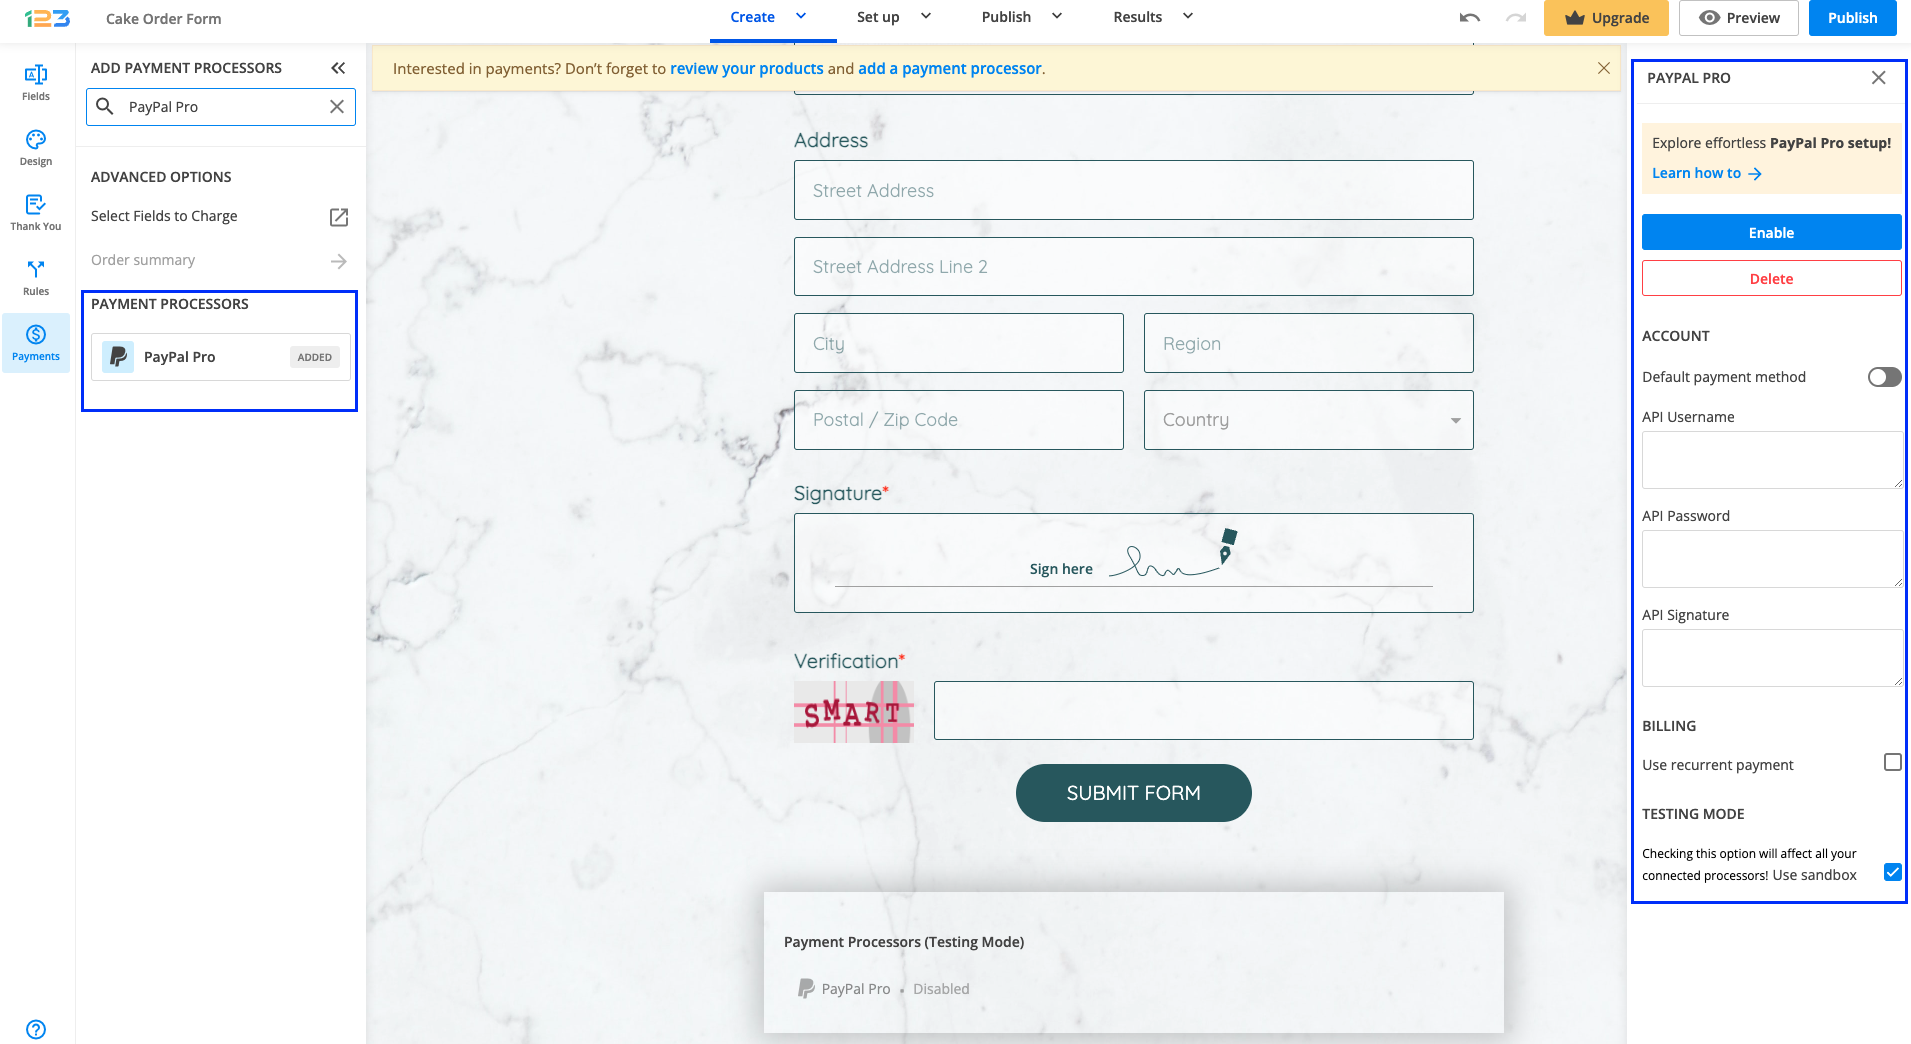
3. In order to set up PayPal Pro integration, you have to provide your PayPal Pro API Username, API Password, and API Signature. Tick the option Use recurrent payment if you want to charge your clients on a regular basis after submission. You can even add the number of cycles the billing occurs.
3. Enable the payment integration by clicking on Enable button. By enabling PayPal Pro, you will notice a couple of changes on your form.
The PayPal Pro payment processor on the left side panel has an Enabled tag on it so you could easily scan which payment processor is enabled.
Another change is that on your form it will be displayed an Order summary. Here will appear all the products your respondents select on the form, together with the price per option, quantity and the total price. If you want to customize the order summary, all you have to do is click on it and the available settings appear on the right side panel.
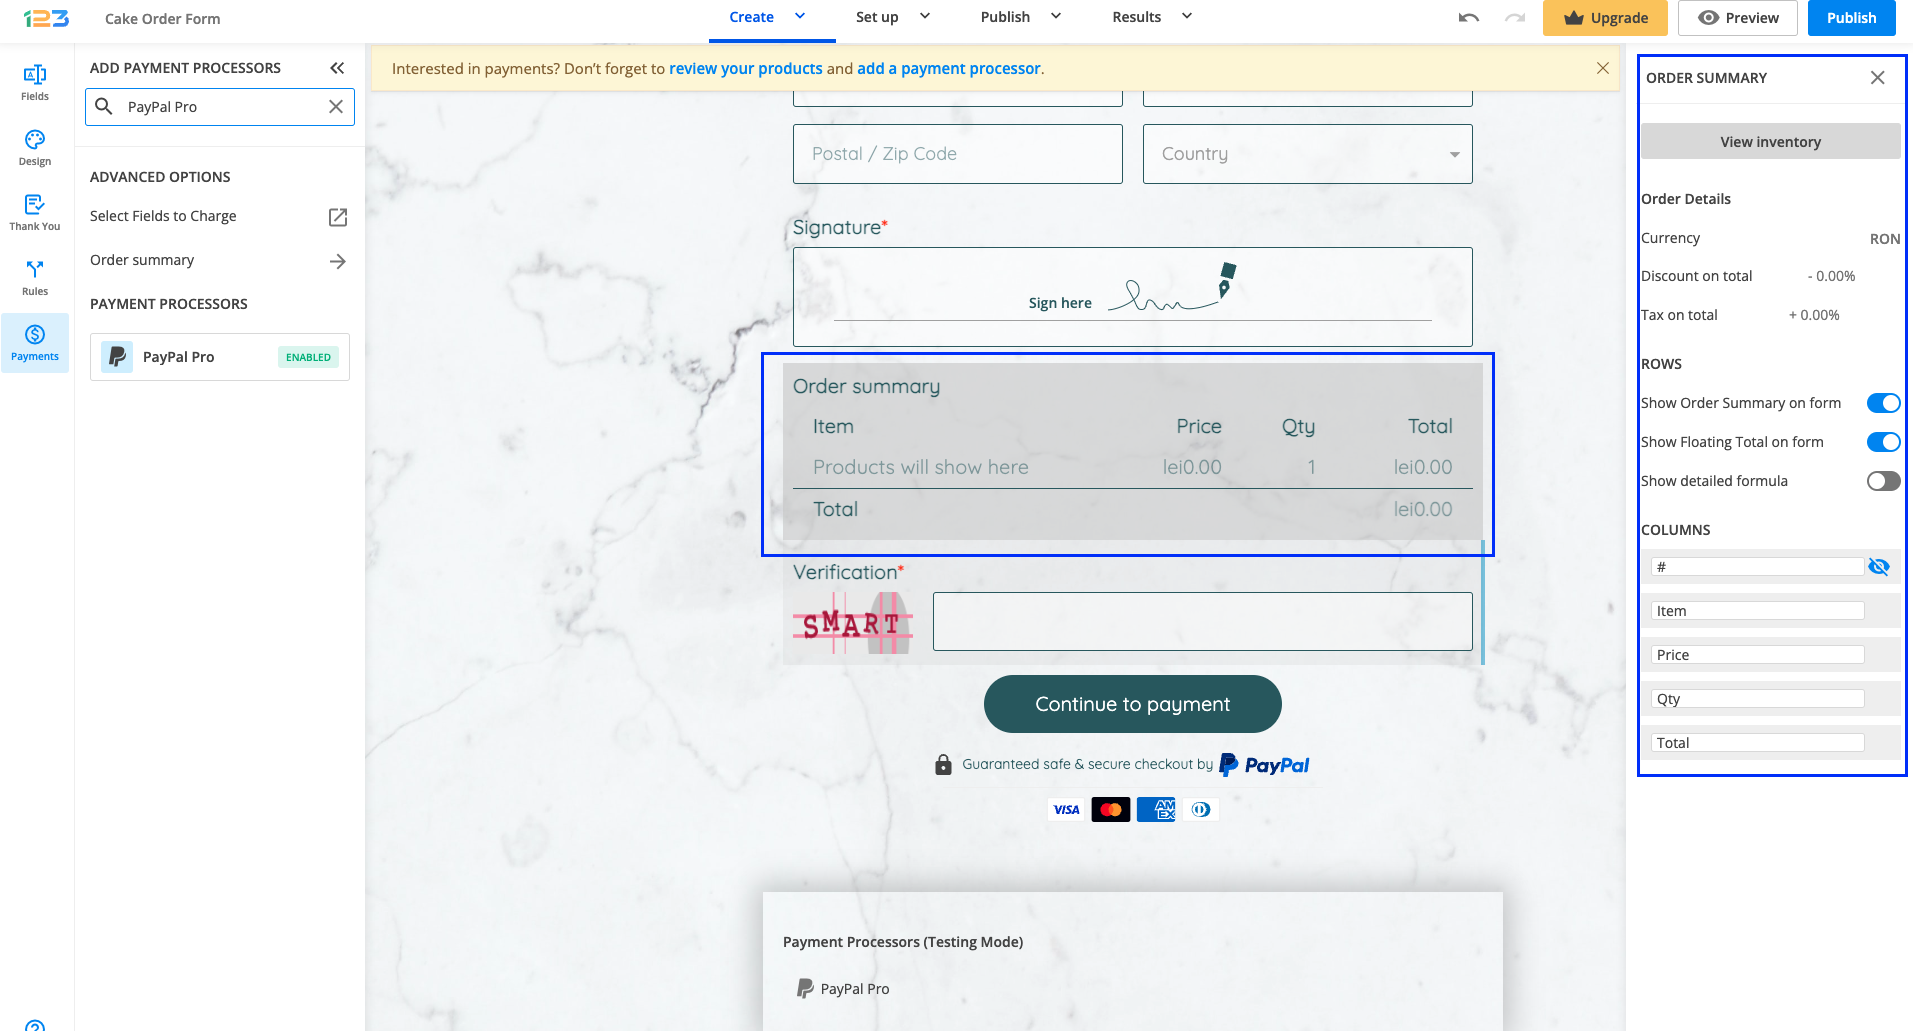
Another change is related to the Submit button. Once your payment integration is enabled, the Submit button is changed to Continue to payment. Below it, we are displaying a disclaimer together with the PayPal logo so that respondents are aware they are proceeding to a payment.
Also, the accepted cards by the PayPal integration are visually displayed so that respondents know from the start what is the accepted payment method.
You can customize the action bar (everything that is related to the submit button, additional buttons, disclaimer, etc) by simply clicking on this area.

Another change that you might have noticed is that under the Continue to payment button, we are displaying a disclaimer text, together with the logo & icon of the payment processor and the accepted cards.
By default, these settings are enabled, but you can simply change them by clicking on the payment processor and going to Display payment info.
Here is further information that will help you use PayPal Pro as a payment processor.
- Where to find your PayPal Pro API credentials? In your PayPal account, go to My Account → Profile → My Selling Tools and click on Update from API Access. Click Request API Credentials on the API page and select Request API signature. In the end, press Agree and Submit.
- When users click Purchase at the bottom of the form, the next form page shows them the credit card information fields. Once these are filled in, users arrive at the regular Thank You page of your form.
Important Note: To test your PayPal integration with 123FormBuilder, you’ll need a sandbox account on PayPal. If you do not have one, go to https://www.sandbox.paypal.com to create one. Type in the credentials of your sandbox account in the PayPal Pro integration and tick the Use sandbox option from the bottom.
Note: You’ll need to make sure you have paid the monthly fee for your PayPal Payments Pro account. If the fee has not been paid, you won’t be able to use the PayPal Pro payment processor on your order form in 123FormBuilder.
If you get this Authorize.net error, it means that you need to add the URL of the page where the payment is made in your Authorize.net account.
Go to the Account → Response/Receipt URLs section of your Authorize.net account and add the URL there. This way Authorize.net will accept all payments coming from your order form.
If you use other URLs, you’ll need to delete them and add them again to the table. Start by deleting them all and including them again, one by one.
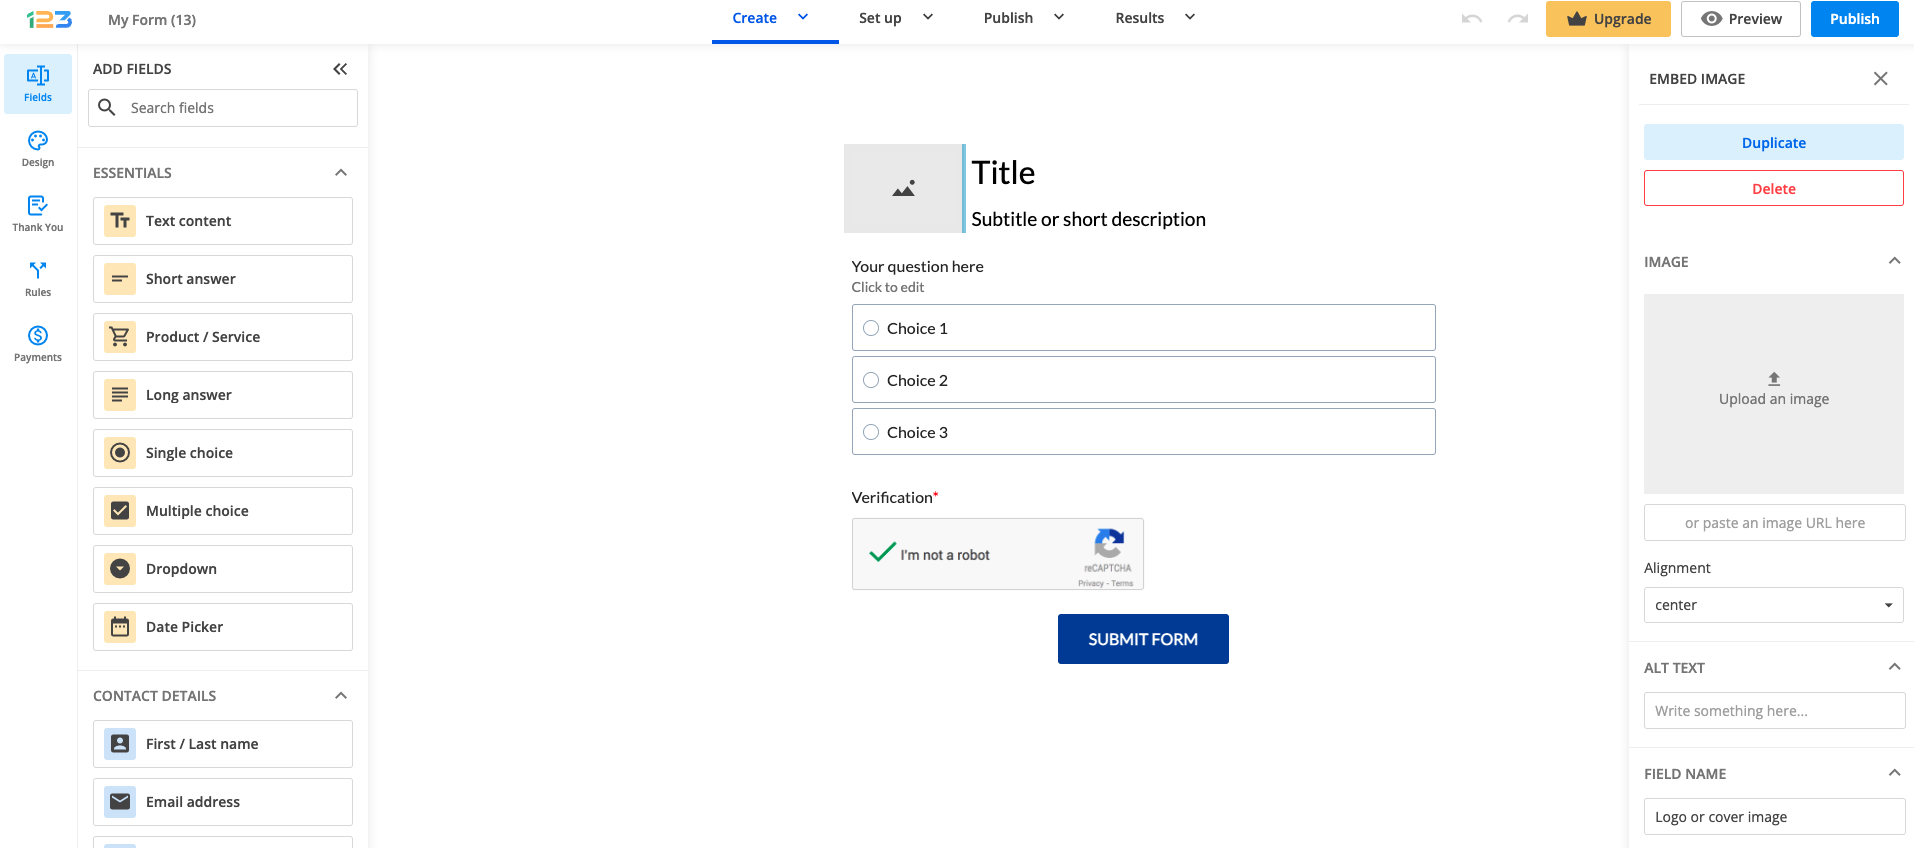
When creating a form from blank, by default you will have a placeholder logo added on the form.
In order to change it, all you have to do is to click on in and from the left side panel, you have the option of uploading an image. If you don’t want to keep the logo on the form, click on Delete button in order to remove it.
There are several buttons that can appear on your form: Submit, Clear all answers, Print, Next, Previous, Preview, Save for later, Update Submission, Go to URL, and Fill again.
The Submit button appears by default on all forms. The Clear all answers and Print buttons can be enabled in the Form Editor. To do so, click on the Submit button area to open its Edit panel and select them by turning on Additional buttons.
The Next and Previous buttons will automatically display on multi-page forms. To enable the Preview and Save for later buttons you need to check their features in the Advanced section (under the Submissions tab). The Update Submission button appears when users edit their submission.
However, the Go to URL and Fill again buttons are specific to the Thank you page that appears after a form is submitted. To make them available to users, you must enable them from the Options menu in the Thank You section.
You can change the appearance of your buttons using our form designer. Go to Design and expand the Buttons section.
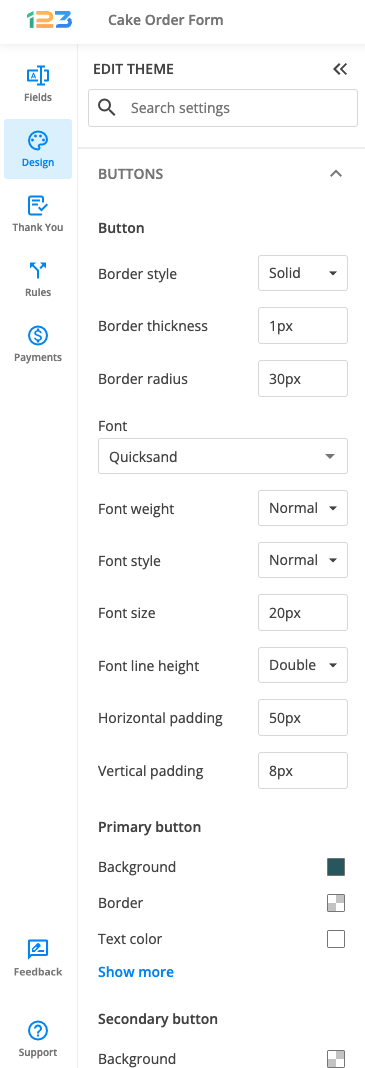
Here you can change the visual properties of all buttons, such as setting the border parameters, choosing your font options, and adjusting the padding. In the Primary button section, you can change the color of the Submit, Go to URL, and Fill again buttons. The Secondary button section will change the aspect of all the other buttons.
To change the text displayed on each button, go to the Translations section.
Related articles
Yes, users can edit their submissions even after they have sent them. To enable this feature, open the Advanced section of your form.
From the Submissions tab, tick the option Allow respondents to edit delivered submissions at a later time.
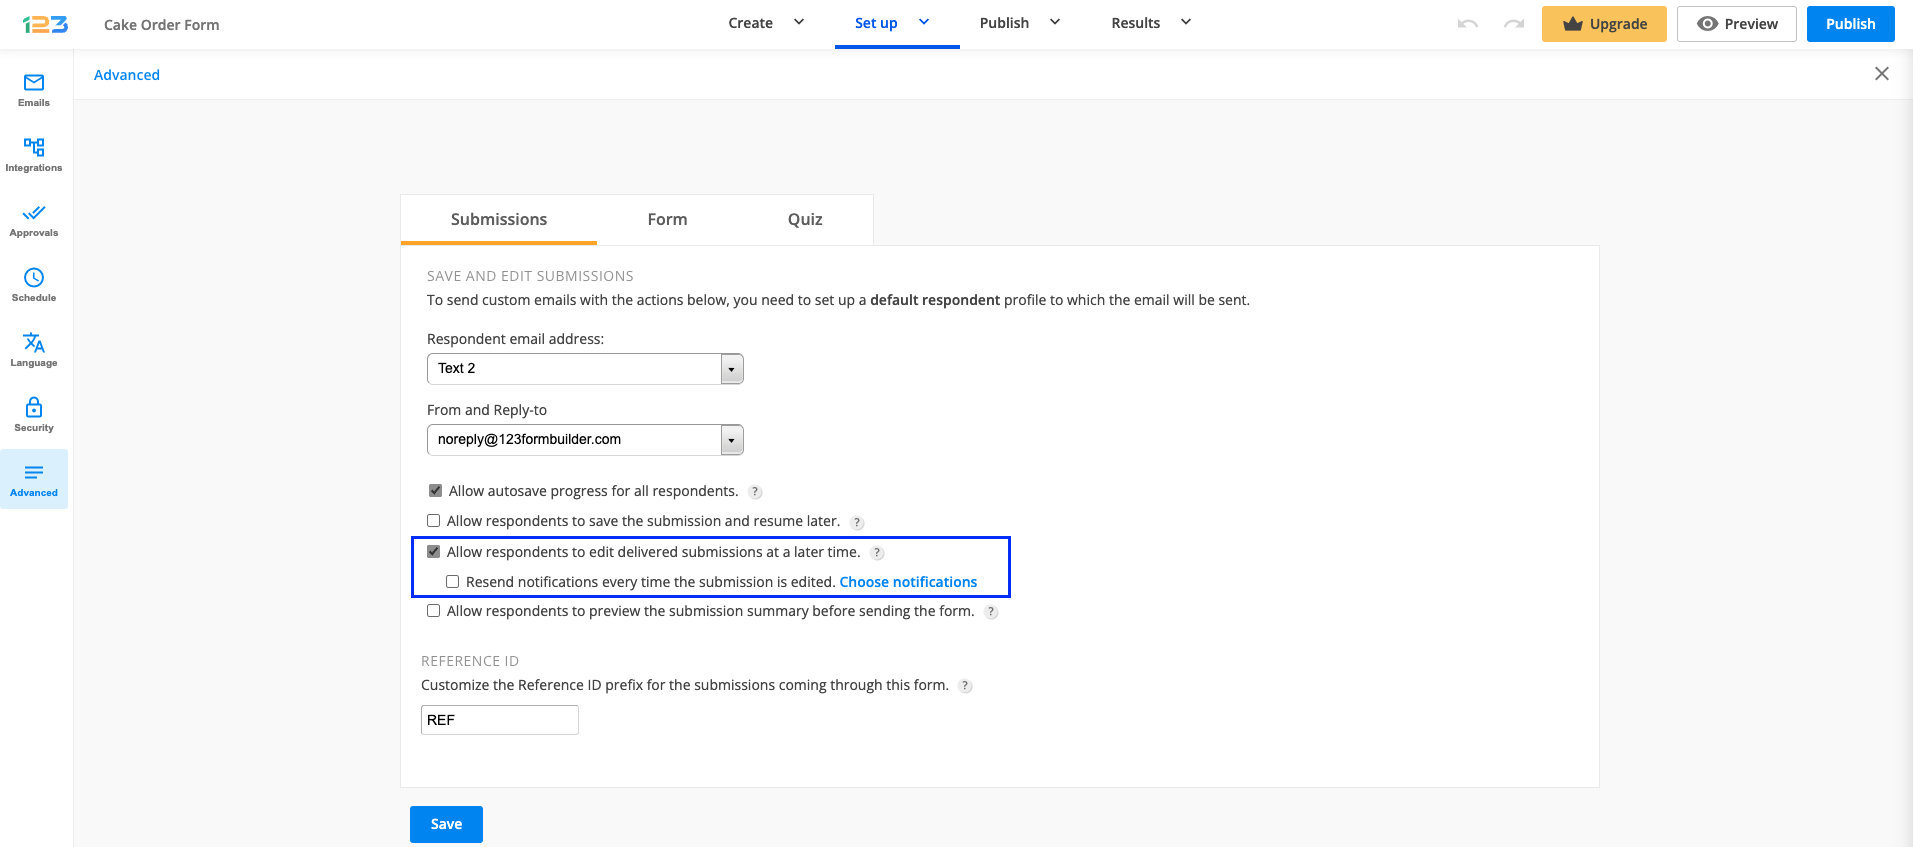
A new option will display – Resend notifications every time the submission is edited. Enable this option to receive submission updates and select which email template you wish to send.
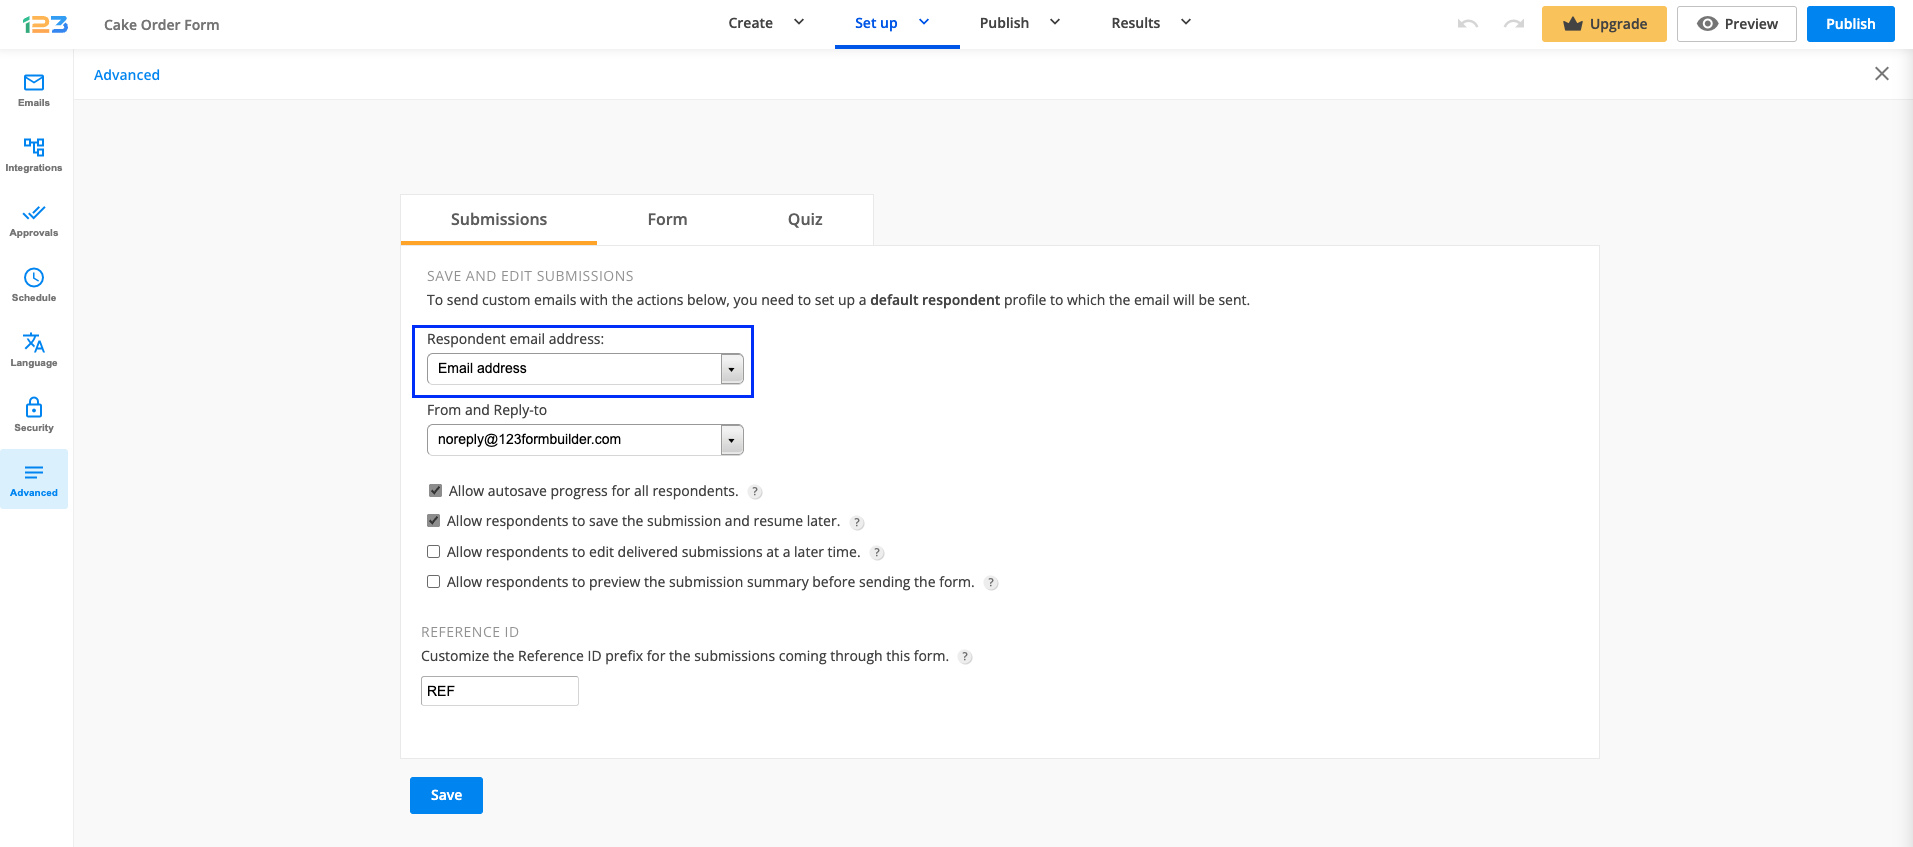
You can also set up an email notification to go automatically to your respondents with the link they need to access to edit the submission, as long as they have provided their email address on the form. Under Respondent email address dropdown, search for the field that collected the email address of your respondents.

After clicking the Submit button, on the Thank You page, your respondents will receive a link and instructions for using it. You can also send this link via email to your users by selecting the Email field in the Respondent email address dropdown from the same Advanced → Submissions tab.
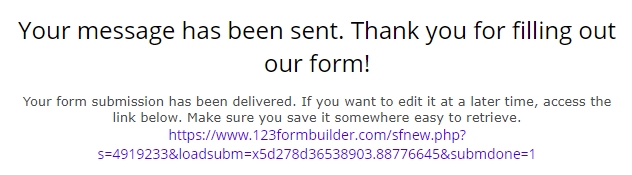
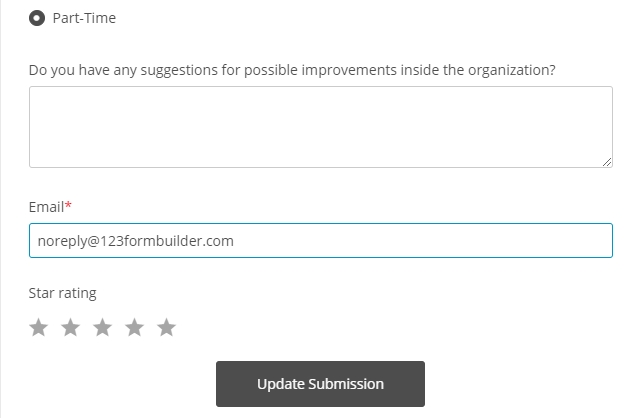
When your users access that link, the form will open up in a lightbox. Form fields will contain the input users have provided and all content is editable. After making edits, users simply need to click on the Update Submission button to have the new content saved.
For more details on how to allow respondents to edit a submission at a later time, please check out our step-by-step tutorial:
Users can save an incomplete form submission and continue filling out the form at a later time.
In the Advanced → Submissions section, check the option Allow respondents to save the submission and resume later
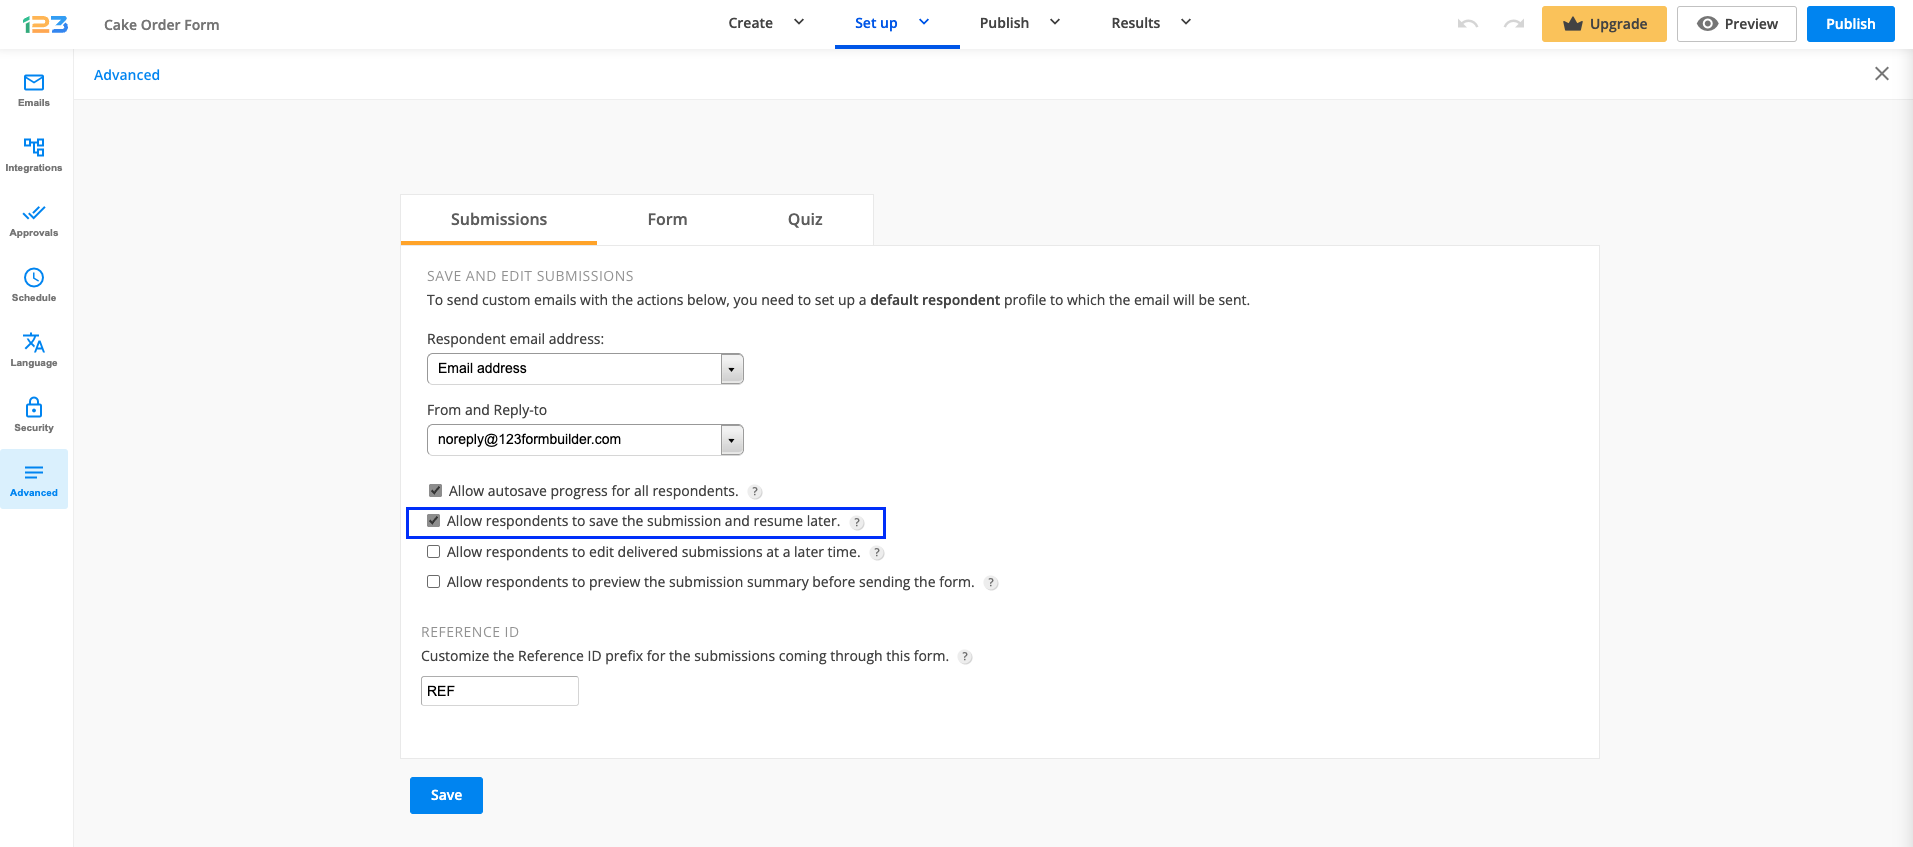
Make sure to select the Email field that contains the user’s email address in the Respondent email address list. The save for later link will be sent by email to form respondents.
A new button will show up at the bottom of your form: Save for later.
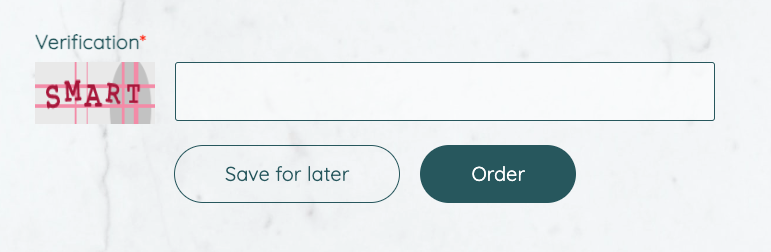
When clicking it, users will be given a link and instructions for using it.

When accessing the link, users will see the form with the content they have already filled out. They simply need to continue filling out the form and click on Save for later or Send.
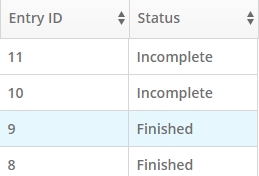
In the Submissions table, you will notice a new column called Status. There you will be informed which entry is finished or incomplete.
For more details on how to allow respondents to save for later a form submission, check out our step-by-step tutorial:
Related articles
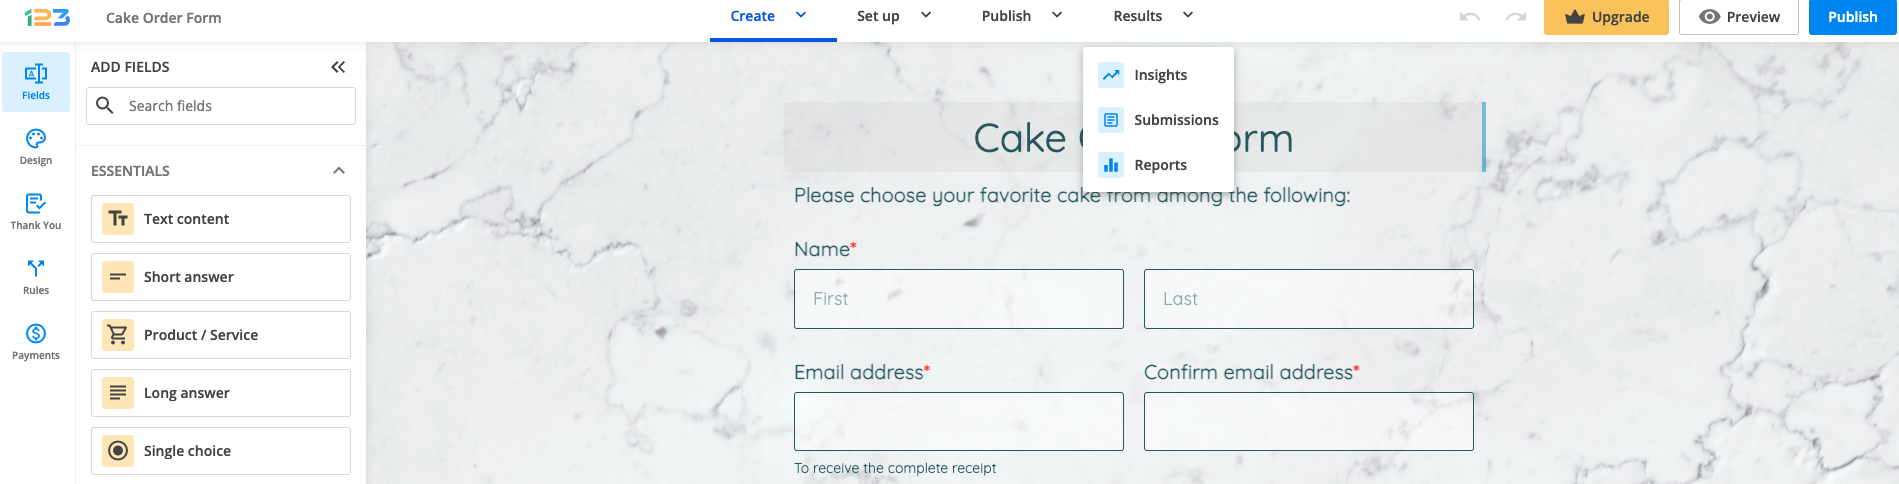
If you want to make edits to form submissions, you can do so by clicking the Results button in the Form Editor of your form builder account so you could navigate to Submissions tab, where all the messages received through your form are listed, one on every line.
Click on the submission that you want to edit and hit the Edit button within the lightbox that appears.
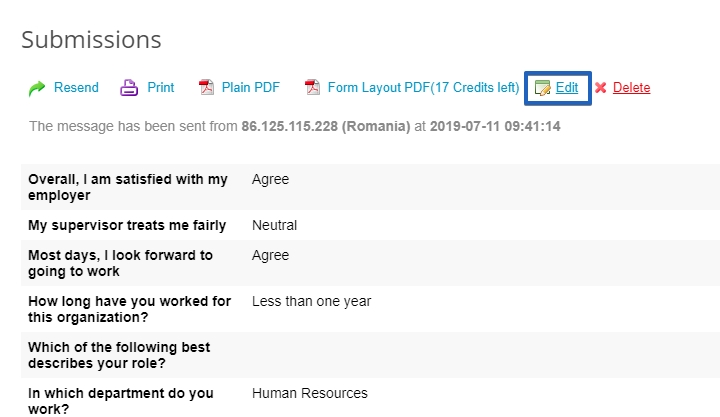
Here you can change the content provided by the end user. After you have made the necessary changes, click on Update Submission. The entry will be changed in the Submissions section, from where you can resend it to your inbox. The default form report will take into account the new content automatically. However, custom reports need to be updated (simply click the Update link) in order to reflect the new content.
Most Popular
Frequently Asked Questions
Here is a list of the most frequently asked questions. For more FAQs, please browse through the FAQs page.