123FormBuilder Knowledge Base
Search our documentation platform for answers, service specifications and 3rd-party integrations.
How to submit customer profiles in your Authorize.Net CIM using 123FormBuilder?
With the 123FormBuilder – Authorize.Net payment gateway integration you can create customer profiles in your Customer Information Manager from Authorize.net through form submissions, besides just having your form users pay the current order that they have submitted. You can later manage these customer profiles in your CIM as you want.
If not accustomed to the Authorize.Net payment gateway integration on our form builder, feel free to read our complete step-by-step Authorize.net documentation. By default, the CIM option is not enabled, but this can be easily done by ticking the Create a Customer Information Profile (CIM) option within the Authorize.net integration.

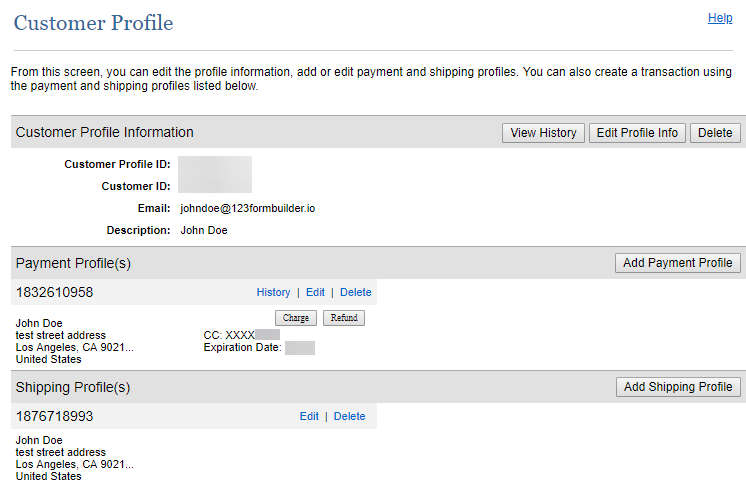
CIM profiles include details such as payment, billing, and shipping information. When a form user submits your order form for the first time, a customer profile is created in your Authorize.net CIM. A customer profile contains payment and billing profiles. Whenever the same form user submits a new order, a new payment and shipping profile is created under the same customer profile.
If you’ve enabled the CIM option, you’ll find all of your customer profiles that have been submitted through your order form in the Tools → Customer Information Manager section of your Authorize.net account.

Select a customer profile and use the View Profile link on top of the table to view the payment and shipping profiles of the respective customer.
Note: The billing address cannot be changed through form submissions, only manually within your CIM.
2 comments
Leave a Reply
Similar Articles
Frequently Asked Questions
Here is a list of the most frequently asked questions. For more FAQs, please browse through the FAQs page.
Does this work for a transaction of $0?
What we’re trying to do is get a client’s billing information on file when they sign with us. They’ll pay later for an amount that’s not known when they become a client since they are paying by the hour. Does this work with 123form builder or would the customer have to pay in the form?
Hello McKay, our platform cannot hold customers’ payment details on file, therefore, the payment can only be made on the spot after submitting the form. Thank you for understanding and please reach out if you have additional questions. Have a great day!